Quantcast
Channel: Baeldung
Viewing all 3692 articles
Browse latest View live

Spring Security and OpenID Connect (Legacy)

$
0
0

Note that this content is outdated. Take a look at Spring Security's latest OAuth support.

1. Overview

In this quick tutorial, we'll focus on setting up OpenID Connect with a Spring Security OAuth2 implementation.

OpenID Connect is a simple identity layer built on top of the OAuth 2.0 protocol.

And, more specifically, we'll learn how to authenticate users using the OpenID Connect implementation from Google.

2. Maven Configuration

First, we need to add the following dependencies to our Spring Boot application:

<dependency>
    <groupId>org.springframework.boot</groupId>
    <artifactId>spring-boot-starter-security</artifactId>
</dependency>
<dependency>
    <groupId>org.springframework.security.oauth</groupId>
    <artifactId>spring-security-oauth2</artifactId>
</dependency>

3. The Id Token

Before we dive into the implementation details, let's have a quick look at how OpenID works, and how we'll interact with it.

At this point, it's, of course, important to already have an understanding of OAuth2, since OpenID is built on top of OAuth.

First, in order to use the identity functionality, we'll make use of a new OAuth2 scope called openid. This will result in an extra field in our Access Token – “id_token“.

The id_token is a JWT (JSON Web Token) that contains identity information about the user, signed by identity provider (in our case Google).

Finally, both server(Authorization Code) and implicit flows are the most commonly used ways of obtaining id_token, in our example, we will use server flow.

3. OAuth2 Client Configuration

Next, let's configure our OAuth2 client – as follows:

@Configuration
@EnableOAuth2Client
public class GoogleOpenIdConnectConfig {
    @Value("${google.clientId}")
    private String clientId;

    @Value("${google.clientSecret}")
    private String clientSecret;

    @Value("${google.accessTokenUri}")
    private String accessTokenUri;

    @Value("${google.userAuthorizationUri}")
    private String userAuthorizationUri;

    @Value("${google.redirectUri}")
    private String redirectUri;

    @Bean
    public OAuth2ProtectedResourceDetails googleOpenId() {
        AuthorizationCodeResourceDetails details = new AuthorizationCodeResourceDetails();
        details.setClientId(clientId);
        details.setClientSecret(clientSecret);
        details.setAccessTokenUri(accessTokenUri);
        details.setUserAuthorizationUri(userAuthorizationUri);
        details.setScope(Arrays.asList("openid", "email"));
        details.setPreEstablishedRedirectUri(redirectUri);
        details.setUseCurrentUri(false);
        return details;
    }

    @Bean
    public OAuth2RestTemplate googleOpenIdTemplate(OAuth2ClientContext clientContext) {
        return new OAuth2RestTemplate(googleOpenId(), clientContext);
    }
}

And here is application.properties:

google.clientId=<your app clientId>
google.clientSecret=<your app clientSecret>
google.accessTokenUri=https://www.googleapis.com/oauth2/v3/token
google.userAuthorizationUri=https://accounts.google.com/o/oauth2/auth
google.redirectUri=http://localhost:8081/google-login

Note that:

  • You first need to obtain OAuth 2.0 credentials for your Google web app from Google Developers Console.
  • We used scope openid to obtain id_token.
  • we also used an extra scope email to include user email in id_token identity information.
  • The redirect URI http://localhost:8081/google-login is the same one used in our Google web app.

4. Custom OpenID Connect Filter

Now, we need to create our own custom OpenIdConnectFilter to extract authentication from id_token – as follows:

public class OpenIdConnectFilter extends AbstractAuthenticationProcessingFilter {

    public OpenIdConnectFilter(String defaultFilterProcessesUrl) {
        super(defaultFilterProcessesUrl);
        setAuthenticationManager(new NoopAuthenticationManager());
    }
    @Override
    public Authentication attemptAuthentication(
      HttpServletRequest request, HttpServletResponse response) 
      throws AuthenticationException, IOException, ServletException {
        OAuth2AccessToken accessToken;
        try {
            accessToken = restTemplate.getAccessToken();
        } catch (OAuth2Exception e) {
            throw new BadCredentialsException("Could not obtain access token", e);
        }
        try {
            String idToken = accessToken.getAdditionalInformation().get("id_token").toString();
            String kid = JwtHelper.headers(idToken).get("kid");
            Jwt tokenDecoded = JwtHelper.decodeAndVerify(idToken, verifier(kid));
            Map<String, String> authInfo = new ObjectMapper()
              .readValue(tokenDecoded.getClaims(), Map.class);
            verifyClaims(authInfo);
            OpenIdConnectUserDetails user = new OpenIdConnectUserDetails(authInfo, accessToken);
            return new UsernamePasswordAuthenticationToken(user, null, user.getAuthorities());
        } catch (InvalidTokenException e) {
            throw new BadCredentialsException("Could not obtain user details from token", e);
        }
    }
}

And here is our simple OpenIdConnectUserDetails:

public class OpenIdConnectUserDetails implements UserDetails {
    private String userId;
    private String username;
    private OAuth2AccessToken token;

    public OpenIdConnectUserDetails(Map<String, String> userInfo, OAuth2AccessToken token) {
        this.userId = userInfo.get("sub");
        this.username = userInfo.get("email");
        this.token = token;
    }
}

Note that:

  • Spring Security JwtHelper to decode id_token.
  • id_token always contains “sub” field which is a unique identifier for the user.
  • id_token will also contain “email” field as we added email scope to our request.

4.1. Verifying the ID Token

In the example above, we used the decodeAndVerify() method of JwtHelper to extract information from the id_token, but also to validate it.

The first step for this is verifying that it was signed with one of the certificates specified in the Google Discovery document.

These change about once per day, so we'll use a utility library called jwks-rsa to read them:

<dependency>
    <groupId>com.auth0</groupId>
    <artifactId>jwks-rsa</artifactId>
    <version>0.3.0</version>
</dependency>

Let's add the URL that contains the certificates to the application.properties file:

google.jwkUrl=https://www.googleapis.com/oauth2/v2/certs

Now we can read this property and build the RSAVerifier object:

@Value("${google.jwkUrl}")
private String jwkUrl;    

private RsaVerifier verifier(String kid) throws Exception {
    JwkProvider provider = new UrlJwkProvider(new URL(jwkUrl));
    Jwk jwk = provider.get(kid);
    return new RsaVerifier((RSAPublicKey) jwk.getPublicKey());
}

Finally, we'll also verify the claims in the decoded id token:

public void verifyClaims(Map claims) {
    int exp = (int) claims.get("exp");
    Date expireDate = new Date(exp * 1000L);
    Date now = new Date();
    if (expireDate.before(now) || !claims.get("iss").equals(issuer) || 
      !claims.get("aud").equals(clientId)) {
        throw new RuntimeException("Invalid claims");
    }
}

The verifyClaims() method is checking that the id token was issued by Google and that it's not expired.

You can find more information on this in the Google documentation.

5. Security Configuration

Next, let's discuss our security configuration:

@Configuration
@EnableWebSecurity
public class SecurityConfig extends WebSecurityConfigurerAdapter {
    @Autowired
    private OAuth2RestTemplate restTemplate;

    @Bean
    public OpenIdConnectFilter openIdConnectFilter() {
        OpenIdConnectFilter filter = new OpenIdConnectFilter("/google-login");
        filter.setRestTemplate(restTemplate);
        return filter;
    }

    @Override
    protected void configure(HttpSecurity http) throws Exception {
        http
        .addFilterAfter(new OAuth2ClientContextFilter(), 
          AbstractPreAuthenticatedProcessingFilter.class)
        .addFilterAfter(OpenIdConnectFilter(), 
          OAuth2ClientContextFilter.class)
        .httpBasic()
        .authenticationEntryPoint(new LoginUrlAuthenticationEntryPoint("/google-login"))
        .and()
        .authorizeRequests()
        .anyRequest().authenticated();
    }
}

Note that:

  • We added our custom OpenIdConnectFilter after OAuth2ClientContextFilter
  • We used a simple security configuration to redirect users to “/google-login” to get authenticated by Google

6. User Controller

Next, here is a simple controller to test our app:

@Controller
public class HomeController {
    @RequestMapping("/")
    @ResponseBody
    public String home() {
        String username = SecurityContextHolder.getContext().getAuthentication().getName();
        return "Welcome, " + username;
    }
}

Sample response (after redirect to Google to approve app authorities) :

Welcome, example@gmail.com

7. Sample OpenID Connect Process

Finally, let's take a look at a sample OpenID Connect authentication process.

First, we're going to send an Authentication Request:

https://accounts.google.com/o/oauth2/auth?
    client_id=sampleClientID
    response_type=code&
    scope=openid%20email&
    redirect_uri=http://localhost:8081/google-login&
    state=abc

The response (after user approval) is a redirect to:

http://localhost:8081/google-login?state=abc&code=xyz

Next, we're going to exchange the code for an Access Token and id_token:

POST https://www.googleapis.com/oauth2/v3/token 
    code=xyz&
    client_id= sampleClientID&
    client_secret= sampleClientSecret&
    redirect_uri=http://localhost:8081/google-login&
    grant_type=authorization_code

Here's a sample Response:

{
    "access_token": "SampleAccessToken",
    "id_token": "SampleIdToken",
    "token_type": "bearer",
    "expires_in": 3600,
    "refresh_token": "SampleRefreshToken"
}

Finally, here's what the information of the actual id_token looks like:

{
    "iss":"accounts.google.com",
    "at_hash":"AccessTokenHash",
    "sub":"12345678",
    "email_verified":true,
    "email":"example@gmail.com",
     ...
}

So you can immediately see just how useful the user information inside the token is for providing identity information to our own application.

8. Conclusion

In this quick intro tutorial, we learned how to authenticate users using the OpenID Connect implementation from Google.

And, as always, you can find the source code over on GitHub.


Spring Boot – Using a Color Startup Banner

$
0
0

1. Introduction

One of the endearing features of Spring Boot is its startup banner. Over the years, Spring Boot has evolved to support various types of banners. For example, both text and background color support was added for banners in Spring Boot 1.3.

In this quick tutorial, we'll look at Spring Boot's color banner support and how to use it.

2. Changing Background Color

To add a background color to a Spring Boot banner, we simply need to prefix lines of banner.txt with the desired color code, using the AnsiBackground class.

For example, let's create a banner.txt file to make the entire background red:

${AnsiBackground.RED}
  ___         _   _      _ 
 / __|  ___  | | (_)  __| |
 \__ \ / _ \ | | | | / _` |
 |___/ \___/ |_| |_| \__,_|
${AnsiBackground.DEFAULT}

In fact, we can use as many background colors as we want in a single banner.

For example, we could set each line to its own background color. We simply prefix each line with the desired color:

${AnsiBackground.RED}    ____             _             __
${AnsiBackground.BLUE}   / __ \  ____ _   (_)   ____    / /_   ____  _      __
${AnsiBackground.YELLOW}  / /_/ / / __ `/  / /   / __ \  / __ \ / __ \| | /| / /
${AnsiBackground.GREEN} / _, _/ / /_/ /  / /   / / / / / /_/ // /_/ /| |/ |/ /
${AnsiBackground.MAGENTA}/_/ |_|  \__,_/  /_/   /_/ /_/ /_.___/ \____/ |__/|__/
${AnsiBackground.DEFAULT}

It's important to remember that all of our application logging will use the last background color specified in banner.txt. Therefore, it's a best practice to always end the banner.txt file with the default color.

3. Changing Text Color

To change the color of the text, we can use the AnsiColor class. Just like the AnsiBackground class, it has predefined color constants we can choose from.

We simply prefix each group of characters with the desired color:

${AnsiColor.RED}.------.${AnsiColor.BLACK}.------.
${AnsiColor.RED}|A.--. |${AnsiColor.BLACK}|K.--. |
${AnsiColor.RED}| (\/) |${AnsiColor.BLACK}| (\/) |
${AnsiColor.RED}| :\/: |${AnsiColor.BLACK}| :\/: |
${AnsiColor.RED}| '--'A|${AnsiColor.BLACK}| '--'K|
${AnsiColor.RED}`------'${AnsiColor.BLACK}`------'
${AnsiColor.DEFAULT}

As with background color, it's important that the last line of the banner always resets the color to default.

4. ANSI 8-Bit Color

One of the new features in Spring Boot 2.2 is support for ANSI 8-bit colors. Instead of being limited to a handful of predefined colors, we can specify both text and background colors using the full range of 256 colors.

To utilize the new colors, both the AnsiColor and AnsiBackground properties now accept a numerical value instead of a color name:

${AnsiColor.1}${AnsiBackground.233}  ______  __________ .___ ___________
${AnsiBackground.235} /  __  \ \______   \|   |\__    ___/
${AnsiBackground.237} >      <  |    |  _/|   |  |    |
${AnsiBackground.239}/   --   \ |    |   \|   |  |    |
${AnsiBackground.241}\______  / |______  /|___|  |____|
${AnsiBackground.243}       \/         \/
${AnsiBackground.DEFAULT}${AnsiColor.DEFAULT}

Notice that we can mix both text and background properties however we want. We can even mix the new 8-bit color codes and older color constants in the same banner.

5. Conclusion

In this article, we've seen how to change both the text and background colors of the Spring Boot banner. We also saw how newer versions of Spring Boot support ANSI 8-bit color codes.

Branch Prediction in Java

$
0
0

1. Introduction

Branch Prediction is an interesting concept in computer science and can have a profound impact on the performance of our applications. Yet it's generally not well understood and most developers pay very little attention to it.

In this article, we are going to explore exactly what it is, how it affects our software, and what we can do about it.

2. What Are Instruction Pipelines?

When we write any computer program, we are writing a set of commands that we expect the computer to execute in sequence.

Early computers would run these one at a time. This means that each command gets loaded into memory, executed in its entirety, and only when it's completed will the next one get loaded.

Instruction Pipelines are an improvement over this. They allow the processor to split the work into pieces and then perform different parts in parallel. This would then allow the processor to execute one command while loading the next, ready to go.

Longer pipelines inside the processor not only allow each part to be simplified but also allow more parts of it to be performed in parallel. This can improve the overall performance of the system.

For example, we could have a simple program:

int a = 0;
a += 1;
a += 2;
a += 3;

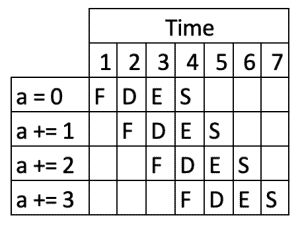
This might be processed by a pipeline comprising of Fetch, Decode, Execute, Store segments as:

We can see here how the overall execution of the four commands is run in parallel, thus making the entire sequence faster.

3. What Are the Hazards?

Certain the commands that the processor needs to execute will cause problems for the pipelining. These are any commands where the execution of one part of the pipeline is dependent on earlier parts, but where those earlier parts might not yet have been executed.

Branches are a specific form of hazard. They cause the execution to go in one of two directions, and it isn't possible to know which direction until the branch is resolved. This means that any attempt to load the commands past the branch isn't safe because we have no way of knowing where to load them from.

Let's change our simple program to introduce a branch:

int a = 0;
a += 1;
if (a < 10) {
  a += 2;
}
a += 3;

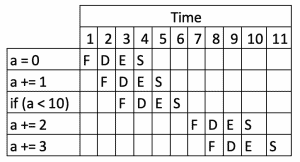
The result of this is the same as before, but we've introduced an if statement in the middle of it. The computer will see this and won't be able to load commands past this until it's been resolved. As such, the flow will look something like:

We can immediately see the impact that this has on the execution of our program, and how many clock steps it took to execute the same result.

4. What Is Branch Prediction?

Branch Prediction is an enhancement to the above, where our computer will attempt to predict which way a branch is going to go and then act accordingly.

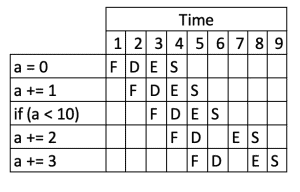
In our above example, the processor might predict that if (a < 10) is likely to be true, and so it will act as if the instruction a += 2 was the next one to execute. This would then cause the flow to look something like:

We can see straight away that this has improved the performance of our program – it's now taking nine ticks and not 11, so it's 19% faster.

This is not without risk, though. If the branch prediction gets it wrong, then it will start to queue up instructions that shouldn't be performed. If this happens, then the computer will need to throw them away and start over.

Let's turn our conditional around so that it's now false:

int a = 0;
a += 1;
if (a > 10) {
  a += 2;
}
a += 3;

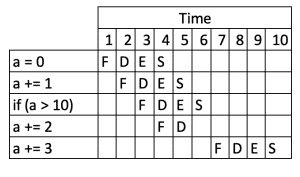
This might execute something like:

This is now slower than the earlier flow, even though we're doing less! The processor incorrectly predicted that the branch would evaluate to true, started queueing up the a += 2 instruction, and then had to discard it and start over when the branch evaluated to false.

5. Real Impact on Code

Now that we know what branch prediction is and what the benefits are, how can it affect us? After all, we're talking about losing a few processor cycles on high-speed computers, so surely it won't be noticeable.

And sometimes that's true. But sometimes it can make a surprising difference to the performance of our applications. It depends a lot on exactly what we're doing. Specifically, it depends on how much we're doing in a short time.

5.1. Counting List Entries

Let's try counting entries in a list. We're going to generate a list of numbers, then count how many of them are less than a certain cutoff. That's very similar to the above examples, but we're doing it in a loop instead of just as a single instruction:

List<Long> numbers = LongStream.range(0, top)
    .boxed()
    .collect(Collectors.toList());

if (shuffle) {
    Collections.shuffle(numbers);
}

long cutoff = top / 2;
long count = 0;

long start = System.currentTimeMillis();
for (Long number : numbers) {
    if (number < cutoff) {
        ++count;
    }
}
long end = System.currentTimeMillis();

LOG.info("Counted {}/{} {} numbers in {}ms",
    count, top, shuffle ? "shuffled" : "sorted", end - start);

Note that we're only timing the loop that does the counting because this is what we're interested in. So, how long does this take?

If we're generating sufficiently small lists, then the code runs so fast that it can't be timed — a list of size 100,000 still shows a time of 0ms. However, when the list gets large enough that we can time it, we can see a significant difference based on whether we have shuffled the list or not. For a list of 10,000,000 numbers:

  • Sorted – 44ms
  • Shuffled – 221ms

That is, the shuffled list takes 5x longer to count than the sorted list, even though the actual numbers being counted are the same.

However, the act of sorting the list is significantly more expensive than just performing the counting. We should always profile our code and determine if any performance gains are beneficial.

5.2. Order of Branches

Following the above, it seems reasonable that the order of branches in an if/else statement should be important. That is, we could expect the following to perform better than if we re-ordered the branches:

if (mostLikely) {
  // Do something
} else if (lessLikely) {
  // Do something
} else if (leastLikely) {
  // Do something
}

However, modern computers can avoid this issue by using the branch prediction cache. Indeed, we can test this as well:

List<Long> numbers = LongStream.range(0, top)
  .boxed()
  .collect(Collectors.toList());
if (shuffle) {
    Collections.shuffle(numbers);
}

long cutoff = (long)(top * cutoffPercentage);
long low = 0;
long high = 0;

long start = System.currentTimeMillis();
for (Long number : numbers) {
    if (number < cutoff) {
        ++low;
    } else {
        ++high;
    }
}
long end = System.currentTimeMillis();

LOG.info("Counted {}/{} numbers in {}ms", low, high, end - start);

This code executes in around the same time – ~35ms for sorted numbers, ~200ms for shuffled numbers – when counting 10,000,000 numbers, irrespective of the value of cutoffPercentage.

This is because the branch predictor is handling both branches equally and correctly guessing which way we're going to go for them.

5.3. Combining Conditions

What if we have a choice between one or two conditions? It might be possible to re-write our logic in a different way that has the same behavior, but should we do this?

As an example, if we are comparing two numbers to 0, an alternative approach is to multiply them together and compare the result to 0. This is then replacing a condition with a multiplication. But is this worthwhile?

Let's consider an example:

long[] first = LongStream.range(0, TOP)
  .map(n -> Math.random() < FRACTION ? 0 : n)
  .toArray();
long[] second = LongStream.range(0, TOP)
  .map(n -> Math.random() < FRACTION ? 0 : n)
  .toArray();

long count = 0;
long start = System.currentTimeMillis();
for (int i = 0; i < TOP; i++) {
    if (first[i] != 0 && second[i] != 0) {
        ++count;
    }
}
long end = System.currentTimeMillis();

LOG.info("Counted {}/{} numbers using separate mode in {}ms", count, TOP, end - start);

Our condition inside the loop can be replaced, as described above. Doing so actually does affect the runtime:

  • Separate conditions – 40ms
  • Multiple and single condition – 22ms

So the option that uses two different conditions actually takes twice as long to execute.

6. Conclusion

We've seen what branch prediction is and how it can have an impact on our programs. This can give us some additional tools in our belt to ensure that our programs are as efficient as possible.

However, as is always the case, we need to remember to profile our code before making major changes. It can sometimes be the case that making changes to help branch prediction costs more in other ways.

Examples of the cases from this article are available over on GitHub.
The Difference between var in Kotlin and Java 10

$
0
0

1. Introduction

In this short tutorial, we’ll cover differences between var keywords in Java and Kotlin.

We cover the identifier var in Java in more depth in our article Java 10 LocalVariable Type-Inference, and we talk about the keyword var in Kotlin in our article Kotlin const, var, and val Keywords.

2. Optional Type Declaration vs No Type Declaration

2.1. Kotlin

If we declare a mutable variable and initialize it at the same time, we don't need to specify the type:

var myVariable = 1

However, we can do so if we choose to:

var myVariable : Int = 1

If we want to declare a variable without initializing it directly, we need to specify its type, and we can assign a value later:

var myVariable : Int
myVariable = 1

2.2. Java

In Java, we can only use var if we initialize the variable on-the-spot, and we can't provide type information even if we want to:

var myVariable = 1;

The following is invalid:

var myVariable;
myVariable = 1;

And we get a compile-time error:

Cannot infer type: 'var' on variable without initializer

3. Keyword vs Identifier 

In Kotlin, var is a keyword, which means we cannot use it as the name of a variable, parameter, method or class. In contrast, Java 10 defines var as an identifier with special meaning.

That means in Java 10, we can still define a variable, parameter, or method with the name var:

public void var() {
    // do something
}

public void method(int var) {
    // do something
}

public void method() {
    int var = 1;
    // do something
}

Keep in mind that, as of Java 10, it’s not possible anymore to define a class with the name var:

public static class var {
}

The above code results in a compile-time error:

Error:(1, 1) java: 'var' not allowed here
  as of release 10, 'var' is a restricted type name and cannot be used for type declarations

This ensures backward compatibility with older Java versions.

4. Mutability

A variable declared with var in Kotlin is always mutable, while a variable declared with var in Java can be mutable or final:

var mutableInt = 1;
final var immutableInt = 1;

In Kotlin, there is no final keyword — final variables are declared with val instead:

val immutableInt = 1

5. Global vs Local Usage

5.1. Kotlin

In Kotlin, we can use var to declare global and local variables, as well as class members:

var myGlobalVar = 3

class MyClass {

    var myVar = 3    

    public fun myFunction() : Int {
        var myVariable = 3
        return myVariable
    }
}

5.2. Java

In Java, we can use var only to declare local variables:

public class MyClass {

    //not possible for member variables
    //private var myVar = 1;

    public int myFunction() {
        var myVariable = 3;
        return myVariable;
    }
}

6. Conclusion

In this article, we looked at the difference between var in Kotlin and Java. Even though both look very similar, there are fundamental differences between the two.

The most important difference is that var in Kotlin is about mutability, and var in Java is about type inference.

Arrays.sort vs Arrays.parallelSort

$
0
0

1. Overview

We've all used Arrays.sort() to sort an array of objects or primitives. In JDK 8, creators enhanced the API to provide a new method: Arrays.parallelSort().

In this tutorial, we'll draw a comparison between the sort() and parallelSort() methods.

2. Arrays.sort()

The Arrays.sort() method sorts the array of objects or primitives. The sorting algorithm used in this method is Dual-Pivot Quicksort. In other words, it is a custom implementation of the Quicksort algorithm to achieve better performance.

This method is single-threaded and there are two variants:

  • sort(array) – sorts the full array into ascending order
  • sort(array, fromIndex, toIndex) – sorts only the elements from fromIndex to toIndex

Let's see an example of both variants:

@Test
public void givenArrayOfIntegers_whenUsingArraysSortMethod_thenSortFullArrayInAscendingOrder() {
    int[] array = { 10, 4, 6, 2, 1, 9, 7, 8, 3, 5 };
    int[] expected = { 1, 2, 3, 4, 5, 6, 7, 8, 9, 10 };

    Arrays.sort(array);

    assertArrayEquals(expected, array);

}

@Test
public void givenArrayOfIntegers_whenUsingArraysSortMethodWithRange_thenSortRangeOfArrayInAscendingOrder() {
    int[] array = { 10, 4, 6, 2, 1, 9, 7, 8, 3, 5 };
    int[] expected = { 10, 4, 1, 2, 6, 7, 8, 9, 3, 5 };

    Arrays.sort(array, 2, 8);

    assertArrayEquals(expected, array);
}

Let's summarize the pros and cons of this approach:

PROS CONS
Works fast on smaller data sets Performance degrades for large datasets
Multiple cores of the system aren't utilized

3. Arrays.parallelSort()

This method also sorts an array of objects or primitives. Similar to sort() it also has two variants to sort a full array and partial array:

@Test
public void givenArrayOfIntegers_whenUsingArraysParallelSortMethod_thenSortFullArrayInAscendingOrder() {
    int[] array = { 10, 4, 6, 2, 1, 9, 7, 8, 3, 5 };
    int[] expected = { 1, 2, 3, 4, 5, 6, 7, 8, 9, 10 };

    Arrays.parallelSort(array);

    assertArrayEquals(expected, array);
}

@Test
public void givenArrayOfIntegers_whenUsingArraysParallelSortMethodWithRange_thenSortRangeOfArrayInAscendingOrder() {
    int[] array = { 10, 4, 6, 2, 1, 9, 7, 8, 3, 5 };
    int[] expected = { 10, 4, 1, 2, 6, 7, 8, 9, 3, 5 };

    Arrays.parallelSort(array, 2, 8);

    assertArrayEquals(expected, array);
}

The parallelSort() is functionally different. Unlike sort(), which sorts data sequentially using a single thread, it uses a parallel sort-merge sorting algorithm. It breaks the array into sub-arrays that are themselves sorted and then merged.

For executing parallel tasks it uses the ForkJoin pool.

But we need to know that it uses parallelism only when certain conditions are met. If the array size is less than or equal to 8192 or the processor has only one core, then it uses the sequential Dual-Pivot Quicksort algorithm. Otherwise, it uses a parallel sort.

Let's summarize the advantages and disadvantages of using it:

PROS CONS
Offers better performance for large size datasets Slower for smaller size arrays
Utilizes multiple cores of the system

4. Comparison

Let's now see how both methods performed with different size datasets. Below numbers are derived using JMH benchmarking. The test environment uses AMD A10 PRO 2.1Ghz quad-core processor and JDK 1.8.0_221:

Array Size Arrays.sort() Arrays.parallelSort()
1000 o.048 0.054
10000 0.847 0.425
100000 7.570 4.395
1000000 65.301 37.998

5. Conclusion

In this quick article, we saw how sort() and parallelSort() differ.

Based on performance results, we can conclude that parallelSort() may be a better choice when we have a large dataset to sort. However, in the case of smaller size arrays, it's better to go with sort() since it offers better performance.

As always, the complete source code is available over on GitHub.
Java Weekly, Issue 314

$
0
0

Welcome to 2020 🙂

1. Spring and Java

>> New Classes in Java 11 [blog.code-cop.org]

A categorized list of classes added in Java 11 as well as those that were removed.

>> Prototyping with JShell [advancedweb.hu]

The good, the bad, and the ugly of the JShell REPL for Java.

>> Memory Leaks in Java: A Cautionary Tale and Gentle Introduction to Preventing Memory Errors [blog.soshace.com]

And a good write-up on the common causes of memory leaks in Java and how to detect them.

Also worth reading:

Webinars and presentations:

2. Technical and Musings

>> Getting Email Sending Settings Right [techblog.bozho.net]

A few DNS records and other strategies to ensure your system-generated emails aren't blocked by SPAM filters.

Also worth reading:

3. Comics

And my favorite Dilberts of the week:

>> Not Fair [dilbert.com]

>> Pre-Meeting [dilbert.com]

>> Can You Explain [dilbert.com]

4. Pick of the Week

>> The Three Levels of Self-Awareness [markmanson.net]

Guide to the Java finally Keyword

$
0
0

1. Overview

In this tutorial, we'll explore the finally keyword in Java. We'll see how to use it alongside try/catch blocks in error handling. Though finally is intended to guarantee the execution of code, we'll discuss exceptional situations in which the JVM does not execute it.

We'll also discuss some common pitfalls where a finally block can have an unexpected outcome.

2. What Is finally?

finally defines a block of code we use along with the try keyword. It defines code that's always run after the try and any catch block, before the method is completed.

The finally block executes regardless of whether an exception is thrown or caught.

2.1. A Quick Example

Let's look at finally in a try-catch-finally block:

try {
    System.out.println("The count is " + Integer.parseInt(count));
} catch (NumberFormatException e) {
    System.out.println("No count");
} finally {
    System.out.println("In finally");
}

In this example, regardless of the value of the parameter count, the JVM executes the finally block and prints “In finally”.

2.2. Using finally Without a catch Block

Also, we can use a finally block with a try block regardless of whether a catch block is present:

try {
    System.out.println("Inside try");
} finally {
    System.out.println("Inside finally");
}

And we'll get the output:

Inside try
Inside finally

2.3. Why finally Is Useful

We generally use the finally block to execute clean up code like closing connections, closing files, or freeing up threads, as it executes regardless of an exception.

Note: try-with-resources can also be used to close resources instead of a finally block.

3. When finally Is executed

Let's have a look at all the permutations of when the JVM executes finally blocks, so we can understand it better.

3.1. No Exception Is Thrown

When the try block completes, the finally block is executed, even if there was no exception:

try {
    System.out.println("Inside try");
} finally {
    System.out.println("Inside finally");
}

In this example, we aren't throwing an exception from the try block. Thus, the JVM executes all code in both the try and finally blocks.

This outputs:

Inside try
Inside finally

3.2. Exception Is Thrown and Not Handled

If there's an exception and it is not caught, the finally block is still executed:

try {
    System.out.println("Inside try");
    throw new Exception();
} finally {
    System.out.println("Inside finally");
}

The JVM executes the finally block even in the case of an unhandled exception.

And the output would be:

Inside try
Inside finally
Exception in thread "main" java.lang.Exception

3.3. Exception Is Thrown and Handled

If there's an exception and it is caught by the catch block, the finally block is still executed:

try {
    System.out.println("Inside try");
    throw new Exception();
} catch (Exception e) {
    System.out.println("Inside catch");
} finally {
    System.out.println("Inside finally");
}

In this case, the catch block handles the thrown exception, and then the JVM executes the finally block and produces the output:

Inside try
Inside catch
Inside finally

3.4. Method Returns from try Block

Even returning from the method will not prevent finally blocks from running:

try {
    System.out.println("Inside try");
    return "from try";
} finally {
    System.out.println("Inside finally");
}

Here, even though the method has a return statement, the JVM executes the finally block before handing the control over to the calling method.

We'll get the output:

Inside try
Inside finally

3.5. Method Returns from catch Block

When the catch block contains a return statement, the finally block is still called:

try {
    System.out.println("Inside try");
    throw new Exception();
} catch (Exception e) {
    System.out.println("Inside catch");
    return "from catch";
} finally {
    System.out.println("Inside finally");
}

When we throw an exception from the try block, the catch block handles the exception. Though there is a return statement in the catch block, the JVM executes the finally block before handing control over to the calling method, and it outputs:

Inside try
Inside catch
Inside finally

4. When finally Isn’t Executed

Although we always expect the JVM to execute the statements inside a finally block, there are some situations where the JVM will not execute a finally block.

We might already expect that if the operating system stops our program, then the program would not get the chance to execute all of its code. There are also some actions we can take that will similarly prevent the execution of a pending finally block.

4.1. Invoking System.exit

In this case, we are terminating the JVM by calling System.exit and hence the JVM will not execute our finally block:

try {
    System.out.println("Inside try");
    System.exit(1);
} finally {
    System.out.println("Inside finally");
}

This outputs:

Inside try

4.2. Invoking halt

Similar to System.exit, a call to Runtime.halt also halts  the execution and the JVM does not execute any finally blocks:

try {
    System.out.println("Inside try");
    Runtime.getRuntime().halt(1);
} finally {
    System.out.println("Inside finally");
}

Thus, the output will be:

Inside try

4.3. Daemon Thread

If a Daemon thread enters the execution of a try/finally block and all other non-daemon threads exit before the daemon thread executes the finally block, the JVM doesn’t wait for the daemon thread to finish the execution of finally block:

Runnable runnable = () -> {
    try {
        System.out.println("Inside try");
    } finally {
        try {
            Thread.sleep(1000);
            System.out.println("Inside finally");
        } catch (InterruptedException e) {
            e.printStackTrace();
        }
    }
};
Thread regular = new Thread(runnable);
Thread daemon = new Thread(runnable);
daemon.setDaemon(true);
regular.start();
Thread.sleep(300);
daemon.start();

In this example, the runnable prints “Inside try” as soon as it enters the method and waits for 1 second before printing “Inside finally”.

Here, we start the regular thread and the daemon thread with a small delay. When the regular thread executes the finally block, the daemon thread is still waiting within the try block. As the regular thread completes execution and exits, the JVM also exits and does not wait for the daemon thread to complete the finally block.

Here's the output:

Inside try
Inside try
Inside finally

4.4. JVM Reaches an Infinite Loop

Here's a try block which contains an infinite while loop:

try {
    System.out.println("Inside try");
    while (true) {
    }
} finally {
    System.out.println("Inside finally");
}

Though it's not specific to finally, it's worth mentioning that if the try or catch block contains an infinite loop, the JVM will never reach any block beyond that loop.

5. Common Pitfalls

There are some common pitfalls that we must avoid when we use the finally block.

Although it's perfectly legal, it's considered bad practice to have a return statement or throw an exception from a finally block, and we should avoid it at all costs.

5.1. Disregards Exception

A return statement in the finally block ignores an uncaught exception:

try {
    System.out.println("Inside try");
    throw new RuntimeException();
} finally {
    System.out.println("Inside finally");
    return "from finally";
}

In this case, the method ignores the RuntimeException thrown and returns the value “from finally”.

5.2. Ignores Other return Statements

A return statement in the finally block ignores any other return statement in the try or catch block. Only the return statement in the finally block executes:

try {
    System.out.println("Inside try");
    return "from try";
} finally {
    System.out.println("Inside finally");
    return "from finally";
}

In this example, the method always returns “from finally” and completely ignores the return statement in the try block. This could be a very difficult bug to spot, which is why we should avoid using return in finally blocks.

5.3. Changes What's Thrown or Returned

Also, in the case of throwing an exception from a finally block, the method disregards the exception thrown or return statements in the try and catch blocks:

try {
    System.out.println("Inside try");
    return "from try";
} finally {
    throw new RuntimeException();
}

This method never returns a value and always throws a RuntimeException.

While we may not intentionally throw an exception from the finally block as in this example, we may still encounter this issue. It can occur when cleanup methods we use in a finally block throw an exception.

6. Conclusion

In this article, we discussed what finally blocks do in Java and how to use them. Then, we looked at different cases where the JVM executes them, and a few when it might not.

Lastly, we looked at some common pitfalls associated with using finally blocks.

As always, the source code used in this tutorial is available over on GitHub.

How to Return Multiple Values From a Java Method

$
0
0

1. Overview

In this tutorial, we'll learn different ways to return multiple values from a Java method.

First, we'll return arrays and collections. Then, we'll show how to use container classes for complex data. And finally, we'll learn how to create generic tuple classes.

2. Using Arrays

Arrays can be used to return both primitive and reference data types.

For example, the following getCoordinates method returns an array of two double values:

double[] getCoordinatesDoubleArray() {
  
    double[] coordinates = new double[2];

    coordinates[0] = 10;
    coordinates[1] = 12.5;
  
    return coordinates;
}

If we want to return an array of different reference types, we can use a common parent type as the array's type:

Number[] getCoordinatesNumberArray() {
  
    Number[] coordinates = new Number[2];

    coordinates[0] = 10;   // Integer
    coordinates[1] = 12.5; // Double
  
    return coordinates;
}

Here we've defined the coordinates array of type Number because it's the common class between Integer and Double elements.

3. Using Collections

With generic Java collections, we can return multiple values of a common type.

The collections framework has a wide spectrum of classes and interfaces. However, in this section, we'll limit our discussion to the List and Map interfaces.

3.1. Returning Values of Similar Type in a List

To start with, let's rewrite the previous array example using List<Number>:

List<Number> getCoordinatesList() {
  
    List<Number> coordinates = new ArrayList<>();
  
    coordinates.add(10);  // Integer
    coordinates.add(12.5);  // Double
  
    return coordinates;
}

Like Number[], the List<Number> collection holds a sequence of mixed-type elements all of the same common type.

3.2. Returning Named Values in a Map

If we'd like to name each entry in our collection, a Map can be used instead:

Map<String, Number> getCoordinatesMap() {
  
    Map<String, Number> coordinates = new HashMap<>();
  
    coordinates.put("longitude", 10);
    coordinates.put("latitude", 12.5);
  
    return coordinates;
}

Users of the getCoordinatesMap method can use the “longitude” or “latitude” keys with the Map#get method to retrieve the corresponding value.

4. Using Container Classes

Unlike arrays and collections, container classes (POJOs) can wrap multiple fields with different data types.

For instance, the following Coordinates class has two different data types, double and String:

public class Coordinates {
  
    private double longitude;
    private double latitude;
    private String placeName;
  
    public Coordinates(double longitude, double latitude, String placeName) {
  
        this.longitude = longitude;
        this.latitude = latitude;
        this.placeName = placeName;
    }
  
    // getters and setters
}

Using container classes like Coordinates enables us to model complex data types with meaningful names.

The next step is to instantiate and return an instance of Coordinates:

Coordinates getCoordinates() {
  
    double longitude = 10;
    double latitude = 12.5;
    String placeName = "home";
  
    return new Coordinates(longitude, latitude, placeName);
}

We should note that it's recommended that we make data classes like Coordinates immutable. By doing so, we create simple, thread-safe, sharable objects.

5. Using Tuples

Like containers, tuples store fields of different types. However, they differ in that they are not application-specific.

They are specialized when we use them to describe which types we want them to handle, but are general purpose container of a certain number of values. This means we do not need to write custom code to have them, and we can use a library, or create a common single implementation.

A tuple can be of any number of fields and is often called Tuplen, where n is the number of fields. For example, Tuple2 is a two-field tuple, Tuple3 is a three-field tuple, and so on.

To demonstrate the importance of tuples, let's consider the following example. Suppose that we want to find the distance between a Coordinates point and all other points inside a List<Coordinates>. Then, we need to return that most distant Coordinate object, along with the distance.

Let's first create a generic two-fields tuple:

public class Tuple2<K, V> {

    private K first;
    private V second;
  
    public Tuple2(K first, V second){
        this.first = first;
        this.second = second;
    }

    // getters and setters
}

Next, let's implement our logic and use a Tuple2<Coordinates, Double> instance to wrap the results:

Tuple2<Coordinates, Double> getMostDistantPoint(List<Coordinates> coordinatesList, 
                                                       Coordinates target) {

    return coordinatesList.stream()
      .map(coor -> new Tuple2<>(coor, coor.calculateDistance(target)))
      .max((d1, d2) -> Double.compare(d1.getSecond(), d2.getSecond())) // compare distances
      .get();
}

Using Tuple2<Coordinates, Double> in the previous example has saved us from creating a separate container class for one-time use with this particular method.

Like containers, tuples should be immutable. Additionally, due to their general-purpose nature, we should use tuples internally rather than as part of our public API.

6. Conclusion

In this article, we've learned how to use arrays, collections, containers, and tuples to return multiple values from a method. We can use arrays and collections in simple cases since they wrap a single data type.

On the other hand, containers and tuples are useful in creating complex types, with containers offering better readability.

As usual, the source code for this article is available over on GitHub.


Decompiling Classes in Java

$
0
0

1. Introduction

In this tutorial, we'll discuss decompiling Java classes. When source code is not available, decompiling Java classes helps to debug and understand source code behavior.

Let's take a look at the different options available.

2. Decompiling in IDE

Since most development is done in an integrated development environment (IDE), it makes sense that decompilation should also take place in an IDE.

For more info on the IDEs we will work with, check out our articles on how to debug in Eclipse and configuration for IntelliJ IDEA.

2.1. Eclipse

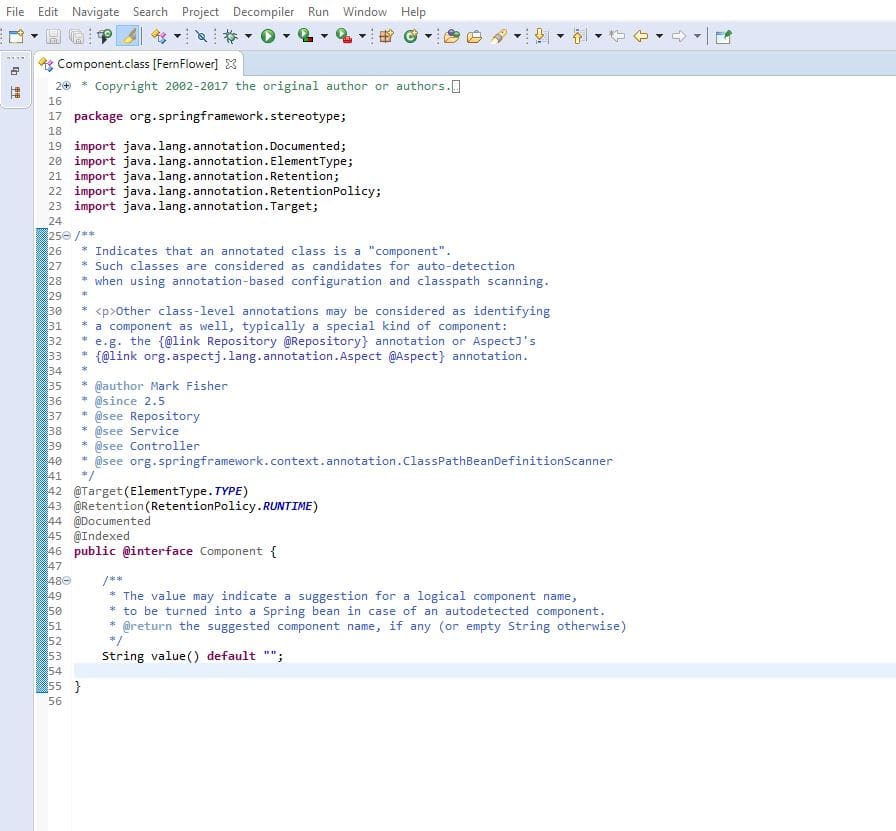
Firstly, in Eclipse we need a plugin such as the Enhanced Class Decompiler (ECD). This plugin uses five different decompilers.  We can install it from the Eclipse Marketplace and then we need to restart Eclipse.

Next, ECD requires a small amount of setup to associate class files with the Class Decompiler Viewer:

Also, we need to associate “.class without source” files:

Finally, we can use the decompiler by pressing Ctrl+Left-Click on a class name. We see the decompiler used on the file tab in brackets.

In this example, we're using FernFlower:

2.2. IntelliJ IDEA

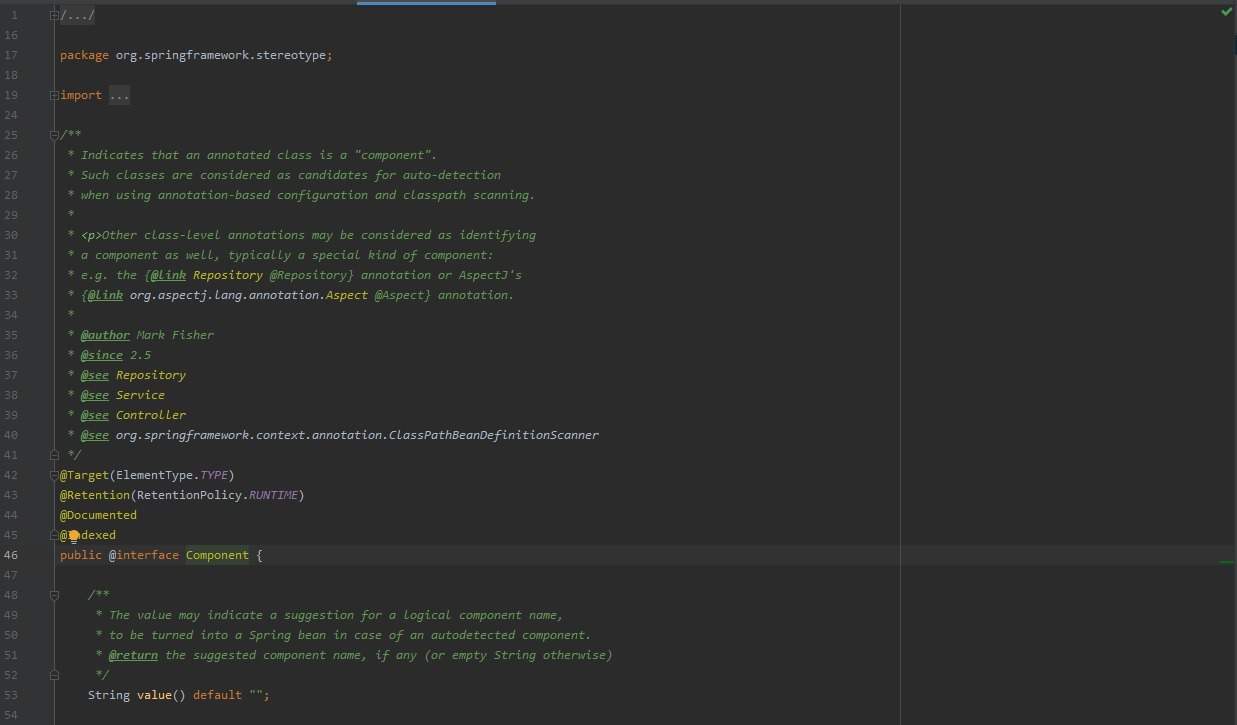
In contrast to Eclipse, IntelliJ IDEA provides the FernFlower decompiler as a default.

To use it, we simply Ctrl+Left-Click on a class name and view the code:

Also, we can download the source. Downloading the source will provide the actual code and comments.

For instance, the Component annotation class from the above screenshot includes Javadoc on the use of Component. We can notice the difference:

While decompilation is very helpful, it doesn't always give a complete picture. The full source code gives us a complete picture.

3. Command Line Decompiling

Before IDE plugins, the command-line was used for decompiling classes. Command-line decompilers can also be useful for debugging Java bytecode on a remote server that is not accessible with an IDE or GUI.

For example, we can decompile with JDCommandLine using a simple jar command:

java -jar JDCommandLine.jar ${TARGET_JAR_NAME}.jar ./classes

Don't leave off the ./classes parameter. It defines the output directory.

After successful decompilation, we can access the source files contained in the output directory. They're now ready to view through a text editor like Vim.

4. Conclusion

We looked at decompilation in Eclipse and IntelliJ IDEA IDEs as well as a command-line option when they aren't available.

We also looked at the difference between linking source code and decompilation.

Specify an Array of Strings as Body Parameters in Swagger

$
0
0

1. Overview

Swagger is a set of specifications to document and describe REST APIs. It also provides example values for the endpoint parameters.

In this tutorial, we'll show how to produce a default example value for String arrays, as this behavior is not enabled by default.

2. Specify an Array of Strings as Body Parameters in Swagger

The issue arises when we want to specify an array of strings as body parameters in Swagger.

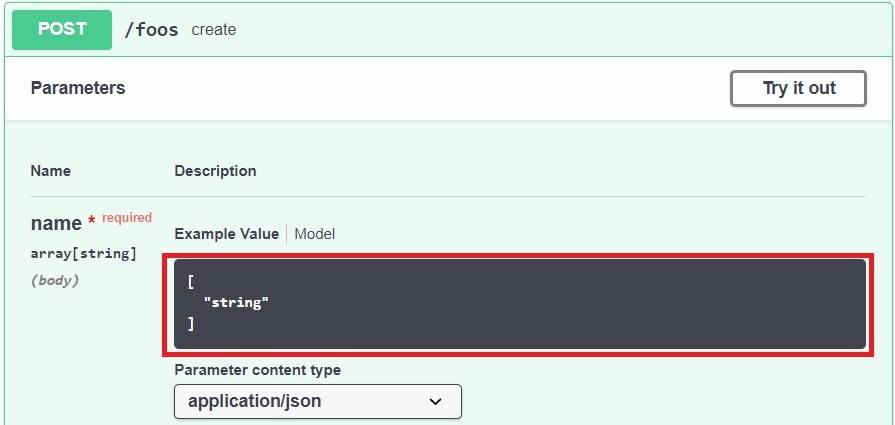
Swagger's default Example Value is a bit opaque, as we can see in the Swagger editor:

So, here we see that Swagger doesn't really show an example of what the array contents ought to look like. Let's see how to add one.

3. YAML

Firstly, we start by specifying the array of strings in Swagger using YAML notation. In the schema section, we include type: array with items String.

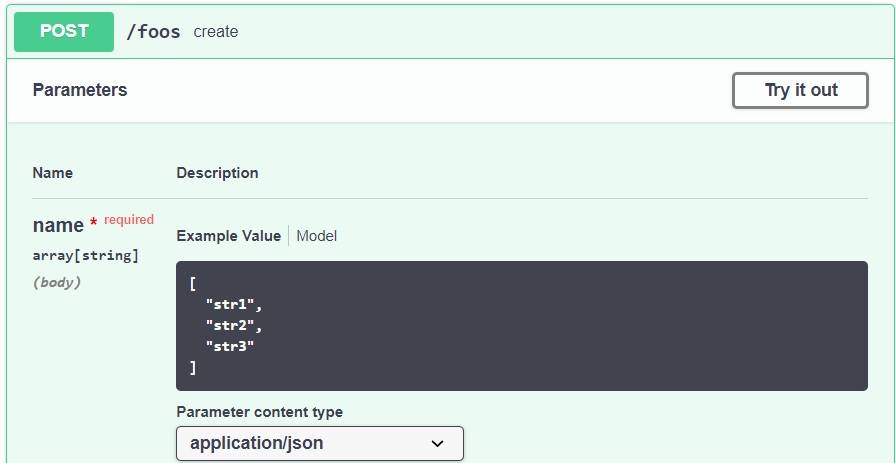
To better document the API and instruct the user, we can use the example label of how to insert values:

parameters:
  - in: body
    description: ""
    required: true
    name: name
    schema:
      type: array
      items:
        type: string
      example: ["str1", "str2", "str3"]

Let's see how our display is now more informative:

4. Springfox

Or, we can achieve the same outcome using Springfox.

We need to use the dataType and example in the data model with @ApiModel and @ApiModelProperty annotations:

@ApiModel
public class Foo {
    private long id;
    @ApiModelProperty(name = "name", dataType = "List", example = "[\"str1\", \"str2\", \"str3\"]")
    private List<String> name;

After that, we also need to annotate the Controller to let Swagger point to the data model.

So, let's use @ApiImplicitParams for that:

@RequestMapping(method = RequestMethod.POST, value = "/foos")
@ResponseStatus(HttpStatus.CREATED)
@ResponseBody
@ApiImplicitParams({ @ApiImplicitParam(name = "foo", 
  value = "List of strings", paramType = "body", dataType = "Foo") })
public Foo create(@RequestBody final Foo foo) {

And that's it!

5. Conclusion

When documenting the REST APIs, we may have parameters that are string arrays. Ideally, we'd document these with Example Values.

We can do this in Swagger with the example property. Or, we can use the example annotation attribute in Springfox.

As always, the code is available over on GitHub.

Apache RocketMQ with Spring Boot

$
0
0

1. Introduction

In this tutorial, we’ll create a message producer and consumer using Spring Boot and Apache RocketMQ, an open-source distributed messaging and streaming data platform.

2. Dependencies

For Maven projects, we need to add the RocketMQ Spring Boot Starter dependency:

<dependency>
    <groupId>org.apache.rocketmq</groupId>
    <artifactId>rocketmq-spring-boot-starter</artifactId>
    <version>2.0.4</version>
</dependency>

3. Producing Messages

For our example, we’ll create a basic message producer that will send events whenever the user adds or removes an item from the shopping cart.

First, let's set up our server location and group name in our application.properties:

rocketmq.name-server=127.0.0.1:9876
rocketmq.producer.group=cart-producer-group

Note that if we had more than one name server, we could list them like host:port;host:port.

Now, to keep it simple, we’ll create a CommandLineRunner application and generate a few events during application startup:

@SpringBootApplication
public class CartEventProducer implements CommandLineRunner {

    @Autowired
    private RocketMQTemplate rocketMQTemplate;

    public static void main(String[] args) {
        SpringApplication.run(CartEventProducer.class, args);
    }

    public void run(String... args) throws Exception {
        rocketMQTemplate.convertAndSend("cart-item-add-topic", new CartItemEvent("bike", 1));
        rocketMQTemplate.convertAndSend("cart-item-add-topic", new CartItemEvent("computer", 2));
        rocketMQTemplate.convertAndSend("cart-item-removed-topic", new CartItemEvent("bike", 1));
    }
}

The CartItemEvent consists of just two properties – the id of the item and a quantity:

class CartItemEvent {
    private String itemId;
    private int quantity;

    // constructor, getters and setters
}

In the above example, we use the convertAndSend() method, a generic method defined by the AbstractMessageSendingTemplate abstract class, to send our cart events. It takes two parameters: A destination, which in our case is a topic name, and a message payload.

4. Message Consumer

Consuming RocketMQ messages is as simple as creating a Spring component annotated with @RocketMQMessageListener and implementing the RocketMQListener interface:

@SpringBootApplication
public class CartEventConsumer {

    public static void main(String[] args) {
        SpringApplication.run(CartEventConsumer.class, args);
    }

    @Service
    @RocketMQMessageListener(
      topic = "cart-item-add-topic",
      consumerGroup = "cart-consumer_cart-item-add-topic"
    )
    public class CardItemAddConsumer implements RocketMQListener<CartItemEvent> {
        public void onMessage(CartItemEvent addItemEvent) {
            log.info("Adding item: {}", addItemEvent);
            // additional logic
        }
    }

    @Service
    @RocketMQMessageListener(
      topic = "cart-item-removed-topic",
      consumerGroup = "cart-consumer_cart-item-removed-topic"
    )
    public class CardItemRemoveConsumer implements RocketMQListener<CartItemEvent> {
        public void onMessage(CartItemEvent removeItemEvent) {
            log.info("Removing item: {}", removeItemEvent);
            // additional logic
        }
    }
}

We need to create a separate component for every message topic we are listening for. In each of these listeners, we define the name of the topic and consumer group name through the @RocketMQMessageListener annotation.

5. Synchronous and Asynchronous Transmission

In the previous examples, we used the convertAndSend method to send our messages. We have some other options, though.

We could, for example, call syncSend which is different from convertAndSend because it returns SendResult object.

It can be used, for example, to verify if our message was sent successfully or get its id:

public void run(String... args) throws Exception { 
    SendResult addBikeResult = rocketMQTemplate.syncSend("cart-item-add-topic", 
      new CartItemEvent("bike", 1)); 
    SendResult addComputerResult = rocketMQTemplate.syncSend("cart-item-add-topic", 
      new CartItemEvent("computer", 2)); 
    SendResult removeBikeResult = rocketMQTemplate.syncSend("cart-item-removed-topic", 
      new CartItemEvent("bike", 1)); 
}

Like convertAndSend, this method is returned only when the sending procedure completes.

We should use synchronous transmission in cases requiring high reliability, such as important notification messages or SMS notification.

On the other hand, we may instead want to send the message asynchronously and be notified when the sending completes.

We can do this with asyncSend, which takes a SendCallback as a parameter and returns immediately:

rocketMQTemplate.asyncSend("cart-item-add-topic", new CartItemEvent("bike", 1), new SendCallback() {
    @Override
    public void onSuccess(SendResult sendResult) {
        log.error("Successfully sent cart item");
    }

    @Override
    public void onException(Throwable throwable) {
        log.error("Exception during cart item sending", throwable);
    }
});

We use asynchronous transmission in cases requiring high throughput.

Lastly, for scenarios where we have very high throughput requirements, we can use sendOneWay instead of asyncSendsendOneWay is different from asyncSend in that it doesn't guarantee the message gets sent.

One-way transmission can also be used for ordinary reliability cases, such as collecting logs.

6. Sending Messages in Transaction

RocketMQ provides us with the ability to send messages within a transaction. We can do it by using the sendInTransaction() method:

MessageBuilder.withPayload(new CartItemEvent("bike", 1)).build();
rocketMQTemplate.sendMessageInTransaction("test-transaction", "topic-name", msg, null);

Also, we must implement a RocketMQLocalTransactionListener interface:

@RocketMQTransactionListener(txProducerGroup="test-transaction")
class TransactionListenerImpl implements RocketMQLocalTransactionListener {
      @Override
      public RocketMQLocalTransactionState executeLocalTransaction(Message msg, Object arg) {
          // ... local transaction process, return ROLLBACK, COMMIT or UNKNOWN
          return RocketMQLocalTransactionState.UNKNOWN;
      }

      @Override
      public RocketMQLocalTransactionState checkLocalTransaction(Message msg) {
          // ... check transaction status and return ROLLBACK, COMMIT or UNKNOWN
          return RocketMQLocalTransactionState.COMMIT;
      }
}

In sendMessageInTransaction(), the first parameter is the transaction name. It must be the same as the @RocketMQTransactionListener‘s member field txProducerGroup.

7. Message Producer Configuration

We can also configure aspects of the message producer itself:

  • rocketmq.producer.send-message-timeout: The message send timeout in milliseconds – the default value is 3000
  • rocketmq.producer.compress-message-body-threshold: Threshold above which, RocketMQ will compress messages – the default value is 1024.
  • rocketmq.producer.max-message-size: The maximum message size in bytes – the default value is 4096.
  • rocketmq.producer.retry-times-when-send-async-failed: The maximum number of retries to perform internally in asynchronous mode before sending failure – the default value is 2.
  • rocketmq.producer.retry-next-server: Indicates whether to retry another broker on sending failure internally – the default value is false.
  • rocketmq.producer.retry-times-when-send-failed: The maximum number of retries to perform internally in asynchronous mode before sending failure – the default value is 2.

8. Conclusion

In this article, we’ve learned how to send and consume messages using Apache RocketMQ and Spring Boot. As always all source code is available on GitHub.

Convert Double to Long in Java

$
0
0

1. Overview

In this tutorial, we'll explore various methods to convert from double to long in Java.

2. Using Type Casting

Let's check a straightforward way to cast the double to long using the cast operator:

Assert.assertEquals(9999, (long) 9999.999);

Applying the (long) cast operator on a double value 9999.999 results in 9999.

This is a narrowing primitive conversion because we're losing precision. When a double is cast to a long, the result will remain the same, excluding the decimal point.

3. Using Double.longValue

Now, let's explore Double's built-in method longValue to convert a double to a long:

Assert.assertEquals(9999, Double.valueOf(9999.999).longValue());

As we can see, applying the longValue method on a double value 9999.999 yields 9999. Internally, the longValue method is performing a simple cast.

4. Using Math Methods

Finally, let's see how to convert a double to long using round, ceil, and floor methods from the Math class:

Let's first check Math.round. This yields a value closest to the argument:

Assert.assertEquals(9999, Math.round(9999.0));
Assert.assertEquals(9999, Math.round(9999.444));
Assert.assertEquals(10000, Math.round(9999.999));

Secondly, Math.ceil will yield the smallest value that is greater than or equal to the argument:

Assert.assertEquals(9999, Math.ceil(9999.0), 0);
Assert.assertEquals(10000, Math.ceil(9999.444), 0);
Assert.assertEquals(10000, Math.ceil(9999.999), 0);

On the other hand, Math.floor does just the opposite of Math.ceil. This returns the largest value that is less than or equal to the argument:

Assert.assertEquals(9999, Math.floor(9999.0), 0);
Assert.assertEquals(9999, Math.floor(9999.444), 0);
Assert.assertEquals(9999, Math.floor(9999.999), 0);

Note that both Math.ceil and Math.round return a double value, but in both cases, the value returned is equivalent to a long value.

5. Conclusion

In this article, we've discussed various methods to convert double to long in Java. It's advisable to have an understanding of how each method behaves before applying it to mission-critical code.

The complete source code for this tutorial is available over on GitHub.

Using Cookies With Selenium WebDriver in Java

$
0
0

1. Overview

In this article, we'll have a quick look at how to use cookies with Selenium WebDriver in Java.

We'll talk a bit about some use cases, and then we'll jump straight into code.

2. Working with Cookies

An everyday use case for manipulating cookies is to persist our session between tests.

An even simpler scenario is when we want to test that our backend is setting cookies properly.

In the next sections, we'll briefly talk about handling cookies while providing simple code examples.

2.1. Setup

We'll need to add the selenium-java dependency to our project:

<dependency>
    <groupId>org.seleniumhq.selenium</groupId>
    <artifactId>selenium-java</artifactId>
    <version>3.14.0</version>
</dependency>

Let's set up our test class:

public class SeleniumCookiesJUnitLiveTest {

    private WebDriver driver;
    private String navUrl;

    @Before
    public void setUp() {
        Capabilities capabilities = DesiredCapabilities.firefox();
        driver = new FirefoxDriver(capabilities);
        navUrl = "https://baeldung.com";
    }
}

2.2. Reading Cookies

Next, we'll implement a simple test to verify that cookies exist in our driver after we've navigated to a webpage:

@Test
public void whenNavigate_thenCookiesExist() {
    driver.navigate().to(navUrl);
    Set<Cookie> cookies = driver.manage().getCookies();

    assertThat(cookies, is(not(empty())));
}

Often, we might want to search for a specific cookie:

@Test
public void whenNavigate_thenLpCookieIsHasCorrectValue() {
    driver.navigate().to(navUrl);
    Cookie lpCookie = driver.manage().getCookieNamed("lp_120073");

    assertThat(lpCookie.getValue(), containsString("www.baeldung.com"));
}

2.3. Cookie Properties

A cookie can be associated with a domain, have an expiry date, and much more.

Let's take a look at some common cookie properties:

@Test
public void whenNavigate_thenLpCookieHasCorrectProps() {
    driver.navigate().to(navUrl);
    Cookie lpCookie = driver.manage().getCookieNamed("lp_120073");

    assertThat(lpCookie.getDomain(), equalTo(".baeldung.com"));
    assertThat(lpCookie.getPath(), equalTo("/"));
    assertThat(lpCookie.getExpiry(), is(not(nullValue())));
    assertThat(lpCookie.isSecure(), equalTo(false));
    assertThat(lpCookie.isHttpOnly(), equalTo(false));
}

2.4. Adding Cookies

Adding a cookie is a straightforward process.

We create the cookie and add it to the driver using the addCookie method:

@Test
public void whenAddingCookie_thenItIsPresent() {
    driver.navigate().to(navUrl);
    Cookie cookie = new Cookie("foo", "bar");
    driver.manage().addCookie(cookie);
    Cookie driverCookie = driver.manage().getCookieNamed("foo");

    assertThat(driverCookie.getValue(), equalTo("bar"));
}

2.5. Deleting Cookies

As we might've expected, we can also delete a cookie using the deleteCookie method:

@Test
public void whenDeletingCookie_thenItIsAbsent() {
    driver.navigate().to(navUrl);
    Cookie lpCookie = driver.manage().getCookieNamed("lp_120073");

    assertThat(lpCookie, is(not(nullValue())));

    driver.manage().deleteCookie(lpCookie);
    Cookie deletedCookie = driver.manage().getCookieNamed("lp_120073");

    assertThat(deletedCookie, is(nullValue()));
}

2.6. Overriding Cookies

Although there's no explicit method for overriding a cookie, there's a simple way.

We can delete the cookie and add a new one with the same name but a different value:

@Test
public void whenOverridingCookie_thenItIsUpdated() {
    driver.navigate().to(navUrl);
    Cookie lpCookie = driver.manage().getCookieNamed("lp_120073");
    driver.manage().deleteCookie(lpCookie);

    Cookie newLpCookie = new Cookie("lp_120073", "foo");
    driver.manage().addCookie(newLpCookie);

    Cookie overriddenCookie = driver.manage().getCookieNamed("lp_120073");

    assertThat(overriddenCookie.getValue(), equalTo("foo"));
}

3. Conclusion

In this quick tutorial, we learned how to work with cookies using Selenium WebDriver in Java through quick and practical examples.

As always, the code is available over on GitHub.

Kotlin Ternary Conditional Operator

$
0
0

1. Overview

Briefly speaking, there is no ternary operator in Kotlin. However, using if and when statements helps to fill this gap.

In this tutorial, we'll look into a few different ways to mimic the ternary operator.

2. if and when Expressions

Unlike other languages, if and when statements in Kotlin are expressions. The result of such an expression can be assigned to a variable.

Using this fact, both if and when can be substituted for the ternary operator in their own way.

2.1. Using if-else

Let's take a look at using the if expression to mimic the ternary operator:

val result = if (a) "yes" else "no"

In the above expression, if is set to true, our result variable is set to yes. Otherwise, it is set to no.

It's worth noting that the result type depends upon the expression on the right side. In general, the type is Any. For example, if the right side has a Boolean type, the result will be Boolean as well:

val result: Boolean = if (a == b) true else false

2.2. Using when

We can also use a when expression to create a pseudo-ternary operator:

val result = when(a) {
  true -> "yes"
  false -> "no"
}

The code is simple, straightforward, and easy to read. If a is true, assign result to be yes. Otherwise, assign it to no.

2.3. DSL

There's certainly a temptation to create a DSL that mimics a ternary operator. But, Kotlin's language restrictions are too tight to allow for a 100% reproduction of the traditional ternary syntax.

As such, let's avoid this temptation and simply use one of the earlier mentioned solutions.

3. Conclusion

Although Kotlin does not have a ternary operator, there are some alternatives we can use – if and when. They are not a syntactic sugar, but complete expressions, as we have seen previously.

As always, the code is available over on GitHub.

Read Excel Cell Value Rather Than Formula With Apache POI

$
0
0

1. Introduction

When reading an Excel file in Java, we usually want to read the values of cells to perform some computation or generate a report. However, we may encounter one or more cells that contain formulas rather than raw data values. So, how do we get at the actual data values of those cells?

In this tutorial, we're going to look at different ways to read Excel cell values – rather than the formula that is calculating the cell values – with the Apache POI Java library.

There are two ways to solve this problem:

  • Fetch the last cached value for the cell
  • Evaluate the formula at runtime to get the cell value

2. Maven Dependency

We need to add the following dependency in our pom.xml file for Apache POI:

<dependency>
    <groupId>org.apache.poi</groupId>
    <artifactId>poi-ooxml</artifactId>
    <version>4.1.1</version>
</dependency>

The latest version of poi-ooxml can be downloaded from Maven Central.

3. Fetch the Last Cached Value

Excel stores two objects for the cell when a formula calculates its value. One is the formula itself, and the second is the cached value. The cached value contains the last value evaluated by the formula.

So the idea here is we can fetch the last cached value and consider it as cell value. It may not always be true that the last cached value is the correct cell value. However, when we're working with an Excel file that is saved, and there are no recent modifications to the file, then the last cached value should be the cell value.

Let's see how to fetch the last cached value for a cell:

FileInputStream inputStream = new FileInputStream(new File("temp.xlsx"));
Workbook workbook = new XSSFWorkbook(inputStream);
Sheet sheet = workbook.getSheetAt(0);

CellAddress cellAddress = new CellAddress("C2");
Row row = sheet.getRow(cellAddress.getRow());
Cell cell = row.getCell(cellAddress.getColumn());

if (cell.getCellType() == CellType.FORMULA) {
    switch (cell.getCachedFormulaResultType()) {
        case BOOLEAN:
            System.out.println(cell.getBooleanCellValue());
            break;
        case NUMERIC:
            System.out.println(cell.getNumericCellValue());
            break;
        case STRING:
            System.out.println(cell.getRichStringCellValue());
            break;
    }
}

4. Evaluate the Formula to Get the Cell Value

Apache POI provides a FormulaEvaluator class, which enables us to calculate the results of formulas in Excel sheets.

So, we can use FormulaEvaluator to calculate the cell value at runtime directly. The FormulaEvaluator class provides a method called evaluateFormulaCell, which evaluates the cell value for the given Cell object and returns a CellType object, which represents the data type of the cell value.

Let's see this approach in action:

// existing Workbook setup

FormulaEvaluator evaluator = workbook.getCreationHelper().createFormulaEvaluator(); 

// existing Sheet, Row, and Cell setup

if (cell.getCellType() == CellType.FORMULA) {
    switch (evaluator.evaluateFormulaCell(cell)) {
        case BOOLEAN:
            System.out.println(cell.getBooleanCellValue());
            break;
        case NUMERIC:
            System.out.println(cell.getNumericCellValue());
            break;
        case STRING:
            System.out.println(cell.getStringCellValue());
            break;
    }
}

5. Which Approach to Choose

The simple difference between the two approaches here is that the first method uses the last cached value, and the second method evaluates the formula at runtime.

If we're working with an Excel file that is already saved and we're not going to make changes to that spreadsheet at runtime, then the cached value approach is better as we don't have to evaluate the formula.

However, if we know that we're going to make frequent changes at runtime, then it's better to evaluate the formula at runtime to fetch the cell value.

6. Conclusion

In this quick article, we saw two ways to get the value of an Excel cell rather than the formula that calculates it.

The complete source code for this article is available over on GitHub.


Cucumber Hooks

$
0
0

1. Introduction

Cucumber hooks can come in handy when we want to perform specific actions for every scenario or step, but without having these actions explicitly in the Gherkin code.

In this tutorial, we'll look at the @Before@BeforeStep, @AfterStep, and @After Cucumber hooks.

2. Overview of Hooks in Cucumber

2.1. When Should Hooks Be Used?

Hooks can be used to perform background tasks that are not part of business functionality. Such tasks could be:

  • Starting up a browser
  • Setting or clearing cookies
  • Connecting to a database
  • Checking the state of the system
  • Monitoring

A use case for monitoring would be to update a dashboard with the test progress in real-time.

Hooks are not visible in the Gherkin code. Therefore, we should not see them as a replacement for a Cucumber Background or a given step.

We'll look at an example where we use hooks to take screenshots during test execution.

2.2. Scope of Hooks

Hooks affect every scenario. Therefore, it's good practice to define all hooks in a dedicated configuration class.

It's not necessary to define the same hooks in every glue code class. If we define hooks in the same class with our glue code, we'd have less readable code.

3. Hooks

Let's first look at the individual hooks. We'll then look at a full example where we'll see how hooks execute when combined.

3.1. @Before

Methods annotated with @Before will execute before every scenario. In our example, we'll start up the browser before every scenario:

@Before
public void initialization() {
    startBrowser();
}

If we annotate several methods with @Before, we can explicitly define the order in which the steps are executed:

@Before(order=2)
public void beforeScenario() {
    takeScreenshot();
}

The above method executes second, as we pass 2 as a value for the order parameter to the annotation. We can also pass 1 as a value for the order parameter of our initialization method:

@Before(order=1)
public void initialization()

So, when we execute a scenario, initialization() executes first, and beforeScenario() executes second.

3.2. @BeforeStep

Methods annotated with @BeforeStep execute before every step. Let's use the annotation to take a screenshot before every step:

@BeforeStep
public void beforeStep() {
    takeScreenshot();
}

3.3. @AfterStep

Methods annotated with @AfterStep execute after every step:

@AfterStep
public void afterStep() {
    takeScreenshot();
}

We've used @AfterStep here to take a screenshot after every step. This happens regardless of whether the step finishes successfully or fails.

3.4. @After

Methods annotated with @After execute after every scenario:

@After
public void afterScenario() {
    takeScreenshot();
    closeBrowser();
}

In our example, we'll take a final screenshot and close the browser. This happens regardless of whether the scenario finishes successfully.

3.5. The Scenario Parameter

The methods annotated with a hook annotation can accept a parameter of type Scenario:

@After
public void beforeScenario(Scenario scenario) { 
    // some code
}

The object of type Scenario contains information on the current scenario. Included are the scenario name, number of steps, names of steps, and status (pass or fail). This can be useful if we want to perform different actions for passed and failed tests.

4. Hook Execution

4.1. Happy Flow

Let's now look at what happens when we run a Cucumber scenario with all four types of hooks:

Feature: Book Store With Hooks
  Background: The Book Store
    Given The following books are available in the store
      | The Devil in the White City          | Erik Larson |
      | The Lion, the Witch and the Wardrobe | C.S. Lewis  |
      | In the Garden of Beasts              | Erik Larson |

  Scenario: 1 - Find books by author
    When I ask for a book by the author Erik Larson
    Then The salesperson says that there are 2 books

  Scenario: 2 - Find books by author, but isn't there
    When I ask for a book by the author Marcel Proust
    Then The salesperson says that there are 0 books

Looking at the result of a test run in the IntelliJ IDE, we can see the execution order:

First, our two @Before hooks execute. Then before and after every step, the @BeforeStep and @AfterStep hooks run, respectively. Finally, the @After hook runs. All hooks execute for both scenarios.

4.2. Unhappy Flow: A Step Fails

Let's see what happens if a step fails. As we can see in the screenshot below, both the @Before and @After hooks of the failing step are executed. The subsequent steps are skipped, and finally, the @After hook executes:

The behavior of @After is similar to the finally-clause after a try-catch in Java. We could use it to perform clean-up tasks if a step failed. In our example, we still take a screenshot even if the scenario fails.

4.3. Unhappy Flow: A Hook Fails

Let's look at what happens when a hook itself fails. In the example below, the first @BeforeStep fails.

In this case, the actual step doesn't run, but it's @AfterStep hook does. Subsequent steps won't run either, whereas the @After hook is executed at the end:

5. Conditional Execution with Tags

Hooks are defined globally and affect all scenarios and steps. However, with the help of Cucumber tags, we can define exactly which scenarios a hook should be executed for:

@Before(order=2, value="@Screenshots")
public void beforeScenario() {
    takeScreenshot();
}

This hook will be executed only for scenarios that are tagged with @Screenshots:

@Screenshots
Scenario: 1 - Find books by author 
When I ask for a book by the author Erik Larson 
Then The salesperson says that there are 2 books

6. Java 8

We can add Cucumber Java 8 Support to define all hooks with lambda expressions.

Recall our initialization hook from the example above:

@Before(order=2)
public void initialization() {
    startBrowser();
}

Rewritten with a lambda expression, we get:

public BookStoreWithHooksRunSteps() {
    Before(2, () -> startBrowser());
}

The same also works for @BeforeStep, @After, and @AfterStep.

7. Conclusion

In this article, we looked at how to define Cucumber hooks.

We discussed in which cases we should use them and when we should not. Then, we saw in which order hooks execute and how we can achieve conditional execution.

Finally, we saw how we could define hooks with Java 8 lambda notation.

As usual, the complete source code of this article is available over on GitHub.

Introduction to Greedy Algorithms with Java

$
0
0

1. Introduction

In this tutorial, we're going to introduce greedy algorithms in the Java ecosystem.

2. Greedy problem

When facing a mathematical problem, there may be several ways to design a solution. We can implement an iterative solution, or some advanced techniques, such as divide and conquer principle (e.g. Quicksort algorithm) or approach with dynamic programming (e.g. Knapsack problem) and many more.

Most of the time, we're searching for an optimal solution, but sadly, we don't always get such an outcome. However, there are cases where even a suboptimal result is valuable. With the help of some specific strategies, or heuristics, we might earn ourselves such a precious reward.

In this context, given a divisible problem, a strategy that at each stage of the process takes the locally optimal choice or “greedy choice” is called a greedy algorithm.

We stated that we should address a “divisible” problem: A situation that can be described as a set of subproblems with, almost, the same characteristics. As a consequence, most of the time, a greedy algorithm will be implemented as a recursive algorithm.

A greedy algorithm can be a way to lead us to a reasonable solution in spite of a harsh environment; lack of computational resources, execution-time constraint, API limitations, or any other kind of restrictions.

2.1. Scenario

In this short tutorial, we're going to implement a greedy strategy to extract data from a social network using its API.

Let's say we'd like to reach more users on the “little-blue-bird” social. The best way to achieve our goal is to post original content or re-tweet something that will arouse some interest to a broad audience.

How do we find such an audience? Well, we must find an account with many followers and tweet some content for them.

2.2. Classic vs. Greedy

We take into account the following situation: Our account has four followers, each of which has, as depicted in the image below, respectively 2, 2, 1 and 3 followers, and so on:

With this purpose in our minds, we'll take the one with more followers among the followers of our account. Then we'll repeat the process two more times until we reach the 3rd degree of connection (four steps in total).

In this way, we define a path made of users, leading us to the vastest followers-base from our account. If we can address some content to them, they'll surely reach our page.

We can start with a “traditional” approach. At every single step, we'll perform a query to get the followers of an account. As a result of our selection process, the number of accounts will increase every step.

Surprisingly, in total, we would end up performing 25 queries:

Here a problem arises: For example, Twitter API limits this type of query to 15 every 15 minutes. If we try to perform more calls than allowed, we'll get a “Rate limit exceeded code – 88“, or “Returned in API v1.1 when a request cannot be served due to the application's rate limit having been exhausted for the resource“. How can we overcome such a limit?

Well, the answer is right in front of us: A greedy algorithm. If we use this approach, at each step, we can assume that the user with the most followers is the only one to consider: In the end, we need only four queries. Quite an improvement!

The outcome of those two approaches will be different. In the first case, we get 16, the optimal solution, while in the latter, the maximum number of reachable followers is merely 12.

Will this difference be so valuable? We'll decide later.

3. Implementation

To implement the above logic, we initialize a small Java program, where we'll mimic the Twitter API. We'll also make use of the Lombok library.

Now, let's define our component SocialConnector in which we'll implement our logic. Note that we're going to put a counter to simulate calls restrictions, but we'll lower it to four:

public class SocialConnector {
    private boolean isCounterEnabled = true;
    private int counter = 4;
    @Getter @Setter
    List users;

    public SocialConnector() {
        users = new ArrayList<>();
    }

    public boolean switchCounter() {
        this.isCounterEnabled = !this.isCounterEnabled;
        return this.isCounterEnabled;
    }
}

Then we're going to add a method to retrieve the followers' list of a specific account:

public List getFollowers(String account) {
    if (counter < 0) {
        throw new IllegalStateException ("API limit reached");
    } else {
        if (this.isCounterEnabled) {
            counter--;
        }
        for (SocialUser user : users) {
            if (user.getUsername().equals(account)) {
                return user.getFollowers();
            }
        }
     }
     return new ArrayList<>();
}

To support our process, we need some classes to model our user entity:

public class SocialUser {
    @Getter
    private String username;
    @Getter
    private List<SocialUser> followers;

    @Override
    public boolean equals(Object obj) {
        return ((SocialUser) obj).getUsername().equals(username);
    }

    public SocialUser(String username) {
        this.username = username;
        this.followers = new ArrayList<>();
    }

    public SocialUser(String username, List<SocialUser> followers) {
        this.username = username;
        this.followers = followers;
    }

    public void addFollowers(List<SocialUser> followers) {
        this.followers.addAll(followers);
    }
}

3.1. Greedy Algorithm

Finally, it's time to implement our greedy strategy, so let's add a new component – GreedyAlgorithm – in which we'll perform the recursion:

public class GreedyAlgorithm {
    int currentLevel = 0;
    final int maxLevel = 3;
    SocialConnector sc;
    public GreedyAlgorithm(SocialConnector sc) {
        this.sc = sc;
    }
}

Then we need to insert a method findMostFollowersPath in which we'll find the user with most followers, count them, and then proceed to the next step:

public long findMostFollowersPath(String account) {
    long max = 0;
    SocialUser toFollow = null;

    List followers = sc.getFollowers(account);
    for (SocialUser el : followers) {
        long followersCount = el.getFollowersCount();
        if (followersCount > max) {
            toFollow = el;
            max = followersCount;
        }
    }
    if (currentLevel < maxLevel - 1) {
        currentLevel++;
        max += findMostFollowersPath(toFollow.getUsername());
    } 
    return max;
}

Remember: Here is where we perform a greedy choice. As such, every time we call this method, we'll choose one and only one element from the list and move on: We won't ever go back on our decisions!

Perfect! We are ready to go, and we can test our application. Before that, we need to remember to populate our tiny network and finally, execute the following unit test:

public void greedyAlgorithmTest() {
    GreedyAlgorithm ga = new GreedyAlgorithm(prepareNetwork());
    assertEquals(ga.findMostFollowersPath("root"), 5);
}

3.2. Non-Greedy Algorithm

Let's create a non-greedy method, merely to check with our eyes what happens. So, we need to start with building a NonGreedyAlgorithm class:

public class NonGreedyAlgorithm {
    int currentLevel = 0;
    final int maxLevel = 3; 
    SocialConnector tc;

    public NonGreedyAlgorithm(SocialConnector tc, int level) {
        this.tc = tc;
        this.currentLevel = level;
    }
}

Let's create an equivalent method to retrieve followers:

public long findMostFollowersPath(String account) {		
    List<SocialUser> followers = tc.getFollowers(account);
    long total = currentLevel > 0 ? followers.size() : 0;

    if (currentLevel < maxLevel ) {
        currentLevel++;
        long[] count = new long[followers.size()];
        int i = 0;
        for (SocialUser el : followers) {
            NonGreedyAlgorithm sub = new NonGreedyAlgorithm(tc, currentLevel);
            count[i] = sub.findMostFollowersPath(el.getUsername());
            i++;
        }

        long max = 0;
        for (; i > 0; i--) {
            if (count[i-1] > max) {
                max = count[i-1];
            }
        }		
        return total + max;
     }	
     return total;
}

As our class is ready, we can prepare some unit tests: One to verify the call limit exceeds and another one to check the value returned with a non-greedy strategy:

public void nongreedyAlgorithmTest() {
    NonGreedyAlgorithm nga = new NonGreedyAlgorithm(prepareNetwork(), 0);
    Assertions.assertThrows(IllegalStateException.class, () -> {
        nga.findMostFollowersPath("root");
    });
}

public void nongreedyAlgorithmUnboundedTest() {
    SocialConnector sc = prepareNetwork();
    sc.switchCounter();
    NonGreedyAlgorithm nga = new NonGreedyAlgorithm(sc, 0);
    assertEquals(nga.findMostFollowersPath("root"), 6);
}

4. Results

It's time to review our work!

First, we tried out our greedy strategy, checking its effectiveness. Then we verified the situation with an exhaustive search, with and without the API limit.

Our quick greedy procedure, which makes locally optimal choices each time, returns a numeric value. On the other hand, we don't get anything from the non-greedy algorithm, due to an environment restriction.

Comparing the two methods' output, we can understand how our greedy strategy saved us, even if the retrieved value that is not optimal. We can call it a local optimum.

5. Conclusion

In mutable and fast-changing contexts like social media, problems that require finding an optimal solution can become a dreadful chimera: Hard to reach and, at the same time, unrealistic.

Overcoming limitations and optimizing API calls is quite a theme, but, as we've discussed, greedy strategies are effective. Choosing this kind of approach saves us much pain, returning valuable results in exchange.

Keep in mind that not every situation is suitable: We need to evaluate our circumstances every time.

As always, the example code from this tutorial is available over on GitHub.

Guide to the @Serial Annotation in Java 14

$
0
0

1. Introduction

In this quick tutorial, we'll take a look at the new @Serial annotation introduced with Java 14.

Similarly to @Override, this annotation is used in combination with the serial lint flag to perform compile-time checks for the serialization-related members of a class.

Although the annotation is already available as per build 25, the lint check has yet to be released.

2. Usage

Let's start by annotating with @Serial any of the seven serialization-related methods and fields:

public class MySerialClass implements Serializable {

    @Serial
    private static final ObjectStreamField[] serialPersistentFields = null;
	
    @Serial
    private static final long serialVersionUID = 1;
	
    @Serial
    private void writeObject(ObjectOutputStream stream) throws IOException {
        // ...
    }
	
    @Serial
    private void readObject(ObjectInputStream stream) throws IOException, ClassNotFoundException {
        // ...
    }

    @Serial
    private void readObjectNoData() throws ObjectStreamException {
        // ...
    }

    @Serial
    private Object writeReplace() throws ObjectStreamException {
        // ...
        return null;
    }

    @Serial
    private Object readResolve() throws ObjectStreamException {
        // ...
        return null;
    }

}

After that, we need to compile our class with the serial lint flag:

javac -Xlint:serial MySerialClass.java

The compiler will then check the signatures and the types of the annotated members and issue a warning if they don't match the expected ones.

Furthermore, the compiler will also throw an error if @Serial is applied:

  • when a class is not implementing the Serializable interface:
public class MyNotSerialClass {
    @Serial 
    private static final long serialVersionUID = 1; // Compilation error
}
public enum MyEnum { 
    @Serial 
    private void readObjectNoData() throws ObjectStreamException {} // Compilation error 
}
  • to writeObject(), readObject(), readObjectNoData() and serialPersistentFields in an Externalizable class since those classes use different serialization methods:
public class MyExternalizableClass implements Externalizable {
    @Serial 
    private void writeObject(ObjectOutputStream stream) throws IOException {} // Compilation error 
}

3. Conclusion

This short article went through the new @Serial annotation usage.

As always, all the code in the article is available over on GitHub.

Obtaining a Power Set of a Set in Java

$
0
0

1. Introduction

In this tutorial, we'll study the process of generating a power set of a given set in Java.

As a quick reminder, for every set of size n, there is a power set of size 2n. We'll learn how to get it using various techniques.

2. Definition of a Power Set

The power set of a given set S is the set of all subsets of S, including S itself and the empty set.

For example, for a given set:

{"APPLE", "ORANGE", "MANGO"}

the power set is:

{
    {},
    {"APPLE"},
    {"ORANGE"},
    {"APPLE", "ORANGE"},
    {"MANGO"},
    {"APPLE", "MANGO"},
    {"ORANGE", "MANGO"},
    {"APPLE", "ORANGE", "MANGO"}
}

As it is also a set of subsets, the order of its internal subsets is not important and they can appear in any order:

{
    {},
    {"MANGO"},
    {"ORANGE"},
    {"ORANGE", "MANGO"},
    {"APPLE"},
    {"APPLE", "MANGO"},
    {"APPLE", "ORANGE"},
    {"APPLE", "ORANGE", "MANGO"}
}

3. Guava Library

The Google Guava library has some useful Set utilities, such as the power set. Thus, we can easily use it to get the power set of the given set, too:

@Test
public void givenSet_WhenGuavaLibraryGeneratePowerSet_ThenItContainsAllSubsets() {
    ImmutableSet<String> set = ImmutableSet.of("APPLE", "ORANGE", "MANGO");
    Set<Set<String>> powerSet = Sets.powerSet(set);
    Assertions.assertEquals((1 << set.size()), powerSet.size());
    MatcherAssert.assertThat(powerSet, Matchers.containsInAnyOrder(
      ImmutableSet.of(),
      ImmutableSet.of("APPLE"),
      ImmutableSet.of("ORANGE"),
      ImmutableSet.of("APPLE", "ORANGE"),
      ImmutableSet.of("MANGO"),
      ImmutableSet.of("APPLE", "MANGO"),
      ImmutableSet.of("ORANGE", "MANGO"),
      ImmutableSet.of("APPLE", "ORANGE", "MANGO")
   ));
}

Guava powerSet internally operates over the Iterator interface in the way when the next subset is requested, the subset is calculated and returned. So, the space complexity is reduced to O(n) instead of O(2n).

But, how does Guava achieve this?

4. Power Set Generation Approach

4.1. Algorithm

Let's now discuss the possible steps for creating an algorithm for this operation.

The power set of an empty set is {{}} in which it contains only one empty set, so that's our simplest case.

For every set S other than the empty set, we first extract one element and name it – element. Then, for the rest of the elements of a set subsetWithoutElement, we calculate their power set recursively – and name it something like powerSetSubsetWithoutElement. Then, by adding the extracted element to all sets in powerSetSubsetWithoutElement, we get powerSetSubsetWithElement.

Now, the power set S is the union of a powerSetSubsetWithoutElement and a powerSetSubsetWithElement:


Let's see an example of the recursive power set stack for the given set {“APPLE”, “ORANGE”, “MANGO”}.

To improve the readability of the image we use short forms of names: P means power set function and “A”, “O”, “M” are short forms of “APPLE”, “ORANGE”, and “MANGO”, respectively:

4.2. Implementation

So, first, let's write the Java code for extracting one element and get the remaining subsets:

T element = set.iterator().next();
Set<T> subsetWithoutElement = new HashSet<>();
for (T s : set) {
    if (!s.equals(element)) {
        subsetWithoutElement.add(s);
    }
}

We'll then want to get the powerset of subsetWithoutElement:

Set<Set<T>> powersetSubSetWithoutElement = recursivePowerSet(subsetWithoutElement);

Next, we need to add that powerset back into the original:

Set<Set<T>> powersetSubSetWithElement = new HashSet<>();
for (Set<T> subsetWithoutElement : powerSetSubSetWithoutElement) {
    Set<T> subsetWithElement = new HashSet<>(subsetWithoutElement);
    subsetWithElement.add(element);
    powerSetSubSetWithElement.add(subsetWithElement);
}

Finally the union of powerSetSubSetWithoutElement and powerSetSubSetWithElement is the power set of the given input set:

Set<Set<T>> powerSet = new HashSet<>();
powerSet.addAll(powerSetSubSetWithoutElement);
powerSet.addAll(powerSetSubSetWithElement);

If we put all our code snippets together, we can see our final product:

public Set<Set<T>> recursivePowerSet(Set<T> set) {
    if (set.isEmpty()) {
        Set<Set<T>> ret = new HashSet<>();
        ret.add(set);
        return ret;
    }

    T element = set.iterator().next();
    Set<T> subSetWithoutElement = getSubSetWithoutElement(set, element);
    Set<Set<T>> powerSetSubSetWithoutElement = recursivePowerSet(subSetWithoutElement);
    Set<Set<T>> powerSetSubSetWithElement = addElementToAll(powerSetSubSetWithoutElement, element);

    Set<Set<T>> powerSet = new HashSet<>();
    powerSet.addAll(powerSetSubSetWithoutElement);
    powerSet.addAll(powerSetSubSetWithElement);
    return powerSet;
}

4.3. Notes for Unit Tests

Now let's test. We've got a bit of criteria here to confirm:

  • First, we check the size of the power set and it must be 2n for a set of size n.
  • Then, every element will occur only one time in a subset and 2n-1 different subsets.
  • Finally, every subset must appear once.

If all these conditions passed, we can be sure that our function works. Now, since we've used Set<Set>, we already know that there's no repetition. In that case, we only need to check the size of the power set, and the number of occurrences of each element in the subsets.

To check the size of the power set we can use:

MatcherAssert.assertThat(powerSet, IsCollectionWithSize.hasSize((1 << set.size())));

And to check the number of occurrences of each element:

Map<String, Integer> counter = new HashMap<>();
for (Set<String> subset : powerSet) { 
    for (String name : subset) {
        int num = counter.getOrDefault(name, 0);
        counter.put(name, num + 1);
    }
}
counter.forEach((k, v) -> Assertions.assertEquals((1 << (set.size() - 1)), v.intValue()));

Finally, if we can put all together into one unit test:

@Test
public void givenSet_WhenPowerSetIsCalculated_ThenItContainsAllSubsets() {
    Set<String> set = RandomSetOfStringGenerator.generateRandomSet();
    Set<Set<String>> powerSet = new PowerSet<String>().recursivePowerSet(set);
    MatcherAssert.assertThat(powerSet, IsCollectionWithSize.hasSize((1 << set.size())));
   
    Map<String, Integer> counter = new HashMap<>();
    for (Set<String> subset : powerSet) {
        for (String name : subset) {
            int num = counter.getOrDefault(name, 0);
            counter.put(name, num + 1);
        }
    }
    counter.forEach((k, v) -> Assertions.assertEquals((1 << (set.size() - 1)), v.intValue()));
}

5. Optimization

In this section, we'll try to minimize the space and reduce the number of internal operations to calculate the power set in an optimal way.

5.1. Data Structure

As we can see in the given approach, we need a lot of subtractions in the recursive call, which consumes a large amount of time and memory.

Instead, we can map each set or subset to some other notions to reduce the number of operations.

First, we need to assign an increasing number starting from 0 to each object in the given set S which means we work with an ordered list of numbers.

For example for the given set {“APPLE”, “ORANGE”, “MANGO”} we get:

“APPLE” -> 0

“ORANGE” -> 1

“MANGO” -> 2

So, from now on, instead of generating subsets of S, we generate them for the ordered list of [0, 1, 2], and as it is ordered we can simulate subtractions by a starting index.

For example, if the starting index is 1 it means that we generate the power set of [1,2].

To retrieve mapped id from the object and vice-versa, we store both sides of mapping. Using our example, we store both (“MANGO” -> 2) and (2 -> “MANGO”). As the mapping of numbers started from zero, so for the reverse map there we can use a simple array to retrieve the respective object.

One of the possible implementations of this function would be:

private Map<T, Integer> map = new HashMap<>();
private List<T> reverseMap = new ArrayList<>();

private void initializeMap(Collection<T> collection) {
    int mapId = 0;
    for (T c : collection) {
        map.put(c, mapId++);
        reverseMap.add(c);
    }
}

Now, to represent subsets there are two well-known ideas:

  1. Index representation
  2. Binary representation

5.2. Index Representation

Each subset is represented by the index of its values. For example, the index mapping of the given set {“APPLE”, “ORANGE”, “MANGO”} would be:

{
   {} -> {}
   [0] -> {"APPLE"}
   [1] -> {"ORANGE"}
   [0,1] -> {"APPLE", "ORANGE"}
   [2] -> {"MANGO"}
   [0,2] -> {"APPLE", "MANGO"}
   [1,2] -> {"ORANGE", "MANGO"}
   [0,1,2] -> {"APPLE", "ORANGE", "MANGO"}
}

So, we can retrieve the respective set from a subset of indices with the given mapping:

private Set<Set<T>> unMapIndex(Set<Set<Integer>> sets) {
    Set<Set<T>> ret = new HashSet<>();
    for (Set<Integer> s : sets) {
        HashSet<T> subset = new HashSet<>();
        for (Integer i : s) {
            subset.add(reverseMap.get(i));
        }
        ret.add(subset);
    }
    return ret;
}

5.3. Binary Representation

Or, we can represent each subset using binary. If an element of the actual set exists in this subset its respective value is 1; otherwise it is 0.

For our fruit example, the power set would be:

{
    [0,0,0] -> {}
    [1,0,0] -> {"APPLE"}
    [0,1,0] -> {"ORANGE"}
    [1,1,0] -> {"APPLE", "ORANGE"}
    [0,0,1] -> {"MANGO"}
    [1,0,1] -> {"APPLE", "MANGO"}
    [0,1,1] -> {"ORANGE", "MANGO"}
    [1,1,1] -> {"APPLE", "ORANGE", "MANGO"}
}

So, we can retrieve the respective set from a binary subset with the given mapping:

private Set<Set<T>> unMapBinary(Collection<List<Boolean>> sets) {
    Set<Set<T>> ret = new HashSet<>();
    for (List<Boolean> s : sets) {
        HashSet<T> subset = new HashSet<>();
        for (int i = 0; i < s.size(); i++) {
            if (s.get(i)) {
                subset.add(reverseMap.get(i));
            }
        }
        ret.add(subset);
    }
    return ret;
}

5.4. Recursive Algorithm Implementation

In this step, we'll try to implement the previous code using both data structures.

Before calling one of these functions, we need to call the initializeMap method to get the ordered list. Also, after creating our data structure, we need to call the respective unMap function to retrieve the actual objects:

public Set<Set<T>> recursivePowerSetIndexRepresentation(Collection<T> set) {
    initializeMap(set);
    Set<Set<Integer>> powerSetIndices = recursivePowerSetIndexRepresentation(0, set.size());
    return unMapIndex(powerSetIndices);
}

So, let's try our hand at the index representation:

private Set<Set<Integer>> recursivePowerSetIndexRepresentation(int idx, int n) {
    if (idx == n) {
        Set<Set<Integer>> empty = new HashSet<>();
        empty.add(new HashSet<>());
        return empty;
    }
    Set<Set<Integer>> powerSetSubset = recursivePowerSetIndexRepresentation(idx + 1, n);
    Set<Set<Integer>> powerSet = new HashSet<>(powerSetSubset);
    for (Set<Integer> s : powerSetSubset) {
        HashSet<Integer> subSetIdxInclusive = new HashSet<>(s);
        subSetIdxInclusive.add(idx);
        powerSet.add(subSetIdxInclusive);
    }
    return powerSet;
}

Now, let's see the binary approach:

private Set<List<Boolean>> recursivePowerSetBinaryRepresentation(int idx, int n) {
    if (idx == n) {
        Set<List<Boolean>> powerSetOfEmptySet = new HashSet<>();
        powerSetOfEmptySet.add(Arrays.asList(new Boolean[n]));
        return powerSetOfEmptySet;
    }
    Set<List<Boolean>> powerSetSubset = recursivePowerSetBinaryRepresentation(idx + 1, n);
    Set<List<Boolean>> powerSet = new HashSet<>();
    for (List<Boolean> s : powerSetSubset) {
        List<Boolean> subSetIdxExclusive = new ArrayList<>(s);
        subSetIdxExclusive.set(idx, false);
        powerSet.add(subSetIdxExclusive);
        List<Boolean> subSetIdxInclusive = new ArrayList<>(s);
        subSetIdxInclusive.set(idx, true);
        powerSet.add(subSetIdxInclusive);
    }
    return powerSet;
}

5.5. Iterate through [0, 2n)

Now, there is a nice optimization we can do with the binary representation. If we look at it, we can see that each row is equivalent to the binary format of a number in [0, 2n).

So, if we iterate through numbers from 0 to 2n, we can convert that index to binary, and use it to create a boolean representation of each subset:

private List<List<Boolean>> iterativePowerSetByLoopOverNumbers(int n) {
    List<List<Boolean>> powerSet = new ArrayList<>();
    for (int i = 0; i < (1 << n); i++) {
        List<Boolean> subset = new ArrayList<>(n);
        for (int j = 0; j < n; j++)
            subset.add(((1 << j) & i) > 0);
        powerSet.add(subset);
    }
    return powerSet;
}

5.6. Minimal Change Subsets by Gray Code

Now, if we define any bijective function from binary representation of length n to a number in [0, 2n), we can generate subsets in any order that we want.

Gray Code is a well-known function that is used to generate binary representations of numbers so that the binary representation of consecutive numbers differ by only one bit (even the difference of the last and first numbers is one).

We can thus optimize this just a bit further:

private List<List<Boolean>> iterativePowerSetByLoopOverNumbersWithGrayCodeOrder(int n) {
    List<List<Boolean>> powerSet = new ArrayList<>();
    for (int i = 0; i < (1 << n); i++) {
        List<Boolean> subset = new ArrayList<>(n);
        for (int j = 0; j < n; j++) {
            int grayEquivalent = i ^ (i >> 1);
            subset.add(((1 << j) & grayEquivalent) > 0);
        }
        powerSet.add(subset);
    }
    return powerSet;
}

6. Lazy Loading

To minimize the space usage of power set, which is O(2n), we can utilize the Iterator interface to fetch every subset, and also every element in each subset lazily.

6.1. ListIterator

First, to be able to iterate from 0 to 2n, we should have a special Iterator that loops over this range but not consuming the whole range beforehand.

To solve this problem, we'll use two variables; one for the size, which is 2n, and another for the current subset index. Our hasNext() function will check that position is less than size:

abstract class ListIterator<K> implements Iterator<K> {
    protected int position = 0;
    private int size;
    public ListIterator(int size) {
        this.size = size;
    }
    @Override
    public boolean hasNext() {
        return position < size;
    }
}

And our next() function returns the subset for the current position and increases the value of position by one:

@Override
public Set<E> next() {
    return new Subset<>(map, reverseMap, position++);
}

6.2. Subset

To have a lazy load Subset, we define a class that extends AbstractSet, and we override some of its functions.

By looping over all bits that are 1 in the receiving mask (or position) of the Subset, we can implement the Iterator and other methods in AbstractSet.

For example, the size() is the number of 1s in the receiving mask:

@Override
public int size() { 
    return Integer.bitCount(mask);
}

And the contains() function is just whether the respective bit in the mask is 1 or not:

@Override
public boolean contains(@Nullable Object o) {
    Integer index = map.get(o);
    return index != null && (mask & (1 << index)) != 0;
}

We use another variable – remainingSetBits – to modify it whenever we retrieve its respective element in the subset we change that bit to 0. Then, the hasNext() checks if remainingSetBits is not zero (that is, it has at least one bit with a value of 1):

@Override
public boolean hasNext() {
    return remainingSetBits != 0;
}

And the next() function uses the right-most 1 in the remainingSetBits, then converts it to 0, and also returns the respective element:

@Override
public E next() {
    int index = Integer.numberOfTrailingZeros(remainingSetBits);
    if (index == 32) {
        throw new NoSuchElementException();
    }
    remainingSetBits &= ~(1 << index);
    return reverseMap.get(index);
}

6.3. PowerSet

To have a lazy-load PowerSet class, we need a class that extends AbstractSet<Set<T>>.

The size() function is simply 2 to the power of the set's size:

@Override
public int size() {
    return (1 << this.set.size());
}

As the power set will contain all possible subsets of the input set, so contains(Object o) function checks if all elements of the object o are existing in the reverseMap (or in the input set):

@Override
public boolean contains(@Nullable Object obj) {
    if (obj instanceof Set) {
        Set<?> set = (Set<?>) obj;
        return reverseMap.containsAll(set);
    }
    return false;
}

To check equality of a given Object with this class, we can only check if the input set is equal to the given Object:

@Override
public boolean equals(@Nullable Object obj) {
    if (obj instanceof PowerSet) {
        PowerSet<?> that = (PowerSet<?>) obj;
        return set.equals(that.set);
    }
    return super.equals(obj);
}

The iterator() function returns an instance of ListIterator that we defined already:

@Override
public Iterator<Set<E>> iterator() {
    return new ListIterator<Set<E>>(this.size()) {
        @Override
        public Set<E> next() {
            return new Subset<>(map, reverseMap, position++);
        }
    };
}

The Guava library uses this lazy-load idea and these PowerSet and Subset are the equivalent implementations of the Guava library.

For more information, check their source code and documentation.

Furthermore, if we want to do parallel operation over subsets in PowerSet, we can call Subset for different values in a ThreadPool.

7. Summary

To sum up, first, we studied what is a power set. Then, we generated it by using the Guava Library. After that, we studied the approach and how we should implement it, and also how to write a unit test for it.

Finally, we utilized the Iterator interface to optimize the space of generation of subsets and also their internal elements.

As always the source code is available over on GitHub.

Looking for Java Developer to Help with Brainstorming Topics for the Site (Remote) (Part Time)

$
0
0

Who?

I'm looking for an experienced Java developer, optionally with knowledge of the Spring ecosystem – to help us brainstorm new topics for the site.

The Work

The process of brainstorming new topics is, at the core, a simple one – finding areas of the Java ecosystem to explain and explore here on the site (full example below).

But, there is still quite a bit of complexity in the details of finding good topics for Baeldung.

You'll naturally get access to our internal topic research documentation and video library – so you can hit the ground running.

An Example

Let's say we need to write about JSON processing in Java, with Jackson.

Here are a few potential topics that would make sense in this area:

  • The Basic Jackson Annotations
  • How to Ignore a Field with Jackson
  • How to Solve an Infinite Recursion Issue with Jackson
  • Dealing with Null in Jackson
  • etc

The Eval

If you apply, the evaluation process for the job will also be very simple – we're going to go with a time-boxed, 5-hour topic push.

You're going to be spending an hour or so watching the documentation videos and the rest finding some actual topics.

Of course, the process is paid normally.

The Admin Details

Type of Engagement: Fully Remote

Time: 6-10 Hours / Week

Systems we use: JIRA, Slack, GitHub, Email

Budget: 20$ – 25$ / hour

Apply

You can apply with a quick message here.

Best of luck,

Eugen.

Viewing all 3692 articles
Browse latest View live


<script src="https://jsc.adskeeper.com/r/s/rssing.com.1596347.js" async> </script>