Quantcast
Channel: Baeldung
Viewing all 3692 articles
Browse latest View live

Wrapping vs Rethrowing Exceptions in Java

$
0
0

1. Overview

The throw keyword in Java is used to explicitly throw either a custom-made exception or in-built exception. But sometimes in the catch block, we need to throw the same exception again. This leads to re-throwing an exception.

In this tutorial, we'll discuss the two most common ways of re-throwing the exception.

2. Re-throwing Exceptions

Sometimes before propagating the exception to the higher level, we might want to perform some activities. For example, we might want to rollback the DB transaction, log the exception, or send an email.

We can perform such activities in the catch block and re-throw the exception again. In this way, a higher level gets notified that the exception has occurred in the system.

Let’s understand our case with an example.

Below, we're re-throwing the same exception. And, we're logging an error message just before throwing it:

String name = null;

try {
    return name.equals("Joe"); // causes NullPointerException
} catch (Exception e) {
    // log
    throw e;
}

The console will show the following message:

Exception in thread "main" java.lang.NullPointerException
  at com.baeldung.exceptions.RethrowSameExceptionDemo.main(RethrowSameExceptionDemo.java:16)

As we can see, our code just rethrows any exception it catches. Because of this, we get the original stack trace without any changes.

3. Wrapping Exceptions

Now, let's take a look at a different approach.

In this case, we'll pass the same exception as a reference in the constructor of a different exception:

String name = null;

try {
    return name.equals("Joe"); // causes NullPointerException
} catch (Exception e) {
    // log
    throw new IllegalArgumentException(e);
}

The console will display:

Exception in thread "main" java.lang.IllegalArgumentException: java.lang.NullPointerException
  at com.baeldung.exceptions.RethrowDifferentExceptionDemo.main(RethrowDifferentExceptionDemo.java:24)
Caused by: java.lang.NullPointerException
  at com.baeldung.exceptions.RethrowDifferentExceptionDemo.main(RethrowDifferentExceptionDemo.java:18)

This time, we see the original exception as well as the wrapping one. In this way, our IllegalArgumentException instance wraps the original NullPointerException as a cause. Hence we can show the more specific exception instead of showing the generic one.

4. Conclusion

In this short article, we presented the main difference between re-throwing the original exception vs first wrapping it. Both ways differ from each other in the way they show the exception message.

Based on our requirement, we can either re-throw the same exception or wrap it with some specific exception by using the second approach. The second approach looks cleaner and easy to backtrack the exception.

As always the project is available over on GitHub.


Guide to the AuthenticationManagerResolver in Spring Security

$
0
0

1. Introduction

In this tutorial, we introduce AuthenticationManagerResolver and then show how to use it for Basic and OAuth2 authentication flows.

2. What is the AuthenticationManager?

Simply put, the AuthenticationManager is the main strategy interface for authentication.

If the principal of the input authentication is valid and verified, AuthenticationManager#authenticate returns an Authentication instance with the authenticated flag set to true. Otherwise, if the principal is not valid, it will throw an AuthenticationException. For the last case, it returns null if it can't decide.

ProviderManager is the default implementation of AuthenticationManager. It delegates the authentication process to a list of AuthenticationProvider instances.

We can set up global or local AuthenticationManager if we extend WebSecurityConfigurerAdapter. For a local AuthenticationManager, we could override configure(AuthenticationManagerBuilder).

AuthenticationManagerBuilder is a helper class that eases the set up of UserDetailService, AuthenticationProvider, and other dependencies to build an AuthenticationManager.

For a global AuthenticationManager, we should define an AuthenticationManager as a bean.

3. Why the AuthenticationManagerResolver?

AuthenticationManagerResolver lets Spring select an AuthenticationManager per context. It's a new feature added to Spring Security in version 5.2.0:

public interface AuthenticationManagerResolver<C> {
    AuthenticationManager resolve(C context);
}

AuthenticationManagerResolver#resolve can return an instance of AuthenticationManager based on a generic context. In other words, we can set a class as the context if we want to resolve the AuthenticationManager according to it.

Spring Security has integrated the AuthenticationManagerResolver in the authentication flow with HttpServletRequest and ServerHttpRequest as the context.

4. Usage Scenario

Let's see how to use AuthenticationManagerResolver in practice.

For example, assume a system that has two groups of users: employees and customers. These two groups have specific authentication logic and have separate datastores. Moreover, users in either of these groups are only allowed to call their related URLs.

5. How Does AuthenticationManagerResolver Work?

We can use AuthenticationManagerResolver wherever we need to choose an AuthenticationManager dynamically, but in this tutorial, we're interested in using it in built-in authentication flows.

First, let's set up an AuthenticationManagerResolver, then use it for Basic and OAuth2 authentications.

5.1. Setting Up AuthenticationManagerResolver

Let's start by creating a class for security configuration. We should extend WebSecurityConfigurerAdapter:

@Configuration
public class CustomWebSecurityConfigurer extends WebSecurityConfigurerAdapter {
    // ...
}

Then, let's add a method that returns the AuthenticationManager for customers:

AuthenticationManager customersAuthenticationManager() {
    return authentication -> {
        if (isCustomer(authentication)) {
            return new UsernamePasswordAuthenticationToken(/*credentials*/);
        }
        throw new UsernameNotFoundException(/*principal name*/);
    };
}

The AuthenticationManager for employees is logically the same, only we replace isCustomer with isEmployee:

public AuthenticationManager employeesAuthenticationManager() {
    return authentication -> {
        if (isEmployee(authentication)) {
            return new UsernamePasswordAuthenticationToken(/*credentials*/);
        }
        throw new UsernameNotFoundException(/*principal name*/);
    };
}

Finally, let's add an AuthenticationManagerResolver that resolves according to the URL of request:

AuthenticationManagerResolver<HttpServletRequest> resolver() {
    return request -> {
        if (request.getPathInfo().startsWith("/employee")) {
            return employeesAuthenticationManager();
        }
        return customersAuthenticationManager();
    };
}

5.2. For Basic Authentication

We can use AuthenticationFilter to dynamically resolve the AuthenticationManager per request. AuthenticationFilter was added to Spring Security in version 5.2.

If we add it to our security filter chain, then for every matched request, it first checks if it can extract any authentication object or not. If yes, then it asks the AuthenticationManagerResolver for a suitable AuthenticationManager and continues the flow.

First, let's add a method in our CustomWebSecurityConfigurer to create an AuthenticationFilter:

private AuthenticationFilter authenticationFilter() {
    AuthenticationFilter filter = new AuthenticationFilter(
      resolver(), authenticationConverter());
    filter.setSuccessHandler((request, response, auth) -> {});
    return filter;
}

The reason for setting the AuthenticationFilter#successHandler with a no-op SuccessHandler is to prevent the default behavior of redirection after successful authentication.

Then, we can add this filter to our security filter chain by overriding WebSecurityConfigurerAdapter#configure(HttpSecurity) in our CustomWebSecurityConfigurer:

@Override
protected void configure(HttpSecurity http) throws Exception {
    http.addFilterBefore(
      authenticationFilter(),
      BasicAuthenticationFilter.class);
}

5.3. For OAuth2 Authentication

BearerTokenAuthenticationFilter is responsible for OAuth2 authentication. The BearerTokenAuthenticationFilter#doFilterInternal method checks for a BearerTokenAuthenticationToken in the request, and if it's available, then it resolves the appropriate AuthenticationManager to authenticate the token.

OAuth2ResourceServerConfigurer is used to set up BearerTokenAuthenticationFilter.

So, we can set up AuthenticationManagerResolver for our resource server in our CustomWebSecurityConfigurer by overriding WebSecurityConfigurerAdapter#configure(HttpSecurity):

@Override
protected void configure(HttpSecurity http) throws Exception {
    http
      .oauth2ResourceServer()
      .authenticationManagerResolver(resolver());
}

6. Resolve AuthenticationManager in Reactive Applications

For a reactive web application, we still can benefit from the concept of resolving AuthenticationManager according to the context. But here we have ReactiveAuthenticationManagerResolver instead:

@FunctionalInterface
public interface ReactiveAuthenticationManagerResolver<C> {
    Mono<ReactiveAuthenticationManager> resolve(C context);
}

It returns a Mono of ReactiveAuthenticationManager. ReactiveAuthenticationManager is the reactive equivalent to AuthenticationManager, hence its authenticate method returns Mono.

6.1. Setting Up ReactiveAuthenticationManagerResolver

Let's start by creating a class for security configuration:

@EnableWebFluxSecurity
@EnableReactiveMethodSecurity
public class CustomWebSecurityConfig {
    // ...
}

Next, let's define ReactiveAuthenticationManager for customers in this class:

ReactiveAuthenticationManager customersAuthenticationManager() {
    return authentication -> customer(authentication)
      .switchIfEmpty(Mono.error(new UsernameNotFoundException(/*principal name*/)))
      .map(b -> new UsernamePasswordAuthenticationToken(/*credentials*/));
}

And after that, we'll define ReactiveAuthenticationManager for employees:

public ReactiveAuthenticationManager employeesAuthenticationManager() {
    return authentication -> employee(authentication)
      .switchIfEmpty(Mono.error(new UsernameNotFoundException(/*principal name*/)))
      .map(b -> new UsernamePasswordAuthenticationToken(/*credentials*/));
}

Lastly, we set up a ReactiveAuthenticationManagerResolver based on our scenario:

ReactiveAuthenticationManagerResolver<ServerHttpRequest> resolver() {
    return request -> {
        if (match(request, "/employee")) {
            return Mono.just(employeesAuthenticationManager());
        }
        return Mono.just(customersAuthenticationManager());
    };
}

6.2. For Basic Authentication

In a reactive web application, we can use AuthenticationWebFilter for authentication. It authenticates the request and fills the security context.

AuthenticationWebFilter first checks if the request matches. After that, if there's an authentication object in the request, it gets the suitable ReactiveAuthenticationManager for the request from ReactiveAuthenticationManagerResolver and continues the authentication flow.

Hence, we can set up our customized AuthenticationWebFilter in our security configuration:

@Bean
public SecurityWebFilterChain securityWebFilterChain(ServerHttpSecurity http) {
    return http
      .authorizeExchange()
      .pathMatchers("/**")
      .authenticated()
      .and()
      .httpBasic()
      .disable()
      .addFilterAfter(
        new AuthenticationWebFilter(resolver()), 
        SecurityWebFiltersOrder.REACTOR_CONTEXT
      )
      .build();
}

First, we disable ServerHttpSecurity#httpBasic to prevent the normal authentication flow, then manually replace it with an AuthenticationWebFilter, passing in our custom resolver.

6.3. For OAuth2 Authentication

We can configure the ReactiveAuthenticationManagerResolver with ServerHttpSecurity#oauth2ResourceServer. ServerHttpSecurity#build adds an instance of AuthenticationWebFilter with our resolver to the chain of security filters.

So, let's set our AuthenticationManagerResolver for OAuth2 authentication filter in our security configuration:

@Bean
public SecurityWebFilterChain securityWebFilterChain(ServerHttpSecurity http) {
    return http
      // ...
      .and()
      .oauth2ResourceServer()
      .authenticationManagerResolver(resolver())
      .and()
      // ...;
}

7. Conclusion

In this article, we've used AuthenticationManagerResolver for Basic and OAuth2 authentications within a simple scenario.

And, we've also explored the usage of ReactiveAuthenticationManagerResolver in reactive Spring web applications for both Basic and OAuth2 authentications.

As always, the source code is available over on GitHub. Our reactive example is also available over on GitHub.

AWS S3 with Java – Reactive Support

$
0
0

1. Introduction

AWS offers many services through its many APIs which we can access from Java using their official SDK. Until recently though, this SDK didn’t offer support for reactive operations and had only limited support for asynchronous access.

With the release of the AWS SDK for Java 2.0, we can now use those APIs in fully non-blocking I/O mode, thanks to its adopting the Reactive Streams standard.

In this tutorial, we’ll explore those new features by implementing a simple blob store REST API in Spring Boot that uses the well-known S3 service as its storage backend.

2. Overview of AWS S3 Operations

Before diving into the implementation, let’s do a quick overview of what we want to achieve here. A typical blob store service exposes CRUD operations that a front-end application consumes to allow an end-user to upload, list, download and delete several types of content, such as audio, pictures, and documents.

A common issue that traditional implementations must deal with is how to efficiently handle large files or slow connections. In early versions (pre-servlet 3.0), all the JavaEE spec had to offer was a blocking API, so we needed a thread for each concurrent blob store client. This model has the drawback that requires more server resources (ergo, bigger machines) and turns them more vulnerable to DoS-type attacks:

By using a reactive stack, we can make our service much less resource-intensive for the same number of clients. The reactor implementation uses a small number of threads that are dispatched in response to I/O completion events, such as the availability of new data to read or the completion of a previous write.

This means that the same thread keeps going on handling those events – which can originate from any of the active client connections – until there is no more available work to do. This approach greatly reduces the number of context switches – a quite expensive operation – and allows for very efficient use of the available resources:

3. Project Setup

Our demo project is a standard Spring Boot WebFlux application which includes the usual support dependencies, such as Lombok and JUnit.

In addition to those libraries, we need to bring in the AWS SDK for Java V2 dependencies:

<dependencyManagement>
    <dependencies>
        <dependency>
            <groupId>software.amazon.awssdk</groupId>
            <artifactId>bom</artifactId>
            <version>2.10.1</version>
            <type>pom</type>
            <scope>import</scope>
        </dependency>
    </dependencies>
</dependencyManagement>

<dependencies>
    <dependency>
        <groupId>software.amazon.awssdk</groupId>
        <artifactId>s3</artifactId>
        <scope>compile</scope>
    </dependency>

    <dependency>
        <artifactId>netty-nio-client</artifactId>
        <groupId>software.amazon.awssdk</groupId>
        <scope>compile</scope>
    </dependency>
</dependencies>

The AWS SDK provides a BOM defining the required versions for all dependencies, so we don't need to specify them in the dependencies section of our POM file.

We've added the S3 client library, which will bring along other core dependencies from the SDK. We also need the Netty client library, required since we'll be using asynchronous APIs to interact with AWS.

The official AWS documentation contains more details on the available transports.

4. AWS S3 Client Creation

The entry point for S3 operations is the S3AsyncClient class, which we'll use to start new API calls.

As we only need a single instance of this class, let's create a @Configuration class with a @Bean method that builds it, so we can inject it wherever we need it:

@Configuration
@EnableConfigurationProperties(S3ClientConfigurarionProperties.class)
public class S3ClientConfiguration {
    @Bean
    public S3AsyncClient s3client(S3ClientConfigurarionProperties s3props, 
      AwsCredentialsProvider credentialsProvider) {
        SdkAsyncHttpClient httpClient = NettyNioAsyncHttpClient.builder()
          .writeTimeout(Duration.ZERO)
          .maxConcurrency(64)
          .build();
        S3Configuration serviceConfiguration = S3Configuration.builder()
          .checksumValidationEnabled(false)
          .chunkedEncodingEnabled(true)
          .build();
        S3AsyncClientBuilder b = S3AsyncClient.builder().httpClient(httpClient)
          .region(s3props.getRegion())
          .credentialsProvider(credentialsProvider)
          .serviceConfiguration(serviceConfiguration);

        if (s3props.getEndpoint() != null) {
            b = b.endpointOverride(s3props.getEndpoint());
        }
        return b.build();
    }
}

For this demo, we're using a minimal @ConfigurationProperties class (available at our repository) that holds the following pieces of information required to access S3 services:

  • region: A valid AWS region identifier, such as us-east-1
  • accessKeyId/secretAccessKey: Our AWS API key and identifier
  • endpoint: An optional URI that we can use to override S3's default service endpoint. The main use case is to use the demo code with alternative storage solutions that offer an S3-compatible API (minio and localstack are examples)
  • bucket: Name of the bucket where we'll store uploaded files

There are a few points worth mentioning about the client's initialization code. First, we're disabling write timeouts and increasing the maximum concurrency, so uploads can complete even under low-bandwidth situations.

Second, we're disabling checksum validation and enabling chunked encoding. We're doing this because we want to start uploading data to the bucket as soon as the data arrives at our service in a streaming fashion.

Finally, we're not addressing the bucket creation itself, as we're assuming it's been already created and configured by an administrator.

As for the credentials, we supply a customized AwsCredentialsProvider that can recover the credentials from Spring properties. This opens the possibility to inject those values through Spring's Environment abstraction and all its supported PropertySource implementations, such as Vault or Config Server:

@Bean
public AwsCredentialsProvider awsCredentialsProvider(S3ClientConfigurarionProperties s3props) {
    if (StringUtils.isBlank(s3props.getAccessKeyId())) {
        return DefaultCredentialsProvider.create();
    } else {
        return () -> {
            return AwsBasicCredentials.create(
              s3props.getAccessKeyId(),
              s3props.getSecretAccessKey());
        };
    }
}

5. Upload Service Overview

We'll now implement an upload service, which we'll be reachable at the /inbox path.

A POST to this resource path will store the file at our S3 bucket under a randomly generated key. We'll store the original filename as a metadata key, so we can use it to generate the appropriate HTTP download headers for browsers.

We need to handle two distinct scenarios: simple and multi-part uploads. Let's go ahead and create a @RestController and add methods to handle those scenarios:

@RestController
@RequestMapping("/inbox")
@Slf4j
public class UploadResource {
    private final S3AsyncClient s3client;
    private final S3ClientConfigurarionProperties s3config;

    public UploadResource(S3AsyncClient s3client, S3ClientConfigurarionProperties s3config) {
        this.s3client = s3client;
        this.s3config = s3config;        
    }
    
    @PostMapping
    public Mono<ResponseEntity<UploadResult>> uploadHandler(
      @RequestHeader HttpHeaders headers, 
      @RequestBody Flux<ByteBuffer> body) {
      // ... see section 6
    }

    @RequestMapping(
      consumes = MediaType.MULTIPART_FORM_DATA_VALUE,
      method = {RequestMethod.POST, RequestMethod.PUT})
    public Mono<ResponseEntity<UploadResult>> multipartUploadHandler(
      @RequestHeader HttpHeaders headers,
      @RequestBody Flux<Part> parts ) {
      // ... see section 7
    }
}

Handler signatures reflect the main difference between both cases: In the simple case, the body contains the file content itself, whereas in the multipart case it can have multiple “parts”, each corresponding to a file or form data.

As a convenience, we'll support multipart uploads using POST or PUT methods. The reason for this is that some tools (cURL, notably) use the latter by default when uploading files with the -F option.

In both cases, we'll return an UploadResult containing the result of the operation and the generated file keys that a client should use to recover the original files – more on this later!

6. Single File Upload

In this case, clients send content in a simple POST operation with the request body containing raw data. To receive this content in a Reactive Web application, all we have to do is to declare a @PostMapping method that takes a Flux<ByteBuffer> argument.

Streaming this flux to a new S3 file is straightforward in this case.

All we need is to build a PutObjectRequest with a generated key, file length, MIME content-type and pass it to the putObject() method in our S3 client:

@PostMapping
public Mono<ResponseEntity<UploadResult>> uploadHandler(@RequestHeader HttpHeaders headers,
  @RequestBody Flux<ByteBuffer> body) {
    // ... some validation code omitted
    String fileKey = UUID.randomUUID().toString();
    MediaType mediaType = headers.getContentType();

    if (mediaType == null) {
        mediaType = MediaType.APPLICATION_OCTET_STREAM;
    }
    CompletableFuture future = s3client
      .putObject(PutObjectRequest.builder()
        .bucket(s3config.getBucket())
        .contentLength(length)
        .key(fileKey.toString())
        .contentType(mediaType.toString())
        .metadata(metadata)
        .build(), 
      AsyncRequestBody.fromPublisher(body));

    return Mono.fromFuture(future)
      .map((response) -> {
        checkResult(response);
        return ResponseEntity
          .status(HttpStatus.CREATED)
          .body(new UploadResult(HttpStatus.CREATED, new String[] {fileKey}));
        });
}

The key point here is how we're passing the incoming Flux to the putObject()  method.

This method expects an AsyncRequestBody object that provides content on demand. Basically, it's a regular Publisher with some extra convenience methods. In our case, we'll take benefit from the fromPublisher() method to convert our Flux into the required type.

Also, we assume that the client will send the Content-Length HTTP header with the correct value. Without this information, the call will fail since this is a required field.

Asynchronous methods in the SDK V2 always return a CompletableFuture object. We take it and adapt it to a Mono using its fromFuture() factory method. This gets mapped to the final UploadResult object.

7. Uploading Multiple Files

Handling a multipart/form-data upload may seem easy, especially when using libraries that handle all details for us. So, can we simply use the previous method for each uploaded file? Well, yes, but this comes with a price: Buffering.

To use the previous method, we need the part's length, but chunked file transfers do not always include this information. One approach is to store the part in a temporary file and then send it to AWS, but this will slow down the total upload time. It also means extra storage for our servers.

As an alternative, here we'll use an AWS multipart upload. This feature allows the upload of a single file to be split in multiple chunks that we can send in parallel and out of order.

The steps are as follows, we need to send:

  • the createMultipartUpload request – AWS responds with an uploadId that we'll use in the next calls
  • file chunks containing the uploadId, sequence number and content – AWS responds with an ETag identifier for each part
  • completeUpload request containing the uploadId and all ETags received

Please note: We'll repeat those steps for each received FilePart!

7.1. Top-Level Pipeline

The multipartUploadHandler in our @Controller class is responsible for handling, not surprisingly, multipart file uploads. In this context, each part can have any kind of data, identified by its MIME-type. The Reactive Web framework delivers those parts to our handler as a Flux of objects that implement the Part interface, which we'll process in turn:

return parts
  .ofType(FilePart.class)
  .flatMap((part)-> saveFile(headers, part))
  .collect(Collectors.toList())
  .map((keys)-> new UploadResult(HttpStatus.CREATED, keys)));

This pipeline starts by filtering parts that correspond to an actual uploaded file, which will always be an object that implements the FilePart interface. Each part is then passed to the saveFile method, which handles the actual upload for a single file and returns the generated file key.

We collect all keys in a List and, finally, build the final UploadResult. We're always creating a new resource, so we'll return a more descriptive CREATED status (202) instead of a regular OK.

7.2. Handling a Single File Upload

We've already outlined the steps required to upload a file using AWS's multipart method. There's a catch, though: The S3 service requires that each part, except the last one, must have a given minimum size – 5 MBytes, currently.

This means that we can't just take the received chunks and send them right away. Instead, we need to buffer them locally until we reach the minimum size or end of data. Since we also need a place to track how many parts we've sent and the resulting CompletedPart results, we'll create a simple UploadState inner class to hold this state:

class UploadState {
    String bucket;
    String filekey;
    String uploadId;
    int partCounter;
    Map<Integer, CompletedPart> completedParts = new HashMap<>();
    int buffered = 0;
    // ... getters/setters omitted
    UploadState(String bucket, String filekey) {
        this.bucket = bucket;
        this.filekey = filekey;
    }
}

Given the required steps and buffering, we end up with implementation may look a bit intimidating at first glance:

Mono<String> saveFile(HttpHeaders headers,String bucket, FilePart part) {
    String filekey = UUID.randomUUID().toString();
    Map<String, String> metadata = new HashMap<String, String>();
    String filename = part.filename();
    if ( filename == null ) {
        filename = filekey;
    }       
    metadata.put("filename", filename);    
    MediaType mt = part.headers().getContentType();
    if ( mt == null ) {
        mt = MediaType.APPLICATION_OCTET_STREAM;
    }
    UploadState uploadState = new UploadState(bucket,filekey);     
    CompletableFuture<CreateMultipartUploadResponse> uploadRequest = s3client
      .createMultipartUpload(CreateMultipartUploadRequest.builder()
        .contentType(mt.toString())
        .key(filekey)
        .metadata(metadata)
        .bucket(bucket)
        .build());

    return Mono
      .fromFuture(uploadRequest)
      .flatMapMany((response) -> {
          checkResult(response);              
          uploadState.uploadId = response.uploadId();
          return part.content();
      })
      .bufferUntil((buffer) -> {
          uploadState.buffered += buffer.readableByteCount();
          if ( uploadState.buffered >= s3config.getMultipartMinPartSize() ) {
              uploadState.buffered = 0;
              return true;
          } else {
              return false;
          }
      })
      .map((buffers) -> concatBuffers(buffers))
      .flatMap((buffer) -> uploadPart(uploadState,buffer))
      .reduce(uploadState,(state,completedPart) -> {
          state.completedParts.put(completedPart.partNumber(), completedPart);              
          return state;
      })
      .flatMap((state) -> completeUpload(state))
      .map((response) -> {
          checkResult(response);
          return  uploadState.filekey;
      });
}

We start by collecting some file metadata and using it to create a request object required by the createMultipartUpload() API call. This call returns a CompletableFuture, which is the starting point for our streaming pipeline.

Let's review what each step of this pipeline does:

  • After receiving the initial result, which contains the S3's generated uploadId, we save it in the upload state object and start streaming the file's body. Notice the use of flatMapMany here, which turns the Mono into a Flux
  • We use bufferUntil() to accumulate the required number of bytes. The pipeline at this point changes from a Flux of DataBuffer objects into a Flux of List<DataBuffer> objects
  • Convert each List<DataBuffer> to a ByteBuffer
  • Send the ByteBuffer to S3 (see next section) and return the resulting CompletedPart value downstream
  • Reduce the resulting CompletedPart values into the uploadState
  • Signals S3 that we've completed the upload (more on this later)
  • Return the generated file key

7.3. Uploading File Parts

Once again, let's make clear that a “file part” here means a piece of a single file (for example, the first 5MB of a 100MB file), not a part of a message that happens to be a file, as it is in the top-level stream!

The file upload pipeline calls the uploadPart() method with two arguments: the upload state and a ByteBuffer. From there, we build a UploadPartRequest instance and use the uploadPart() method available in our S3AsyncClient to send the data:

private Mono<CompletedPart> uploadPart(UploadState uploadState, ByteBuffer buffer) {
    final int partNumber = ++uploadState.partCounter;
    CompletableFuture<UploadPartResponse> request = s3client.uploadPart(UploadPartRequest.builder()
        .bucket(uploadState.bucket)
        .key(uploadState.filekey)
        .partNumber(partNumber)
        .uploadId(uploadState.uploadId)
        .contentLength((long) buffer.capacity())
        .build(), 
        AsyncRequestBody.fromPublisher(Mono.just(buffer)));
    
    return Mono
      .fromFuture(request)
      .map((uploadPartResult) -> {              
          checkResult(uploadPartResult);
          return CompletedPart.builder()
            .eTag(uploadPartResult.eTag())
            .partNumber(partNumber)
            .build();
      });
}

Here, we use the return value from the uploadPart() request to build a CompletedPart instance. This is an AWS SDK type that we'll need later when building the final request that closes the upload.

7.4. Completing the Upload

Last, but not least, we need to finish the multi-part file upload by sending a completeMultipartUpload() request to S3. This is quite easy given that the upload pipeline passes all the information we need as arguments:

private Mono<CompleteMultipartUploadResponse> completeUpload(UploadState state) {        
    CompletedMultipartUpload multipartUpload = CompletedMultipartUpload.builder()
        .parts(state.completedParts.values())
        .build();
    return Mono.fromFuture(s3client.completeMultipartUpload(CompleteMultipartUploadRequest.builder()
        .bucket(state.bucket)
        .uploadId(state.uploadId)
        .multipartUpload(multipartUpload)
        .key(state.filekey)
        .build()));
}

8. Downloading Files from AWS

Compared to multi-part uploads, downloading objects from an S3 bucket is a much simpler task. In this case, we don't have to worry about chunks or anything like that. The SDK API provides the getObject() method that takes two arguments:

  • A GetObjectRequest object containing the requested bucket and file key
  • An AsyncResponseTransformer, which allows us to map an incoming streaming response to something else

The SDK provides a couple of implementations of the latter that make it possible to adapt the stream to a Flux, but, again, at a cost: they buffer data internally in an array buffer. As this buffering results in poor response time for a client of our demo service, we'll implement our own adapter – which is not a big deal, as we'll see.

8.1. Download Controller

Our download controller is a standard Spring Reactive @RestController, with a single @GetMapping method that handles download requests. We expect the file key through a @PathVariable argument and we'll return an asynchronous ResponseEntity with the file's content:

@GetMapping(path="/{filekey}")
Mono<ResponseEntity<Flux<ByteBuffer>>> downloadFile(@PathVariable("filekey") String filekey) {    
    GetObjectRequest request = GetObjectRequest.builder()
      .bucket(s3config.getBucket())
      .key(filekey)
      .build();
    
    return Mono.fromFuture(s3client.getObject(request,new FluxResponseProvider()))
      .map(response -> {
        checkResult(response.sdkResponse);
        String filename = getMetadataItem(response.sdkResponse,"filename",filekey);            
        return ResponseEntity.ok()
          .header(HttpHeaders.CONTENT_TYPE, response.sdkResponse.contentType())
          .header(HttpHeaders.CONTENT_LENGTH, Long.toString(response.sdkResponse.contentLength()))
          .header(HttpHeaders.CONTENT_DISPOSITION, "attachment; filename=\"" + filename + "\"")
          .body(response.flux);
      });
}

Here, getMetadataItem() is just a helper method that looks up a given metadata key in the response in a case-insensitive way.

This is an important detail: S3 returns metadata information using special HTTP headers, but those headers are case insensitive (see RFC 7230, section 3.2). This means that implementations may change the case for a given item at will – and this actually happens when using MinIO.

8.2. FluxResponseProvider Implementation

Our FluxReponseProvider must implement the AsyncResponseTransformer interface, which has only four methods:

  • prepare(), where we can do any required setup
  • onResponse(), called when S3 returns response status and metadata
  • onStream() called when the response has a body, always after onResponse()
  • exceptionOccurred() called in the event of some error

This provider's job is to handle those events and create a FluxResponse instance, containing both the provided GetObjectResponse instance and the response body as a stream:

class FluxResponseProvider implements AsyncResponseTransformer<GetObjectResponse,FluxResponse> {    
    private FluxResponse response;
    @Override
    public CompletableFuture<FluxResponse> prepare() {
        response = new FluxResponse();
        return response.cf;
    }

    @Override
    public void onResponse(GetObjectResponse sdkResponse) {            
        this.response.sdkResponse = sdkResponse;
    }

    @Override
    public void onStream(SdkPublisher<ByteBuffer> publisher) {
        response.flux = Flux.from(publisher);
        response.cf.complete(response);            
    }

    @Override
    public void exceptionOccurred(Throwable error) {
        response.cf.completeExceptionally(error);
    }
}

Finally, let's take a quick look at the FluxResponse class:

class FluxResponse {
    final CompletableFuture<FluxResponse> cf = new CompletableFuture<>();
    GetObjectResponse sdkResponse;
    Flux<ByteBuffer> flux;
}

9. Conclusion

In this tutorial, we've covered the basics of using the reactive extensions available in the AWS SDK V2 library. Our focus here was the AWS S3 service, but we can extend the same techniques to other reactive-enabled services, such as DynamoDB.

As usual, all code is available over on GitHub.

A Quick Guide to Post Requests with OkHttp

$
0
0

1. Introduction

We cover the basics of the OkHttp client in our Guide to OkHttp.

In this short tutorial, we'll look specifically at different types of POST requests for version 3.x of the client.

2. Basic POST

We can use FormBody.Builder to build a basic  RequestBody to send two parameters – username and password – with a POST request:

@Test
public void whenSendPostRequest_thenCorrect() 
  throws IOException {
    RequestBody formBody = new FormBody.Builder()
      .add("username", "test")
      .add("password", "test")
      .build();

    Request request = new Request.Builder()
      .url(BASE_URL + "/users")
      .post(formBody)
      .build();

    Call call = client.newCall(request);
    Response response = call.execute();
    
    assertThat(response.code(), equalTo(200));
}

3. POST with Authorization

If we want to authenticate the request, we can use the Credentials.basic builder to add credentials to the header.

In this simple example, we'll also send a String as the body of the request:

@Test
public void whenSendPostRequestWithAuthorization_thenCorrect() 
  throws IOException {
    String postBody = "test post";
    
    Request request = new Request.Builder()
      .url(URL_SECURED_BY_BASIC_AUTHENTICATION)
      .addHeader("Authorization", Credentials.basic("username", "password"))
      .post(RequestBody.create(
        MediaType.parse("text/x-markdown), postBody))
      .build();

    Call call = client.newCall(request);
    Response response = call.execute();

    assertThat(response.code(), equalTo(200));
}

4. POST with JSON

In order to send JSON in the request body, we have to set its media type application/json. We can do that using the RequestBody.create builder:

@Test
public void whenPostJson_thenCorrect() throws IOException {
    String json = "{\"id\":1,\"name\":\"John\"}";

    RequestBody body = RequestBody.create(
      MediaType.parse("application/json"), json);

    Request request = new Request.Builder()
      .url(BASE_URL + "/users/detail")
      .post(body)
      .build();
 
    Call call = client.newCall(request);
    Response response = call.execute();

    assertThat(response.code(), equalTo(200));
}

5. Multipart POST Request

The last example we'll look at is a POST multipart request. We need to build our RequestBody as a MultipartBody to post a file, a username, and a password:

@Test
public void whenSendMultipartRequest_thenCorrect() 
  throws IOException {	
    RequestBody requestBody = new MultipartBody.Builder()
      .setType(MultipartBody.FORM)
      .addFormDataPart("username", "test")
      .addFormDataPart("password", "test")
      .addFormDataPart("file", "file.txt",
        RequestBody.create(MediaType.parse("application/octet-stream"), 
          new File("src/test/resources/test.txt")))
      .build();

    Request request = new Request.Builder()
      .url(BASE_URL + "/users/multipart")
      .post(requestBody)
      .build();

    Call call = client.newCall(request);
    Response response = call.execute();

    assertThat(response.code(), equalTo(200));
}

6. POST with Non-Default Character Encoding

OkHttp's default character encoding is UTF-8:

@Test
public void whenPostJsonWithoutCharset_thenCharsetIsUtf8() throws IOException {
    final String json = "{\"id\":1,\"name\":\"John\"}";

    final RequestBody body = RequestBody.create(
        MediaType.parse("application/json"), json);

    String charset = body.contentType().charset().displayName();

    assertThat(charset, equalTo("UTF-8"));
}

If we want to use a different character encoding, we can pass it as the second parameter of the MediaType.parse():

@Test
public void whenPostJsonWithUtf16Charset_thenCharsetIsUtf16() throws IOException {
    final String json = "{\"id\":1,\"name\":\"John\"}";

    final RequestBody body = RequestBody.create(
        MediaType.parse("application/json; charset=utf-16"), json);

    String charset = body.contentType().charset().displayName();

    assertThat(charset, equalTo("UTF-16"));
}

7. Conclusion

In this short article, we saw several examples of POST requests with the OkHttp client.

As usual, the code examples are available over on GitHub.

Java Weekly, Issue 312

$
0
0

1. Spring and Java

>> The Future of Spring Cloud's Hystrix Project [infoq.com]

A good overview of Resilience4j — the heir-apparent to Netflix Hystrix, which is in maintenance mode.

>> Flight of the Flux 3 – Hopping Threads and Schedulers [spring.io]

A quick look at how Reactor's Scheduler abstraction enables advanced control of threading.

>> The Best Way to Configure the Spring MVC Test Framework, Part One [petrikainulainen.net]

And a comparison of three methods for configuring Spring MVC tests.

Also worth reading:

Webinars and presentations:

Time to upgrade:

2. Technical

>> DBLog: A Generic Change-Data-Capture Framework [medium.com]

An early look at DBLog, scheduled to be open-sourced in 2020, for keeping heterogeneous datastores in sync.

>> A beginner’s guide to SQL Cross Join [vladmihalcea.com]

And an example of CROSS JOIN, the preferred way to generate a Cartesian product of two tables.

Also worth reading:

3. Musings

>> Coders in the Hands of a Missing God: How Newly Minted Freelancers Badly Miss the Point [daedtech.com]

Practical advice for individual contributors making the shift to freelance work.

Also worth reading:

4. Comics

And my favorite Dilberts of the week:

>> Dogbert's Tech Support [dilbert.com]

>> Robot Pronouns [dilbert.com]

>> Can't Work From Home [dilbert.com]

5. Pick of the Week

Finally, as we almost wrap up 2019, an internal pick this week:

>> The Baeldung YouTube Channel [youtube.com]

I don't release new videos super often, but the ones I do release are, hopefully, cool and helpful, so definitely subscribe if YouTube is your thing.

Guide to WebRTC

$
0
0

1. Overview

When two browsers need to communicate, they typically need a server in between to coordinate the communication, passing messages between them. But having a server in the middle results in a delay in communication between the browsers.

In this tutorial, we'll learn about WebRTC, an open-source project that enables browsers and mobile applications to communicate directly with each other in real-time. Then we'll see it in action by writing a simple application that creates a peer-to-peer connection to share data between two HTML clients.

We'll be using HTML, JavaScript, and the WebSocket library along with the built-in WebRTC support in the web browsers to build a client. And, we'll be building a Signaling server with Spring Boot, using WebSocket as the communication protocol. Finally, we'll see how to add video and audio streams to this connection.

2. Fundamentals and Concepts of WebRTC

Let's see how two browsers communicate in a typical scenario without WebRTC.

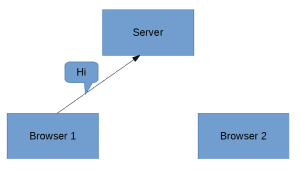
Suppose we have two browsers, and Browser 1 needs to send a message to Browser 2. Browser 1 first sends it to the Server:


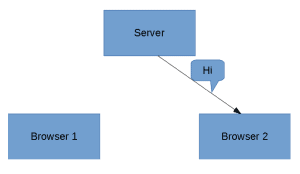
After the Server receives the message, it processes it, finds Browser 2, and sends it the message:


Since the server has to process the message before sending it to browser 2, communication takes place in near real-time. Of course, we'd like it to be at real-time.

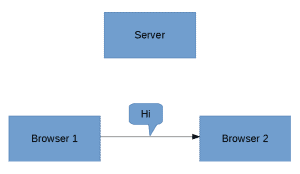
WebRTC solves this problem by creating a direct channel between the two browsers, eliminating the need for the server:


As a result, the time it takes to pass messages from one browser to another is reduced drastically as the messages now route directly from sender to receiver. It also takes away the heavy lifting and bandwidth incurred from the servers and causes it to be shared between the clients involved.

3. Support for WebRTC and Built-In Features

WebRTC is supported by major browsers like Chrome, Firefox, Opera, and Microsoft Edge, as well as platforms like Android and iOS.

WebRTC does not need any external plugins to be installed in our browser as the solution comes bundled out-of-the-box with the browser.

Furthermore, in a typical real-time application involving video and audio transmission, we have to depend heavily on C++ libraries, and we have to handle a lot of problems, including:

  • Packet-loss concealment
  • Echo cancellation
  • Bandwidth adaptivity
  • Dynamic jitter buffering
  • Automatic gain control
  • Noise reduction and suppression
  • Image “cleaning”

But WebRTC handles all these concerns under the hood, making it simpler to make real-time communications between clients.

4. Peer-to-Peer Connection

Unlike a client-server communication, where there's a known address for the server, and the client already knows the address of the server to communicate with, in a P2P (peer-to-peer) connection, none of the peers has a direct address to another peer.

To establish a peer-to-peer connection, there are few steps involved to allow clients to:

  • make themselves available for communication
  • identify each other and share network-related information
  • share and agree on the format of the data, mode, and protocols involved
  • share data

WebRTC defines a set of APIs and methodologies for performing these steps.

For the clients to discover each other, share the network details, and then share the format of the data, WebRTC uses a mechanism called signaling.

5. Signaling

Signaling refers to the processes involved in network discovery, creation of a session, managing the session, and exchanging the media-capability metadata.

This is essential as the clients need to know each other up front to initiate the communication.

To achieve all these, WebRTC does not specify a standard for signaling and leaves it to the developer’s implementation. So, this provides us the flexibility to use WebRTC on a range of devices with any technology and supporting protocol.

5.1. Building the Signaling Server

For the signaling server, we'll build a WebSocket server using Spring Boot. We can begin with an empty Spring Boot project generated from Spring Initializr.

To use WebSocket for our implementation, let's add the dependency to our pom.xml:

<dependency>
    <groupId>org.springframework.boot</groupId>
    <artifactId>spring-boot-starter-websocket</artifactId>
</dependency>

We can always find the latest version to use from Maven Central.

The implementation of the signaling server is simple — we'll create an endpoint that a client application can use to register as a WebSocket connection.

To do this in Spring Boot, let's write a @Configuration class that extends the WebSocketConfigurer and overrides the registerWebSocketHandlers method:

@Configuration
@EnableWebSocket
public class WebSocketConfiguration implements WebSocketConfigurer {

    @Override
    public void registerWebSocketHandlers(WebSocketHandlerRegistry registry) {
        registry.addHandler(new SocketHandler(), "/socket")
          .setAllowedOrigins("*");
    }
}

Note that we've identified /socket as the URL that we'll register from the client that we'll be building in the next step. We also passed in a SocketHandler as an argument to the addHandler method — this is actually the message handler that we'll create next.

5.2. Creating Message Handler in Signaling Server

The next step is to create a message handler to process the WebSocket messages that we'll receive from multiple clients.

This is essential to aid the exchange of metadata between the different clients to establish a direct WebRTC connection.

Here, to keep things simple, when we receive the message from a client, we will send it to all other clients except to itself.

To do this, we can extend TextWebSocketHandler from the Spring WebSocket library and override both the handleTextMessage and afterConnectionEstablished methods:

@Component
public class SocketHandler extends TextWebSocketHandler {

    List<WebSocketSession>sessions = new CopyOnWriteArrayList<>();

    @Override
    public void handleTextMessage(WebSocketSession session, TextMessage message)
      throws InterruptedException, IOException {
        for (WebSocketSession webSocketSession : sessions) {
            if (webSocketSession.isOpen() && !session.getId().equals(webSocketSession.getId())) {
                webSocketSession.sendMessage(message);
            }
        }
    }

    @Override
    public void afterConnectionEstablished(WebSocketSession session) throws Exception {
        sessions.add(session);
    }
}

As we can see in the afterConnectionEstablished method, we add the received session to a list of sessions so that we can keep track of all the clients.

And when we receive a message from any of the clients, as can be seen in the handleTextMessage, we iterate over all the client sessions in the list and send the message to all other clients except the sender by comparing the session id of the sender and the sessions in the list.

6. Exchanging Metadata

In a P2P connection, the clients can be very different from each other. For example, Chrome on Android can connect to Mozilla on a Mac.

Hence, the media capabilities of these devices can vary widely. Therefore, it's essential for a handshake between peers to agree upon the media types and codecs used for communication.

In this phase, WebRTC uses the SDP (Session Description Protocol) to agree on the metadata between the clients. 

To achieve this, the initiating peer creates an offer that must be set as a remote descriptor by the other peer. In addition, the other peer then generates an answer that is accepted as a remote descriptor by the initiating peer.

The connection is established when this process is complete.

7. Setting Up the Client

Let's create our WebRTC client such that it can act both as the initiating peer and the remote peer.

We'll begin by creating an HTML file called index.html and a JavaScript file named client.js which index.html will use.

To connect to our signaling server, we create a WebSocket connection to it. Assuming that the Spring Boot signaling server that we built is running on http://localhost:8080, we can create the connection:

var conn = new WebSocket('ws://localhost:8080/socket');

To send a message to the signaling server, we'll create a send method that will be used to pass the message in the upcoming steps:

function send(message) {
    conn.send(JSON.stringify(message));
}

8. Setting Up a Simple RTCDataChannel

After setting up the client in the client.js, we need to create an object for the RTCPeerConnection class. Here, we set up the object and enable the data channel by passing RtpDataChannels as true:

var peerConnection = new RTCPeerConnection(configuration, {
    optional : [ {
        RtpDataChannels : true
    } ]
});

In this example, the purpose of the configuration object is to pass in the STUN (Session Traversal Utilities for NAT) and TURN (Traversal Using Relays around NAT) servers and other configurations that we'll be discussing in the latter part of this tutorial. For this example, it's sufficient to pass in null.

Now, we can create a dataChannel to use for message passing:

var dataChannel = peerConnection.createDataChannel("dataChannel", { reliable: true });

Subsequently, we can create listeners for various events on the data channel:

dataChannel.onerror = function(error) {
    console.log("Error:", error);
};
dataChannel.onclose = function() {
    console.log("Data channel is closed");
};

9. Establishing a Connection with ICE

The next step in establishing a WebRTC connection involves the ICE (Interactive Connection Establishment) and SDP protocols, where the session descriptions of the peers are exchanged and accepted at both peers.

The signaling server is used to send this information between the peers. This involves a series of steps where the clients exchange connection metadata through the signaling server.

9.1. Creating an Offer

Firstly, we create an offer and set it as the local description of the peerConnection. We then send the offer to the other peer:

peerConnection.createOffer(function(offer) {
    send({
        event : "offer",
        data : offer
    });
    peerConnection.setLocalDescription(offer);
}, function(error) {
    // Handle error here
});

Here, the send method makes a call to the signaling server to pass the offer information.

Note that we are free to implement the logic of the send method with any server-side technology.

9.2. Handling ICE Candidates

Secondly, we need to handle the ICE candidates. WebRTC uses the ICE (Interactive Connection Establishment) protocol to discover the peers and establish the connection.

When we set the local description on the peerConnection, it triggers an icecandidate event.

This event should transmit the candidate to the remote peer so that the remote peer can add it to its set of remote candidates.

To do this, we create a listener for the onicecandidate event:

peerConnection.onicecandidate = function(event) {
    if (event.candidate) {
        send({
            event : "candidate",
            data : event.candidate
        });
    }
};

The icecandidate event triggers again with an empty candidate string when all the candidates are gathered.

We must pass this candidate object as well to the remote peer. We pass this empty candidate string to ensure that the remote peer knows that all the icecandidate objects are gathered.

Also, the same event is triggered again to indicate that the ICE candidate gathering is complete with the value of candidate object set to null on the event. This need not be passed on to the remote peer.

9.3. Receiving the ICE Candidate

Thirdly, we need to process the ICE candidate sent by the other peer.

The remote peer, upon receiving this candidate, should add it to its candidate pool:

peerConnection.addIceCandidate(new RTCIceCandidate(candidate));

9.4. Receiving the Offer

After that, when the other peer receives the offer, it must set it as the remote description. In addition, it must generate an answer, which is sent to the initiating peer:

peerConnection.setRemoteDescription(new RTCSessionDescription(offer));
peerConnection.createAnswer(function(answer) {
    peerConnection.setLocalDescription(answer);
        send({
            event : "answer",
            data : answer
        });
}, function(error) {
    // Handle error here
});

9.5. Receiving the Answer

Finally, the initiating peer receives the answer and sets it as the remote description:

handleAnswer(answer){
    peerConnection.setRemoteDescription(new RTCSessionDescription(answer));
}

With this, WebRTC establishes a successful connection.

Now, we can send and receive data between the two peers directly, without the signaling server.

10. Sending a Message

Now that we've established the connection, we can send messages between the peers using the send method of the dataChannel:

dataChannel.send(“message”);

Likewise, to receive the message on the other peer, let's create a listener for the onmessage event:

dataChannel.onmessage = function(event) {
    console.log("Message:", event.data);
};

With this step, we have created a fully functional WebRTC data channel. We can now send and receive data between the clients. Additionally, we can add video and audio channels to this.

11. Adding Video and Audio Channels

When WebRTC establishes a P2P connection, we can easily transfer audio and video streams directly.

11.1. Obtaining the Media Stream

Firstly, we need to obtain the media stream from the browser. WebRTC provides an API for this:

const constraints = {
    video: true,audio : true
};
navigator.mediaDevices.getUserMedia(constraints).
  then(function(stream) { /* use the stream */ })
    .catch(function(err) { /* handle the error */ });

We can specify the frame rate, width, and height of the video using the constraints object.

The constraint object also allows specifying the camera used in the case of mobile devices:

var constraints = {
    video : {
        frameRate : {
            ideal : 10,
            max : 15
        },
        width : 1280,
        height : 720,
        facingMode : "user"
    }
};

Also, the value of facingMode can be set to “environment” instead of “user” if we want to enable the back camera.

11.2. Sending the Stream

Secondly, we have to add the stream to the WebRTC peer connection object:

peerConnection.addStream(stream);

Adding the stream to the peer connection triggers the addstream event on the connected peers.

11.3. Receiving the Stream

Thirdly, to receive the stream on the remote peer, we can create a listener.

Let's set this stream to an HTML video element:

peerConnection.onaddstream = function(event) {
    videoElement.srcObject = event.stream;
};

12. NAT Issues

In the real world, firewall and NAT (Network Address Traversal) devices connect our devices to the public Internet.

NAT provides the device an IP address for usage within the local network. So, this address is not accessible outside the local network. Without a public address, peers are unable to communicate with us.

To address this issue, WebRTC uses two mechanisms:

  1. STUN
  2. TURN

13. Using STUN

STUN is the simplest approach to this problem. Before sharing the network information to the peer, the client makes a request to a STUN server. The responsibility of the STUN server is to return the IP address from which it receives the request.

So, by querying the STUN server, we get our own public-facing IP address. We then share this IP and port information to the peer we want to connect to. The other peers can do the same to share their public-facing IPs.

To use a STUN server, we can simply pass the URL in the configuration object for creating the RTCPeerConnection object:

var configuration = {
    "iceServers" : [ {
        "url" : "stun:stun2.1.google.com:19302"
    } ]
};

14. Using TURN

In contrast, TURN is a fallback mechanism used when WebRTC is unable to establish a P2P connection. The role of the TURN server is to relay data directly between the peers. In this case, the actual stream of data flows through the TURN servers. Using the default implementations, TURN servers also act as STUN servers.

TURN servers are publicly available, and clients can access them even if they are behind a firewall or proxy.

But, using a TURN server is not truly a P2P connection, as an intermediate server is present.

Note: TURN is a last resort when we are unable to establish P2P connection. As the data flows through the TURN server, it requires a lot of bandwidth, and we're not using P2P in this case.

Similar to STUN, we can provide the TURN server URL in the same configuration object:

{
  'iceServers': [
    {
      'urls': 'stun:stun.l.google.com:19302'
    },
    {
      'urls': 'turn:10.158.29.39:3478?transport=udp',
      'credential': 'XXXXXXXXXXXXX',
      'username': 'XXXXXXXXXXXXXXX'
    },
    {
      'urls': 'turn:10.158.29.39:3478?transport=tcp',
      'credential': 'XXXXXXXXXXXXX',
      'username': 'XXXXXXXXXXXXXXX'
    }
  ]
}

15. Conclusion

In this tutorial, we discussed what the WebRTC project is and introduced its fundamental concepts. We then built a simple application to share data between two HTML clients.

We also discussed the steps involved in creating and establishing a WebRTC connection.

Furthermore, we looked into the use of STUN and TURN servers as a fallback mechanism when WebRTC fails.

You can check out the examples provided in this article over on GitHub.

Deny Access on Missing @PreAuthorize to Spring Controller Methods

$
0
0

1. Introduction

In our tutorial on Spring method security, we saw how we can use the @PreAuthorize and @PostAuthorize annotations.

In this tutorial, we'll see how to deny access to methods that lack authorization annotations.

2. Security by Default

After all, we are only human, so we might forget to protect one of our endpoints. Unfortunately, there's no easy way to deny access to non-annotated endpoints.

Luckily, Spring Security requires authentication for all endpoints by default. However, it will not require a specific role. Also, it will not deny access when we did not add security annotations.

3. Setup

First, let's take a look at the application for this example. We have a simple Spring Boot application:

@SpringBootApplication
public class DenyApplication {
    public static void main(String[] args) {
        SpringApplication.run(DenyApplication.class, args);
    }
}

Secondly, we have a security configuration. We set up two users and enable the pre/post annotations:

@Configuration
@EnableWebSecurity
@EnableGlobalMethodSecurity(prePostEnabled = true)
public class DenyMethodSecurityConfig extends GlobalMethodSecurityConfiguration {
    @Bean
    public UserDetailsService userDetailsService() {
        return new InMemoryUserDetailsManager(
            User.withUsername("user").password("{noop}password").roles("USER").build(),
            User.withUsername("guest").password("{noop}password").roles().build()
        );
    }
}

Finally, we have a rest controller with two methods. However, we “forgot” to protect the /bye endpoint:

@RestController
public class DenyOnMissingController {
    @GetMapping(path = "hello")
    @PreAuthorize("hasRole('USER')")
    public String hello() {
        return "Hello world!";
    }

    @GetMapping(path = "bye")
    // whoops!
    public String bye() {
        return "Bye bye world!";
    }
}

When running the example, we can sign in with user/password. Then, we access the /hello endpoint. We can also sign in with guest/guest. In that case, we cannot access the /hello endpoint.

However, any authenticated user can access the /bye endpoint. In the next section, we write a test to prove that.

4. Testing the Solution

Using MockMvc we can set up a test. We check that our non-annotated method is still accessible:

@RunWith(SpringJUnit4ClassRunner.class)
@SpringBootTest(classes = DenyApplication.class)
public class DenyOnMissingControllerIntegrationTest {
    @Rule
    public ExpectedException expectedException = ExpectedException.none();

    @Autowired
    private WebApplicationContext context;
    private MockMvc mockMvc;

    @Before
    public void setUp() {
        mockMvc = MockMvcBuilders.webAppContextSetup(context).build();
    }

    @Test
    @WithMockUser(username = "user")
    public void givenANormalUser_whenCallingHello_thenAccessDenied() throws Exception {
        mockMvc.perform(get("/hello"))
          .andExpect(status().isOk())
          .andExpect(content().string("Hello world!"));
    }

    @Test
    @WithMockUser(username = "user")
    // This will fail without the changes from the next section
    public void givenANormalUser_whenCallingBye_thenAccessDenied() throws Exception {
        expectedException.expectCause(isA(AccessDeniedException.class));

        mockMvc.perform(get("/bye"));
    }
}

The second test fails because the /bye endpoint is accessible. In the next section, we update our configuration to deny access to unannotated endpoints.

5. Solution: Deny by Default

Let's extend our MethodSecurityConfig class and set up a MethodSecurityMetadataSource:

@Configuration 
@EnableWebSecurity 
@EnableGlobalMethodSecurity(prePostEnabled = true) 
public class DenyMethodSecurityConfig extends GlobalMethodSecurityConfiguration {
    @Override
    protected MethodSecurityMetadataSource customMethodSecurityMetadataSource() {
        return new CustomPermissionAllowedMethodSecurityMetadataSource();
    }
    // setting up in memory users not repeated
    ...
}

Now let's implement the MethodSecurityMetadataSource interface:

public class CustomPermissionAllowedMethodSecurityMetadataSource 
  extends AbstractFallbackMethodSecurityMetadataSource {
    @Override
    protected Collection findAttributes(Class<?> clazz) { return null; }

    @Override
    protected Collection findAttributes(Method method, Class<?> targetClass) {
        Annotation[] annotations = AnnotationUtils.getAnnotations(method);
        List attributes = new ArrayList<>();

        // if the class is annotated as @Controller we should by default deny access to all methods
        if (AnnotationUtils.findAnnotation(targetClass, Controller.class) != null) {
            attributes.add(DENY_ALL_ATTRIBUTE);
        }

        if (annotations != null) {
            for (Annotation a : annotations) {
                // but not if the method has at least a PreAuthorize or PostAuthorize annotation
                if (a instanceof PreAuthorize || a instanceof PostAuthorize) {
                    return null;
                }
            }
        }
        return attributes;
    }

    @Override
    public Collection getAllConfigAttributes() { return null; }
}

We'll add the DENY_ALL_ATTRIBUTE to all methods of @Controller classes.

But, we don't add them if a @PreAuthorize/@PostAuthorize annotation is found. We do this by returning null, indicating that no metadata applies.

With the updated code, our /bye endpoint is protected and the tests succeed.

6. Conclusion

In this short tutorial, we've shown how to protect endpoints lacking @PreAuthorize / @PostAuthorize annotations.

Also, we show that non-annotated methods are now indeed protected.

As always, the full source code of the article is available over on GitHub.

Pre-compile Regex Patterns Into Pattern Objects

$
0
0

1. Overview

In this tutorial, we'll see the benefits of pre-compile a regex pattern and the new methods introduced in Java 8 and 11.

This will not be a regex how-to, but we have an excellent Guide To Java Regular Expressions API for that purpose.

2. Benefits

Reuse inevitably brings performance gain, as we don't need to create and recreate instances of the same objects time after time. So, we can assume that reuse and performance are often linked.

Let's take a look at this principle as it pertains to Pattern#compile. We'll use a simple benchmark:

  1. We have a list with 5,000,000 numbers from 1 to 5,000,000
  2. Our regex will match even numbers

So, let's test parsing these numbers with the following Java regex expressions:

  • String.matches(regex)
  • Pattern.matches(regex, charSequence)
  • Pattern.compile(regex).matcher(charSequence).matches()
  • Pre-compiled regex with many calls to preCompiledPattern.matcher(value).matches()
  • Pre-compiled regex with one Matcher instance and many calls to matcherFromPreCompiledPattern.reset(value).matches()

Actually, if we look at the String#matches‘s implementation:

public boolean matches(String regex) {
    return Pattern.matches(regex, this);
}

And at Pattern#matches:

public static boolean matches(String regex, CharSequence input) {
    Pattern p = compile(regex);
    Matcher m = p.matcher(input);
    return m.matches();
}

Then, we can imagine that the first three expressions will perform similarly. That's because the first expression calls the second, and the second calls the third.

The second point is that these methods do not reuse the Pattern and Matcher instances created. And, as we'll see in the benchmark, this degrades performance by a factor of six:

    
@Benchmark
public void matcherFromPreCompiledPatternResetMatches(Blackhole bh) {
    for (String value : values) {
        bh.consume(matcherFromPreCompiledPattern.reset(value).matches());
    }
}

@Benchmark
public void preCompiledPatternMatcherMatches(Blackhole bh) {
    for (String value : values) {
        bh.consume(preCompiledPattern.matcher(value).matches());
    }
}

@Benchmark
public void patternCompileMatcherMatches(Blackhole bh) {
    for (String value : values) {
        bh.consume(Pattern.compile(PATTERN).matcher(value).matches());
    }
}

@Benchmark
public void patternMatches(Blackhole bh) {
    for (String value : values) {
        bh.consume(Pattern.matches(PATTERN, value));
    }
}

@Benchmark
public void stringMatchs(Blackhole bh) {
    Instant start = Instant.now();
    for (String value : values) {
        bh.consume(value.matches(PATTERN));
    }
}

Looking at the benchmark results, there's no doubt that pre-compiled Pattern and reused Matcher are the winners with a result of more than six times faster:

Benchmark                                                               Mode  Cnt     Score     Error  Units
PatternPerformanceComparison.matcherFromPreCompiledPatternResetMatches  avgt   20   278.732 ±  22.960  ms/op
PatternPerformanceComparison.preCompiledPatternMatcherMatches           avgt   20   500.393 ±  34.182  ms/op
PatternPerformanceComparison.stringMatchs                               avgt   20  1433.099 ±  73.687  ms/op
PatternPerformanceComparison.patternCompileMatcherMatches               avgt   20  1774.429 ± 174.955  ms/op
PatternPerformanceComparison.patternMatches                             avgt   20  1792.874 ± 130.213  ms/op

Beyond performance times, we also have the number of objects created:

  • First three forms:
    • 5,000,000 Pattern instances created
    • 5,000,000 Matcher instances created
  • preCompiledPattern.matcher(value).matches()
    • 1 Pattern instance created
    • 5,000,000 Matcher instances created
  • matcherFromPreCompiledPattern.reset(value).matches()
    • 1 Pattern instance created
    • 1 Matcher instance created

So, instead of delegating our regex to String#matches or Pattern#matches that always will create the Pattern and Matcher instances. We should pre-compile our regex to earn performance and has fewer objects created.

To know more about performance in regex check out our Overview of Regular Expressions Performance in Java.

3. New Methods

Since the introduction of functional interfaces and streams, reuse has become easier.

The Pattern class has evolved in new Java versions to provide integration with streams and lambdas.

3.1. Java 8

Java 8 introduced two new methods: splitAsStream and asPredicate.

Let's look at some code for splitAsStream that creates a stream from the given input sequence around matches of the pattern:

@Test
public void givenPreCompiledPattern_whenCallSplitAsStream_thenReturnArrayWithValuesSplitByThePattern() {
    Pattern splitPreCompiledPattern = Pattern.compile("__");
    Stream<String> textSplitAsStream = splitPreCompiledPattern.splitAsStream("My_Name__is__Fabio_Silva");
    String[] textSplit = textSplitAsStream.toArray(String[]::new);

    assertEquals("My_Name", textSplit[0]);
    assertEquals("is", textSplit[1]);
    assertEquals("Fabio_Silva", textSplit[2]);
}

The asPredicate method creates a predicate that behaves as if it creates a matcher from the input sequence and then calls find:

string -> matcher(string).find();

Let's create a pattern that matches names from a list that have at least first and last names with at least three letters each:

@Test
public void givenPreCompiledPattern_whenCallAsPredicate_thenReturnPredicateToFindThePatternInTheListElements() {
    List<String> namesToValidate = Arrays.asList("Fabio Silva", "Mr. Silva");
    Pattern firstLastNamePreCompiledPattern = Pattern.compile("[a-zA-Z]{3,} [a-zA-Z]{3,}");
    
    Predicate<String> patternsAsPredicate = firstLastNamePreCompiledPattern.asPredicate();
    List<String> validNames = namesToValidate.stream()
        .filter(patternsAsPredicate)
        .collect(Collectors.toList());

    assertEquals(1,validNames.size());
    assertTrue(validNames.contains("Fabio Silva"));
}

3.2. Java 11

Java 11 introduced the asMatchPredicate method that creates a predicate that behaves as if it creates a matcher from the input sequence and then calls matches:

string -> matcher(string).matches();

Let's create a pattern that matches names from a list that have only first and last name with at least three letters each:

@Test
public void givenPreCompiledPattern_whenCallAsMatchPredicate_thenReturnMatchPredicateToMatchesThePatternInTheListElements() {
    List<String> namesToValidate = Arrays.asList("Fabio Silva", "Fabio Luis Silva");
    Pattern firstLastNamePreCompiledPattern = Pattern.compile("[a-zA-Z]{3,} [a-zA-Z]{3,}");
        
    Predicate<String> patternAsMatchPredicate = firstLastNamePreCompiledPattern.asMatchPredicate();
    List<String> validatedNames = namesToValidate.stream()
        .filter(patternAsMatchPredicate)
        .collect(Collectors.toList());

    assertTrue(validatedNames.contains("Fabio Silva"));
    assertFalse(validatedNames.contains("Fabio Luis Silva"));
}

4. Conclusion

In this tutorial, we saw that the use of pre-compiled patterns brings us a far superior performance.

We also learned about three new methods introduced in JDK 8 and JDK 11 that make our lives easier.

The code for these examples is available over on GitHub in core-java-11 for the JDK 11 snippets and core-java-text for the others.


Get Substring from String in Java

$
0
0

1. Overview

In this quick tutorial, we'll focus on the substring functionality of Strings in Java.

We'll mostly use the methods from the String class and few from Apache Commons' StringUtils class.

In all of the following examples, we're going to using this simple String:

String text = "Julia Evans was born on 25-09-1984. "
  + "She is currently living in the USA (United States of America).";

2. Basics of substring

Let's start with a very simple example here – extracting a substring with the start index:

assertEquals("USA (United States of America).", 
  text.substring(67));

Note how we extracted Julia's country of residence in our example here.

There's also an option to specify an end index, but without it – substring will go all the way to the end of the String. 

Let's do that and get rid of that extra dot at the end, in the example above:

assertEquals("USA (United States of America)", 
  text.substring(67, text.length() - 1));

In the examples above, we've used the exact position to extract the substring.

2.1. Getting a Substring Starting at a Specific Character

In case the position needs to be dynamically calculated based on a character or String we can make use of the indexOf method:

assertEquals("United States of America", 
  text.substring(text.indexOf('(') + 1, text.indexOf(')')));

A similar method that can help us locate our substring is lastIndexOf. Let's use lastIndexOf to extract the year “1984”. Its the portion of text between the last dash and the first dot:

assertEquals("1984",
  text.substring(text.lastIndexOf('-') + 1, text.indexOf('.')));

Both indexOf and lastIndexOf can take a character or a String as a parameter. Let's extract the text “USA” and the rest of the text in the parenthesis:

assertEquals("USA (United States of America)",
  text.substring(text.indexOf("USA"), text.indexOf(')') + 1));

3. Using subSequence

The String class provides another method called subSequence which acts similar to the substring method.

The only difference is that it returns a CharSequence instead of a String and it can only be used with a specific start and end index:

assertEquals("USA (United States of America)", 
  text.subSequence(67, text.length() - 1));

4. Using Regular Expressions

Regular expressions will come to our rescue if we have to extract a substring that matches a specific pattern.

In the example String, Julia's date of birth is in the format “dd-mm-yyyy”. We can match this pattern using the Java regular expression API.

First of all, we need to create a pattern for “dd-mm-yyyy”:

Pattern pattern = Pattern.compile("\\d{2}-\\d{2}-\\d{4}");

Then, we'll apply the pattern to find a match from the given text:

Matcher matcher = pattern.matcher(text);

Upon successful match we can extract the matched String:

if (matcher.find()) {                                  
    Assert.assertEquals("25-09-1984", matcher.group());
}

For more details on the Java regular expressions check out this tutorial.

5. Using split

We can use the split method from the String class to extract a substring. Say we want to extract the first sentence from the example String. This is quite easy to do using split:

String[] sentences = text.split("\\.");

Since the split method accepts a regex we had to escape the period character. Now the result is an array of 2 sentences.

We can use the first sentence (or iterate through the whole array):

assertEquals("Julia Evans was born on 25-09-1984", sentences[0]);

Please note that there are better ways for sentence detection and tokenization using Apache OpenNLP. Check out this tutorial to learn more about the OpenNLP API.

6. Using Scanner

We generally use Scanner to parse primitive types and Strings using regular expressions. A Scanner breaks its input into tokens using a delimiter pattern, which by default matches whitespace.

Let's find out how to use this to get the first sentence from the example text:

try (Scanner scanner = new Scanner(text)) {
    scanner.useDelimiter("\\.");           
    assertEquals("Julia Evans was born on 25-09-1984", scanner.next());    
}

In the above example, we have set the example String as the source for the scanner to use.

Then we are setting the period character as the delimiter (which needs to be escaped otherwise it will be treated as the special regular expression character in this context).

Finally, we assert the first token from this delimited output.

If required, we can iterate through the complete collection of tokens using a while loop.

while (scanner.hasNext()) {
   // do something with the tokens returned by scanner.next()
}

7. Maven Dependencies

We can go a bit further and use a useful utility – the StringUtils class – part of the Apache Commons Lang library:

<dependency>
    <groupId>org.apache.commons</groupId>
    <artifactId>commons-lang3</artifactId>
    <version>3.8</version>
</dependency>

You can find the latest version of this library here.

8. Using StringUtils

The Apache Commons libraries add some useful methods for manipulating core Java types. Apache Commons Lang provides a host of helper utilities for the java.lang API, most notably String manipulation methods.

In this example, we're going to see how to extract a substring nested between two Strings:

assertEquals("United States of America", 
  StringUtils.substringBetween(text, "(", ")"));

There is a simplified version of this method in case the substring is nested in between two instances of the same String:

substringBetween(String str, String tag)

The substringAfter method from the same class gets the substring after the first occurrence of a separator.

The separator isn't returned:

assertEquals("the USA (United States of America).", 
  StringUtils.substringAfter(text, "living in "));

Similarly, the substringBefore method gets the substring before the first occurrence of a separator.

The separator isn't returned:

assertEquals("Julia Evans", 
  StringUtils.substringBefore(text, " was born"));

You can check out this tutorial to find out more on String processing using Apache Commons Lang API.

9. Conclusion

In this quick article, we found out various ways to extract a substring from a String in Java. You can explore our other tutorials on String manipulation in Java.

As always, code snippets can be found over on GitHub.

Java Scanner

$
0
0

1. Overview

In this quick tutorial, we'll illustrate how to use the Java Scanner class – to read input, find and skip patterns with different delimiters.

2. Scan a File

First – let's see how to read a file using Scanner.

In the following example – we read a file contains “Hello world” into tokens:

@Test
public void whenReadFileWithScanner_thenCorrect() throws IOException{
    Scanner scanner = new Scanner(new File("test.txt"));

    assertTrue(scanner.hasNext());
    assertEquals("Hello", scanner.next());
    assertEquals("world", scanner.next());

    scanner.close();
}

Note that the next() method returns the next String token here.

Also, note how we're closing the scanner when we're done using it.

3. Convert InputStream to String

Next – let's see how to convert an InputStream into a String using a Scanner:

@Test
public void whenConvertInputStreamToString_thenConverted()
  throws IOException {
    String expectedValue = "Hello world";
    FileInputStream inputStream 
      = new FileInputStream("test.txt");
    
    Scanner scanner = new Scanner(inputStream);
    scanner.useDelimiter("A");

    String result = scanner.next();
    assertEquals(expectedValue, result);

    scanner.close();
}

Similar to the previous example, we used the Scanner to tokenize the entire stream from the beginning to the next regex “A” – which matches the full input.

4. Scanner vs. BufferedReader

Now – let's discuss the difference between Scanner and BufferedReader – we generally use:

  • BufferedReader when we want to read the input into lines
  • Scanner to read the input into tokens

In the following example – we're reading a file into lines using BufferedReader:

@Test
public void whenReadUsingBufferedReader_thenCorrect() 
  throws IOException {
    String firstLine = "Hello world";
    String secondLine = "Hi, John";
    BufferedReader reader 
      = new BufferedReader(new FileReader("test.txt"));

    String result = reader.readLine();
    assertEquals(firstLine, result);

    result = reader.readLine();
    assertEquals(secondLine, result);

    reader.close();
}

Now, let's use Scanner to read the same file into tokens:

@Test
public void whenReadUsingScanner_thenCorrect() 
  throws IOException {
    String firstLine = "Hello world";
    FileInputStream inputStream 
      = new FileInputStream("test.txt");
    Scanner scanner = new Scanner(inputStream);

    String result = scanner.nextLine();
    assertEquals(firstLine, result);

    scanner.useDelimiter(", ");
    assertEquals("Hi", scanner.next());
    assertEquals("John", scanner.next());

    scanner.close();
}

Note how we're using the Scanner nextLine() API – to read the entire line.

5. Scan Input from Console Using New Scanner(System.in)

Next – let's see how to read input from the Console using a Scanner instance:

@Test
public void whenReadingInputFromConsole_thenCorrect() {
    String input = "Hello";
    InputStream stdin = System.in;
    System.setIn(new ByteArrayInputStream(input.getBytes()));

    Scanner scanner = new Scanner(System.in);

    String result = scanner.next();
    assertEquals(input, result);

    System.setIn(stdin);
    scanner.close();
}

Note that we used System.setIn(…) to simulate some input coming from the Console.

5.1. nextLine() API

This method simply returns the string at the current line:

scanner.nextLine();

This reads the content of the current line and returns it except for any line separator at the end – in this case – the new line character.

After reading the content, Scanner sets its position to the start of the next line. The important point to remember is that the nextLine() API consumes the line separator and moves the position of the Scanner to the next line.

So the next time if we read through Scanner we'll be reading from the start of the next line.

5.2. nextInt() API

This method scans the next token of the input as an int:

scanner.nextInt();

The API reads the integer token available next.

In this case, if the next token is an integer and after the integer, there is a line separator, always remember that nextInt() will not consume the line separator. Instead, the position of the scanner will be the line separator itself.

So if we have a series of operations, where the first operation is a scanner.nextInt() and then scanner.nextLine() and as an input if we provide an integer and press line break, both the operations will be executed.

The nextInt() API will consume the integer and the nextLine() API will consume the line separator and will place Scanner to the starting of next line.

6. Validate Input

Now – let's see how to validate input using a Scanner. In the following example – we use the Scanner method hasNextInt() to check if the input is an integer value:

@Test
public void whenValidateInputUsingScanner_thenValidated() 
  throws IOException {
    String input = "2000";
    InputStream stdin = System.in;
    System.setIn(new ByteArrayInputStream(input.getBytes()));

    Scanner scanner = new Scanner(System.in);

    boolean isIntInput = scanner.hasNextInt();
    assertTrue(isIntInput);

    System.setIn(stdin);
    scanner.close();
}

7. Scan a String

Next – let's see how to scan a String using Scanner:

@Test
public void whenScanString_thenCorrect() 
  throws IOException {
    String input = "Hello 1 F 3.5";
    Scanner scanner = new Scanner(input);

    assertEquals("Hello", scanner.next());
    assertEquals(1, scanner.nextInt());
    assertEquals(15, scanner.nextInt(16));
    assertEquals(3.5, scanner.nextDouble(), 0.00000001);

    scanner.close();
}

Note: The method nextInt(16) reads the next token as a hexadecimal integer value.

8. Find Pattern

Now – let's see how to find a Pattern using Scanner.

In the following example – we use findInLine() to search for a token that matches the given Pattern in the entire input:

@Test
public void whenFindPatternUsingScanner_thenFound() throws IOException {
    String expectedValue = "world";
    FileInputStream inputStream = new FileInputStream("test.txt");
    Scanner scanner = new Scanner(inputStream);

    String result = scanner.findInLine("wo..d");
    assertEquals(expectedValue, result);

    scanner.close();
}

We can also search for a Pattern in the specific domain using findWithinHorizon() as in the following example:

@Test
public void whenFindPatternInHorizon_thenFound() 
  throws IOException {
    String expectedValue = "world";
    FileInputStream inputStream = new FileInputStream("test.txt");
    Scanner scanner = new Scanner(inputStream);

    String result = scanner.findWithinHorizon("wo..d", 5);
    assertNull(result);

    result = scanner.findWithinHorizon("wo..d", 100);
    assertEquals(expectedValue, result);

    scanner.close();
}

Note that the search horizon is simply the number of characters within which the search is performed.

9. Skip Pattern

Next – let's see how to skip a Pattern in Scanner. We can skip tokens that match a specific pattern while reading the input using Scanner.

In the following example – we skip “Hello” token using the Scanner method skip():

@Test
public void whenSkipPatternUsingScanner_thenSkipped() 
  throws IOException {
    FileInputStream inputStream = new FileInputStream("test.txt");
    Scanner scanner = new Scanner(inputStream);

    scanner.skip(".e.lo");

    assertEquals("world", scanner.next());

    scanner.close();
}

10. Change Scanner Delimiter

Finally – let's see how to change the Scanner delimiter. In the following example – we change the default Scanner delimiter to “o“:

@Test
public void whenChangeScannerDelimiter_thenChanged() 
  throws IOException {
    String expectedValue = "Hello world";
    String[] splited = expectedValue.split("o");

    FileInputStream inputStream = new FileInputStream("test.txt");
    Scanner scanner = new Scanner(inputStream);
    scanner.useDelimiter("o");

    assertEquals(splited[0], scanner.next());
    assertEquals(splited[1], scanner.next());
    assertEquals(splited[2], scanner.next());

    scanner.close();
}

We can also use multiple delimiters. In the following example – we use both comma “,” and dash”” as delimiters to scan a file contains “John,Adam-Tom“:

@Test
public void whenReadWithScannerTwoDelimiters_thenCorrect() 
  throws IOException {
    Scanner scanner = new Scanner(new File("test.txt"));
    scanner.useDelimiter(",|-");

    assertEquals("John", scanner.next());
    assertEquals("Adam", scanner.next());
    assertEquals("Tom", scanner.next());

    scanner.close();
}

Note: The default Scanner delimiter is whitespace.

11. Conclusion

In this tutorial, we went over multiple real-world examples of using the Java Scanner.

We learned how to read input from file, Console or String using Scanner; we also learned how to find and skip a pattern using Scanner – as well as how to change the Scanner delimiter.

The implementation of these examples can be found over on GitHub.

Quick Guide to Java Stack

$
0
0

1. Overview

In this quick article, we'll introduce the java.util.Stack class and start looking at how we can make use of it.

The Stack is a generic data structure that represents a LIFO (last in, first out) collection of objects allowing for pushing/popping elements in constant time.

2. Create a Stack

Let's start by creating an empty instance of Stack, by using the default, no-argument constructor:

@Test
public void whenStackIsCreated_thenItHasSize0() {
    Stack<Integer> intStack = new Stack();
 
    assertEquals(0, intStack.size());
}

This will create a Stack with the default capacity of 10. If the number of added elements exceeds the total Stack size, it will be doubled automatically. However, its size will never shrink after removing elements.

3. Synchronization for Stack

Stack is a direct subclass of Vector; this means that similarly to its superclass, it's a synchronized implementation.

However, synchronization isn't always needed, in such cases, it's advised to use ArrayDeque.

4. Add into a Stack

Let's start by adding an element to the top of the Stack, with the push() method – which also returns the element that was added:

@Test
public void whenElementIsPushed_thenStackSizeIsIncreased() {
    Stack<Integer> intStack = new Stack();
    intStack.push(1);
 
    assertEquals(1, intStack.size());
}

Using push() method has the same effect as using addElement(). The only difference is that addElement() returns the result of the operation, instead of the element that was added.

We can also add multiple elements at once:

@Test
public void whenMultipleElementsArePushed_thenStackSizeisIncreased() {
    Stack<Integer> intStack = new Stack();
    List<Integer> intList = Arrays.asList(1, 2, 3, 4, 5, 6, 7);
    boolean result = intStack.addAll(intList);
 
    assertTrue(result);
    assertEquals(7, intList.size());
}

5. Retrieve from a Stack

Next, let's have a look at how to get and remove the last element in a Stack:

@Test
public void whenElementIsPoppedFromStack_thenSizeChanges() {
    Stack<Integer> intStack = new Stack();
    intStack.push(5);
    intStack.pop();

    assertTrue(intStack.isEmpty());
}

We can also get the last element of the Stack without removing it:

@Test
public void whenElementIsPeeked_thenElementIsNotRemoved() {
    Stack<Integer> intStack = new Stack();
    intStack.push(5);
    intStack.peek();

    assertEquals(1, intStack.search(5));
    assertEquals(1, intStack.size());
}

6. Search for an Element in a Stack

6.1. Search

Stack allows us to search for an element and get its distance from the top:

@Test
public void whenElementIsOnStack_thenSearchReturnsItsDistanceFromTheTop() {
    Stack<Integer> intStack = new Stack();
    intStack.push(5);

    assertEquals(1, intStack.search(5));
}

The result is an index of given Object. If more than one Object is present, the index of Object closest to the top is returned. The item that is on the top of the stack is considered to be at position 1.

If the Object is not found, search() will return -1.

6.2. Getting Index of Element

To get an index of an element on the Stack, we can also use the indexOf() and lastIndexOf() methods:

@Test
public void whenElementIsOnStack_thenIndexOfReturnsItsIndex() {
    Stack<Integer> intStack = new Stack();
    intStack.push(5);
    int indexOf = intStack.indexOf(5);

    assertEquals(0, indexOf);
}

The lastIndexOf() will always find the index of the element that's closest to the top of the stack. This works very similarly to search() – with the important difference that it returns the index, instead of the distance from the top:

@Test
public void whenMultipleElementsAreOnStack_thenIndexOfReturnsLastElementIndex() {
    Stack<Integer> intStack = new Stack();
    intStack.push(5);
    intStack.push(5);
    intStack.push(5);
    int lastIndexOf = intStack.lastIndexOf(5);

    assertEquals(2, lastIndexOf);
}

7. Remove Elements from a Stack

Apart from the pop() operation, used both for removing and retrieving elements, we can also use multiple operations inherited from the Vector class to remove elements.

7.1. Removing Specified Elements

We can use the removeElement() method to remove the first occurrence of the given element:

@Test
public void whenRemoveElementIsInvoked_thenElementIsRemoved() {
    Stack<Integer> intStack = new Stack();
    intStack.push(5);
    intStack.push(5);
    intStack.removeElement(5);
 
    assertEquals(1, intStack.size());
}

We can also use the removeElementAt() to delete elements under a specified index in the Stack:

@Test 
public void whenRemoveElementAtIsInvoked_thenElementIsRemoved() { 
    Stack<Integer> intStack = new Stack(); 
    intStack.push(5); intStack.push(7); 
    intStack.removeElementAt(1); 
 
    assertEquals(-1, intStack.search(7)); 
}

7.2. Removing Multiple Elements

Let's have a quick look at how to remove multiple elements from a Stack using the removeAll() API – which will take a Collection as an argument and remove all matching elements from the Stack:

@Test
public void whenRemoveAllIsInvoked_thenAllElementsFromCollectionAreRemoved() {
    Stack<Integer> intStack = new Stack();
    List<Integer> intList = Arrays.asList(1, 2, 3, 4, 5, 6, 7);
    intStack.addAll(intList);
    intStack.add(500);
    intStack.removeAll(intList);
 
    assertEquals(1, intStack.size());
}

It's also possible to remove all elements from the Stack using the clear() or removeAllElements() methods; both of those methods work the same:

@Test
public void whenRemoveIfIsInvoked_thenAllElementsSatysfyingConditionAreRemoved() {
    Stack<Integer> intStack = new Stack();
    List<Integer> intList = Arrays.asList(1, 2, 3, 4, 5, 6, 7);
    intStack.addAll(intList);
    intStack.removeIf(element -> element < 6);
 
    assertEquals(2, intStack.size());
}

7.3. Removing Elements Using Filter

We can also use a condition for removing elements from the Stack. Let's see how to do this using the removeIf(), with a filter expression as an argument:

@Test
public void whenRemoveIfIsInvoked_thenAllElementsSatysfyingConditionAreRemoved() {
    Stack<Integer> intStack = new Stack();
    List<Integer> intList = Arrays.asList(1, 2, 3, 4, 5, 6, 7);
    intStack.addAll(intList);
    intStack.removeIf(element -> element < 6);
    
    assertEquals(2, intStack.size());
}

8. Iterate over a Stack

Stack allows us to use both an Iterator and a ListIterator. The main difference is that the first one allows us to traverse Stack in one direction and second allows to do this in both directions:

@Test
public void whenAnotherStackCreatedWhileTraversingStack_thenStacksAreEqual() {
    Stack<Integer> intStack = new Stack<>();
    List<Integer> intList = Arrays.asList(1, 2, 3, 4, 5, 6, 7);
    intStack.addAll(intList);
    ListIterator<Integer> it = intStack.listIterator();
    Stack<Integer> result = new Stack();
    while(it.hasNext()) {
        result.push(it.next());
    }

    assertThat(result, equalTo(intStack));
}

All Iterators returned by Stack are fail-fast.

9. Stream API for the Java Stack

A Stack is a collection, which means we can use it with Java 8 Streams API. Using Streams with the Stack is similar to using it with any other Collection:

@Test
public void whenStackIsFiltered_allElementsNotSatisfyingFilterConditionAreDiscarded() {
    Stack<Integer> intStack = new Stack();
    List<Integer> inputIntList = Arrays.asList(1, 2, 3, 4, 5, 6, 7,9,10);
    intStack.addAll(inputIntList);
    int[] intArray = intStack.stream()
      .mapToInt(element -> (int)element)
      .filter(element -> element <= 3)
      .toArray();
 
    assertEquals(3, intArray.length);
}

10. Summary

This tutorial is a quick and practical guide to understand this core class in Java – the Stack.

Of course, you can explore the full API in the Javadoc.

And, as always, all code samples can be found over on Github.

Introduction to Ninja Framework

$
0
0

1. Overview

Nowadays, there are many JEE based frameworks like Spring, Play, and Grails available for web application development.

We may have our reasons to choose one of them over the others. However, our choice also depends on the use case and the problem we're trying to solve.

In this introductory tutorial, we'll explore the Ninja web framework and create a simple web application. At the same time, we'll examine a few of the basic features that it provides.

2. Ninja

Ninja is a full-stack, yet lightweight, web framework that utilizes existing Java libraries to get the work done.

Having features from HTML to JSON rendering, persistence to testing, it is a one-stop solution for building scalable web applications.

It follows the convention-over-configuration paradigm and categorizes the code in packages like models, controllers, and services.

Ninja uses popular Java libraries for key features like Jackson for JSON/XML rendering, Guice for dependency management, Hibernate for persistence, and Flyway for database migrations.

For rapid development, it offers SuperDevMode for hot reloading of the code. So, it allows us to see the changes instantly in the development environment.

3. Setup

Ninja requires a standard set of tools to create a web application:

  • Java 1.8 or later
  • Maven 3 or later
  • IDE (Eclipse or IntelliJ)

We'll use a Maven archetype to set up the Ninja project quickly. It'll prompt us to provide a group id, an artifact id, and a version number, followed by a project name:

mvn archetype:generate -DarchetypeGroupId=org.ninjaframework \
  -DarchetypeArtifactId=ninja-servlet-archetype-simple

Or, for an existing Maven project, we can add the latest ninja-core dependency to the pom.xml:

<dependency>
    <groupId>org.ninjaframework</groupId>
    <artifactId>ninja-core</artifactId>
    <version>6.5.0</version>
</dependency>

Then, we'll run the Maven command to compile the files for the first time:

mvn clean install

Last, let's run the app using a Ninja-provided Maven command:

mvn ninja:run

Voila! Our application is started and will be accessible at localhost:8080:

4. Project Structure

Let's take a look at the Maven-like project structure created by Ninja:

The framework creates a few packages based on conventions.

The Java classes are categorized under conf, controllers, models, and services directories in src/main/java.

Likewise, src/test/java holds the corresponding unit test classes.

The views directory under src/main/java contains the HTML files. And, the src/main/java/assets directory contains resources like images, stylesheets, and JavaScript files.

5. Controller

We're all set to discuss a few basic features of the framework. A controller is a class that receives a request and returns the response with specific results.

First, let's discuss a few conventions to follow:

  • Create a class in the controllers package and suffix the name with Controller
  • A method serving the request must return the object of the Result class

Let's create the ApplicationController class with a simple method to render the HTML:

@Singleton
public class ApplicationController {
    public Result index() {
        return Results.html();
    }
}

Here, the index method will render an HTML by calling the html method of the Results class. The Result object holds everything that is required to render the content like response code, headers, and cookies.

Note: Guice's @Singleton annotation allows only one instance of the controller throughout the app.

6. View

For the index method, Ninja will look for the HTML file – index.ftl.html under the views/ApplicationController directory.

Ninja uses the Freemarker template engine for HTML rendering. So, all the files under views should have the .ftl.html extension.

Let's create the index.ftl.html file for the index method:

<html>  
<head>
    <title>Ninja: Index</title>
</head>
<body>
    <h1>${i18n("helloMsg")}</h1>
    <a href="/userJson">User Json</a>
</body>
</html>

Here, we've used the Ninja-provided i18n tag to get the helloMsg property from the message.properties file. We'll discuss this further in the internationalization section later on.

7. Route

Next, we'll define the route for the request to reach the index method.

Ninja uses the Routes class in the conf package to map a URL to a particular method of the controller.

Let's add a route to access the index method of the ApplicationController:

public class Routes implements ApplicationRoutes {
    @Override
    public void init(Router router) {          
        router.GET().route("/index").with(ApplicationController::index);
    }
}

That's it! We're all set to access the index page at localhost:8080/index:

8. JSON Rendering

As already discussed, Ninja uses Jackson for JSON rendering. To render JSON content, we can use the json method of the Results class.

Let's add the userJson method in the ApplicationController class and render the content of a simple HashMap in JSON:

public Result userJson() {
    HashMap<String, String> userMap = new HashMap<>();
    userMap.put("name", "Norman Lewis");
    userMap.put("email", "norman@email.com");    
    return Results.json().render(user);
}

Then, we'll add the required routing to access the userJson:

router.GET().route("/userJson").with(ApplicationController::userJson);

Now, we can render JSON using localhost:8080/userJson:

9. Service

We can create a service to keep the business logic separate from the controller and inject our service wherever required.

First, let's create a simple UserService interface to define the abstraction:

public interface UserService {
    HashMap<String, String> getUserMap();
}

Then, we'll implement the UserService interface in the UserServiceImpl class and override the getUserMap method:

public class UserServiceImpl implements UserService {
    @Override
    public HashMap<String, String> getUserMap() {
        HashMap<String, String> userMap = new HashMap<>(); 
        userMap.put("name", "Norman Lewis"); 
        userMap.put("email", "norman@email.com"); 
        return userMap;
    }
}

Then, we'll bind the UserService interface with the UserServiceImpl class using Ninja's dependency injection feature provided by Guice.

Let's add the binding in the Module class available in the conf package:

@Singleton
public class Module extends AbstractModule {
    protected void configure() {        
        bind(UserService.class).to(UserServiceImpl.class);
    }
}

Last, we'll inject the UserService dependency in the ApplicationController class using the @Inject annotation:

public class ApplicationController {
    @Inject
    UserService userService;
    
    // ...
}

Thus, we're all set to use the UserService‘s getUserMap method in the ApplicationController:

public Result userJson() {
    HashMap<String, String> userMap = userService.getUserMap();
    return Results.json().render(userMap);
}

10. Flash Scope

Ninja provides a simple yet efficient way to handle success and error messages from requests through its feature called Flash Scope.

To use it in the controller, we'll add the FlashScope argument to the method:

public Result showFlashMsg(FlashScope flashScope) {
    flashScope.success("Success message");
    flashScope.error("Error message");
    return Results.redirect("/home");
}

Note: The redirect method of the Results class redirects the target to the provided URL.

Then, we'll add a routing /flash to the showFlashMsg method and modify the view to show the flash messages:

<#if (flash.error)??>
    <div class="alert alert-danger">
        ${flash.error}
    </div>
</#if>
<#if (flash.success)??>
    <div class="alert alert-success">
        ${flash.success}
    </div>
</#if>

Now, we can see the FlashScope in action at localhost:8080/flash:

11. Internationalization

Ninja provides a built-in internationalization feature that is easy to configure.

First, we'll define the list of supported languages in the application.conf file:

application.languages=fr,en

Then, we'll create the default properties file – messages.properties for English – with key-value pairs for messages:

header.home=Home!
helloMsg=Hello, welcome to Ninja Framework!

Similarly, we can add the language code in the file name for a language-specific properties file — for instance, message_fr.properties file for French:

header.home=Accueil!
helloMsg=Bonjour, bienvenue dans Ninja Framework!

Once the configurations are ready, we can easily enable internationalization in the ApplicationController class.

We've got two ways, either by using the Lang class or the Messages class:

@Singleton
public class ApplicationController {
    @Inject
    Lang lang;

    @Inject
    Messages msg;
    
    // ...
}

Then, using the Lang class, we can set the language of the result:

Result result = Results.html();
lang.setLanguage("fr", result);

Similarly, using the Messages class, we can get a language-specific message:

Optional<String> language = Optional.of("fr");        
String helloMsg = msg.get("helloMsg", language).get();

12. Persistence

Ninja supports JPA 2.0 and utilizes Hibernate to enable persistence in the web application. Also, it offers built-in H2 database support for rapid development.

12.1. Model

We require an Entity class to connect with a table in the database. For this, Ninja follows the convention of looking for the entity classes in the models package. So, we'll create the User entity class there:

@Entity
public class User {
    @Id
    @GeneratedValue(strategy=GenerationType.AUTO)
    Long id;
    public String firstName;
    public String email;  
}

Then, we'll configure Hibernate and set the details for the database connection.

12.2. Configuration

For Hibernate configuration, Ninja expects the persistence.xml file to be in the src/main/java/META-INF directory:

<?xml version="1.0" encoding="UTF-8"?>
<persistence xmlns="http://java.sun.com/xml/ns/persistence"
  xmlns:xsi="http://www.w3.org/2001/XMLSchema-instance"
  xsi:schemaLocation="http://java.sun.com/xml/ns/persistence/persistence_2_0.xsd"
  version="2.0">
   
    <!-- Database settings for development -->
    <persistence-unit name="dev_unit"
      transaction-type="RESOURCE_LOCAL">
        <provider>org.hibernate.jpa.HibernatePersistenceProvider</provider>
        <properties>
            <property name="hibernate.connection.driver_class" value="org.h2.Driver" />
            <property name="hibernate.dialect" value="org.hibernate.dialect.H2Dialect" />
            <property name="hibernate.show_sql" value="true" />
            <property name="hibernate.format_sql" value="true" />
            <property name="hibernate.hbm2ddl.auto" value="update" />
            <property name="hibernate.connection.autocommit" value="true" />
        </properties>
    </persistence-unit>
</persistence>

Then, we'll add the database connection details to application.conf:

ninja.jpa.persistence_unit_name=dev_unit
db.connection.url=jdbc:h2:./devDb
db.connection.username=sa
db.connection.password=

12.3. EntityManager

Last, we'll inject the instance of the EntityManager in the ApplicationController using Guice's Provider class:

public class ApplicationController {
    @Inject 
    Provider<EntityManager> entityManagerProvider;

    // ...
}

So, we're ready to use the EntityManager to persist the User object:

@Transactional
public Result insertUser(User user) {
    EntityManager entityManager = entityManagerProvider.get();
    entityManager.persist(user);
    entityManager.flush();
    return Results.redirect("/home");
}

Similarly, we can use the EntityManager to read the User object from the DB:

@UnitOfWork
public Result fetchUsers() {
    EntityManager entityManager = entityManagerProvider.get();
    Query q = entityManager.createQuery("SELECT x FROM User x");
    List<User> users = (List<User>) q.getResultList();
    return Results.json().render(users);
}

Here, Ninja's @UnitOfWork annotation will handle everything about the database connections without dealing with transactions. Hence, it can prove handy for read-only queries, where we usually don't require transactions.

13. Validation

Ninja provides built-in support for bean validations by following the JSR303 specifications.

Let's examine the feature by annotating a property in the User entity with the @NotNull annotation:

public class User {
    // ...
    
    @NotNull
    public String firstName;
}

Then, we'll modify the already discussed insertUser method in the ApplicationController to enable the validation:

@Transactional
public Result insertUser(FlashScope flashScope, @JSR303Validation User user, Validation validation) {
    if (validation.getViolations().size() > 0) {
        flashScope.error("Validation Error: User can't be created");
    } else {
        EntityManager entityManager = entitiyManagerProvider.get();
        entityManager.persist(user);
        entityManager.flush();
        flashScope.success("User '" + user + "' is created successfully");
    }
    return Results.redirect("/home");
}

We've used Ninja's @JSR303Validation annotation to enable the validation of the User object. Then, we've added the Validation argument to work with validations through methods like hasViolations, getViolations, and addViolation.

Last, the FlashScope object is used to show the validation error on the screen.

Note: Ninja follows the JSR303 specifications for bean validations. However, the JSR380 specification (Bean Validation 2.0) is the new standard.

14. Conclusion

In this article, we explored the Ninja web framework — a full-stack framework that provides handy features using popular Java libraries.

To begin with, we created a simple web application using controllers, models, and services. Then, we enabled JPA support in the app for persistence.

At the same time, we saw a few basic features like Routes, JSON rendering, Internationalization, and Flash Scopes.

Last, we explored the validation support provided by the framework.

As usual, all the code implementations are available over on GitHub.

Median of Stream of Integers using Heap

$
0
0

1. Overview

In this tutorial, we'll learn how to compute the median of a stream of integers.

We'll proceed by stating the problem with examples, then analyze the problem, and finally implement several of solutions in Java.

2. Problem Statement

Median is the middle value of an ordered data set. For a set of integers, there are just as many elements less than the median as greater.

In an ordered set of:

  • odd number of integers, the middle element is the median – in the ordered set { 5, 7, 10 }, the median is 7
  • even number of integers, there's no middle element; the median is computed as the average of the two middle elements – in the ordered set {5, 7, 8, 10}, the median is (7 + 8) / 2 = 7.5

Now, let's assume that instead of a finite set, we're reading integers off a data stream. We can define the median of a stream of integers as the median of the set of integers read so far.

Let's formalize the problem statement. Given an input of a stream of integers, we must design a class that performs the following two tasks for each integer that we read:

  1. Add the integer to the set of integers
  2. Find the median of the integers read so far

For example:

add 5         // sorted-set = { 5 }, size = 1
get median -> 5

add 7         // sorted-set = { 5, 7 }, size = 2 
get median -> (5 + 7) / 2 = 6

add 10        // sorted-set = { 5, 7, 10 }, size = 3 
get median -> 7

add 8         // sorted-set = { 5, 7, 8, 10 }, size = 4 
get median -> (7 + 8) / 2 = 7.5
..

Although the stream is non-finite, we can assume that we can hold all the elements of the stream in memory at once.

We can represent our tasks as the following operations in code:

void add(int num);

double getMedian();

3. Naive Approach

3.1. Sorted List

Let's begin with a simple idea – we can compute the median of a sorted list of integers by accessing the middle element or the middle two elements of the list, by index. The time complexity of the getMedian operation is O(1).

While adding a new integer, we must determine its correct position in the list such that the list remains sorted. This operation can be performed in O(n) time, where n is the size of the list. So, the overall cost of adding a new element to the list and computing the new median is O(n).

3.2. Improving on the Naive Approach

The add operation runs in linear time, which isn't optimal. Let's try to address that in this section.

We can split the list into two sorted liststhe smaller half of the integers sorted in decreasing order, and the larger half of the integers in increasing order. We can add a new integer into the appropriate half such that the size of the lists differs by 1, at most:

if element is smaller than min. element of larger half:
    insert into smaller half at appropriate index
    if smaller half is much bigger than larger half:
        remove max. element of smaller half and insert at the beginning of larger half (rebalance)
else
    insert into larger half at appropriate index:
    if larger half is much bigger than smaller half:
        remove min. element of larger half and insert at the beginning of smaller half (rebalance)

Now, we can compute the median:

if lists contain equal number of elements:
    median = (max. element of smaller half + min. element of larger half) / 2
else if smaller half contains more elements:
    median = max. element of smaller half
else if larger half contains more elements:
    median = min. element of larger half

Though we have only improved the time complexity of the add operation by some constant factor, we have made progress.

Let's analyze the elements we access in the two sorted lists. We potentially access each element as we shift them during the (sorted) add operation. More importantly, we access the minimum and maximum (extremums) of the larger and smaller halves respectively, during the add operation for rebalancing and during the getMedian operation.

We can see that extremums are the first elements of their respective lists. So, we must optimize for accessing the element at index 0 for each half to improve the overall running time of the add operation.

4. Heap-based Approach

Let's refine our understanding of the problem, by applying what we've learnt from our naive approach:

  1. We must get the minimum/maximum element of a dataset in O(1) time
  2. The elements don't have to be kept in a sorted order as long as we can get the minimum/maximum element efficiently
  3. We need to find an approach for adding an element to our dataset that costs less than O(n) time

Next, we'll look at the Heap data structure that helps us achieve our goals efficiently.

4.1. Heap Data Structure

Heap is a data structure that is usually implemented with an array but can be thought of as a binary tree.

Heaps are constrained by the heap property:

4.1.1. Maxheap Property

A (child) node can't have a value greater than that of its parent. Hence, in a max-heap, the root node always has the largest value.

4.1.2. Minheap Property

A (parent) node can't have a value greater than that of its children. Thus, in a min-heap, the root node always has the smallest value.

In Java, the PriorityQueue class represents a heap. Let's move ahead to our first solution using heaps.

4.2. First Solution

Let's replace the lists in our naive approach with two heaps:

  • A min-heap that contains the larger half of the elements, with the minimum element at the root
  • A max-heap that contains the smaller half of the elements, with the maximum element at the root

Now, we can add the incoming integer to the relevant half by comparing with the root of the min-heap. Next, if after insertion, the size of one heap differs from that of the other heap by more than 1, we can rebalance the heaps, thus maintaining a size difference of at most 1:

if size(minHeap) > size(maxHeap) + 1:
    remove root element of minHeap, insert into maxHeap
if size(maxHeap) > size(minHeap) + 1:
    remove root element of maxHeap, insert into minHeap

With this approach, we can compute the median as the average of the root elements of both the heaps, if the size of the two heaps is equal. Otherwise, the root element of the heap with more elements is the median.

We'll use the PriorityQueue class to represent the heaps. The default heap property of a PriorityQueue is min-heap. We can create a max-heap by using a Comparator.reverserOrder that uses the reverse of the natural order:

class MedianOfIntegerStream {

    private Queue<Integer> minHeap, maxHeap;

    MedianOfIntegerStream() {
        minHeap = new PriorityQueue<>();
        maxHeap = new PriorityQueue<>(Comparator.reverseOrder());
    }

    void add(int num) {
        if (!minHeap.isEmpty() && num < minHeap.peek()) {
            maxHeap.offer(num);
            if (maxHeap.size() > minHeap.size() + 1) {
                minHeap.offer(maxHeap.poll());
            }
        } else {
            minHeap.offer(num);
            if (minHeap.size() > maxHeap.size() + 1) {
                maxHeap.offer(minHeap.poll());
            }
        }
    }

    double getMedian() {
        int median;
        if (minHeap.size() < maxHeap.size()) {
            median = maxHeap.peek();
        } else if (minHeap.size() > maxHeap.size()) {
            median = minHeap.peek();
        } else {
            median = (minHeap.peek() + maxHeap.peek()) / 2; 
        }
        return median;
    }
}

Before we analyze the running time of our code, let's look at the time complexity of the heap operations we have used:

find-min/find-max        O(1)    

delete-min/delete-max    O(log n)

insert                   O(log n)

So, the getMedian operation can be performed in O(1) time as it requires the find-min and find-max functions only. The time complexity of the add operation is O(log n) – three insert/delete calls each requiring O(log n) time.

4.3. Heap Size Invariant Solution

In our previous approach, we compared each new element with the root elements of the heaps. Let's explore another approach using heap in which we can leverage the heap property to add a new element in the appropriate half.

As we have done for our previous solution, we begin with two heaps – a min-heap and a max-heap. Next, let's introduce a condition: the size of the max-heap must be (n / 2) at all times, while the size of the min-heap can be either (n / 2) or (n / 2) + 1, depending on the total number of elements in the two heaps. In other words, we can allow only the min-heap to have an extra element, when the total number of elements is odd.

With our heap size invariant, we can compute the median as the average of the root elements of both heaps, if the sizes of both heaps are (n / 2). Otherwise, the root element of the min-heap is the median.

When we add a new integer, we have two scenarios:

1. Total no. of existing elements is even
   size(min-heap) == size(max-heap) == (n / 2)

2. Total no. of existing elements is odd
   size(max-heap) == (n / 2)
   size(min-heap) == (n / 2) + 1

We can maintain the invariant by adding the new element to one of the heaps and rebalancing every time:

The rebalancing works by moving the largest element from the max-heap to the min-heap, or by moving the smallest element from the min-heap to the max-heap. This way, though we're not comparing the new integer before adding it to a heap, the subsequent rebalancing ensures that we honor the underlying invariant of smaller and larger halves.

Let's implement our solution in Java using PriorityQueues:

class MedianOfIntegerStream {

    private Queue<Integer> minHeap, maxHeap;

    MedianOfIntegerStream() {
        minHeap = new PriorityQueue<>();
        maxHeap = new PriorityQueue<>(Comparator.reverseOrder());
    }

    void add(int num) {
        if (minHeap.size() == maxHeap.size()) {
            maxHeap.offer(num);
            minHeap.offer(maxHeap.poll());
        } else {
            minHeap.offer(num);
            maxHeap.offer(minHeap.poll());
        }
    }

    double getMedian() {
        int median;
        if (minHeap.size() > maxHeap.size()) {
            median = minHeap.peek();
        } else {
            median = (minHeap.peek() + maxHeap.peek()) / 2;
        }
        return median;
    }
}

The time complexities of our operations remain unchanged: getMedian costs O(1) time, while add runs in time O(log n) with exactly the same number of operations.

Both the heap-based solutions offer similar space and time complexities. While the second solution is clever and has a cleaner implementation, the approach isn't intuitive. On the other hand, the first solution follows our intuition naturally, and it's easier to reason about the correctness of its add operation.

5. Conclusion

In this tutorial, we learned how to compute the median of a stream of integers. We evaluated a few approaches and implemented a couple of different solutions in Java using PriorityQueue.

As usual, the source code for all the examples is available over on GitHub.

How to Set the JVM Time Zone

$
0
0

1. Overview

The users of our applications can be demanding when it comes to timestamps. They expect our applications to detect their time zones automatically, and display timestamps in the correct time zone.

In this tutorial, we'll take a look at several ways we can modify the time zone of the JVM. We'll also learn about some of the pitfalls associated with managing the time zone.

2. Introduction to Time Zone

By default, the JVM reads time zone information from the operating system. This information gets passed to the TimeZone class, which stores the time zone and calculates the daylight saving time.

We can call the method getDefault, which will return the time zone where the program is running. Furthermore, we can obtain a list of supported time zone IDs from the application using TimeZone.getAvailableIDs().

When naming the time zone, Java relies on the naming convention of the tz database.

3. Changing the Time Zone

In this section, we're going to take a look at several ways we can change the time zone in the JVM.

3.1. Setting an Environment Variable

Let's begin by seeing how we can use an environment variable to change the time zone. We can add or modify an environment variable TZ.

For example, in Linux-based environments, we can use the export command:

export TZ="America/Sao_Paulo"

After setting the environment variable, we can see that the time zone of our running application is now America/Sao_Paulo:

Calendar calendar = Calendar.getInstance();
assertEquals(calendar.getTimeZone(), TimeZone.getTimeZone("America/Sao_Paulo"));

3.2. Setting a JVM Argument

An alternative to setting an environment variable is setting the JVM argument user.timezone. This JVM argument takes precedence over the environment variable TZ.

For example, we can use the flag -D when we run our application:

java -Duser.timezone="Asia/Kolkata" com.company.Main

Likewise, we can also set the JVM argument from the application:

System.setProperty("user.timezone", "Asia/Kolkata");

We can now see that the time zone is Asia/Kolkata:

Calendar calendar = Calendar.getInstance();
assertEquals(calendar.getTimeZone(), TimeZone.getTimeZone("Asia/Kolkata"));

3.3. Setting the Time Zone From the Application

Finally, we can also modify the JVM time zone from the application using the TimeZone class. This approach takes precedence over both the environment variable and the JVM argument.

Setting the default time zone is easy:

TimeZone.setDefault(TimeZone.getTimeZone("Portugal"));

As expected, the time zone is now Portugal:

Calendar calendar = Calendar.getInstance();
assertEquals(calendar.getTimeZone(), TimeZone.getTimeZone("Portugal"));

4. Pitfalls

4.1. Using Three-letter Time Zone IDs

Even though it's possible to use three-letter IDs to represent the time zone, it's not recommended.

Instead, we should use the longer names, as the three-letter IDs are ambiguous. For example, IST could be either India Standard Time, Irish Standard Time or Israel Standard Time.

4.2. Global Settings

Note that each of the above approaches is setting the timezone globally for the entire application. In modern applications, though, setting the timezone is often more nuanced than that.

For example, we probably need to translate time into the end user's timezone, and so a global timezone wouldn't make much sense. If a global timezone isn't needed, consider specifying the time zone directly on each date-time instance. Either ZonedDateTime or OffsetDateTime is a handy class for this.

5. Conclusion

In this tutorial, we explained several ways to modify the time zone of the JVM. We saw that we could either set a system-wide environment variable, change a JVM argument or modify it programmatically from our application.

As usual, all the examples used in this article are available over on GitHub.

Using the Not Operator in If Conditions in Java

$
0
0

1. Introduction

In Java's if-else statements we can take a certain action when an expression is true, and an alternative when it is false. In this tutorial, we'll learn about how to reverse the logic using the not operator.

2. The if-else statement

Let's start with a simple if-else statement:

boolean isValid = true;

if (isValid) {
    System.out.println("Valid");
} else {
    System.out.println("Invalid");
}

What if our program only needs to handle the negative case? How would we re-write the above example?

One option is to simply remove the code in the if block:

boolean isValid = true;

if (isValid) {

} else {
    System.out.println("Invalid");
}

However, an empty if block looks like it might be incomplete code, and seems a long-winded way of handling only the negative condition. We might instead try testing if our logical expression evaluates to false:

boolean isValid = true;

if (isValid == false) {
    System.out.println("Invalid");
}

The above version is relatively easy to read, though it might be harder to do if the logical expression were more complex. Java has an alternative for us, though, in the form of the not operator:

boolean isValid = true;

if (!isValid) {
    System.out.println("Invalid");
}

3. The not Operator

The not operator is a logical operator, represented in Java by the ! symbol. It's a unary operator that takes a boolean value as its operand. The not operator works by inverting (or negating) the value of its operand.

3.1. Applying the not Operator to a Boolean Value

When applied to a boolean value, the not operator turns true to false and false to true.

For example:

System.out.println(!true);   // prints false 
System.out.println(!false);  // prints true 
System.out.println(!!false); // prints false

3.2. Applying the not Operator to a Boolean Expression

Since not is a unary operator, when you want to not the outcome of an expression, you need to surround that expression in parenthesis to get the right answer. The expression in the parenthesis is evaluated first and then the not operator inverts its outcome.

For example:

int count = 2;

System.out.println(!(count > 2));  // prints true
System.out.println(!(count <= 2)); // prints false
boolean x = true;
boolean y = false;

System.out.println(!(x && y));  // prints true
System.out.println(!(x || y));  // prints false

We should note that when negating an expression, De Morgan's laws come into play. In other words, each term in the expression is negated and the operator is reversed. This can help us to simplify harder to read expressions.

For example:

!(x && y) is same as !x || !y
!(x || y) is same as !x && !y
!(a < 3 && b == 10) is same as a >= 3 || b != 10

4. Some Common Pitfalls

Using the not operator can sometimes compromise the readability of our code. Negatives can be harder to understand than positives. Let's look at some examples.

4.1. Double Negatives

Because the not operator is a negation operator, using it with variables or functions that have a negative name, can result in hard to read code. This is similar to natural languages, where double negatives are often considered hard to understand.

For example:

if (product.isActive()) {...}

reads better than

if (!product.isNotActive()) {...}

While our API may not provide an isActive method, we can create one to aid readability.

4.2. Complex Conditions

The not operator can sometimes make an already complex expression even more difficult to read and understand. When this happens, we can simplify the code by reversing the condition or by extracting methods. Let's look at some examples of conditions made complex by the not operator and how we can simplify them by reversing the condition:

if (!true) // Complex
if (false) // Simplified

if (!myDate.onOrAfter(anotherDate)) // Complex 
if (myDate.before(anotherDate))     // Simplified
 
if (!(a >= b)) // Complex
if (a < b)     // Simplified

if (!(count >= 10 || total >= 1000))  // Complex
if (count < 10 && total < 1000)       // Simplified

5. Conclusion

In this article, we discussed the not operator and how it can be used with boolean values, expressions and in if-else statements.

We also looked at some common pitfalls, caused by writing expressions in their inverse and how to fix them.

As always the source code for the examples used in this article is available over on GitHub.


Bitwise & vs Logical && Operators

$
0
0

1. Introduction

In Java, we've got two ways to say “AND”. But which to use?

In this tutorial, we'll look at the differences between & and &&. And, we'll learn about bitwise operations and short-circuiting along the way.

2. Use of Bitwise AND

The bitwise AND (&) operator compares each binary digit of two integers and returns 1 if both are 1, otherwise, it returns 0. 

Let's take a look at two integers:

int six = 6;
int five = 5;

Next, let's apply a bitwise AND operator on these numbers:

int resultShouldBeFour = six & five;
assertEquals(4, resultShouldBeFour);

To understand this operation, let's look at the binary representation of each number:

Binary of decimal 4: 0100
Binary of decimal 5: 0101
Binary of decimal 6: 0110

The & operator performs a logical AND on each bit, and returns a new binary number:

0110
0101
-----
0100

Finally, our result –  0100 – can be converted back to decimal number – 4.

Let's see the test Java code:

int six = 6;
int five = 5;
int resultShouldBeFour = six & five;
assertEquals(4, resultShouldBeFour);

2.1. Use of & with Booleans

Also, we can use the bitwise AND (&) operator with boolean operands. It returns true only if both the operands are true, otherwise, it returns false.

Let's take three boolean variables:

boolean trueBool = true;
boolean anotherTrueBool = true;
boolean falseBool = false;

Next, let's apply a bitwise AND operator on variables trueBool and anotherTrueBool:

boolean trueANDtrue = trueBool & anotherTrueBool;

Then, the result will be true.

Next, let's apply a bitwise AND operator on trueBool and falseBool:

boolean trueANDFalse = trueBool & falseBool;

In this case, the result will be false.

Let's see the test Java code:

boolean trueBool = true;
boolean anotherTrueBool = true;
boolean falseBool = false;

boolean trueANDtrue= trueBool & anotherTrueBool;
boolean trueANDFalse = trueBool & falseBool;

assertTrue(trueANDtrue);
assertFalse(trueANDFalse);

3. Use of Logical AND

Like &, the logical AND (&&) operator compares the value of two boolean variables or expressions. And, it returns also true only if both operands are true, otherwise, it returns false.

Let's take three boolean variables:

boolean trueBool = true;
boolean anotherTrueBool = true;
boolean falseBool = false;

Next, let's apply a logical AND operator on variables trueBool and anotherTrueBool:

boolean trueANDtrue = trueBool && anotherTrueBool;

Then, the result will be true.

Next, let's apply a logical AND operator on trueBool and falseBool:

boolean trueANDFalse = trueBool && falseBool;

In this case, the result will be false.

Let's see the test Java code:

boolean trueBool = true;
boolean anotherTrueBool = true;
boolean falseBool = false;
boolean anotherFalseBool = false;

boolean trueANDtrue = trueBool && anotherTrueBool;
boolean trueANDFalse = trueBool && falseBool;
boolean falseANDFalse = falseBool && anotherFalseBool;

assertTrue(trueANDtrue);
assertFalse(trueANDFalse);
assertFalse(falseANDFalse);

3.1. Short-circuit

So, what's the difference? Well, the && operator short-circuits. This means it doesn't evaluate the right-hand side operand or expression when the left-hand side operand or expression is false.

Let's take two expressions evaluating as false:

First Expression: 2<1
Second Expression: 4<5

When we apply a logical AND operator on expressions 2<1 and 4<5, then it evaluates only the first expression 2<1 and returns false.

boolean shortCircuitResult = (2<1) && (4<5);
assertFalse(shortCircuitResult);

3.2. Use of && with Integers

We can use the & operator with boolean or numeric types but && can only be used with boolean operands. Using it with integer operands results in a compilation error:

int five = 2;
int six = 4;
int result = five && six;

4. Comparison

  1. The & operator always evaluates both expressions, whereas the && operator evaluates the second expression only if the first one is true
  2. & compares each operand bitwise, whereas && operates only on booleans

5. Conclusion

In this article, we used the bitwise & operator to compare bits of two digits resulting in a new digit. Also, we used the logical && operator to compare two booleans, resulting in a boolean value.

We also saw some key differences between the two operators.

As always you can find the code for this tutorial over on GitHub.

Java Weekly, Issue 313

$
0
0

Last Java Weekly of 2019 – let's jump right in here 🙂

1. Spring and Java

>> Java 14 Is in Feature-Freeze and Release Rampdown [infoq.com]

Now that the release process has begun, learn which JEPs made the cut.

>> Getting to Know Deep Java Library (DJL) [infoq.com]

A nice overview of Amazon's engine-agnostic machine learning toolkit for Java.

>> The best way to prevent JPA and Hibernate performance issues [vladmihalcea.com]

And see how FetchType.LAZY can prevent superfluous and inefficient queries in a @ManyToOne mapping.

Also worth reading:

Webinars and presentations:

Time to upgrade:

2. Technical

>> Concurrency and Automatic Conflict Resolution [dev.to]

A comparison of two common approaches for resolving conflicts in concurrent applications.

Also worth reading:

3. Musings

>> Assess Quality, Don’t Measure It [satisfice.com]

And though they're nice to have, quality metrics are no substitute for a subjective assessment of quality.

Also worth reading:

4. Comics

>> Worst Idea Ever [dilbert.com]

>> Wally Uses Deep Fake [dilbert.com]

>> Ship Without Manual [dilbert.com]

5. Pick of the Week

>> 5 Principles for Making Better Life Decisions [markmanson.net]

Range Search Algorithm in Java

$
0
0

1. Overview

In this tutorial, we'll explore the concept of searching for neighbors in a two-dimensional space. Then, we'll walk through its implementation in Java.

2. One-Dimensional Search vs Two-Dimensional Search

We know that binary search is an efficient algorithm for finding an exact match in a list of items using a divide-and-conquer approach.

Let's now consider a two-dimensional area where each item is represented by XY coordinates (points) in a plane.

However, instead of an exact match, suppose we want to find neighbors of a given point in the plane. It's clear that if we want the nearest n matches, then binary search will not work. This is because binary search can compare two items in one axis only, whereas we need to be able to compare them in two axes.

We'll look at an alternative to the binary tree data structure in the next section.

3. Quadtree

A quadtree is a spatial tree data structure in which each node has exactly four children. Each child can either be a point or a list containing four sub-quadtrees.

A point stores data — for example, XY coordinates. A region represents a closed boundary within which a point can be stored. It is used to define the area of reach of a quadtree.

Let's understand this more using an example of 10 coordinates in some arbitrary order:

(21,25), (55,53), (70,318), (98,302), (49,229), (135,229), (224,292), (206,321), (197,258), (245,238)

The first three values will be stored as points under the root node as shown in the left-most picture.

The root node cannot accommodate new points now as it has reached its capacity of three points. Therefore, we'll divide the region of the root node into four equal quadrants.

Each of these quadrants can store three points and additionally contain four quadrants within its boundary. This can be done recursively, resulting in a tree of quadrants, which is where the quadtree data structure gets its name.

In the middle picture above, we can see the quadrants created from the root node and how the next four points are stored in these quadrants.

Finally, the right-most picture shows how one quadrant is again subdivided to accommodate more points in that region while the other quadrants still can accept the new points.

We'll now see how to implement this algorithm in Java.

4. Data Structure

Let's create a quadtree data structure. We'll need three domain classes.

Firstly, we'll create a Point class to store the XY coordinates:

public class Point {
    private float x;
    private float y;

    public Point(float x, float y) {
        this.x = x;
        this.y = y;
    }

    // getters & toString()
}

Secondly, let's create a Region class to define the boundaries of a quadrant:

public class Region {
    private float x1;
    private float y1;
    private float x2;
    private float y2;

    public Region(float x1, float y1, float x2, float y2) {
        this.x1 = x1;
        this.y1 = y1;
        this.x2 = x2;
        this.y2 = y2;
    }

    // getters & toString()
}

Finally, let's have a QuadTree class to store data as Point instances and children as QuadTree classes:

public class QuadTree {
    private static final int MAX_POINTS = 3;
    private Region area;
    private List<Point> points = new ArrayList<>();
    private List<QuadTree> quadTrees = new ArrayList<>();

    public QuadTree(Region area) {
        this.area = area;
    }
}

To instantiate a QuadTree object, we specify its area using the Region class through the constructor.

5. Algorithm

Before we write our core logic to store data, let's add a few helper methods. These will prove useful later.

5.1. Helper Methods

Let's modify our Region class.

Firstly, let's have a method containsPoint to indicate if a given point falls inside or outside of a region's area:

public boolean containsPoint(Point point) {
    return point.getX() >= this.x1 
        && point.getX() < this.x2 
        && point.getY() >= this.y1 
        && point.getY() < this.y2;
}

Next, let's have a method doesOverlap to indicate if a given region overlaps with another region:

public boolean doesOverlap(Region testRegion) {
    if (testRegion.getX2() < this.getX1()) {
        return false;
    }
    if (testRegion.getX1() > this.getX2()) {
        return false;
    }
    if (testRegion.getY1() > this.getY2()) {
        return false;
    }
    if (testRegion.getY2() < this.getY1()) {
        return false;
    }
    return true;
}

Finally, let's create a method getQuadrant to divide a range into four equal quadrants and return a specified one:

public Region getQuadrant(int quadrantIndex) {
    float quadrantWidth = (this.x2 - this.x1) / 2;
    float quadrantHeight = (this.y2 - this.y1) / 2;

    // 0=SW, 1=NW, 2=NE, 3=SE
    switch (quadrantIndex) {
    case 0:
        return new Region(x1, y1, x1 + quadrantWidth, y1 + quadrantHeight);
    case 1:
        return new Region(x1, y1 + quadrantHeight, x1 + quadrantWidth, y2);
    case 2:
        return new Region(x1 + quadrantWidth, y1 + quadrantHeight, x2, y2);
    case 3:
        return new Region(x1 + quadrantWidth, y1, x2, y1 + quadrantHeight);
    }
    return null;
}

5.2. Storing Data

We can now write our logic to store data. Let's start by defining a new method addPoint on the QuadTree class to add a new point. This method will return true if a point was successfully added:

public boolean addPoint(Point point) {
    // ...
}

Next, let's write the logic to handle the point. First, we need to check if the point is contained within the boundary of the QuadTree instance. We also need to ensure that the QuadTree instance has not reached the capacity of MAX_POINTS points.

If both the conditions are satisfied, we can add the new point:

if (this.area.containsPoint(point)) {
    if (this.points.size() < MAX_POINTS) {
        this.points.add(point);
        return true;
    }
}

On the other hand, if we've reached the MAX_POINTS value, then we need to add the new point to one of the sub-quadrants. For this, we loop through the child quadTrees list and call the same addPoint method which will return a true value on successful addition. Then we exit the loop immediately as a point needs to be added exactly to one quadrant.

We can encapsulate all this logic inside a helper method:

private boolean addPointToOneQuadrant(Point point) {
    boolean isPointAdded;
    for (int i = 0; i < 4; i++) {
        isPointAdded = this.quadTrees.get(i)
            .addPoint(point);
        if (isPointAdded)
            return true;
    }
    return false;
}

Additionally, let's have a handy method createQuadrants to subdivide the current quadtree into four quadrants:

private void createQuadrants() {
    Region region;
    for (int i = 0; i < 4; i++) {
        region = this.area.getQuadrant(i);
        quadTrees.add(new QuadTree(region));
    }
}

We'll call this method to create quadrants only if we're no longer able to add any new points. This ensures that our data structure uses optimum memory space.

Putting it all together, we've got the updated addPoint method:

public boolean addPoint(Point point) {
    if (this.area.containsPoint(point)) {
        if (this.points.size() < MAX_POINTS) {
            this.points.add(point);
            return true;
        } else {
            if (this.quadTrees.size() == 0) {
                createQuadrants();
            }
            return addPointToOneQuadrant(point);
        }
    }
    return false;
}

5.3. Searching Data

Having our quadtree structure defined to store data, we can now think of the logic for performing a search.

As we're looking for finding adjacent items, we can specify a searchRegion as the starting point. Then, we check if it overlaps with the root region. If it does, then we add all its child points that fall inside the searchRegion.

After the root region, we get into each of the quadrants and repeat the process. This goes on until we reach the end of the tree.

Let's write the above logic as a recursive method in the QuadTree class:

public List<Point> search(Region searchRegion, List<Point> matches) {
    if (matches == null) {
        matches = new ArrayList<Point>();
    }
    if (!this.area.doesOverlap(searchRegion)) {
        return matches;
    } else {
        for (Point point : points) {
            if (searchRegion.containsPoint(point)) {
                matches.add(point);
            }
        }
        if (this.quadTrees.size() > 0) {
            for (int i = 0; i < 4; i++) {
                quadTrees.get(i)
                    .search(searchRegion, matches);
            }
        }
    }
    return matches;
}

6. Testing

Now that we have our algorithm in place, let's test it.

6.1. Populating the Data

First, let's populate the quadtree with the same 10 coordinates we used earlier:

Region area = new Region(0, 0, 400, 400);
QuadTree quadTree = new QuadTree(area);

float[][] points = new float[][] { { 21, 25 }, { 55, 53 }, { 70, 318 }, { 98, 302 }, 
    { 49, 229 }, { 135, 229 }, { 224, 292 }, { 206, 321 }, { 197, 258 }, { 245, 238 } };

for (int i = 0; i < points.length; i++) {
    Point point = new Point(points[i][0], points[i][1]);
        quadTree.addPoint(point);
}

6.2. Range Search

Next, let's perform a range search in an area enclosed by lower bound coordinate (200, 200) and upper bound coordinate (250, 250):

Region searchArea = new Region(200, 200, 250, 250);
List<Point> result = quadTree.search(searchArea, null);

Running the code will give us one nearby coordinate contained within the search area:

[[245.0 , 238.0]]

Let's try a different search area between coordinates (0, 0) and (100, 100):

Region searchArea = new Region(0, 0, 100, 100);
List<Point> result = quadTree.search(searchArea, null);

Running the code will give us two nearby coordinates for the specified search area:

[[21.0 , 25.0], [55.0 , 53.0]]

We observe that depending on the size of the search area, we get zero, one or many points. So, if we're given a point and asked to find the nearest n neighbors, we could define a suitable search area where the given point is at the center.

Then, from all the resulting points of the search operation, we can calculate the Euclidean distances between the given points and sort them to get the nearest neighbors.

7. Time Complexity

The time complexity of a range query is simply O(n). The reason is that, in the worst-case scenario, it has to traverse through each item if the search area specified is equal to or bigger than the populated area.

8. Conclusion

In this article, we first understood the concept of a quadtree by comparing it with a binary tree. Next, we saw how it can be used efficiently to store data spread across a two-dimensional space.

We then saw how to store data and perform a range search.

As always, the source code with tests is available over on GitHub.

Kruskal’s Algorithm for Spanning Trees

$
0
0

1. Overview

In a previous article, we introduced Prim's algorithm to find the minimum spanning trees. In this article, we'll use another approach, Kruskal’s algorithm, to solve the minimum and maximum spanning tree problems.

2. Spanning Tree

A spanning tree of an undirected graph is a connected subgraph that covers all the graph nodes with the minimum possible number of edges. In general, a graph may have more than one spanning tree. The following figure shows a graph with a spanning tree (edges of the spanning tree are in red):

If the graph is edge-weighted, we can define the weight of a spanning tree as the sum of the weights of all its edges. A minimum spanning tree is a spanning tree whose weight is the smallest among all possible spanning trees. The following figure shows a minimum spanning tree on an edge-weighted graph:

Similarly, a maximum spanning tree has the largest weight among all spanning trees. The following figure shows a maximum spanning tree on an edge-weighted graph:

3. Kruskal’s Algorithm

Given a graph, we can use Kruskal’s algorithm to find its minimum spanning tree. If the number of nodes in a graph is V, then each of its spanning trees should have (V-1) edges and contain no cycles. We can describe Kruskal’s algorithm in the following pseudo-code:

Initialize an empty edge set T. 
Sort all graph edges by the ascending order of their weight values. 
foreach edge in the sorted edge list
    Check whether it will create a cycle with the edges inside T.
    If the edge doesn't introduce any cycles, add it into T. 
    If T has (V-1) edges, exit the loop. 
return T

Let's run Kruskal’s algorithm for a minimum spanning tree on our sample graph step-by-step:

Firstly, we choose the edge (0, 2) because it has the smallest weight. Then, we can add edges (3, 4) and (0, 1) as they do not create any cycles. Now the next candidate is edge (1, 2) with weight 9. However, if we include this edge, we'll produce a cycle (0, 1, 2). Therefore, we discard this edge and continue to choose the next smallest one. Finally, the algorithm finishes by adding the edge (2, 4) of weight 10.

To calculate the maximum spanning tree, we can change the sorting order to descending order. The other steps remain the same. The following figure shows the step-by-step construction of a maximum spanning tree on our sample graph.

4. Cycle Detection with a Disjoint Set

In Kruskal’s algorithm, the crucial part is to check whether an edge will create a cycle if we add it to the existing edge set. There are several graph cycle detection algorithms we can use. For example, we can use a depth-first search (DFS) algorithm to traverse the graph and detect whether there is a cycle.

However, we need to do a cycle detection on existing edges each time when we test a new edge. A faster solution is to use the Union-Find algorithm with the disjoint data structure because it also uses an incremental edge adding approach to detect cycles. We can fit this into our spanning tree construction process.

4.1. Disjoint Set and Spanning Tree Construction

Firstly, we treat each node of the graph as an individual set that contains only one node. Then, each time we introduce an edge, we check whether its two nodes are in the same set. If the answer is yes, then it will create a cycle. Otherwise, we merge the two disjoint sets into one set and include the edge for the spanning tree.

We can repeat the above steps until we construct the whole spanning tree.

For example, in the above minimum spanning tree construction, we first have 5 node sets: {0}, {1}, {2}, {3}, {4}. When we check the first edge (0, 2), its two nodes are in different node sets. Therefore, we can include this edge and merge {0} and {2} into one set {0, 2}.

We can do similar operations for the edges (3, 4) and (0, 1). The node sets then become {0, 1, 2} and {3, 4}. When we check the next edge (1, 2), we can see that both nodes of this edge are in the same set. Therefore, we discard this edge and continue to check the next one. Finally, the edge (2, 4) satisfies our condition, and we can include it for the minimum spanning tree.

4.2. Disjoint Set Implementation

We can use a tree structure to represent a disjoint set. Each node has a parent pointer to reference its parent node. In each set, there is a unique root node that represents this set. The root node has a self-referenced parent pointer.

Let's use a Java class to define the disjoint set information:

public class DisjointSetInfo {
    private Integer parentNode;
    DisjointSetInfo(Integer parent) {
        setParentNode(parent);
    }
 
    //standard setters and getters
}

Let's label each graph node with an integer number, starting from 0. We can use a list data structure, List<DisjointSetInfo> nodes, to store the disjoint set information of a graph. In the beginning, each node is the representative member of its own set:

void initDisjointSets(int totalNodes) {
    nodes = new ArrayList<>(totalNodes);
    for (int i = 0; i < totalNodes; i++) {
        nodes.add(new DisjointSetInfo(i));
    }
}

4.3. Find Operation

To find the set that a node belongs to, we can follow the node's parent chain upwards until we reach the root node:

Integer find(Integer node) {
    Integer parent = nodes.get(node).getParentNode();
    if (parent.equals(node)) {
        return node;
    } else {
        return find(parent);
    }
}

It is possible to have a highly unbalanced tree structure for a disjoint set. We can improve the find operation by using the path compression technique.

Since each node we visit on the way to the root node is part of the same set, we can attach the root node to its parent reference directly. The next time when we visit this node, we need one lookup path to get the root node:

Integer pathCompressionFind(Integer node) {
    DisjointSetInfo setInfo = nodes.get(node);
    Integer parent = setInfo.getParentNode();
    if (parent.equals(node)) {
        return node;
    } else {
        Integer parentNode = find(parent);
        setInfo.setParentNode(parentNode);
        return parentNode;
    }
}

4.4. Union Operation

If the two nodes of an edge are in different sets, we'll combine these two sets into one. We can achieve this union operation by setting the root of one representative node to the other representative node:

void union(Integer rootU, Integer rootV) {
    DisjointSetInfo setInfoU = nodes.get(rootU);
    setInfoU.setParentNode(rootV);
}

This simple union operation could produce a highly unbalanced tree as we chose a random root node for the merged set. We can improve the performance using a union by rank technique.

Since it is tree depth that affects the running time of the find operation, we attach the set with the shorter tree to the set with the longer tree. This technique only increases the depth of the merged tree if the original two trees have the same depth.

To achieve this, we first add a rank property to the DisjointSetInfo class:

public class DisjointSetInfo {
    private Integer parentNode;
    private int rank;
    DisjointSetInfo(Integer parent) {
        setParentNode(parent);
        setRank(0);
    }
 
    //standard setters and getters
}

In the beginning, a single node disjoint has a rank of 0. During the union of two sets, the root node with a higher rank becomes the root node of the merged set. We increase the new root node's rank by one only if the original two ranks are the same:

void unionByRank(int rootU, int rootV) {
    DisjointSetInfo setInfoU = nodes.get(rootU);
    DisjointSetInfo setInfoV = nodes.get(rootV);
    int rankU = setInfoU.getRank();
    int rankV = setInfoV.getRank();
    if (rankU < rankV) {
        setInfoU.setParentNode(rootV);
    } else {
        setInfoV.setParentNode(rootU);
        if (rankU == rankV) {
            setInfoU.setRank(rankU + 1);
        }
    }
}

4.5. Cycle Detection

We can determine whether two nodes are in the same disjoint set by comparing the results of two find operations. If they have the same representive root node, then we've detected a cycle. Otherwise, we merge the two disjoint sets by using a union operation:

boolean detectCycle(Integer u, Integer v) {
    Integer rootU = pathCompressionFind(u);
    Integer rootV = pathCompressionFind(v);
    if (rootU.equals(rootV)) {
        return true;
    }
    unionByRank(rootU, rootV);
    return false;
}

The cycle detection, with the union by rank technique alone, has a running time of O(logV). We can achieve better performance with both path compression and union by rank techniques. The running time is O(α(V)), where α(V) is the inverse Ackermann function of the total number of nodes. It is a small constant that is less than 5 in our real-world computations.

5. Java Implementation of Kruskal’s Algorithm

We can use the ValueGraph data structure in Google Guava to represent an edge-weighted graph.

To use ValueGraph, we first need to add the Guava dependency to our project's pom.xml file:

<dependency>
    <groupId>com.google.guava</groupId>
    <artifactId>guava</artifactId>
    <version>28.1-jre</version>
</dependency>

We can wrap the above cycle detection methods into a CycleDetector class and use it in Kruskal's algorithm. Since the minimum and maximum spanning tree construction algorithms only have a slight difference, we can use one general function to achieve both constructions:

ValueGraph<Integer, Double> spanningTree(ValueGraph<Integer, Double> graph, boolean minSpanningTree) {
    Set<EndpointPair> edges = graph.edges();
    List<EndpointPair> edgeList = new ArrayList<>(edges);

    if (minSpanningTree) {
        edgeList.sort(Comparator.comparing(e -> graph.edgeValue(e).get()));
    } else {
        edgeList.sort(Collections.reverseOrder(Comparator.comparing(e -> graph.edgeValue(e).get())));
    }

    int totalNodes = graph.nodes().size();
    CycleDetector cycleDetector = new CycleDetector(totalNodes);
    int edgeCount = 0;

    MutableValueGraph<Integer, Double> spanningTree = ValueGraphBuilder.undirected().build();
    for (EndpointPair edge : edgeList) {
        if (cycleDetector.detectCycle(edge.nodeU(), edge.nodeV())) {
            continue;
        }
        spanningTree.putEdgeValue(edge.nodeU(), edge.nodeV(), graph.edgeValue(edge).get());
        edgeCount++;
        if (edgeCount == totalNodes - 1) {
            break;
        }
    }
    return spanningTree;
}

In Kruskal's algorithm, we first sort all graph edges by their weights. This operation takes O(ElogE) time, where E is the total number of edges.

Then we use a loop to go through the sorted edge list. In each iteration, we check whether a cycle will be formed by adding the edge into the current spanning tree edge set. This loop with the cycle detection takes at most O(ElogV) time.

Therefore, the overall running time is O(ELogE + ELogV). Since the value of E is in the scale of O(V2), the time complexity of Kruskal's algorithm is O(ElogE) or O(ElogV).

6. Conclusion

In this article, we learned how to use Kruskal’s algorithm to find a minimum or maximum spanning tree of a graph. As always, the source code for the article is available over on GitHub.

Sending Emails with Logback

$
0
0

1. Overview

Logback is one of the most popular logging frameworks for Java-based applications. It has built-in support for advanced filtering, archival and removal of old log files, and sending log messages over email.

In this quick tutorial, we'll configure Logback for sending out an email notification for any application errors.

2. Setup

Logback's email notification feature requires using a SMTPAppender. The SMTPAppender makes use of the Java Mail API, which in turn depends on the JavaBeans Activation Framework.

Let's add those dependencies in our POM:

<dependency>
    <groupId>javax.mail</groupId>
    <artifactId>mail</artifactId>
    <version>1.4.7</version>
</dependency>
<dependency>
    <groupId>javax.activation</groupId>
    <artifactId>activation</artifactId>
    <version>1.1.1</version>
    <scope>runtime</scope>
</dependency>

We can find the latest versions of the Java Mail API and JavaBeans Activation Framework on Maven Central.

3. Configuring SMTPAppender

Logback's SMTPAppender, by default, triggers an email when logging an ERROR event.

It holds all the logging events in a cyclic buffer with a default maximum capacity of 256 events. After the buffer gets full, it throws away any older log events.

Let's configure a SMTPAppender in our logback.xml:

<appender name="emailAppender" class="ch.qos.logback.classic.net.SMTPAppender">
    <smtpHost>OUR-SMTP-HOST-ADDRESS</smtpHost>
    <!-- one or more recipients are possible -->
    <to>EMAIL-RECIPIENT-1</to>
    <to>EMAIL-RECIPIENT-2</to>
    <from>SENDER-EMAIL-ADDRESS</from>
    <subject>BAELDUNG: %logger{20} - %msg</subject>
    <layout class="ch.qos.logback.classic.PatternLayout">
        <pattern>%d{HH:mm:ss.SSS} [%thread] %-5level %logger{35} - %msg%n</pattern>
    </layout>
</appender>

Also, we'll add this appender to our Logback configuration's root element:

<root level="INFO">
    <appender-ref ref="emailAppender"/>
</root>

As a result, for any application ERROR that gets logged, it'll send an email with all the buffered logging events formatted by PatternLayout.

We can further replace the PatternLayout with an HTMLLayout to format the log messages in an HTML table:Sample Logback Email

4. Custom Buffer Size

We now know that by default, the outgoing email will contain the last 256 logging event messages. However, we can customize this behavior by including the cyclicBufferTracker configuration and specifying the desired bufferSize.

For triggering an email notification that'll only include the latest five logging events, we'll have:

<appender name="emailAppender" class="ch.qos.logback.classic.net.SMTPAppender">
    <smtpHost>OUR-SMTP-HOST-ADDRESS</smtpHost>
    <to>EMAIL-RECIPIENT</to>
    <from>SENDER-EMAIL-ADDRESS</from>
    <subject>BAELDUNG: %logger{20} - %msg</subject>
    <layout class="ch.qos.logback.classic.html.HTMLLayout"/>
    <cyclicBufferTracker class="ch.qos.logback.core.spi.CyclicBufferTracker"> 
        <bufferSize>5</bufferSize>
    </cyclicBufferTracker>
</appender>

5. SMTPAppender for Gmail

If we're using Gmail as our SMTP provider, we'll have to authenticate over SSL or STARTTLS.

To establish a connection over STARTTLS, the client first issues a STARTTLS command to the server. If the server supports this communication, the connection then switches over to SSL.

Let's now configure our appender for Gmail using STARTTLS:

<appender name="emailAppender" class="ch.qos.logback.classic.net.SMTPAppender">
    <smtpHost>smtp.gmail.com</smtpHost>
    <smtpPort>587</smtpPort>
    <STARTTLS>true</STARTTLS>
    <asynchronousSending>false</asynchronousSending>
    <username>SENDER-EMAIL@gmail.com</username>
    <password>GMAIL-ACCT-PASSWORD</password>
    <to>EMAIL-RECIPIENT</to>
    <from>SENDER-EMAIL@gmail.com</from>
    <subject>BAELDUNG: %logger{20} - %msg</subject>
    <layout class="ch.qos.logback.classic.html.HTMLLayout"/>
</appender>

6. Conclusion

In this article, we explored how to configure a Logback's SMTPAppender for sending out emails in case of an application error.

As usual, all code samples are available over on Github.

Viewing all 3692 articles
Browse latest View live


<script src="https://jsc.adskeeper.com/r/s/rssing.com.1596347.js" async> </script>