Quantcast
Channel: Baeldung
Viewing all 3702 articles
Browse latest View live

Efficiently Merge Sorted Java Sequences

$
0
0

1. Overview

In this short tutorial, we'll see how we can efficiently merge sorted arrays using a heap.

2. The Algorithm

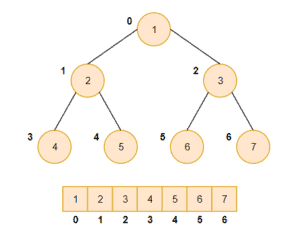
Since our problem statement is to use a heap to merge the arrays, we'll use a min-heap to solve our problem. A min-heap is nothing but a binary tree in which the value of each node is smaller than the values of its child nodes.

Usually, the min-heap is implemented using an array in which the array satisfies specific rules when it comes to finding the parent and children of a node.

For an array A[] and an element at index i:

  • A[(i-1)/2] will return its parent
  • A[(2*i)+1] will return the left child
  • A[(2*i)+2] will return the right child

Here's a picture of min-heap and its array representation:
Let's now create our algorithm that merges a set of sorted arrays:

  1. Create an array to store the results, with the size determined by adding the length of all the input arrays.
  2. Create a second array of size equal to the number of input arrays, and populate it with the first elements of all the input arrays.
  3. Transform the previously created array into a min-heap by applying the min-heap rules on all nodes and their children.
  4. Repeat the next steps until the result array is fully populated.
  5. Get the root element from the min-heap and store it in the result array.
  6. Replace the root element with the next element from the array in which the current root is populated.
  7. Apply min-heap rule again on our min-heap array.

Our algorithm has a recursive flow to create the min-heap, and we have to visit all the elements of the input arrays.

The time complexity of this algorithm is O(k log n), where k is the total number of elements in all the input arrays, and n is the total number of sorted arrays.

Let's now see a sample input and the expected result after running the algorithm so that we can gain a better understanding of the problem. So for these arrays:

{ { 0, 6 }, { 1, 5, 10, 100 }, { 2, 4, 200, 650 } }

The algorithm should return a result array:

{ 0, 1, 2, 4, 5, 6, 10, 100, 200, 650 }

3. Java Implementation

Now that we have a basic understanding of what a min-heap is and how the merge algorithm works, let's look at the Java implementation. We'll use two classes — one to represent the heap nodes and the other to implement the merge algorithm.

3.1. Heap Node Representation

Before implementing the algorithm itself, let's create a class that represents a heap node. This will store the node value and two supporting fields:

public class HeapNode {

    int element;
    int arrayIndex;
    int nextElementIndex = 1;

    public HeapNode(int element, int arrayIndex) {
        this.element = element;
        this.arrayIndex = arrayIndex;
    }
}

Note that we've purposefully omitted the getters and setters here to keep things simple. We'll use the arrayIndex property to store the index of the array in which the current heap node element is taken. And we'll use the nextElementIndex property to store the index of the element that we'll be taking after moving the root node to the result array.

Initially, the value of nextElementIndex will be 1. We'll be incrementing its value after replacing the root node of the min-heap.

3.2. Min-Heap Merge Algorithm

Our next class is to represent the min-heap itself and to implement the merge algorithm:

public class MinHeap {

    HeapNode[] heapNodes;

    public MinHeap(HeapNode heapNodes[]) {
        this.heapNodes = heapNodes;
        heapifyFromLastLeafsParent();
    }

    int getParentNodeIndex(int index) {
        return (index - 1) / 2;
    }

    int getLeftNodeIndex(int index) {
        return (2 * index + 1);
    }

    int getRightNodeIndex(int index) {
        return (2 * index + 2);
    }

    HeapNode getRootNode() {
        return heapNodes[0];
    }

    // additional implementation methods
}

Now that we've created our min-heap class, let's add a method that will heapify a subtree where the root node of the subtree is at the given index of the array:

void heapify(int index) {
    int leftNodeIndex = getLeftNodeIndex(index);
    int rightNodeIndex = getRightNodeIndex(index);
    int smallestElementIndex = index;
    if (leftNodeIndex < heapNodes.length 
      && heapNodes[leftNodeIndex].element < heapNodes[index].element) {
        smallestElementIndex = leftNodeIndex;
    }
    if (rightNodeIndex < heapNodes.length
      && heapNodes[rightNodeIndex].element < heapNodes[smallestElementIndex].element) {
        smallestElementIndex = rightNodeIndex;
    }
    if (smallestElementIndex != index) {
        swap(index, smallestElementIndex);
        heapify(smallestElementIndex);
    }
}

When we use an array to represent a min-heap, the last leaf node will always be at the end of the array. So when transforming an array into a min-heap by calling the heapify() method iteratively, we only need to start the iteration from the last leaf's parent node:

void heapifyFromLastLeafsParent() {
    int lastLeafsParentIndex = getParentNodeIndex(heapNodes.length);
    while (lastLeafsParentIndex >= 0) {
        heapify(lastLeafsParentIndex);
        lastLeafsParentIndex--;
    }
}

Our next method will do the actual implementation of our algorithm. For our better understanding, let's split the method into two parts and see how it works:

int[] merge(int[][] array) {
    // transform input arrays
    // run the minheap algorithm
    // return the resulting array
}

The first part transforms the input arrays into a heap node array that contains all the first array's elements and finds the resulting array's size:

HeapNode[] heapNodes = new HeapNode[array.length];
int resultingArraySize = 0;

for (int i = 0; i < array.length; i++) {
    HeapNode node = new HeapNode(array[i][0], i);
    heapNodes[i] = node;
    resultingArraySize += array[i].length;
}

And the next part populates the result array by implementing the steps 4, 5, 6, and 7 of our algorithm:

MinHeap minHeap = new MinHeap(heapNodes);
int[] resultingArray = new int[resultingArraySize];

for (int i = 0; i < resultingArraySize; i++) {
    HeapNode root = minHeap.getRootNode();
    resultingArray[i] = root.element;

    if (root.nextElementIndex < array[root.arrayIndex].length) {
        root.element = array[root.arrayIndex][root.nextElementIndex++];
    } else {
        root.element = Integer.MAX_VALUE;
    }
    minHeap.heapify(0);
}

4. Testing the Algorithm

Let's now test our algorithm with the same input we mentioned previously:

int[][] inputArray = { { 0, 6 }, { 1, 5, 10, 100 }, { 2, 4, 200, 650 } };
int[] expectedArray = { 0, 1, 2, 4, 5, 6, 10, 100, 200, 650 };

int[] resultArray = MinHeap.merge(inputArray);

assertThat(resultArray.length, is(equalTo(10)));
assertThat(resultArray, is(equalTo(expectedArray)));

5. Conclusion

In this tutorial, we learned how we can efficiently merge sorted arrays using min-heap.

The example we've demonstrated here can be found over on Github.


Java Weekly, Issue 315

$
0
0

1. Spring and Java

>> Manage multiple Java SDKs with SDKMAN! with ease [blog.codeleak.pl]

A good intro to this handy tool for installing and switching between multiple versions of Java, Maven, Gradle, Spring Boot CLI, and more. Very cool.

>> One-Stop Guide to Profiles with Spring Boot [reflectoring.io]

A nice intro to profiles, along with practical advice regarding when to use them and, just as important, when not to use them.

>> Rethinking the Java DTO [blog.scottlogic.com]

And an interesting approach to request/response DTO design in Java using a proliferation of enums, interfaces, and Lombok annotations.

Also worth reading:

Webinars and presentations:

2. Technical

>> Microservice Observability, Part 2: Evolutionary Patterns for Solving Observability Problems [bravenewgeek.com]

A roundup of strategies, patterns, and best practices for building an observability pipeline.

Also worth reading:

3. Musings

>> On Developers' Productivity [blog.frankel.ch]

A fresh look at the myth of the 10x developer and the problems associated with evaluating developer productivity.

Also worth reading:

4. Comics

And my favorite Dilberts of the week:

>> Inefficiency [dilbert.com]

>> Incompetent Employees [dilbert.com]

>> Court of Stupidity [dilbert.com]

5. Pick of the Week

>> Keep earning your title, or it expires [sivers.org]

Get String Value of Excel Cell with Apache POI

$
0
0

1. Overview

A Microsoft Excel cell can have different types like string, numeric, boolean, and formula.

In this quick tutorial, we'll show how to read the cell value as a string – regardless of the cell type – with Apache POI.

2. Apache POI

To begin with, we first need to add the poi dependency to our project pom.xml file:

<dependency>
    <groupId>org.apache.poi</groupId>
    <artifactId>poi</artifactId>
    <version>4.1.1</version>
</dependency>

Apache POI uses the Workbook interface to represent an Excel file. It also uses SheetRow, and Cell interfaces to model different levels of elements in an Excel file. At the Cell level, we can use its getCellType() method to get the cell type. Apache POI supports the following cell types:

  • BLANK
  • BOOLEAN
  • ERROR
  • FORMULA
  • NUMERIC
  • STRING

If we want to display the Excel file content on the screen, we would like to get the string representation of a cell, instead of its raw value. Therefore, for cells that are not of type STRING, we need to convert their data into string values.

3. Get Cell String Value

We can use DataFormatter to fetch the string value of an Excel cell. It can get a formatted string representation of the value stored in a cell. For example, if a cell's numeric value is 1.234, and the format rule of this cell is two decimal points, we'll get string representation “1.23”:

Cell cell = // a numeric cell with value of 1.234 and format rule "0.00"

DataFormatter formatter = new DataFormatter();
String strValue = formatter.formatCellValue(cell);

assertEquals("1.23", strValue);

Therefore, the result of DataFormatter.formatCellValue() is the display string exactly as it appears in Excel.

4. Get String Value of a Formula Cell

If the cell's type is FORMULA, the previous method will return the original formula string, instead of the calculated formula value. Therefore, to get the string representation of the formula value, we need to use FormulaEvaluator to evaluate the formula:

Workbook workbook = // existing Workbook setup
FormulaEvaluator evaluator = workbook.getCreationHelper().createFormulaEvaluator();

Cell cell = // a formula cell with value of "SUM(1,2)"

DataFormatter formatter = new DataFormatter();
String strValue = formatter.formatCellValue(cell, evaluator);

assertEquals("3", strValue);

This method is general to all cell types. If the cell type is FORMULA, we'll evaluate it using the given FormulaEvaluator. Otherwise, we'll return the string representation without any evaluations.

5. Summary

In this quick article, we showed how to get the string representation of an Excel cell, regardless of its type. As always, the source code for the article is available over on GitHub.

Partitioning and Sorting Arrays with Many Repeated Entries

$
0
0

1. Overview

The run-time complexity of algorithms is often dependent on the nature of the input.

In this tutorial, we’ll see how the trivial implementation of the Quicksort algorithm has a poor performance for repeated elements.

Further, we’ll learn a few Quicksort variants to efficiently partition and sort inputs with a high density of duplicate keys.

2. Trivial Quicksort

Quicksort is an efficient sorting algorithm based on the divide and conquer paradigm. Functionally speaking, it operates in-place on the input array and rearranges the elements with simple comparison and swap operations.

2.1. Single-pivot Partitioning

A trivial implementation of the Quicksort algorithm relies heavily on a single-pivot partitioning procedure. In other words, partitioning divides the array A=[ap, ap+1, ap+2,…, ar] into two parts A[p..q] and A[q+1..r] such that:

  • All elements in the first partition, A[p..q] are lesser than or equal to the pivot value A[q]
  • All elements in the second partition, A[q+1..r] are greater than or equal to the pivot value A[q]

After that, the two partitions are treated as independent input arrays and fed themselves to the Quicksort algorithm. Let's see Lomuto's Quicksort in action:

2.2. Performance with Repeated Elements

Let’s say we have an array A = [4, 4, 4, 4, 4, 4, 4] that has all equal elements.

On partitioning this array with the single-pivot partitioning scheme, we'll get two partitions. The first partition will be empty, while the second partition will have N-1 elements. Further, each subsequent invocation of the partition procedure will reduce the input size by only one. Let's see how it works:

Since the partition procedure has linear time complexity, the overall time complexity, in this case, is quadratic. This is the worst-case scenario for our input array.

3. Three-way Partitioning

To efficiently sort an array having a high number of repeated keys, we can choose to handle the equal keys more responsibly. The idea is to place them in the right position when we first encounter them. So, what we're looking for is a three partition state of the array:

  • The left-most partition contains elements which are strictly less than the partitioning key
  • The middle partition contains all elements which are equal to the partitioning key
  • The right-most partition contains all elements which are strictly greater than the partitioning key

We'll now dive deeper into a couple of approaches that we can use to achieve three-way partitioning.

4. Dijkstra's Approach

Dijkstra's approach is an effective way of doing three-way partitioning. To understand this, let's look into a classic programming problem.

4.1. Dutch National Flag Problem

Inspired by the tricolor flag of the Netherlands, Edsger Dijkstra proposed a programming problem called the Dutch National Flag Problem (DNF).

In a nutshell, it's a rearrangement problem where we're given balls of three colors placed randomly in a line, and we're asked to group the same colored balls together. Moreover, the rearrangement must ensure that groups follow the correct order.

Interestingly, the DNF problem makes a striking analogy with the 3-way partitioning of an array with repeated elements.

We can categorize all the numbers of an array into three groups with respect to a given key:

  • The Red group contains all elements that are strictly lesser than the key
  • The White group contains all elements that are equal to the key
  • The Blue group contains all elements that strictly greater than the key

4.2. Algorithm

One of the approaches to solve the DNF problem is to pick the first element as the partitioning key and scan the array from left to right. As we check each element, we move it to its correct group, namely Lesser, Equal, and Greater.

To keep track of our partitioning progress, we'd need the help of three pointers, namely lt, current, and gt. At any point in time, the elements to the left of lt will be strictly less than the partitioning key, and the elements to the right of gt will be strictly greater than the key.

Further, we'll use the current pointer for scanning, which means that all elements lying between the current and gt pointers are yet to be explored:

To begin with, we can set lt and current pointers at the very beginning of the array and the gt pointer at the very end of it:

For each element read via the current pointer, we compare it with the partitioning key and take one of the three composite actions:

  • If input[current] < key, then we exchange input[current] and input[lt] and increment both current and lt pointers
  • If input[current] == key, then we increment current pointer
  • If input[current] > key, then we exchange input[current] and input[gt] and decrement gt

Eventually, we'll stop when the current and gt pointers cross each other. With that, the size of the unexplored region reduces to zero, and we'll be left with only three required partitions.

Finally, let's see how this algorithm works on an input array having duplicate elements:

4.3. Implementation

First, let's write a utility procedure named compare() to do a three-way comparison between two numbers:

public static int compare(int num1, int num2) {
    if (num1 > num2)
        return 1;
    else if (num1 < num2)
        return -1;
    else
        return 0;
}

Next, let's add a method called swap() to exchange elements at two indices of the same array:

public static void swap(int[] array, int position1, int position2) {
    if (position1 != position2) {
        int temp = array[position1];
        array[position1] = array[position2];
        array[position2] = temp;
    }
}

To uniquely identify a partition in the array, we'll need its left and right boundary-indices. So, let's go ahead and create a Partition class:

public class Partition {
    private int left;
    private int right;
}

Now, we're ready to write our three-way partition() procedure:

public static Partition partition(int[] input, int begin, int end) {
    int lt = begin, current = begin, gt = end;
    int partitioningValue = input[begin];

    while (current <= gt) {
        int compareCurrent = compare(a[current], partitioningValue);
        switch (compareCurrent) {
            case -1:
                swap(input, current++, lt++);
                break;
            case 0:
                current++;
                break;
            case 1:
                swap(input, current, gt--);
                break;
        }
    }
    return new Partition(lt, gt);
}

Finally, let's write a quicksort() method that leverages our 3-way partitioning scheme to sort the left and right partitions recursively:

public static void quicksort(int[] input, int begin, int end) {
    if (end <= begin)
        return;

    Partition middlePartition = partition(input, begin, end);

    quicksort(input, begin, middlePartition.getLeft() - 1);
    quicksort(input, middlePartition.getRight() + 1, end);
}

5. Bentley-McIlroy's Approach

Jon Bentley and Douglas McIlroy co-authored an optimized version of the Quicksort algorithm. Let's understand and implement this variant in Java:

5.1. Partitioning Scheme

The crux of the algorithm is an iteration-based partitioning scheme. In the start, the entire array of numbers is an unexplored territory for us:

We then start exploring the elements of the array from the left and right direction. Whenever we enter or leave the loop of exploration, we can visualize the array as a composition of five regions:

  • On the extreme two ends, lies the regions having elements that are equal to the partitioning value
  • The unexplored region stays in the center and its size keeps on shrinking with each iteration
  • On the left of the unexplored region lies all elements lesser than the partitioning value
  • On the right side of the unexplored region are elements greater than the partitioning value

Eventually, our loop of exploration terminates when there are no elements to be explored anymore. At this stage, the size of the unexplored region is effectively zero, and we're left with only four regions:

Next, we move all the elements from the two equal-regions in the center so that there is only one equal-region in the center surrounding by the less-region on the left and the greater-region on the right. To do so, first, we swap the elements in the left equal-region with the elements on the right end of the less-region. Similarly, the elements in the right equal-region are swapped with the elements on the left end of the greater-region.

Finally, we'll be left with only three partitions, and we can further use the same approach to partition the less and the greater regions.

5.2. Implementation

In our recursive implementation of the three-way Quicksort, we'll need to invoke our partition procedure for sub-arrays that'll have a different set of lower and upper bounds. So, our partition() method must accept three inputs, namely the array along with its left and right bounds.

public static Partition partition(int input[], int begin, int end){
	// returns partition window
}

For simplicity, we can choose the partitioning value as the last element of the array. Also, let's define two variables left=begin and right=end to explore the array inward.

Further, We'll also need to keep track of the number of equal elements lying on the leftmost and rightmost. So, let's initialize leftEqualKeysCount=0 and rightEqualKeysCount=0, and we're now ready to explore and partition the array.

First, we start moving from both the directions and find an inversion where an element on the left is not less than partitioning value, and an element on the right is not greater than partitioning value. Then, unless the two pointers left and right have crossed each other, we swap the two elements.

In each iteration, we move elements equal to partitioningValue towards the two ends and increment the appropriate counter:

while (true) {
    while (input[left] < partitioningValue) left++; 
    
    while (input[right] > partitioningValue) {
        if (right == begin)
            break;
        right--;
    }

    if (left == right && input[left] == partitioningValue) {
        swap(input, begin + leftEqualKeysCount, left);
        leftEqualKeysCount++;
        left++;
    }

    if (left >= right) {
        break;
    }

    swap(input, left, right);

    if (input[left] == partitioningValue) {
        swap(input, begin + leftEqualKeysCount, left);
        leftEqualKeysCount++;
    }

    if (input[right] == partitioningValue) {
        swap(input, right, end - rightEqualKeysCount);
        rightEqualKeysCount++;
    }
    left++; right--;
}

In the next phase, we need to move all the equal elements from the two ends in the center. After we exit the loop, the left-pointer will be at an element whose value is not less than partitioningValue. Using this fact, we start moving equal elements from the two ends towards the center:

right = left - 1;
for (int k = begin; k < begin + leftEqualKeysCount; k++, right--) { 
    if (right >= begin + leftEqualKeysCount)
        swap(input, k, right);
}
for (int k = end; k > end - rightEqualKeysCount; k--, left++) {
    if (left <= end - rightEqualKeysCount)
        swap(input, left, k);
}

In the last phase, we can return the boundaries of the middle partition:

return new Partition(right + 1, left - 1);

Finally, let's take a look at a demonstration of our implementation on a sample input

6. Algorithm Analysis

In general, the Quicksort algorithm has an average-case time complexity of O(n*log(n)) and worst-case time complexity of O(n2). With a high density of duplicate keys, we almost always get the worst-case performance with the trivial implementation of Quicksort.

However, when we use the three-way partitioning variant of Quicksort, such as DNF partitioning or Bentley's partitioning, we're able to prevent the negative effect of duplicate keys. Further, as the density of duplicate keys increase, the performance of our algorithm improves as well. As a result, we get the best-case performance when all keys are equal, and we get a single partition containing all equal keys in linear time.

Nevertheless, we must note that we're essentially adding overhead when we switch to a three-way partitioning scheme from the trivial single-pivot partitioning.

For DNF based approach, the overhead doesn't depend on the density of repeated keys. So, if we use DNF partitioning for an array with all unique keys, then we'll get poor performance as compared to the trivial implementation where we're optimally choosing the pivot.

But, Bentley-McIlroy's approach does a smart thing as the overhead of moving the equal keys from the two extreme ends is dependent on their count. As a result, if we use this algorithm for an array with all unique keys, even then, we'll get reasonably good performance.

In summary, the worst-case time complexity of both single-pivot partitioning and three-way partitioning algorithms is O(nlog(n)). However, the real benefit is visible in the best-case scenarios, where we see the time complexity going from O(nlog(n)) for single-pivot partitioning to O(n) for three-way partitioning.

7. Conclusion

In this tutorial, we learned about the performance issues with the trivial implementation of the Quicksort algorithm when the input has a large number of repeated elements.

With a motivation to fix this issue, we learned different three-way partitioning schemes and how we can implement them in Java.

As always, the complete source code for the Java implementation used in this article is available on GitHub.

Asynchronous Programming in Java

$
0
0

1. Overview

With the growing demand for writing non-blocking code, we need ways to execute the code asynchronously.

In this tutorial, we'll look at a few ways to achieve asynchronous programming in Java. Also, we'll explore a few Java libraries that provide out-of-the-box solutions.

2. Asynchronous Programming in Java

2.1. Thread

We can create a new thread to perform any operation asynchronously. With the release of lambda expressions in Java 8, it's cleaner and more readable.

Let's create a new thread that computes and prints the factorial of a number:

int number = 20;
Thread newThread = new Thread(() -> {
    System.out.println("Factorial of " + number + " is: " + factorial(number));
});
newThread.start();

2.2. FutureTask

Since Java 5, the Future interface provides a way to perform asynchronous operations using the FutureTask.

We can use the submit method of the ExecutorService to perform the task asynchronously and return the instance of the FutureTask.

So, let's find the factorial of a number:

ExecutorService threadpool = Executors.newCachedThreadPool();
Future<Long> futureTask = threadpool.submit(() -> factorial(number));

while (!futureTask.isDone()) {
    System.out.println("FutureTask is not finished yet..."); 
} 
long result = futureTask.get(); 

threadpool.shutdown();

Here, we've used the isDone method provided by the Future interface to check if the task is completed. Once finished, we can retrieve the result using the get method.

2.3. CompletableFuture

Java 8 introduced CompletableFuture with a combination of a Future and CompletionStage. It provides various methods like supplyAsync, runAsync, and thenApplyAsync for asynchronous programming.

So, let's use the CompletableFuture in place of the FutureTask to find the factorial of a number:

CompletableFuture<Long> completableFuture = CompletableFuture.supplyAsync(() -> factorial(number));
while (!completableFuture.isDone()) {
    System.out.println("CompletableFuture is not finished yet...");
}
long result = completableFuture.get();

We don't need to use the ExecutorService explicitly. The CompletableFuture internally uses ForkJoinPool to handle the task asynchronously. Hence, it makes our code a lot cleaner.

3. Guava

Guava provides the ListenableFuture class to perform asynchronous operations.

First, we'll add the latest guava Maven dependency:

<dependency>
    <groupId>com.google.guava</groupId>
    <artifactId>guava</artifactId>
    <version>28.2-jre</version>
</dependency>

Then, let's find the factorial of a number using the ListenableFuture:

ExecutorService threadpool = Executors.newCachedThreadPool();
ListeningExecutorService service = MoreExecutors.listeningDecorator(threadpool);
ListenableFuture<Long> guavaFuture = (ListenableFuture<Long>) service.submit(()-> factorial(number));
long result = guavaFuture.get();

Here, the MoreExecutors class provides the instance of the ListeningExecutorService class. Then, the ListeningExecutorService.submit method performs the task asynchronously and returns the instance of the ListenableFuture.

Guava also has a Futures class that provides methods like submitAsync, scheduleAsync, and transformAsync to chain the ListenableFutures similar to the CompletableFuture.

For instance, let's see how to use Futures.submitAsync in place of the ListeningExecutorService.submit method:

ListeningExecutorService service = MoreExecutors.listeningDecorator(threadpool);
AsyncCallable<Long> asyncCallable = Callables.asAsyncCallable(new Callable<Long>() {
    public Long call() {
        return factorial(number);
    }
}, service);
ListenableFuture<Long> guavaFuture = Futures.submitAsync(asyncCallable, service);

Here, the submitAsync method requires an argument of AsyncCallable, which is created using the Callables class.

Additionally, the Futures class provides the addCallback method to register the success and failure callbacks:

Futures.addCallback(
  factorialFuture,
  new FutureCallback<Long>() {
      public void onSuccess(Long factorial) {
          System.out.println(factorial);
      }
      public void onFailure(Throwable thrown) {
          thrown.getCause();
      }
  }, 
  service);

4. EA Async

Electronic Arts brought the async-await feature from .NET to the Java ecosystem through the ea-async library.

The library allows writing asynchronous (non-blocking) code sequentially. Therefore, it makes asynchronous programming easier and scales naturally.

First, we'll add the latest ea-async Maven dependency to the pom.xml:

<dependency>
    <groupId>com.ea.async</groupId>
    <artifactId>ea-async</artifactId>
    <version>1.2.3</version>
</dependency>

Then, let's transform the previously discussed CompletableFuture code by using the await method provided by EA's Async class:

static { 
    Async.init(); 
}

public long factorialUsingEAAsync(int number) {
    CompletableFuture<Long> completableFuture = CompletableFuture.supplyAsync(() -> factorial(number));
    long result = Async.await(completableFuture);
}

Here, we make a call to the Async.init method in the static block to initialize the Async runtime instrumentation.

Async instrumentation transforms the code at runtime and rewrites the call to the await method, to behave similarly to using the chain of CompletableFuture.

Therefore, the call to the await method is similar to calling Future.join.

We can use the – javaagent JVM parameter for compile-time instrumentation. This is an alternative to the Async.init method:

java -javaagent:ea-async-1.2.3.jar -cp <claspath> <MainClass>

Let's examine another example of writing asynchronous code sequentially.

First, we'll perform a few chain operations asynchronously using the composition methods like thenComposeAsync and thenAcceptAsync of the CompletableFuture class:

CompletableFuture<Void> completableFuture = hello()
  .thenComposeAsync(hello -> mergeWorld(hello))
  .thenAcceptAsync(helloWorld -> print(helloWorld))
  .exceptionally(throwable -> {
      System.out.println(throwable.getCause()); 
      return null;
  });
completableFuture.get();

Then, we can transform the code using EA's Async.await():

try {
    String hello = await(hello());
    String helloWorld = await(mergeWorld(hello));
    await(CompletableFuture.runAsync(() -> print(helloWorld)));
} catch (Exception e) {
    e.printStackTrace();
}

The implementation resembles the sequential blocking code. However, the await method doesn't block the code.

As discussed, all calls to the await method will be rewritten by the Async instrumentation to work similarly to the Future.join method.

So, once the asynchronous execution of the hello method is finished, the Future result is passed to the mergeWorld method. Then, the result is passed to the last execution using the CompletableFuture.runAsync method.

5. Cactoos

Cactoos is a Java library based on object-oriented principles.

It is an alternative to Google Guava and Apache Commons that provides common objects for performing various operations.

First, let's add the latest cactoos Maven dependency:

<dependency>
    <groupId>org.cactoos</groupId>
    <artifactId>cactoos</artifactId>
    <version>0.43</version>
</dependency>

The library provides an Async class for asynchronous operations.

So, we can find the factorial of a number using the instance of Cactoos's Async class:

Async<Integer, Long> asyncFunction = new Async<Integer, Long>(input -> factorial(input));
Future<Long> asyncFuture = asyncFunction.apply(number);
long result = asyncFuture.get();

Here, the apply method executes the operation using the ExecutorService.submit method and returns an instance of the Future interface.

Similarly, the Async class has the exec method that provides the same feature without a return value.

Note: the Cactoos library is in the initial stages of development and may not be appropriate for production use yet.

6. Jcabi-Aspects

Jcabi-Aspects provides the @Async annotation for asynchronous programming through AspectJ AOP aspects.

First, let's add the latest jcabi-aspects Maven dependency:

<dependency>
    <groupId>com.jcabi</groupId>
    <artifactId>jcabi-aspects</artifactId>
    <version>0.22.6</version>
</dependency>

The jcabi-aspects library requires AspectJ runtime support. So, we'll add the aspectjrt Maven dependency:

<dependency>
    <groupId>org.aspectj</groupId>
    <artifactId>aspectjrt</artifactId>
    <version>1.9.5</version>
</dependency>

Next, we'll add the jcabi-maven-plugin plugin that weaves the binaries with AspectJ aspects. The plugin provides the ajc goal that does all the work for us:

<plugin>
    <groupId>com.jcabi</groupId>
    <artifactId>jcabi-maven-plugin</artifactId>
    <version>0.14.1</version>
    <executions>
        <execution>
            <goals>
                <goal>ajc</goal>
            </goals>
        </execution>
    </executions>
    <dependencies>
        <dependency>
            <groupId>org.aspectj</groupId>
            <artifactId>aspectjtools</artifactId>
            <version>1.9.1</version>
        </dependency>
        <dependency>
            <groupId>org.aspectj</groupId>
            <artifactId>aspectjweaver</artifactId>
            <version>1.9.1</version>
        </dependency>
    </dependencies>
</plugin>

So, we're all set to use the AOP aspects for asynchronous programming:

@Async
@Loggable
public Future<Long> factorialUsingAspect(int number) {
    Future<Long> factorialFuture = CompletableFuture.completedFuture(factorial(number));
    return factorialFuture;
}

When we compile the code, the library will inject AOP advice in place of the @Async annotation through AspectJ weaving, for the asynchronous execution of the factorialUsingAspect method.

So, let's compile the class using the Maven command:

mvn install

The output from the jcabi-maven-plugin may look like:

 --- jcabi-maven-plugin:0.14.1:ajc (default) @ java-async ---
[INFO] jcabi-aspects 0.18/55a5c13 started new daemon thread jcabi-loggable for watching of @Loggable annotated methods
[INFO] Unwoven classes will be copied to /tutorials/java-async/target/unwoven
[INFO] jcabi-aspects 0.18/55a5c13 started new daemon thread jcabi-cacheable for automated cleaning of expired @Cacheable values
[INFO] ajc result: 10 file(s) processed, 0 pointcut(s) woven, 0 error(s), 0 warning(s)

We can verify if our class is woven correctly by checking the logs in the jcabi-ajc.log file, generated by the Maven plugin:

Join point 'method-execution(java.util.concurrent.Future 
com.baeldung.async.JavaAsync.factorialUsingJcabiAspect(int))' 
in Type 'com.baeldung.async.JavaAsync' (JavaAsync.java:158) 
advised by around advice from 'com.jcabi.aspects.aj.MethodAsyncRunner' 
(jcabi-aspects-0.22.6.jar!MethodAsyncRunner.class(from MethodAsyncRunner.java))

Then, we'll run the class as a simple Java application, and the output will look like:

17:46:58.245 [main] INFO com.jcabi.aspects.aj.NamedThreads - 
jcabi-aspects 0.22.6/3f0a1f7 started new daemon thread jcabi-loggable for watching of @Loggable annotated methods
17:46:58.355 [main] INFO com.jcabi.aspects.aj.NamedThreads - 
jcabi-aspects 0.22.6/3f0a1f7 started new daemon thread jcabi-async for Asynchronous method execution
17:46:58.358 [jcabi-async] INFO com.baeldung.async.JavaAsync - 
#factorialUsingJcabiAspect(20): 'java.util.concurrent.CompletableFuture@14e2d7c1[Completed normally]' in 44.64µs

So, we can see a new daemon thread jcabi-async is created by the library that performed the task asynchronously.

Similarly, the logging is enabled by the @Loggable annotation provided by the library.

7. Conclusion

In this article, we've seen a few ways of asynchronous programming in Java.

To begin with, we explored Java's in-built features like FutureTask and CompletableFuture for asynchronous programming. Then, we've seen a few libraries like EA Async and Cactoos with out-of-the-box solutions.

Also, we examined the support of performing tasks asynchronously using Guava's ListenableFuture and Futures classes. Last, we explored the jcabi-AspectJ library that provides AOP features through its @Async annotation for asynchronous method calls.

As usual, all the code implementations are available over on GitHub.

Generating Random Numbers

$
0
0

1. Overview

In this tutorial, we'll explore different ways of generating random numbers in Java.

2. Using Java API

The Java API provides us with several ways to achieve our purpose. Let’s see some of them.

2.1. java.lang.Math

The random method of the Math class will return a double value in a range from 0.0 (inclusive) to 1.0 (exclusive). Let's see how we'd use it to get a random number in a given range defined by min and max:

int randomWithMathRandom = (int) ((Math.random() * (max - min)) + min);

2.2. java.util.Random

Before Java 1.7, the most popular way of generating random numbers was using nextInt. There were two ways of using this method, with and without parameters. The no-parameter invocation returns any of the int values with approximately equal probability. So, it's very likely that we'll get negative numbers:

Random random = new Random();
int randomWithNextInt = random.nextInt();

If we use the netxInt invocation with the bound parameter, we'll get numbers within a range:

int randomWintNextIntWithinARange = random.nextInt(max - min) + min;

This will give us a number between 0 (inclusive) and parameter (exclusive). So, the bound parameter must be greater than 0. Otherwise, we'll get a java.lang.IllegalArgumentException.

Java 8 introduced the new ints methods that return a java.util.stream.IntStream. Let’s see how to use them.

The ints method without parameters returns an unlimited stream of int values:

IntStream unlimitedIntStream = random.ints();

We can also pass in a single parameter to limit the stream size:

IntStream limitedIntStream = random.ints(streamSize);

And, of course, we can set the maximum and minimum for the generated range:

IntStream limitedIntStreamWithinARange = random.ints(streamSize, min, max);

2.3. java.util.concurrent.ThreadLocalRandom

Java 1.7 release brought us a new and more efficient way of generating random numbers via the ThreadLocalRandom class. This one has three important differences from the Random class:

  • We don’t need to explicitly initiate a new instance of ThreadLocalRandom. This helps us to avoid mistakes of creating lots of useless instances and wasting garbage collector time
  • We can’t set the seed for ThreadLocalRandom, which can lead to a real problem. If we need to set the seed, then we should avoid this way of generating random numbers
  • Random class doesn’t perform well in multi-threaded environments

Now, let’s see how it works:

int randomWithThreadLocalRandomInARange = ThreadLocalRandom.current().nextInt(min, max);

With Java 8 or above, we have new possibilities. Firstly, we have two variations for the nextInt method:

int randomWithThreadLocalRandom = ThreadLocalRandom.current().nextInt();
int randomWithThreadLocalRandomFromZero = ThreadLocalRandom.current().nextInt(max);

Secondly, and more importantly, we can use the ints method:

IntStream streamWithThreadLocalRandom = ThreadLocalRandom.current().ints();

2.4. java.util.SplittableRandom

Java 8 has also brought us a really fast generator — the SplittableRandom class.

As we can see in the JavaDoc, this is a generator for use in parallel computations. It's important to know that the instances are not thread-safe. So, we have to take care when using this class.

We have available the nextInt and ints methods. With nextInt we can set directly the top and bottom range using the two parameters invocation:

SplittableRandom splittableRandom = new SplittableRandom();
int randomWithSplittableRandom = splittableRandom.nextInt(min, max);

This way of using checks that the max parameter is bigger than min. Otherwise, we'll get an IllegalArgumentException. However, it doesn't check if we work with positive or negative numbers. So, any of the parameters can be negative. Also, we have available one- and zero-parameter invocations. Those work in the same way as we have described before.

We have available the ints methods, too. This means that we can easily get a stream of int values. To clarify, we can choose to have a limited or unlimited stream. For a limited stream, we can set the top and bottom for the number generation range:

IntStream limitedIntStreamWithinARangeWithSplittableRandom = splittableRandom.ints(streamSize, min, max);

2.5. java.security.SecureRandom

If we have security-sensitive applications, we should consider using SecureRandom. This is a cryptographically strong generator. Default-constructed instances don't use cryptographically random seeds. So, we should either:

  • Set the seed — consequently, the seed will be unpredictable
  • Set the java.util.secureRandomSeed system property to true

This class inherits from java.util.Random. So, we have available all the methods we saw above. For example, if we need to get any of the int values, then we'll call nextInt without parameters:

SecureRandom secureRandom = new SecureRandom();
int randomWithSecureRandom = secureRandom.nextInt();

On the other hand, if we need to set the range, we can call it with the bound parameter:

int randomWithSecureRandomWithinARange = secureRandom.nextInt(max - min) + min;

We must remember that this way of using it throws IllegalArgumentException if the parameter is not bigger than zero.

3. Using Third-Party APIs

As we have seen, Java provides us with a lot of classes and methods for generating random numbers. However, there are also third-party APIs for this purpose.

We're going to take a look at some of them.

3.1. org.apache.commons.math3.random.RandomDataGenerator

There are a lot of generators in the commons mathematics library from the Apache Commons project. The easiest, and probably the most useful, is the RandomDataGenerator. It uses the Well19937c algorithm for the random generation. However, we can provide our algorithm implementation.

Let’s see how to use it. Firstly, we have to add the dependency:

<dependency>
    <groupId>org.apache.commons</groupId>
    <artifactId>commons-math3</artifactId>
    <version>3.6.1</version>
</dependency>

The latest version of commons-math3 can be found on Maven Central.

Then we can start working with it:

RandomDataGenerator randomDataGenerator = new RandomDataGenerator();
int randomWithRandomDataGenerator = randomDataGenerator.nextInt(min, max);

3.2. it.unimi.dsi.util.XoRoShiRo128PlusRandom

Certainly, this is one of the fastest random number generator implementations. It has been developed at the Information Sciences Department of the Milan University.

The library is also available at Maven Central repositories. So, let's add the dependency:

<dependency>
    <groupId>it.unimi.dsi</groupId>
    <artifactId>dsiutils</artifactId>
    <version>2.6.0</version>
</dependency>

This generator inherits from java.util.Random. However, if we take a look at the JavaDoc, we realize that there's only one way of using it —  through the nextInt method. Above all, this method is only available with the zero- and one-parameter invocations. Any of the other invocations will directly use the java.util.Random methods.

For example, if we want to get a random number within a range, we would write:

XoRoShiRo128PlusRandom xoroRandom = new XoRoShiRo128PlusRandom();
int randomWithXoRoShiRo128PlusRandom = xoroRandom.nextInt(max - min) + min;

4. Conclusion

There are several ways to implement random number generation. However, there is no best way. Consequently, we should choose the one that best suits our needs.

The full example can be found over on GitHub.

Intro to OpenCV with Java

$
0
0

1. Introduction

In this tutorial, we'll learn how to install and use the OpenCV computer vision library and apply it to real-time face detection.

2. Installation

To use the OpenCV library in our project, we need to add the opencv Maven dependency to our pom.xml:

<dependency>
    <groupId>org.openpnp</groupId>
    <artifactId>opencv</artifactId>
    <version>3.4.2-0</version>
</dependency>

For Gradle users, we'll need to add the dependency to our build.gradle file:

compile group: 'org.openpnp', name: 'opencv', version: '3.4.2-0'

After adding the library to our dependencies, we can use the features provided by OpenCV.

3. Using the Library

To start using OpenCV, we need to initialize the library, which we can do in our main method:

OpenCV.loadShared();

OpenCV is a class that holds methods related to loading native packages required by the OpenCV library for various platforms and architectures.

It's worth noting that the documentation does things slightly differently:

System.loadLibrary(Core.NATIVE_LIBRARY_NAME)

Both of those method calls will actually load the required native libraries.

The difference here is that the latter requires the native libraries to be installed. The former, however, can install the libraries to a temporary folder if they are not available on a given machine. Due to this difference, the loadShared method is usually the best way to go.

Now that we've initialized the library, let's see what we can do with it.

4. Loading Images

To start, let's load the sample image from the disk using OpenCV:

public static Mat loadImage(String imagePath) {
    Imgcodecs imageCodecs = new Imgcodecs();
    return imageCodecs.imread(imagePath);
}

This method will load the given image as a Mat object, which is a matrix representation.

To save the previously loaded image, we can use the imwrite() method of the Imgcodecs class:

public static void saveImage(Mat imageMatrix, String targetPath) {
    Imgcodecs imgcodecs = new Imgcodecs();
    imgcodecs.imwrite(targetPath, imageMatrix);
}

5. Haar Cascade Classifier

Before diving into facial-recognition, let's understand the core concepts that make this possible.

Simply put, a classifier is a program that seeks to place a new observation into a group dependent on past experience. Cascading classifiers seek to do this using a concatenation of several classifiers. Each subsequent classifier uses the output from the previous as additional information, improving the classification greatly.

5.1. Haar Features

Face detection in OpenCV is done by Haar-feature-based cascade classifiers.

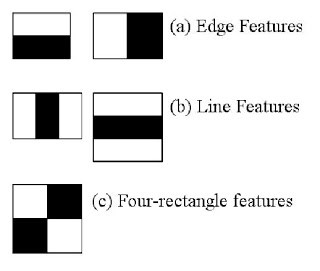
Haar features are filters that are used to detect edges and lines on the image. The filters are seen as squares with black and white colors:

Haar Features

These filters are applied multiple times to an image, pixel by pixel, and the result is collected as a single value. This value is the difference between the sum of pixels under the black square and the sum of pixels under the white square.

6. Face Detection

Generally, the cascade classifier needs to be pre-trained to be able to detect anything at all.

Since the training process can be long and would require a big dataset, we're going to use one of the pre-trained models offered by OpenCV. We'll place this XML file in our resources folder for easy access.

Let's step through the process of detecting a face:

Face To Detect

We'll attempt to detect the face by outlining it with a red rectangle.

To get started, we need to load the image in Mat format from our source path:

Mat loadedImage = loadImage(sourceImagePath);

Then, we'll declare a MatOfRect object to store the faces we find:

MatOfRect facesDetected = new MatOfRect();

Next, we need to initialize the CascadeClassifier to do the recognition:

CascadeClassifier cascadeClassifier = new CascadeClassifier(); 
int minFaceSize = Math.round(loadedImage.rows() * 0.1f); 
cascadeClassifier.load("./src/main/resources/haarcascades/haarcascade_frontalface_alt.xml"); 
cascadeClassifier.detectMultiScale(loadedImage, 
  facesDetected, 
  1.1, 
  3, 
  Objdetect.CASCADE_SCALE_IMAGE, 
  new Size(minFaceSize, minFaceSize), 
  new Size() 
);

Above, the parameter 1.1 denotes the scale factor we want to use, specifying how much the image size is reduced at each image scale. The next parameter, 3, is minNeighbors. This is the number of neighbors a candidate rectangle should have in order to retain it.

Finally, we'll loop through the faces and save the result:

Rect[] facesArray = facesDetected.toArray(); 
for(Rect face : facesArray) { 
    Imgproc.rectangle(loadedImage, face.tl(), face.br(), new Scalar(0, 0, 255), 3); 
} 
saveImage(loadedImage, targetImagePath);

When we input our source image, we should now receive the output image with all the faces marked with a red rectangle:

Face Detected

7. Accessing the Camera Using OpenCV

So far, we've seen how to perform face detection on loaded images. But most of the time, we want to do it in real-time. To be able to do that, we need to access the camera.

However, to be able to show an image from a camera, we need a few additional things, apart from the obvious — a camera. To show the images, we'll use JavaFX.

Since we'll be using an ImageView to display the pictures our camera has taken, we need a way to translate an OpenCV Mat to a JavaFX Image:

public Image mat2Img(Mat mat) {
    MatOfByte bytes = new MatOfByte();
    Imgcodecs.imencode("img", mat, bytes);
    InputStream inputStream = new ByteArrayInputStream(bytes.toArray());
    return new Image(inputStream);
}

Here, we are converting our Mat into bytes, and then converting the bytes into an Image object.

We'll start by streaming the camera view to a JavaFX Stage.

Now, let's initialize the library using the loadShared method:

OpenCV.loadShared();

Next, we'll create the stage with a VideoCapture and an ImageView to display the Image:

VideoCapture capture = new VideoCapture(0); 
ImageView imageView = new ImageView(); 
HBox hbox = new HBox(imageView); 
Scene scene = new Scene(hbox);
stage.setScene(scene); 
stage.show();

Here, 0 is the ID of the camera we want to use. We also need to create an AnimationTimer to handle setting the image:

new AnimationTimer() { 
    @Override public void handle(long l) { 
        imageView.setImage(getCapture()); 
    } 
}.start();

Finally, our getCapture method handles converting the Mat to an Image:

public Image getCapture() { 
    Mat mat = new Mat(); 
    capture.read(mat); 
    return mat2Img(mat); 
}

The application should now create a window and then live-stream the view from the camera to the imageView window.

8. Real-Time Face Detection

Finally, we can connect all the dots to create an application that detects a face in real-time.

The code from the previous section is responsible for grabbing the image from the camera and displaying it to the user. Now, all we have to do is to process the grabbed images before showing them on screen by using our CascadeClassifier class.

Let's simply modify our getCapture method to also perform face detection:

public Image getCaptureWithFaceDetection() {
    Mat mat = new Mat();
    capture.read(mat);
    Mat haarClassifiedImg = detectFace(mat);
    return mat2Img(haarClassifiedImg);
}

Now, if we run our application, the face should be marked with the red rectangle.

We can also see a disadvantage of the cascade classifiers. If we turn our face too much in any direction, then the red rectangle disappears. This is because we've used a specific classifier that was trained only to detect the front of the face.

9. Summary

In this tutorial, we learned how to use OpenCV in Java.

We used a pre-trained cascade classifier to detect faces on the images. With the help of JavaFX, we managed to make the classifiers detect the faces in real-time with images from a camera.

As always all the code samples can be found over on GitHub.

Java Weekly, Issue 320

$
0
0

1. Spring and Java

>> Java 14 Feature Spotlight: Records [infoq.com]

A deep dive into the records preview feature with Java Language Architect Brian Goetz.

>> Multitenancy Applications with Spring Boot and Flyway [reflectoring.io]

A basic example of how to bind an incoming request to a tenant and its data source, with practical tips on managing multi-tenant database migrations.

>> How to map a PostgreSQL ARRAY to a Java List with JPA and Hibernate [vladmihalcea.com]

You'll need to update to version 2.9 of the Hibernate Types project to take advantage of this enhancement.

Also worth reading:

Webinars and presentations:

Time to upgrade:

2. Technical

>> TDD Classic State Based UI [blog.code-cop.org]

A practical application of TDD to heavyweight, state-based UI frameworks, using a Java Swing example.

Also worth reading:

3. Musings

>> The Laboring Strategist, A Free-Agent Anti-Pattern (And How to Fix) [daedtech.com]

A intro to the certified Solo Content Marketer and its parallels to the freelance software engineer who fancies himself a consultant.

Also worth reading:

4. Comics

And my favorite Dilberts of the week:

>> Cancelled Presentation [dilbert.com]

>> Slide Deck Too Well Designed [dilbert.com]

>> Making The World A Better Place [dilbert.com]

5. Pick of the Week

>> You can have two Big Things, but not three [asmartbear.com]


Spring Projects Version Naming Scheme

$
0
0

1. Overview

It is common to use Semantic Versioning when naming release versions. For example, these rules apply for a version format such as MAJOR.MINOR.REVISION:

  • MAJOR: Major features and potential breaking changes
  • MINOR: Backward compatible features
  • REVISION: Backward compatible fixes and improvements

Together with Semantic Versioning, projects often use labels to further clarify the state of a particular release. In fact, by using these labels we give hints about the build lifecycle or where artifacts are published.

In this quick article, we'll examine the version-naming schemes adopted by major Spring projects.

2. Spring Framework and Spring Boot

In addition to Semantic Versioning, we can see that Spring Framework and Spring Boot use these labels:

  • BUILD-SNAPSHOT
  • M[number]
  • RC[number]
  • RELEASE

BUILD-SNAPSHOT is the current development release. The Spring team builds this artifact every day and deploys it to https://maven.springframework.org/snapshot.

A Milestone release (M1, M2, M3, …) marks a significant stage in the release process. The team builds this artifact when a development iteration is completed and deploys it to https://maven.springframework.org/milestone.

A Release Candidate (RC1, RC2, RC3, …) is the last step before building the final release. To minimize code changes, only bug fixes should occur at this stage. It is also deployed to https://maven.springframework.org/milestone.

At the very end of the release process, the Spring team produces a RELEASE. Consequently, this is usually the only production-ready artifact. We can also refer to this release as GA, for General Availability.

These labels are alphabetically ordered to make sure that build and dependency managers correctly determine if a version is more recent than another. For example, Maven 2 wrongly considered 1.0-SNAPSHOT as more recent than 1.0-RELEASE. Maven 3 fixed this behavior. As a consequence, we can experience strange behaviors when our naming scheme is not optimal.

3. Umbrella Projects

Umbrella projects, like Spring Cloud and Spring Data, are projects over independent but related sub-projects. To avoid conflicts with these sub-projects, an umbrella project adopts a different naming scheme. Instead of a numbered version, each Release Train has a special name.

In alphabetical order, the London Subway Stations are the inspiration for the Spring Cloud release names — for starters, Angel, Brixton, Finchley, Greenwich, and Hoxton.

In addition to Spring labels shown above, it also defines a Service Release label (SR1, SR2…). If we find a critical bug, a Service Release can be produced.

It is important to realize that a Spring Cloud release is only compatible with a specific Spring Boot version. As a reference, the Spring Cloud Project page contains the compatibility table.

4. Conclusion

As shown above, having a clear version-naming scheme is important. While some releases like Milestones or Release Candidates may be stable, we should always use production-ready artifacts. What is your naming scheme? What advantages does it have over this one?

Breaking YAML Strings Over Multiple Lines

$
0
0

1. Overview

In this article, we'll learn about breaking YAML strings over multiple lines.

In order to parse and test our YAML files, we'll make use of the SnakeYAML library.

2. Multi-Line Strings

Before we begin, let's create a method to simply read a YAML key from a file into a String:

String parseYamlKey(String fileName, String key) {
    InputStream inputStream = this.getClass()
      .getClassLoader()
      .getResourceAsStream(fileName);
    Map<String, String> parsed = yaml.load(inputStream);
    return parsed.get(key);
}

In the next subsections, we'll look over a few strategies for splitting strings over multiple lines.

We'll also learn how YAML handles leading and ending line breaks represented by empty lines at the beginning and end of a block.

3. Literal Style

The literal operator is represented by the pipe (“|”) symbol. It keeps our line breaks but reduces empty lines at the end of the string down to a single line break.

Let's take a look at the YAML file literal.yaml:

key: |
  Line1
  Line2
  Line3

We can see that our line breaks are preserved:

String key = parseYamlKey("literal.yaml", "key");
assertEquals("Line1\nLine2\nLine3", key);

Next, let's take a look at literal2.yaml, which has some leading and ending line breaks:

key: |


  Line1

  Line2

  Line3


...

We can see that every line break is present except for ending line breaks, which are reduced to one:

String key = parseYamlKey("literal2.yaml", "key");
assertEquals("\n\nLine1\n\nLine2\n\nLine3\n", key);

Next, we'll talk about block chomping and how it gives us more control over starting and ending line breaks.

We can change the default behavior by using two chomping methods: keep and strip.

3.1. Keep

Keep is represented by “+” as we can see in literal_keep.yaml:

key: |+
  Line1
  Line2
  Line3


...

By overriding the default behavior, we can see that every ending empty line is kept:

String key = parseYamlKey("literal_keep.yaml", "key");
assertEquals("Line1\nLine2\nLine3\n\n", key);

3.2. Strip

The strip is represented by “-” as we can see in literal_strip.yaml:

key: |-
  Line1
  Line2
  Line3

...

As we might've expected, this results in removing every ending empty line:

String key = parseYamlKey("literal_strip.yaml", "key");
assertEquals("Line1\nLine2\nLine3", key);

4. Folded Style

The folded operator is represented by “>” as we can see in folded.yaml:

key: >
  Line1
  Line2
  Line3

By default, line breaks are replaced by space characters for consecutive non-empty lines:

String key = parseYamlKey("folded.yaml", "key");
assertEquals("Line1 Line2 Line3", key);

Let's look at a similar file, folded2.yaml, which has a few ending empty lines:

key: >
  Line1
  Line2


  Line3


...

We can see that empty lines are preserved, but ending line breaks are also reduced to one:

String key = parseYamlKey("folded2.yaml", "key");
assertEquals("Line1 Line2\n\nLine3\n", key);

We should keep in mind that block chomping affects the folding style in the same way it affects the literal style.

5. Quoting

Let's have a quick look at splitting strings with the help of double and single quotes.

5.1. Double Quotes

With double quotes, we can easily create multi-line strings by using “\n“:

key: "Line1\nLine2\nLine3"
String key = parseYamlKey("plain_double_quotes.yaml", "key");
assertEquals("Line1\nLine2\nLine3", key);

5.2. Single Quotes

On the other hand, single-quoting treats “\n” as part of the string, so the only way to insert a line break is by using an empty line:

key: 'Line1\nLine2

  Line3'
String key = parseYamlKey("plain_single_quotes.yaml", "key");
assertEquals("Line1\\nLine2\nLine3", key);

6. Conclusion

In this quick tutorial, we've looked over multiple ways of breaking YAML strings over multiple lines through quick and practical examples.

As always, the code is available over on GitHub.

Add Build Properties to a Spring Boot Application

$
0
0

1. Introduction

Usually, our project's build configuration contains quite a lot of information about our application. Some of this information might be needed in the application itself. So, rather than hard-code this information, we can use it from the existing build configuration.

In this article, we'll see how to use information from the project's build configuration in a Spring Boot application.

2. The Build Information

Let's say we want to display the application description and version on our website's home page.

Usually, this information is present in pom.xml:

<project xmlns="http://maven.apache.org/POM/4.0.0"
    xmlns:xsi="http://www.w3.org/2001/XMLSchema-instance"
    xsi:schemaLocation="http://maven.apache.org/POM/4.0.0 http://maven.apache.org/xsd/maven-4.0.0.xsd">
    <modelVersion>4.0.0</modelVersion>
    <artifactId>spring-boot</artifactId>
    <name>spring-boot</name>
    <packaging>war</packaging>
    <description>This is simple boot application for Spring boot actuator test</description>
    <version>0.0.1-SNAPSHOT</version>
...
</project>

3. Referencing the Information in the Application Properties File

Now, to use the above information in our application, we'll have to first reference it in one of our application properties files:

application-description=@project.description@
application-version=@project.version@

Here, we've used the value of the build property project.description to set the application property application-description. Similarly, application-version is set using project.version.

The most significant bit here is the use of the @ character around the property name. This tells Spring to expand the named property from the Maven project.

Now, when we build our project, these properties will be replaced with their values from pom.xml.

This expansion is also referred to as resource filtering. It's worth noting that this kind of filtering is only applied to the production configuration. Consequently, we cannot use the build properties in the files under src/test/resources.

Another thing to note is that if we use the addResources flag, the spring-boot:run goal adds src/main/resources directly to the classpath. Although this is useful for hot reloading purposes, it circumvents resource filtering and, consequently, this feature, too.

Now, the above property expansion works out-of-the-box only if we use spring-boot-starter-parent.

3.1. Expanding Properties Without spring-boot-starter-parent

Let's see how we can enable this feature without using the spring-boot-starter-parent dependency.

First, we have to enable resource filtering inside the <build/> element in our pom.xml:

<resources>
    <resource>
        <directory>src/main/resources</directory>
        <filtering>true</filtering>
    </resource>
</resources>

Here, we've enabled resource filtering under src/main/resources only.

Then, we can add the delimiter configuration for the maven-resources-plugin:

<plugin>
    <groupId>org.apache.maven.plugins</groupId>
    <artifactId>maven-resources-plugin</artifactId>
    <configuration>
        <delimiters>
            <delimiter>@</delimiter>
        </delimiters>
        <useDefaultDelimiters>false</useDefaultDelimiters>
    </configuration>
</plugin>

Note that we've specified the useDefaultDelimiters property as false. This ensures that the standard Spring placeholders such as ${placeholder} are not expanded by the build.

4. Using the Build Information in YAML Files

If we're using YAML to store application properties, we might not be able to use @ to specify the build properties. This is because @ is a reserved character in YAML.

But, we can overcome this by either configuring a different delimiter in maven-resources-plugin:

<plugin>
    <groupId>org.apache.maven.plugins</groupId>
    <artifactId>maven-resources-plugin</artifactId>
    <configuration>
        <delimiters>
            <delimiter>^</delimiter>
        </delimiters>
        <useDefaultDelimiters>false</useDefaultDelimiters>
    </configuration>
</plugin>

Or, simply by overriding the resource.delimiter property in the properties block of our pom.xml:

<properties>
    <resource.delimiter>^</resource.delimiter>
</properties>

Then, we can use ^ in our YAML file:

application-description: ^project.description^
application-version: ^project.version^

5. Conclusion

In this article, we saw how we could use Maven project information in our application. This can help us to avoid hardcoding the information that's already present in the project build configuration in our application properties files.

And of course, the code that accompanies this tutorial can be found over on GitHub.

The Java Headless Mode

$
0
0

1. Overview

On occasion, we need to work with graphics-based applications in Java without an actual display, keyboard, or mouse, let's say, on a server or a container.

In this short tutorial, we're going to learn about Java's headless mode to address this scenario. We'll also look at what we can do in headless mode and what we can't.

2. Setting up Headless Mode

There are many ways we can set up headless mode in Java explicitly:

  • Programmatically setting the system property java.awt.headless to true
  • Using the command line argument: java -Djava.awt.headless=true
  • Adding -Djava.awt.headless=true to the JAVA_OPTS environment variable in a server startup script

If the environment is actually headless, the JVM would be aware of it implicitly. However, there will be subtle differences in some scenarios. We'll see them shortly.

3. Examples of UI Components in Headless Mode

A typical use case of UI components running in a headless environment could be an image converter app. Though it needs graphics data for image processing, a display is not really necessary. The app could be run on a server and converted files saved or sent over the network to another machine for display.

Let's see this in action.

First, we'll turn the headless mode on programmatically in a JUnit class:

@Before
public void setUpHeadlessMode() {
    System.setProperty("java.awt.headless", "true");
}

To make sure it is set up correctly, we can use java.awt.GraphicsEnvironment#isHeadless:

@Test
public void whenSetUpSuccessful_thenHeadlessIsTrue() {
    assertThat(GraphicsEnvironment.isHeadless()).isTrue();
}

We should bear in mind that the above test will succeed in a headless environment even if the mode is not explicitly turned on.

Now let's see our simple image converter:

@Test
public void whenHeadlessMode_thenImagesWork() {
    boolean result = false;
    try (InputStream inStream = HeadlessModeUnitTest.class.getResourceAsStream(IN_FILE); 
      FileOutputStream outStream = new FileOutputStream(OUT_FILE)) {
        BufferedImage inputImage = ImageIO.read(inStream);
        result = ImageIO.write(inputImage, FORMAT, outStream);
    }

    assertThat(result).isTrue();
}

In this next sample, we can see that information of all fonts, including font metrics, is also available to us:

@Test
public void whenHeadless_thenFontsWork() {
    GraphicsEnvironment ge = GraphicsEnvironment.getLocalGraphicsEnvironment();
    String fonts[] = ge.getAvailableFontFamilyNames();
      
    assertThat(fonts).isNotEmpty();

    Font font = new Font(fonts[0], Font.BOLD, 14);
    FontMetrics fm = (new Canvas()).getFontMetrics(font);
        
    assertThat(fm.getHeight()).isGreaterThan(0);
    assertThat(fm.getAscent()).isGreaterThan(0);
    assertThat(fm.getDescent()).isGreaterThan(0);
}

4. HeadlessException

There are components that require peripheral devices and won't work in the headless mode. They throw a HeadlessException when used in a non-interactive environment:

Exception in thread "main" java.awt.HeadlessException
	at java.awt.GraphicsEnvironment.checkHeadless(GraphicsEnvironment.java:204)
	at java.awt.Window.<init>(Window.java:536)
	at java.awt.Frame.<init>(Frame.java:420)

This test asserts that using Frame in a headless mode will indeed throw a HeadlessException:

@Test
public void whenHeadlessmode_thenFrameThrowsHeadlessException() {
    assertThatExceptionOfType(HeadlessException.class).isThrownBy(() -> {
        Frame frame = new Frame();
        frame.setVisible(true);
        frame.setSize(120, 120);
    });
}

As a rule of thumb, remember that top-level components such as Frame and Button always need an interactive environment and will throw this exception. However, it will be thrown as an irrecoverable Error if the headless mode is not explicitly set.

5. Bypassing Heavyweight Components in Headless Mode

At this point, we might be asking a question to ourselves – but what if we have code with GUI components to run on both types of environments – a headed production machine and a headless source code analysis server?

In the above examples, we have seen that the heavyweight components won't work on the server and will throw an exception.

So, we can use a conditional approach:

public void FlexibleApp() {
    if (GraphicsEnvironment.isHeadless()) {
        System.out.println("Hello World");
    } else {
        JOptionPane.showMessageDialog(null, "Hello World");
    }
}

Using this pattern, we can create a flexible app that adjusts its behavior as per the environment.

6. Conclusion

With different code samples, we saw the how and why of headless mode in java. This technical article provides a complete list of what all can be done while operating in headless mode.

As usual, the source code for the above examples is available over on GitHub.

MongoDB Aggregations Using Java

$
0
0

1. Overview

In this tutorial, we'll take a dive into the MongoDB Aggregation framework using the MongoDB Java driver.

We'll first look at what aggregation means conceptually, and then set up a dataset. Finally, we'll see various aggregation techniques in action using Aggregates builder.

2. What are Aggregations?

Aggregations are used in MongoDB to analyze data and derive meaningful information out of it. Aggregation is usually performed in various stages, and these stages together form a pipeline, such that the output of one stage is passed on as input to the next stage.

The most commonly used stages can be summarized as:

Stage SQL Equivalent Description
 project SELECT selects only the required fields, can also be used to compute and add derived fields to the collection
 match WHERE filters the collection as per specified criteria
 group GROUP BY gathers input together as per the specified criteria (e.g. count, sum) to return a document for each distinct grouping
 sort ORDER BY sorts the results in ascending or descending order of a given field
 count COUNT counts the documents the collection contains
 limit LIMIT limits the result to a specified number of documents, instead of returning the entire collection
 out SELECT INTO NEW_TABLE writes the result to a named collection; this stage is only acceptable as the last in a pipeline


The SQL Equivalent for each aggregation stage is included above to give us an idea of what the said operation means in the SQL world.

We'll look at Java code samples for all of these stages shortly. But before that, we need a database.

3. Database Setup

3.1. Dataset

The first and foremost requirement for learning anything database-related is the dataset itself!

For the purpose of this tutorial, we'll use a publicly available restful API endpoint that provides comprehensive information about all the countries of the world. This API gives us a lot of data points for a country in a convenient JSON format. Some of the fields that we'll be using in our analysis are:

  • name – the name of the country; for example, United States of America
  • alpha3Code – a shortcode for the country name; for example, IND (for India)
  • region – the region the country belongs to; for example, Europe
  • area – the geographical area of the country
  • languages – official languages of the country in an array format; for example, English
  • borders – an array of neighboring countries' alpha3Codes

Now let's see how to convert this data into a collection in a MongoDB database.

3.2. Importing to MongoDB

First, we need to hit the API endpoint to get all countries and save the response locally in a JSON file. The next step is to import it into MongoDB using the mongoimport command:

mongoimport.exe --db <db_name> --collection <collection_name> --file <path_to_file> --jsonArray

Successful import should give us a collection with 250 documents.

4. Aggregation Samples in Java

Now that we have the bases covered, let's get into deriving some meaningful insights from the data we have for all the countries. We'll use several JUnit tests for this purpose.

But before we do that, we need to make a connection to the database:

@BeforeClass
public static void setUpDB() throws IOException {
    mongoClient = MongoClients.create();
    database = mongoClient.getDatabase(DATABASE);
    collection = database.getCollection(COLLECTION);
}

In all the examples that follow, we'll be using the Aggregates helper class provided by the MongoDB Java driver.

For better readability of our snippets, we can add a static import:

import static com.mongodb.client.model.Aggregates.*;

4.1. match and count

To begin with, let's start with something simple. Earlier we noted that the dataset contains information about languages.

Now, let's say we want to check the number of countries in the world where English is an official language:

@Test
public void givenCountryCollection_whenEnglishSpeakingCountriesCounted_thenNinetyOne() {
    Document englishSpeakingCountries = collection.aggregate(Arrays.asList(
      match(Filters.eq("languages.name", "English")),
      count())).first();
    
    assertEquals(91, englishSpeakingCountries.get("count"));
}

Here we are using two stages in our aggregation pipeline: match and count.

First, we filter out the collection to match only those documents that contain English in their languages field. These documents can be imagined as a temporary or intermediate collection that becomes the input for our next stage, count. This counts the number of documents in the previous stage.

Another point to note in this sample is the use of the method first. Since we know that the output of the last stage, count, is going to be a single record, this is a guaranteed way to extract out the lone resulting document.

4.2. group (with sum) and sort

In this example, our objective is to find out the geographical region containing the maximum number of countries:

@Test
public void givenCountryCollection_whenCountedRegionWise_thenMaxInAfrica() {
    Document maxCountriedRegion = collection.aggregate(Arrays.asList(
      group("$region", Accumulators.sum("tally", 1)),
      sort(Sorts.descending("tally")))).first();
    
    assertTrue(maxCountriedRegion.containsValue("Africa"));
}

As is evident, we are using group and sort to achieve our objective here.

First, we gather the number of countries in each region by accumulating a sum of their occurrences in a variable tally. This gives us an intermediate collection of documents, each containing two fields: the region and the tally of countries in it.  Then we sort it in the descending order and extract the first document to give us the region with maximum countries.

4.3. sort, limit, and out

Now let's use sort, limit and out to extract the seven largest countries area-wise and write them into a new collection:

@Test
public void givenCountryCollection_whenAreaSortedDescending_thenSuccess() {
    collection.aggregate(Arrays.asList(
      sort(Sorts.descending("area")), 
      limit(7),
      out("largest_seven"))).toCollection();

    MongoCollection<Document> largestSeven = database.getCollection("largest_seven");

    assertEquals(7, largestSeven.countDocuments());

    Document usa = largestSeven.find(Filters.eq("alpha3Code", "USA")).first();

    assertNotNull(usa);
}

Here, we first sorted the given collection in the descending order of area. Then, we used the Aggregates#limit method to restrict the result to seven documents only. Finally, we used the out stage to deserialize this data into a new collection called largest_seven. This collection can now be used in the same way as any other – for example, to find if it contains USA.

4.4. project, group (with max), match

In our last sample, let's try something trickier. Say we need to find out how many borders each country shares with others, and what is the maximum such number.

Now in our dataset, we have a borders field, which is an array listing alpha3Codes for all bordering countries of the nation, but there isn't any field directly giving us the count. So we'll need to derive the number of borderingCountries using project:

@Test
public void givenCountryCollection_whenNeighborsCalculated_thenMaxIsFifteenInChina() {
    Bson borderingCountriesCollection = project(Projections.fields(Projections.excludeId(), 
      Projections.include("name"), Projections.computed("borderingCountries", 
        Projections.computed("$size", "$borders"))));
    
    int maxValue = collection.aggregate(Arrays.asList(borderingCountriesCollection, 
      group(null, Accumulators.max("max", "$borderingCountries"))))
      .first().getInteger("max");

    assertEquals(15, maxValue);

    Document maxNeighboredCountry = collection.aggregate(Arrays.asList(borderingCountriesCollection,
      match(Filters.eq("borderingCountries", maxValue)))).first();
       
    assertTrue(maxNeighboredCountry.containsValue("China"));
}

After that, as we saw before, we'll group the projected collection to find the max value of borderingCountries. One thing to point out here is that the max accumulator gives us the maximum value as a number, not the entire Document containing the maximum value. We need to perform match to filter out the desired Document if any further operations are to be performed.

5. Conclusion

In this article, we saw what are MongoDB aggregations, and how to apply them in Java using an example dataset.

We used four samples to illustrate the various aggregation stages to form a basic understanding of the concept. There are umpteen possibilities for data analytics that this framework offers which can be explored further.

For further reading, Spring Data MongoDB provides an alternative way to handle projections and aggregations in Java.

As always, source code is available over on GitHub.

The BeanDefinitionOverrideException in Spring Boot

$
0
0

1. Introduction

The Spring Boot 2.1 upgrade surprised several people with unexpected occurrences of BeanDefinitionOverrideException. It can confuse some developers and make them wonder about what happened to the bean overriding behavior in Spring.

In this tutorial, we'll unravel this issue and see how best to address it.

2. Maven Dependencies

For our example Maven project, we need to add the Spring Boot Starter dependency:

<dependency>
    <groupId>org.springframework.boot</groupId>
    <artifactId>spring-boot-starter</artifactId>
    <version>2.2.3.RELEASE</version>
</dependency>

3. Bean Overriding

Spring beans are identified by their names within an ApplicationContext.

Thus, bean overriding is a default behavior that happens when we define a bean within an ApplicationContext which has the same name as another bean. It works by simply replacing the former bean in case of a name conflict.

Starting in Spring 5.1, the BeanDefinitionOverrideException was introduced to allow developers to automatically throw the exception to prevent any unexpected bean overriding. By default, the original behavior is still available which allows bean overriding.

4. Configuration Change for Spring Boot 2.1

Spring Boot 2.1 disabled bean overriding by default as a defensive approach. The main purpose is to notice the duplicate bean names in advance to prevent overriding beans accidentally.

Therefore, if our Spring Boot application relies on bean overriding, it is very likely to encounter the BeanDefinitionOverrideException after we upgrade the Spring Boot version to 2.1 and later.

In the next sections, we'll look at an example where the BeanDefinitionOverrideException would occur, and then we will discuss some solutions.

5. Identifying the Beans in Conflict

Let's create two different Spring configurations, each with a testBean() method, to produce the BeanDefinitionOverrideException:

@Configuration
public class TestConfiguration1 {

    class TestBean1 {
        private String name;

        // standard getters and setters

    }

    @Bean
    public TestBean1 testBean(){
        return new TestBean1();
    }
}
@Configuration
public class TestConfiguration2 {

    class TestBean2 {
        private String name;

        // standard getters and setters

    }

    @Bean
    public TestBean2 testBean(){
        return new TestBean2();
    }
}

Next, we will create our Spring Boot test class:

@RunWith(SpringRunner.class)
@SpringBootTest(classes = {TestConfiguration1.class, TestConfiguration2.class})
public class SpringBootBeanDefinitionOverrideExceptionIntegrationTest {

    @Test
    public void whenBeanOverridingAllowed_thenTestBean2OverridesTestBean1() {
        Object testBean = applicationContext.getBean("testBean");

        assertThat(testBean.getClass()).isEqualTo(TestConfiguration2.TestBean2.class);
    }
}

Running the test produces a BeanDefinitionOverrideException. However, the exception provides us with some helpful information:

Invalid bean definition with name 'testBean' defined in ... 
... com.baeldung.beandefinitionoverrideexception.TestConfiguration2 ...
Cannot register bean definition [ ... defined in ... 
... com.baeldung.beandefinitionoverrideexception.TestConfiguration2] for bean 'testBean' ...
There is already [ ... defined in ...
... com.baeldung.beandefinitionoverrideexception.TestConfiguration1] bound.

Notice that the exception reveals two important pieces of information.

The first one is the conflicting bean name, testBean:

Invalid bean definition with name 'testBean' ...

And the second shows us the full path of the configurations affected:

... com.baeldung.beandefinitionoverrideexception.TestConfiguration2 ...
... com.baeldung.beandefinitionoverrideexception.TestConfiguration1 ...

As a result, we can see that two different beans are identified as testBean causing a conflict. Additionally, the beans are contained inside the configuration classes TestConfiguration1 and TestConfiguration2.

6. Possible Solutions

Depending on our configuration, Spring Beans have default names unless we set them explicitly.

Therefore, the first possible solution is to rename our beans.

There are some common ways to set bean names in Spring.

6.1. Changing Method Names

By default, Spring takes the name of the annotated methods as bean names.

Therefore, if we have beans defined in a configuration class, like our example, then simply changing the method names will prevent the BeanDefinitionOverrideException:

@Bean
public TestBean1 testBean1() {
    return new TestBean1();
}
@Bean
public TestBean2 testBean2() {
    return new TestBean2();
}

6.2. @Bean Annotation

Spring's @Bean annotation is a very common way of defining a bean.

Thus, another option is to set the name property of @Bean annotation:

@Bean("testBean1")
public TestBean1 testBean() {
    return new TestBean1();
}
@Bean("testBean2")
public TestBean1 testBean() {
    return new TestBean2();
}

6.3. Stereotype Annotations

Another way to define a bean is with stereotype annotations. With Spring's @ComponentScan feature enabled, we can define our bean names at the class level using the @Component annotation:

@Component("testBean1")
class TestBean1 {

    private String name;

    // standard getters and setters

}
@Component("testBean2")
class TestBean2 {

    private String name;

    // standard getters and setters

}

6.4. Beans Coming From 3rd Party Libraries

In some cases, it's possible to encounter a name conflict caused by beans originating from 3rd party spring-supported libraries.

When this happens, we should attempt to identify which conflicting bean belongs to our application, to determine if any of the above solutions can be used.

However, if we are unable to alter any of the bean definitions, then configuring Spring Boot to allow bean overriding can be a workaround.

To enable bean overriding, let's set the spring.main.allow-bean-definition-overriding property to true in our application.properties file:

spring.main.allow-bean-definition-overriding=true

By doing this, we are telling Spring Boot to allow bean overriding without any change to bean definitions.

As a final notice, we should be aware that it is difficult to guess which bean will have priority because the bean creation order is determined by dependency relationships mostly influenced in runtime. Therefore, allowing bean overriding can produce unexpected behavior unless we know the dependency hierarchy of our beans well enough.

7. Conclusion

In this tutorial, we explained what BeanDefinitionOverrideException means in Spring, why it suddenly appears, and how to address it after the Spring Boot 2.1 upgrade.

Like always, the complete source code of this article can be found over on GitHub.

Jenkins Slack Integration

$
0
0

1. Overview

When our teams are responsible for DevOps practices, we often need to monitor builds and other automated jobs.

In this tutorial, we'll see how to configure two popular platforms, Jenkins and Slack, to work together and tell us what's happening while our CI/CD pipelines are running.

2. Setting up Slack

Let's start by configuring Slack so Jenkins can send messages to it. To do this, we'll create a custom Slack app, which requires an Administrator account.

In Slack, we'll create an application and generate an OAuth token:

  • Visit https://api.slack.com
  • Login to the desired workspace
  • Click the Start Building button
  • Name the application Jenkins and click Create App
  • Click on OAuth & Permissions
  • In the Bot Token Scopes section, add the chat:write scope
  • Click the Install App to Workspace button
  • Click the Accept button

When this is done, we'll see a summary screen:

Now, we need to take note of the OAuth token — we'll need it later when we configure Jenkins. We should treat these as sensitive credentials and keep them safe..

To complete the Slack setup, we must invite the new Jenkins user into the channels we wish it to use. One easy way to do this is to mention the new user with the @ character inside each channel.

3. Setting up Jenkins

To set up Jenkins, we'll need an administrator account.

First, let's start by logging into Jenkins and navigating to Manage Jenkins > Plugin Manager.

Then, on the Available tab, we'll search for Slack:

Let's select the checkbox for Slack Notification and click Install without restart.

Now, we need to configure new credentials. Let's navigate to Jenkins > Credentials > System > Global Credentials and add a new Secret text credential:

We'll put the OAuth token from Slack into the Secret field. We should also give these credentials a meaningful ID and description to help us easily identify them later. The Jenkins credentials store is a safe place to keep this token.

Once we save the credentials, there is one more global configuration to set. Under Jenkins > Manage Jenkins > Configure System, we need to check the Custom slack app bot user checkbox under the Slack section:

Now that we've completed the Jenkins setup, let's look at how to configure Jenkins jobs and pipelines to send Slack messages.

4. Configuring a Traditional Jenkins Job

Traditional Jenkins jobs usually execute one or more actions to accomplish their goals. These are configured via the Jenkins user interface.

In order to integrate a traditional job with Slack, we'll use a post-build action.

Let's pick any job, or create a new one. When we drop down the Add post-build action menu, we'll find Slack Notifications:

Once selected, there are lots of available inputs to the Slack Notification action. Generally, most of the default values are sufficient. However, there are a few required pieces of information:

  • Which build phases to send messages for (start, success, failure, etc)
  • The name of the credentials to use – the ones we added previously
  • The Slack channel name or member ID to send messages to

We can also specify additional fields if desired, such as commit information used for the Jenkins job, custom messages, custom bot icons, and more:

When setting things up via the UI, we can use the Test Connection button to ensure that Jenkins can reach Slack. If successful, we'll see a test message in the Slack channel from the Jenkins user:

If the message doesn't show up, the Jenkins log files are useful for troubleshooting. Generally, we need to double-check that the post-build action has all required fields, that the OAuth token was copied correctly, and that the token was granted the proper scopes when we configured Slack.

5. Configuring a Jenkins Pipeline

Jenkins Pipelines differ from traditional jobs. They use a single Groovy script, broken into stages, to define a build. They also don't have post-build actions, so we use the pipeline script itself to send Slack messages.

The following snippet sends a message to Slack from a Jenkins pipeline:

slackSend botUser: true, 
  channel: 'builds', 
  color: '#00ff00', 
  message: 'Testing Jekins with Slack', 
  tokenCredentialId: 'slack-token'

Just like with the traditional Jenkins job setup, we must still specify a channel name and the name of the credential to use.

Via a Jenkins pipeline, we can also use a variety of additional Slack features, such as file upload, message threads, and more.

One downside to using Jenkins pipelines is that there's no test button. To test the integration with Slack, we have to execute the whole pipeline.

When first setting things up, we can create a new pipeline that contains only the Slack command while we're getting things working.

6. Additional Considerations

Now that we've got Jenkins and Slack connected, there are some additional considerations.

Firstly, a single Jenkins instance can communicate with multiple Slack workspaces. All we have to do is create a custom application and generate a new token for each workspace. As long as each token is stored as its own credential in Jenkins, different jobs can post to different workspaces.

Along those same lines, a different Jenkins job can post to different Slack channels. This is a per-job setting in the post-build actions we configure. For example, jobs related to software builds could post to a development-only channel. And jobs related to test or production could go to their own dedicated channels.

Finally, while we've looked at one of the more popular Slack plugins for Jenkins, which provides fine-grain control over what to send, there are a number of other plugins that serve different purposes. For example, if we want every Jenkins job to send the same notification, there is a Global Slack Notifier plugin that might be better suited for this.

7. Conclusion

In this article, we've seen how to integrate Jenkins and Slack to gain feedback on our CI/CD pipelines.

Using a Jenkins plugin, along with a custom Slack application, we were able to send messages from Jenkins to Slack. This allows teams to notice the status of Jenkins jobs and address issues more quickly.


Design Patterns in the Spring Framework

$
0
0

1. Introduction

Design patterns are an essential part of software development. These solutions not only solve recurring problems but also help developers understand the design of a framework by recognizing common patterns.

In this tutorial, we'll look at four of the most common design patterns used in the Spring Framework:

  1. Singleton pattern
  2. Factory Method pattern
  3. Proxy pattern
  4. Template pattern

We'll also look at how Spring uses these patterns to reduce the burden on developers and help users quickly perform tedious tasks.

2. Singleton Pattern

The singleton pattern is a mechanism that ensures only one instance of an object exists per application. This pattern can be useful when managing shared resources or providing cross-cutting services, such as logging.

2.1. Singleton Beans

Generally, a singleton is globally unique for an application, but in Spring, this constraint is relaxed. Instead, Spring restricts a singleton to one object per Spring IoC container. In practice, this means Spring will only create one bean for each type per application context.

Spring's approach differs from the strict definition of a singleton since an application can have more than one Spring container. Therefore, multiple objects of the same class can exist in a single application if we have multiple containers.


By default, Spring creates all beans as singletons.

2.2. Autowired Singletons

For example, we can create two controllers within a single application context and inject a bean of the same type into each.

First, we create a BookRepository that manages our Book domain objects.

Next, we create LibraryController, which uses the BookRepository to return the number of books in the library:

@RestController
public class LibraryController {
    
    @Autowired
    private BookRepository repository;

    @GetMapping("/count")
    public Long findCount() {
        System.out.println(repository);
        return repository.count();
    }
}

Lastly, we create a BookController, which focuses on Book-specific actions, such as finding a book by its ID:

@RestController
public class BookController {
     
    @Autowired
    private BookRepository repository;
 
    @GetMapping("/book/{id}")
    public Book findById(@PathVariable long id) {
        System.out.println(repository);
        return repository.findById(id).get();
    }
}

We then start this application and perform a GET on /count and /book/1:

curl -X GET http://localhost:8080/count
curl -X GET http://localhost:8080/book/1

In the application output, we see that both BookRepository objects have the same object ID:

com.baeldung.spring.patterns.singleton.BookRepository@3ea9524f

The BookRepository object IDs in the LibraryController and BookController are the same, proving that Spring injected the same bean into both controllers.

We can create separate instances of the BookRepository bean by changing the bean scope from singleton to prototype using the @Scope(ConfigurableBeanFactory.SCOPE_PROTOTYPE) annotation.

Doing so instructs Spring to create separate objects for each of the BookRepository beans it creates. Therefore, if we inspect the object ID of the BookRepository in each of our controllers again, we see that they are no longer the same.

3. Factory Method Pattern

The factory method pattern entails a factory class with an abstract method for creating the desired object.

Often, we want to create different objects based on a particular context.

For example, our application may require a vehicle object. In a nautical environment, we want to create boats, but in an aerospace environment, we want to create airplanes:


To accomplish this, we can create a factory implementation for each desired object and return the desired object from the concrete factory method.

3.1. Application Context

Spring uses this technique at the root of its Dependency Injection (DI) framework.

Fundamentally, Spring treats a bean container as a factory that produces beans.

Thus, Spring defines the BeanFactory interface as an abstraction of a bean container:

public interface BeanFactory {

    getBean(Class<T> requiredType);
    getBean(Class<T> requiredType, Object... args);
    getBean(String name);

    // ...
]

Each of the getBean methods is considered a factory method, which returns a bean matching the criteria supplied to the method, like the bean's type and name.

Spring then extends BeanFactory with the ApplicationContext interface, which introduces additional application configuration. Spring uses this configuration to start-up a bean container based on some external configuration, such as an XML file or Java annotations.

Using the ApplicationContext class implementations like AnnotationConfigApplicationContext, we can then create beans through the various factory methods inherited from the BeanFactory interface.

First, we create a simple application configuration:

@Configuration
@ComponentScan(basePackageClasses = ApplicationConfig.class)
public class ApplicationConfig {
}

Next, we create a simple class, Foo, that accepts no constructor arguments:

@Component
public class Foo {
}

Then create another class, Bar, that accepts a single constructor argument:

@Component
@Scope(ConfigurableBeanFactory.SCOPE_PROTOTYPE)
public class Bar {
 
    private String name;
     
    public Bar(String name) {
        this.name = name;
    }
     
    // Getter ...
}

Lastly, we create our beans through the AnnotationConfigApplicationContext implementation of ApplicationContext:

@Test
public void whenGetSimpleBean_thenReturnConstructedBean() {
    
    ApplicationContext context = new AnnotationConfigApplicationContext(ApplicationConfig.class);
    
    Foo foo = context.getBean(Foo.class);
    
    assertNotNull(foo);
}

@Test
public void whenGetPrototypeBean_thenReturnConstructedBean() {
    
    String expectedName = "Some name";
    ApplicationContext context = new AnnotationConfigApplicationContext(ApplicationConfig.class);
    
    Bar bar = context.getBean(Bar.class, expectedName);
    
    assertNotNull(bar);
    assertThat(bar.getName(), is(expectedName));
}

Using the getBean factory method, we can create configured beans using just the class type and — in the case of Bar — constructor parameters.

3.2. External Configuration

This pattern is versatile because we can completely change the application's behavior based on external configuration.

If we wish to change the implementation of the autowired objects in the application, we can adjust the ApplicationContext implementation we use.


For example, we can change the AnnotationConfigApplicationContext to an XML-based configuration class, such as ClassPathXmlApplicationContext:

@Test 
public void givenXmlConfiguration_whenGetPrototypeBean_thenReturnConstructedBean() { 

    String expectedName = "Some name";
    ApplicationContext context = new ClassPathXmlApplicationContext("context.xml");
 
    // Same test as before ...
}

4. Proxy Pattern

Proxies are a handy tool in our digital world, and we use them very often outside of software (such as network proxies). In code, the proxy pattern is a technique that allows one object — the proxy — to control access to another object — the subject or service.


4.1. Transactions

To create a proxy, we create an object that implements the same interface as our subject and contains a reference to the subject.

We can then use the proxy in place of the subject.

In Spring, beans are proxied to control access to the underlying bean. We see this approach when using transactions:

@Service
public class BookManager {
    
    @Autowired
    private BookRepository repository;

    @Transactional
    public Book create(String author) {
        System.out.println(repository.getClass().getName());
        return repository.create(author);
    }
}

In our BookManager class, we annotate the create method with the @Transactional annotation. This annotation instructs Spring to atomically execute our create method. Without a proxy, Spring wouldn't be able to control access to our BookRepository bean and ensure its transactional consistency.

4.2. CGLib Proxies

Instead, Spring creates a proxy that wraps our BookRepository bean and instruments our bean to execute our create method atomically.

When we call our BookManager#create method, we can see the output:

com.baeldung.patterns.proxy.BookRepository$$EnhancerBySpringCGLIB$$3dc2b55c

Typically, we would expect to see a standard BookRepository object ID; instead, we see an EnhancerBySpringCGLIB object ID.

Behind the scenes, Spring has wrapped our BookRepository object inside as EnhancerBySpringCGLIB object. Spring thus controls access to our BookRepository object (ensuring transactional consistency).

Generally, Spring uses two types of proxies:

  1. CGLib Proxies – Used when proxying classes
  2. JDK Dynamic Proxies – Used when proxying interfaces

While we used transactions to expose the underlying proxies, Spring will use proxies for any scenario in which it must control access to a bean.

5. Template Method Pattern

In many frameworks, a significant portion of the code is boilerplate code.

For example, when executing a query on a database, the same series of steps must be completed:

  1. Establish a connection
  2. Execute query
  3. Perform cleanup
  4. Close the connection

These steps are an ideal scenario for the template method pattern.

5.1. Templates & Callbacks

The template method pattern is a technique that defines the steps required for some action, implementing the boilerplate steps, and leaving the customizable steps as abstract. Subclasses can then implement this abstract class and provide a concrete implementation for the missing steps.

We can create a template in the case of our database query:

public abstract DatabaseQuery {

    public void execute() {
        Connection connection = createConnection();
        executeQuery(connection);
        closeConnection(connection);
    } 

    protected Connection createConnection() {
        // Connect to database...
    }

    protected void closeConnection(Connection connection) {
        // Close connection...
    }

    protected abstract void executeQuery(Connection connection);
}

Alternatively, we can provide the missing step by supplying a callback method.

A callback method is a method that allows the subject to signal to the client that some desired action has completed.

In some cases, the subject can use this callback to perform actions — such as mapping results.


For example, instead of having an executeQuery method, we can supply the execute method a query string and a callback method to handle the results.

First, we create the callback method that takes a Results object and maps it to an object of type T:

public interface ResultsMapper<T> {
    public T map(Results results);
}

Then we change our DatabaseQuery class to utilize this callback:

public abstract DatabaseQuery {

    public <T> T execute(String query, ResultsMapper<T> mapper) {
        Connection connection = createConnection();
        Results results = executeQuery(connection, query);
        closeConnection(connection);
        return mapper.map(results);
    ]

    protected Results executeQuery(Connection connection, String query) {
        // Perform query...
    }
}

This callback mechanism is precisely the approach that Spring uses with the JdbcTemplate class.

5.2. JdbcTemplate

The JdbcTemplate class provides the query method, which accepts a query String and ResultSetExtractor object:

public class JdbcTemplate {

    public <T> T query(final String sql, final ResultSetExtractor<T> rse) throws DataAccessException {
        // Execute query...
    }

    // Other methods...
}

The ResultSetExtractor converts the ResultSet object — representing the result of the query — into a domain object of type T:

@FunctionalInterface
public interface ResultSetExtractor<T> {
    T extractData(ResultSet rs) throws SQLException, DataAccessException;
}

Spring further reduces boilerplate code by creating more specific callback interfaces.

For example, the RowMapper interface is used to convert a single row of SQL data into a domain object of type T.

@FunctionalInterface
public interface RowMapper<T> {
    T mapRow(ResultSet rs, int rowNum) throws SQLException;
}

To adapt the RowMapper interface to the expected ResultSetExtractor, Spring creates the RowMapperResultSetExtractor class:

public class JdbcTemplate {

    public <T> List<T> query(String sql, RowMapper<T> rowMapper) throws DataAccessException {
        return result(query(sql, new RowMapperResultSetExtractor<>(rowMapper)));
    }

    // Other methods...
}

Instead of providing logic for converting an entire ResultSet object, including iteration over the rows, we can provide logic for how to convert a single row:

public class BookRowMapper implements RowMapper<Book> {

    @Override
    public Book mapRow(ResultSet rs, int rowNum) throws SQLException {

        Book book = new Book();
        
        book.setId(rs.getLong("id"));
        book.setTitle(rs.getString("title"));
        book.setAuthor(rs.getString("author"));
        
        return book;
    }
}

With this converter, we can then query a database using the JdbcTemplate and map each resulting row:

JdbcTemplate template = // create template...
template.query("SELECT * FROM books", new BookRowMapper());

Apart from JDBC database management, Spring also uses templates for:

6. Conclusion

In this tutorial, we looked at four of the most common design patterns applied in the Spring Framework.

We also explored how Spring utilizes these patterns to provide rich features while reducing the burden on developers.

The code from this article can be found over on GitHub.

Cache Headers in Spring MVC

$
0
0

1. Overview

In this tutorial, we'll learn about HTTP caching. We'll also look at various ways to implement this mechanism between a client and a Spring MVC application.

2. Introducing HTTP Caching

When we open a web page on a browser, it usually downloads a lot of resources from the webserver:

For instance, in this example, a browser needs to download three resources for one /login page. It's common for a browser to make multiple HTTP requests for every web page. Now, if we request such pages very frequently, it causes a lot of network traffic and takes longer to serve these pages.

To reduce network load, the HTTP protocol allows browsers to cache some of these resources. If enabled, browsers can save a copy of a resource in the local cache. As a result, browsers can serve these pages from the local storage instead of requesting it over the network:

A web server can direct the browser to cache a particular resource by adding a Cache-Control header in the response.

Since the resources are cached as a local copy, there is a risk of serving stale content from the browser. Therefore, web servers usually add an expiration time in the Cache-Control header.

In the following sections, we'll add this header in a response from the Spring MVC controller. Later, we'll also see Spring APIs to validate the cached resources based on the expiration time.

3. Cache-Control in Controller's Response

3.1. Using ResponseEntity

The most straightforward way to do this is to use the CacheControl builder class provided by Spring:

@GetMapping("/hello/{name}")
@ResponseBody
public ResponseEntity<String> hello(@PathVariable String name) {
    CacheControl cacheControl = CacheControl.maxAge(60, TimeUnit.SECONDS)
      .noTransform()
      .mustRevalidate();
    return ResponseEntity.ok()
      .cacheControl(cacheControl)
      .body("Hello " + name);
}

This will add a Cache-Control header in the response:

@Test
void whenHome_thenReturnCacheHeader() throws Exception {
    this.mockMvc.perform(MockMvcRequestBuilders.get("/hello/baeldung"))
      .andDo(MockMvcResultHandlers.print())
      .andExpect(MockMvcResultMatchers.status().isOk())
      .andExpect(MockMvcResultMatchers.header()
        .string("Cache-Control","max-age=60, must-revalidate, no-transform"));
}

3.2. Using HttpServletResponse

Often, the controllers need to return the view name from the handler method. However, the ResponseEntity class doesn't allow us to return the view name and deal with the request body at the same time.

Alternatively, for such controllers we can set the Cache-Control header in the HttpServletResponse directly:

@GetMapping(value = "/home/{name}")
public String home(@PathVariable String name, final HttpServletResponse response) {
    response.addHeader("Cache-Control", "max-age=60, must-revalidate, no-transform");
    return "home";
}

This will also add a Cache-Control header in the HTTP response similar to the last section:

@Test
void whenHome_thenReturnCacheHeader() throws Exception {
    this.mockMvc.perform(MockMvcRequestBuilders.get("/home/baeldung"))
      .andDo(MockMvcResultHandlers.print())
      .andExpect(MockMvcResultMatchers.status().isOk())
      .andExpect(MockMvcResultMatchers.header()
        .string("Cache-Control","max-age=60, must-revalidate, no-transform"))
      .andExpect(MockMvcResultMatchers.view().name("home"));
}

4. Cache-Control for Static Resources

Generally, our Spring MVC application serves a lot of static resources like HTML, CSS and JS files. Since such files consume a lot of network bandwidth, so it's important for browsers to cache them. We'll again enable this with the Cache-Control header in the response.

Spring allows us to control this caching behavior in resource mapping:

@Override
public void addResourceHandlers(final ResourceHandlerRegistry registry) {
    registry.addResourceHandler("/resources/**").addResourceLocations("/resources/")
      .setCacheControl(CacheControl.maxAge(60, TimeUnit.SECONDS)
        .noTransform()
        .mustRevalidate());
}

This ensures that all resources defined under /resources are returned with a Cache-Control header in the response.

5. Cache-Control in Interceptors

We can use interceptors in our Spring MVC application to do some pre- and post-processing for every request. This is another placeholder where we can control the caching behavior of the application.

Now instead of implementing a custom interceptor, we'll use the WebContentInterceptor provided by Spring:

@Override
public void addInterceptors(InterceptorRegistry registry) {
    WebContentInterceptor interceptor = new WebContentInterceptor();
    interceptor.addCacheMapping(CacheControl.maxAge(60, TimeUnit.SECONDS)
      .noTransform()
      .mustRevalidate(), "/login/*");
    registry.addInterceptor(interceptor);
}

Here, we registered the WebContentInterceptor and added the Cache-Control header similar to the last few sections. Notably, we can add different Cache-Control headers for different URL patterns.

In the above example, for all requests starting with /login, we'll add this header:

@Test
void whenInterceptor_thenReturnCacheHeader() throws Exception {
    this.mockMvc.perform(MockMvcRequestBuilders.get("/login/baeldung"))
      .andDo(MockMvcResultHandlers.print())
      .andExpect(MockMvcResultMatchers.status().isOk())
      .andExpect(MockMvcResultMatchers.header()
        .string("Cache-Control","max-age=60, must-revalidate, no-transform"));
}

6. Cache Validation in Spring MVC

So far, we've discussed various ways of including a Cache-Control header in the response. This indicates the clients or browsers to cache the resources based on configuration properties like max-age.

It's generally a good idea to add a cache expiry time with each resource. As a result, browsers can avoid serving expired resources from the cache.

Although browsers should always check for expiry, it may not be necessary to re-fetch the resource every time. If a browser can validate that a resource hasn't changed on the server, it can continue to serve the cached version of it. And for this purpose, HTTP provides us with two response headers:

  1. Etag – an HTTP response header that stores a unique hash value to determine whether a cached resource has changed on the server – a corresponding If-None-Match request header must carry the last Etag value
  2. LastModified – an HTTP response header that stores a unit of time when the resource was last updated – a corresponding If-Unmodified-Since request header must carry the last modified date

We can use either of these headers to check if an expired resource needs to be re-fetched. After validating the headers, the server can either re-send the resource or send a 304 HTTP code to signify no change. For the latter scenario, browsers can continue to use the cached resource.

The LastModified header can only store time intervals up to seconds precision. This can be a limitation in cases where a shorter expiry is required. For this reason, it's recommended to use Etag instead. Since Etag header stores a hash value, it's possible to create a unique hash up to more finer intervals like nanoseconds.

That said, let's check out what it looks like to use LastModified.

Spring provides some utility methods to check if the request contains an expiration header or not:

@GetMapping(value = "/productInfo/{name}")
public ResponseEntity<String> validate(@PathVariable String name, WebRequest request) {
 
    ZoneId zoneId = ZoneId.of("GMT");
    long lastModifiedTimestamp = LocalDateTime.of(2020, 02, 4, 19, 57, 45)
      .atZone(zoneId).toInstant().toEpochMilli();
     
    if (request.checkNotModified(lastModifiedTimestamp)) {
        return ResponseEntity.status(304).build();
    }
     
    return ResponseEntity.ok().body("Hello " + name);
}

Spring provides the checkNotModified() method to check if a resource has been modified since the last request:

@Test
void whenValidate_thenReturnCacheHeader() throws Exception {
    HttpHeaders headers = new HttpHeaders();
    headers.add(IF_UNMODIFIED_SINCE, "Tue, 04 Feb 2020 19:57:25 GMT");
    this.mockMvc.perform(MockMvcRequestBuilders.get("/productInfo/baeldung").headers(headers))
      .andDo(MockMvcResultHandlers.print())
      .andExpect(MockMvcResultMatchers.status().is(304));
}

7. Conclusion

In this article, we learned about HTTP caching by using the Cache-Control response header in Spring MVC. We can either add the header in the controller's response using the ResponseEntity class or through resource mapping for static resources.

We can also add this header for particular URL patterns using Spring interceptors.

As always, the code is available over on GitHub.

How to Handle Java SocketException

$
0
0

1. Introduction

In this tutorial, we'll learn the causes of SocketException with an example. We’ll also discuss how to handle the exception.

2. Causes of SocketException

The most common cause of SocketException is writing or reading data to or from a closed socket connection. Another cause of it is closing the connection before reading all data in the socket buffer.

Let's take a closer look at some common underlying reasons.

2.1. Slow Network

A poor network connection might be the underlying problem. Setting a higher socket connection timeout can decrease the rate of SocketException for slow connections:

socket.setSoTimeout(30000); // timeout set to 30,000 ms

2.2. Firewall Intervention

A network firewall can close socket connections. If we have access to the firewall, we can turn it off and see if it solves the problem.

Otherwise, we can use a network monitoring tool such as Wireshark to check firewall activities.

2.3. Long Idle Connection

Idle connections might get forgotten by the other end (to save resources). If we have to use a connection for a long time, we can send heartbeat messages to prevent idle state.

2.4. Application Error

Last but not least, SocketException can occur because of mistakes or bugs in our code.

To demonstrate this, let's start a server on port 6699:

SocketServer server = new SocketServer();
server.start(6699);

When the server is started, we'll wait for a message from the client:

serverSocket = new ServerSocket(port);
clientSocket = serverSocket.accept();
out = new PrintWriter(clientSocket.getOutputStream(), true);
in = new BufferedReader(new InputStreamReader(clientSocket.getInputStream()));
String msg = in.readLine();

Once we get it, we'll respond and close the connection:

out.println("hi");
in.close();
out.close();
clientSocket.close();
serverSocket.close();

So, let's say a client connects to our server and sends “hi”:

SocketClient client = new SocketClient();
client.startConnection("127.0.0.1", 6699);
client.sendMessage("hi");

So far, so good.

But, if the client sends another message:

client.sendMessage("hi again");

Since the client sends “hi again” to the server after the connection is aborted, a SocketException occurs.

3. Handling of a SocketException

Handling SocketException is pretty easy and straightforward. Similar to any other checked exception, we must either throw it or surround it with a try-catch block.

Let's handle the exception in our example:

try {
    client.sendMessage("hi");
    client.sendMessage("hi again");
} catch (SocketException e) {
    client.stopConnection();
}

Here, we've closed the client connection after the exception occurred. Retrying won't work, because the connection is already closed. We should start a new connection instead:

client.startConnection("127.0.0.1", 6699);
client.sendMessage("hi again");

4. Conclusion

In this article, we learned what causes SocketException and how to handle it.

As always, the code is available over on Github.
Arrays.deepEquals

$
0
0

1. Overview

In this tutorial, we'll dive into the details of the deepEquals method from the Arrays class. We'll see when we should use this method, and we'll go through some simple examples.

To learn more about the different methods in the java.util.Arrays class, check out our quick guide.

2. Purpose

We should use the deepEquals method when we want to check the equality between two nested or multidimensional arrays. Also, when we want to compare two arrays composed of user-defined objects, as we'll see later, we must override the equals method.

Now, let's find out more details about the deepEquals method.

2.1. Syntax

We'll start by having a look at the method signature:

public static boolean deepEquals(Object[] a1, Object[] a2)

From the method signature, we notice that we cannot use deepEquals to compare two unidimensional arrays of primitive data types. For this, we must either box the primitive array to its corresponding wrapper or use the Arrays.equals method, which has overloaded methods for primitive arrays.

2.2. Implementation

By analyzing the method's internal implementation, we can see that the method not only checks the top-level elements of the arrays but also checks recursively every subelement of it.

Therefore, we should avoid using the deepEquals method with arrays that have a self-reference because this will result in a java.lang.StackOverflowError.

Next, let's find out what output we can get from this method.

3. Output

The Arrays.deepEquals method returns:

  • true if both parameters are the same object (have the same reference)
  • true if both parameters are null
  • false if only one of the two parameters is null
  • false if the arrays have different lengths
  • true if both arrays are empty
  • true if the arrays contain the same number of elements and every pair of subelements are deeply equal
  • false in other cases

In the next section, we'll have a look at some code examples.

4. Examples

Now it's time to start looking at deepEquals method in action. Moreover, we'll compare the deepEquals method with the equals method from the same Arrays class.

4.1. Unidimensional Arrays

Firstly, let's start with a simple example and compare two unidimensional arrays of type Object:

    Object[] anArray = new Object[] { "string1", "string2", "string3" };
    Object[] anotherArray = new Object[] { "string1", "string2", "string3" };

    assertTrue(Arrays.equals(anArray, anotherArray));
    assertTrue(Arrays.deepEquals(anArray, anotherArray));

We see that both equals and deepEquals methods return true. Let's find out what happens if one element of our arrays is null:

    Object[] anArray = new Object[] { "string1", null, "string3" };
    Object[] anotherArray = new Object[] { "string1", null, "string3" };

    assertTrue(Arrays.equals(anArray, anotherArray));
    assertTrue(Arrays.deepEquals(anArray, anotherArray));

We see that both assertions are passing. Hence, we can conclude that when using the deepEquals method, null values are accepted at any depth of the input arrays.

But let's try one more thing and let's check the behavior with nested arrays:

    Object[] anArray = new Object[] { "string1", null, new String[] {"nestedString1", "nestedString2" }};
    Object[] anotherArray = new Object[] { "string1", null, new String[] {"nestedString1", "nestedString2" } };

    assertFalse(Arrays.equals(anArray, anotherArray));
    assertTrue(Arrays.deepEquals(anArray, anotherArray));

Here we find out that the deepEquals returns true while equals returns false. This is because deepEquals calls itself recursively when encountering an array, while equals just compares the references of the sub-arrays.

4.2. Multidimensional Arrays of Primitive Types

Next, let's check the behavior using multidimensional arrays. In the next example, the two methods have different outputs, emphasizing the fact that we should use deepEquals instead of the equals method when we are comparing multidimensional arrays:

    int[][] anArray = { { 1, 2, 3 }, { 4, 5, 6, 9 }, { 7 } };
    int[][] anotherArray = { { 1, 2, 3 }, { 4, 5, 6, 9 }, { 7 } };

    assertFalse(Arrays.equals(anArray, anotherArray));
    assertTrue(Arrays.deepEquals(anArray, anotherArray));

4.3. Multidimensional Arrays of User-Defined Objects

Finally, let's check the behavior of deepEquals and equals methods when testing the equality of two multidimensional arrays for a user-defined object:

Let's start by creating a simple Person class:

    class Person {
        private int id;
        private String name;
        private int age;

        // constructor & getters & setters

        @Override
        public boolean equals(Object obj) {
            if (this == obj) {
                return true;
            }
            if (obj == null) {
                return false;
            }
            if (!(obj instanceof Person))
                return false;
            Person person = (Person) obj;
            return id == person.id && name.equals(person.name) && age == person.age;
        }
    }

It is necessary to override the equals method for our Person class. Otherwise, the default equals method will compare only the references of the objects.

Also, let's take into consideration that, even though it's not relevant for our example, we should always override hashCode when we override the equals method so that we don't violate their contracts.

Next, we can compare two multidimensional arrays of the Person class:

    Person personArray1[][] = { { new Person(1, "John", 22), new Person(2, "Mike", 23) },
      { new Person(3, "Steve", 27), new Person(4, "Gary", 28) } };
    Person personArray2[][] = { { new Person(1, "John", 22), new Person(2, "Mike", 23) }, 
      { new Person(3, "Steve", 27), new Person(4, "Gary", 28) } };
        
    assertFalse(Arrays.equals(personArray1, personArray2));
    assertTrue(Arrays.deepEquals(personArray1, personArray2));

As a result of recursively comparing the subelements, the two methods again have different results.

Finally, it is worth mentioning that the Objects.deepEquals method executes the Arrays.deepEquals method internally when it is called with two Object arrays:

    assertTrue(Objects.deepEquals(personArray1, personArray2));

5. Conclusion

In this quick tutorial, we learned that we should use the Arrays.deepEquals method when we want to compare the equality between two nested or multi-dimensional arrays of objects or primitive types.

As always, the full source code of the article is available over on GitHub.

Intro to OpenCV with Java

$
0
0

1. Introduction

In this tutorial, we'll learn how to install and use the OpenCV computer vision library and apply it to real-time face detection.

2. Installation

To use the OpenCV library in our project, we need to add the opencv Maven dependency to our pom.xml:

<dependency>
    <groupId>org.openpnp</groupId>
    <artifactId>opencv</artifactId>
    <version>3.4.2-0</version>
</dependency>

For Gradle users, we'll need to add the dependency to our build.gradle file:

compile group: 'org.openpnp', name: 'opencv', version: '3.4.2-0'

After adding the library to our dependencies, we can use the features provided by OpenCV.

3. Using the Library

To start using OpenCV, we need to initialize the library, which we can do in our main method:

OpenCV.loadShared();

OpenCV is a class that holds methods related to loading native packages required by the OpenCV library for various platforms and architectures.

It's worth noting that the documentation does things slightly differently:

System.loadLibrary(Core.NATIVE_LIBRARY_NAME)

Both of those method calls will actually load the required native libraries.

The difference here is that the latter requires the native libraries to be installed. The former, however, can install the libraries to a temporary folder if they are not available on a given machine. Due to this difference, the loadShared method is usually the best way to go.

Now that we've initialized the library, let's see what we can do with it.

4. Loading Images

To start, let's load the sample image from the disk using OpenCV:

public static Mat loadImage(String imagePath) {
    Imgcodecs imageCodecs = new Imgcodecs();
    return imageCodecs.imread(imagePath);
}

This method will load the given image as a Mat object, which is a matrix representation.

To save the previously loaded image, we can use the imwrite() method of the Imgcodecs class:

public static void saveImage(Mat imageMatrix, String targetPath) {
    Imgcodecs imgcodecs = new Imgcodecs();
    imgcodecs.imwrite(targetPath, imageMatrix);
}

5. Haar Cascade Classifier

Before diving into facial-recognition, let's understand the core concepts that make this possible.

Simply put, a classifier is a program that seeks to place a new observation into a group dependent on past experience. Cascading classifiers seek to do this using a concatenation of several classifiers. Each subsequent classifier uses the output from the previous as additional information, improving the classification greatly.

5.1. Haar Features

Face detection in OpenCV is done by Haar-feature-based cascade classifiers.

Haar features are filters that are used to detect edges and lines on the image. The filters are seen as squares with black and white colors:

Haar Features

These filters are applied multiple times to an image, pixel by pixel, and the result is collected as a single value. This value is the difference between the sum of pixels under the black square and the sum of pixels under the white square.

6. Face Detection

Generally, the cascade classifier needs to be pre-trained to be able to detect anything at all.

Since the training process can be long and would require a big dataset, we're going to use one of the pre-trained models offered by OpenCV. We'll place this XML file in our resources folder for easy access.

Let's step through the process of detecting a face:

Face To Detect

We'll attempt to detect the face by outlining it with a red rectangle.

To get started, we need to load the image in Mat format from our source path:

Mat loadedImage = loadImage(sourceImagePath);

Then, we'll declare a MatOfRect object to store the faces we find:

MatOfRect facesDetected = new MatOfRect();

Next, we need to initialize the CascadeClassifier to do the recognition:

CascadeClassifier cascadeClassifier = new CascadeClassifier(); 
int minFaceSize = Math.round(loadedImage.rows() * 0.1f); 
cascadeClassifier.load("./src/main/resources/haarcascades/haarcascade_frontalface_alt.xml"); 
cascadeClassifier.detectMultiScale(loadedImage, 
  facesDetected, 
  1.1, 
  3, 
  Objdetect.CASCADE_SCALE_IMAGE, 
  new Size(minFaceSize, minFaceSize), 
  new Size() 
);

Above, the parameter 1.1 denotes the scale factor we want to use, specifying how much the image size is reduced at each image scale. The next parameter, 3, is minNeighbors. This is the number of neighbors a candidate rectangle should have in order to retain it.

Finally, we'll loop through the faces and save the result:

Rect[] facesArray = facesDetected.toArray(); 
for(Rect face : facesArray) { 
    Imgproc.rectangle(loadedImage, face.tl(), face.br(), new Scalar(0, 0, 255), 3); 
} 
saveImage(loadedImage, targetImagePath);

When we input our source image, we should now receive the output image with all the faces marked with a red rectangle:

Face Detected

7. Accessing the Camera Using OpenCV

So far, we've seen how to perform face detection on loaded images. But most of the time, we want to do it in real-time. To be able to do that, we need to access the camera.

However, to be able to show an image from a camera, we need a few additional things, apart from the obvious — a camera. To show the images, we'll use JavaFX.

Since we'll be using an ImageView to display the pictures our camera has taken, we need a way to translate an OpenCV Mat to a JavaFX Image:

public Image mat2Img(Mat mat) {
    MatOfByte bytes = new MatOfByte();
    Imgcodecs.imencode("img", mat, bytes);
    InputStream inputStream = new ByteArrayInputStream(bytes.toArray());
    return new Image(inputStream);
}

Here, we are converting our Mat into bytes, and then converting the bytes into an Image object.

We'll start by streaming the camera view to a JavaFX Stage.

Now, let's initialize the library using the loadShared method:

OpenCV.loadShared();

Next, we'll create the stage with a VideoCapture and an ImageView to display the Image:

VideoCapture capture = new VideoCapture(0); 
ImageView imageView = new ImageView(); 
HBox hbox = new HBox(imageView); 
Scene scene = new Scene(hbox);
stage.setScene(scene); 
stage.show();

Here, 0 is the ID of the camera we want to use. We also need to create an AnimationTimer to handle setting the image:

new AnimationTimer() { 
    @Override public void handle(long l) { 
        imageView.setImage(getCapture()); 
    } 
}.start();

Finally, our getCapture method handles converting the Mat to an Image:

public Image getCapture() { 
    Mat mat = new Mat(); 
    capture.read(mat); 
    return mat2Img(mat); 
}

The application should now create a window and then live-stream the view from the camera to the imageView window.

8. Real-Time Face Detection

Finally, we can connect all the dots to create an application that detects a face in real-time.

The code from the previous section is responsible for grabbing the image from the camera and displaying it to the user. Now, all we have to do is to process the grabbed images before showing them on screen by using our CascadeClassifier class.

Let's simply modify our getCapture method to also perform face detection:

public Image getCaptureWithFaceDetection() {
    Mat mat = new Mat();
    capture.read(mat);
    Mat haarClassifiedImg = detectFace(mat);
    return mat2Img(haarClassifiedImg);
}

Now, if we run our application, the face should be marked with the red rectangle.

We can also see a disadvantage of the cascade classifiers. If we turn our face too much in any direction, then the red rectangle disappears. This is because we've used a specific classifier that was trained only to detect the front of the face.

9. Summary

In this tutorial, we learned how to use OpenCV in Java.

We used a pre-trained cascade classifier to detect faces on the images. With the help of JavaFX, we managed to make the classifiers detect the faces in real-time with images from a camera.

As always all the code samples can be found over on GitHub.

Viewing all 3702 articles
Browse latest View live


<script src="https://jsc.adskeeper.com/r/s/rssing.com.1596347.js" async> </script>