Quantcast
Channel: Baeldung
Viewing all 3734 articles
Browse latest View live

Spring Cloud AWS – Messaging Support

$
0
0

In the final article, we move on to AWS Messaging Support.

1. AWS Messaging Support

1.1. SQS (Simple Queue Service)

We can send messages to an SQS queue using the QueueMessagingTemplate.

To create this bean, we can use an AmazonSQSAsync client which is available by default in the application context when using Spring Boot starters:

@Bean
public QueueMessagingTemplate queueMessagingTemplate(
  AmazonSQSAsync amazonSQSAsync) {
    return new QueueMessagingTemplate(amazonSQSAsync);
}

Then, we can send the messages using the convertAndSend() method:

@Autowired
QueueMessagingTemplate messagingTemplate;
 
public void send(String topicName, Object message) {
    messagingTemplate.convertAndSend(topicName, message);
}

Since Amazon SQS only accepts String payloads, Java objects are automatically serialized to JSON.

We can also configure listeners using @SqsListener:

@SqsListener("spring-cloud-test-queue")
public void receiveMessage(String message, 
  @Header("SenderId") String senderId) {
    // ...
}

This method will receive messages from spring-cloud-test-queue and then process them. We can also retrieve message headers using the @Header annotation on method parameters.

If the first parameter is a custom Java object instead of String, Spring will convert the message to that type using JSON conversion.

1.2. SNS (Simple Notification Service)

Similar to SQS, we can use NotificationMessagingTemplate to publish messages to a topic.

To create it, we need an AmazonSNS client:

@Bean
public NotificationMessagingTemplate notificationMessagingTemplate(
  AmazonSNS amazonSNS) {
    return new NotificationMessagingTemplate(amazonSNS);
}

Then, we can send notifications to the topic:

@Autowired
NotificationMessagingTemplate messagingTemplate;

public void send(String Object message, String subject) {
    messagingTemplate
      .sendNotification("spring-cloud-test-topic", message, subject);
}

Out of the multiple SNS endpoints supported by AWS – SQS, HTTP(S), email and SMS, the project only supports HTTP(S).

We can configure the endpoints in an MVC controller:

@Controller
@RequestMapping("/topic-subscriber")
public class SNSEndpointController {

    @NotificationSubscriptionMapping
    public void confirmUnsubscribeMessage(
      NotificationStatus notificationStatus) {
        notificationStatus.confirmSubscription();
    }
 
    @NotificationMessageMapping
    public void receiveNotification(@NotificationMessage String message, 
      @NotificationSubject String subject) {
        // handle message
    }

    @NotificationUnsubscribeConfirmationMapping
    public void confirmSubscriptionMessage(
      NotificationStatus notificationStatus) {
        notificationStatus.confirmSubscription();
    }
}

We need to add the topic name to the @RequestMapping annotation on the controller level. This controller enables an HTTP(s) endpoint – /topic-subscriber which be used by an SNS topic to create a subscription.

For example, we can subscribe to a topic by calling the URL:

https://host:port/topic-subscriber/

The header in the request determines which of the three methods is invoked.

The method with @NotificationSubscriptionMapping annotation is invoked when the header [x-amz-sns-message-type=SubscriptionConfirmation] is present and confirms a new subscription to a topic.

Once subscribed, the topic will send notifications to the endpoint with the header [x-amz-sns-message-type=Notification]. This will invoke the method annotated with @NotificationMessageMapping.

Finally, when the endpoint unsubscribes from the topic, a confirmation request is received with the header [x-amz-sns-message-type=UnsubscribeConfirmation].

This calls the method annotated with @NotificationUnsubscribeConfirmationMapping which confirms unsubscribe action.

Please note that the value in @RequestMapping has nothing to do with the topic name to which it’s subscribed.

2. Conclusion

In this final article, we explored Spring Cloud’s support for AWS Messaging – which concludes this quick series about Spring Cloud and AWS.


A Quick Guide to Maven Wrapper

$
0
0

1. Overview

The Maven Wrapper is an excellent choice for projects that need a specific version of Maven (or for users that don’t want to install Maven at all). Instead of installing many versions of it in the operating system, we can just use the project-specific wrapper script.

In this quick article, we’ll show how to set up a Maven Wrapper for an existing Maven project.

2. Setting Up the Maven Wrapper

There’re two ways to configure it in a project, where the simplest one is to use an appropriate plugin to automate it or by applying the manual installation.

2.1. Plugin

Let’s use this Maven Wrapper plugin to make auto installation in a simple Spring Boot project.

First, we need to go in the main folder of the project and run this command:

mvn -N io.takari:maven:wrapper

We can also specify the version of Maven:

mvn -N io.takari:maven:wrapper -Dmaven=3.5.2

The option -N means –non-recursive so that the wrapper will only be applied to the main project of the current directory, not in any submodules.

After executing the goal, we’ll have more files and directories in the project:

  • mvnw: it’s an executable Unix shell script used in place of a fully installed Maven
  • mvnw.cmd: it’s the Batch version of the above script
  • mvn: the hidden folder that holds the Maven Wrapper Java library and its properties file

2.2. Manual

With a manual approach, we can copy files and folders seen above from another project to the main folder of the current project.

Afterwards, we need to specify the version of Maven to use in the wrapper properties file located in .mvn/wrapper/maven-wrapper.properties file.

For instance, our properties file has the following line:

distributionUrl=https://repo1.maven.org/maven2/org/apache/maven/apache-maven/3.5.2/apache-maven-3.5.2-bin.zip

Consequently, the version 3.5.2 will be downloaded and used.

3. Use Cases

The wrapper should work with different operating systems such as:

  • Linux
  • OSX
  • Windows
  • Solaris

After that, we can run our goals like this for the Unix system:

./mvnw clean install

And the following command for Batch:

./mvnw.cmd clean install

If we don’t have the specified Maven in the wrapper properties, it’ll be downloaded and installed in the folder $USER_HOME/.m2/wrapper/dists of the system. 

Let’s run our Spring-Boot project:

./mvnw spring-boot:run

The output is the same as for a fully installed Maven:

Note: we use the executable mvnw in place of mvn, which stands now as the Maven command line program.

4. Conclusion

In this tutorial, we’ve seen how to set up and use Maven Wrapper in a Maven project.

As always, the source code for this article can be found over on GitHub.

Spring Security 5 – OAuth2 Login

$
0
0

1. Overview

Spring Security 5 introduces a new OAuth2LoginConfigurer class that we can use for configuring an external authorization server.

In this article, we’ll explore some of the various configuration options available for the oauth2Login() element.

2. Maven Dependencies

In addition to the standard Spring and Spring Security dependencies, we’ll also need to add the spring-security-oauth2-client and spring-security-oauth2-jose dependencies:

<dependency>
    <groupId>org.springframework.security</groupId>
    <artifactId>spring-security-oauth2-client</artifactId>
</dependency>
<dependency>
   <groupId>org.springframework.security</groupId>
   <artifactId>spring-security-oauth2-jose</artifactId>
</dependency>

In our example, dependencies are managed by the Spring Boot starter parent, version 2.0.0.M7, which corresponds to version 5.0.0.RELEASE of the Spring Security artifacts.

For now, since we’re using a milestone version of Spring Boot, we’ll also need to add the repository:

<repositories>
    <repository>
        <id>spring-milestones</id>
        <name>Spring Milestones</name>
        <url>https://repo.spring.io/milestone</url>
        <snapshots>
            <enabled>false</enabled>
        </snapshots>
    </repository>
</repositories>

3. Clients Setup

In a Spring Boot project, all we need to do is add a few standard properties for each client we want to configure.

Let’s set up our project for login with clients registered with Google and Facebook as authentication providers.

3.1. Obtaining Client Credentials

To obtain client credentials for Google OAuth2 authentication, head on over to the Google API Console – section “Credentials”.

Here we’ll create credentials of type “OAuth2 Client ID” for our web application. This results in Google setting up a client id and secret for us.

We also have to configure an authorized redirect URI in the Google Console, which is the path that users will be redirected to after they successfully login with Google.

By default, Spring Boot configures this redirect URI as /login/oauth2/client/{clientId}. Therefore, for Google we’ll add the URI:

http://localhost:8081/login/oauth2/client/google

To obtain the client credentials for authentication with Facebook, we need to register an application on the Facebook for Developers website and set up the corresponding URI as a “Valid OAuth redirect URI”:

http://localhost:8081/login/oauth2/client/facebook

3.3. Security Configuration

Next, we need to add client credentials in the application.properties file. The Spring Security properties are prefixed with “spring.security.oauth2.client.registration” followed by the client name, then the name of the client property:

spring.security.oauth2.client.registration.google.client-id=<your client id>
spring.security.oauth2.client.registration.google.client-secret=<your client secret>

spring.security.oauth2.client.registration.facebook.client-id=<your client id> 
spring.security.oauth2.client.registration.facebook.client-secret=<your client secret>

Adding these properties for at least one client will enable the Oauth2ClientAutoConfiguration class which sets up all the necessary beans.

The automatic web security configuration is equivalent to defining a simple oauth2Login() element:

@Configuration
public class SecurityConfig extends WebSecurityConfigurerAdapter {

    @Override
    protected void configure(HttpSecurity http) throws Exception {
        http.authorizeRequests()
         .anyRequest().authenticated()
         .and()
         .oauth2Login();
    }
}

Here, we can see the oauth2Login() element is used in a similar manner to already known httpBasic() and formLogin() elements.

Now, when we try to access a protected URL, the application will display an auto-generated login page with two clients:

3.4. Other Clients

Note that in addition to Google and Facebook, the Spring Security project also contains default configurations for GitHub and Okta. These default configurations provide all the necessary information for authentication, which is what allows us to only enter the client credentials.

If we want to use a different authentication provider not configured in Spring Security, we’ll need to define the full configuration, with information such as authorization URI and token URI. Here‘s a look at the default configurations in Spring Security to have an idea of the properties needed.

4. Setup in a Non-Boot Project

4.1. Creating a ClientRegistrationRepository Bean

If we’re not working with a Spring Boot application, we’ll need to define a ClientRegistrationRepository bean that contains an internal representation of the client information owned by the authorization server:

@Configuration
@EnableWebSecurity
@PropertySource("classpath:application.properties")
public class SecurityConfig extends WebSecurityConfigurerAdapter {
    private static List<String> clients = Arrays.asList("google", "facebook");

    @Bean
    public ClientRegistrationRepository clientRegistrationRepository() {
        List<ClientRegistration> registrations = clients.stream()
          .map(c -> getRegistration(c))
          .filter(registration -> registration != null)
          .collect(Collectors.toList());
        
        return new InMemoryClientRegistrationRepository(registrations);
    }
}

Here we’re creating an InMemoryClientRegistrationRepository with a list of ClientRegistration objects.

4.2. Building ClientRegistration Objects

Let’s see the getRegistration() method that builds these objects:

private static String CLIENT_PROPERTY_KEY 
  = "spring.security.oauth2.client.registration.";

@Autowired
private Environment env;

private ClientRegistration getRegistration(String client) {
    String clientId = env.getProperty(
      CLIENT_PROPERTY_KEY + client + ".client-id");

    if (clientId == null) {
        return null;
    }

    String clientSecret = env.getProperty(
      CLIENT_PROPERTY_KEY + client + ".client-secret");
 
    if (client.equals("google")) {
        return CommonOAuth2Provider.GOOGLE.getBuilder(client)
          .clientId(clientId).clientSecret(clientSecret).build();
    }
    if (client.equals("facebook")) {
        return CommonOAuth2Provider.FACEBOOK.getBuilder(client)
          .clientId(clientId).clientSecret(clientSecret).build();
    }
    return null;
}

Here, we’re reading the client credentials from a similar application.properties file, then using the CommonOauth2Provider enum already defined in Spring Security for the rest of the client properties for Google and Facebook clients.

Each ClientRegistration instance corresponds to a client.

4.3. Registering the ClientRegistrationRepository

Finally, we have to create an OAuth2AuthorizedClientService bean based on the ClientRegistrationRepository bean and register both with the oauth2Login() element:

@Override
protected void configure(HttpSecurity http) throws Exception {
    http.authorizeRequests().anyRequest().authenticated()
      .and()
      .oauth2Login()
      .clientRegistrationRepository(clientRegistrationRepository())
      .authorizedClientService(authorizedClientService());
}

@Bean
public OAuth2AuthorizedClientService authorizedClientService() {
 
    return new InMemoryOAuth2AuthorizedClientService(
      clientRegistrationRepository());
}

As evidenced here, we can use the clientRegistrationRepository() method of oauth2Login() to register a custom registration repository.

We’ll also have to define a custom login page, as it won’t be automatically generated anymore. We’ll see more information on this in the next section.

Let’s continue with further customization of our login process.

5. Customizing oauth2Login()

There are several elements that the OAuth 2 process uses and that we can customize using oauth2Login() methods.

Note that all these elements have default configurations in Spring Boot and explicit configuration isn’t required.

Let’s see how we can customize these in our configuration.

5.1. Custom Login Page

Even though Spring Boot generates a default login page for us, we’ll usually want to define our own customized page.

Let’s start with configuring a new login URL for the oauth2Login() element by using the loginPage() method:

@Override
protected void configure(HttpSecurity http) throws Exception {
    http.authorizeRequests()
      .antMatchers("/oauth_login")
      .permitAll()
      .anyRequest()
      .authenticated()
      .and()
      .oauth2Login()
      .loginPage("/oauth_login");
}

Here, we’ve set up our login URL to be /oauth_login.

Next, let’s define a LoginController with a method that maps to this URL:

@Controller
public class LoginController {

    private static String authorizationRequestBaseUri
      = "oauth2/authorization";
    Map<String, String> oauth2AuthenticationUrls
      = new HashMap<>();

    @Autowired
    private ClientRegistrationRepository clientRegistrationRepository;

    @GetMapping("/oauth_login")
    public String getLoginPage(Model model) {
        // ...

        return "oauth_login";
    }
}

This method has to send a map of the clients available and their authorization endpoints to the view, which we’ll obtain from the ClientRegistrationRepository bean:

public String getLoginPage(Model model) {
    Iterable<ClientRegistration> clientRegistrations = null;
    ResolvableType type = ResolvableType.forInstance(clientRegistrationRepository)
      .as(Iterable.class);
    if (type != ResolvableType.NONE && 
      ClientRegistration.class.isAssignableFrom(type.resolveGenerics()[0])) {
        clientRegistrations = (Iterable<ClientRegistration>) clientRegistrationRepository;
    }

    clientRegistrations.forEach(registration -> 
      oauth2AuthenticationUrls.put(registration.getClientName(), 
      authorizationRequestBaseUri + "/" + registration.getRegistrationId()));
    model.addAttribute("urls", oauth2AuthenticationUrls);

    return "oauth_login";
}

Finally, we need to define our oauth_login.html page:

<h3>Login with:</h3>
<p th:each="url : ${urls}">
    <a th:text="${url.key}" th:href="${url.value}">Client</a>
</p>

This is a simple HTML page which displays links to authenticate with each client.

After adding some styling to it, we can have a much nicer looking login page:

5.2. Custom Authentication Success and Failure Behavior

We can control the post-authentication behavior by using different methods:

  • defaultSuccessUrl() and failureUrl() – to redirect the user to a given URL
  • successHandler() and failureHandler() – to execute custom logic following the authentication process

Let’s see how we can set custom URL’s to redirect the user to:

.oauth2Login()
  .defaultSuccessUrl("/loginSuccess")
  .failureUrl("/loginFailure");

If the user visited a secured page before authenticating, they will be redirected to that page after logging in; otherwise, they will be redirected to /loginSuccess.

If we want the user to always be sent to the /loginSuccess URL regardless if they were on a secured page before or not, we can use the method defaultSuccessUrl(“/loginSuccess”, true).

To use a custom handler, we would have to create a class that implements the AuthenticationSuccessHandler or AuthenticationFailureHandler interfaces, override the inherited methods, then set the beans using the successHandler() and failureHandler() methods.

5.3. Custom Authorization Endpoint

The authorization endpoint is the endpoint that Spring Security uses to trigger an authorization request to the external server.

First, let’s set new properties for the authorization endpoint:

.oauth2Login() 
  .authorizationEndpoint()
  .baseUri("/oauth2/authorize-client")
  .authorizationRequestRepository(authorizationRequestRepository());

Here, we’ve modified the baseUri to /oauth2/authorize-client instead of the default /oauth2/authorization. We’re also explicitly setting an authorizationRequestRepository() bean that we have to define:

@Bean
public AuthorizationRequestRepository<OAuth2AuthorizationRequest> 
  authorizationRequestRepository() {
 
    return new HttpSessionOAuth2AuthorizationRequestRepository();
}

In our example, we’ve used the Spring-provided implementation for our bean, but we could also provide a custom one.

5.4. Custom Token Endpoint

The token endpoint processes access tokens.

Let’s explicitly configure the tokenEndpoint() with the default response client implementation:

.oauth2Login()
  .tokenEndpoint()
  .accessTokenResponseClient(accessTokenResponseClient());

And here’s the response client bean:

@Bean
public OAuth2AccessTokenResponseClient<OAuth2AuthorizationCodeGrantRequest> 
  accessTokenResponseClient() {
 
    return new NimbusAuthorizationCodeTokenResponseClient();
}

This configuration is the same as the default one and is using the Spring implementation which is based on exchanging an authorization code with the provider.

Of course, we could also substitute a custom response client.

5.5. Custom Redirection Endpoint

This is the endpoint to redirect to after authentication with the external provider.

Let’s see how we can change the baseUri for the redirection endpoint:

.oauth2Login()
  .redirectionEndpoint()
  .baseUri("/oauth2/redirect")

The default URI is login/oauth2/client.

Note that if we change it, we also have to update the redirectUriTemplate property of each ClientRegistration and add the new URI as an authorized redirect URI for each client.

5.6. Custom User Information Endpoint

The user info endpoint is the location we can leverage to obtain user information.

We can customize this endpoint using the userInfoEndpoint() method. For this, we can use methods such as userService() and customUserType() to modify the way user information is retrieved.

6. Accessing User Information

A common task we may want to achieve is finding information about the logged-in user. For this, we can make a request to the user information endpoint.

First, we’ll have to get the client corresponding to the current user token:

@Autowired
private OAuth2AuthorizedClientService authorizedClientService;

@GetMapping("/loginSuccess")
public String getLoginInfo(Model model, OAuth2AuthenticationToken authentication) {
    OAuth2AuthorizedClient client = authorizedClientService
      .loadAuthorizedClient(
        authentication.getAuthorizedClientRegistrationId(), 
          authentication.getName());
    //...
    return "loginSuccess";
}

Next, we’ll send a request to the client’s user info endpoint and retrieve the userAttributes Map:

String userInfoEndpointUri = client.getClientRegistration()
  .getProviderDetails().getUserInfoEndpoint().getUri();

if (!StringUtils.isEmpty(userInfoEndpointUri)) {
    RestTemplate restTemplate = new RestTemplate();
    HttpHeaders headers = new HttpHeaders();
    headers.add(HttpHeaders.AUTHORIZATION, "Bearer " + client.getAccessToken()
      .getTokenValue());
    HttpEntity entity = new HttpEntity("", headers);
    ResponseEntity <map>response = restTemplate
      .exchange(userInfoEndpointUri, HttpMethod.GET, entity, Map.class);
    Map userAttributes = response.getBody();
    model.addAttribute("name", userAttributes.get("name"));
}

By adding the name property as a Model attribute, we can display it in the loginSuccess view as a welcome message to the user:

Besides the name, the userAttributes Map also contains properties such as email, family_name, picture, locale.

7. Conclusion

In this article, we’ve seen how we can use the oauth2Login() element in Spring Security to authenticate with different providers such as Google and Facebook. We’ve also gone through some common scenarios of customizing this process.

The full source code of the examples can be found over on GitHub.

Integration Guide for Spring and EJB

$
0
0

1. Overview

In this article, we’ll show how to integrate Spring and remote Enterprise Java Beans (EJB).

To do this, we’ll create some EJBs and the necessary remote interfaces, and then we’ll run them inside a JEE container. After that, we’ll start our Spring application and, using the remote interfaces, instantiate our beans so that they can execute remote calls.

If there is any doubt about what EJBs are or how they work, we already published an introductory article on the topic here.

2. EJB Setup

We’ll need to create our remote interfaces and our EJB implementations. To make them usable, we’ll also need a container to hold and manage beans.

2.1. EJB Remote Interfaces

Let’s start by defining two very simple beans — one stateless and one stateful.

We’ll begin with their interfaces:

@Remote
public interface HelloStatefulWorld {
    int howManyTimes();
    String getHelloWorld();
}

@Remote
public interface HelloStatelessWorld {
    String getHelloWorld();
}

2.2. EJB Implementation

Now, let’s implement our remote EJB interfaces:

@Stateful(name = "HelloStatefulWorld")
public class HelloStatefulWorldBean implements HelloStatefulWorld {

    private int howManyTimes = 0;

    public int howManyTimes() {
        return howManyTimes;
    }

    public String getHelloWorld() {
        howManyTimes++;
        return "Hello Stateful World";
    }
}

@Stateless(name = "HelloStatelessWorld")
public class HelloStatelessWorldBean implements HelloStatelessWorld {

    public String getHelloWorld() {
        return "Hello Stateless World!";
    }
}

If stateful and stateless beans sound unfamiliar, this intro article may come in handy.

2.3. EJB Container

We can run our code in any JEE container, but for practicality purposes, we’ll use Wildfly and the cargo Maven plugin to do the heavy lifting for us:

<plugin>
    <groupId>org.codehaus.cargo</groupId>
    <artifactId>cargo-maven2-plugin</artifactId>
    <version>1.6.1</version>
    <configuration>
        <container>
            <containerId>wildfly10x</containerId>
            <zipUrlInstaller>
                <url>
                  http://download.jboss.org/wildfly/10.1.0.Final/wildfly-10.1.0.Final.zip
                </url>
            </zipUrlInstaller>
        </container>
        <configuration>
            <properties>
                <cargo.hostname>127.0.0.1</cargo.hostname>
                <cargo.jboss.configuration>standalone-full</cargo.jboss.configuration>
                <cargo.jboss.management-http.port>9990</cargo.jboss.management-http.port>
                <cargo.servlet.users>testUser:admin1234!</cargo.servlet.users>
            </properties>
        </configuration>
    </configuration>
</plugin>

2.4. Running the EJBs

With these configured, we can run the container directly from the Maven command line:

mvn clean package cargo:run -Pwildfly-standalone

We now have a working instance of Wildfly hosting our beans. We can confirm this by the log lines:

java:global/ejb-remote-for-spring/HelloStatefulWorld!com.baeldung.ejb.tutorial.HelloStatefulWorld
java:app/ejb-remote-for-spring/HelloStatefulWorld!com.baeldung.ejb.tutorial.HelloStatefulWorld
java:module/HelloStatefulWorld!com.baeldung.ejb.tutorial.HelloStatefulWorld
java:jboss/exported/ejb-remote-for-spring/HelloStatefulWorld!com.baeldung.ejb.tutorial.HelloStatefulWorld
java:global/ejb-remote-for-spring/HelloStatefulWorld
java:app/ejb-remote-for-spring/HelloStatefulWorld
java:module/HelloStatefulWorld

java:global/ejb-remote-for-spring/HelloStatelessWorld!com.baeldung.ejb.tutorial.HelloStatelessWorld
java:app/ejb-remote-for-spring/HelloStatelessWorld!com.baeldung.ejb.tutorial.HelloStatelessWorld
java:module/HelloStatelessWorld!com.baeldung.ejb.tutorial.HelloStatelessWorld
java:jboss/exported/ejb-remote-for-spring/HelloStatelessWorld!com.baeldung.ejb.tutorial.HelloStatelessWorld
java:global/ejb-remote-for-spring/HelloStatelessWorld
java:app/ejb-remote-for-spring/HelloStatelessWorld
java:module/HelloStatelessWorld

3. Spring Setup

Now that we have our JEE container up and running, and our EJBs deployed, we can start our Spring application. We’ll use spring-boot-web to make it easier to test manually, but it isn’t mandatory for the remote call.

3.1. Maven Dependencies

To be able to connect to the remote EJBs, we’ll need the Wildfly EJB Client library and our remote interface:

<dependency>
    <groupId>org.wildfly</groupId>
    <artifactId>wildfly-ejb-client-bom</artifactId>
    <version>10.1.0.Final</version>
    <type>pom</type>
</dependency>
<dependency>
    <groupId>com.baeldung.spring.ejb</groupId>
    <artifactId>ejb-remote-for-spring</artifactId>
    <version>1.0.1</version>
    <type>ejb</type>
</dependency>

The last version of wildfly-ejb-client-bom can be found here.

3.2. Naming Strategy Context

With these dependencies in the classpath, we can instantiate a javax.naming.Context to do the lookup of our remote beans. We’ll create this as a Spring Bean so that we can autowire it when we need it:

@Bean   
public Context context() throws NamingException {
    Properties jndiProps = new Properties();
    jndiProps.put("java.naming.factory.initial", 
      "org.jboss.naming.remote.client.InitialContextFactory");
    jndiProps.put("jboss.naming.client.ejb.context", true);
    jndiProps.put("java.naming.provider.url", 
      "http-remoting://localhost:8080");
    return new InitialContext(jndiProps);
}

The properties are necessary to inform both the remote URL and the naming strategy context.

3.3. JNDI Pattern

Before we can wire our remote beans inside the Spring container, we’ll need to know how to reach them. For this, we’ll use their JNDI bindings. Let’s see the standard pattern for these bindings:

${appName}/${moduleName}/${distinctName}/${beanName}!${viewClassName}

Keep in mind that, since we deployed a simple jar instead of an ear and didn’t explicitly set up a name, we don’t have an appName and a distinctName. There are more details at our EJB Intro article in case something seems odd.

We’ll use this pattern to bind our remote beans to our Spring ones.

3.4. Building our Spring Beans

To reach our EJBs, we’ll use the aforementioned JNDI. Remember log lines that we used to check if our enterprise beans were deployed?

We’ll see that information in use now:

@Bean
public HelloStatelessWorld helloStatelessWorld(Context context) 
  throws NamingException {
 
    return (HelloStatelessWorld) 
      context.lookup(this.getFullName(HelloStatelessWorld.class));
}
@Bean
public HelloStatefulWorld helloStatefulWorld(Context context) 
  throws NamingException {
 
    return (HelloStatefulWorld) 
      context.lookup(this.getFullName(HelloStatefulWorld.class));
}
private String getFullName(Class classType) {
    String moduleName = "ejb-remote-for-spring/";
    String beanName = classType.getSimpleName();
    String viewClassName = classType.getName();
    return moduleName + beanName + "!" + viewClassName;
}

We need to be very careful about the correct full JNDI binding, or the context won’t be able to reach the remote EJB and create the necessary underlying infrastructure.

Keep in mind that the method lookup from Context will throw a NamingException in case it doesn’t find the bean you are requiring.

4. Integration

With everything in place, we can inject our beans in a controller, so we can test if the wiring is right:

@RestController
public class HomeEndpoint {
 
    // ...
 
    @GetMapping("/stateless")
    public String getStateless() {
        return helloStatelessWorld.getHelloWorld();
    }
    
    @GetMapping("/stateful")
    public String getStateful() {
        return helloStatefulWorld.getHelloWorld()
          + " called " + helloStatefulWorld.howManyTimes() + " times";
    }
}

Let’s start our Spring server and check some logs. We’ll see the following line, indicating that everything is OK:

EJBCLIENT000013: Successful version handshake completed

Now, let’s test our stateless bean. We can try some curl commands to verify that they’re operating as expected:

curl http://localhost:8081/stateless
Hello Stateless World!

And let’s check our stateful one:

curl http://localhost:8081/stateful
Hello Stateful World called 1 times

curl http://localhost:8081/stateful
Hello Stateful World called 2 times

5. Conclusion

In this article, we learned how to integrate Spring to EJB and make remote calls to the JEE container. We created two remote EJB interfaces, and we were able to call those using Spring Beans in a transparent way.

Even though Spring is widely adopted, EJBs are still popular in enterprise environments, and in this quick example, we’ve shown that it’s possible to make use of both the distributed gains of JavaEE and the ease of use of Spring applications.

As always, the code can be found over on GitHub.

Try-with-resources in Kotlin

$
0
0

1. Introduction

Managed languages, such as those targeting the JVM, automatically handle the most common resource: memory.

However, we need to deal with all kinds of resources, not just memory: files, network connections, streams, windows, etc. And, just like memory, those need to be released when no longer needed.

In this article, we’re going to look at how resources can be managed automatically in Kotlin and how it differs from Java’s try-with-resources construct.

If you want to skip the theory, jump straight to the example.

2. Automatic Resource Management

We can distinguish three different phases when working with resources in Java (pseudocode):

resource = acquireResource()
try {
    useResource(resource)
} finally {
    releaseResource(resource)
}

If the language or library is responsible for releasing the resource (the finally part), then we call it Automatic Resource Management. Such feature relieves us from having to remember to free a resource.

Also, since resource management is usually tied to a block scope, if we deal with more than one resource at the same time, they will be always released in the correct order.

In Java, objects that hold a resource and are eligible for automatic resource management implement a specific interface: Closeable for I/O related resources and AutoCloseable.

Also, Java 7 retrofitted the pre-existing Closeable interface to extend AutoCloseable.

Therefore, Kotlin has the same concept of resource holders: that is, objects implementing either Closeable or AutoCloseable.

3. The use Function in Kotlin

To automatically manage resources, some languages have a dedicated construct: Java 7 introduced try-with-resources, for example, while C# has the using keyword.

Sometimes, they offer us a pattern, like RAII in C++. In some other cases, they give us a library method.

Kotlin falls into the latter category.

By design, it doesn’t have a language construct akin to try-with-resources in Java.

Instead, we can find an extension method called use in its standard library.

We’ll look at it in detail later. For now, we just need to know that every resource holder object has the use method that we can invoke.

3.1. How to Use It

A simple example:

val writer = FileWriter("test.txt")
writer.use {
    writer.write("something")
}

We can invoke the use function on any object which implements AutoCloseable or Closeable, just as with try-with-resources in Java.

The method takes a lambda expression, executes it and disposes of the resource of (by calling close() on it) whenever execution leaves the block, either normally or with an exception.

So, in this case, after use, the writer is no longer usable, because Kotlin has automatically closed it.

3.2. A Shorter Form

In the example above, for clarity, we used a variable called writer, thus creating a closure.

However, use accepts a lambda expression with a single parameter – the object holding the resource:

FileWriter("test.txt")
  .use { w -> w.write("something") }

Inside the block, we can also use the implicit variable it:

FileWriter("test.txt")
  .use { it.write("something") }

So, as we can see, we don’t have to give the object an explicit name. However, it is usually a good idea to be clear rather than writing overly concise code.

3.3. The Definition of use()

Let’s look at the definition of use function in Kotlin, as found in its standard library:

public inline fun <T : Closeable?, R> T.use(block: (T) -> R): R

We can see, in the <T : Closeable?, R> part, that use is defined as an extension function on Java’s Closeable interface.

More about extension methods can be found in our introductory article.

Of course, the use function is documented as part of Kotlin’s standard library.

3.4. Closeable vs AutoCloseable

If we pay closer attention to the example from the previous section, we can see that the use function signature is defined only on the Closeable interface. This is because Kotlin’s standard library targets Java 6.

In Java versions before 7, AutoCloseable didn’t exist and, of course, Closeable didn’t extend it.

In practice, classes that implement AutoCloseable but not Closeable are rare. Still, we may encounter one of them.

In that case, we only have to add a dependency on Kotlin’s extensions for Java 7, 8 or whatever version we’re targeting:

<dependency>
    <groupId>org.jetbrains.kotlin</groupId>
    <artifactId>kotlin-stdlib-jre8</artifactId>
    <version>1.2.10</version>
</dependency>

The latest version of the dependency can be found on Maven Central.

That gives us another use extension function defined on the AutoCloseable interface:

public inline fun <T : AutoCloseable?, R> T.use(block: (T) -> R): R

4. Conclusion

In this tutorial, we’ve seen how a simple extension function in Kotlin’s standard library is all that we need to manage all kinds of resources known to the JVM automatically.

The implementation of all these examples and code snippets can be found in the GitHub project – this is a Maven project, so it should be easy to import and run as it is.

Writing a Jenkins Plugin

$
0
0

1. Overview

Jenkins is an open-source Continuous Integration server, which enables to create a custom plugin creation for particular task/environment.

In this article, we’ll go through the whole process of creating an extension which adds statistics to the build output, namely, number of classes and lines of code.

2. Setup

The first thing to do is to set up the project. Luckily, Jenkins provides convenient Maven archetypes for that.

Just run the command below from a shell:

mvn archetype:generate -Dfilter=io.jenkins.archetypes:plugin

We’ll get the following output:

[INFO] Generating project in Interactive mode
[INFO] No archetype defined. Using maven-archetype-quickstart
  (org.apache.maven.archetypes:maven-archetype-quickstart:1.0)
Choose archetype:
1: remote -> io.jenkins.archetypes:empty-plugin (Skeleton of
  a Jenkins plugin with a POM and an empty source tree.)
2: remote -> io.jenkins.archetypes:global-configuration-plugin
  (Skeleton of a Jenkins plugin with a POM and an example piece
  of global configuration.)
3: remote -> io.jenkins.archetypes:hello-world-plugin
  (Skeleton of a Jenkins plugin with a POM and an example build step.)

Now, choose the first option and define group/artifact/package in the interactive mode. After that, it’s necessary to make refinements to the pom.xml – as it contains entries such as <name>TODO Plugin</name>.

3. Jenkins Plugin Design

3.1. Extension Points

Jenkins provides a number of extension points. These are interfaces or abstract classes which define contracts for particular use-cases and allow other plugins to implement them.

For example, every build consists of a number of steps, e.g. “Checkout from VCS”, “Compile”, “Test”, “Assemble”, etc. Jenkins defines hudson.tasks.BuildStep extension point, so we can implement it to provide a custom step which can be configured.

Another example is hudson.tasks.BuildWrapper – this allows us to define pre/post actions.

We also have a non-core Email Extension plugin that defines the hudson.plugins.emailext.plugins.RecipientProvider extension point, which allows providing email recipients. An example implementation is available in here: hudson.plugins.emailext.plugins.recipients.UpstreamComitterRecipientProvider.

Note: there is a legacy approach where plugin class needs to extend hudson.Plugin. However, it’s now recommended to use extension points instead.

3.2. Plugin Initialization

It’s necessary to tell Jenkins about our extension and how it should be instantiated.

First, we define a static inner class within the plugin and mark it using the hudson.Extension annotation:

class MyPlugin extends BuildWrapper {
    @Extension
    public static class DescriptorImpl 
      extends BuildWrapperDescriptor {

        @Override
        public boolean isApplicable(AbstractProject<?, ?> item) {
            return true;
        }

        @Override
        public String getDisplayName() {
            return "name to show in UI";
        }
    }
}

Secondly, we need to define a constructor to be used for plugin’s object instantiation and mark it by the org.kohsuke.stapler.DataBoundConstructor annotation.

It’s possible to use parameters for it. They’re shown in UI and are automatically delivered by Jenkins.

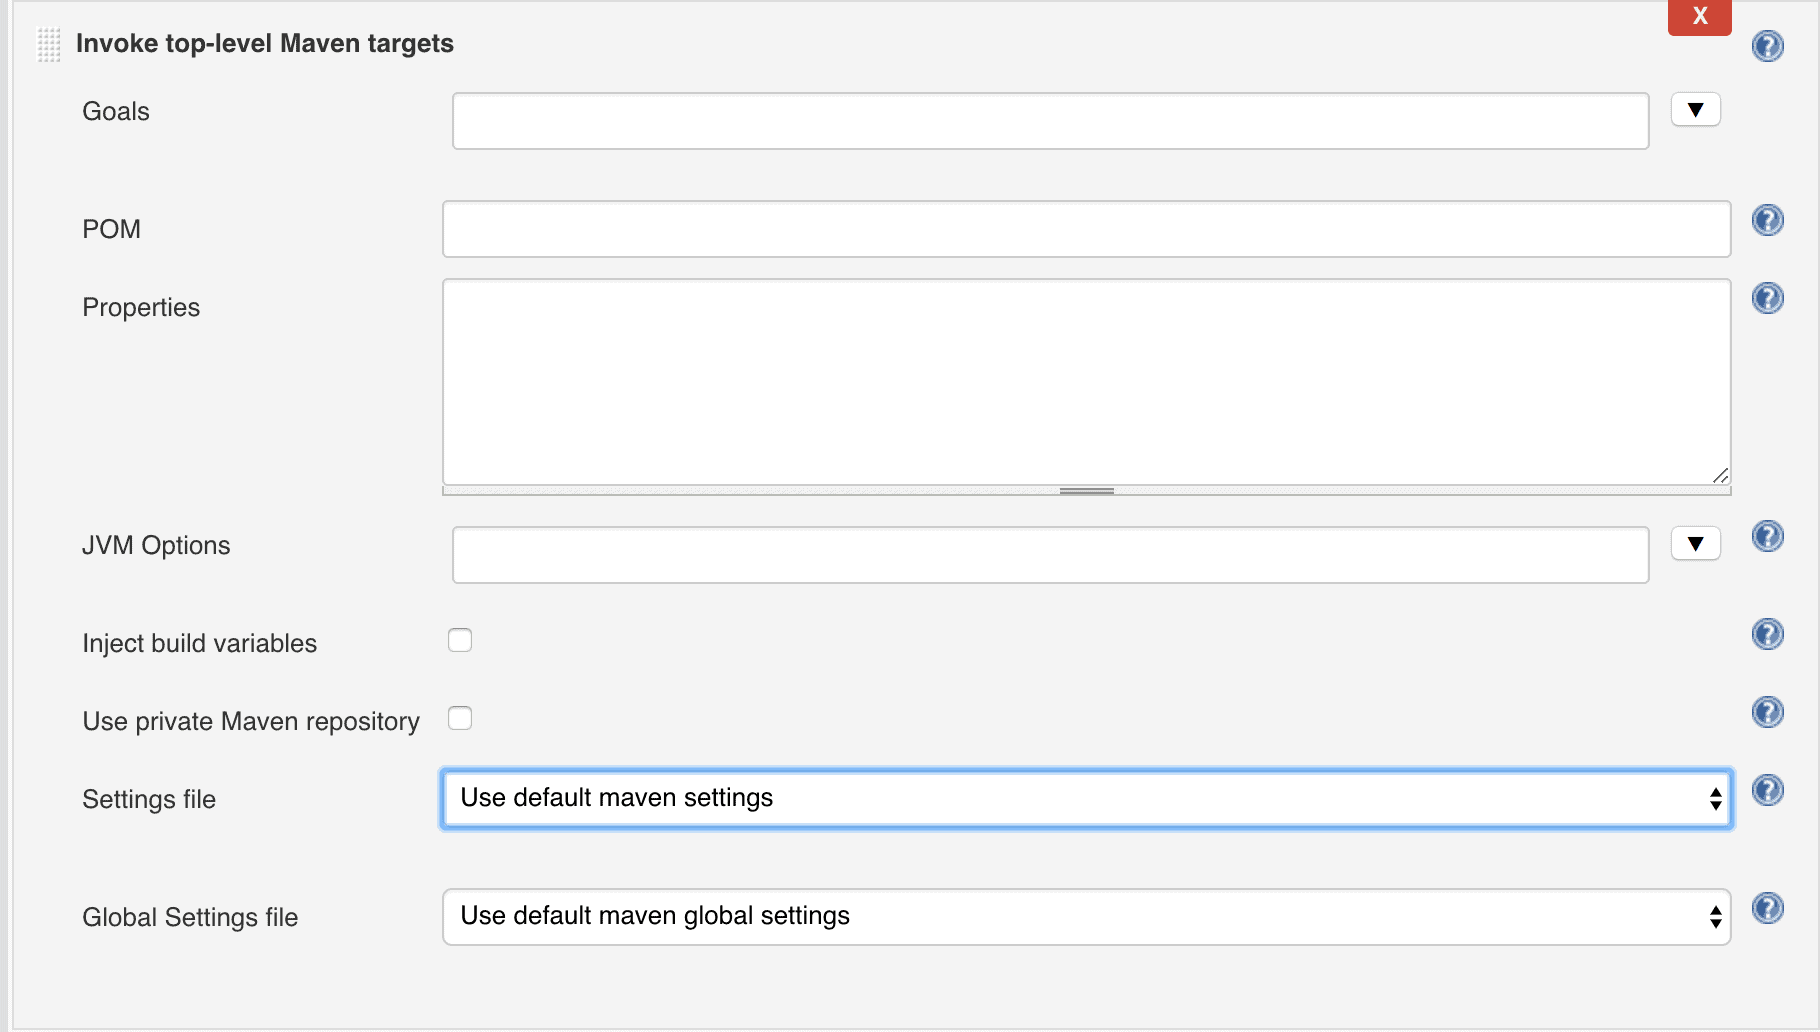
E.g. consider the Maven plugin:

@DataBoundConstructor
public Maven(
  String targets,
  String name,
  String pom,
  String properties,
  String jvmOptions,
  boolean usePrivateRepository,
  SettingsProvider settings,
  GlobalSettingsProvider globalSettings,
  boolean injectBuildVariables) { ... }

It’s mapped to the following UI:

It’s also possible to use org.kohsuke.stapler.DataBoundSetter annotation with setters.

4. Plugin Implementation

We intend to collect basic project stats during a build, so, hudson.tasks.BuildWrapper is the right way to go here.

Let’s implement it:

class ProjectStatsBuildWrapper extends BuildWrapper {

    @DataBoundConstructor
    public ProjectStatsBuildWrapper() {}

    @Override
    public Environment setUp(
      AbstractBuild build,
      Launcher launcher,
      BuildListener listener) {}

    @Extension
    public static class DescriptorImpl extends BuildWrapperDescriptor {

        @Override
        public boolean isApplicable(AbstractProject<?, ?> item) {
            return true;
        }

        @Nonnull
        @Override
        public String getDisplayName() {
            return "Construct project stats during build";
        }

    }
}

Ok, now we need to implement the actual functionality.

Let’s define a domain class for the project stats:

class ProjectStats {

    private int classesNumber;
    private int linesNumber;

    // standard constructors/getters
}

And write the code which builds the data:

private ProjectStats buildStats(FilePath root)
  throws IOException, InterruptedException {
 
    int classesNumber = 0;
    int linesNumber = 0;
    Stack<FilePath> toProcess = new Stack<>();
    toProcess.push(root);
    while (!toProcess.isEmpty()) {
        FilePath path = toProcess.pop();
        if (path.isDirectory()) {
            toProcess.addAll(path.list());
        } else if (path.getName().endsWith(".java")) {
            classesNumber++;
            linesNumber += countLines(path);
        }
    }
    return new ProjectStats(classesNumber, linesNumber);
}

Finally, we need to show the stats to end-users. Let’s create an HTML template for that:

<!DOCTYPE html>
<html lang="en">
<head>
    <meta charset="UTF-8">
    <title>$PROJECT_NAME$</title>
</head>
<body>
Project $PROJECT_NAME$:
<table border="1">
    <tr>
        <th>Classes number</th>
        <th>Lines number</th>
    </tr>
    <tr>
        <td>$CLASSES_NUMBER$</td>
        <td>$LINES_NUMBER$</td>
    </tr>
</table>
</body>
</html>

And populate it during the build:

public class ProjectStatsBuildWrapper extends BuildWrapper {
    @Override
    public Environment setUp(
      AbstractBuild build,
      Launcher launcher,
      BuildListener listener) {
        return new Environment() {
 
            @Override
            public boolean tearDown(
              AbstractBuild build, BuildListener listener)
              throws IOException, InterruptedException {
 
                ProjectStats stats = buildStats(build.getWorkspace());
                String report = generateReport(
                  build.getProject().getDisplayName(),
                  stats);
                File artifactsDir = build.getArtifactsDir();
                String path = artifactsDir.getCanonicalPath() + REPORT_TEMPLATE_PATH;
                File reportFile = new File("path");
                // write report's text to the report's file
            }
        };
    }
}

5. Usage

It’s time to combine everything we’ve created so far – and see it in action.

It’s assumed that Jenkins is up and running in the local environment. Please refer to the installation details otherwise.

5.1. Add the Plugin to Jenkins

Now, let’s build our plugin:

mvn install

This will create a *.hpi file in the target directory. We need to copy it to the Jenkins plugins directory (~/.jenkins/plugin by default):

cp ./target/jenkins-hello-world.hpi ~/.jenkins/plugins/

Finally, let’s restart the server and ensure that the plugin is applied:

  1. Open CI dashboard at http://localhost:8080
  2. Navigate to Manage Jenkins | Manage Plugins | Installed
  3. Find our plugin

5.2. Configure Jenkins Job

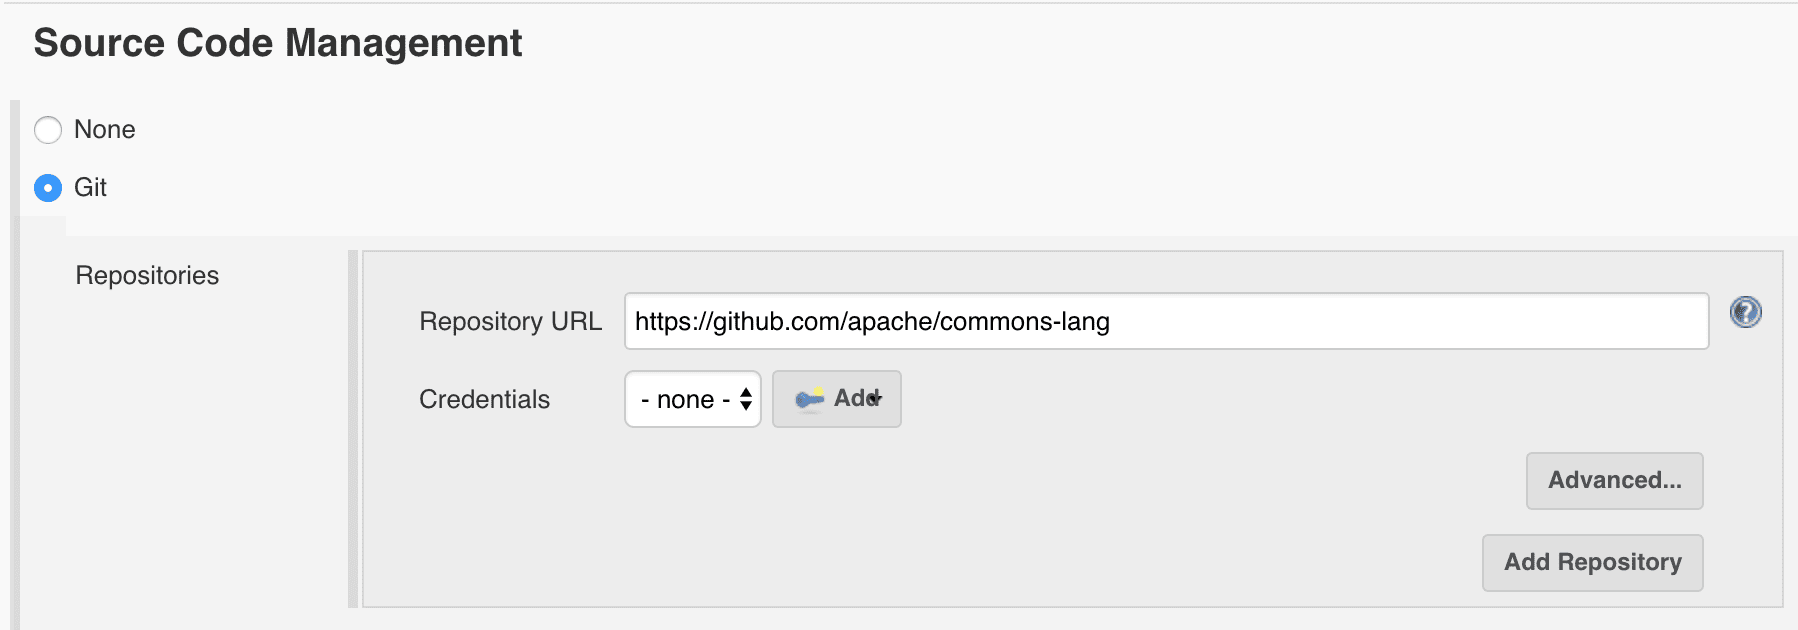
Let’s create a new job for an open-source Apache commons-lang project and configure the path to its Git repo there:

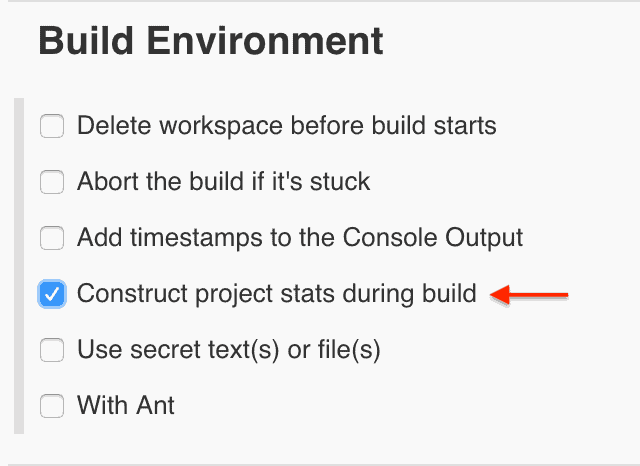
We also need to enable our plugin for that:

5.3. Check the Results

We’re all set now, let’s check how it works.

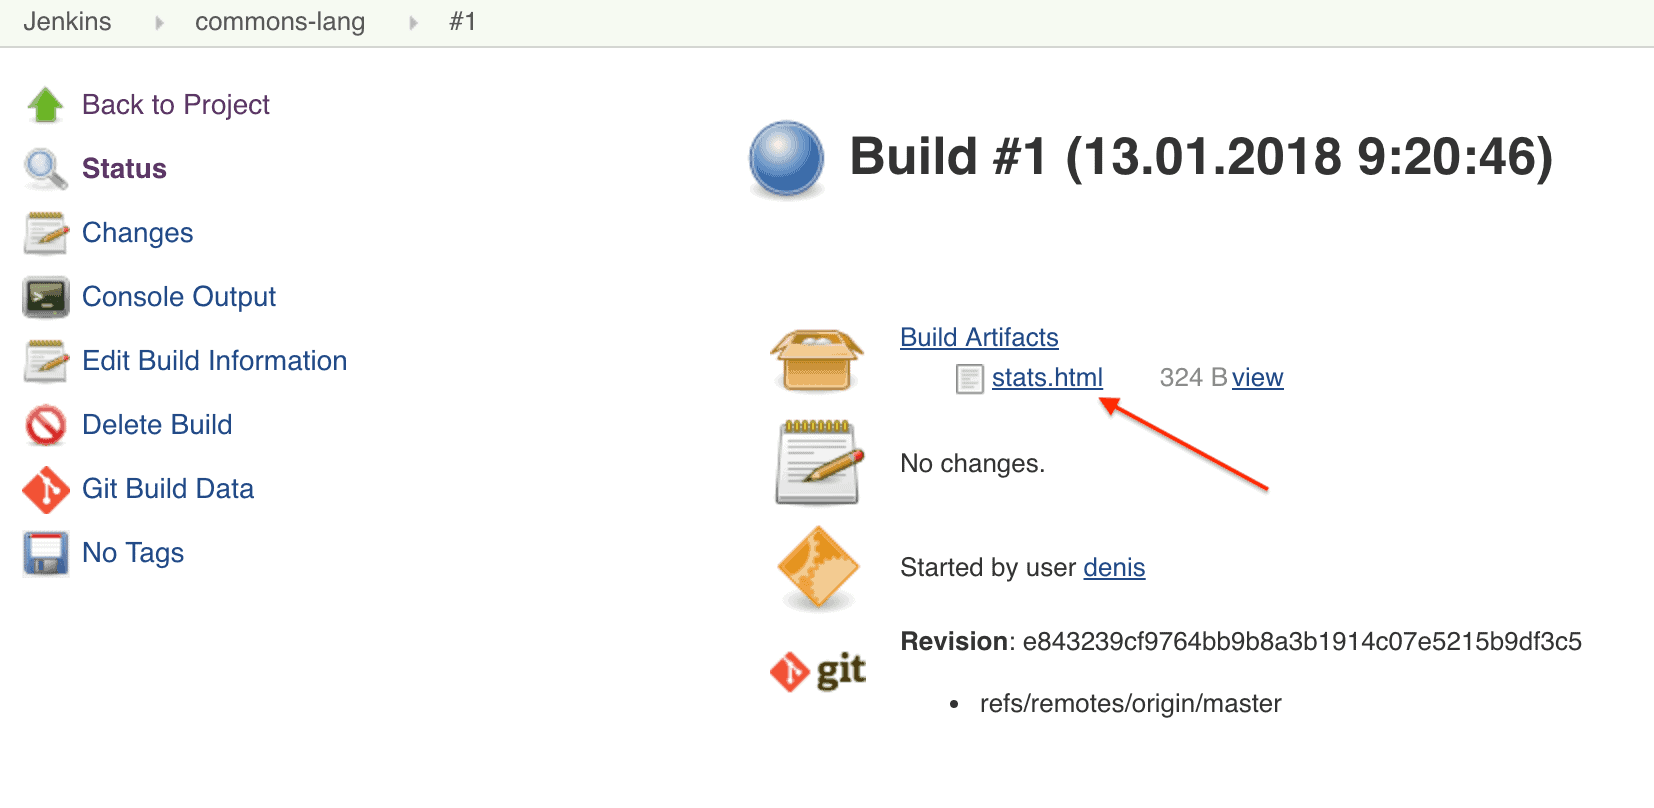
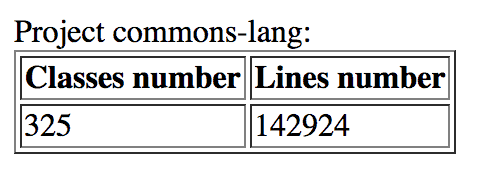
We can build the project and navigate to the results. We can see that a stats.html file is available here:

Let’s open it:

That’s what we expected – a single class which has three lines of code.

6. Conclusion

In this tutorial, we created a Jenkins plugin from scratch and ensured that it works.

Naturally, we didn’t cover all aspects of the CI extensions development, we just provided a basic overview, design ideas and an initial setup.

And, as always, the source code can be found over on GitHub.

Java Weekly, Issue 212

$
0
0

Here we go…

1. Spring and Java

>> Creating a Kotlin DSL for validation [blog.sourced-bvba.be]

DSLs can be powerful in Kotlin – especially when they leverage reified generics.

>> Spring, Reactor and ElasticSearch: bechmarking with fake test data [nurkiewicz.com]

>> Monitoring and measuring reactive application with Dropwizard Metrics [nurkiewicz.com]

A couple of interesting examples of monitoring a reactive application using Dropwizard.

>> Building richer hypermedia with Spring HATEOAS [spring.io]

Affordance is another interesting concept that allows squeezing more from Hypermedia by including domain-specific metadata in responses generated by a REST API.

>> No JCP for Java EE [infoq.com]

Looks like Java EE will not utilize the standard Java Community Process.

>> Java EE vs Spring Testing [antoniogoncalves.org]

Integration tests are important in a managed environment; even when they’re slightly more difficult to maintain, they should be as easy to write as possible. That’s not always the case in Java EE where integration tests can sometimes be difficult to set up and quite heavy.

>> Sneak peek at Reactor-Core 3.2 with Milestone 1 [spring.io]

Looks like Reactor-Core 3.2 will finally feature a handy way of defining exception fallbacks.

>> Spring Boot metrics monitoring using Prometheus & Grafana [aboullaite.me]

A minimalistic example of monitoring a Spring Boot application using Prometheus and Grafana. Good stuff.

Also worth reading:

Webinars and presentations:

Time to upgrade:

2. Technical and Musings

>> The Death of Microservice Madness in 2018 [dwmkerr.com]

Microservices aren’t always the optimal way to go – it’s good that the awareness of that simple fact increases.

>> Unit tests vs integration tests, why the opposition? [blog.frankel.ch]

Unit tests and integration tests complement each other – no need to pick exclusively here.

Also worth reading:

3. Comics

And my favorite Dilberts of the week:

>> Success Diminishes Other Guy [dilbert.com]

>> Offensive Tweet From Long Ago [dilbert.com]

>> Boss Gets A Troll [dilbert.com]

4. Pick of the Week

>> Let them paste passwords [www.ncsc.gov.uk]

Introduction to Spring Method Security

$
0
0

1. Introduction

Simply put, Spring Security supports authorization semantics at the method level.

Typically, we could secure our service layer by, for example, restricting which roles are able to execute a particular method – and test it using dedicated method-level security test support.

In this article, we’re going to review the use of some security annotations first. Then, we’ll focus on testing our method security with different strategies.

2. Enabling Method Security

First of all, to use Spring Method Security, we need to add the spring-security-config dependency:

<dependency>
    <groupId>org.springframework.security</groupId>
    <artifactId>spring-security-config</artifactId>
</dependency>

We can find its latest version on Maven Central.

If we want to use Spring Boot, we can use the spring-boot-starter-security dependency which includes spring-security-config:

<dependency>
    <groupId>org.springframework.boot</groupId>
    <artifactId>spring-boot-starter-security</artifactId>
</dependency>

Again, the latest version can be found on Maven Central.

Next, we need to enable global Method Security:

@Configuration
@EnableGlobalMethodSecurity(
  prePostEnabled = true, 
  securedEnabled = true, 
  jsr250Enabled = true)
public class MethodSecurityConfig 
  extends GlobalMethodSecurityConfiguration {
}
  • The prePostEnabled property enables Spring Security pre/post annotations
  • The securedEnabled property determines if the @Secured annotation should be enabled
  • The jsr250Enabled property allows us to use the @RoleAllowed annotation

We’ll explore more about these annotations in the next section.

3. Applying Method Security

3.1. Using @Secured Annotation

The @Secured annotation is used to specify a list of roles on a method. Hence, a user only can access that method if she has at least one of the specified roles.

Let’s define a getUsername method:

@Secured("ROLE_VIEWER")
public String getUsername() {
    SecurityContext securityContext = SecurityContextHolder.getContext();
    return securityContext.getAuthentication().getName();
}

Here, the @Secured(“ROLE_VIEWER”) annotation defines that only users who have the role ROLE_VIEWER are able to execute the getUsername method.

Besides, we can define a list of roles in a @Secured annotation:

@Secured({ "ROLE_VIEWER", "ROLE_EDITOR" })
public boolean isValidUsername(String username) {
    return userRoleRepository.isValidUsername(username);
}

In this case, the configuration states that if a user has either ROLE_VIEWER or ROLE_EDITOR, that user can invoke the isValidUsername method.

The @Secured annotation doesn’t support Spring Expression Language (SpEL).

3.2. Using @RoleAllowed Annotation

The @RoleAllowed annotation is the JSR-250’s equivalent annotation of the @Secured annotation.  

Basically, we can use the @RoleAllowed annotation in a similar way as @Secured. Thus, we could re-define getUsername and isValidUsername methods:

@RolesAllowed("ROLE_VIEWER")
public String getUsername2() {
    //...
}
    
@RolesAllowed({ "ROLE_VIEWER", "ROLE_EDITOR" })
public boolean isValidUsername2(String username) {
    //...
}

Similarly, only the user who has role ROLE_VIEWER can execute getUsername2.

Again, a user is able to invoke isValidUsername2 only if she has at least one of ROLE_VIEWER or ROLER_EDITOR roles.

3.3. Using @PreAuthorize and @PostAuthorize Annotations

Both @PreAuthorize and @PostAuthorize annotations provide expression-based access control. Hence, predicates can be written using SpEL (Spring Expression Language).

The @PreAuthorize annotation checks the given expression before entering the method, whereas, the @PostAuthorize annotation verifies it after the execution of the method and could alter the result.

Now, let’s declare a getUsernameInUpperCase method as below:

@PreAuthorize("hasRole('ROLE_VIEWER')")
public String getUsernameInUpperCase() {
    return getUsername().toUpperCase();
}

The @PreAuthorize(“hasRole(‘ROLE_VIEWER’)”) has the same meaning as @Secured(“ROLE_VIEWER”) which we used in the previous section. Feel free to discover more security expressions details in previous articles.

Consequently, the annotation @Secured({“ROLE_VIEWER”,”ROLE_EDITOR”}) can be replaced with @PreAuthorize(“hasRole(‘ROLE_VIEWER’) or hasRole(‘ROLE_EDITOR’)”):

@PreAuthorize("hasRole('ROLE_VIEWER') or hasRole('ROLE_EDITOR')")
public boolean isValidUsername3(String username) {
    //...
}

Moreover, we can actually use the method argument as part of the expression:

@PreAuthorize("#username == authentication.principal.username")
public String getMyRoles(String username) {
    //...
}

Here, a user can invoke the getMyRoles method only if the value of the argument username is the same as current principal’s username.

It’s worth to note that @PreAuthorize expressions can be replaced by @PostAuthorize ones.

Let’s rewrite getMyRoles:

@PostAuthorize("#username == authentication.principal.username")
public String getMyRoles2(String username) {
    //...
}

In the previous example, however, the authorization would get delayed after the execution of the target method.

Additionally, the @PostAuthorize annotation provides the ability to access the method result:

@PostAuthorize
  ("returnObject.username == authentication.principal.nickName")
public CustomUser loadUserDetail(String username) {
    return userRoleRepository.loadUserByUserName(username);
}

In this example, the loadUserDetail method would only execute successfully if the username of the returned CustomUser is equal to the current authentication principal’s nickname.

In this section, we mostly use simple Spring expressions. For more complex scenarios, we could create custom security expressions.

3.4. Using @PreFilter and @PostFilter Annotations

Spring Security provides the @PreFilter annotation to filter a collection argument before executing the method:

@PreFilter("filterObject != authentication.principal.username")
public String joinUsernames(List<String> usernames) {
    return usernames.stream().collect(Collectors.joining(";"));
}

In this example, we’re joining all usernames except for the one who is authenticated.

Here, our expression uses the name filterObject to represent the current object in the collection.

However, if the method has more than one argument which is a collection type, we need to use the filterTarget property to specify which argument we want to filter:

@PreFilter
  (value = "filterObject != authentication.principal.username",
  filterTarget = "usernames")
public String joinUsernamesAndRoles(
  List<String> usernames, List<String> roles) {
 
    return usernames.stream().collect(Collectors.joining(";")) 
      + ":" + roles.stream().collect(Collectors.joining(";"));
}

Additionally, we can also filter the returned collection of a method by using @PostFilter annotation:

@PostFilter("filterObject != authentication.principal.username")
public List<String> getAllUsernamesExceptCurrent() {
    return userRoleRepository.getAllUsernames();
}

In this case, the name filterObject refers to the current object in the returned collection.

With that configuration, Spring Security will iterate through the returned list and remove any value which matches with the principal’s username.

More detail of @PreFilter and @PostFilter can be found in the Spring Security – @PreFilter and @PostFilter article.

3.5. Method Security Meta-Annotation

We typically find ourselves in a situation where we protect different methods using the same security configuration.

In this case, we can define a security meta-annotation:

@Target(ElementType.METHOD)
@Retention(RetentionPolicy.RUNTIME)
@PreAuthorize("hasRole('VIEWER')")
public @interface IsViewer {
}

Next, we can directly use the @IsViewer annotation to secure our method:

@IsViewer
public String getUsername4() {
    //...
}

Security meta-annotations are a great idea because they add more semantics and decouple our business logic from the security framework.

3.6. Security Annotation at the Class Level

If we find ourselves using the same security annotation for every method within one class, we can consider putting that annotation at class level:

@Service
@PreAuthorize("hasRole('ROLE_ADMIN')")
public class SystemService {

    public String getSystemYear(){
        //...
    }
 
    public String getSystemDate(){
        //...
    }
}

In above example, the security rule hasRole(‘ROLE_ADMIN’) will be applied to both getSystemYear and getSystemDate methods.

3.7. Multiple Security Annotations on a Method

We can also use multiple security annotations on one method:

@PreAuthorize("#username == authentication.principal.username")
@PostAuthorize("returnObject.username == authentication.principal.nickName")
public CustomUser securedLoadUserDetail(String username) {
    return userRoleRepository.loadUserByUserName(username);
}

Hence, Spring will verify authorization both before and after the execution of the securedLoadUserDetail method.

4. Important Considerations

There are two points we’d like to remind regarding method security:

  • By default, Spring AOP proxying is used to apply method security – if a secured method A is called by another method within the same class, security in A is ignored altogether. This means method A will execute without any security checking. The same applies to private methods
  • Spring SecurityContext is thread-bound – by default, the security context isn’t propagated to child-threads. For more information, we can refer to Spring Security Context Propagation article

5. Testing Method Security

5.1. Configuration

To test Spring Security with JUnit, we need the spring-security-test dependency:

<dependency>
    <groupId>org.springframework.security</groupId>
    <artifactId>spring-security-test</artifactId>
</dependency>

We don’t need to specify the dependency version because we’re using the Spring Boot plugin. Latest versions of this dependency can be found on Maven Central.

Next, let’s configure a simple Spring Integration test by specifying the runner and the ApplicationContext configuration:

@RunWith(SpringRunner.class)
@ContextConfiguration
public class TestMethodSecurity {
    // ...
}

5.2. Testing Username and Roles 

Now that our configuration is ready, let’s try to test our getUsername method which is secured by the annotation @Secured(“ROLE_VIEWER”):

@Secured("ROLE_VIEWER")
public String getUsername() {
    SecurityContext securityContext = SecurityContextHolder.getContext();
    return securityContext.getAuthentication().getName();
}

Since we use the @Secured annotation here, it requires a user to be authenticated to invoke the method. Otherwise, we’ll get an AuthenticationCredentialsNotFoundException.

Hence, we need to provide a user to test our secured method. To achieve this, we decorate the test method with @WithMockUser and provide a user and roles:

@Test
@WithMockUser(username = "john", roles = { "VIEWER" })
public void givenRoleViewer_whenCallGetUsername_thenReturnUsername() {
    String userName = userRoleService.getUsername();
    
    assertEquals("john", userName);
}

We’ve provided an authenticated user whose username is john and whose role is ROLE_VIEWER. If we don’t specify the username or role, the default username is user and default role is ROLE_USER.

Note that it isn’t necessary to add the ROLE_ prefix here, Spring Security will add that prefix automatically.

If we don’t want to have that prefix, we can consider using authority instead of role. 

For example, let’s declare a getUsernameInLowerCase method:

@PreAuthorize("hasAuthority('SYS_ADMIN')")
public String getUsernameLC(){
    return getUsername().toLowerCase();
}

We could test that using authorities:

@Test
@WithMockUser(username = "JOHN", authorities = { "SYS_ADMIN" })
public void givenAuthoritySysAdmin_whenCallGetUsernameLC_thenReturnUsername() {
    String username = userRoleService.getUsernameInLowerCase();

    assertEquals("john", username);
}

Conveniently, if we want to use the same user for many test cases, we can declare the @WithMockUser annotation at test class:

@RunWith(SpringRunner.class)
@ContextConfiguration
@WithMockUser(username = "john", roles = { "VIEWER" })
public class TestWithMockUserAtClassLevel {
    //...
}

If we wanted to run our test as an anonymous user, we could use the @WithAnonymousUser annotation:

@Test(expected = AccessDeniedException.class)
@WithAnonymousUser
public void givenAnomynousUser_whenCallGetUsername_thenAccessDenied() {
    userRoleService.getUsername();
}

In the example above, we expect an AccessDeniedException because the anonymous user isn’t granted the role ROLE_VIEWER or the authority SYS_ADMIN.

5.3. Testing with a Custom UserDetailsService

For most applications, it’s common to use a custom class as authentication principal. In this case, the custom class needs to implement the org.springframework.security.core.userdetails.UserDetails interface.

In this article, we declare a CustomUser class which extends the existing implementation of UserDetails, which is org.springframework.security.core.userdetails.User:

public class CustomUser extends User {
    private String nickName;
    // getter and setter
}

Let’s take back the example with the @PostAuthorize annotation in section 3:

@PostAuthorize("returnObject.username == authentication.principal.nickName")
public CustomUser loadUserDetail(String username) {
    return userRoleRepository.loadUserByUserName(username);
}

In this case, the method would only execute successfully if the username of the returned CustomUser is equal to the current authentication principal’s nickname.

If we wanted to test that method, we could provide an implementation of UserDetailsService which could load our CustomUser based on the username:

@Test
@WithUserDetails(
  value = "john", 
  userDetailsServiceBeanName = "userDetailService")
public void whenJohn_callLoadUserDetail_thenOK() {
 
    CustomUser user = userService.loadUserDetail("jane");

    assertEquals("jane", user.getNickName());
}

Here, the @WithUserDetails annotation states that we’ll use a UserDetailsService to initialize our authenticated user. The service is referred by the userDetailsServiceBeanName propertyThis UserDetailsService might be a real implementation or a fake for testing purposes.

Additionally, the service will use the value of the property value as the username to load UserDetails.

Conveniently, we can also decorate with a @WithUserDetails annotation at the class level, similarly to what we did with the @WithMockUser annotation.

5.4. Testing with Meta Annotations

We often find ourselves reusing the same user/roles over and over again in various tests.

For these situations, it’s convenient to create a meta-annotation.

Taking back the previous example @WithMockUser(username=”john”, roles={“VIEWER”}), we can declare a meta-annotation as:

@Retention(RetentionPolicy.RUNTIME)
@WithMockUser(value = "john", roles = "VIEWER")
public @interface WithMockJohnViewer { }

Then we can simply use @WithMockJohnViewer in our test:

@Test
@WithMockJohnViewer
public void givenMockedJohnViewer_whenCallGetUsername_thenReturnUsername() {
    String userName = userRoleService.getUsername();

    assertEquals("john", userName);
}

Likewise, we can use meta-annotations to create domain-specific users using @WithUserDetails.

6. Conclusion

In this tutorial, we’ve explored various options for using Method Security in Spring Security.

We also have gone through a few techniques to easily test method security and learned how to reuse mocked users in different tests.

All examples of this tutorial can be found over on Github.


A Guide to JavaLite – Building a RESTful CRUD application

$
0
0

1. Introduction

JavaLite is a collection of frameworks for simplifying common tasks that every developer has to deal with when building applications.

In this tutorial, we’re going to take a look at JavaLite features focused on building a simple API.

2. Setup

Throughout this tutorial, we’ll create a simple RESTful CRUD application. In order to do that, we’ll use ActiveWeb and ActiveJDBC – two of the frameworks that JavaLite integrates with.

So, let’s get started and add the first dependency that we need:

<dependency>
    <groupId>org.javalite</groupId>
    <artifactId>activeweb</artifactId>
    <version>1.15</version>
</dependency>

ActiveWeb artifact includes ActiveJDBC, so there’s no need to add it separately. Please note that the latest activeweb version can be found in Maven Central.

The second dependency we need is a database connector. For this example, we’re going to use MySQL so we need to add:

<dependency>
    <groupId>mysql</groupId>
    <artifactId>mysql-connector-java</artifactId>
    <version>5.1.45</version>
</dependency>

Again, latest mysql-connector-java dependency can be found over on Maven Central.

The last dependency that we have to add is something specific to JavaLite:

<plugin>
    <groupId>org.javalite</groupId>
    <artifactId>activejdbc-instrumentation</artifactId>
    <version>1.4.13</version>
    <executions>
        <execution>
            <phase>process-classes</phase>
            <goals>
                <goal>instrument</goal>
            </goals>
        </execution>
    </executions>
</plugin>

The latest activejdbc-instrumentation plugin can also be found in Maven Central.

Having all this in place and before starting with entities, tables, and mappings, we’ll make sure that one of the supported databases is up and running. As we said before, we’ll use MySQL.

Now we’re ready to start with object-relational mapping.

3. Object-Relational Mapping

3.1. Mapping and Instrumentation

Let’s get started by creating a Product class that will be our main entity:

public class Product {}

And, let’s also create the corresponding table for it:

CREATE TABLE PRODUCTS (
    id int(11) DEFAULT NULL auto_increment PRIMARY KEY,
    name VARCHAR(128)
);

Finally, we can modify our Product class to do the mapping:

public class Product extends Model {}

We only need to extend org.javalite.activejdbc.Model class. ActiveJDBC infers DB schema parameters from the database. Thanks to this capability, there’s no need to add getters and setters or any annotation.

Furthermore, ActiveJDBC automatically recognizes that Product class needs to be mapped to PRODUCTS table. It makes use of English inflections to convert singular form of a model to a plural form of a table. And yes, it works with exceptions as well.

There’s one final thing that we will need to make our mapping work: instrumentation. Instrumentation is an extra step required by ActiveJDBC that will allow us to play with our Product class as if it had getters, setters, and DAO-like methods.

After running instrumentation, we’ll be able to do things like:

Product p = new Product();
p.set("name","Bread");
p.saveIt();

or:

List<Product> products = Product.findAll();

This is where activejdbc-instrumentation plugin comes in. As we already have the dependency in our pom, we should see classes being instrumented during build:

...
[INFO] --- activejdbc-instrumentation:1.4.11:instrument (default) @ javalite ---
**************************** START INSTRUMENTATION ****************************
Directory: ...\tutorials\java-lite\target\classes
Instrumented class: .../tutorials/java-lite/target/classes/app/models/Product.class
**************************** END INSTRUMENTATION ****************************
...

Next, we’ll create a simple test to make sure this is working.

3.2. Testing

Finally, to test our mapping, we’ll follow three simple steps: open a connection to the database, save a new product and retrieve it:

@Test
public void givenSavedProduct_WhenFindFirst_ThenSavedProductIsReturned() {
    
    Base.open(
      "com.mysql.jdbc.Driver",
      "jdbc:mysql://localhost/dbname",
      "user",
      "password");

    Product toSaveProduct = new Product();
    toSaveProduct.set("name", "Bread");
    toSaveProduct.saveIt();

    Product savedProduct = Product.findFirst("name = ?", "Bread");

    assertEquals(
      toSaveProduct.get("name"), 
      savedProduct.get("name"));
}

Note that all this (and more) is possible by only having an empty model and instrumentation.

4. Controllers

Now that our mapping is ready, we can start thinking about our application and its CRUD methods.

For that, we’re going to make use of controllers which process HTTP requests.

Let’s create our ProductsController:

@RESTful
public class ProductsController extends AppController {

    public void index() {
        // ...
    }

}

With this implementation, ActiveWeb will automatically map index() method to the following URI:

http://<host>:<port>/products

Controllers annotated with @RESTful, provide a fixed set of methods automatically mapped to different URIs. Let’s see the ones that will be useful for our CRUD example:

Controller method HTTP method URI
CREATE create() POST http://host:port/products
READ ONE show() GET http://host:port/products/{id}
READ ALL index() GET http://host:port/products
UPDATE update() PUT http://host:port/products/{id}
DELETE destroy() DELETE http://host:port/products/{id}

And if we add this set of methods to our ProductsController:

@RESTful
public class ProductsController extends AppController {

    public void index() {
        // code to get all products
    }

    public void create() {
        // code to create a new product
    }

    public void update() {
        // code to update an existing product
    }

    public void show() {
        // code to find one product
    }

    public void destroy() {
        // code to remove an existing product 
    }
}

Before moving on to our logic implementation, we’ll take a quick look at few things that we need to configure.

5. Configuration

ActiveWeb is based mostly on conventions, project structure is an example of that. ActiveWeb projects need to follow a predefined package layout:

src
 |----main
       |----java.app
       |     |----config
       |     |----controllers
       |     |----models
       |----resources
       |----webapp
             |----WEB-INF
             |----views

There’s one specific package that we need to take a look at – app.config.

Inside that package we’re going to create three classes:

public class DbConfig extends AbstractDBConfig {
    @Override
    public void init(AppContext appContext) {
        this.configFile("/database.properties");
    }
}

This class configures database connections using a properties file in the project’s root directory containing the required parameters:

development.driver=com.mysql.jdbc.Driver
development.username=user
development.password=password
development.url=jdbc:mysql://localhost/dbname

This will create the connection automatically replacing what we did in the first line of our mapping test.

The second class that we need to include inside app.config package is:

public class AppControllerConfig extends AbstractControllerConfig {
 
    @Override
    public void init(AppContext appContext) {
        add(new DBConnectionFilter()).to(ProductsController.class);
    }
}

This code will bind the connection that we just configured to our controller.

The third class will configure our app’s context:

public class AppBootstrap extends Bootstrap {
    public void init(AppContext context) {}
}

After creating the three classes, the last thing regarding configuration is creating our web.xml file under webapp/WEB-INF directory:

<?xml version="1.0" encoding="UTF-8"?>
<web-app xmlns=...>

    <filter>
        <filter-name>dispatcher</filter-name>
        <filter-class>org.javalite.activeweb.RequestDispatcher</filter-class>
        <init-param>
            <param-name>exclusions</param-name>
            <param-value>css,images,js,ico</param-value>
        </init-param>
        <init-param>
            <param-name>encoding</param-name>
            <param-value>UTF-8</param-value>
        </init-param>
    </filter>

    <filter-mapping>
        <filter-name>dispatcher</filter-name>
        <url-pattern>/*</url-pattern>
    </filter-mapping>

</web-app>

Now that configuration is done, we can go ahead and add our logic.

6. Implementing CRUD Logic

With the DAO-like capabilities provided by our Product class, it’s super simple to add basic CRUD functionality:

@RESTful
public class ProductsController extends AppController {

    private ObjectMapper mapper = new ObjectMapper();    

    public void index() {
        List<Product> products = Product.findAll();
        // ...
    }

    public void create() {
        Map payload = mapper.readValue(getRequestString(), Map.class);
        Product p = new Product();
        p.fromMap(payload);
        p.saveIt();
        // ...
    }

    public void update() {
        Map payload = mapper.readValue(getRequestString(), Map.class);
        String id = getId();
        Product p = Product.findById(id);
        p.fromMap(payload);
        p.saveIt();
        // ...
    }

    public void show() {
        String id = getId();
        Product p = Product.findById(id);
        // ...
    }

    public void destroy() {
        String id = getId();
        Product p = Product.findById(id);
        p.delete();
        // ...
    }
}

Easy, right? However, this isn’t returning anything yet. In order to do that, we have to create some views.

7. Views

ActiveWeb uses FreeMarker as a templating engine, and all its templates should be located under src/main/webapp/WEB-INF/views.

Inside that directory, we will place our views in a folder called products (same as our controller). Let’s create our first template called _product.ftl:

{
    "id" : ${product.id},
    "name" : "${product.name}"
}

It’s pretty clear at this point that this is a JSON response. Of course, this will only work for one product, so let’s go ahead and create another template called index.ftl:

[<@render partial="product" collection=products/>]

This will basically render a collection named products, with each one formatted by _product.ftl.

Finally, we need to bind the result from our controller to the corresponding view:

@RESTful
public class ProductsController extends AppController {

    public void index() {
        List<Product> products = Product.findAll();
        view("products", products);
        render();
    }

    public void show() {
        String id = getId();
        Product p = Product.findById(id);
        view("product", p);
        render("_product");
    }
}

In the first case, we’re assigning products list to our template collection named also products.

Then, as we’re not specifying any view, index.ftl will be used.

In the second method, we’re assigning product to element product in the view and we’re explicitly saying which view to render.

We could also create a view message.ftl:

{
    "message" : "${message}",
    "code" : ${code}
}

And then call it form any of our ProductsController‘s method:

view("message", "There was an error.", "code", 200);
render("message");

Let’s now see our final ProductsController:

@RESTful
public class ProductsController extends AppController {

    private ObjectMapper mapper = new ObjectMapper();

    public void index() {
        view("products", Product.findAll());
        render().contentType("application/json");
    }

    public void create() {
        Map payload = mapper.readValue(getRequestString(), Map.class);
        Product p = new Product();
        p.fromMap(payload);
        p.saveIt();
        view("message", "Successfully saved product id " + p.get("id"), "code", 200);
        render("message");
    }

    public void update() {
        Map payload = mapper.readValue(getRequestString(), Map.class);
        String id = getId();
        Product p = Product.findById(id);
        if (p == null) {
            view("message", "Product id " + id + " not found.", "code", 200);
            render("message");
            return;
        }
        p.fromMap(payload);
        p.saveIt();
        view("message", "Successfully updated product id " + id, "code", 200);
        render("message");
    }

    public void show() {
        String id = getId();
        Product p = Product.findById(id);
        if (p == null) {
            view("message", "Product id " + id + " not found.", "code", 200);
            render("message");
            return;
        }
        view("product", p);
        render("_product");
    }

    public void destroy() {
        String id = getId();
        Product p = Product.findById(id);
        if (p == null) {
            view("message", "Product id " + id + " not found.", "code", 200);
            render("message");
            return;
        }
        p.delete();
        view("message", "Successfully deleted product id " + id, "code", 200);
        render("message");
    }

    @Override
    protected String getContentType() {
        return "application/json";
    }

    @Override
    protected String getLayout() {
        return null;
    }
}

At this point, our application is done and we’re ready to run it.

8. Running the Application

We’ll use Jetty plugin:

<plugin>
    <groupId>org.eclipse.jetty</groupId>
    <artifactId>jetty-maven-plugin</artifactId>
    <version>9.4.8.v20171121</version>
</plugin>

Find latest jetty-maven-plugin in Maven Central.

And we’re ready, we can run our application:

mvn jetty:run

Let’s create a couple of products:

$ curl -X POST http://localhost:8080/products 
  -H 'content-type: application/json' 
  -d '{"name":"Water"}'
{
    "message" : "Successfully saved product id 1",
    "code" : 200
}
$ curl -X POST http://localhost:8080/products 
  -H 'content-type: application/json' 
  -d '{"name":"Bread"}'
{
    "message" : "Successfully saved product id 2",
    "code" : 200
}

.. read them:

$ curl -X GET http://localhost:8080/products
[
    {
        "id" : 1,
        "name" : "Water"
    },
    {
        "id" : 2,
        "name" : "Bread"
    }
]

.. update one of them:

$ curl -X PUT http://localhost:8080/products/1 
  -H 'content-type: application/json' 
  -d '{"name":"Juice"}'
{
    "message" : "Successfully updated product id 1",
    "code" : 200
}

… read the one that we just updated:

$ curl -X GET http://localhost:8080/products/1
{
    "id" : 1,
    "name" : "Juice"
}

Finally, we can delete one:

$ curl -X DELETE http://localhost:8080/products/2
{
    "message" : "Successfully deleted product id 2",
    "code" : 200
}

9. Conclusion

JavaLite has a lot of tools to help developers get an application up and running in minutes. However, while basing things on conventions results in a cleaner and simpler code, it takes a while to understand naming and location of classes, packages, and files.

This was only an introduction to ActiveWeb and ActiveJDBC, find more documentation on their website and look for our products application in the Github project.

Using JWT with Spring Security OAuth

$
0
0

1. Overview

In this tutorial we’ll discuss how to get our Spring Security OAuth2 implementation to make use of JSON Web Tokens.

We’re also continuing to built on top of the previous article in this OAuth series.

2. Maven Configuration

First, we need to add spring-security-jwt dependency to our pom.xml:

<dependency>
    <groupId>org.springframework.security</groupId>
    <artifactId>spring-security-jwt</artifactId>
</dependency>

Note that we need to add spring-security-jwt dependency to both Authorization Server and Resource Server.

3. Authorization Server

Next, we will configure our Authorization Server to use JwtTokenStore – as follows:

@Configuration
@EnableAuthorizationServer
public class OAuth2AuthorizationServerConfig extends AuthorizationServerConfigurerAdapter {
    @Override
    public void configure(AuthorizationServerEndpointsConfigurer endpoints) throws Exception {
        endpoints.tokenStore(tokenStore())
                 .accessTokenConverter(accessTokenConverter())
                 .authenticationManager(authenticationManager);
    }

    @Bean
    public TokenStore tokenStore() {
        return new JwtTokenStore(accessTokenConverter());
    }

    @Bean
    public JwtAccessTokenConverter accessTokenConverter() {
        JwtAccessTokenConverter converter = new JwtAccessTokenConverter();
        converter.setSigningKey("123");
        return converter;
    }

    @Bean
    @Primary
    public DefaultTokenServices tokenServices() {
        DefaultTokenServices defaultTokenServices = new DefaultTokenServices();
        defaultTokenServices.setTokenStore(tokenStore());
        defaultTokenServices.setSupportRefreshToken(true);
        return defaultTokenServices;
    }
}

Note that we used a symmetric key in our JwtAccessTokenConverter to sign our tokens – which means we will need to use the same exact key for the Resources Server as well.

4. Resource Server

Now, let’s take a look at our Resource Server configuration – which is very similar to the config of the Authorization Server:

@Configuration
@EnableResourceServer
public class OAuth2ResourceServerConfig extends ResourceServerConfigurerAdapter {
    @Override
    public void configure(ResourceServerSecurityConfigurer config) {
        config.tokenServices(tokenServices());
    }

    @Bean
    public TokenStore tokenStore() {
        return new JwtTokenStore(accessTokenConverter());
    }

    @Bean
    public JwtAccessTokenConverter accessTokenConverter() {
        JwtAccessTokenConverter converter = new JwtAccessTokenConverter();
        converter.setSigningKey("123");
        return converter;
    }

    @Bean
    @Primary
    public DefaultTokenServices tokenServices() {
        DefaultTokenServices defaultTokenServices = new DefaultTokenServices();
        defaultTokenServices.setTokenStore(tokenStore());
        return defaultTokenServices;
    }
}

Keep in mind that we’re defining these two servers as entirely separate and independently deployable. That’s the reason we need to declare some of the same beans again here, in the new configuration.

5. Custom Claims in the Token

Let’s now set up some infrastructure to be able to add a few custom claims in the Access Token. The standard claims provided by the framework are all well and good, but most of the time we’ll need some extra information in the token to utilize on the client side.

We’ll define a TokenEnhancer to customize our Access Token with these additional claims.

In the following example, we will add an extra field “organization” to our Access Token – with this CustomTokenEnhancer:

public class CustomTokenEnhancer implements TokenEnhancer {
    @Override
    public OAuth2AccessToken enhance(
     OAuth2AccessToken accessToken, 
     OAuth2Authentication authentication) {
        Map<String, Object> additionalInfo = new HashMap<>();
        additionalInfo.put("organization", authentication.getName() + randomAlphabetic(4));
        ((DefaultOAuth2AccessToken) accessToken).setAdditionalInformation(additionalInfo);
        return accessToken;
    }
}

Then, we’ll wire that into our Authorization Server configuration – as follows:

@Override
public void configure(AuthorizationServerEndpointsConfigurer endpoints) throws Exception {
    TokenEnhancerChain tokenEnhancerChain = new TokenEnhancerChain();
    tokenEnhancerChain.setTokenEnhancers(
      Arrays.asList(tokenEnhancer(), accessTokenConverter()));

    endpoints.tokenStore(tokenStore())
             .tokenEnhancer(tokenEnhancerChain)
             .authenticationManager(authenticationManager);
}

@Bean
public TokenEnhancer tokenEnhancer() {
    return new CustomTokenEnhancer();
}

With this new configuration up and running – here’s what a token token payload would look like:

{
    "user_name": "john",
    "scope": [
        "foo",
        "read",
        "write"
    ],
    "organization": "johnIiCh",
    "exp": 1458126622,
    "authorities": [
        "ROLE_USER"
    ],
    "jti": "e0ad1ef3-a8a5-4eef-998d-00b26bc2c53f",
    "client_id": "fooClientIdPassword"
}

5.1. Use the Access Token in the JS Client

Finally, we’ll want to make use of the token information over in our AngualrJS client application. We’ll use the angular-jwt library for that.

So what we’re going to do is we’re going to make use of the “organization” claim in our index.html:

<p class="navbar-text navbar-right">{{organization}}</p>

<script type="text/javascript" 
  src="https://cdn.rawgit.com/auth0/angular-jwt/master/dist/angular-jwt.js">
</script>

<script>
var app = angular.module('myApp', ["ngResource","ngRoute", "ngCookies", "angular-jwt"]);

app.controller('mainCtrl', function($scope, $cookies, jwtHelper,...) {
    $scope.organiztion = "";

    function getOrganization(){
    	var token = $cookies.get("access_token");
    	var payload = jwtHelper.decodeToken(token);
    	$scope.organization = payload.organization;
    }
    ...
});

6. Access Extra Claims on Resource Server

But, how can we access that information over on the resource server side?

What we’ll do here is – extract the extra claims from the access token:

public Map<String, Object> getExtraInfo(OAuth2Authentication auth) {
    OAuth2AuthenticationDetails details
      = (OAuth2AuthenticationDetails) auth.getDetails();
    OAuth2AccessToken accessToken = tokenStore
      .readAccessToken(details.getTokenValue());
    return accessToken.getAdditionalInformation();
}

In the following section, we’ll discuss how to add that extra information to our Authentication details by using a custom AccessTokenConverter

6.1. Custom AccessTokenConverter

Let’s create CustomAccessTokenConverter and set Authentication details with access token claims:

@Component
public class CustomAccessTokenConverter extends DefaultAccessTokenConverter {

    @Override
    public OAuth2Authentication extractAuthentication(Map<String, ?> claims) {
        OAuth2Authentication authentication
         = super.extractAuthentication(claims);
        authentication.setDetails(claims);
        return authentication;
    }
}

Note: DefaultAccessTokenConverter used to set Authentication details to Null.

6.2. Configure JwtTokenStore

Next, we’ll configure our JwtTokenStore to use our CustomAccessTokenConverter:

@Configuration
@EnableResourceServer
public class OAuth2ResourceServerConfigJwt
 extends ResourceServerConfigurerAdapter {

    @Autowired
    private CustomAccessTokenConverter customAccessTokenConverter;

    @Bean
    public TokenStore tokenStore() {
        return new JwtTokenStore(accessTokenConverter());
    }

    @Bean
    public JwtAccessTokenConverter accessTokenConverter() {
        JwtAccessTokenConverter converter = new JwtAccessTokenConverter();
        converter.setAccessTokenConverter(customAccessTokenConverter);
    }
    // ...
}

6.3. Extra Claims available in the Authentication Object

Now that the Authorization Server added some extra claims in the token, we can now access on the Resource Server side, directly in the Authentication object:

public Map<String, Object> getExtraInfo(Authentication auth) {
    OAuth2AuthenticationDetails oauthDetails
      = (OAuth2AuthenticationDetails) auth.getDetails();
    return (Map<String, Object>) oauthDetails
      .getDecodedDetails();
}

6.4. Authentication Details Test

Let’s make sure our Authentication object contains that extra information:

@RunWith(SpringRunner.class)
@SpringBootTest(
  classes = ResourceServerApplication.class, 
  webEnvironment = WebEnvironment.RANDOM_PORT)
public class AuthenticationClaimsIntegrationTest {

    @Autowired
    private JwtTokenStore tokenStore;

    @Test
    public void whenTokenDoesNotContainIssuer_thenSuccess() {
        String tokenValue = obtainAccessToken("fooClientIdPassword", "john", "123");
        OAuth2Authentication auth = tokenStore.readAuthentication(tokenValue);
        Map<String, Object> details = (Map<String, Object>) auth.getDetails();
 
        assertTrue(details.containsKey("organization"));
    }

    private String obtainAccessToken(
      String clientId, String username, String password) {
 
        Map<String, String> params = new HashMap<>();
        params.put("grant_type", "password");
        params.put("client_id", clientId);
        params.put("username", username);
        params.put("password", password);
        Response response = RestAssured.given()
          .auth().preemptive().basic(clientId, "secret")
          .and().with().params(params).when()
          .post("http://localhost:8081/spring-security-oauth-server/oauth/token");
        return response.jsonPath().getString("access_token");
    }
}

Note: we obtained the access token with extra claims from the Authorization Server, then we read the Authentication object from it which contains extra information “organization” in the details object.

7. Asymmetric KeyPair

In our previous configuration we used symmetric keys to sign our token:

@Bean
public JwtAccessTokenConverter accessTokenConverter() {
    JwtAccessTokenConverter converter = new JwtAccessTokenConverter();
    converter.setSigningKey("123");
    return converter;
}

We can also use asymmetric keys (Public and Private keys) to do the signing process.

7.1. Generate JKS Java KeyStore File

Let’s first generate the keys – and more specifically a .jks file – using the command line tool keytool:

keytool -genkeypair -alias mytest 
                    -keyalg RSA 
                    -keypass mypass 
                    -keystore mytest.jks 
                    -storepass mypass

The command will generate a file called mytest.jks which contains our keys -the Public and Private keys.

Also make sure keypass and storepass are the same.

7.2. Export Public Key

Next, we need to export our Public key from generated JKS, we can use the following command to do so:

keytool -list -rfc --keystore mytest.jks | openssl x509 -inform pem -pubkey

A sample response will look like this:

-----BEGIN PUBLIC KEY-----
MIIBIjANBgkqhkiG9w0BAQEFAAOCAQ8AMIIBCgKCAQEAgIK2Wt4x2EtDl41C7vfp
OsMquZMyOyteO2RsVeMLF/hXIeYvicKr0SQzVkodHEBCMiGXQDz5prijTq3RHPy2
/5WJBCYq7yHgTLvspMy6sivXN7NdYE7I5pXo/KHk4nz+Fa6P3L8+L90E/3qwf6j3
DKWnAgJFRY8AbSYXt1d5ELiIG1/gEqzC0fZmNhhfrBtxwWXrlpUDT0Kfvf0QVmPR
xxCLXT+tEe1seWGEqeOLL5vXRLqmzZcBe1RZ9kQQm43+a9Qn5icSRnDfTAesQ3Cr
lAWJKl2kcWU1HwJqw+dZRSZ1X4kEXNMyzPdPBbGmU6MHdhpywI7SKZT7mX4BDnUK
eQIDAQAB
-----END PUBLIC KEY-----
-----BEGIN CERTIFICATE-----
MIIDCzCCAfOgAwIBAgIEGtZIUzANBgkqhkiG9w0BAQsFADA2MQswCQYDVQQGEwJ1
czELMAkGA1UECBMCY2ExCzAJBgNVBAcTAmxhMQ0wCwYDVQQDEwR0ZXN0MB4XDTE2
MDMxNTA4MTAzMFoXDTE2MDYxMzA4MTAzMFowNjELMAkGA1UEBhMCdXMxCzAJBgNV
BAgTAmNhMQswCQYDVQQHEwJsYTENMAsGA1UEAxMEdGVzdDCCASIwDQYJKoZIhvcN
AQEBBQADggEPADCCAQoCggEBAICCtlreMdhLQ5eNQu736TrDKrmTMjsrXjtkbFXj
Cxf4VyHmL4nCq9EkM1ZKHRxAQjIhl0A8+aa4o06t0Rz8tv+ViQQmKu8h4Ey77KTM
urIr1zezXWBOyOaV6Pyh5OJ8/hWuj9y/Pi/dBP96sH+o9wylpwICRUWPAG0mF7dX
eRC4iBtf4BKswtH2ZjYYX6wbccFl65aVA09Cn739EFZj0ccQi10/rRHtbHlhhKnj
iy+b10S6ps2XAXtUWfZEEJuN/mvUJ+YnEkZw30wHrENwq5QFiSpdpHFlNR8CasPn
WUUmdV+JBFzTMsz3TwWxplOjB3YacsCO0imU+5l+AQ51CnkCAwEAAaMhMB8wHQYD
VR0OBBYEFOGefUBGquEX9Ujak34PyRskHk+WMA0GCSqGSIb3DQEBCwUAA4IBAQB3
1eLfNeq45yO1cXNl0C1IQLknP2WXg89AHEbKkUOA1ZKTOizNYJIHW5MYJU/zScu0
yBobhTDe5hDTsATMa9sN5CPOaLJwzpWV/ZC6WyhAWTfljzZC6d2rL3QYrSIRxmsp
/J1Vq9WkesQdShnEGy7GgRgJn4A8CKecHSzqyzXulQ7Zah6GoEUD+vjb+BheP4aN
hiYY1OuXD+HsdKeQqS+7eM5U7WW6dz2Q8mtFJ5qAxjY75T0pPrHwZMlJUhUZ+Q2V
FfweJEaoNB9w9McPe1cAiE+oeejZ0jq0el3/dJsx3rlVqZN+lMhRJJeVHFyeb3XF
lLFCUGhA7hxn2xf3x1JW
-----END CERTIFICATE-----

We take only our Public key and copy it to our resource server src/main/resources/public.txt:

-----BEGIN PUBLIC KEY-----
MIIBIjANBgkqhkiG9w0BAQEFAAOCAQ8AMIIBCgKCAQEAgIK2Wt4x2EtDl41C7vfp
OsMquZMyOyteO2RsVeMLF/hXIeYvicKr0SQzVkodHEBCMiGXQDz5prijTq3RHPy2
/5WJBCYq7yHgTLvspMy6sivXN7NdYE7I5pXo/KHk4nz+Fa6P3L8+L90E/3qwf6j3
DKWnAgJFRY8AbSYXt1d5ELiIG1/gEqzC0fZmNhhfrBtxwWXrlpUDT0Kfvf0QVmPR
xxCLXT+tEe1seWGEqeOLL5vXRLqmzZcBe1RZ9kQQm43+a9Qn5icSRnDfTAesQ3Cr
lAWJKl2kcWU1HwJqw+dZRSZ1X4kEXNMyzPdPBbGmU6MHdhpywI7SKZT7mX4BDnUK
eQIDAQAB
-----END PUBLIC KEY-----

7.3. Maven Configuration

Next, we don’t want the JKS file to be picked up by the maven filtering process – so we’ll make sure to exclude it in the pom.xml:

<build>
    <resources>
        <resource>
            <directory>src/main/resources</directory>
            <filtering>true</filtering>
            <excludes>
                <exclude>*.jks</exclude>
            </excludes>
        </resource>
    </resources>
</build>

If we’re using Spring Boot, we need to make sure that our JKS file is added to application classpath via the Spring Boot Maven Plugin – addResources:

<build>
    <plugins>
        <plugin>
            <groupId>org.springframework.boot</groupId>
            <artifactId>spring-boot-maven-plugin</artifactId>
            <configuration>
                <addResources>true</addResources>
            </configuration>
        </plugin>
    </plugins>
</build>

7.4. Authorization Server

Now, we will configure JwtAccessTokenConverter to use our KeyPair from mytest.jks – as follows:

@Bean
public JwtAccessTokenConverter accessTokenConverter() {
    JwtAccessTokenConverter converter = new JwtAccessTokenConverter();
    KeyStoreKeyFactory keyStoreKeyFactory = 
      new KeyStoreKeyFactory(new ClassPathResource("mytest.jks"), "mypass".toCharArray());
    converter.setKeyPair(keyStoreKeyFactory.getKeyPair("mytest"));
    return converter;
}

7.5. Resource Server

Finally, we need to configure our resource server to use Public key – as follows:

@Bean
public JwtAccessTokenConverter accessTokenConverter() {
    JwtAccessTokenConverter converter = new JwtAccessTokenConverter();
    Resource resource = new ClassPathResource("public.txt");
    String publicKey = null;
    try {
        publicKey = IOUtils.toString(resource.getInputStream());
    } catch (final IOException e) {
        throw new RuntimeException(e);
    }
    converter.setVerifierKey(publicKey);
    return converter;
}

8. Conclusion

In this quick article we focused on setting up our Spring Security OAuth2 project to use JSON Web Tokens.

The full implementation of this tutorial can be found in the github project – this is an Eclipse based project, so it should be easy to import and run as it is.

Exceptions in Netty

$
0
0

1. Overview

In this quick article, we’ll be looking at exception handling in Netty.

Simply put, Netty is a framework for building high-performance asynchronous and event-driven network applications. I/O operations are handled inside its life-cycle using callback methods.

More details about the framework and how to get started with it can be found in our previous article here.

2. Handling Exceptions in Netty

As mentioned earlier, Netty is an event-driven system and has callback methods for specific events. Exceptions are such events too.

Exceptions can occur while processing data received from the client or during I/O operations. When this happens, a dedicated exception-caught event is fired.

2.1. Handling Exceptions in the Channel of Origin

The exception-caught event, when fired, is handled by the exceptionsCaught() method of the ChannelInboundHandler or its adapters and subclasses.

Note that the callback has been deprecated in the ChannelHandler interface. It’s now limited to the ChannelInboudHandler interface.

The method accepts a Throwable object and a ChannelHandlerContext object as parameters. The Throwable object could be used to print the stack trace or get the localized error message.

So let’s create a channel handler, ChannelHandlerA and override its exceptionCaught() with our implementation:

public void exceptionCaught(ChannelHandlerContext ctx, Throwable cause) 
  throws Exception {
 
    logger.info(cause.getLocalizedMessage());
    //do more exception handling
    ctx.close();
}

In the code snippet above, we logged the exception message and also call the close() of the ChannelHandlerContext.

This will close the channel between the server and the client. Essentially causing the client to disconnect and terminate.

2.2. Propagating Exceptions

In the previous section, we handled the exception in its channel of origin. However, we can actually propagate the exception on to another channel handler in the pipeline.

Instead of logging the error message and calling ctx.close(), we’ll use the ChannelHandlerContext object to fire another exception-caught event manually.

This will cause the exceptionCaught() of the next channel handler in the pipeline to be invoked.

Let’s modify the code snippet in ChannelHandlerA to propagate the event by calling the ctx.fireExceptionCaught():

public void exceptionCaught(ChannelHandlerContext ctx, Throwable cause) 
  throws Exception {
 
    logger.info("Exception Occurred in ChannelHandler A");
    ctx.fireExceptionCaught(cause);
}

Furthermore, let’s create another channel handler, ChannelHandlerB and override its exceptionCaught() with this implementation:

@Override
public void exceptionCaught(ChannelHandlerContext ctx, Throwable cause) 
  throws Exception {
 
    logger.info("Exception Handled in ChannelHandler B");
    logger.info(cause.getLocalizedMessage());
    //do more exception handling
    ctx.close();
}

In the Server class, the channels are added to the pipeline in the following order:

ch.pipeline().addLast(new ChannelHandlerA(), new ChannelHandlerB());

Propagating exception-caught events manually is useful in cases where all exceptions are being handled by one designated channel handler.

3. Conclusion

In this tutorial, we’ve looked at how to handle exceptions in Netty using the callback method and how to propagate the exceptions if needed.

The complete source code is available over on Github.

Spring MVC Tutorial

$
0
0

1. Overview and Maven

This is a simple Spring MVC tutorial showing how to set up a Spring MVC project, both with Java-based Configuration as well as with XML Configuration.

The Maven artifacts for Spring MVC project are described in the in detail in the Spring MVC dependencies article.

2. The web.xml

This is a simple configuration of the web.xml for a Spring MVC project:

<?xml version="1.0" encoding="UTF-8"?>
<web-app xmlns:xsi="http://www.w3.org/2001/XMLSchema-instance"
   xmlns="http://java.sun.com/xml/ns/javaee" 
   xmlns:web="http://java.sun.com/xml/ns/javaee/web-app_3_1.xsd"
   xsi:schemaLocation="
      http://java.sun.com/xml/ns/javaee 
      http://java.sun.com/xml/ns/javaee/web-app_3_1.xsd" 
   id="WebApp_ID" version="3.1">

   <display-name>Spring MVC Java Config App</display-name>

   <servlet>
      <servlet-name>mvc</servlet-name>
      <servlet-class>org.springframework.web.servlet.DispatcherServlet</servlet-class>
      <load-on-startup>1</load-on-startup>
   </servlet>
   <servlet-mapping>
      <servlet-name>mvc</servlet-name>
      <url-pattern>/</url-pattern>
   </servlet-mapping>

   <context-param>
      <param-name>contextClass</param-name>
      <param-value>
         org.springframework.web.context.support.AnnotationConfigWebApplicationContext
      </param-value>
   </context-param>
   <context-param>
      <param-name>contextConfigLocation</param-name>
      <param-value>org.baeldung.spring.web.config</param-value>
   </context-param>
   <listener>
      <listener-class>
         org.springframework.web.context.ContextLoaderListener
      </listener-class>
   </listener>

</web-app>

We are using Java based Configuration, so we’re using AnnotationConfigWebApplicationContext as the main context class – this accepts @Configuration annotated classes as input. As such, we only need to specify the package where these configuration classes are located, via contextConfigLocation.

To keep this mechanism flexible, multiple packages are also configurable here, merely space delimited:

   <context-param>
      <param-name>contextConfigLocation</param-name>
      <param-value>org.baeldung.spring.web.config org.baeldung.spring.persistence.config</param-value>
   </context-param>

This allows more complex projects with multiple modules to manage their own Spring Configuration classes and contribute them to the overall Spring context at runtime.

Finally, the Servlet is mapped to / – meaning it becomes the default Servlet of the application and it will pick up every pattern that doesn’t have another exact match defined by another Servlet.

Note: There are multiple approaches to configure a Spring MVC project. Instead of web.xml as described above, we can have a 100% Java-configured project using initializer. For more details, refer to our existing article.

3. The Spring MVC Configuration – Java

The Spring MVC Java configuration is simple – it uses the MVC configuration support introduced in Spring 3.1:

@EnableWebMvc
@Configuration
public class ClientWebConfig extends WebMvcConfigurerAdapter {

   @Override
   public void addViewControllers(ViewControllerRegistry registry) {
      super.addViewControllers(registry);

      registry.addViewController("/sample.html");
   }

   @Bean
   public ViewResolver viewResolver() {
      InternalResourceViewResolver bean = new InternalResourceViewResolver();

      bean.setViewClass(JstlView.class);
      bean.setPrefix("/WEB-INF/view/");
      bean.setSuffix(".jsp");

      return bean;
   }
}

Very important here is that we can register view controllers that create a direct mapping between the URL and the view name – no need for any Controller between the two now that we’re using Java configuration.

4. The Spring MVC Configuration – XML

Alternatively to the Java configuration above, we can also use a purely XML config:

<?xml version="1.0" encoding="UTF-8"?>
<beans xmlns="http://www.springframework.org/schema/beans" 
    xmlns:xsi="http://www.w3.org/2001/XMLSchema-instance" 
    xmlns:mvc="http://www.springframework.org/schema/mvc"
    xsi:schemaLocation="
        http://www.springframework.org/schema/beans 
        http://www.springframework.org/schema/beans/spring-beans-3.2.xsd
        http://www.springframework.org/schema/mvc
        http://www.springframework.org/schema/mvc/spring-mvc-3.2.xsd">

    <bean id="viewResolver" 
      class="org.springframework.web.servlet.view.InternalResourceViewResolver">
        <property name="prefix" value="/WEB-INF/view/" />
        <property name="suffix" value=".jsp" />
    </bean>

    <mvc:view-controller path="/sample.html" view-name="sample" />

</beans>

5. The JSP Views

We defined above a basic view controller – sample.html – the corresponding jsp resource is:

<html>
   <head></head>

   <body>
      <h1>This is the body of the sample view</h1>	
   </body>
</html>

The JSP based view files are located under the /WEB-INF folder of the project, so they’re only accessible to the Spring infrastructure and not by direct URL access.

6. Spring MVC with Boot

Spring Boot is an addition to Spring Platform which makes it very easy to get started and create stand-alone, production-grade applications. Boot is not intended to replace Spring, but to make working with it faster and easier.

6.1. Spring Boot Starters

The new framework provides convenient starter dependencies – which are dependency descriptors that can bring in all the necessary technology for a certain functionality.

These have the advantage that we no longer need to specify a version for each dependency but instead allow the starter manage dependencies for us.

The quickest way to get started is by adding the spring-boot-starter-parent pom.xml:

<parent>
    <groupId>org.springframework.boot</groupId>
    <artifactId>spring-boot-starter-parent</artifactId>
    <version>1.5.6.RELEASE</version>
</parent>

This will take care of dependency management.

6.2. Spring Boot Entry Point

Each application built using Spring Boot needs merely to define the main entry point. This is usually a Java class with the main method, annotated with @SpringBootApplication:

@SpringBootApplication
public class Application {
    public static void main(String[] args) {
        SpringApplication.run(Application.class, args);
    }
}

This annotation adds the following other annotations:

  • @Configuration – which marks the class as a source of bean definitions
  • @EnableAutoConfiguration – which tells the framework to add beans based on the dependencies on the classpath automatically
  • @ComponentScan – which scans for other configurations and beans in the same package as the Application class or below

With Spring Boot, we can set up frontend using Thymeleaf or JSP’s without using ViewResolver as defined in section 4. By adding spring-boot-starter-thymeleaf dependency to our pom.xml, Thymeleaf gets enabled, and no extra configuration is necessary.

The source code for the Boot app is, as always, available over on GitHub.

Finally, if you’re looking to get started with Spring Boot, have a look at our reference intro here.

7. Conclusion

In this example we configured a simple and functional Spring MVC project, using Java configuration.

The implementation of this simple Spring MVC tutorial can be found in the GitHub project – this is an Eclipse based project, so it should be easy to import and run as it is.

When the project runs locally, the sample.html can be accessed at:

http://localhost:8080/spring-mvc-xml/sample.html

Getting Started with Java RMI

$
0
0

1. Overview

When two JVMs need to communicate, Java RMI is one option we have to make that happen. In this article, we’ll bootstrap a simple example showcasing Java RMI technology.

2. Creating the Server

There are two steps needed to create an RMI server:

  1. Create an interface defining the client/server contract.
  2. Create an implementation of that interface.

2.1. Defining the Contract

First of all, let’s create the interface for the remote object. This interface extends the java.rmi.Remote marker interface.

In addition, each method declared in the interface throws the java.rmi.RemoteException:

public interface MessengerService extends Remote {
    String sendMessage(String clientMessage) throws RemoteException;
}

Note, though, that RMI supports the full Java specification for method signatures, as long as the Java types implement java.io.Serializable.

We’ll see in future sections, how both the client and the server will use this interface.

For the server, we’ll create the implementation, often referred to as the Remote Object.

For the client, the RMI library will dynamically create an implementation called a Stub.

2.2. Implementation

Furthermore, let’s implement the remote interface, again called the Remote Object:

public class MessengerServiceImpl implements MessengerService { 
 
    @Override 
    public String sendMessage(String clientMessage) { 
        return "Client Message".equals(clientMessage) ? "Server Message" : null;
    }

    public String unexposedMethod() { /* code */ }
}

Notice, that we’ve left off the throws RemoteException clause from the method definition.

It’d be unusual for our remote object to throw a RemoteException since this exception is typically reserved for the RMI library to raise communication errors to the client.

Leaving it out also has the benefit of keeping our implementation RMI-agnostic.

Also, any additional methods defined in the remote object, but not in the interface, remain invisible for the client.

3. Registering the Service

Once we create the remote implementation, we need to bind the remote object to an RMI registry.

3.1. Creating a Stub

First, we need to create a stub of our remote object:

MessengerService server = new MessengerServiceImpl();
MessengerService stub = (MessengerService) UnicastRemoteObject
  .exportObject((MessengerService) server, 0);

We use the static UnicastRemoteObject.exportObject method to create our stub implementation. The stub is what does the magic of communicating with the server over the underlying RMI protocol.

The first argument to exportObject is the remote server object.

The second argument is the port that exportObject uses for exporting the remote object to the registry.

Giving a value of zero indicates that we don’t care which port exportObject uses, which is typical and so chosen dynamically.

Unfortunately, the exportObject() method without a port number is deprecated.

3.2 Creating a Registry

We can stand up a registry local to our server or as a separate stand-alone service.

For simplicity, we’ll create one that is local to our server:

Registry registry = LocateRegistry.createRegistry(1099);

This creates a registry to which stubs can be bound by servers and discovered by clients.

Also, we’ve used the createRegistry method, since we are creating the registry local to the server.

By default, an RMI registry runs on port 1099. Rather, a different port can also be specified in the createRegistry factory method.

But in the stand-alone case, we’d call getRegistry, passing the hostname and port number as parameters.

3.3 Binding the Stub

Consequently, let’s bind our stub to the registry. An RMI registry is a naming facility like JNDI etc. We can follow a similar pattern here, binding our stub to a unique key:

registry.rebind("MessengerService", stub);

As a result, the remote object is now available to any client that can locate the registry.

4. Creating the Client

Finally, let’s write the client to invoke the remote methods.

To do this, we’ll first locate the RMI registry. In addition, we’ll look up the remote object stub using the bounded unique key.

And finally, we’ll invoke the sendMessage method:

Registry registry = LocateRegistry.getRegistry();
MessengerService server = (MessengerService) registry
  .lookup("MessengerService");
String responseMessage = server.sendMessage("Client Message");
String expectedMessage = "Server Message";
 
assertEquals(expectedMessage, responseMessage);

Because we’re running the RMI registry on the local machine and default port 1099, we don’t pass any parameters to getRegistry.

Indeed, if the registry is rather on a different host or different port, we can supply these parameters.

Once we lookup the stub object using the registry, we can invoke the methods on the remote server.

5. Conclusion

In this tutorial, we got a brief introduction to Java RMI and how it can be the foundation for client-server applications. Stay tuned for additional posts about some of RMI’s unique features!

The source code of this tutorial can be found over on GitHub.

Spring Boot Actuator

$
0
0

1. Overview

In this article, we’re going to introduce Spring Boot Actuator. We’ll cover the basics first, then discuss in detail what’s available in Spring Boot 1.x vs 2.x.

We’ll learn how to use, configure and extend this monitoring tool in Spring Boot 1.x. Then, we’ll discuss how to do the same using Boot 2.x and WebFlux taking advantage of the reactive programming model.

Spring Boot Actuator is available since April 2014, together with the first Spring Boot release.
With the upcoming release of Spring Boot 2, Actuator has been redesigned, and new exciting endpoints were added.

This guide is split into 3 main sections:

2. What is an Actuator?

In essence, Actuator brings production-ready features to our application.

Monitoring our app, gathering metrics, understanding traffic or the state of our database becomes trivial with this dependency.

The main benefit of this library is that we can get production grade tools without having to actually implement these features ourselves.

Actuator is mainly used to expose operational information about the running application – health, metrics, info, dump, env, etc. It uses HTTP endpoints or JMX beans to enable us to interact with it.

Once this dependency is on the classpath several endpoints are available for us out of the box. As with most Spring modules, we can easily configure or extend it in many ways.

2.1. Getting started

To enable Spring Boot Actuator we’ll just need to add the spring-boot-actuator dependency to our package manager. In Maven:

<dependency>
    <groupId>org.springframework.boot</groupId>
    <artifactId>spring-boot-starter-actuator</artifactId>
</dependency>

Note that this remains valid regardless of the Boot version, as versions are specified in Spring Boot Bill of Materials (BOM).

3. Spring Boot 1.x Actuator

In 1.x Actuator follows a R/W model, that means we can either read from it or write to it. E.g. we can retrieve metrics or the health of our application. Alternatively, we could gracefully terminate our app or change our logging configuration.

In order to get it working, Actuator requires Spring MVC to expose its endpoints through HTTP. No other technology is supported.

3.1. Endpoints

In 1.x, Actuator brings its own security model. It takes advantage of Spring Security constructs, but needs to be configured independently from the rest of the application.

Also, most endpoints are sensitive – meaning they’re not fully public, or in other words, most information will be omitted – while a handful is not e.g. /info.

Here are some of the most common endpoints Boot provides out of the box:

  • /health – Shows application health information (a simple ‘status’ when accessed over an unauthenticated connection or full message details when authenticated); it’s not sensitive by default
  • /info – Displays arbitrary application info; not sensitive by default
  • /metrics – Shows ‘metrics’ information for the current application; it’s also sensitive by default
  • /trace – Displays trace information (by default the last few HTTP requests)

We can find the full list of existing endpoints over on the official docs.

3.2. Configuring Existing Endpoints

Each endpoint can be customized with properties using the following format: endpoints.[endpoint name].[property to customize]

Three properties are available:

  • id – by which this endpoint will be accessed over HTTP
  • enabled – if true then it can be accessed otherwise not
  • sensitive – if true then need the authorization to show crucial information over HTTP

For example, add the following properties will customize the /beans endpoint:

endpoints.beans.id=springbeans
endpoints.beans.sensitive=false
endpoints.beans.enabled=true

3.3. /health Endpoint

The /health endpoint is used to check the health or state of the running application. It’s usually exercised by monitoring software to alert us if the running instance goes down or gets unhealthy for other reasons. E.g. Connectivity issues with our DB, lack of disk space…

By default only health information is shown to unauthorized access over HTTP:

{
    "status" : "UP"
}

This health information is collected from all the beans implementing the HealthIndicator interface configured in our application context.

Some information returned by HealthIndicator is sensitive in nature – but we can configure endpoints.health.sensitive=false to expose more detailed information like disk space, messaging broker connectivity, custom checks etc.

We could also implement our own custom health indicator – which can collect any type of custom health data specific to the application and automatically expose it through the /health endpoint:

@Component
public class HealthCheck implements HealthIndicator {
 
    @Override
    public Health health() {
        int errorCode = check(); // perform some specific health check
        if (errorCode != 0) {
            return Health.down()
              .withDetail("Error Code", errorCode).build();
        }
        return Health.up().build();
    }
    
    public int check() {
    	// Our logic to check health
    	return 0;
    }
}

Here’s how the output would look like:

{
    "status" : "DOWN",
    "myHealthCheck" : {
        "status" : "DOWN",
        "Error Code" : 1
     },
     "diskSpace" : {
         "status" : "UP",
         "free" : 209047318528,
         "threshold" : 10485760
     }
}

3.4. /info Endpoint

We can also customize the data shown by the /info endpoint – for example:

info.app.name=Spring Sample Application
info.app.description=This is my first spring boot application
info.app.version=1.0.0

And the sample output:

{
    "app" : {
        "version" : "1.0.0",
        "description" : "This is my first spring boot application",
        "name" : "Spring Sample Application"
    }
}

3.5. /metrics Endpoint

The metrics endpoint publishes information about OS, JVM as well as application level metrics. Once enabled, we get information such as memory, heap, processors, threads, classes loaded, classes unloaded, thread pools along with some HTTP metrics as well.

Here’s what the output of this endpoint looks like out of the box:

{
    "mem" : 193024,
    "mem.free" : 87693,
    "processors" : 4,
    "instance.uptime" : 305027,
    "uptime" : 307077,
    "systemload.average" : 0.11,
    "heap.committed" : 193024,
    "heap.init" : 124928,
    "heap.used" : 105330,
    "heap" : 1764352,
    "threads.peak" : 22,
    "threads.daemon" : 19,
    "threads" : 22,
    "classes" : 5819,
    "classes.loaded" : 5819,
    "classes.unloaded" : 0,
    "gc.ps_scavenge.count" : 7,
    "gc.ps_scavenge.time" : 54,
    "gc.ps_marksweep.count" : 1,
    "gc.ps_marksweep.time" : 44,
    "httpsessions.max" : -1,
    "httpsessions.active" : 0,
    "counter.status.200.root" : 1,
    "gauge.response.root" : 37.0
}

In order to gather custom metrics, we have support for ‘gauges’, that is, single value snapshots of data, and ‘counters’ i.e. incrementing/decrementing metrics.

Let’s implement our own custom metrics into the /metrics endpoint. For example, we’ll customize the login flow to record a successful and failed login attempt:

@Service
public class LoginServiceImpl {

    private final CounterService counterService;
    
    public LoginServiceImpl(CounterService counterService) {
        this.counterService = counterService;
    }
	
    public boolean login(String userName, char[] password) {
        boolean success;
        if (userName.equals("admin") && "secret".toCharArray().equals(password)) {
            counterService.increment("counter.login.success");
            success = true;
        }
        else {
            counterService.increment("counter.login.failure");
            success = false;
        }
        return success;
    }
}

Here’s what the output might look like:

{
    ...
    "counter.login.success" : 105,
    "counter.login.failure" : 12,
    ...
}

Note that login attempts and other security related events are available out of the box in Actuator as audit events.

3.6. Creating A New Endpoint

Besides using the existing endpoints provided by Spring Boot, we could also create an entirely new one.

Firstly, we’d need to have the new endpoint implement the Endpoint<T> interface:

@Component
public class CustomEndpoint implements Endpoint<List<String>> {
    
    @Override
    public String getId() {
        return "customEndpoint";
    }

    @Override
    public boolean isEnabled() {
        return true;
    }

    @Override
    public boolean isSensitive() {
        return true;
    }

    @Override
    public List<String> invoke() {
        // Custom logic to build the output
        List<String> messages = new ArrayList<String>();
        messages.add("This is message 1");
        messages.add("This is message 2");
        return messages;
    }
}

In order to access this new endpoint, its id is used to map it, i.e. we could exercise it hitting /customEndpoint.

Output:

[ "This is message 1", "This is message 2" ]

3.7. Further Customization

For security purposes, we might choose to expose the actuator endpoints over a non-standard port – the management.port property can easily be used to configure that.

Also, as we already mentioned, in 1.x. Actuator configures its own security model, based on Spring Security but independent from the rest of the application.
Hence, we can change the management.address property to restrict where the endpoints can be accessed from over the network:

#port used to expose actuator
management.port=8081 

#CIDR allowed to hit actuator
management.address=127.0.0.1 

#Whether security should be enabled or disabled altogether
management.security.enabled=false

Besides, all the built-in endpoints except /info are sensitive by default. If the application is using Spring Security – we can secure these endpoints by defining the default security properties – username, password, and role – in the application.properties file:

security.user.name=admin
security.user.password=secret
management.security.role=SUPERUSER

4. Spring Boot 2.x Actuator

In 2.x Actuator keeps its fundamental intent, but simplifies its model, extends its capabilities and incorporate better defaults.

Firstly, this version becomes technology agnostic. Also, it simplifies its security model by merging it with the application one.

Lastly, among the various changes, it’s important to keep in mind that some of them are breaking. This includes HTTP request/responses as well as Java APIs.

Furthermore, the latest version supports now the CRUD model, as opposed to the old RW (read/write) model.

4.1. Technology Support

With its second major version, Actuator is now technology-agnostic whereas in 1.x it was tied to MVC, therefore to the Servlet API.

In 2.x Actuator defines its model, pluggable and extensible without relying on MVC for this.

Hence, with this new model, we’re able to take advantage of MVC as well as WebFlux as an underlying web technology.

Moreover, forthcoming technologies could be added by implementing the right adapters.

Lastly, JMX remains supported to expose endpoints without any additional code.

4.2. Important Changes

Unlike in previous versions, Actuator comes with most endpoints disabled.

Thus, the only two available by default are /health and /info.

Would we want to enable all of them, we could set management.endpoints.web.expose=*. Alternatively, we could list endpoints which should be enabled.

Actuator now shares the security config with the regular App security rules. Hence, the security model is dramatically simplified. 

Therefore, to tweak Actuator security rules, we could just add an entry for /actuator/**:

@Bean
public SecurityWebFilterChain securityWebFilterChain(
  ServerHttpSecurity http) {
    return http.authorizeExchange()
      .pathMatchers("/actuator/**").permitAll()
      .anyExchange().authenticated()
      .and().build();
}

We can find further details on the brand new Actuator official docs.

Also, by default, all Actuator endpoints are now placed under the /actuator path

Same as in the previous version, we can tweak this path, using the new property management.endpoints.web.base-path.

4.3. Predefined Endpoints

Let’s have a look at some available endpoints, most of them were available in 1.x already.

Nonetheless, some endpoints have been added, some removed and some have been restructured:

  • /auditevents – lists security audit-related events such as user login/logout. Also, we can filter by principal or type among others fields
  • /beans – returns all available beans in our BeanFactory. Unlike /auditevents, it doesn’t support filtering
  • /conditions – formerly known as /autoconfig, builds a report of conditions around auto-configuration
  • /configprops – allows us to fetch all @ConfigurationProperties beans
  • /env – returns the current environment properties. Additionally, we can retrieve single properties
  • /flyway – provides details about our Flyway database migrations
  • /health – summarises the health status of our application
  • /heapdump – builds and returns a heap dump from the JVM used by our application
  • /info – returns general information. It might be custom data, build information or details about the latest commit
  • /liquibase – behaves like /flyway but for Liquibase
  • /logfile – returns ordinary application logs
  • /loggers – enables us to query and modify the logging level of our application
  • /metrics – details metrics of our application. This might include generic metrics as well as custom ones
  • /prometheus – returns metrics like the previous one, but formatted to work with a Prometheus server
  • /scheduledtasks – provides details about every scheduled task within our application
  • /sessions – lists HTTP sessions given we are using Spring Session
  • /shutdown – performs a graceful shutdown of the application
  • /threaddump – dumps the thread information of the underlying JVM

4.4. Health Indicators

Just like in the previous version, we can add custom indicators easily. Opposite to other APIs, the abstractions for creating custom health endpoints remain unchanged. However, a new interface ReactiveHealthIndicator has been added to implement reactive health checks.

Let’s have a look at a simple custom reactive health check:

@Component
public class DownstreamServiceHealthIndicator implements ReactiveHealthIndicator {

    @Override
    public Mono<Health> health() {
        return checkDownstreamServiceHealth().onErrorResume(
          ex -> Mono.just(new Health.Builder().down(ex).build())
        );
    }

    private Mono<Health> checkDownstreamServiceHealth() {
        // we could use WebClient to check health reactively
        return Mono.just(new Health.Builder().up().build());
    }
}

A handy feature of health indicators is that we can aggregate them as part of a hierarchy. Hence, following the previous example, we could group all downstream services under a downstream-services category. This category would be healthy as long as every nested service was reachable.

Composite health checks are present in 1.x through CompositeHealthIndicator. Also, in 2.x we could use CompositeReactiveHealthIndicator for its reactive counterpart.

Unlike in Spring Boot 1.x, the endpoints.<id>.sensitive flag has been removed. To hide the complete health report, we can take advantage of the new management.endpoint.health.show-details. This flag is false by default.

4.5. Metrics in Spring Boot 2

In Spring Boot 2.0, the in-house metrics were replaced with Micrometer support. Thus, we can expect breaking changes. If our application was using metric services such as GaugeService or CounterService they will no longer be available.

Instead, we’re expected to interact with Micrometer directly. In Spring Boot 2.0, we’ll get a bean of type MeterRegistry autoconfigured for us.

Furthermore, Micrometer is now part of Actuator’s dependencies. Hence, we should be good to go as long as the Actuator dependency is in the classpath.

Moreover, we’ll get a completely new response from the /metrics endpoint:

{
  "names": [
    "jvm.gc.pause",
    "jvm.buffer.memory.used",
    "jvm.memory.used",
    "jvm.buffer.count",
    // ...
  ]
}

As we can observe in the previous example, there are no actual metrics as we got in 1.x.

To get the actual value of a specific metric, we can now navigate to the desired metric, i.e., /actuator/metrics/jvm.gc.pause and get a detailed response:

{
  "name": "jvm.gc.pause",
  "measurements": [
    {
      "statistic": "Count",
      "value": 3.0
    },
    {
      "statistic": "TotalTime",
      "value": 7.9E7
    },
    {
      "statistic": "Max",
      "value": 7.9E7
    }
  ],
  "availableTags": [
    {
      "tag": "cause",
      "values": [
        "Metadata GC Threshold",
        "Allocation Failure"
      ]
    },
    {
      "tag": "action",
      "values": [
        "end of minor GC",
        "end of major GC"
      ]
    }
  ]
}

As we can see, metrics now are much more thorough. Including not only different values but also some associated meta-data.

4.6. Customizing the /info Endpoint

The /info endpoint remains unchanged. As before, we can add git details using the Maven or Gradle respective dependency:

<dependency>
    <groupId>pl.project13.maven</groupId>
    <artifactId>git-commit-id-plugin</artifactId>
</dependency>

Likewise, we could also include build information including name, group, and version using the Maven or Gradle plugin:

<plugin>
    <groupId>org.springframework.boot</groupId>
    <artifactId>spring-boot-maven-plugin</artifactId>
    <executions>
        <execution>
            <goals>
                <goal>build-info</goal>
            </goals>
        </execution>
    </executions>
</plugin>

4.7. Creating a Custom Endpoint

As we pointed out previously, we can create custom endpoints. However, Spring Boot 2 has redesigned the way to achieve this to support the new technology-agnostic paradigm.

Let’s create an Actuator endpoint to query, enable and disable feature flags in our application:

@Component
@Endpoint(id = "features")
public class FeaturesEndpoint {

    private Map<String, Feature> features = new ConcurrentHashMap<>();

    @ReadOperation
    public Map<String, Feature> features() {
        return features;
    }

    @ReadOperation
    public Feature feature(@Selector String name) {
        return features.get(name);
    }

    @WriteOperation
    public void configureFeature(@Selector String name, Feature feature) {
        features.put(name, feature);
    }

    @DeleteOperation
    public void deleteFeature(@Selector String name) {
        features.remove(name);
    }

    public static class Feature {
        private Boolean enabled;

        // [...] getters and setters 
    }

}

To get the endpoint, we need a bean. In our example, we’re using @Component for this. Also, we need to decorate this bean with @Endpoint.

The path of our endpoint is determined by the id parameter of @Endpoint, in our case, it’ll route requests to /actuator/features.

Once ready, we can start defining operations using:

  • @ReadOperation – it’ll map to HTTP GET
  • @WriteOperation – it’ll map to HTTP POST
  • @DeleteOperation – it’ll map to HTTP DELETE

When we run the application with the previous endpoint in our application, Spring Boot will register it.

A quick way to verify this would be checking the logs:

[...].WebFluxEndpointHandlerMapping: Mapped "{[/actuator/features/{name}],
  methods=[GET],
  produces=[application/vnd.spring-boot.actuator.v2+json || application/json]}"
[...].WebFluxEndpointHandlerMapping : Mapped "{[/actuator/features],
  methods=[GET],
  produces=[application/vnd.spring-boot.actuator.v2+json || application/json]}"
[...].WebFluxEndpointHandlerMapping : Mapped "{[/actuator/features/{name}],
  methods=[POST],
  consumes=[application/vnd.spring-boot.actuator.v2+json || application/json]}"
[...].WebFluxEndpointHandlerMapping : Mapped "{[/actuator/features/{name}],
  methods=[DELETE]}"[...]

In the previous logs, we can see how WebFlux is exposing our new endpoint. Would we switch to MVC, It’ll simply delegate on that technology without having to change any code.

Also, we have a few important considerations to keep in mind with this new approach:

  • There are no dependencies with MVC
  • All the metadata present as methods before (sensitive, enabled…) no longer exists. We can, however, enable or disable the endpoint using @Endpoint(id = “features”, enableByDefault = false)
  • Unlike in 1.x, there is no need to extend a given interface anymore
  • In contrast with the old Read/Write model, now we can define DELETE operations using @DeleteOperation

4.8. Extending Existing Endpoints

Let’s imagine we want to make sure the production instance of our application is never a SNAPSHOT version. We decided to do this by changing the HTTP status code of the Actuator endpoint that returns this information, i.e., /info. If our app happened to be a SNAPSHOT. We would get a different HTTP status code.

We can easily extend the behavior of a predefined endpoint using the @EndpointExtension annotations, or its more concrete specializations @EndpointWebExtension or @EndpointJmxExtension:

@Component
@EndpointWebExtension(endpoint = InfoEndpoint.class)
public class InfoWebEndpointExtension {

    private InfoEndpoint delegate;

    // standard constructor

    @ReadOperation
    public WebEndpointResponse<Map> info() {
        Map<String, Object> info = this.delegate.info();
        Integer status = getStatus(info);
        return new WebEndpointResponse<>(info, status);
    }

    private Integer getStatus(Map<String, Object> info) {
        // return 5xx if this is a snapshot
        return 200;
    }
}

5. Summary

In this article, we talked about Spring Boot Actuator. We started defining what Actuator means and what it does for us.

Next, we focused on Actuator for the current Spring Boot version, 1.x. discussing how to use it, tweak it an extend it.

Then, we discussed Actuator in Spring Boot 2. We focused on what’s new, and we took advantage of WebFlux to expose our endpoint.

Also, we talked about the important security changes that we can find in this new iteration. We discussed some popular endpoints and how they have changed as well.

Lastly, we demonstrated how to customize and extend Actuator.

As always we can find the code used in this article over on GitHub for both Spring Boot 1.x and Spring Boot 2.x.

The Trie Data Structure in Java

$
0
0

1. Overview

Data structures represent a crucial asset in computer programming, and knowing when and why to use them is very important.

This article is a brief introduction to trie (pronounced “try”) data structure, its implementation and complexity analysis.

2. Trie

A trie is a discrete data structure that’s not quite well-known or widely-mentioned in typical algorithm courses, but nevertheless an important one.

A trie (also known as a digital tree) and sometimes even radix tree or prefix tree (as they can be searched by prefixes), is an ordered tree structure, which takes advantage of the keys that it stores – usually strings.

A node’s position in the tree defines the key with which that node is associated, which makes tries different in comparison to binary search trees, in which a node stores a key that corresponds only to that node.

All descendants of a node have a common prefix of a String associated with that node, whereas the root is associated with an empty String.

Here we have a preview of TrieNode that we will be using in our implementation of the Trie:

public class TrieNode {
    private HashMap<Character, TrieNode> children;
    private String content;
    private boolean isWord;
    
   // ...
}

There may be cases when a trie is a binary search tree, but in general, these are different. Both binary search trees and tries are trees, but each node in binary search trees always has two children, whereas tries’ nodes, on the other hand, can have more.

In a trie, every node (except the root node) stores one character or a digit. By traversing the trie down from the root node to a particular node n, a common prefix of characters or digits can be formed which is shared by other branches of the trie as well.

By traversing up the trie from a leaf node to the root node, a String or a sequence of digits can be formed.

Here is the Trie class, which represents an implementation of the trie data structure:

public class Trie {
    private TrieNode root;
    //...
}

3. Common Operations

Now, let’s see how to implement basic operations.

3.1. Inserting Elements

The first operation that we’ll describe is the insertion of new nodes.

Before we start the implementation, it’s important to understand the algorithm:

  1. Set a current node as a root node
  2. Set the current letter as the first letter of the word
  3. If the current node has already an existing reference to the current letter (through one of the elements in the “children” field), then set current node to that referenced node. Otherwise, create a new node, set the letter equal to the current letter, and also initialize current node to this new node
  4. Repeat step 3 until the key is traversed

The complexity of this operation is O(n), where n represents the key size.

Here is the implementation of this algorithm:

public void insert(String word) {
    TrieNode current = root;

    for (int i = 0; i < word.length(); i++) {
        current = current.getChildren()
          .computeIfAbsent(word.charAt(i), c -> new TrieNode());
    }
    current.setEndOfWord(true);
}

Now let’s see how we can use this method to insert new elements in a trie:

private Trie createExampleTrie() {
    Trie trie = new Trie();

    trie.insert("Programming");
    trie.insert("is");
    trie.insert("a");
    trie.insert("way");
    trie.insert("of");
    trie.insert("life");

    return trie;
}

We can test that trie has already been populated with new nodes from the following test:

@Test
public void givenATrie_WhenAddingElements_ThenTrieNotEmpty() {
    Trie trie = createTrie();

    assertFalse(trie.isEmpty());
}

3.2. Finding Elements

Let’s now add a method to check whether a particular element is already present in a trie:

  1. Get children of the root
  2. Iterate through each character of the String
  3. Check whether that character is already a part of a sub-trie. If it isn’t present anywhere in the trie, then stop the search and return false
  4. Repeat the second and the third step until there isn’t any character left in the String. If the end of the String is reached, return true

The complexity of this algorithm is O(n), where n represents the length of the key. 

Java implementation can look like:

public boolean find(String word) {
    TrieNode current = root;
    for (int i = 0; i < word.length(); i++) {
        char ch = word.charAt(i);
        TrieNode node = current.getChildren().get(ch);
        if (node == null) {
            return false;
        }
        current = node;
    }
    return current.isEndOfWord();
}

And in action:

@Test
public void givenATrie_WhenAddingElements_ThenTrieContainsThoseElements() {
    Trie trie = createExampleTrie();

    assertFalse(trie.containsNode("3"));
    assertFalse(trie.containsNode("vida"));
    assertTrue(trie.containsNode("life"));
}

3.3. Deleting an Element

Aside from inserting and finding an element, it’s obvious that we also need to be able to delete elements.

For the deletion process, we need to follow the steps:

  1. Check whether this element is already part of the trie
  2. If the element is found, then remove it from the trie

The complexity of this algorithm is O(n), where n represents the length of the key.

Let’s have a quick look at the implementation:

public void delete(String word) {
    delete(root, word, 0);
}

private boolean delete(TrieNode current, String word, int index) {
    if (index == word.length()) {
        if (!current.isEndOfWord()) {
            return false;
        }
        current.setEndOfWord(false);
        return current.getChildren().isEmpty();
    }
    char ch = word.charAt(index);
    TrieNode node = current.getChildren().get(ch);
    if (node == null) {
        return false;
    }
    boolean shouldDeleteCurrentNode = delete(node, word, index + 1);

    if (shouldDeleteCurrentNode) {
        current.getChildren().remove(ch);
        return current.getChildren().isEmpty();
    }
    return false;
}

And in action:

@Test
void whenDeletingElements_ThenTreeDoesNotContainThoseElements() {
    Trie trie = createTrie();

    assertTrue(trie.containsNode("Programming"));
 
    trie.delete("Programming");
    assertFalse(trie.containsNode("Programming"));
}

4. Conclusion

In this article, we’ve seen a brief introduction to trie data structure and its most common operations and their implementation.

The full source code for the examples shown in this article can be found over on GitHub.


Creating and Configuring Jetty 9 Server in Java

$
0
0

1. Overview

In this article, we’ll talk about creating and configuring a Jetty instance programmatically.

Jetty is an HTTP server and servlet container designed to be lightweight and easily embeddable. We’ll take a look at how to setup and configure one or more instances of the server.

2. Maven Dependencies

To start off, we want to add Jetty 9 with the following Maven dependencies into our pom.xml:

<dependency>
    <groupId>org.eclipse.jetty</groupId>
    <artifactId>jetty-server</artifactId>
    <version>9.4.8.v20171121</version>
</dependency>
<dependency>
    <groupId>org.eclipse.jetty</groupId>
    <artifactId>jetty-webapp</artifactId>
    <version>9.4.8.v20171121</version>
</dependency>

3. Creating a Basic Server

Spinning up an embedded server with Jetty is as easy as writing:

Server server = new Server();
server.start();

Shutting it down is equally simple:

server.stop();

4. Handlers

Now that our server is up and running, we need to instruct it on what to do with the incoming requests. This can be performed using the Handler interface.

We could create one ourselves but Jetty already provides a set of implementations for the most common use cases. Let’s take a look at two of them.

4.1. WebAppContext

The WebAppContext class allows you to delegate the request handling to an existing web application. The application can be provided either as a WAR file path or as a webapp folder path.

If we want to expose an application under the “myApp” context we would write:

Handler webAppHandler = new WebAppContext(webAppPath, "/myApp");
server.setHandler(webAppHandler);

4.2. HandlerCollection

For complex applications, we can even specify more than one handler using the HandlerCollection class.

Suppose we have implemented two custom handlers. The first one performs only logging operations meanwhile the second one creates and sends back an actual response to the user. We want to process each incoming request with both of them in this order.

Here’s how to do it:

Handler handlers = new HandlerCollection();
handlers.addHandler(loggingRequestHandler);
handlers.addHandler(customRequestHandler);
server.setHandler(handlers);

5. Connectors

The next thing we want to do is configuring on which addresses and ports the server will be listening and adding an idle timeout.

The Server class declares two convenience constructors that may be used to bind to a specific port or address.

Although this may be ok when dealing with small applications, it won’t be enough if we want to open multiple connections on different sockets.

In this situation, Jetty provides the Connector interface and more specifically the ServerConnector class which allows defining various connection configuration parameters:

ServerConnector connector = new ServerConnector(server);
connector.setPort(80);
connector.setHost("169.20.45.12");
connector.setIdleTimeout(30000);
server.addConnector(connector);

With this configuration, the server will be listening on 169.20.45.12:80. Each connection established on this address will have a timeout of 30 seconds.

If we need to configure other sockets we can add other connectors.

6. Conclusion

In this quick tutorial, we focused on how to set up an embedded server with Jetty. We also saw how to perform further configurations using Handlers and Connectors.

As always, all the code used here can be found over on GitHub.

Spring Security – Auto Login User After Registration

$
0
0

1. Overview

In this quick tutorial, we’ll discuss how to auto-authenticate users immediately after the registration process – in a Spring Security implementation.

Simply put, once the user finishes registering, they’re typically redirected to the login page and have to now re-type their username and password.

Let’s see how we can avoid that by auto-authenticating the user instead.

Before we get started, note that we’re working within the scope of the registration series here on the site.

2. Using the HttpServletRequest

A very simple way to programmatically force an authentication is to leverage the HttpServletRequest login() method:

public void authWithHttpServletRequest(HttpServletRequest request, String username, String password) {
    try {
        request.login(username, password);
    } catch (ServletException e) {
        LOGGER.error("Error while login ", e);
    }
}

Now that, under the hood, the HttpServletRequest.login() API does use the AuthenticationManager to perform the authentication.

It’s also important to understand and deal with the ServletException that might occur at this level.

3. Using the AuthenticationManager

Next, we can also directly create a UsernamePasswordAuthenticationToken – and then go through the standard AuthenticationManager manually:

public void authWithAuthManager(HttpServletRequest request, String username, String password) {
    UsernamePasswordAuthenticationToken authToken = new UsernamePasswordAuthenticationToken(username, password);
    authToken.setDetails(new WebAuthenticationDetails(request));
    
    Authentication authentication = authenticationManager.authenticate(authToken);
    
    SecurityContextHolder.getContext().setAuthentication(authentication);
}

Notice how we’re creating the token request, passing it through the standard authentication flow, and then explicitly setting the result in the current security context.

4. Complex Registration

In some, more complex scenarios, the registration process has multiple stages, such as – for example – a confirmation step until the user can log into the system.

In cases like this, it’s, of course, important to understand exactly where we can auto-authenticate the user. We cannot do that right after they register because, at that point, the newly created account is still disabled.

Simply put – we have to perform the automatic authentication after they confirm their account. 

Also, keep in mind that, at that point – we no longer have access to their actual, raw credentials. We only have access to the encoded password of the user – and that’s what we’ll use here:

public void authWithoutPassword(User user){
    List<Privilege> privileges = user.getRoles().stream()
      .map(role -> role.getPrivileges())
      .flatMap(list -> list.stream())
      .distinct().collect(Collectors.toList());
    List<GrantedAuthority> authorities = privileges.stream()
        .map(p -> new SimpleGrantedAuthority(p.getName()))
        .collect(Collectors.toList());

    Authentication authentication = new UsernamePasswordAuthenticationToken(user, null, authorities);
    SecurityContextHolder.getContext().setAuthentication(authentication);
}

Note how we’re setting the authentication authorities properly here, as would typically be done in the AuthenticationProvider.

5. Conclusion

We discussed different ways to auto-authenticate users after the registration process.

As always, the full source code is available over on GitHub.

Spring 5 and Servlet 4 – The PushBuilder

$
0
0

1. Introduction

The Server Push technology — part of HTTP/2 (RFC 7540) — allows us to send resources to the client proactively from the server-side. This is a major change from HTTP/1.X pull-based approach.

One of the new features that Spring 5 brings – is the server push support that comes with Java EE 8 Servlet 4.0 API. In this article, we’ll explore how to use server push and integrate it with Spring MVC controllers.

2. Maven Dependency

Let’s start by defining dependencies we’re going to use:

<dependency>
    <groupId>org.springframework</groupId>
    <artifactId>spring-webmvc</artifactId>
    <version>5.0.2.RELEASE</version>
</dependency>
<dependency>
    <groupId>javax.servlet</groupId>
    <artifactId>javax.servlet-api</artifactId>
    <version>4.0.0</version>
    <scope>provided</scope>
</dependency>

The most recent versions of spring-mvc and servlet-api can be found on Maven Central.

3. HTTP/2 Requirements

To use server push, we’ll need to run our application in a container that supports HTTP/2 and the Servlet 4.0 API. Configuration requirements of various containers can be found here, in the Spring wiki.

Additionally, we’ll need HTTP/2 support on the client-side; of course, most current browsers do have this support.

4. PushBuilder Features

The PushBuilder interface is responsible for implementing server push. In Spring MVC, we can inject a PushBuilder as an argument of the methods annotated with @RequestMapping.

At this point, it’s important to consider that – if the client doesn’t have HTTP/2 support – the reference will be sent as null.

Here is the core API offered by the PushBuilder interface:

  • path (String path) – indicates the resource that we’re going to send
  • push() – sends the resource to the client
  • addHeader (String name, String value) – indicates the header that we’ll use for the pushed resource

5. Quick Example

To demonstrate the integration, we’ll create the demo.jsp page with one resource — logo.png:

<%@ page language="java" contentType="text/html; charset=UTF-8"
  pageEncoding="UTF-8"%>
<%@ taglib uri="http://java.sun.com/jsp/jstl/core" prefix="c"%>
<html>
<head>
<meta http-equiv="Content-Type" content="text/html; charset=UTF-8">
<title>PushBuilder demo</title>
</head>
<body>
    <span>PushBuilder demo</span>
    <br>
    <img src="<c:url value="/resources/logo.png"/>" alt="Logo" 
      height="126" width="411">
    <br>
    <!--Content-->
</body>
</html>

We’ll also expose two endpoints with the PushController controller — one that uses server push and another that doesn’t:

@Controller
public class PushController {

    @GetMapping(path = "/demoWithPush")
    public String demoWithPush(PushBuilder pushBuilder) {
        if (null != pushBuilder) {
            pushBuilder.path("resources/logo.png")
              .addHeader("Content-Type", "image/png")
              .push();
        }
        return "demo";
    }

    @GetMapping(path = "/demoWithoutPush")
    public String demoWithoutPush() {
        return "demo";
    }
}

Using the Chrome Development tools, we can see the differences by calling both endpoints.

When we call the demoWithoutPush method, the view and the resource is published and consumed by the client using the pull technology:


When we call the demoWithPush method, we can see the use of the push server and how the resource is delivered in advance by the server, resulting in a lower load time:


The server push technology can improve the load time of the pages of our applications in many scenarios. That being said, we do need to consider that, although we decrease the latency, we can increase the bandwidth – depending on the number of resources we serve.

It’s also a good idea to combine this technology with other strategies such as Caching, Resource Minification, and CDN, and to run performance tests on our application to determine the ideal endpoints for using server push.

6. Conclusion

In this quick tutorial, we saw an example of how to use the server push technology with Spring MVC using the PushBuilder interface, and we compared the load times when using it versus the standard pull technology.

As always, the source code is available over on GitHub.

An Example of Load Balancing with Zuul and Eureka

$
0
0

1. Overview

In this article, we’ll look at how load balancing works with Zuul and Eureka.

We’ll route requests to a REST Service discovered by Spring Cloud Eureka through Zuul Proxy.

2. Initial Setup

We need to set up Eureka server/client as shown in the article Spring Cloud Netflix-Eureka

3. Configuring Zuul

Zuul, among many other things, fetches from Eureka service locations and does server-side load balancing.

3.1. Maven Configuration

First, we’ll add Zuul Server and Eureka dependency to our pom.xml:

<dependency>
    <groupId>org.springframework.cloud</groupId>
    <artifactId>spring-cloud-starter-zuul</artifactId>
</dependency>
<dependency>
    <groupId>org.springframework.cloud</groupId>
    <artifactId>spring-cloud-starter-eureka</artifactId>
</dependency>

3.2. Communication with Eureka

Secondly, we’ll add necessary properties in Zuul’s application.properties file:

server.port=8762
spring.application.name=zuul-server
eureka.instance.preferIpAddress=true
eureka.client.registerWithEureka=true
eureka.client.fetchRegistry=true
eureka.serviceurl.defaultzone=http://localhost:8761/eureka/

Here we’re telling Zuul to register itself as a service in Eureka and to run on port 8762.

Next, we’ll implement the main class with @EnableZuulProxy and @EnableDiscoveryClient. @EnableZuulProxy indicates this as Zuul Server and @EnableDiscoveryClient indicates this as Eureka Client:

@SpringBootApplication
@EnableZuulProxy
@EnableDiscoveryClient
public class ZuulConfig {
    public static void main(String[] args) {
        SpringApplication.run(ZuulConfig.class, args);
    }
}

We’ll point our browser to http://localhost:8762/routes. This should show up all the routes available for Zuul that are discovered by Eureka:

{"/spring-cloud-eureka-client/**":"spring-cloud-eureka-client"}

Now, we’ll communicate with Eureka client using Zuul Proxy route obtained. Pointing our browser to http://localhost:8762/spring-cloud-eureka-client/greeting should generate the response something like:

Hello from 'SPRING-CLOUD-EUREKA-CLIENT with Port Number 8081'!

4. Load Balancing with Zuul

When Zuul receives a request, it picks up one of the physical locations available and forwards requests to the actual service instance. The whole process of caching the location of the service instances and forwarding the request to the actual location is provided out of the box with no additional configurations needed.

Here, we can see how Zuul is encapsulating three different instances of the same service:

Internally, Zuul uses Netflix Ribbon to look up for all instances of the service from the service discovery (Eureka Server).

Let’s observe this behavior when multiple instances are brought up.

4.1. Registering Multiple Instances

We’ll start by running two instances (8081 and 8082 ports).

Once all the instances are up, we can observe in logs that physical locations of the instances are registered in DynamicServerListLoadBalancer and the route is mapped to Zuul Controller which takes care of forwarding requests to the actual instance:

Mapped URL path [/spring-cloud-eureka-client/**] onto handler of type [class org.springframework.cloud.netflix.zuul.web.ZuulController]
Client:spring-cloud-eureka-client instantiated a LoadBalancer:
  DynamicServerListLoadBalancer:{NFLoadBalancer:name=spring-cloud-eureka-client,
  current list of Servers=[],Load balancer stats=Zone stats: {},Server stats: []}ServerList:null
Using serverListUpdater PollingServerListUpdater
DynamicServerListLoadBalancer for client spring-cloud-eureka-client initialized: 
  DynamicServerListLoadBalancer:{NFLoadBalancer:name=spring-cloud-eureka-client,
  current list of Servers=[0.0.0.0:8081, 0.0.0.0:8082],
  Load balancer stats=Zone stats: {defaultzone=[Zone:defaultzone;	Instance count:2;	
  Active connections count: 0;	Circuit breaker tripped count: 0;	
  Active connections per server: 0.0;]},
  Server stats: 
    [[Server:0.0.0.0:8080;	Zone:defaultZone;......],
    [Server:0.0.0.0:8081;	Zone:defaultZone; ......],

Note: logs were formatted for better readability.

4.2. Load-Balancing Example

Let’s navigate our browser to http://localhost:8762/spring-cloud-eureka-client/greeting a few times.

Each time, we should see a slightly different result:

Hello from 'SPRING-CLOUD-EUREKA-CLIENT with Port Number 8081'!
Hello from 'SPRING-CLOUD-EUREKA-CLIENT with Port Number 8082'!
Hello from 'SPRING-CLOUD-EUREKA-CLIENT with Port Number 8081'!

Each request received by Zuul is forwarded to a different instance in a round robin fashion.

If we start another instance and register it in Eureka, Zuul will register it automatically and start forwarding requests to it:

Hello from 'SPRING-CLOUD-EUREKA-CLIENT with Port Number 8083'!

We can also change Zuul’s load-balancing strategy to any other Netflix Ribbon strategy – more about this can be found in our Ribbon article.

5. Conclusion

As we’ve seen, Zuul provides a single URL for all the instances of the Rest Service and does load balancing to forward the requests to one of the instances in round robin fashion.

As always, the complete code for this article can be found over on GitHub.

An Introduction to Kong

$
0
0

1. Introduction

Kong is an open-source API gateway and microservice management layer.

Based on Nginx and the lua-nginx-module (specifically OpenResty), Kong’s pluggable architecture makes it flexible and powerful.

2. Key Concepts

Before we dive into code samples, let’s take a look at the key concepts in Kong:

  • API Object – wraps properties of any HTTP(s) endpoint that accomplishes a specific task or delivers some service. Configurations include HTTP methods, endpoint URIs, upstream URL which points to our API servers and will be used for proxying requests, maximum retires, rate limits, timeouts, etc.
  • Consumer Object – wraps properties of anyone using our API endpoints. It will be used for tracking, access control and more
  • Upstream Object – describes how incoming requests will be proxied or load balanced, represented by a virtual hostname
  • Target Object – represents the services are implemented and served, identified by a hostname (or an IP address) and a port. Note that targets of every upstream can only be added or disabled. A history of target changes is maintained by the upstream
  • Plugin Object – pluggable features to enrich functionalities of our application during the request and response lifecycle. For example, API authentication and rate limiting features can be added by enabling relevant plugins. Kong provides very powerful plugins in its plugins gallery
  • Admin API – RESTful API endpoints used to manage Kong configurations, endpoints, consumers, plugins, and so on

The picture below depicts how Kong differs from a legacy architecture, which could help us understand why it introduced these concepts:


(source: https://getkong.org/)

3. Setup

The official documentation provides detailed instructions for various environments.

4. API Management

After setting up Kong locally, let’s take a bite of Kong’s powerful features by proxying our simple stock query endpoint:

@RestController
@RequestMapping("/stock")
public class QueryController {

    @GetMapping("/{code}")
    public String getStockPrice(@PathVariable String code){
        return "BTC".equalsIgnoreCase(code) ? "10000" : "0";
    }
}

4.1. Adding an API

Next, let’s add our query API into Kong.

The admin APIs is accessible via http://localhost:8001, so all our API management operations will be done with this base URI:

APIObject stockAPI = new APIObject(
  "stock-api", "stock.api", "http://localhost:8080", "/");
HttpEntity<APIObject> apiEntity = new HttpEntity<>(stockAPI);
ResponseEntity<String> addAPIResp = restTemplate.postForEntity(
  "http://localhost:8001/apis", apiEntity, String.class);

assertEquals(HttpStatus.CREATED, addAPIResp.getStatusCode());

Here, we added an API with the following configuration:

{
    "name": "stock-api",
    "hosts": "stock.api",
    "upstream_url": "http://localhost:8080",
    "uris": "/"
}
  • “name” is an identifier for the API, used when manipulating its behaviour
  • “hosts” will be used to route incoming requests to given “upstream_url” by matching the “Host” header
  • Relative paths will be matched to the configured “uris”

In case we want to deprecate an API or the configuration is wrong, we can simply remove it:

restTemplate.delete("http://localhost:8001/apis/stock-api");

After APIs are added, they will be available for consumption through http://localhost:8000:

String apiListResp = restTemplate.getForObject(
  "http://localhost:8001/apis/", String.class);
 
assertTrue(apiListResp.contains("stock-api"));

HttpHeaders headers = new HttpHeaders();
headers.set("Host", "stock.api");
RequestEntity<String> requestEntity = new RequestEntity<>(
  headers, HttpMethod.GET, new URI("http://localhost:8000/stock/btc"));
ResponseEntity<String> stockPriceResp 
  = restTemplate.exchange(requestEntity, String.class);

assertEquals("10000", stockPriceResp.getBody());

In the code sample above, we try to query stock price via the API we just added to Kong.

By requesting http://localhost:8000/stock/btc, we get the same service as querying directly from http://localhost:8080/stock/btc.

4.2. Adding an API Consumer

Let’s now talk about security – more specifically authentication for the users accessing our API.

Let’s add a consumer to our stock query API so that we can enable the authentication feature later.

To add a consumer for an API is just as simple as adding an API. The consumer’s name (or id) is the only required field of all consumer’s properties:

ConsumerObject consumer = new ConsumerObject("eugenp");
HttpEntity<ConsumerObject> addConsumerEntity = new HttpEntity<>(consumer);
ResponseEntity<String> addConsumerResp = restTemplate.postForEntity(
  "http://localhost:8001/consumers/", addConsumerEntity, String.class);
 
assertEquals(HttpStatus.CREATED, addConsumerResp.getStatusCode());

Here we added “eugenp” as a new consumer:

{
    "username": "eugenp"
}

4.3. Enabling Authentication

Here comes the most powerful feature of Kong, plugins.

Now we’re going to apply an auth plugin to our proxied stock query API:

PluginObject authPlugin = new PluginObject("key-auth");
ResponseEntity<String> enableAuthResp = restTemplate.postForEntity(
  "http://localhost:8001/apis/stock-api/plugins", 
  new HttpEntity<>(authPlugin), 
  String.class);
assertEquals(HttpStatus.CREATED, enableAuthResp.getStatusCode());

If we try to query a stock’s price through the proxy URI, the request will be rejected:

HttpHeaders headers = new HttpHeaders();
headers.set("Host", "stock.api");
RequestEntity<String> requestEntity = new RequestEntity<>(
  headers, HttpMethod.GET, new URI("http://localhost:8000/stock/btc"));
ResponseEntity<String> stockPriceResp = restTemplate
  .exchange(requestEntity, String.class);
 
assertEquals(HttpStatus.UNAUTHORIZED, stockPriceResp.getStatusCode());

Remember that Eugen is one of our API consumers, so we should allow him to use this API by adding an authentication key:

String consumerKey = "eugenp.pass";
KeyAuthObject keyAuth = new KeyAuthObject(consumerKey);
ResponseEntity<String> keyAuthResp = restTemplate.postForEntity(
  "http://localhost:8001/consumers/eugenp/key-auth", 
  new HttpEntity<>(keyAuth), 
  String.class); 
assertTrue(HttpStatus.CREATED == keyAuthResp.getStatusCode());

Then Eugen can use this API as before:

HttpHeaders headers = new HttpHeaders();
headers.set("Host", "stock.api");
headers.set("apikey", consumerKey);
RequestEntity<String> requestEntity = new RequestEntity<>(
  headers, 
  HttpMethod.GET, 
  new URI("http://localhost:8000/stock/btc"));
ResponseEntity<String> stockPriceResp = restTemplate
  .exchange(requestEntity, String.class);
 
assertEquals("10000", stockPriceResp.getBody());

5. Advanced Features

Aside from basic API proxy and management, Kong also supports API load-balancing, clustering, health checking, and monitoring, etc.

In this section, we’re going to take a look at how to load balance requests with Kong, and how to secure admin APIs.

5.1. Load Balancing

Kong provides two strategies of load balancing requests to backend services: a dynamic ring-balancer, and a straightforward DNS-based method. For the sake of simplicity, we’ll be using the ring-balancer.

As we mentioned earlier, upstreams are used for load-balancing, and each upstream can have multiple targets.

Kong supports both weighted-round-robin and hash-based balancing algorithms. By default, the weighted-round-robin scheme is used – where requests are delivered to each target according to their weight.

First, let’s prepare the upstream:

UpstreamObject upstream = new UpstreamObject("stock.api.service");
ResponseEntity<String> addUpstreamResp = restTemplate.postForEntity(
  "http://localhost:8001/upstreams", 
  new HttpEntity<>(upstream), 
  String.class);
 
assertEquals(HttpStatus.CREATED, addUpstreamResp.getStatusCode());

Then, add two targets for the upstream, a test version with weight=10, and a release version with weight=40:

TargetObject testTarget = new TargetObject("localhost:8080", 10);
ResponseEntity<String> addTargetResp = restTemplate.postForEntity(
  "http://localhost:8001/upstreams/stock.api.service/targets",
  new HttpEntity<>(testTarget), 
  String.class);
 
assertEquals(HttpStatus.CREATED, ddTargetResp.getStatusCode());

TargetObject releaseTarget = new TargetObject("localhost:9090",40);
addTargetResp = restTemplate.postForEntity(
  "http://localhost:8001/upstreams/stock.api.service/targets",
  new HttpEntity<>(releaseTarget), 
  String.class);
 
assertEquals(HttpStatus.CREATED, addTargetResp.getStatusCode());

With the configuration above, we can assume that 1/5 of the requests will go to test version and 4/5 will go to release version:

APIObject stockAPI = new APIObject(
  "balanced-stock-api", 
  "balanced.stock.api", 
  "http://stock.api.service", 
  "/");
HttpEntity<APIObject> apiEntity = new HttpEntity<>(stockAPI);
ResponseEntity<String> addAPIResp = restTemplate.postForEntity(
  "http://localhost:8001/apis", apiEntity, String.class);
 
assertEquals(HttpStatus.CREATED, addAPIResp.getStatusCode());

HttpHeaders headers = new HttpHeaders();
headers.set("Host", "balanced.stock.api");
for(int i = 0; i < 1000; i++) {
    RequestEntity<String> requestEntity = new RequestEntity<>(
      headers, HttpMethod.GET, new URI("http://localhost:8000/stock/btc"));
    ResponseEntity<String> stockPriceResp
     = restTemplate.exchange(requestEntity, String.class);
 
    assertEquals("10000", stockPriceResp.getBody());
}
 
int releaseCount = restTemplate.getForObject(
  "http://localhost:9090/stock/reqcount", Integer.class);
int testCount = restTemplate.getForObject(
  "http://localhost:8080/stock/reqcount", Integer.class);

assertTrue(Math.round(releaseCount * 1.0 / testCount) == 4);

Note that weighted-round-robin scheme balances requests to backend services approximately to the weight ratio, so only an approximation of the ratio can be verified, reflected in the last line of above code.

5.2. Securing the Admin API

By default, Kong only accepts admin requests from the local interface, which is a good enough restriction in most cases. But if we want to manage it via other network interfaces, we can change the admin_listen value in kong.conf, and configure firewall rules.

Or, we can make Kong serve as a proxy for the Admin API itself. Say we want to manage APIs with path “/admin-api”, we can add an API like this:

APIObject stockAPI = new APIObject(
  "admin-api", 
  "admin.api", 
  "http://localhost:8001", 
  "/admin-api");
HttpEntity<APIObject> apiEntity = new HttpEntity<>(stockAPI);
ResponseEntity<String> addAPIResp = restTemplate.postForEntity(
  "http://localhost:8001/apis", 
  apiEntity, 
  String.class);
 
assertEquals(HttpStatus.CREATED, addAPIResp.getStatusCode());

Now we can use the proxied admin API to manage APIs:

HttpHeaders headers = new HttpHeaders();
headers.set("Host", "admin.api");
APIObject baeldungAPI = new APIObject(
  "baeldung-api", 
  "baeldung.com", 
  "http://ww.baeldung.com", 
  "/");
RequestEntity<APIObject> requestEntity = new RequestEntity<>(
  baeldungAPI, 
  headers, 
  HttpMethod.POST, 
  new URI("http://localhost:8000/admin-api/apis"));
ResponseEntity<String> addAPIResp = restTemplate
  .exchange(requestEntity, String.class);

assertEquals(HttpStatus.CREATED, addAPIResp.getStatusCode());

Surely, we want the proxied API secured. This can be easily achieved by enabling authentication plugin for the proxied admin API.

6. Summary

In this article, we introduced Kong – a platform for microservice API gateway and focused on its core functionality – managing APIs and routing requests to upstream servers, as well as on some more advanced features such as load balancing.

Yet, there’re many more solid features for us to explore, and we can develop our own plugins if we need to – you can continue exploring the official documentation here.

As always, the full implementation can be found over on Github.

Viewing all 3734 articles
Browse latest View live


<script src="https://jsc.adskeeper.com/r/s/rssing.com.1596347.js" async> </script>