Quantcast
Channel: Baeldung
Viewing all 3783 articles
Browse latest View live

Configure Jenkins to Run and Show JMeter Tests

$
0
0

1. Overview

In this article, we’re going to configure a continuous delivery pipeline using Jenkins and Apache JMeter.

We’ll rely on the JMeter article as a great starting-point to first understand the basics of JMeter, as it already has some configured performance tests we can run. And, we’ll use the build output of that project to see the report generated by the Jenkins Performance plugin.

2. Setting up Jenkins

First of all, we need to download the latest stable version of Jenkins, navigate to the folder where our file is and run it using the java -jar jenkins.war command.

Keep in mind that we can’t use Jenkins without an initial users setup.

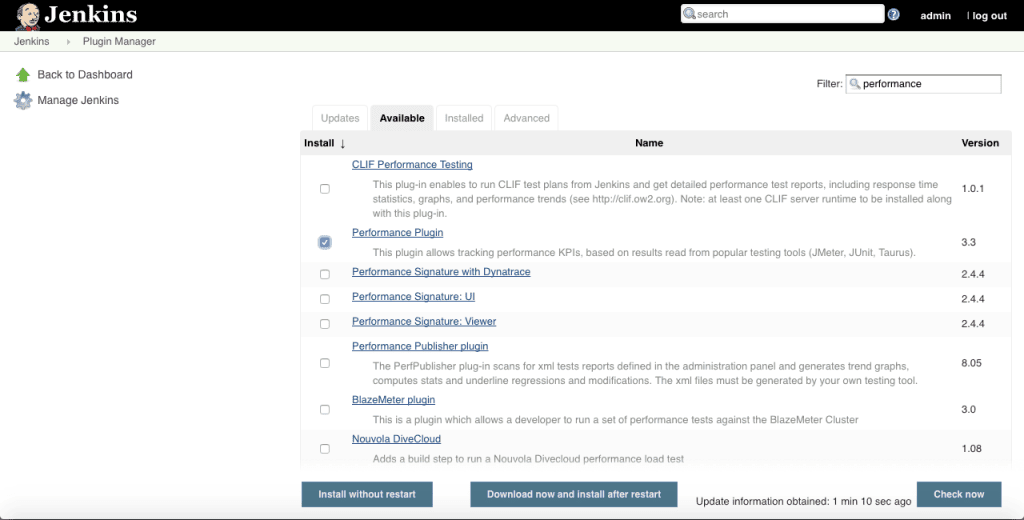
3. Installing the Performance Plugin

Let’s install the Performance plugin, which is necessary for running and displaying JMeter tests:

Now, we need to remember to restart the instance.

4. Run JMeter tests with Jenkins

Now, let’s go to Jenkins home page and click on “create new jobs”, specify a name, select Freestyle project and click “OK”.

In the next step, on the General Tab, we can configure it with these general details:
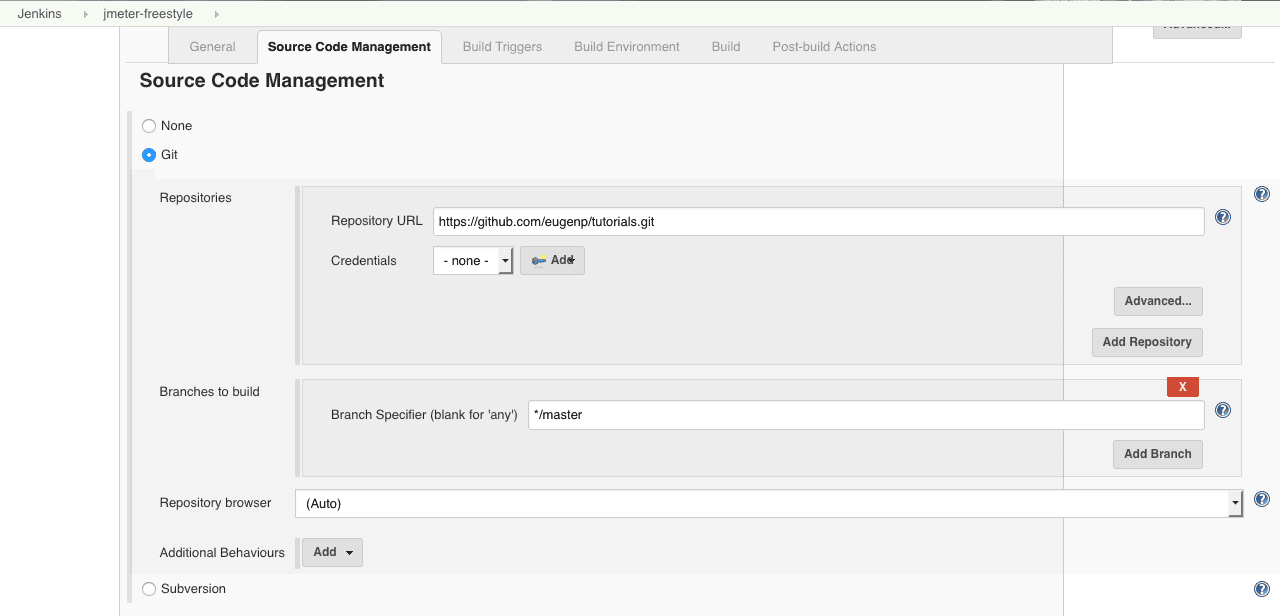
Next, let’s set the repository URL and branches to build:
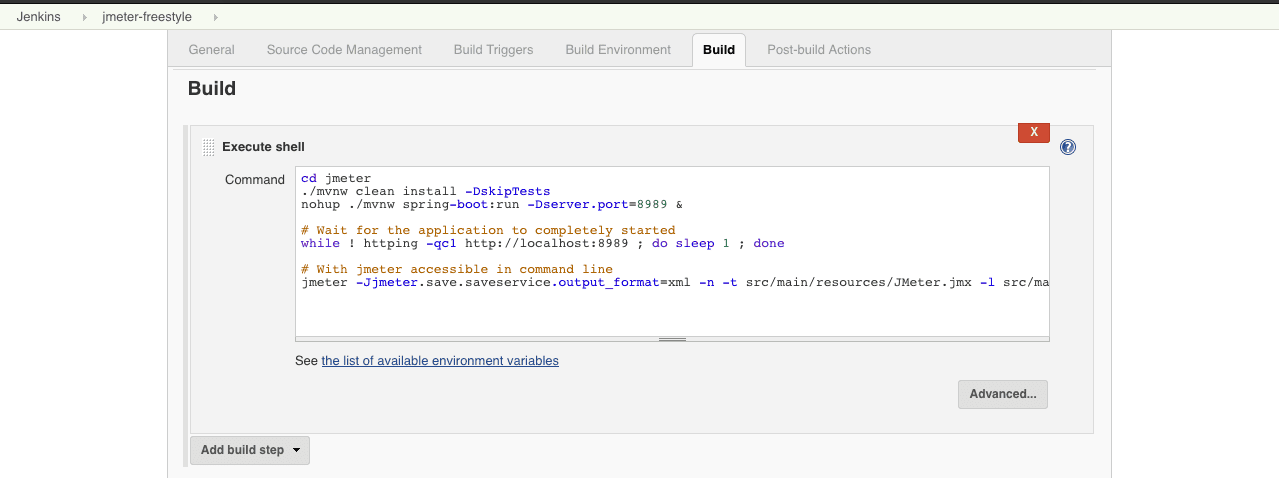
Now go to the Build Tab to specify how we’ll build the project. Here instead of directly specified the Maven command to build the whole project, we can take another way to better have the control of our pipeline as the intent is just to build one module.

On the Execute shell Sub-tab we write a script to perform the necessary actions after the repository is cloned:

  • Navigate to the desired sub-module
  • We compiled it
  • We deployed it, knowing that it’s a spring-boot based project
  • We wait until the app is available on the port 8989
  • And at the end, we just specify both the path of our JMeter script (located inside the resource folder of the jmeter module) to use for performance testing and the path of the resultant file (JMeter.jtl) also in the resource folder

Here is the small corresponding shell script:

cd jmeter
./mvnw clean install -DskipTests
nohup ./mvnw spring-boot:run -Dserver.port=8989 &

while ! httping -qc1 http://localhost:8989 ; do sleep 1 ; done

jmeter -Jjmeter.save.saveservice.output_format=xml 
  -n -t src/main/resources/JMeter.jmx 
    -l src/main/resources/JMeter.jtl

As shown in the following image:

After the project is cloned from GitHub, we compiled it, opened on port 8989 and processed the performance tests, we need to make the performance plugin display result in a user-friendly way.

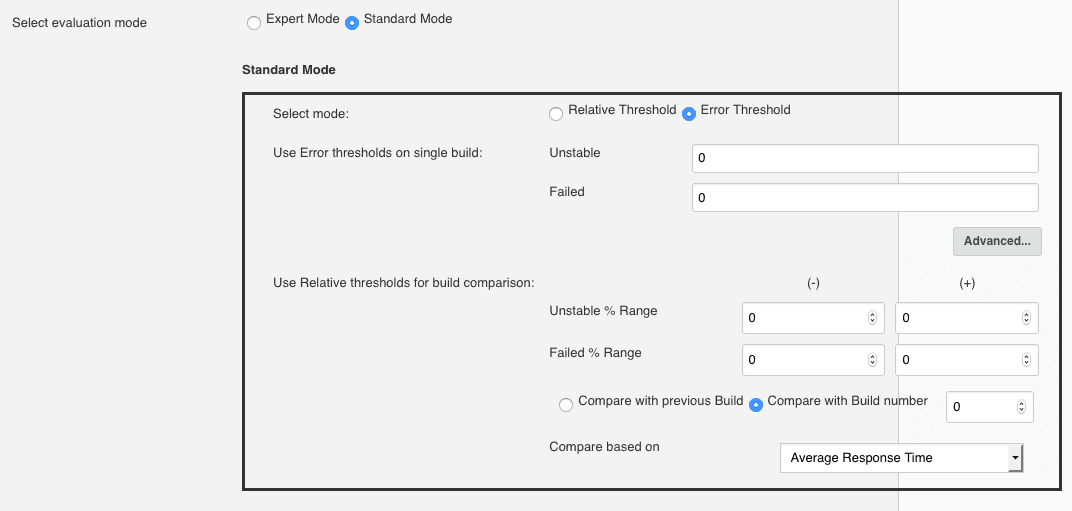
We can do that by adding a dedicated Post-build Actions. We need to provide the results source file and configure the action:

We choose the Standard Mode with the subsequent configs:

Let’s hit Save, on the left menu of Jenkins dashboard click on the button Build Now and wait for it to finish the set of operations we configured up there.

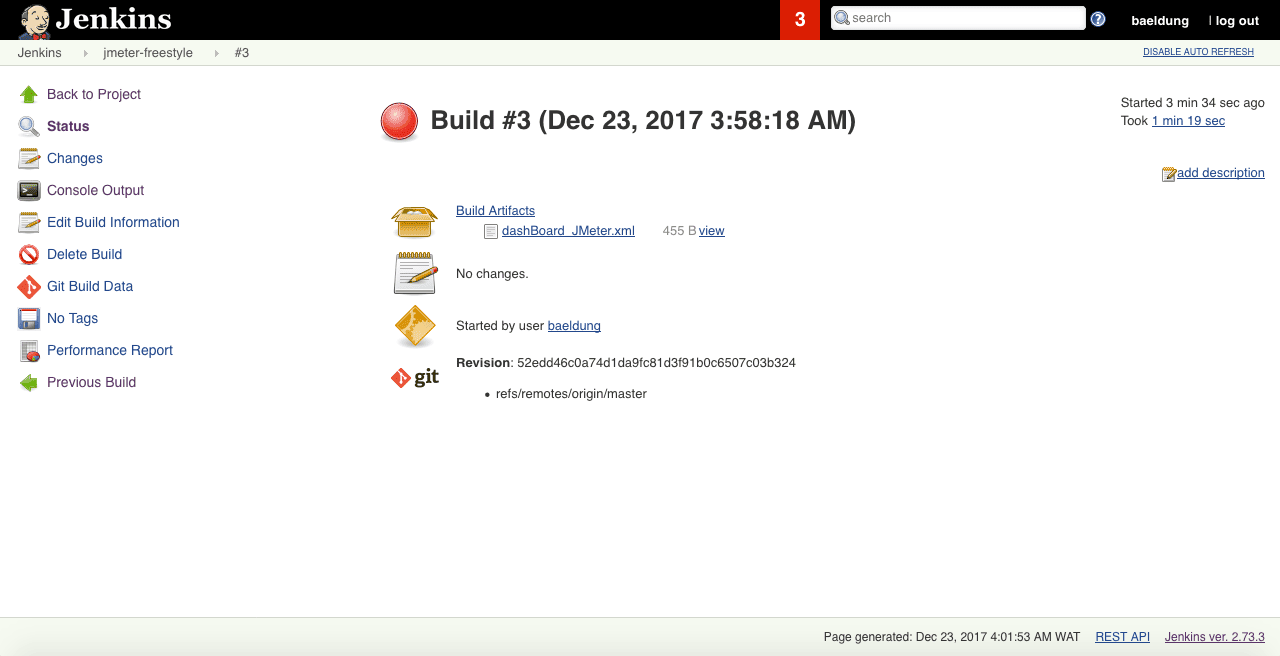
After it’s finished, we’ll see on the console all outputs of our project. At the end we’ll get either Finished: SUCCESS or Finished: FAILURE:

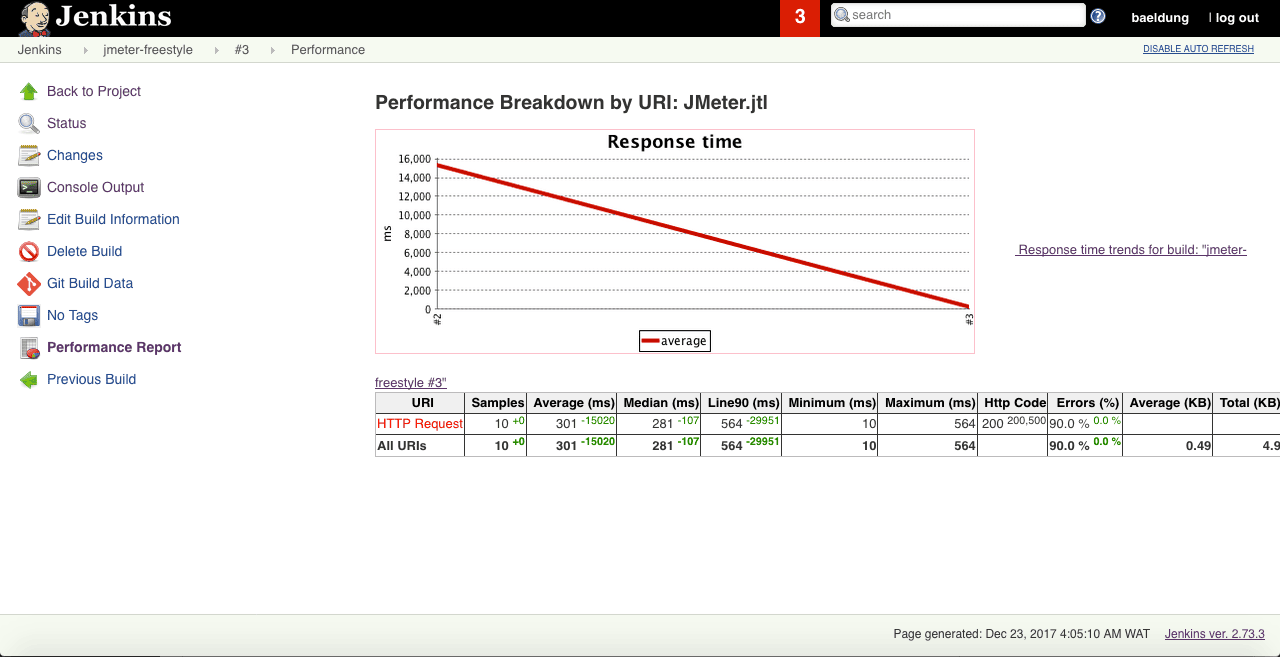
Let’s go to the Performance Report area accessible via the left side menu.

Here we’ll have the report of all past builds including the current one to see the difference in term of performance:

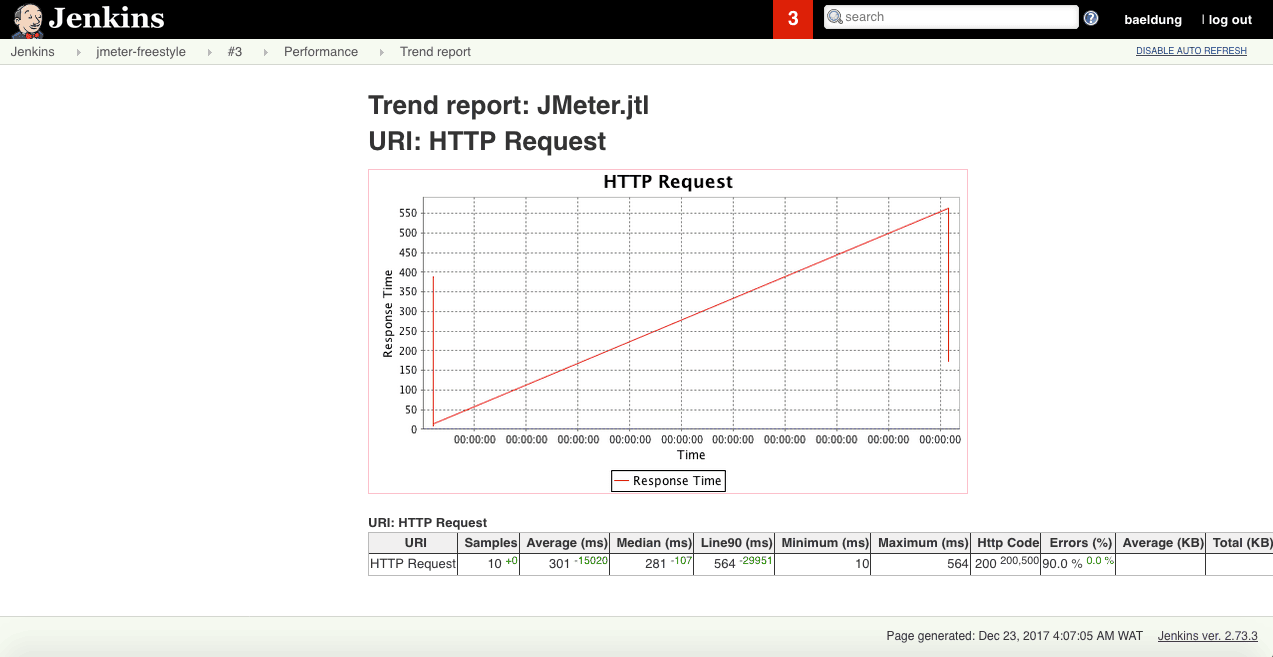
Let’s click on the indication just up of the table to have only the result of the last build we just made:

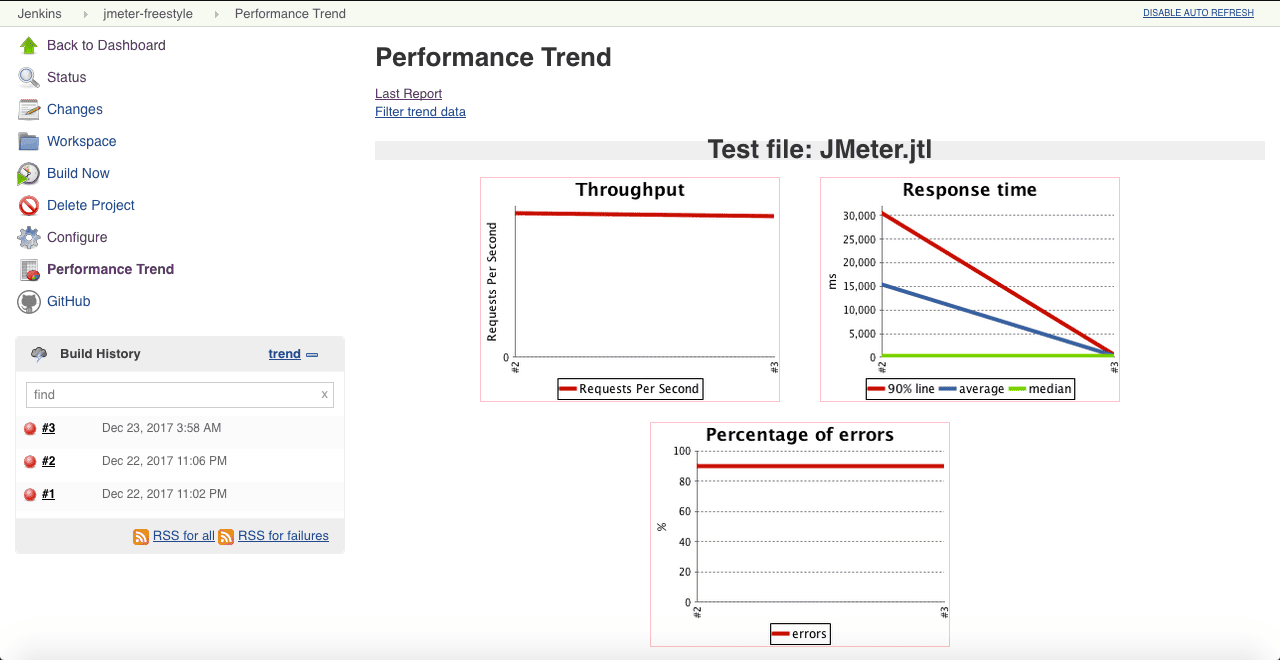
From the dashboard of our project we can get the Performance Trend, which are other graphs showing the last builds results:

Note: Applying the same thing to a Pipeline project is also simple as:

  1. Create another project (item) from the dashboard and name it JMeter-pipeline for example (General info Tab)
  2. Select Pipeline as project type
  3. On the Pipeline Tab, on the definition select Pipeline script and check Use Groovy Sandbox
  4. In the script area just fill the following lines:
node {
    stage 'Build, Test and Package'
    git 'https://github.com/eugenp/tutorials.git'
  
    dir('jmeter') {
        sh "./mvnw clean install -DskipTests"
        sh 'nohup ./mvnw spring-boot:run -Dserver.port=8989 &'
        sh "while ! httping -qc1
          http://localhost:8989 ; do sleep 1 ; done"
                
        sh "jmeter -Jjmeter.save.saveservice.output_format=xml
          -n -t src/main/resources/JMeter.jmx 
            -l src/main/resources/JMeter.jtl"
        step([$class: 'ArtifactArchiver', artifacts: 'JMeter.jtl'])
        sh "pid=\$(lsof -i:8989 -t); kill -TERM \$pid || kill -KILL \$pid"
    }
}

This script starts by cloning the project, goes in the target module, compile and run it to make sure the app is accessible at http://localhost:8989.

Next, we run JMeter tests located in the resource folder, save the results as the build output, and finally, the application is closed.

5. Conclusion

In this quick article, we have settled up a simple continuous delivery environment to run and show Apache JMeter tests in Jenkins in two ways; first via a Freestyle project and second with a Pipeline.

As always, the source code for this article can be found over on GitHub.


A Guide to Java Initialization

$
0
0

1. Overview

Simply put, before we can work with an object on the JVM, it has to be initialized.

In the following sections, we’ll take a look at various ways we can initialize primitive types and objects.

2. Declaration vs. Initialization

Let’s start by making sure that we’re on the same page.

Declaration is the process of defining the variable along with its type and name.

Here, we’re declaring the id variable:

int id;

Initialization, on the other hand, is all about assigning a value; for example:

id = 1;

To demonstrate, we’ll create a User class with a name and id properties:

public class User implements {
    private String name;
    private int id;
    
    // standard constructor, getters, setters,
}

Next, we’ll see that initialization works differently depending on the type of field we’re initializing.

3. Objects vs. Primitives

Java provides two types of data representation: primitive types and reference types. In this section, we’ll discuss the differences between the two with regards to initialization.

Java has eight built-in data types, referred to as Java primitive types; variables of this type hold their values directly.

Reference types hold references to objects (instances of classes). Unlike primitive types that hold their values in the memory where the variable is allocated, references don’t hold the value of the object they refer to.

Instead, a reference points to an object by storing the memory address where the object is located.

Note that Java doesn’t allow us to discover what the physical memory address is. Rather, we can only use the reference to refer to the object.

Let’s take a look at an example that declares and initializes a reference type out of our User class:

@Test
public void whenIntializedWithNew_thenInstanceIsNotNull() {
    User user = new User();
 
    assertThat(user).isNotNull();
}

As we can see here, a reference can be assigned to a new by using the keyword new, which is responsible for creating the new User object.

Let’s continue with learning more about object creation.

5. Creating Objects

Unlike with primitives, objects creation is a bit more complex. This is because we’re not just adding the value to the field; instead, we trigger the initialization using the new keyword. This, in return, invokes a constructor and initializes the object in memory.

Let’s discuss constructors and the new keyword in further detail.

The new keyword is responsible for allocating memory for the new object through a constructor.

A constructor is typically used to initialize instance variables representing the main properties of the created object.

If we don’t supply a constructor explicitly, the compiler will create a default constructor which has no arguments and just allocates memory for the object.

A class can have many constructors as long as their parameters lists are different (overload). Every constructor that doesn’t call another constructor in the same class has a call to its parent constructor whether it was written explicitly or inserted by the compiler through super().

Let’s add a constructor to our User class:

public User(String name, int id) {
    this.name = name;
    this.id = id;
}

Now we can use our constructor to create a User object with initial values for its properties:

User user = new User("Alice", 1);

6. Variable Scope

In the following sections, we’ll take a look at the different types of scopes that a variable in Java can exist within and how this affects the initialization process.

6.1. Instance and Class Variables

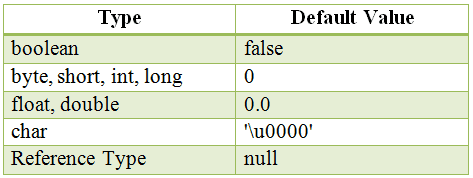
Instance and class variables don’t require us to initialize them. As soon as we declare these variables, they are given a default value as follows:

Now, let’s try to define some instance and class-related variables and test whether they have a default value or not:

@Test
public void whenValuesAreNotInitialized_thenUserNameAndIdReturnDefault() {
    User user = new User();
 
    assertThat(user.getName()).isNull();
    assertThat(user.getId() == 0);
}

6.2. Local Variables

Local variables must be initialized before use, as they don’t have a default value and the compiler won’t let us use an uninitialized value.

For example, the following code generates a compiler error:

public void print(){
    int i;
    System.out.println(i);
}

7. The Final Keyword

The final keyword applied to a field means that the field’s value can no longer be changed after initialization. In this way, we can define constants in Java.

Let’s add a constant  to our User class:

private static final int YEAR = 2000;

Constants must be initialized either when they’re declared or in a constructor.

8. Initializers

In Java, an initializer is a block of code that has no associated name or data type and is placed outside of any method, constructor, or another block of code.

Java offers two types of initializers, static and instance initializers. Let’s see how we can use each of them.

8.1. Instance Initializers

We can use these to initialize instance variables.

To demonstrate, let’s provide a value for a user id using an instance initializer in our User class:

{
    id = 0;
}

8.2. Static Initialization Block

A static initializer or static block – is a block of code which is used to initialize static fields. In other words, it’s a simple initializer marked with the keyword static:

private static String forum;
static {
    forum = "Java";
}

9. Order of Initialization

When writing code that initializes different types of fields, of course, we have to keep an eye on the order of initialization.

In Java, the order for initialization statements is as follows:

  • static variables and static initializers in order
  • instance variables and instance initializers in order
  • constructors

10. Object Life Cycle

Now that we’ve learned how to declare and initialize objects, let’s discover what happens to objects when they’re not in use.

Unlike other languages where we have to worry about object destruction, Java takes care of obsolete objects through its garbage collector.

All objects in Java are stored in our program’s heap memory. In fact, the heap represents a large pool of unused memory, allocated for our Java application.

On the other hand, the garbage collector is a Java program that takes care of automatic memory management by deleting objects that are no longer reachable.

For a Java object to become unreachable, it has to encounter one of the following situations:

  • The object no longer has any references pointing to it
  • All reference pointing to the object are out of scope

In conclusion, an object is first created from a class, usually using the keyword new. Then the object lives its life and provides us with access to its methods and fields.

Finally, when it’s no longer needed,  the garbage collector destroys it.

11. Other Methods for Creating Objects

In this section, we’ll take a brief look at methods other than new keyword to create objects and how to apply them, specifically reflection, cloning, and serialization.

Reflection is a mechanism we can use to inspect classes, fields, and methods at run-time. Here’s an example of creating our User object using reflection:

@Test
public void whenInitializedWithReflection_thenInstanceIsNotNull() 
  throws Exception {
    User user = User.class.getConstructor(String.class, int.class)
      .newInstance("Alice", 2);
 
    assertThat(user).isNotNull();
}

In this case, we’re using reflection to find and invoke a constructor of the User class.

The next method, cloning, is a way to create an exact copy of an object. For this, our User class must implement the Cloneable interface:

public class User implements Cloneable { //... }

Now we can use the clone() method to create a new clonedUser object which has the same property values as the user object:

@Test
public void whenCopiedWithClone_thenExactMatchIsCreated() 
  throws CloneNotSupportedException {
    User user = new User("Alice", 3);
    User clonedUser = (User) user.clone();
 
    assertThat(clonedUser).isEqualTo(user);
}

We can also use the sun.misc.Unsafe class to allocate memory for an object without calling a constructor:

User u = (User) unsafeInstance.allocateInstance(User.class);

12. Conclusion

In this tutorial, we covered initialization of fields in Java. We discovered different data types in Java and how to use them. We also took an in-depth on several ways of creating objects in Java.

The full implementation of this tutorial can be found over on Github.

How to Wait for Threads to Finish in the ExecutorService

$
0
0

1. Overview

The ExecutorService framework makes it easy to process tasks in multiple threads. We’re going to exemplify some scenarios in which we wait for threads to finish their execution.

Also, we’ll show how to gracefully shutdown an ExecutorService and wait for already running threads to finish their execution.

2. After Executor’s Shutdown

When using an Executor, we can shut it down by calling the shutdown() or shutdownNow() methods. Although, it won’t wait until all threads stop executing.

Waiting for existing threads to complete their execution can be achieved by using the awaitTermination() method.

This blocks the thread until all tasks complete their execution or the specified timeout is reached:

public void awaitTerminationAfterShutdown(ExecutorService threadPool) {
    threadPool.shutdown();
    try {
        if (!threadPool.awaitTermination(60, TimeUnit.SECONDS)) {
            threadPool.shutdownNow();
        }
    } catch (InterruptedException ex) {
        threadPool.shutdownNow();
        Thread.currentThread().interrupt();
    }
}

3. Using CountDownLatch

Next, let’s look at another approach to solving this problem – using a CountDownLatch to signal the completion of a task.

We can initialize it with a value that represents the number of times it can be decremented before all threads, that have called the await() method, are notified.

For example, if we need the current thread to wait for another N threads to finish their execution, we can initialize the latch using N:

ExecutorService WORKER_THREAD_POOL 
  = Executors.newFixedThreadPool(10);
CountDownLatch latch = new CountDownLatch(2);
for (int i = 0; i < 2; i++) {
    WORKER_THREAD_POOL.submit(() -> {
        try {
            // ...
            latch.countDown();
        } catch (InterruptedException e) {
            Thread.currentThread().interrupt();
        }
    });
}

// wait for the latch to be decremented by the two remaining threads
latch.await();

4. Using invokeAll()

The first approach that we can use to run threads is the invokeAll() method. The method returns a list of Future objects after all tasks finish or the timeout expires.

Also, we must note that the order of the returned Future objects is the same as the list of the provided Callable objects:

ExecutorService WORKER_THREAD_POOL = Executors.newFixedThreadPool(10);

List<Callable<String>> callables = Arrays.asList(
  new DelayedCallable("fast thread", 100), 
  new DelayedCallable("slow thread", 3000));

long startProcessingTime = System.currentTimeMillis();
List<Future<String>> futures = WORKER_THREAD_POOL.invokeAll(callables);

awaitTerminationAfterShutdown(WORKER_THREAD_POOL);

long totalProcessingTime = System.currentTimeMillis() - startProcessingTime;
 
assertTrue(totalProcessingTime >= 3000);

String firstThreadResponse = futures.get(0).get();
 
assertTrue("fast thread".equals(firstThreadResponse));

String secondThreadResponse = futures.get(1).get();
assertTrue("slow thread".equals(secondThreadResponse));

5. Using ExecutorCompletionService

Another approach to running multiple threads is by using ExecutorCompletionService. It uses a supplied ExecutorService to execute tasks.

One difference over invokeAll() is the order in which the Futures, representing the executed tasks are returned. ExecutorCompletionService uses a queue to store the results in the order they are finished, while invokeAll() returns a list having the same sequential order as produced by the iterator for the given task list:

CompletionService<String> service
  = new ExecutorCompletionService<>(WORKER_THREAD_POOL);

List<Callable<String>> callables = Arrays.asList(
  new DelayedCallable("fast thread", 100), 
  new DelayedCallable("slow thread", 3000));

for (Callable<String> callable : callables) {
    service.submit(callable);
}

The results can be accessed using the take() method:

long startProcessingTime = System.currentTimeMillis();

Future<String> future = service.take();
String firstThreadResponse = future.get();
long totalProcessingTime
  = System.currentTimeMillis() - startProcessingTime;

assertTrue("First response should be from the fast thread", 
  "fast thread".equals(firstThreadResponse));
assertTrue(totalProcessingTime >= 100
  && totalProcessingTime < 1000);
LOG.debug("Thread finished after: " + totalProcessingTime
  + " milliseconds");

future = service.take();
String secondThreadResponse = future.get();
totalProcessingTime
  = System.currentTimeMillis() - startProcessingTime;

assertTrue(
  "Last response should be from the slow thread", 
  "slow thread".equals(secondThreadResponse));
assertTrue(
  totalProcessingTime >= 3000
  && totalProcessingTime < 4000);
LOG.debug("Thread finished after: " + totalProcessingTime
  + " milliseconds");

awaitTerminationAfterShutdown(WORKER_THREAD_POOL);

6. Conclusion

Depending on the use case, we have various options to wait for threads to finish their execution.

A CountDownLatch is useful when we need a mechanism to notify one or more threads that a set of operations performed by other threads has finished.

ExecutorCompletionService is useful when we need to access the task result as soon as possible and other approaches when we want to wait for all of the running tasks to finish.

The source code for the article is available over on GitHub.

Fail-Safe Iterator vs Fail-Fast Iterator

$
0
0

1. Introduction

In this article, we’ll introduce the concept of Fail-Fast and Fail-Safe Iterators.

Fail-Fast systems abort operation as-fast-as-possible exposing failures immediately and stopping the whole operation.

Whereas, Fail-Safe systems don’t abort an operation in the case of a failure. Such systems try to avoid raising failures as much as possible.

2. Fail-Fast Iterators

Fail-fast iterators in Java don’t play along when the underlying collection gets modified.

Collections maintain an internal counter called modCount. Each time an item is added or removed from the Collection, this counter gets incremented.

When iterating, on each next() call, the current value of modCount gets compared with the initial value. If there’s a mismatch, it throws ConcurrentModificationException which aborts the entire operation.

Default iterators for Collections from java.util package such as ArrayList, HashMap, etc. are Fail-Fast.

ArrayList<Integer> numbers = // ...

Iterator<Integer> iterator = numbers.iterator();
while (iterator.hasNext()) {
    Integer number = iterator.next();
    numbers.add(50);
}

In the code snippet above, the ConcurrentModificationException gets thrown at the beginning of a next iteration cycle after the modification was performed.

The Fail-Fast behavior isn’t guaranteed to happen in all scenarios as it’s impossible to predict behavior in case of concurrent modifications. These iterators throw ConcurrentModificationException on a best effort basis.

If during iteration over a Collection, an item is removed using Iterator‘s remove() method, that’s entirely safe and doesn’t throw an exception.

However, if the Collection‘s remove() method is used for removing an element, it throws an exception:

ArrayList<Integer> numbers = // ...

Iterator<Integer> iterator = numbers.iterator();
while (iterator.hasNext()) {
    if (iterator.next() == 30) {
        iterator.remove(); // ok!
    }
}

iterator = numbers.iterator();
while (iterator.hasNext()) {
    if (iterator.next() == 40) {
        numbers.remove(2); // exception
    }
}

3. Fail-Safe Iterators

Fail-Safe iterators favor lack of failures over the inconvenience of exception handling.

Those iterators create a clone of the actual Collection and iterate over it. If any modification happens after the iterator is created, the copy still remains untouched. Hence, these Iterators continue looping over the Collection even if it’s modified.

However, it’s important to remember that there’s no such thing as a truly Fail-Safe iterator. The correct term is Weakly Consistent.

That means, if a Collection is modified while being iterated over, what the Iterator sees is weakly guaranteed. This behavior may be different for different Collections and is documented in Javadocs of each such Collection.

The Fail-Safe Iterators have a few disadvantages, though. One disadvantage is that the Iterator isn’t guaranteed to return updated data from the Collection, as it’s working on the clone instead of the actual Collection.

Another disadvantage is the overhead of creating a copy of the Collection, both regarding time and memory.

Iterators on Collections from java.util.concurrent package such as ConcurrentHashMapCopyOnWriteArrayList, etc. are Fail-Fast in nature.

ConcurrentHashMap<String, Integer> map = new ConcurrentHashMap<>();

map.put("First", 10);
map.put("Second", 20);
map.put("Third", 30);
map.put("Fourth", 40);

Iterator<String> iterator = map.keySet().iterator();

while (iterator.hasNext()) {
    String key = iterator.next();
    map.put("Fifth", 50);
}

In the code snippet above, we’re using Fail-Safe Iterator. Hence, even though a new element is added to the Collection during the iteration, it doesn’t throw an exception.

The default iterator for the ConcurrentHashMap is weakly consistent. This means that this Iterator can tolerate concurrent modification, traverses elements as they existed when Iterator was constructed and may (but isn’t guaranteed to) reflect modifications to the Collection after the construction of the Iterator.

Hence, in the code snippet above, the iteration loops five times, which means it does detect the newly added element to the Collection.

4. Conclusion

In this tutorial, we’ve seen what Fail-Safe and Fail-Fast Iterators mean and how these are implemented in Java.

The complete code presented in this article is available over on GitHub.

Guide to JSpec

$
0
0

1. Overview

Test runner frameworks like JUnit and TestNG provide some basic assertion methods (assertTrue, assertNotNull, etc.).

Then there are assertion frameworks like Hamcrest, AssertJ, and Truth, which provide fluent and rich assertion methods with names that usually begin with “assertThat”.

JSpec is another framework that allows us to write fluent assertions closer to the way we write specifications in our natural language, albeit in a slightly different manner from other frameworks.

In this article, we’ll learn how to use JSpec. We’ll demonstrate the methods required to write our specifications and the messages that will print in case of test failure.

2. Maven Dependencies

Let’s import the javalite-common dependency, which contains JSpec:

<dependency>
    <groupId>org.javalite</groupId>
    <artifactId>javalite-common</artifactId>
    <version>1.4.13</version>
</dependency>

For the latest version, please check the Maven Central repository.

3. Comparing Assertion Styles

Instead of the typical way of asserting based on rules, we just write the specification of behavior. Let’s look at a quick example for asserting equality in JUnit, AssertJ, and JSpec.

In JUnit, we’d write:

assertEquals(1 + 1, 2);

And in AssertJ, we’d write:

assertThat(1 + 1).isEqualTo(2);

Here’s how we’d write the same test in JSpec:

$(1 + 1).shouldEqual(2);

JSpec uses the same style as fluent assertion frameworks but omits the leading assert/assertThat keyword and uses should instead.

Writing assertions in this way makes it easier to represent the real specifications, promoting TDD and BDD concepts.

Look how this example is very close to our natural writing of specifications:

String message = "Welcome to JSpec demo";
the(message).shouldNotBe("empty");
the(message).shouldContain("JSpec");

4. Structure of Specifications

The specification statement consists of two parts: an expectation creator and an expectation method.

4.1. Expectation Creator

The expectation creator generates an Expectation object using one of these statically imported methods: a(), the(), it(), $():

$(1 + 2).shouldEqual(3);
a(1 + 2).shouldEqual(3);
the(1 + 2).shouldEqual(3);
it(1 + 2).shouldEqual(3);

All these methods are essentially the same — they all exist only for providing various ways to express our specification.

The only difference is that the it() method is type-safe, allowing comparison only of objects that are of the same type:

it(1 + 2).shouldEqual("3");

Comparing objects of different types using it() would result in a compilation error.

4.2. Expectation Method

The second part of the specification statement is the expectation method, which tells about the required specification like shouldEqual, shouldContain.

When the test fails, an exception of the type javalite.test.jspec.TestException displays an expressive message. We’ll see examples of these failure messages in the following sections.

5. Built-in Expectations

JSpec provides several kinds of expectation methods. Let’s take a look at those, including a scenario for each that shows the failure message that JSpec generates upon test failure.

5.1. Equality Expectation

shouldEqual(), shouldBeEqual(), shouldNotBeEqual()

These specify that two objects should/shouldn’t be equal, using the java.lang.Object.equals() method to check for equality:

$(1 + 2).shouldEqual(3);

Failure scenario:

$(1 + 2).shouldEqual(4);

would produce the following message:

Test object:java.lang.Integer == <3>
and expected java.lang.Integer == <4>
are not equal, but they should be.

5.2. Boolean Property Expectation

shouldHave(), shouldNotHave()

We use these methods to specify whether a named boolean property of the object should/shouldn’t return true:

Cage cage = new Cage();
cage.put(tomCat, boltDog);
the(cage).shouldHave("animals");

This requires the Cage class to contain a method with the signature:

boolean hasAnimals() {...}

Failure scenario:

the(cage).shouldNotHave("animals");

would produce the following message:

Method: hasAnimals should return false, but returned true

shouldBe(), shouldNotBe()

We use these to specify that the tested object should/shouldn’t be something:

the(cage).shouldNotBe("empty");

This requires the Cage class to contain a method with the signature “boolean isEmpty()”.

Failure scenario:

the(cage).shouldBe("empty");

would produce the following message:

Method: isEmpty should return true, but returned false

5.3. Type Expectation

shouldBeType(), shouldBeA()

We can use these methods to specify that an object should be of a specific type:

cage.put(boltDog);
Animal releasedAnimal = cage.release(boltDog);
the(releasedAnimal).shouldBeA(Dog.class);

Failure scenario:

the(releasedAnimal).shouldBeA(Cat.class);

would produce the following message:

class com.baeldung.jspec.Dog is not class com.baeldung.jspec.Cat

5.4. Nullability Expectation

shouldBeNull(), shouldNotBeNull()

We use these to specify that the tested object should/shouldn’t be null:

cage.put(boltDog);
Animal releasedAnimal = cage.release(dogY);
the(releasedAnimal).shouldBeNull();

Failure scenario:

the(releasedAnimal).shouldNotBeNull();

would produce the following message:

Object is null, while it is not expected

5.5. Reference Expectation

shouldBeTheSameAs(), shouldNotBeTheSameAs()

These methods are used to specify that an object’s reference should be the same as the expected one:

Dog firstDog = new Dog("Rex");
Dog secondDog = new Dog("Rex");
$(firstDog).shouldEqual(secondDog);
$(firstDog).shouldNotBeTheSameAs(secondDog);

Failure scenario:

$(firstDog).shouldBeTheSameAs(secondDog);

would produce the following message:

references are not the same, but they should be

5.6. Collection and String Contents Expectation

shouldContain(), shouldNotContain()
We use these to specify that the tested Collection or Map should/shouldn’t contain a given element:

cage.put(tomCat, felixCat);
the(cage.getAnimals()).shouldContain(tomCat);
the(cage.getAnimals()).shouldNotContain(boltDog);

Failure scenario:

the(animals).shouldContain(boltDog);

would produce the following message:

tested value does not contain expected value: Dog [name=Bolt]

We can also use these methods to specify that a String should/shouldn’t contain a given substring:

$("Welcome to JSpec demo").shouldContain("JSpec");

And although it may seem strange, we can extend this behavior to other object types, which are compared using their toString() methods:

cage.put(tomCat, felixCat);
the(cage).shouldContain(tomCat);
the(cage).shouldNotContain(boltDog);

To clarify, the toString() method of the Cat object tomCat would produce:

Cat [name=Tom]

which is a substring of the toString() output of the cage object:

Cage [animals=[Cat [name=Tom], Cat[name=Felix]]]

6. Custom Expectations

In addition to the built-in expectations, JSpec allows us to write custom expectations.

6.1. Difference Expectation

We can write a DifferenceExpectation to specify that the return value of executing some code should not be equal to a particular value.

In this simple example we’re making sure that the operation (2 + 3) will not give us the result (4):

expect(new DifferenceExpectation<Integer>(4) {
    @Override
    public Integer exec() {
        return 2 + 3;
    }
});

We can also use it to ensure that executing some code would change the state or value of some variable or method.

For example, when releasing an animal from a Cage that contains two animals, the size should be different:

cage.put(tomCat, boltDog);
expect(new DifferenceExpectation<Integer>(cage.size()) {
    @Override
    public Integer exec() {
        cage.release(tomCat);
        return cage.size();
    }
});

Failure scenario:

Here we’re trying to release an animal that doesn’t exist inside the Cage:

cage.release(felixCat);

The size won’t be changed, and we get the following message:

Objects: '2' and '2' are equal, but they should not be

6.2. Exception Expectation

We can write an ExceptionExpectation to specify that the tested code should throw an Exception.

We’ll just pass the expected exception type to the constructor and provide it as a generic type:

expect(new ExceptionExpectation<ArithmeticException>(ArithmeticException.class) {
    @Override
    public void exec() throws ArithmeticException {
        System.out.println(1 / 0);
    }
});

Failure scenario #1:

System.out.println(1 / 1);

As this line wouldn’t result in any exception, executing it would produce the following message:

Expected exception: class java.lang.ArithmeticException, but instead got nothing

Failure scenario #2:

Integer.parseInt("x");

This would result in an exception different from the expected exception:

class java.lang.ArithmeticException,
but instead got: java.lang.NumberFormatException: For input string: "x"

7. Conclusion

Other fluent assertion frameworks provide better methods for collections assertion, exception assertion, and Java 8 integration, but JSpec provides a unique way for writing assertions in the form of specifications.

It has a simple API that let us write our assertions like natural language, and it provides descriptive test failure messages.

The complete source code for all these examples can be found over on GitHub – in the package com.baeldung.jspec.

Static and Default Methods in Interfaces in Java

$
0
0

1. Overview

Java 8 brought to the table a few brand new features, including lambda expressions, functional interfaces, method references, streams, Optional, and static and default methods in interfaces.

Some of them have been already covered in this article. Nonetheless, static and default methods in interfaces deserve a deeper look on their own.

In this article, we’ll discuss in depth how to use static and default methods in interfaces and go through some use cases where they can be useful.

2. Why Default Methods in Interfaces Are Needed

Like regular interface methods, default methods are implicitly public — there’s no need to specify the public modifier.

Unlike regular interface methods, they are declared with the default keyword at the beginning of the method signature, and they provide an implementation.

Let’s see a simple example:

public interface MyInterface {
    
    // regular interface methods
    
    default void defaultMethod() {
        // default method implementation
    }
}

The reason why default methods were included in the Java 8 release is pretty obvious.

In a typical design based on abstractions, where an interface has one or multiple implementations, if one or more methods are added to the interface, all the implementations will be forced to implement them too. Otherwise, the design will just break down.

Default interface methods are an efficient way to deal with this issue. They allow us to add new methods to an interface that are automatically available in the implementations. Thus, there’s no need to modify the implementing classes.

In this way, backward compatibility is neatly preserved without having to refactor the implementers.

3. Default Interface Methods in Action

To better understand the functionality of default interface methods, let’s create a simple example.

Say that we have a naive Vehicle interface and just one implementation. There could be more, but let’s keep it that simple:

public interface Vehicle {
    
    String getBrand();
    
    String speedUp();
    
    String slowDown();
    
    default String turnAlarmOn() {
        return "Turning the vehicle alarm on.";
    }
    
    default String turnAlarmOff() {
        return "Turning the vehicle alarm off.";
    }
}

And let’s write the implementing class:

public class Car implements Vehicle {

    private String brand;
    
    // constructors/getters
    
    @Override
    public String getBrand() {
        return brand;
    }
    
    @Override
    public String speedUp() {
        return "The car is speeding up.";
    }
    
    @Override
    public String slowDown() {
        return "The car is slowing down.";
    }
}

Lastly, let’s define a typical main class, which creates an instance of Car and calls its methods:

public static void main(String[] args) { 
    Vehicle car = new Car("BMW");
    System.out.println(car.getBrand());
    System.out.println(car.speedUp());
    System.out.println(car.slowDown());
    System.out.println(car.turnAlarmOn());
    System.out.println(car.turnAlarmOff());
}

Please notice how the default methods turnAlarmOn() and turnAlarmOff() from our Vehicle interface are automatically available in the Car class.

Furthermore, if at some point we decide to add more default methods to the Vehicle interface, the application will still continue working, and we won’t have to force the class to provide implementations for the new methods.

The most typical use of default methods in interfaces is to incrementally provide additional functionality to a given type without breaking down the implementing classes.

In addition, they can be used to provide additional functionality around an existing abstract method:

public interface Vehicle {
    
    // additional interface methods 
    
    double getSpeed();
    
    default double getSpeedInKMH(double speed) {
       // conversion      
    }
}

4. Multiple Interface Inheritance Rules

Default interface methods are a pretty nice feature indeed, but with some caveats worth mentioning. Since Java allows classes to implement multiple interfaces, it’s important to know what happens when a class implements several interfaces that define the same default methods.

To better understand this scenario, let’s define a new Alarm interface and refactor the Car class:

public interface Alarm {

    default String turnAlarmOn() {
        return "Turning the alarm on.";
    }
    
    default String turnAlarmOff() {
        return "Turning the alarm off.";
    }
}

With this new interface defining its own set of default methods, the Car class would implement both Vehicle and Alarm:

public class Car implements Vehicle, Alarm {
    // ...
}

In this case, the code simply won’t compile, as there’s a conflict caused by multiple interface inheritance (a.k.a the Diamond Problem). The Car class would inherit both sets of default methods. Which ones should be called then?

To solve this ambiguity, we must explicitly provide an implementation for the methods:

@Override
public String turnAlarmOn() {
    // custom implementation
}
    
@Override
public String turnAlarmOff() {
    // custom implementation
}

We can also have our class use the default methods of one of the interfaces.

Let’s see an example that uses the default methods from the Vehicle interface:

@Override
public String turnAlarmOn() {
    return Vehicle.super.turnAlarmOn();
}

@Override
public String turnAlarmOff() {
    return Vehicle.super.turnAlarmOff();
}

Similarly, we can have the class use the default methods defined within the Alarm interface:

@Override
public String turnAlarmOn() {
    return Alarm.super.turnAlarmOn();
}

@Override
public String turnAlarmOff() {
    return Alarm.super.turnAlarmOff();
}

Furthermore, it’s even possible to make the Car class use both sets of default methods:

@Override
public String turnAlarmOn() {
    return Vehicle.super.turnAlarmOn() + " " + Alarm.super.turnAlarmOn();
}
    
@Override
public String turnAlarmOff() {
    return Vehicle.super.turnAlarmOff() + " " + Alarm.super.turnAlarmOff();
}

5. Static Interface Methods

Aside from being able to declare default methods in interfaces, Java 8 allows us to define and implement static methods in interfaces.

Since static methods don’t belong to a particular object, they are not part of the API of the classes implementing the interface, and they have to be called by using the interface name preceding the method name.

To understand how static methods work in interfaces, let’s refactor the Vehicle interface and add to it a static utility method:

public interface Vehicle {
    
    // regular / default interface methods
    
    static int getHorsePower(int rpm, int torque) {
        return (rpm * torque) / 5252;
    }
}

Defining a static method within an interface is identical to defining one in a class. Moreover, a static method can be invoked within other static and default methods.

Now, say that we want to calculate the horsepower of a given vehicle’s engine. We just call the getHorsePower() method:

Vehicle.getHorsePower(2500, 480));

The idea behind static interface methods is to provide a simple mechanism that allows us to increase the degree of cohesion of a design by putting together related methods in one single place without having to create an object.

Pretty much the same can be done with abstract classes. The main difference lies in the fact that abstract classes can have constructors, state, and behavior.

Furthermore, static methods in interfaces make possible to group related utility methods, without having to create artificial utility classes that are simply placeholders for static methods.

6. Conclusion

In this article, we explored in depth the use of static and default interface methods in Java 8. At first glance, this feature may look a little bit sloppy, particularly from an object-oriented purist perspective. Ideally, interfaces shouldn’t encapsulate behavior and should be used only for defining the public API of a certain type.

When it comes to maintaining backward compatibility with existing code, however, static and default methods are a good trade-off.

And, as usual, all the code samples shown in this article are available over on GitHub.

Quick Guide to BDDMockito

$
0
0

1. Overview

The BDD term was coined first by Dan North – back in 2006.

BDD encourages writing tests in a natural, human-readable language that focuses on the behavior of the application.

It defines a clearly structured way of writing tests following three sections (Arrange, Act, Assert):

  • given some preconditions (Arrange)
  • when an action occurs (Act)
  • then verify the output (Assert)

The Mockito library is shipped with a BDDMockito class which introduces BDD-friendly APIs. This API allows us to take a more BDD friendly approach arranging our tests using given() and making assertions using then().

In this article, we’re going to explain how to setup our BDD-based Mockito tests. We’ll also talk about differences between Mockito and BDDMockito APIs, to eventually focus on the BDDMockito API.

2. Setup

2.1. Maven Dependencies

The BDD flavor of Mockito is part of the mockito-core library, in order to get started we just need to include the artifact:

<dependency>
    <groupId>org.mockito</groupId>
    <artifactId>mockito-core</artifactId>
    <version>2.13.0</version>
</dependency>

For the latest version of Mockito please check Maven Central.

2.2. Imports

Our tests can become more readable if we include the following static import:

import static org.mockito.BDDMockito.*;

Notice that BDDMockito extends Mockito, so we won’t miss any feature provided by the traditional Mockito API.

3. Mockito vs. BDDMockito

The traditional mocking in Mockito is performed using when(obj).then*() in the Arrange step.

Later, interaction with our mock can be validated using verify() in the Assert step.

BDDMockito provides BDD aliases for various Mockito methods, so we can write our Arrange step using given (instead of when), likewise, we could write our Assert step using then (instead of verify).

Let’s look at an example of a test body using traditional Mockito:

when(phoneBookRepository.contains(momContactName))
  .thenReturn(false);
 
phoneBookService.register(momContactName, momPhoneNumber);
 
verify(phoneBookRepository)
  .insert(momContactName, momPhoneNumber);

Let’s see how that compares to BDDMockito:

given(phoneBookRepository.contains(momContactName))
  .willReturn(false);
 
phoneBookService.register(momContactName, momPhoneNumber);
 
then(phoneBookRepository)
  .should()
  .insert(momContactName, momPhoneNumber);

4. Mocking with BDDMockito

Let’s try to test the PhoneBookService where we’ll need to mock the PhoneBookRepository:

public class PhoneBookService {
    private PhoneBookRepository phoneBookRepository;

    public void register(String name, String phone) {
        if(!name.isEmpty() && !phone.isEmpty()
          && !phoneBookRepository.contains(name)) {
            phoneBookRepository.insert(name, phone);
        }
    }

    public String search(String name) {
        if(!name.isEmpty() && phoneBookRepository.contains(name)) {
            return phoneBookRepository.getPhoneNumberByContactName(name);
        }
        return null;
    }
}

BDDMockito as Mockito allows us to return a value that may be fixed or dynamic. It’d also allow us to throw an exception:

4.1. Returning a Fixed Value

Using BDDMockito, we could easily configure Mockito to return a fixed result whenever our mock object target method is invoked:

given(phoneBookRepository.contains(momContactName))
  .willReturn(false);
 
phoneBookService.register(xContactName, "");
 
then(phoneBookRepository)
  .should(never())
  .insert(momContactName, momPhoneNumber);

4.2. Returning a Dynamic Value

BDDMockito allows us to provide a more sophisticated way to return values. We could return a dynamic result based on the input:

given(phoneBookRepository.contains(momContactName))
  .willReturn(true);
given(phoneBookRepository.getPhoneNumberByContactName(momContactName))
  .will((InvocationOnMock invocation) ->
    invocation.getArgument(0).equals(momContactName) 
      ? momPhoneNumber 
      : null);
phoneBookService.search(momContactName);
then(phoneBookRepository)
  .should()
  .getPhoneNumberByContactName(momContactName);

4.3. Throwing an Exception

Telling Mockito to throw an exception is pretty straightforward:

given(phoneBookRepository.contains(xContactName))
  .willReturn(false);
willThrow(new RuntimeException())
  .given(phoneBookRepository)
  .insert(any(String.class), eq(tooLongPhoneNumber));

try {
    phoneBookService.register(xContactName, tooLongPhoneNumber);
    fail("Should throw exception");
} catch (RuntimeException ex) { }

then(phoneBookRepository)
  .should(never())
  .insert(momContactName, tooLongPhoneNumber);

Notice how we exchanged the positions of given and will*, that’s mandatory in case we’re mocking a method that has no return value.

Also notice that we used argument matchers like (any, eq) to provide a more generic way of mocking based on criteria rather than depending on a fixed value.

5. Conclusion

In this quick tutorial, we discussed how BDDMockito tries to bring a BDD resemblance to our Mockito tests, and we discussed some of the differences between Mockito and BDDMockito.

As always, the source code can be found over on GitHub – within the test package com.baeldung.bddmockito.

Java Weekly, Issue 209

$
0
0

Here we go…

1. Spring and Java

>> JUnit 5 Tutorial: Writing Parameterized Tests [petrikainulainen.net]

Finally, no need to use external tools for writing parameterized tests in JUnit.

>> How to map JSON collections using JPA and Hibernate [vladmihalcea.com]

The open-source hibernate-types project makes it possible to map JSON collections.

>> Managing randomness in Java [blog.frankel.ch]

There’re various ways of generating random values in Java – it’s crucial to know their pros and cons.

Also worth reading:

Time to upgrade:

2. Technical and Musings

>> I Learned Some sed [blog.thecodewhisperer.com]

It’s always good to recall some basics.

>> Do not GRANT ALL PRIVILEGES to your Production Users [blog.jooq.org]

… and not to grant users more privileges than necessary.

Also worth reading:

3. Comics

And my favorite Dilberts of the week:

>> Winning Design Awards [dilbert.com]

>> Homeland Security Risk [dilbert.com]

>> Product Too Addictive [dilbert.com]

4. Pick of the Week

>> The Beginner’s Guide to Deliberate Practice [jamesclear.com]


Introduction to KafkaStreams in Java

$
0
0

1. Overview

In this article, we’ll be looking at the KafkaStreams library.

KafkaStreams is engineered by the creators of Apache KafkaThe primary goal of this piece of software is to allow programmers to create efficient, real-time, streaming applications that could work as Microservices.

KafkaStreams enables us to consume from Kafka topics, analyze or transform data, and potentially, send it to another Kafka topic.

To demonstrate KafkaStreams, we’ll create a simple application that reads sentences from a topic, counts occurrences of words and prints the count per word.

Important to note is that the KafkaStreams library isn’t reactive and has no support for async operations and backpressure handling.

2. Maven Dependency

To start writing Stream processing logic using KafkaStreams, we need to add a dependency to kafka-streams and kafka-clients:

<dependency>
    <groupId>org.apache.kafka</groupId>
    <artifactId>kafka-streams</artifactId>
    <version>1.0.0</version>
</dependency>
<dependency>
    <groupId>org.apache.kafka</groupId>
    <artifactId>kafka-clients</artifactId>
    <version>1.0.0</version>
</dependency>

We also need to have Apache Kafka installed and started because we’ll be using a Kafka topic. This topic will be the data source for our streaming job.

We can download Kafka and other required dependencies from the official website.

3. Configuring KafkaStreams Input

The first thing we’ll do is the definition of the input Kafka topic.

We can use the Confluent tool that we downloaded – it contains a Kafka Server. It also contains the kafka-console-producer that we can use to publish messages to Kafka.

To get started let’s run our Kafka cluster:

./confluent start

Once Kafka starts, we can define our data source and name of our application using APPLICATION_ID_CONFIG:

String inputTopic = "inputTopic";
Properties streamsConfiguration = new Properties();
streamsConfiguration.put(
  StreamsConfig.APPLICATION_ID_CONFIG, 
  "wordcount-live-test");

A crucial configuration parameter is the BOOTSTRAP_SERVER_CONFIG. This is the URL to our local Kafka instance that we just started:

private String bootstrapServers = "localhost:9092";
streamsConfiguration.put(
  StreamsConfig.BOOTSTRAP_SERVERS_CONFIG, 
  bootstrapServers);

Next, we need to pass the type of the key and value of messages that will be consumed from inputTopic:

streamsConfiguration.put(
  StreamsConfig.DEFAULT_KEY_SERDE_CLASS_CONFIG, 
  Serdes.String().getClass().getName());
streamsConfiguration.put(
  StreamsConfig.DEFAULT_VALUE_SERDE_CLASS_CONFIG, 
  Serdes.String().getClass().getName());

Stream processing is often stateful. When we want to save intermediate results, we need to specify the STATE_DIR_CONFIG parameter.

In our test, we’re using a local file system:

streamsConfiguration.put(
  StreamsConfig.STATE_DIR_CONFIG, 
  TestUtils.tempDirectory().getAbsolutePath());

4. Building a Streaming Topology

Once we defined our input topic, we can create a Streaming Topology – that is a definition of how events should be handled and transformed.

In our example, we’d like to implement a word counter. For every sentence sent to inputTopic, we want to split it into words and calculate the occurrence of every word.

We can use an instance of the KStreamsBuilder class to start constructing our topology:

KStreamBuilder builder = new KStreamBuilder();
KStream<String, String> textLines = builder.stream(inputTopic);
Pattern pattern = Pattern.compile("\\W+", Pattern.UNICODE_CHARACTER_CLASS);

KTable<String, Long> wordCounts = textLines
  .flatMapValues(value -> Arrays.asList(pattern.split(value.toLowerCase())))
  .groupBy((key, word) -> word)
  .count();

To implement word count, firstly, we need to split the values using the regular expression.

The split method is returning an array. We’re using the flatMapValues() to flatten it. Otherwise, we’d end up with a list of arrays, and it’d be inconvenient to write code using such structure.

Finally, we’re aggregating the values for every word and calling the count() that will calculate occurrences of a specific word.

5. Handling Results 

We already calculated the word count of our input messages. Now let’s print the results on the standard output using the foreach() method:

wordCounts
  .foreach((w, c) -> System.out.println("word: " + w + " -> " + c));

On production, often such streaming job might publish the output to another Kafka topic.

We could do this using the to() method:

String outputTopic = "outputTopic";
Serde<String> stringSerde = Serdes.String();
Serde<Long> longSerde = Serdes.Long();
wordCounts.to(stringSerde, longSerde, outputTopic);

The Serde class gives us preconfigured serializers for Java types that will be used to serialize objects to an array of bytes. The array of bytes will then be sent to the Kafka topic.

We’re using String as a key to our topic and Long as a value for the actual count. The to() method will save the resulting data to outputTopic.

6. Starting KafkaStream Job

Up to this point, we built a topology that can be executed. However, the job hasn’t started yet.

We need to start our job explicitly by calling the start() method on the KafkaStreams instance:

KafkaStreams streams = new KafkaStreams(builder, streamsConfiguration);
streams.start();

Thread.sleep(30000);
streams.close();

Note that we are waiting 30 seconds for the job to finish. In a real-world scenario, that job would be running all the time, processing events from Kafka as they arrive.

We can test our job by publishing some events to our Kafka topic.

Let’s start a kafka-console-producer and manually send some events to our inputTopic:

./kafka-console-producer --topic inputTopic --broker-list localhost:9092
>"this is a pony"
>"this is a horse and pony"

This way, we published two events to Kafka. Our application will consume those events and will print the following output:

word:  -> 1
word: this -> 1
word: is -> 1
word: a -> 1
word: pony -> 1
word:  -> 2
word: this -> 2
word: is -> 2
word: a -> 2
word: horse -> 1
word: and -> 1
word: pony -> 2

We can see that when the first message arrived, the word pony occurred only once. But when we sent the second message, the word pony happened for the second time printing: “word: pony -> 2″.

6. Conclusion

This article discusses how to create a primary stream processing application using Apache Kafka as a data source and the KafkaStreams library as the stream processing library.

All these examples and code snippets can be found in the GitHub project – this is a Maven project, so it should be easy to import and run as it is.

Using InfluxDB with Java

$
0
0

1. Overview

InfluxDB is a high-performance store for time-series data. It supports insertion and real-time querying of data via a SQL-like query language.

In this introductory article, we’ll demonstrate how to connect to an InfluxDb server, create a database, write time-series information, and then query the database.

2. Setup

To connect to the database, we’ll need to add an entry to our pom.xml file:

<dependency>
    <groupId>org.influxdb</groupId>
    <artifactId>influxdb-java</artifactId>
    <version>2.8</version>
</dependency>

The latest version of this dependency can be found on Maven Central.

We’ll also need an InfluxDB instance. Instructions for downloading and installing a database can be found on the InfluxData website.

3. Connecting to a Server

3.1. Creating a Connection

Creating a database connection requires passing a URL String and user credentials to a connection factory:

InfluxDB influxDB = InfluxDBFactory.connect(databaseURL, userName, password);

3.2. Verifying the Connection

Communications with the database are performed over a RESTful API, so they aren’t persistent.

The API offers a dedicated “ping” service to confirm that the connection is functional. If the connection is good, the response contains a database version. If not, it contains “unknown”.

So after creating a connection, we can verify it by doing:

Pong response = this.influxDB.ping();
if (response.getVersion().equalsIgnoreCase("unknown")) {
    log.error("Error pinging server.");
    return;
} 

3.3. Creating a Database

Creating an InfluxDB database is similar to creating a database on most platforms. But we need to create at least one retention policy before using it.

A retention policy tells the database how long a piece of data should be stored. Time series, such as CPU or memory statistics, tend to accumulate in large datasets.

A typical strategy for controlling the size of time series databases is downsampling. “Raw” data is stored at a high rate, summarized, and then removed after a short time.

Retention policies simplify this by associating a piece of data with an expiration time. InfluxData has an in-depth explanation on their site.

After creating the database, we’ll add a single policy named defaultPolicy. It will simply retain data for 30 days:

influxDB.createDatabase("baeldung");
influxDB.createRetentionPolicy(
  "defaultPolicy", "baeldung", "30d", 1, true);

To create a retention policy, we’ll need a name, the database, an interval, a replication factor (which should be 1 for a single-instance database), and a boolean indicating it’s a default policy.

3.4. Setting a Logging Level

Internally, InfluxDB API uses Retrofit and exposes an interface to Retrofit’s logging facility, via a logging interceptor.

So, we can set the logging level using:

influxDB.setLogLevel(InfluxDB.LogLevel.BASIC);

And now we can see messages when we open a connection and ping it:

Dec 20, 2017 5:38:10 PM okhttp3.internal.platform.Platform log
INFO: --> GET http://127.0.0.1:8086/ping

The available levels are BASIC, FULL, HEADERS, and NONE. 

4. Adding and Retrieving Data

4.1. Points

So now we’re ready to start inserting and retrieving data.

The basic unit of information in InfluxDB is a Point, which is essentially a timestamp and a key-value map.

Let’s have a look at a point holding memory utilization data:

Point point = Point.measurement("memory")
  .time(System.currentTimeMillis(), TimeUnit.MILLISECONDS)
  .addField("name", "server1")
  .addField("free", 4743656L)
  .addField("used", 1015096L)
  .addField("buffer", 1010467L)
  .build();

We’ve created an entry that contains three Longs as memory statistics, a hostname, and a timestamp.

Let’s see how to add this to the database.

4.2. Writing Batches

Time series data tends to consist of many small points, and writing those records one at a time would be very inefficient. The preferred method is to collect records into batches.

The InfluxDB API provides a BatchPoint object:

BatchPoints batchPoints = BatchPoints
  .database(dbName)
  .retentionPolicy("defaultPolicy")
  .build();

Point point1 = Point.measurement("memory")
  .time(System.currentTimeMillis(), TimeUnit.MILLISECONDS)
  .addField("name", "server1") 
  .addField("free", 4743656L)
  .addField("used", 1015096L) 
  .addField("buffer", 1010467L)
  .build();

Point point2 = Point.measurement("memory")
  .time(System.currentTimeMillis() - 100, TimeUnit.MILLISECONDS)
  .addField("name", "server1")
  .addField("free", 4743696L)
  .addField("used", 1016096L)
  .addField("buffer", 1008467L)
  .build();

batchPoints.point(point1);
batchPoints.point(point2);
influxDB.write(batchPoints);

We create a BatchPoint and then add Points to it. We set the timestamp for our second entry to 100 milliseconds in the past since the timestamps are a primary index. If we send two points with the same timestamp, only one will be kept.

Note that we must associate BatchPoints with a database and a retention policy.

4.3. Writing One at a Time

Batching may be impractical for some use-cases.

Let’s enable batch mode with a single call to an InfluxDB connection:

influxDB.enableBatch(100, 200, TimeUnit.MILLISECONDS);

We enabled batching of 100 for insertion into the server or sending what it has every 200 milliseconds.

With batch mode enabled, we can still write one at a time. However, some additional setup is required:

influxDB.setRetentionPolicy("defaultPolicy");
influxDB.setDatabase(dbName);

Moreover, now we can write individuals points, and they are being collected in batches by a background thread:

influxDB.write(point);

Before we enqueue individual points, we need to set a database (similar to the use command in SQL) and set a default retention policy. Therefore, if we wish to take advantage of downsampling with multiple retention policies, creating batches is the way to go.

Batch mode utilizes a separate thread pool. So it’s a good idea to disable it when it’s no longer needed:

influxDB.disableBatch();

Closing the connection will also shut down the thread pool:

influxDB.close();

4.4. Mapping Query Results

Queries return a QueryResult, which we can map to POJOs.

Before we look at the query syntax, let’s create a class to hold our memory statistics:

@Measurement(name = "memory")
public class MemoryPoint {

    @Column(name = "time")
    private Instant time;

    @Column(name = "name")
    private String name;

    @Column(name = "free")
    private Long free;

    @Column(name = "used")
    private Long used;

    @Column(name = "buffer")
    private Long buffer;
}

The class is annotated with @Measurement(name = “memory”), corresponding to the Point.measurement(“memory”) we used to create our Points.

For each field in our QueryResult, we add the @Column(name = “XXX”) annotation with the name of the corresponding field.

QueryResults are mapped to POJOs with an InfluxDBResultMapper.

4.5. Querying InfluxDB

So let’s use our POJO with the points we added to the database in our two-point batch:

QueryResult queryResult = connection
  .performQuery("Select * from memory", "baeldung");

InfluxDBResultMapper resultMapper = new InfluxDBResultMapper();
List<MemoryPoint> memoryPointList = resultMapper
  .toPOJO(queryResult, MemoryPoint.class);

assertEquals(2, memoryPointList.size());
assertTrue(4743696L == memoryPointList.get(0).getFree());

The query illustrates how our measurement named memory is stored as a table of Points that we can select from.

InfluxDBResultMapper accepts a reference to MemoryPoint.class with the QueryResult and returns a list of points.

After we map the results, we verify that we received two by checking the length of the List we received from the query. Then we look at the first entry in the list and see the free memory size of the second point we inserted. The default ordering of query results from InfluxDB is ascending by timestamp.

Let’s change that:

queryResult = connection.performQuery(
  "Select * from memory order by time desc", "baeldung");
memoryPointList = resultMapper
  .toPOJO(queryResult, MemoryPoint.class);

assertEquals(2, memoryPointList.size());
assertTrue(4743656L == memoryPointList.get(0).getFree());

Adding order by time desc reverses the order of our results.

InfluxDB queries look very similar to SQL. There is an extensive reference guide on their site.

5. Conclusion

We’ve connected to an InfluxDB server, created a database with a retention policy, and then inserted and retrieved data from the server.

The full source code of the examples is over on GitHub.

A Docker Guide for Java

$
0
0

1. Overview

In this article, we take a look at another well-established platform specific API — Java API Client for Docker.

Throughout the article, we comprehend the way of how to connect with a running Docker daemon and what type of important functionality the API offers to Java developers.

2. Maven Dependency

First, we need to add the main dependency into our pom.xml file:

<dependency>
    <groupId>com.github.docker-java</groupId>
    <artifactId>docker-java</artifactId>
    <version>3.0.14</version>
</dependency>

At the time of writing the article, the latest version of the API is 3.0.14. Each release can be viewed either from the GitHub release page or from the Maven repository.

3. Using the Docker Client

DockerClient is where we can establish a connection between a Docker engine/daemon and our application.

By default, the Docker daemon can only be accessible at the unix:///var/run/docker.sock file. We can locally communicate with the Docker engine listening on the Unix socket unless otherwise configured.

Here, we apply to the DockerClientBuilder class to create a connection by accepting the default settings:

DockerClient dockerClient = DockerClientBuilder.getInstance().build();

Similarly, we can open a connection in two steps:

DefaultDockerClientConfig.Builder config 
  = DefaultDockerClientConfig.createDefaultConfigBuilder();
DockerClient dockerClient = DockerClientBuilder
  .getInstance(config)
  .build();

Since engines could rely on other characteristics, the client is also configurable with different conditions.

For example, the builder accepts a server URL, that is, we can update the connection value if the engine is available on port 2375:

DockerClient dockerClient
  = DockerClientBuilder.getInstance("tcp://docker.baeldung.com:2375").build();

Note that we need to prepend the connection string with unix:// or tcp:// depending on the connection type.

If we go one step further, we can end up with a more advanced configuration using the DefaultDockerClientConfig class:

DefaultDockerClientConfig config
  = DefaultDockerClientConfig.createDefaultConfigBuilder()
    .withRegistryEmail("info@baeldung.com")
    .withRegistryPassword("baeldung")
    .withRegistryUsername("baeldung")
    .withDockerCertPath("/home/baeldung/.docker/certs")
    .withDockerConfig("/home/baeldung/.docker/")
    .withDockerTlsVerify("1")
    .withDockerHost("tcp://docker.baeldung.com:2376").build();

DockerClient dockerClient = DockerClientBuilder.getInstance(config).build();

Likewise, we can carry out the same approach using Properties:

Properties properties = new Properties();
properties.setProperty("registry.email", "info@baeldung.com");
properties.setProperty("registry.password", "baeldung");
properties.setProperty("registry.username", "baaldung");
properties.setProperty("DOCKER_CERT_PATH", "/home/baeldung/.docker/certs");
properties.setProperty("DOCKER_CONFIG", "/home/baeldung/.docker/");
properties.setProperty("DOCKER_TLS_VERIFY", "1");
properties.setProperty("DOCKER_HOST", "tcp://docker.baeldung.com:2376");

DefaultDockerClientConfig config
  = DefaultDockerClientConfig.createDefaultConfigBuilder()
    .withProperties(properties).build();

DockerClient dockerClient = DockerClientBuilder.getInstance(config).build();

Another choice unless we configure the engine’s settings in the source code is to set  corresponding environment variables so that we can only consider the default instantiation of DockerClient in the project:

export DOCKER_CERT_PATH=/home/baeldung/.docker/certs
export DOCKER_CONFIG=/home/baeldung/.docker/
export DOCKER_TLS_VERIFY=1
export DOCKER_HOST=tcp://docker.baeldung.com:2376

4. Container Management

The API allows us a variety of choices about container management. Let’s look at each one of them.

4.1. List Containers

Now that we have an established connection, we can list all the running containers located on the Docker host:

List<Container> containers = dockerClient.listContainersCmd().exec();

Provided that showing the running containers doesn’t appeal the need, we can make use of the offered options to query containers.

In this case, we display containers with the “exited” status:

List<Container> containers = dockerClient.listContainersCmd()
  .withShowSize(true)
  .withShowAll(true)
  .withStatusFilter("exited").exec()

It’s an equivalent of:

$ docker ps -a -s -f status=exited
# or 
$ docker container ls -a -s -f status=exited

4.2. Create a Container

Creating a container is served with the createContainerCmd method. We can declare more complex declaration using the available methods starting with the “with” prefix.

Let’s assume that we have a docker create command defining a host-dependent MongoDB container listening internally on port 27017:

$ docker create --name mongo \
  --hostname=baeldung \
  -e MONGO_LATEST_VERSION=3.6 \
  -p 9999:27017 \
  -v /Users/baeldung/mongo/data/db:/data/db \
  mongo:3.6 --bind_ip_all

We’re able to bootstrap the same container along with its configurations programmatically:

CreateContainerResponse container
  = dockerClient.createContainerCmd("mongo:3.6")
    .withCmd("--bind_ip_all")
    .withName("mongo")
    .withHostName("baeldung")
    .withEnv("MONGO_LATEST_VERSION=3.6")
    .withPortBindings(PortBinding.parse("9999:27017"))
    .withBinds(Bind.parse("/Users/baeldung/mongo/data/db:/data/db")).exec();

4.3. Start, Stop, and Kill a Container

Once we create the container, we can start, stop and kill it by name or id respectively:

dockerClient.startContainerCmd(container.getId()).exec();

dockerClient.stopContainerCmd(container.getId()).exec();

dockerClient.killContainerCmd(container.getId()).exec();

4.4. Inspect a Container

The inspectContainerCmd method takes a String argument which indicates the name or id of a container. Using this method, we can observe the metadata of a container directly:

InspectContainerResponse container 
  = dockerClient.inspectContainerCmd(container.getId()).exec();

4.5. Snapshot a Container

Similar to the docker commit command, we can create a new image using the commitCmd method.

In our example, the scenario is, we previously run an alpine:3.6 container whose id is “3464bb547f88” and installed git on top of it.

Now, we want to create a new image snapshot from the container:

String snapshotId = dockerClient.commitCmd("3464bb547f88")
  .withAuthor("Baeldung <info@baeldung.com>")
  .withEnv("SNAPSHOT_YEAR=2018")
  .withMessage("add git support")
  .withCmd("git", "version")
  .withRepository("alpine")
  .withTag("3.6.git").exec();

Since our new image bundled with git remains on the host, we can search it on the Docker host:

$ docker image ls alpine --format "table {{.Repository}} {{.Tag}}"
REPOSITORY TAG
alpine     3.6.git

5. Image Management

There are a few applicable commands we are given to manage image operations.

5.1. List Images

To list all the available images including dangling images on the Docker host, we need to apply to the listImagesCmd method:

List<Image> images = dockerClient.listImagesCmd().exec();

If we have two images on our Docker Host, we should obtain the Image objects of them at run-time.  The images we look for are:

$ docker image ls --format "table {{.Repository}} {{.Tag}}"
REPOSITORY TAG
alpine     3.6
mongo      3.6

Next to this, to see the intermediate images, we need to request it explicitly:

List<Image> images = dockerClient.listImagesCmd()
  .withShowAll(true).exec();

If only displaying the dangling images is the case, the withDanglingFilter method must be considered:

List<Image> images = dockerClient.listImagesCmd()
  .withDanglingFilter(true).exec();

5.2. Build an Image

Let’s focus on the way of building an image using the API. The buildImageCmd method builds Docker images from a Dockerfile. In our project, we already have one Dockerfile which gives an Alpine image with git installed:

FROM alpine:3.6

RUN apk --update add git openssh && \
  rm -rf /var/lib/apt/lists/* && \
  rm /var/cache/apk/*

ENTRYPOINT ["git"]
CMD ["--help"]

The new image will be built without using cache and before starting the building process, in any case, Docker engine will attempt to pull the newer version of alpine:3.6. If everything goes well, we should eventually see the image with the given name, alpine:git:

String imageId = dockerClient.buildImageCmd()
  .withDockerfile(new File("path/to/Dockerfile"))
  .withPull(true)
  .withNoCache(true)
  .withTag("alpine:git")
  .exec(new BuildImageResultCallback())
  .awaitImageId();

5.3. Inspect an Image

We can inspect the low-level information about an image thanks to the inspectImageCmd method:

InspectImageResponse image 
  = dockerClient.inspectImageCmd("161714540c41").exec();

5.4. Tag an Image

Adding a tag to our image is quite simple using the docker tag command, so the API is no exception. We can carry out the same intention with the tagImageCmd method as well. To tag a Docker image with id 161714540c41 into the baeldung/alpine repository with git:

String imageId = "161714540c41";
String repository = "baeldung/alpine";
String tag = "git";

dockerClient.tagImageCmd(imageId, repository, tag).exec();

We would list the newly created image, and there it is:

$ docker image ls --format "table {{.Repository}} {{.Tag}}"
REPOSITORY      TAG
baeldung/alpine git

5.5. Push an Image 

Before sending out an image to a registry service, the docker client must be configured to cooperate with the service because working with registries need to be authenticated in advance.

Since we assume that the client was configured with Docker Hub, we can push the baeldung/alpine image to the baeldung DockerHub account:

dockerClient.pushImageCmd("baeldung/alpine")
  .withTag("git")
  .exec(new PushImageResultCallback())
  .awaitCompletion(90, TimeUnit.SECONDS);

We must abide by the duration of the process. In the example, we are waiting 90 seconds.

5.6. Pull an Image

To download images from registry services, we make use of the pullImageCmd method. In addition, if the image being pulled from a private registry, the client must know our credential otherwise the process ends up with a failure. Same as the pulling an image, we specify a callback along with a fixed period to pull an image:

dockerClient.pullImageCmd("baeldung/alpine")
  .withTag("git")
  .exec(new PullImageResultCallback())
  .awaitCompletion(30, TimeUnit.SECONDS);

To check out whether the mentioned image exists on the Docker host after pulling it:

$ docker images baeldung/alpine --format "table {{.Repository}} {{.Tag}}"
REPOSITORY      TAG
baeldung/alpine git

5.7. Remove an Image

Another simple function among the rest is the removeImageCmd method. We can remove an image with its short or long ID:

dockerClient.removeImageCmd("beaccc8687ae").exec();

5.8. Search in Registry

To search an image from Docker Hub, the client comes with the searchImagesCmd method taking a String value which indicates a term. Here, we explore images related to a name containing ‘Java’ in Docker Hub:

List<SearchItem> items = dockerClient.searchImagesCmd("Java").exec();

The output returns first 25 related images in a list of  SearchItem objects.

6. Volume Management

If Java projects need to interact with Docker for volumes, we should also take into account this section. Briefly, we look at the fundamental techniques of volumes provided by the Docker Java API.

6.1. List Volumes

All of the available volumes including named and unnamed are listed with:

ListVolumesResponse volumesResponse = dockerClient.listVolumesCmd().exec();
List<InspectVolumeResponse> volumes = volumesResponse.getVolumes();

6.2. Inspect a Volume

The inspectVolumeCmd method is the form to show the detailed information of a volume. We inspect the volume by specifying its short id:

InspectVolumeResponse volume 
  = dockerClient.inspectVolumeCmd("0220b87330af5").exec();

6.3. Create a Volume

The API serves two different options to create a volume. The non-arg createVolumeCmd method creates a volume where the name is given by Docker:

CreateVolumeResponse unnamedVolume = dockerClient.createVolumeCmd().exec();

Rather than using the default behavior, the helper method called withName lets us set a name to a volume:

CreateVolumeResponse namedVolume 
  = dockerClient.createVolumeCmd().withName("myNamedVolume").exec();

6.4. Remove a Volume

We can intuitively delete a volume from the Docker host using the removeVolumeCmd method. What is important to note that we cannot delete a volume if it is in use from a container. We remove the volume, myNamedVolume, from the volume list:

dockerClient.removeVolumeCmd("myNamedVolume").exec();

7. Network Management

Our last section is about managing network tasks with the API.

7.1. List Networks

We can display the list of network units with one of the conventional API methods starting with list:

List<Network> networks = dockerClient.listNetworksCmd().exec();

7.2. Create a Network

The equivalent of the docker network create command is conducted with the createNetworkCmd method. If we have a thirty party or a custom network driver, the withDriver method can accept them besides the built-in drivers. In our case, let’s create a bridge network whose name is baeldung:

CreateNetworkResponse networkResponse 
  = dockerClient.createNetworkCmd()
    .withName("baeldung")
    .withDriver("bridge").exec();

Furthermore, creating a network unit with the default settings doesn’t solve the problem, we can apply for other helper methods to construct an advanced network. Thus, to override the default subnetwork with a custom value:

CreateNetworkResponse networkResponse = dockerClient.createNetworkCmd()
  .withName("baeldung")
  .withIpam(new Ipam()
    .withConfig(new Config()
    .withSubnet("172.36.0.0/16")
    .withIpRange("172.36.5.0/24")))
  .withDriver("bridge").exec();

The same command we can run with the docker command is:

$ docker network create \
  --subnet=172.36.0.0/16 \
  --ip-range=172.36.5.0/24 \
  baeldung

7.3. Inspect a Network

Displaying the low-level details of a network is also covered in the API:

Network network 
  = dockerClient.inspectNetworkCmd().withNetworkId("baeldung").exec();

7.4. Remove a Network

We can safely remove a network unit with its name or id using the removeNetworkCmd method:

dockerClient.removeNetworkCmd("baeldung").exec();

8. Conclusion

In this extensive tutorial, we explored the various diverse functionality of the Java Docker API Client, along with several implementation approaches for deployment and management scenarios.

All the examples illustrated in this article can be found over on GitHub.

Introduction to Future in Vavr

$
0
0

1. Introduction

Core Java provides a basic API for asynchronous computations – Future. CompletableFuture is one of its newest implementations.

Vavr provides its new functional alternative to the Future API. In this article, we’ll discuss the new API and show how to make use of some of its new features.

More articles on Vavr can be found here.

2. Maven Dependency

The Future API is included in the Vavr Maven dependency.

So, let’s add it to our pom.xml:

<dependency>
    <groupId>io.vavr</groupId>
    <artifactId>vavr</artifactId>
    <version>0.9.2</version>
</dependency>

We can find the latest version of the dependency on Maven Central.

3. Vavr’s Future

The Future can be in one of two states:

  • Pending – the computation is ongoing
  • Completed – the computation finished successfully with a result, failed with an exception or was canceled

The main advantage over the core Java Future is that we can easily register callbacks and compose operations in a non-blocking way.

4. Basic Future Operations

4.1. Starting Asynchronous Computations

Now, let’s see how we can start asynchronous computations using Vavr:

String initialValue = "Welcome to ";
Future<String> resultFuture = Future.of(() -> someComputation());

4.2. Retrieving Values from a Future

We can extract values from a Future by simply calling one of the get() or getOrElse() methods:

String result = resultFuture.getOrElse("Failed to get underlying value.");

The difference between get() and getOrElse() is that get() is the simplest solution, while getOrElse() enables us to return a value of any type in case we weren’t able to retrieve the value inside the Future.

It’s recommended to use getOrElse() so we can handle any errors that occur while trying to retrieve the value from a Future. For the sake of simplicity, we’ll just use get() in the next few examples.

Note that the get() method blocks the current thread if it’s necessary to wait for the result.

A different approach is to call the nonblocking getValue() method, which returns an Option<Try<T>> which will be empty as long as computation is pending.

We can then extract the computation result which is inside the Try object:

Option<Try<String>> futureOption = resultFuture.getValue();
Try<String> futureTry = futureOption.get();
String result = futureTry.get();

Sometimes we need to check if the Future contains a value before retrieving values from it.

We can simply do that by using:

resultFuture.isEmpty();

It’s important to note that the method isEmpty() is blocking – it will block the thread until its operation is finished.

4.3. Changing the Default ExecutorService

Futures use an ExecutorService to run their computations asynchronously. The default ExecutorService is Executors.newCachedThreadPool().

We can use another ExecutorService by passing an implementation of our choice:

@Test
public void whenChangeExecutorService_thenCorrect() {
    String result = Future.of(newSingleThreadExecutor(), () -> HELLO)
      .getOrElse(error);
    
    assertThat(result)
      .isEqualTo(HELLO);
}

5. Performing Actions Upon Completion

The API provides the onSuccess() method which performs an action as soon as the Future completes successfully.

Similarly, the method onFailure() is executed upon the failure of the Future.

Let’s see a quick example:

Future<String> resultFuture = Future.of(() -> appendData(initialValue))
  .onSuccess(v -> System.out.println("Successfully Completed - Result: " + v))
  .onFailure(v -> System.out.println("Failed - Result: " + v));

The method onComplete() accepts an action to be run as soon as the Future has completed its execution, whether or not the Future was successful. The method andThen() is similar to onComplete() – it just guarantees the callbacks are executed in a specific order:

Future<String> resultFuture = Future.of(() -> appendData(initialValue))
  .andThen(finalResult -> System.out.println("Completed - 1: " + finalResult))
  .andThen(finalResult -> System.out.println("Completed - 2: " + finalResult));

6. Useful Operations on Futures

6.1. Blocking the Current Thread

The method await() has two cases:

  • if the Future is pending, it blocks the current thread until the Future has completed
  • if the Future is completed, it finishes immediately

Using this method is straightforward:

resultFuture.await();

6.2. Canceling a Computation

We can always cancel the computation:

resultFuture.cancel();

6.3. Retrieving the Underlying ExecutorService

To obtain the ExecutorService that is used by a Future, we can simply call executorService():

resultFuture.executorService();

6.4. Obtaining a Throwable from a Failed Future

We can do that using the getCause() method which returns the Throwable wrapped in an io.vavr.control.Option object.

We can later extract the Throwable from the Option object:

@Test
public void whenDivideByZero_thenGetThrowable2() {
    Future<Integer> resultFuture = Future.of(() -> 10 / 0)
      .await();
    
    assertThat(resultFuture.getCause().get().getMessage())
      .isEqualTo("/ by zero");
}

Additionally, we can convert our instance to a Future holding a Throwable instance using the failed() method:

@Test
public void whenDivideByZero_thenGetThrowable1() {
    Future<Integer> resultFuture = Future.of(() -> 10 / 0);
    
    assertThatThrownBy(resultFuture::get)
      .isInstanceOf(ArithmeticException.class);
}

6.5. isCompleted(), isSuccess(), and isFailure()

These methods are pretty much self-explanatory. They check if a Future completed, whether it completed successfully or with a failure. All of them return boolean values, of course.

We’re going to use these methods with the previous example:

@Test
public void whenDivideByZero_thenCorrect() {
    Future<Integer> resultFuture = Future.of(() -> 10 / 0)
      .await();
    
    assertThat(resultFuture.isCompleted()).isTrue();
    assertThat(resultFuture.isSuccess()).isFalse();
    assertThat(resultFuture.isFailure()).isTrue();
}

6.6. Applying Computations on Top of a Future

The map() method allows us to apply a computation on top of a pending Future:

@Test
public void whenCallMap_thenCorrect() {
    Future<String> futureResult = Future.of(() -> "from Baeldung")
      .map(a -> "Hello " + a)
      .await();
    
    assertThat(futureResult.get())
      .isEqualTo("Hello from Baeldung");
}

If we pass a function that returns a Future to the map() method, we can end up with a nested Future structure. To avoid this, we can leverage the flatMap() method:

@Test
public void whenCallFlatMap_thenCorrect() {
    Future<Object> futureMap = Future.of(() -> 1)
      .flatMap((i) -> Future.of(() -> "Hello: " + i));
         
    assertThat(futureMap.get()).isEqualTo("Hello: 1");
}

6.7. Transforming Futures

The method transformValue() can be used to apply a computation on top of a Future and change the value inside it to another value of the same type or a different type:

@Test
public void whenTransform_thenCorrect() {
    Future<Object> future = Future.of(() -> 5)
      .transformValue(result -> Try.of(() -> HELLO + result.get()));
                
    assertThat(future.get()).isEqualTo(HELLO + 5);
}

6.8. Zipping Futures

The API provides the zip() method which zips Futures together into tuples – a tuple is a collection of several elements that may or may not be related to each other. They can also be of different types. Let’s see a quick example:

@Test
public void whenCallZip_thenCorrect() {
    Future<String> f1 = Future.of(() -> "hello1");
    Future<String> f2 = Future.of(() -> "hello2");
    
    assertThat(f1.zip(f2).get())
      .isEqualTo(Tuple.of("hello1", "hello2"));
}

The point to note here is that the resulting Future will be pending as long as at least one of the base Futures is still pending.

6.9. Conversion between Futures and CompletableFutures

The API supports integration with java.util.CompletableFuture. So, we can easily convert a Future to a CompletableFuture if we want to perform operations that only the core Java API supports.

Let’s see how we can do that:

@Test
public void whenConvertToCompletableFuture_thenCorrect()
  throws Exception {
 
    CompletableFuture<String> convertedFuture = Future.of(() -> HELLO)
      .toCompletableFuture();
    
    assertThat(convertedFuture.get())
      .isEqualTo(HELLO);
}

We can also convert a CompletableFuture to a Future using the fromCompletableFuture() method.

6.10. Exception Handling

Upon the failure of a Future, we can handle the error in a few ways.

For example, we can make use of the method recover() to return another result, such as an error message:

@Test
public void whenFutureFails_thenGetErrorMessage() {
    Future<String> future = Future.of(() -> "Hello".substring(-1))
      .recover(x -> "fallback value");
    
    assertThat(future.get())
      .isEqualTo("fallback value");
}

Or, we can return the result of another Future computation using recoverWith():

@Test
public void whenFutureFails_thenGetAnotherFuture() {
    Future<String> future = Future.of(() -> "Hello".substring(-1))
      .recoverWith(x -> Future.of(() -> "fallback value"));
    
    assertThat(future.get())
      .isEqualTo("fallback value");
}

The method fallbackTo() is another way to handle errors. It’s called on a Future and accepts another Future as a parameter.

If the first Future is successful, then it returns its result. Otherwise, if the second Future is successful, then it returns its result. If both Futures fail, then the failed() method returns a Future of a Throwable, which holds the error of the first Future:

@Test
public void whenBothFuturesFail_thenGetErrorMessage() {
    Future<String> f1 = Future.of(() -> "Hello".substring(-1));
    Future<String> f2 = Future.of(() -> "Hello".substring(-2));
    
    Future<String> errorMessageFuture = f1.fallbackTo(f2);
    Future<Throwable> errorMessage = errorMessageFuture.failed();
    
    assertThat(
      errorMessage.get().getMessage())
      .isEqualTo("String index out of range: -1");
}

7. Conclusion

In this article, we’ve seen what a Future is and learned some of its important concepts. We’ve also walked through some of the features of the API using a few practical examples.

The full version of the code is available over on GitHub.

A Guide to Iterator in Java

$
0
0

1. Introduction

An Iterator is one of many ways we can traverse a collection, and as every option, it has its pros and cons.

It was first introduced in Java 1.2 as a replacement of Enumerations and:

In this tutorial, we’re going to review the simple Iterator interface to learn how we can use its different methods.

We’ll also check the more robust ListIterator extension which adds some interesting functionality.

2. The Iterator Interface

To start, we need to obtain an Iterator from a Collection; this is done by calling the iterator() method.

For simplicity, we’ll obtain Iterator instance from a list:

List<String> items = ...
Iterator<String> iter = items.iterator();

The Iterator interface has three core methods:

2.1. hasNext()

The hasNext() method can be used for checking if there’s at least one element left to iterate over.

It’s designed to be used as a condition in while loops:

while (iter.hasNext()) {
    // ...
}

2.2. next()

The next() method can be used for stepping over the next element and obtaining it:

String next = iter.next();

It’s good practice to use hasNext() before attempting to call next().

Iterators for Collections don’t guarantee iteration in any particular order unless particular implementation provides it.

2.3. remove()

Finally, if we want to remove the current element from the collection, we can use the remove:

iter.remove();

This is a safe way to remove elements while iterating over a collection without a risk of a ConcurrentModificationException.

2.4. Full Example

Now we can combine them all and have a look at how we use the three methods together for collection filtering:

while (iter.hasNext()) {
    String next = iter.next();
    System.out.println(next);
 
    if( "TWO".equals(next)) {
        iter.remove();				
    }
}

This is how we commonly use an Iterator, we check ahead of time if there is another element, we retrieve it and then we perform some action on it.

2.5. Lambda Expressions

As we saw in the previous examples, it’s very verbose to use an Iterator when we just want to go over all the elements and do something with them.

Since Java 8, we have the forEachRemaining method that allows the use of lambdas to processing remaining elements:

iter.forEachRemaining(System.out::println);

3. The ListIterator Interface

ListIterator is an extension that adds new functionality for iterating over lists:

ListIterator<String> listIterator = items.listIterator(items.size());

Notice how we can provide a starting position which in this case is the end of the List.

3.1. hasPrevious() and previous()

ListIterator can be used for backward traversal so it provides equivalents of hasNext() and next():

while(listIterator.hasPrevious()) {
    String previous = listIterator.previous();
}

3.2. nextIndex() and previousIndex()

Additionally, we can traverse over indices and not actual elements:

String nextWithIndex = items.get(listIterator.nextIndex());
String previousWithIndex = items.get(listIterator.previousIndex());

This could prove very useful in case we need to know the indexes of the objects we’re currently modifying, or if we want to keep a record of removed elements.

3.3. add()

The add method, which, as the name suggests, allows us to add an element before the item that would be returned by next() and after the one returned by previous():

listIterator.add("FOUR");

3.4. set()

The last method worth mentioning is set(), which lets us replace the element that was returned in the call to next() or previous():

String next = listIterator.next();
if( "ONE".equals(next)) {
    listIterator.set("SWAPPED");
}

It’s important to note that this can only be executed if no prior calls to add() or remove() were made.

3.5. Full Example

We can now combine them all to make a complete example:

ListIterator<String> listIterator = items.listIterator();
while(listIterator.hasNext()) {
    String nextWithIndex = items.get(listIterator.nextIndex());		
    String next = listIterator.next();
    if("REPLACE ME".equals(next)) {
        listIterator.set("REPLACED");
    }
}
listIterator.add("NEW");
while(listIterator.hasPrevious()) {
    String previousWithIndex
     = items.get(listIterator.previousIndex());
    String previous = listIterator.previous();
    System.out.println(previous);
}

In this example, we start by getting the ListIterator from the List, then we can obtain the next element either by index –which doesn’t increase the iterator’s internal current element – or by calling next.

Then we can replace a specific item with set and insert a new one with add.

After reaching the end of the iteration, we can go backward to modify additional elements or simply print them from bottom to top.

4. Conclusion

The Iterator interface allows us to modify a collection while traversing it, which is more difficult with a simple for/while statement. This, in turn, gives us a good pattern we can use in many methods that only requires collections processing while maintaining good cohesion and low coupling.

Finally, as always the full source code is available over at GitHub.

Phantom References in Java

$
0
0

1. Overview

In this article, we’ll have a look at the concept of a Phantom Reference – in the Java language.

2. Phantom References

Phantom references have two major differences from soft and weak references.

We can’t get a referent of a phantom reference. The referent is never accessible directly through the API and this is why we need a reference queue to work with this type of references.

The Garbage Collector adds a phantom reference to a reference queue after the finalize method of its referent is executed. It implies that the instance is still in the memory.

3. Use Cases

There’re two common use-cases they are used for.

The first technique is to determine when an object was removed from the memory which helps to schedule memory-sensitive tasks. For example, we can wait for a large object to be removed before loading another one.

The second practice is to avoid using the finalize method and improve the finalization process.

3.1. Example

Now, let’s implement the second use case to practically figure out how this kind of references works.

First off, we need a subclass of the PhantomReference class to define a method for clearing resources:

public class LargeObjectFinalizer extends PhantomReference<Object> {

    public LargeObjectFinalizer(
      Object referent, ReferenceQueue<? super Object> q) {
        super(referent, q);
    }

    public void finalizeResources() {
        // free resources
        System.out.println("clearing ...");
    }
}

Now we’re going to write an enhanced fine-grained finalization:

ReferenceQueue<Object> referenceQueue = new ReferenceQueue<>();
List<LargeObjectFinalizer> references = new ArrayList<>();
List<Object> largeObjects = new ArrayList<>();

for (int i = 0; i < 10; ++i) {
    Object largeObject = new Object();
    largeObjects.add(largeObject);
    references.add(new LargeObjectFinalizer(largeObject, referenceQueue));
}

largeObjects = null;
System.gc();

Reference<?> referenceFromQueue;
for (PhantomReference<Object> reference : references) {
    System.out.println(reference.isEnqueued());
}

while ((referenceFromQueue = referenceQueue.poll()) != null) {
    ((LargeObjectFinalizer)referenceFromQueue).finalizeResources();
    referenceFromQueue.clear();
}

First, we’re initializing all necessary objects: referenceQueue – to keep track of enqueued references, references – to perform cleaning work afterward, largeObjects – to imitate a large data structure.

Next, we’re creating these objects using the Object and LargeObjectFinalizer classes.

Before we call the Garbage Collector, we manually free up a large piece of data by dereferencing the largeObjects list. Note that we used a shortcut for the Runtime.getRuntime().gc() statement to invoke the Garbage Collector.

It’s important to know that System.gc() isn’t triggering garbage collection immediately – it’s simply a hint for JVM to trigger the process.

The for loop demonstrates how to make sure that all references are enqueued – it will print out true for each reference.

Finally, we used a while loop to poll out the enqueued references and do cleaning work for each of them.

4. Conclusion

In this quick tutorial, we introduced Java’s phantom references.

We learned what these are and how they can be useful in some simple and to-the-point examples.

Weak References in Java

$
0
0

1. Overview

In this article, we’ll have a look at the concept of a weak reference – in the Java language.

We’re going to explain what these are, what they’re used for and how to work with them properly.

2. Weak References

A weakly referenced object is cleared by the Garbage Collector when it’s weakly reachable.

Weak reachability means that an object has neither strong nor soft references pointing to it. The object can be reached only by traversing a weak reference.

First off, the Garbage Collector clears a weak reference, so the referent is no longer accessible. Then the reference is placed in a reference queue (if any associated exists) where we can obtain it from.

At the same time, formerly weakly-reachable objects are going to be finalized.

3. Use Cases

As stated by Java documentation, weak references are most often used to implement canonicalizing mappings. A mapping is called canonicalized if it holds only one instance of a particular value. Rather than creating a new object, it looks up the existing one in the mapping and uses it.

Of course, the most known use of these references is the WeakHashMap class. It’s the implementation of the Map interface where every key is stored as a weak reference to the given key. When the Garbage Collector removes a key, the entity associated with this key is deleted as well.

For more information, check out our guide to WeakHashMap.

Another area where they can be used is the Lapsed Listener problem.

A publisher (or a subject) holds strong references to all subscribers (or listeners) to notify them about events that happened. The problem arises when a listener can’t successfully unsubscribe from a publisher.

Therefore, a listener can’t be garbage collected since a strong reference to it’s still available to a publisher. Consequently, memory leaks may happen.

The solution to the problem can be a subject holding a weak reference to an observer allowing the former to be garbage collected without the need to be unsubscribed (note that this isn’t a complete solution, and it introduces some other issues which aren’t covered here).

4. Working with Weak References

Weak references are represented by the java.lang.ref.WeakReference class. We can initialize it by passing a referent as a parameter. Optionally, we can provide a java.lang.ref.ReferenceQueue:

Object referent = new Object();
ReferenceQueue<Object> referenceQueue = new ReferenceQueue<>();

WeakReference weakReference1 = new WeakReference<>(referent);
WeakReference weakReference2 = new WeakReference<>(referent, referenceQueue);

The referent of a reference can be fetched by the get method, and removed manually using the clear method:

Object referent2 = weakReference1.get();
weakReference1.clear();

The pattern for safe working with this kind of references is the same as with soft references:

Object referent3 = weakReference2.get();
if (referent3 != null) {
    // GC hasn't removed the instance yet
} else {
    // GC has cleared the instance
}

5. Conclusion

In this quick tutorial, we had a look at the low-level concept of a weak reference in Java – and focused on the most common scenarios to use these.


Introduction to Java Primitives

$
0
0

1. Overview

The Java Programming Language features eight primitive data types.

In this article, we’ll recall what primitives are and go over them.

2. Primitive Data Types

The eight primitives defined in Java are int, byte, short, long, float, double, boolean, and char – those aren’t considered objects and represent raw values.

They’re stored directly on the stack (check out this article for more information about memory management in Java).

Let’s take a look at storage size, default values, and examples of how to use each type.

Let’s start with a quick reference:

Type Size (bits) Minimum Maximum Example
byte 8 -27 27– 1 byte b = 100;
short 16 -215 215– 1 short s = 30_000;
int 32 -231 231– 1 int i = 100_000_000;
long 64 -263 263– 1 long l = 100_000_000_000_000;
float 32 -2-149 (2-2-23)·2127 float f = 1.456f;
double 64 -2-1074 (2-2-52)·21023 double f = 1.456789012345678;
char 16 0 216– 1 char c = ‘c’;
boolean 1 boolean b = true;

2.1. int

The first primitive data type we’re going to cover is int. Also known as an integer, int type holds a wide range of non-fractional number values.

Specifically, Java stores it using 32 bits of memory. In other words, it can represent values from -2,147,483,648 (-231) to 2,147,483,647 (231-1).

In Java 8, it’s possible to store an unsigned integer value up to 4,294,967,295 (232-1) by using new special helper functions.

We can simply declare an int simply:

int x = 424_242;

int y;

The default value of an int declared without an assignment is 0.

If the variable is defined in a method, we must assign a value before we can use it.

We can perform all standard arithmetic operations on ints. Just be aware that decimal values will be chopped off when performing these on integers.

2.2. byte

byte is a primitive data type similar to int, except it only takes up 8 bits of memory. Thus, why we call it a byte. Because the memory size being so small, byte can only hold the values from -128 (-27) to 127 (27 – 1).

We can create byte:

byte b = 100;

byte empty;

The default value of byte is also 0.

2.3. short

The next stop on our list of primitive data types in Java is short.

If we want to save memory and byte is too small, we can use the type halfway between the two: short.

At 16 bits of memory, it’s half the size of int and twice the size of byte. Its range of possible values is -32,768(-215) to 32,767(215 – 1).

short is declared like this:

short s = 202_020;

short s;

Also similar to the other types, the default value is 0. We can use all standard arithmetic on it as well.

2.4. long

Our last primitive data type related to integers is long.

long is the big brother of int. It’s stored in 64 bits of memory so it can hold a significantly larger set of possible values.

The possible values of a long are between -9,223,372,036,854,775,808 (-263) to 9,223,372,036,854,775,807 (263 – 1).

We can simply declare one:

long l = 1_234_567_890;

long l;

As with other integer types, the default is also 0. We can use all arithmetic on long that works on int.

2.5. float

We represent basic fractional numbers in Java using the float type. This is a single-precision decimal number. Which means if we get past six decimal points, this number becomes less precise and more of an estimate.

In most cases, we don’t care about the precision loss. But, if our calculation requires absolute precision (i.e., financial operations, landing on the moon, etc.) we need to use specific types designed for this work. For more information, check out the Java class Big Decimal.

This type is stored in 32 bits of memory just like int. However, because of the floating decimal point its range is much different. It can represent both positive and negative numbers. The smallest decimal is 1.40239846 x 10-45, and the largest value is 3.40282347 x 1038.

We declare floats the same as any other type:

float f = 3.145f;

float f;

And the default value is 0.0 instead of 0. Also, notice we add the f designation to the end of the literal number to define a float. Otherwise, Java will throw an error because the default type of a decimal value is double.

We can also perform all standard arithmetic operations on floats. However, it’s important to note that we perform floating point arithmetic very differently than integer arithmetic.

2.6. double

Next, we look at double – its name comes from the fact that it’s a double-precision decimal number.

It’s stored in 64 bits of memory. Which means it represents a much larger range of possible numbers than float.

Although, it does suffer from the same precision limitation as float does. The range is 4.9406564584124654 x 10-324 to 1.7976931348623157 x 10308. That range can also be positive or negative.

Declaring double is the same as other numeric types:

double d = 3.13457599923384753929348D;

double d;

The default value is also 0.0 as it is with float. Similar to float, we attach the letter D to designate the literal as a double.

2.7. boolean

The simplest primitive data type is boolean. It can contain only two values: true or false. It stores its value in a single bit.

However, for convenience, Java pads the value and stores it in a single byte.

Declare boolean like this:

boolean b = true;

boolean b;

Declaring it without a value defaults to false. boolean is the cornerstone of controlling our programs flow. We can use boolean operators on them (i.e., and, or, etc.).

2.8. char

The final primitive data type to look at is char.

Also called a character, char is a 16-bit integer representing a Unicode-encoded character. Its range is from 0 to 65,535. Which in Unicode represents ‘\u0000’ to ‘\uffff’.

For a list of all possible Unicode values check out sites like Unicode Table.

Let’s now declare a char:

char c = 'a';

char c = 65;

char c;

When defining our variables, we can use any character literal, and they will get automatically transformed into their Unicode encoding for us. A characters default value is ‘/u0000’.

2.9. Overflow

The primitive data types have size limits. But what happens if we try to store a value that’s larger than the maximum value?

We run into a situation called overflow.

When an integer overflows, it rolls over to the minimum value and begins counting up from there.

Floating point number overflow by returning Infinity. When they underflow, they return 0.0.

Here’s an example:

int i = Integer.MAX_VALUE;
int j = i + 1;
// j will roll over to -2_147_483_648

double d = Double.MAX_VALUE;
double o = d + 1;
// o will be Infinity

Underflow is the same issue except if we store a value smaller than the minimum value.

2.10. Autoboxing

Each primitive data type also has a full Java class implementation that can wrap it. For instance, the Integer class can wrap an int. There is sometimes a need to convert from the primitive type to its object wrapper (e.g., using them with generics).

Luckily, Java can perform this conversion for us automatically. We call this process Autoboxing. Here is an example:

Character c = 'c';

Integer i = 1;

3. Conclusion

In this tutorial, we’ve covered the eight primitive data types supported in Java.

These are the building blocks used by most, of not all Java programs out there – so it’s well worth understanding how they work.

Java Weekly, Issue 211

$
0
0

Let’s jump right in …

1. Spring and Java

>> Spring, Reactor and ElasticSearch: from callbacks to reactive streams [nurkiewicz.com]

Even if some tools don’t provide out-of-the-box support for reactive APIs, we can quickly construct these ourselves.

>> JPA Criteria API Bulk Update and Delete [vladmihalcea.com]

CriteriaUpdate and CriteriaDelete made it into the JPA specification starting with 2.1.

At this point, they’re not very well known or acknowledged; this article shows how useful they are and how to use them.

>> How to Choose the Most Efficient Data Type for To-Many Associations – Bag vs. List vs. Set [thoughts-on-java.org]

The title says it all – getting efficiency out of Hibernate is never a bad thing 🙂

>> Java Reflection, but much faster [optaplanner.org]

There are much faster alternatives to plain-old Java Reflection.

>> Facebook Open-Sources RacerD – Java Race Condition Detector [infoq.com]

An interesting tool from Facebook – for detecting race conditions in multithreaded Java code.

Also worth reading:

Webinars and presentations:

Time to upgrade:

2. Technical and Musings

>> A Career Guide for the Recovering Software Generalist [daedtech.com]

You can’t excel at everything (even if you do, no one will believe you), so it’s better to start specializing at some point 🙂

>> JMeter VS Gatling Tool [octoperf.com]

A comprehensive comparison of the two very popular performance testing tools.

Also worth reading:

4. Comics

And my favorite Dilberts of the week:

>> Coworkers Who Are Special [dilbert.com]

>> Boss Hits Jackpot [dilbert.com]

>> Boss Counts Cards [dilbert.com]

5. Pick of the Week

>> The presence prison [m.signalvnoise.com]

Spring Cloud AWS – S3

$
0
0

In this quick article, we’re going to explore the AWS support provided in the Spring Cloud platform – focusing on S3.

1. Simple S3 Download

Let’s start by easily accessing files stored on S3:

@Autowired
ResourceLoader resourceLoader;

public void downloadS3Object(String s3Url) throws IOException {
    Resource resource = resourceLoader.getResource(s3Url);
    File downloadedS3Object = new File(resource.getFilename());
 
    try (InputStream inputStream = resource.getInputStream()) {
        Files.copy(inputStream, downloadedS3Object.toPath(), 
          StandardCopyOption.REPLACE_EXISTING);
    }
}

2. Simple S3 Upload

We can also upload files:

public void uploadFileToS3(File file, String s3Url) throws IOException {
    WritableResource resource = (WritableResource) resourceLoader
      .getResource(s3Url);
 
    try (OutputStream outputStream = resource.getOutputStream()) {
        Files.copy(file.toPath(), outputStream);
    }
}

3. S3 URL Structure

The s3Url is represented using the format:

s3://<bucket>/<object>

For example, if a file bar.zip is in the folder foo on a my-s3-bucket bucket, then the URL will be:

s3://my-s3-bucket/foo/bar.zip

And, we can also download multiple objects at once using ResourcePatternResolver and the Ant-style pattern matching:

@Autowired
ResourcePatternResolver resourcePatternResolver;

public void downloadMultipleS3Objects(String s3Url) throws IOException {
    Resource[] allFileMatchingPatten = this.resourcePatternResolver
      .getResources(s3Url);
        // ...
    }
}

URLs can contain wildcards instead of exact names.

For example the s3://my-s3-bucket/**/a*.txt URL will recursively look for all text files whose name starts with ‘a‘ in any folder of the my-s3-bucket.

Note that the beans ResourceLoader and ResourcePatternResolver are created at application startup using Spring Boot’s auto-configuration feature.

4. Conclusion

And we’re done – this is a quick and to-the-point introduction to accessing S3 with Spring Cloud AWS.

In the next article of the series, we’ll explore the EC2 support of the framework.

Spring Cloud AWS – EC2

$
0
0

In the previous article, we’re focusing on S3; now we’ll focus on the Elastic Compute Cloud – commonly known as EC2.

1. EC2 Metadata Access

The AWS EC2MetadataUtils class provides static methods to access instance metadata like AMI Id and instance type. With Spring Cloud AWS we can inject this metadata directly using the @Value annotation.

This can be enabled by adding the @EnableContextInstanceData annotation over any of the configuration classes:

@Configuration
@EnableContextInstanceData
public class EC2EnableMetadata {
    //
}

In a Spring Boot environment, instance metadata is enabled by default which means this configuration is not required.

Then, we can inject the values:

@Value("${ami-id}")
private String amiId;

@Value("${hostname}")
private String hostname;

@Value("${instance-type}")
private String instanceType;

@Value("${services/domain}")
private String serviceDomain;

1.1. Custom Tags

Additionally, Spring also supports injection of user-defined tags. We can enable this by defining an attribute user-tags-map in context-instance-data using the following XML configuration:

<beans...>
    <aws-context:context-instance-data user-tags-map="instanceData"/>
</beans>

Now, let’s inject the user-defined tags with the help of Spring expression syntax:

@Value("#{instanceData.myTagKey}")
private String myTagValue;

2. EC2 Client

Furthermore, if there are user tags configured for the instance, Spring will create an AmazonEC2 client which we can inject into our code using @Autowired:

@Autowired
private AmazonEC2 amazonEc2;

Please note that these features work only if the app is running on an EC2 instance.

3. Conclusion

This was a quick and to-the-point introduction to accessing EC2d data with Spring Cloud AWS.

In the next article of the series, we’ll explore the RDS support.

Spring Cloud AWS – RDS

$
0
0

In the previous article, we were focusing on EC2; now, let’s move on to the Relational Database Service.

1. RDS Support

1.1. Simple Configuration

Spring Cloud AWS can automatically create a DataSource just by specifying the RDS database identifier and the master password. The username, JDBC driver, and the complete URL are all resolved by Spring.

If an AWS account has an RDS instance with DB instance identifier as spring-cloud-test-db having master password se3retpass, then all that’s required to create a DataSource is the following two lines in application.properties:

cloud.aws.rds.spring-cloud-test-db
cloud.aws.rds.spring-cloud-test-db.password=se3retpass

Three other properties can be added if you wish to use values other than the RDS default:

cloud.aws.rds.spring-cloud-test-db.username=testuser
cloud.aws.rds.spring-cloud-test-db.readReplicaSupport=true
cloud.aws.rds.spring-cloud-test-db.databaseName=test

1.2. Custom Datasource

In an application without Spring Boot or in cases where custom configurations are required, we can also create the DataSource using the Java-based configuration:

@Configuration
@EnableRdsInstance(
  dbInstanceIdentifier = "spring-cloud-test-db", 
  password = "se3retpass")
public class SpringRDSSupport {

    @Bean
    public RdsInstanceConfigurer instanceConfigurer() {
        return () -> {
            TomcatJdbcDataSourceFactory dataSourceFactory
             = new TomcatJdbcDataSourceFactory();
            dataSourceFactory.setInitialSize(10);
            dataSourceFactory.setValidationQuery("SELECT 1");
            return dataSourceFactory;
        };
    }
}

Also, note that we need to add the correct JDBC driver dependency.

2. Conclusion

In this article, we had a look at various ways of accessing AWS RDS service; in the next and final article of the series, we’ll have a look at AWS Messaging support.

Viewing all 3783 articles
Browse latest View live


<script src="https://jsc.adskeeper.com/r/s/rssing.com.1596347.js" async> </script>