Quantcast
Channel: Baeldung
Viewing all 3798 articles
Browse latest View live

Using libphonenumber to Validate Phone Numbers

$
0
0

1. Overview

In this quick tutorial, we'll see how to use Google's open-source library libphonenumber to validate phone numbers in Java.

2. Maven Dependency

First, we'll need to add the dependency for this library in our pom.xml:

<dependency>
    <groupId>com.googlecode.libphonenumber</groupId>
    <artifactId>libphonenumber</artifactId>
    <version>8.12.10</version>
</dependency>

The latest version information can be found over on Maven Central.

Now, we're equipped to use all the functionality this library has to offer.

3. PhoneNumberUtil

The library provides a utility class, PhoneNumberUtil, which provides several methods to play around with phone numbers.

Let's see a few examples of how we can use its various APIs for validation.

Importantly, in all examples, we'll be using the singleton object of this class to make method calls:

PhoneNumberUtil phoneNumberUtil = PhoneNumberUtil.getInstance();

3.1. isPossibleNumber

Using PhoneNumberUtil#isPossibleNumber, we can check if a given number is possible for a particular country code or region.

As an example, let's take the United States, which has a country code of 1. We can check if given phone numbers are possible US numbers in this fashion:

@Test
public void givenPhoneNumber_whenPossible_thenValid() {
    PhoneNumber number = new PhoneNumber();
    number.setCountryCode(1).setNationalNumber(123000L);
    assertFalse(phoneNumberUtil.isPossibleNumber(number));
    assertFalse(phoneNumberUtil.isPossibleNumber("+1 343 253 00000", "US"));
    assertFalse(phoneNumberUtil.isPossibleNumber("(343) 253-00000", "US"));
    assertFalse(phoneNumberUtil.isPossibleNumber("dial p for pizza", "US"));
    assertFalse(phoneNumberUtil.isPossibleNumber("123-000", "US"));
}

Here, we used another variant of this function as well by passing in the region that we're expecting the number to be dialed from as a String.

3.2. isPossibleNumberForType

The library recognizes different types of phone numbers, such as fixed-line, mobile, toll-free, voicemail, VoIP, pager, and many more.

Its utility method isPossibleNumberForType checks if the given number is possible for a given type in a particular region.

As an example, let's go for Argentina since it allows for different possible lengths of numbers for different types.

Hence, we can use it to demonstrate the capability of this API:

@Test
public void givenPhoneNumber_whenPossibleForType_thenValid() {
    PhoneNumber number = new PhoneNumber();
    number.setCountryCode(54);
    number.setNationalNumber(123456);
    assertTrue(phoneNumberUtil.isPossibleNumberForType(number, PhoneNumberType.FIXED_LINE));
    assertFalse(phoneNumberUtil.isPossibleNumberForType(number, PhoneNumberType.TOLL_FREE));
    number.setNationalNumber(12345678901L);
    assertFalse(phoneNumberUtil.isPossibleNumberForType(number, PhoneNumberType.FIXED_LINE));
    assertTrue(phoneNumberUtil.isPossibleNumberForType(number, PhoneNumberType.MOBILE));
    assertFalse(phoneNumberUtil.isPossibleNumberForType(number, PhoneNumberType.TOLL_FREE));
}

As we can see, the above code validates that Argentina permits 6-digit fixed line numbers and 11-digit mobile numbers.

3.3. isAlphaNumber

This method is used to verify if the given phone number is a valid alphanumeric one, such as 325-CARS:

@Test
public void givenPhoneNumber_whenAlphaNumber_thenValid() {
    assertTrue(phoneNumberUtil.isAlphaNumber("325-CARS"));
    assertTrue(phoneNumberUtil.isAlphaNumber("0800 REPAIR"));
    assertTrue(phoneNumberUtil.isAlphaNumber("1-800-MY-APPLE"));
    assertTrue(phoneNumberUtil.isAlphaNumber("1-800-MY-APPLE.."));
    assertFalse(phoneNumberUtil.isAlphaNumber("+876 1234-1234"));
}

To clarify, a valid alpha number contains at least three digits at the beginning, followed by three or more alphabet letters. The utility method above first strips the given input off any formatting and then checks for this condition.

3.4. isValidNumber

The previous API we discussed quickly checks the phone number on the basis of its length only. On the other hand, isValidNumber does a complete validation using prefix as well as length information:

@Test
public void givenPhoneNumber_whenValid_thenOK() throws Exception {
    PhoneNumber phone = phoneNumberUtil.parse("+911234567890", 
      CountryCodeSource.UNSPECIFIED.name());
    assertTrue(phoneNumberUtil.isValidNumber(phone));
    assertTrue(phoneNumberUtil.isValidNumberForRegion(phone, "IN"));
    assertFalse(phoneNumberUtil.isValidNumberForRegion(phone, "US"));
    assertTrue(phoneNumberUtil.isValidNumber(phoneNumberUtil.getExampleNumber("IN")));
}

Here, the number is validated when we did not specify a region, and also when we did.

3.5. isNumberGeographical​

This method checks if a given number has geography or region associated with it:

@Test
public void givenPhoneNumber_whenNumberGeographical_thenValid() throws NumberParseException {
    
    PhoneNumber phone = phoneNumberUtil.parse("+911234567890", "IN");
    assertTrue(phoneNumberUtil.isNumberGeographical(phone));
    phone = new PhoneNumber().setCountryCode(1).setNationalNumber(2530000L);
    assertFalse(phoneNumberUtil.isNumberGeographical(phone));
    phone = new PhoneNumber().setCountryCode(800).setNationalNumber(12345678L);
    assertFalse(phoneNumberUtil.isNumberGeographical(phone));
}

Here, in the first assert above, we gave the phone number in an international format with the region code, and the method returned true. The second assert uses a local number from the USA, and the third one a toll-free number. So the API returned false for these two.

4. Conclusion

In this tutorial, we saw some of the functionality offered by libphonenumber to format and validate phone numbers using code samples.

This is a rich library that offers many more utility functions and takes care of most of our application needs for formatting, parsing, and validating phone numbers.

As always, the source code is available over on GitHub.

The post Using libphonenumber to Validate Phone Numbers first appeared on Baeldung.


Using JNA to Access Native Dynamic Libraries

$
0
0

1. Overview

In this tutorial, we'll see how to use the Java Native Access library (JNA for short) to access native libraries without writing any JNI (Java Native Interface) code.

2. Why JNA?

For many years, Java and other JVM-based languages have, to a large extent, fulfilled its “write once, run everywhere” motto. However, sometimes we need to use native code to implement some functionality:

  • Reusing legacy code written in C/C++ or any other language able to create native code
  • Accessing system-specific functionality not available in the standard Java runtime
  • Optimizing speed and/or memory usage for specific sections of a given application.

Initially, this kind of requirement meant we'd have to resort do JNI – Java Native Interface. While effective, this approach has its drawbacks and was generally avoided due to a few issues:

  • Requires developers to write C/C++ “glue code” to bridge Java and native code
  • Requires a full compile and link toolchain available for every target system
  • Marshalling and unmarshalling values to and from the JVM is a tedious and error-prone task
  • Legal and support concerns when mixing Java and native libraries

JNA came to solve most of the complexity associated with using JNI. In particular, there's no need to create any JNI code to use native code located in dynamic libraries, which makes the whole process much easier.

Of course, there are some trade-offs:

  • We can't directly use static libraries
  • Slower when compared to handcrafted JNI code

For most applications, though, JNA's simplicity benefits far outweigh those disadvantages. As such, it is fair to say that, unless we have very specific requirements, JNA today is probably the best available choice to access native code from Java – or any other JVM-based language, by the way.

3. JNA Project Setup

The first thing we have to do to use JNA is to add its dependencies to our project's pom.xml:

<dependency>
    <groupId>net.java.dev.jna</groupId>
    <artifactId>jna-platform</artifactId>
    <version>5.6.0</version>
</dependency>

The latest version of jna-platform can be downloaded from Maven Central.

4. Using JNA

Using JNA is a two-step process:

  • First, we create a Java interface that extends JNA's Library interface to describe the methods and types used when calling the target native code
  • Next, we pass this interface to JNA which returns a concrete implementation of this interface that we use to invoke native methods

4.1. Calling Methods from the C Standard Library

For our first example, let's use JNA to call the cosh function from the standard C library, which is available in most systems. This method takes a double argument and computes its hyperbolic cosine. A C program can use this function just by including the <math.h> header file:

#include <math.h>
#include <stdio.h>
int main(int argc, char** argv) {
    double v = cosh(0.0);
    printf("Result: %f\n", v);
}

Let's create the Java interface needed to call this method:

public interface CMath extends Library { 
    double cosh(double value);
}

Next, we use JNA's Native class to create a concrete implementation of this interface so we can call our API:

CMath lib = Native.load(Platform.isWindows()?"msvcrt":"c", CMath.class);
double result = lib.cosh(0);

The really interesting part here is the call to the load() method. It takes two arguments: the dynamic library name and a Java interface describing the methods that we'll use. It returns a concrete implementation of this interface, allowing us to call any of its methods.

Now, dynamic library names are usually system-dependent, and C standard library is no exception: libc.so in most Linux-based systems, but msvcrt.dll in Windows. This is why we've used the Platform helper class, included in JNA, to check which platform we're running in and select the proper library name.

Notice that we don't have to add the .so or .dll extension, as they're implied. Also, for Linux-based systems, we don't need to specify the “lib” prefix that is standard for shared libraries.

Since dynamic libraries behave like Singletons from a Java perspective, a common practice is to declare an INSTANCE field as part of the interface declaration:

public interface CMath extends Library {
    CMath INSTANCE = Native.load(Platform.isWindows() ? "msvcrt" : "c", CMath.class);
    double cosh(double value);
}

4.2. Basic Types Mapping

In our initial example, the called method only used primitive types as both its argument and return value. JNA handles those cases automatically, usually using their natural Java counterparts when mapping from C types:

  • char => byte
  • short => short
  • wchar_t => char
  • int => int
  • long => com.sun.jna.NativeLong
  • long long => long
  • float => float
  • double => double
  • char * => String

A mapping that might look odd is the one used for the native long type. This is because, in C/C++, the long type may represent a 32- or 64-bit value, depending on whether we're running on a 32- or 64-bit system.

To address this issue, JNA provides the NativeLong type, which uses the proper type depending on the system's architecture.

4.3. Structures and Unions

Another common scenario is dealing with native code APIs that expect a pointer to some struct or union type. When creating the Java interface to access it, the corresponding argument or return value must be a Java type that extends Structure or Union, respectively.

For instance, given this C struct:

struct foo_t {
    int field1;
    int field2;
    char *field3;
};

Its Java peer class would be:

@FieldOrder({"field1","field2","field3"})
public class FooType extends Structure {
    int field1;
    int field2;
    String field3;
};

JNA requires the @FieldOrder annotation so it can properly serialize data into a memory buffer before using it as an argument to the target method.

Alternatively, we can override the getFieldOrder() method for the same effect. When targeting a single architecture/platform, the former method is generally good enough. We can use the latter to deal with alignment issues across platforms, that sometimes require adding some extra padding fields.

Unions work similarly, except for a few points:

  • No need to use a @FieldOrder annotation or implement getFieldOrder()
  • We have to call setType() before calling the native method

Let's see how to do it with a simple example:

public class MyUnion extends Union {
    public String foo;
    public double bar;
};

Now, let's use MyUnion with a hypothetical library:

MyUnion u = new MyUnion();
u.foo = "test";
u.setType(String.class);
lib.some_method(u);

If both foo and bar where of the same type, we'd have to use the field's name instead:

u.foo = "test";
u.setType("foo");
lib.some_method(u);

4.4. Using Pointers

JNA offers a Pointer abstraction that helps to deal with APIs declared with untyped pointer – typically a void *. This class offers methods that allow read and write access to the underlying native memory buffer, which has obvious risks.

Before start using this class, we must be sure we clearly understand who “owns” the referenced memory at each time. Failing to do so will likely produce hard to debug errors related to memory leaks and/or invalid accesses.

Assuming we know what we're doing (as always), let's see how we can use the well-known malloc() and free() functions with JNA, used to allocate and release a memory buffer. First, let's again create our wrapper interface:

public interface StdC extends Library {
    StdC INSTANCE = // ... instance creation omitted
    Pointer malloc(long n);
    void free(Pointer p);
}

Now, let's use it to allocate a buffer and play with it:

StdC lib = StdC.INSTANCE;
Pointer p = lib.malloc(1024);
p.setMemory(0l, 1024l, (byte) 0);
lib.free(p);

The setMemory() method just fills the underlying buffer with a constant byte value (zero, in this case). Notice that the Pointer instance has no idea to what it is pointing to, much less its size. This means that we can quite easily corrupt our heap using its methods.

We'll see later how we can mitigate such errors using JNA's crash protection feature.

4.5. Handling Errors

Old versions of the standard C library used the global errno variable to store the reason a particular call failed. For instance, this is how a typical open() call would use this global variable in C:

int fd = open("some path", O_RDONLY);
if (fd < 0) {
    printf("Open failed: errno=%d\n", errno);
    exit(1);
}

Of course, in modern multi-threaded programs this code would not work, right? Well, thanks to C's preprocessor, developers can still write code like this and it will work just fine. It turns out that nowadays, errno is a macro that expands to a function call:

// ... excerpt from bits/errno.h on Linux
#define errno (*__errno_location ())
// ... excerpt from <errno.h> from Visual Studio
#define errno (*_errno())

Now, this approach works fine when compiling source code, but there's no such thing when using JNA. We could declare the expanded function in our wrapper interface and call it explicitly, but JNA offers a better alternative: LastErrorException.

Any method declared in wrapper interfaces with throws LastErrorException will automatically include a check for an error after a native call. If it reports an error, JNA will throw a LastErrorException, which includes the original error code.

Let's add a couple of methods to the StdC wrapper interface we've used before to show this feature in action:

public interface StdC extends Library {
    // ... other methods omitted
    int open(String path, int flags) throws LastErrorException;
    int close(int fd) throws LastErrorException;
}

Now, we can use open() in a try/catch clause:

StdC lib = StdC.INSTANCE;
int fd = 0;
try {
    fd = lib.open("/some/path",0);
    // ... use fd
}
catch (LastErrorException err) {
    // ... error handling
}
finally {
    if (fd > 0) {
       lib.close(fd);
    }
}

In the catch block, we can use LastErrorException.getErrorCode() to get the original errno value and use it as part of the error handling logic.

4.6. Handling Access Violations

As mentioned before, JNA does not protect us from misusing a given API, especially when dealing with memory buffers passed back and forth native code. In normal situations, such errors result in an access violation and terminate the JVM.

JNA supports, to some extent, a method that allows Java code to handle access violation errors. There are two ways to activate it:

  • Setting the jna.protected system property to true
  • Calling Native.setProtected(true)

Once we've activated this protected mode, JNA will catch access violation errors that would normally result in a crash and throw a java.lang.Error exception. We can verify that this works using a Pointer initialized with an invalid address and trying to write some data to it:

Native.setProtected(true);
Pointer p = new Pointer(0l);
try {
    p.setMemory(0, 100*1024, (byte) 0);
}
catch (Error err) {
    // ... error handling omitted
}

However, as the documentation states, this feature should only be used for debugging/development purposes.

5. Conclusion

In this article, we've shown how to use JNA to access native code easily when compared to JNI.

As usual, all code is available over on GitHub.

The post Using JNA to Access Native Dynamic Libraries first appeared on Baeldung.


Checking if a Java Class is ‘abstract’ Using Reflection

$
0
0

1. Overview

In this quick tutorial, we'll discuss how we can check if a class is abstract or not in Java by using the Reflection API.

2. Example Class

To demonstrate this, we'll create an AbstractExample class:

public abstract class AbstractExample {
    public abstract LocalDate getLocalDate();
    public abstract LocalTime getLocalTime();
}

3. The Modifier#isAbstract Method

We can check if a class is abstract or not by using the Modifier#isAbstract method from the Reflection API:

@Test
void givenAbstractClass_whenCheckModifierIsAbstract_thenTrue() throws Exception {
    Class<AbstractExample> clazz = AbstractExample.class;
 
    Assertions.assertTrue(Modifier.isAbstract(clazz.getModifiers()));
}

In the above example, we first obtain the instance of the class we want to test. Once we have the class reference, all we need to do is call the Modifier#isAbstract method. As we'd expect, it returns true if the class is abstract, and otherwise, it returns false.

4. Conclusion

In this tutorial, we've seen how we can check if a class is abstract or not.

As always, the complete code for this example is available over on GitHub.

The post Checking if a Java Class is 'abstract' Using Reflection first appeared on Baeldung.


Differences Between Netflix Feign and OpenFeign

$
0
0

1. Overview

In this tutorial, we're going to describe the differences between Spring Cloud Netflix Feign and Spring Cloud OpenFeign.

2. Feign

Feign makes writing web service clients easier by providing annotation support that allows us to implement our clients with just interfaces.

Originally, Feign was created and released by Netflix as part of their Netflix OSS project. Today, it is an open-source project.

2.1. Spring Cloud Netflix Feign

Spring Cloud Netflix integrates the Netflix OSS offerings into the Spring Cloud ecosystem. This includes Feign, Eureka, Ribbon, and a host of other tools and utilities. However, Feign was given its own Spring Cloud Starter to allow access to just Feign.

2.2. OpenFeign

Ultimately, Netflix decided to stop using Feign internally and ceased its development. As a result of this decision, Netflix fully transferred Feign to the open-source community under a new project named OpenFeign.

Luckily, it continues to receive immense support from the open-source community and has seen many new features and updates.

2.3. Spring Cloud OpenFeign

Similar to its predecessor, Spring Cloud OpenFeign integrates the predecessor project into the Spring Cloud ecosystem.

Conveniently, this integration adds support for Spring MVC annotations and provides the same HttpMessageConverters.

Let's compare the Feign implementation found in the Spring Cloud OpenFeign to one using Spring Cloud Netflix Feign.

3. Dependencies

First, we must add the spring-cloud-starter-feign and spring-cloud-dependencies dependencies to our pom.xml file:

<dependency>
    <groupId>org.springframework.cloud</groupId>
    <artifactId>spring-cloud-starter-feign</artifactId>
    <versionId>1.4.7.RELEASE</versionID>
</dependency>
<dependency>
    <groupId>org.springframework.cloud</groupId>
    <artifactId>spring-cloud-dependencies</artifactId>
    <version>Hoxton.SR8</version>
    <type>pom</type>
    <scope>import</scope>
</dependency>

Please note that this library only works with Spring Boot 1.4.7 or earlier. Therefore our pom.xml must use compatible versions of any Spring Cloud dependencies.

4. Implementation with Spring Cloud Netflix Feign

Now, we can use @EnableFeignClients to enable component scanning for any interfaces that use @FeignClient.

For every example that we developed using the Spring Cloud Netflix Feign project, we use the following imports:

import org.springframework.cloud.netflix.feign.FeignClient;
import org.springframework.cloud.netflix.feign.EnableFeignClients;

The implementation of all features is exactly the same for the old and the new version.

5. Implementation with Spring Cloud OpenFeign

Comparatively, our Spring Cloud OpenFeign tutorial contains the same example as the implementation with Spring Netflix Feign.

The only difference here is that our imports are from a different package:

import org.springframework.cloud.openfeign.FeignClient;
import org.springframework.cloud.openfeign.EnableFeignClients;

Everything else is the same, which should come as no surprise due to the relation between these two libraries.

6. Comparison

Fundamentally, these two implementations of Feign are identical. We can ascribe this to Netflix Feign being the ancestor of OpenFeign.

However, Spring Cloud OpenFeign includes new options and features that are not available in Spring Cloud Netflix Feign.

Recently, we can get support for Micrometer, Dropwizard Metrics, Apache HTTP Client 5, Google HTTP client, and many more.

7. Conclusion

This article compared the Spring Cloud integrations of OpenFeign and Netflix Feign. As usual, you'll find the sources over on GitHub for both Spring Cloud OpenFeign and Netflix Feign.

The post Differences Between Netflix Feign and OpenFeign first appeared on Baeldung.


Performing Calculations in the Database vs. the Application

$
0
0

1. Overview

Often, we find it difficult to decide whether a calculation should be performed in the database (RDBMS) or application code to get good performance along with convenience at the same time.

In this article, we'll explore the advantages and disadvantages of performing calculations in the database and application code.

We'll consider a few factors that can influence this decision, and we'll discuss which layer (database or application) is better suited to handle them.

2. Calculation in the Database

2.1. Data Selection and Aggregation

Relational databases are highly optimized for the handling, selection, and aggregation of data. We can easily group, order, filter, and aggregate data using SQL.

For example, we can easily select and deselect datasets from multiple tables using LEFT and RIGHT JOIN.

Similarly, aggregate functions like MIN, MAX, SUM, and AVG are quite handy and faster than a Java implementation.

Also, we can fine-tune the performance of the disk IO by leveraging indexes while aggregating data.

2.2. Volume of Data

All popular RDBMS provide unmatched performance in handling a large volume of data from tables for performing a calculation.

However, we'll require a lot of resources like memory and CPU processing to process a similar volume of data in the application as compared to a database.

Also, to save bandwidth, it's advised to perform data-centric calculations in the database, thereby avoiding the transfer of large volumes of data over the network.

3. Calculation in the Application

3.1. Complexity

Unlike the database, higher-level languages like Java are well equipped in dealing with complex calculations.

For example, we can leverage asynchronous programming, parallel execution, and multithreading in Java to solve a complex problem.

Similarly, the database provides minimal support for logging and debugging. However, today's higher-level languages have excellent support for such critical features, which are often handy in implementing a complex calculation.

For instance, we can easily add logging in a Java application by using SLF4J and use popular IDEs like Eclipse and IntelliJ IDEA for debugging. Therefore, performing a calculation in the application is a convenient option for a developer as compared to the database.

Likewise, another argument is that we can easily unit test our calculations in the application code, which is fairly complex to perform in the database.

Unit testing proves quite handy in keeping a check on the changes in the implementations. So, when performing a calculation in the Java application, we can use JUnit to add unit tests.

3.2. Advanced Data Analysis and Transformation

The database provides limited support for advanced data analysis and transformation. However, it's simple to perform complex computations using the application code.

For instance, a variety of libraries like Deeplearning4J, Weka, and TensorFlow are available for advanced statistics and machine learning support.

Another common use-case is that we can easily objectify the data using ORM technologies like Hibernate, use APIs like Java Streams to process it, and produce results in various formats through XML or JSON parsing libraries.

3.3. Scalability

Achieving database scalability can be a daunting task as RDBMS can only scale up. However, the application code offers a more scalable solution.

We can easily scale out the app-servers and handle a large number of requests using a load balancer.

4. Database vs. Application

Now that we've seen the advantages of performing a calculation based on certain factors at each of the layers, let's summarize their differences:

  • The database is a preferred choice for data selection, aggregation, and handling large volumes
  • However, performing a calculation in the application code looks a better candidate when considering factors like complexity, advanced-data transformation, third-party integrations, and scalability
  • Also, higher-level languages provide extra benefits like logging, debugging, error handling, and unit testing capabilities

It's always a good idea to mix and leverage the best of both layers to solve a complex problem.

In other words, use the database for selection and aggregation of data, then transmit useful lean data to the application and perform complex operations over it using an efficient higher-level language.

5. Conclusion

In this article, we explored the pros and cons of performing calculations in the application and database.

First, we discussed the advantages of performing calculations in both the database and application layers. Then, we summarized our conclusions about performing a calculation based on all the factors we discussed.

The post Performing Calculations in the Database vs. the Application first appeared on Baeldung.


Background Jobs in Spring with JobRunr

$
0
0

1. Overview

In this tutorial, we're going to look into distributed background job scheduling and processing in Java using JobRunr and have it integrate with Spring.

2. About JobRunr

JobRunr is a library that we can embed in our application and which allows us to schedule background jobs using a Java 8 lambda. We can use any existing method of our Spring services to create a job without the need to implement an interface. A job can be a short or long-running process, and it will be automatically offloaded to a background thread so that the current web request is not blocked.

To do its job, JobRunr analyses the Java 8 lambda. It serializes it as JSON, and stores it into either a relational database or a NoSQL data store.

3. JobRunr Features

If we see that we're producing too many background jobs and our server can not cope with the load, we can easily scale horizontally by just adding extra instances of our application. JobRunr will share the load automatically and distribute all jobs over the different instances of our application.

It also contains an automatic retry feature with an exponential back-off policy for failed jobs. There is also a built-in dashboard that allows us to monitor all jobs. JobRunr is self-maintaining – succeeded jobs will automatically be deleted after a configurable amount of time so there is no need to perform manual storage cleanup.

4. Setup

For the sake of simplicity, we'll use an in-memory data store to store all job-related information.

4.1. Maven Configuration

Let's jump straight to the Java code. But before that, we need to have the following Maven dependency declared in our pom.xml file:

<dependency>
    <groupId>org.jobrunr</groupId>
    <artifactId>jobrunr-spring-boot-starter</artifactId>
    <version>1.0.0</version>
</dependency>

4.2. Spring Integration

Before we jump straight to how to create background jobs, we need to initialize JobRunr. As we're using the jobrunr-spring-boot-starter dependency, this is easy. We only need to add some properties to the application.properties:

org.jobrunr.background_job_server=true
org.jobrunr.dashboard=true

The first property tells JobRunr that we want to start an instance of a BackgroundJobServer that is responsible for processing jobs. The second property tells JobRunr to start the embedded dashboard.

By default, the jobrunr-spring-boot-starter will try to use your existing DataSource in case of a relational database to store all the job-related information.

However, since we'll use an in-memory data store, we need to provide a StorageProvider bean:

@Bean
public StorageProvider storageProvider(JobMapper jobMapper) {
    InMemoryStorageProvider storageProvider = new InMemoryStorageProvider();
    storageProvider.setJobMapper(jobMapper);
    return storageProvider;
}

5. Usage

Now, let's find out how to create and schedule background jobs in Spring using JobRunr.

5.1. Inject Dependencies

When we want to create jobs, we'll need to inject the JobScheduler and our existing Spring service containing the method for which we want to create jobs, in this case, the SampleJobService:

@Inject
private JobScheduler jobScheduler;
@Inject
private SampleJobService sampleJobService;

The JobScheduler class from JobRunr allows us to enqueue or schedule new background jobs.

The SampleJobService could be any of our existing Spring services containing a method that might take too long to handle in a web request. It can also be a method that calls some other external services where we want to add resilience as JobRunr will retry the method if an exception occurs.

5.2. Creating Fire-and-Forget Jobs

Now that we have our dependencies, we can create fire-and-forget jobs using the enqueue method:

jobScheduler.enqueue(() -> sampleJobService.executeSampleJob());

Jobs can have parameters, just like any other lambda:

jobScheduler.enqueue(() -> sampleJobService.executeSampleJob("some string"));

This line makes sure that the lambda – including type, method, and arguments – is serialized as JSON to persistent storage (an RDBMS like Oracle, Postgres, MySql, and MariaDB or a NoSQL database).

A dedicated worker pool of threads running in all the different BackgroundJobServers will then execute these queued background jobs as soon as possible, in a first-in-first-out manner. JobRunr guarantees the execution of your job by a single worker by means of optimistic locking.

5.3. Scheduling Jobs in the Future

We can also schedule jobs in the future using the schedule method:

jobScheduler.schedule(() -> sampleJobService.executeSampleJob(), LocalDateTime.now().plusHours(5));

5.4. Scheduling Jobs Recurrently

If we want to have recurrent jobs, we need to use the scheduleRecurrently method:

jobScheduler.scheduleRecurrently(() -> sampleJobService.executeSampleJob(), Cron.hourly());

5.5. Annotating with the @Job Annotation

To control all aspects of a job, we can annotate our service method with the @Job annotation. This allows setting the display name in the dashboard and configuring the number of retries in case a job fails.

@Job(name = "The sample job with variable %0", retries = 2)
public void executeSampleJob(String variable) {
    ...
}

We can even use variables that are passed to our job in the display name by means of the String.format() syntax.

If we have very specific use cases where we would want to retry a specific job only on a certain exception, we can write our own ElectStateFilter where we have access to the Job and full control on how to proceed.

6. Dashboard

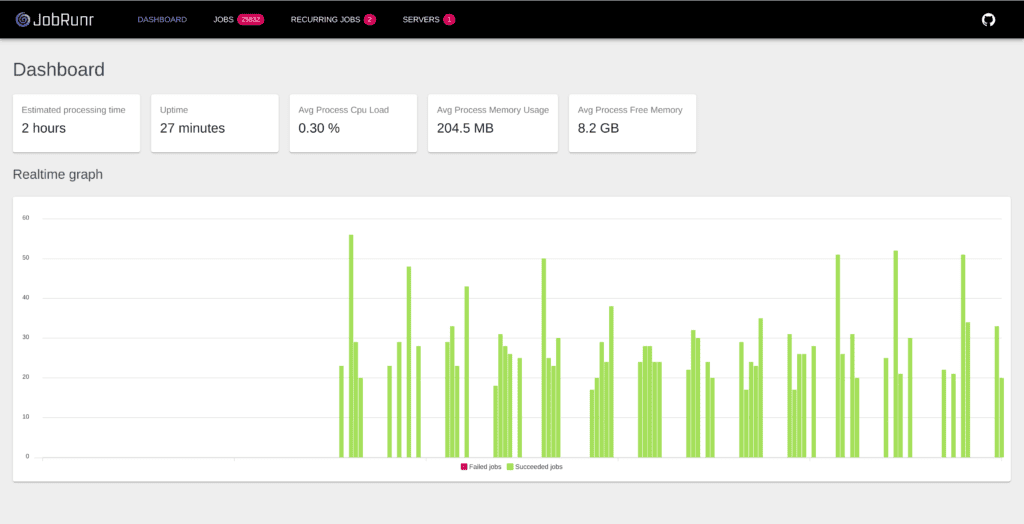
JobRunr comes with a built-in dashboard that allows us to monitor our jobs. We can find it at http://localhost:8000 and inspect all the jobs, including all recurring jobs and an estimation of how long it will take until all the enqueued jobs are processed:

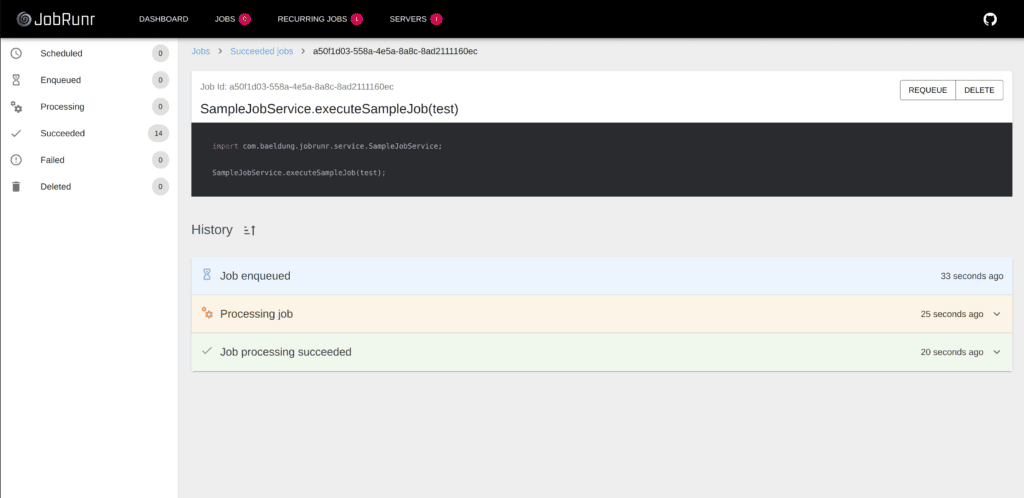
Bad things can happen, for example, an SSL certificate expired, or a disk is full. JobRunr, by default, will reschedule the background job with an exponential back-off policy. If the background job continues to fail ten times, only then will it go to the Failed state. You can then decide to re-queue the failed job when the root cause has been solved.

All of this is visible in the dashboard, including each retry with the exact error message and the complete stack trace of why a job failed:

7. Conclusion

In this article, we built our first basic scheduler using JobRunr with the jobrunr-spring-boot-starter. The key takeaway from this tutorial is that we were able to create a job with just one line of code and without any XML-based configuration or the need to implement an interface.

The complete source code for the example is available over on GitHub.

The post Background Jobs in Spring with JobRunr first appeared on Baeldung.


How to Stop Execution After a Certain Time in Java

$
0
0

1. Overview

In this article, we'll learn how we can end a long-running execution after a certain time. We'll explore the various solutions to this problem. Also, we'll cover some of their pitfalls.

2. Using a Loop

Imagine that we're processing a bunch of items in a loop, such as some details of the product items in an e-commerce application, but that it may not be necessary to complete all the items.

In fact, we'd want to process only up to a certain time, and after that, we want to stop the execution and show whatever the list has processed up to that time.

Let's see a quick example:

long start = System.currentTimeMillis();
long end = start + 30*1000;
while (System.currentTimeMillis() < end) {
    // Some expensive operation on the item. 
}

Here, the loop will break if the time has surpassed the limit of 30 seconds. There are some noteworthy points in the above solution:

  • Low accuracy: The loop can run for longer than the imposed time limit. This will depend on the time each iteration may take. For example, if each iteration may take up to 7 seconds, then the total time can go up to 35 seconds, which is around 17% longer than the desired time limit of 30 seconds
  • Blocking: Such processing in the main thread may not be a good idea as it'll block it for a long time. Instead, these operations should be decoupled from the main thread

In the next section, we'll discuss how the interrupt-based approach eliminates these limitations.

3. Using an Interrupt Mechanism

Here, we'll use a separate thread to perform the long-running operations. The main thread will send an interrupt signal to the worker thread on timeout.

If the worker thread is still alive, it'll catch the signal and stop its execution. If the worker finishes before the timeout, it'll have no impact on the worker thread.

Let's take a look at the worker thread:

class LongRunningTask implements Runnable {
    @Override
    public void run() {
        try {
            while (!Thread.interrupted()) {
                Thread.sleep(500);
            }
        } catch (InterruptedException e) {
            // log error
        }
    }
}

Here, Thread.sleep simulates a long-running operation. Instead of this, there could be any other operation. It's important to check the interrupt flag because not all the operations are interruptible. So in those cases, we should manually check the flag.

Also, we should check this flag in every iteration to ensure that the thread stops executing itself within the delay of one iteration at most.

Next, we'll cover three different mechanisms of sending the interrupt signal.

3.1. Using a Timer

Alternatively, we can create a TimerTask to interrupt the worker thread upon timeout:

class TimeOutTask extends TimerTask {
    private Thread t;
    private Timer timer;
    TimeOutTask(Thread t, Timer timer){
        this.t = t;
        this.timer = timer;
    }
 
    public void run() {
        if (t != null && t.isAlive()) {
            t.interrupt();
            timer.cancel();
        }
    }
}

Here, we've defined a TimerTask that takes a worker thread at the time of its creation. It'll interrupt the worker thread upon the invocation of its run method. The Timer will trigger the TimerTask after the specified delay:

Thread t = new Thread(new LongRunningTask());
Timer timer = new Timer();
timer.schedule(new TimeOutTask(t, timer), 30*1000);
t.start();

3.2. Using the Method Future#get

We can also use the get method of a Future instead of using a Timer:

ExecutorService executor = Executors.newSingleThreadExecutor();
Future future = executor.submit(new LongRunningTask());
try {
    f.get(30, TimeUnit.SECONDS);
} catch (TimeoutException e) {
    f.cancel(true);
} finally {
    service.shutdownNow();
}

Here, we used the ExecutorService to submit the worker thread that returns an instance of Future, whose get method will block the main thread until the specified time. It'll raise a TimeoutException after the specified timeout. In the catch block, we are interrupting the worker thread by calling the cancel method on the Future object.

The main benefit of this approach over the previous one is that it uses a pool to manage the thread, while the Timer uses only a single thread (no pool).

3.3. Using a ScheduledExcecutorSercvice

We can also use ScheduledExecutorService to interrupt the task. This class is an extension of an ExecutorService and provides the same functionality with the addition of several methods that deal with the scheduling of execution. This can execute the given task after a certain delay of set time units:

ScheduledExecutorService executor = Executors.newScheduledThreadPool(2);
Future future = executor.submit(new LongRunningTask());
executor.schedule(new Runnable(){
    public void run(){
        future.cancel(true);
    }
}, 1000, TimeUnit.MILLISECONDS);
executor.shutdown();

Here, we created a scheduled thread pool of size two with the method newScheduledThreadPool. The ScheduledExecutorService#schedule method takes a Runnable, a delay value, and the unit of the delay.

The above program schedules the task to execute after one second from the time of submission. This task will cancel the original long-running task.

Note that unlike the previous approach, we are not blocking the main thread by calling the Future#get method. Therefore, it's the most preferred approach among all the above-mentioned approaches.

4. Is There a Guarantee?

There's no guarantee that the execution is stopped after a certain time. The main reason is that not all blocking methods are interruptible. In fact, there are only a few well-defined methods that are interruptible. So, if a thread is interrupted and a flag is set, nothing else will happen until it reaches one of these interruptible methods.

For example, read and write methods are interruptible only if they're invoked on streams created with an InterruptibleChannel. BufferedReader is not an InterruptibleChannel. So, if the thread uses it to read a file, calling interrupt() on this thread blocked in the read method has no effect.

However, we can explicitly check for the interrupt flag after every read in a loop. This will give a reasonable surety to stop the thread with some delay. But, this doesn't guarantee to stop the thread after a strict time, because we don't know how much time a read operation can take.

On the other hand, the wait method of the Object class is interruptible. Thus, the thread blocked in the wait method will immediately throw an InterruptedException after the interrupt flag is set.

We can identify the blocking methods by looking for a throws InterruptedException in their method signatures.

One important piece of advice is to avoid using the deprecated Thread.stop() method. Stopping the thread causes it to unlock all of the monitors that it has locked. This happens because of the ThreadDeath exception that propagates up the stack.

If any of the objects previously protected by these monitors were in an inconsistent state, the inconsistent objects become visible to other threads. This can lead to arbitrary behavior that is very hard to detect and reason about.

5. Conclusion

In this tutorial, we've learned various techniques for stopping the execution after a given time, along with the pros and cons of each. The complete source code can be found over on GitHub.

The post How to Stop Execution After a Certain Time in Java first appeared on Baeldung.


Where Does H2’s Embedded Database Store The Data?

$
0
0

1. Introduction

In this article, we'll learn how to configure the Spring Boot application to use the embedded H2 database and then see where H2's embedded database stores the data.

H2 database is a lightweight and open-source database with no commercial support at this point. We can use it in various modes:

  • server mode – for remote connections using JDBC or ODBC over TCP/IP
  • embedded mode – for local connections that use JDBC
  • mixed-mode – this means that we can use H2 for both local and remote connections

H2 can be configured to run as an in-memory database, but it can also be persistent, e.g., its data will be stored on disk. For the purpose of this tutorial, we'll be working with the H2 database in embedded mode with enabled persistence so we'll have data on the disk.

2. Embedded H2 Database

If we want to use the H2 database, we'll need to add the h2 and spring-boot-starter-data-jpa Maven dependencies to our pom.xml file:

<dependency>
    <groupId>com.h2database</groupId>
    <artifactId>h2</artifactId>
    <versionId>1.4.200</versionId>
    <scope>runtime</scope>
</dependency>
<dependency>
    <groupId>org.springframework.boot</groupId>
    <artifactId>spring-boot-starter-data-jpa</artifactId>
    <versionId>2.3.4.RELEASE</versionId>
</dependency>

3. H2's Embedded Persistence Mode

We already mentioned that H2 could use a file system to store database data. The biggest advantage of this approach comparing to in-memory one is that database data is not lost after the application restarts.

We're able to configure storage mode through the spring.datasource.url property in our application.properties file. This way, we're able to set the H2 database to use the in-memory approach by adding the mem parameter in data source URL, followed by database name:

spring.datasource.url=jdbc:h2:mem:demodb

If we use the file-based persistence mode, we'll set one of the available options for disk locations instead of the mem parameter. In the next section, we'll discuss what these options are.

Let's see which files does the H2 database create:

  • demodb.mv.db – unlike the others, this file is always created and it contains data, transaction log, and indexes
  • demodb.lock.db – it is a database lock file and H2 recreates it when the database is in use
  • demodb.trace.db – this file contains trace information
  • demodb.123.temp.db – used for handling blobs or huge result sets
  • demodb.newFile – H2 uses this file for database compaction and it contains a new database store file
  • demodb.oldFile – H2 also uses this file for database compaction and it contains old database store file

4. H2's Embedded Database Storage Location

H2 is very flexible concerning the storage of database files. At this moment, we can configure its storage directory to:

  • directory on disk
  • current user directory
  • current project directory or working directory

4.1. Directory on Disk

We can set a specific directory location where our database files will be stored:

spring.datasource.url=jdbc:h2:file:C:/data/demodb

Notice that in this connection string, the last chunk refers to the database name. Also, even if we miss the file keyword in this data source connection URL, H2 will manage it and create files in the provided location.

4.2.  Current User Directory

In case we want to store database files in the current user directory, we'll use the data source URL that contains a tilde (~) after the file keyword:

spring.datasource.url=jdbc:h2:file:~/demodb

For example, in Windows systems, this directory will be C:/Users/<current user>.

To store database files in the subdirectory of the current user directory:

spring.datasource.url=jdbc:h2:file:~/subdirectory/demodb

Notice that if the subdirectory does not exist, it will be created automatically.

4.3. Current Working Directory

The current working directory is one where the application is started, and it's referenced as a dot (.) in the data source URL. If we want database files there, we'll configure it as follows:

spring.datasource.url=jdbc:h2:file:./demodb

To store database files in the subdirectory of the current working directory:

spring.datasource.url=jdbc:h2:file:./subdirectory/demodb

Notice that if the subdirectory does not exist, it will be created automatically.

5. Conclusion

In this short tutorial, we discussed some aspects of the H2 database and showed where H2's embedded database stores the data. We also learned how to configure the location of the database files.

The complete code sample is available over on GitHub.

The post Where Does H2's Embedded Database Store The Data? first appeared on Baeldung.


Java Weekly, Issue 354

$
0
0

1. Spring and Java

>> Shenandoah in JDK 11 – Interview With Red Hat's Team [infoq.com]

Deep insights from Kennke and Shipilev about Shenandoah's history, the interaction with other JVM parts and source code, the integration with OpenJDK, and the GC internals!

>> GitHub Welcomes the OpenJDK Project! [github.blog]

OpenJDK is now completely on GitHub as part of Java 16 and Project Skara: the number of contributors is already tripled!

>> Hibernate Session doWork and doReturningWork methods [vladmihalcea.com]

Working directly with JDBC connections in Hibernate with doWork and doReturningWork APIs.

Also worth reading:

Webinars and presentations:

Time to upgrade:

2. Technical

>> On learning a new programming language [blog.frankel.ch]

A critical take and guide on learning a new programming language.

Also worth reading:

3. Musings

>> The five pillars of IT security [blog.codecentric.de]

An effective, and not just additive, approach to integrating IT security into organizations!

Also worth reading:

4. Comics

And my favorite Dilberts of the week:

>> No Mask For Zoom Call [dilbert.com]

>> Astrology Filter [dilbert.com]

>> Robots Will Sneak Up On Us [dilbert.com]

5. Pick of the Week

>> 8 Logical Fallacies That Mess Us All App [markmanson.net]

The post Java Weekly, Issue 354 first appeared on Baeldung.


Difference Between @ComponentScan and @EnableAutoConfiguration in Spring Boot

$
0
0

1. Introduction

In this quick tutorial, we'll learn about the differences between @ComponentScan and @EnableAutoConfiguration annotations in the Spring Framework.

2. Spring Annotations

Annotations make it easier to configure the dependency injection in Spring. Instead of using XML configuration files, we can use Spring Bean annotations on classes and methods to define beans. After that, the Spring IoC container configures and manages the beans.

Here's an overview of the annotations that we are going to discuss in this article:

  • @ComponentScan scans for annotated Spring components
  • @EnableAutoConfiguration is used to enable the auto-configuration

Let's now look into the difference between these two annotations.

3. How They Differ

The main difference between these annotations is that @ComponentScan scans for Spring components while @EnableAutoConfiguration is used for auto-configuring beans present in the classpath in Spring Boot applications.

Now, let's go through them in more detail.

3.1. @ComponentScan

While developing an application, we need to tell the Spring framework to look for Spring-managed components. @ComponentScan enables Spring to scan for things like configurations, controllers, services, and other components we define.

In particular, the @ComponentScan annotation is used with @Configuration annotation to specify the package for Spring to scan for components:

@Configuration
@ComponentScan
public class EmployeeApplication {
    public static void main(String[] args) {
        ApplicationContext context = SpringApplication.run(EmployeeApplication.class, args);
        // ...
    }
}

Alternatively, Spring can also start scanning from the specified package, which we can define using basePackageClasses() or basePackages(). If no package is specified, then it considers the package of the class declaring the @ComponentScan annotation as the starting package:

package com.baeldung.annotations.componentscanautoconfigure;
// ...
@Configuration
@ComponentScan(basePackages = {"com.baeldung.annotations.componentscanautoconfigure.healthcare",
  "com.baeldung.annotations.componentscanautoconfigure.employee"},
  basePackageClasses = Teacher.class)
public class EmployeeApplication {
    public static void main(String[] args) {
        ApplicationContext context = SpringApplication.run(EmployeeApplication.class, args);
        // ...
    }
}

In the example, Spring will scan the healthcare and employee packages and the Teacher class for components.

Spring searches the specified packages along with all its sub-packages for classes annotated with @Configuration. Additionally, the Configuration classes can contain @Bean annotations, which register the methods as beans in the Spring application context. After that, the @ComponentScan annotation can auto-detect such beans:

@Configuration
public class Hospital {
    @Bean
    public Doctor getDoctor() {
        return new Doctor();
    }
}

Furthermore, the @ComponentScan annotation can also scan, detect, and register beans for classes annotated with @Component, @Controller, @Service, and @Repository.

For example, we can create an Employee class as a component which can be scanned by the @ComponentScan annotation:

@Component("employee")
public class Employee {
    // ...
}

3.2. @EnableAutoConfiguration

The @EnableAutoConfiguration annotation enables Spring Boot to auto-configure the application context. Therefore, it automatically creates and registers beans based on both the included jar files in the classpath and the beans defined by us.

For example, when we define the spring-boot-starter-web dependency in our classpath, Spring boot auto-configures Tomcat and Spring MVC. However, this auto-configuration has less precedence in case we define our own configurations.

The package of the class declaring the @EnableAutoConfiguration annotation is considered as the default. Therefore, we should always apply the @EnableAutoConfiguration annotation in the root package so that every sub-packages and class can be examined:

@Configuration
@EnableAutoConfiguration
public class EmployeeApplication {
    public static void main(String[] args) {
        ApplicationContext context = SpringApplication.run(EmployeeApplication.class, args);
        // ...
    }
}

Furthermore, the @EnableAutoConfiguration annotation provides two parameters to manually exclude any parameter:

We can use exclude to disable a list of classes that we do not want to be auto-configured:

@Configuration
@EnableAutoConfiguration(exclude={JdbcTemplateAutoConfiguration.class})
public class EmployeeApplication {
    public static void main(String[] args) {
        ApplicationContext context = SpringApplication.run(EmployeeApplication.class, args);
        // ...
    }
}

We can use excludeName to define a fully qualified list of class names that we want to exclude from the auto-configuration:

@Configuration
@EnableAutoConfiguration(excludeName = {"org.springframework.boot.autoconfigure.jdbc.JdbcTemplateAutoConfiguration"})
public class EmployeeApplication {
    public static void main(String[] args) {
        ApplicationContext context = SpringApplication.run(EmployeeApplication.class, args);
        // ...
    }
}

Since Spring Boot 1.2.0, we can use the @SpringBootApplication annotation, which is a combination of the three annotations @Configuration, @EnableAutoConfiguration, and@ComponentScan with their default attributes:

@SpringBootApplication
public class EmployeeApplication {
    public static void main(String[] args) {
        ApplicationContext context = SpringApplication.run(EmployeeApplication.class, args);
        // ...
    }
}

4. Conclusion

In this article, we learned about the differences between @ComponentScan and @EnableAutoConfiguration in Spring Boot.

As always, the code for these examples is available over on GitHub.

The post Difference Between @ComponentScan and @EnableAutoConfiguration in Spring Boot first appeared on Baeldung.


Creational Design Patterns in Core Java

$
0
0

1. Introduction

Design Patterns are common patterns that we use when writing our software. They represent established best practices developed over time. These can then help us to ensure that our code is well designed and well built.

Creational Patterns are design patterns that focus on how we obtain instances of objects. Typically, this means how we construct new instances of a class, but in some cases, it means obtaining an already constructed instance ready for us to use.

In this article, we're going to revisit some common creational design patterns. We'll see what they look like and where to find them within the JVM or other core libraries.

2. Factory Method

The Factory Method pattern is a way for us to separate out the construction of an instance from the class we are constructing. This is so we can abstract away the exact type, allowing our client code to instead work in terms of interfaces or abstract classes:

class SomeImplementation implements SomeInterface {
    // ...
}
public class SomeInterfaceFactory {
    public SomeInterface newInstance() {
        return new SomeImplementation();
    }
}

Here, our client code never needs to know about SomeImplementation, and instead, it works in terms of SomeInterface. Even more than this, though, we can change the type returned from our factory and the client code needn't change. This can even include dynamically selecting the type at runtime.

2.1. Examples in the JVM

Possibly the most well-known examples of this pattern the JVM are the collection building methods on the Collections class, like singleton(), singletonList(), and singletonMap(). These all return instances of the appropriate collection – Set, List, or Map – but the exact type is irrelevant. Additionally, the Stream.of() method and the new Set.of(), List.of(), and Map.ofEntries() methods allow us to do the same with larger collections.

There are plenty of other examples of this as well, including Charset.forName(), which will return a different instance of the Charset class depending on the name asked for, and ResourceBundle.getBundle(), which will load a different resource bundle depending on the name provided.

Not all of these need to provide different instances, either. Some are just abstractions to hide inner workings. For example, Calendar.getInstance() and NumberFormat.getInstance() always return the same instance, but the exact details are irrelevant to the client code.

3. Abstract Factory

The Abstract Factory pattern is a step beyond this, where the factory used also has an abstract base type. We can then write our code in terms of these abstract types, and select the concrete factory instance somehow at runtime.

First, we have an interface and some concrete implementations for the functionality we actually want to use:

interface FileSystem {
    // ...
}
class LocalFileSystem implements FileSystem {
    // ...
}
class NetworkFileSystem implements FileSystem {
    // ...
}

Next, we have an interface and some concrete implementations for the factory to obtain the above:

interface FileSystemFactory {
    FileSystem newInstance();
}
class LocalFileSystemFactory implements FileSystemFactory {
    // ...
}
class NetworkFileSystemFactory implements FileSystemFactory {
    // ...
}

We then have another factory method to obtain the abstract factory through which we can obtain the actual instance:

class Example {
    static FileSystemFactory getFactory(String fs) {
        FileSystemFactory factory;
        if ("local".equals(fs)) {
            factory = new LocalFileSystemFactory();
        else if ("network".equals(fs)) {
            factory = new NetworkFileSystemFactory();
        }
        return factory;
    }
}

Here, we have a FileSystemFactory interface that has two concrete implementations. We select the exact implementation at runtime, but the code that makes use of it doesn't need to care which instance is actually used. These then each return a different concrete instance of the FileSystem interface, but again, our code doesn't need to care exactly which instance of this we have.

Often, we obtain the factory itself using another factory method, as described above. In our example here, the getFactory() method is itself a factory method that returns an abstract FileSystemFactory that's then used to construct a FileSystem.

3.1. Examples in the JVM

There are plenty of examples of this design pattern used throughout the JVM. The most commonly seen are around the XML packages — for example, DocumentBuilderFactory, TransformerFactory, and XPathFactory. These all have a special newInstance() factory method to allow our code to obtain an instance of the abstract factory.

Internally, this method uses a number of different mechanisms – system properties, configuration files in the JVM, and the Service Provider Interface – to try and decide exactly which concrete instance to use. This then allows us to install alternative XML libraries in our application if we wish, but this is transparent to any code actually using them.

Once our code has called the newInstance() method, it will then have an instance of the factory from the appropriate XML library. This factory then constructs the actual classes we want to use from that same library.

For example, if we're using the JVM default Xerces implementation, we'll get an instance of com.sun.org.apache.xerces.internal.jaxp.DocumentBuilderFactoryImpl, but if we wanted to instead use a different implementation, then calling newInstance() would transparently return that instead.

4. Builder

The Builder pattern is useful when we want to construct a complicated object in a more flexible manner. It works by having a separate class that we use for building our complicated object and allowing the client to create this with a simpler interface:

class CarBuilder {
    private String make = "Ford";
    private String model = "Fiesta";
    private int doors = 4;
    private String color = "White";
    public Car build() {
        return new Car(make, model, doors, color);
    }
}

This allows us to individually provide values for make, model, doors, and color, and then when we build the Car, all of the constructor arguments get resolved to the stored values.

4.1. Examples in the JVM

There are some very key examples of this pattern within the JVM. The StringBuilder and StringBuffer classes are builders that allow us to construct a long String by providing many small parts. The more recent Stream.Builder class allows us to do exactly the same in order to construct a Stream:

Stream.Builder<Integer> builder = Stream.builder<Integer>();
builder.add(1);
builder.add(2);
if (condition) {
    builder.add(3);
    builder.add(4);
}
builder.add(5);
Stream<Integer> stream = builder.build();

5. Lazy Initialization

We use the Lazy Initialization pattern to defer the calculation of some value until it's needed. Sometimes, this can involve individual pieces of data, and other times, this can mean entire objects.

This is useful in a number of scenarios. For example, if fully constructing an object requires database or network access and we may never need to use it, then performing those calls may cause our application to under-perform. Alternatively, if we're computing a large number of values that we may never need, then this can cause unnecessary memory usage.

Typically, this works by having one object be the lazy wrapper around the data that we need, and having the data computed when accessed via a getter method:

class LazyPi {
    private Supplier<Double> calculator;
    private Double value;
    public synchronized Double getValue() {
        if (value == null) {
            value = calculator.get();
        }
        return value;
    }
}

Computing pi is an expensive operation and one that we may not need to perform. The above will do so on the first time that we call getValue() and not before.

5.1. Examples in the JVM

Examples of this in the JVM are relatively rare. However, the Streams API introduced in Java 8 is a great example. All of the operations performed on a stream are lazy, so we can perform expensive calculations here and know they are only called if needed.

However, the actual generation of the stream itself can be lazy as well. Stream.generate() takes a function to call whenever the next value is needed and is only ever called when needed. We can use this to load expensive values – for example, by making HTTP API calls – and we only pay the cost whenever a new element is actually needed:

Stream.generate(new BaeldungArticlesLoader())
  .filter(article -> article.getTags().contains("java-streams"))
  .map(article -> article.getTitle())
  .findFirst();

Here, we have a Supplier that will make HTTP calls to load articles, filter them based on the associated tags, and then return the first matching title. If the very first article loaded matches this filter, then only a single network call needs to be made, regardless of how many articles are actually present.

6. Object Pool

We'll use the Object Pool pattern when constructing a new instance of an object that may be expensive to create, but re-using an existing instance is an acceptable alternative. Instead of constructing a new instance every time, we can instead construct a set of these up-front and then use them as needed.

The actual object pool exists to manage these shared objects. It also tracks them so that each one is only used in one place at the same time. In some cases, the entire set of objects gets constructed only at the start. In other cases, the pool may create new instances on demand if it's necessary

6.1. Examples in the JVM

The main example of this pattern in the JVM is the use of thread pools. An ExecutorService will manage a set of threads and will allow us to use them when a task needs to execute on one. Using this means that we don't need to create new threads, with all of the cost involved, whenever we need to spawn an asynchronous task:

ExecutorService pool = Executors.newFixedThreadPool(10);
pool.execute(new SomeTask()); // Runs on a thread from the pool
pool.execute(new AnotherTask()); // Runs on a thread from the pool

These two tasks get allocated a thread on which to run from the thread pool. It might be the same thread or a totally different one, and it doesn't matter to our code which threads are used.

7. Prototype

We use the Prototype pattern when we need to create new instances of an object that are identical to the original. The original instance acts as our prototype and gets used to construct new instances that are then completely independent of the original. We can then use these however is necessary.

Java has a level of support for this by implementing the Cloneable marker interface and then using Object.clone(). This will produce a shallow clone of the object, creating a new instance, and copying the fields directly.

This is cheaper but has the downside that any fields inside our object that have structure themselves will be the same instance. This, then, means changes to those fields also happen across all instances. However, we can always override this ourselves if necessary:

public class Prototype implements Cloneable {
    private Map<String, String> contents = new HashMap<>();
    public void setValue(String key, String value) {
        // ...
    }
    public String getValue(String key) {
        // ...
    }
    @Override
    public Prototype clone() {
        Prototype result = new Prototype();
        this.contents.entrySet().forEach(entry -> result.setValue(entry.getKey(), entry.getValue()));
        return result;
    }
}

7.1. Examples in the JVM

The JVM has a few examples of this. We can see these by following the classes that implement the Cloneable interface. For example, PKIXCertPathBuilderResult, PKIXBuilderParameters, PKIXParameters, PKIXCertPathBuilderResult, and PKIXCertPathValidatorResult are all Cloneable.

Another example is the java.util.Date class. Notably, this overrides the Object.clone() method to copy across an additional transient field as well.

8. Singleton

The Singleton pattern is often used when we have a class that should only ever have one instance, and this instance should be accessible from throughout the application. Typically, we manage this with a static instance that we access via a static method:

public class Singleton {
    private static Singleton instance = null;
    public static Singleton getInstance() {
        if (instance == null) {
            instance = new Singleton();
        }
        return instance;
    }
}

There are several variations to this depending on the exact needs — for example, whether the instance is created at startup or on first use, whether accessing it needs to be threadsafe, and whether or not there needs to be a different instance per thread.

8.1. Examples in the JVM

The JVM has some examples of this with classes that represent core parts of the JVM itselfRuntime, Desktop, and SecurityManager. These all have accessor methods that return the single instance of the respective class.

Additionally, much of the Java Reflection API works with singleton instances. The same actual class always returns the same instance of Class, regardless of whether it's accessed using Class.forName(), String.class, or through other reflection methods.

In a similar manner, we might consider the Thread instance representing the current thread to be a singleton. There are often going to be many instances of this, but by definition, there is a single instance per thread. Calling Thread.currentThread() from anywhere executing in the same thread will always return the same instance.

9. Summary

In this article, we've had a look at various different design patterns used for creating and obtaining instances of objects. We've also looked at examples of these patterns as used within the core JVM as well, so we can see them in use in a way that many applications already benefit from.

The post Creational Design Patterns in Core Java first appeared on Baeldung.


Java Weekly, Issue 355

$
0
0

1. Spring and Java

>> Project Panama and jextract [inside.java]

Explore the secure, efficient, and modern native interaction APIs from Project Panama: foreign-Memory Access API and Foreign Linker API.

>> A Hitchhiker's Guide to Containerizing (Spring Boot) Java Apps [blog.frankel.ch]

Comparing available options to dockerize Spring Boot apps, covering docker multistage builds, JIB, Spring Boot layered JARs, and cloud-native buildpacks!

>> Java and Spring Boot multiline log support for Fluentd (EFK stack) [arnoldgalovics.com]

The path towards operational visibility: centralized logging in the K8S world using the EFK stack for Java applications.

Also worth reading:

Webinars and presentations:

Time to upgrade:

2. Technical

>> An experiment with Little's Law [java-allandsundry.com]

Back to basics: an experimental take on how event arrival rate and response time affect the number of events in the system!

Also worth reading:

3. Musings

>> 60 years of COBOL – past, present, and future [vladmihalcea.com]

COBOL ain't gonna go anytime soon: a veteran COBOL developer reflects on its dominance, speed, the demand crisis, and what the future holds for COBOL!

Also worth reading:

4. Comics

And my favorite Dilberts of the week:

>> Talk To The Experts [dilbert.com]

>> Asok is Overpaid [dilbert.com]

>> Building Codes [dilbert.com]

5. Pick of the Week

>> Are you present-focused or future-focused? [sive.rs]

The post Java Weekly, Issue 355 first appeared on Baeldung.


Detecting If a Spring Transaction Is Active

$
0
0

1. Overview

Detecting transactions could be useful for audit purposes or for dealing with a complex code base where good transaction conventions weren't implemented.

In this brief tutorial, we'll go over a couple of ways to detect Spring transactions in our code.

2. Transaction Configuration

In order for transactions to work in Spring, transaction management must be enabled. Spring will enable transaction management by default if we're using a Spring Boot project with spring-data-* or spring-tx dependencies. Otherwise, we'll have to enable transactions and provide a transaction manager explicitly.

First, we need to add the @EnableTransactionManagement annotation to our @Configuration class. This enables Spring's annotation-driven transaction management for our project.

Next, we must provide either a PlatformTransactionManager or a ReactiveTransactionManager bean. This bean requires a DataSource. We could choose to use a number of common libraries, such as those for H2 or MySQL. Our implementation doesn't matter for this tutorial.

Once we enable transactions, we can use the @Transactional annotation to generate transactions.

3. Using TransactionSynchronizationManager

Spring has provided a class called TransactionSychronizationManager. Thankfully, this class has a static method that allows us to know whether we are in a transaction, called isActualTransactionActive().

To test this, let's annotate a test method with @Transactional. We can assert that isActualTransactionActive() returns true:

@Test
@Transactional
public void givenTransactional_whenCheckingForActiveTransaction_thenReceiveTrue() {
    assertTrue(TransactionSynchronizationManager.isActualTransactionActive());
}

Similarly, the test should assert that false is returned when we remove the @Transactional annotation:

@Test
public void givenNoTransactional_whenCheckingForActiveTransaction_thenReceiveFalse() {
    assertFalse(TransactionSynchronizationManager.isActualTransactionActive());
}

4. Using Spring Transaction Logging

Perhaps we don't need to programmatically detect a transaction. If we would rather just see when a transaction happens in our application's logs, we can enable Spring's transaction logs in our properties file:

logging.level.org.springframework.transaction.interceptor = TRACE

Once we enable that logging level, transaction logs will start appearing:

2020-10-02 14:45:07,162 TRACE - Getting transaction for [com.Class.method]
2020-10-02 14:45:07,273 TRACE - Completing transaction for [com.Class.method]

These logs won't offer very helpful information without any context. We can simply add some of our own logging and we should easily be able to see where transactions are happening in our Spring-managed code.

5. Conclusion

In this article, we saw how to check whether a Spring transaction is active. We learned how to programmatically detect transactions using the TransactionSynchronizationManager.isActualTransactionActive() method. We also discovered how to enable Spring's internal transaction logging in case we want to see transactions in our logs.

As always, code examples can be found over on GitHub.

The post Detecting If a Spring Transaction Is Active first appeared on Baeldung.


Finding a Free Port in Java

$
0
0

1. Overview

When starting a socket server in our Java application, the java.net API requires us to specify a free port number to listen on. The port number is required so that the TCP layer can identify the application that the incoming data is intended for.

Specifying a port number explicitly is not always a good option, because applications might already occupy it. This will cause an input/output exception in our Java application.

In this quick tutorial, we’ll look at how to check a specific port status and how to use an automatically allocated one. We’ll look into how this can be done with plain Java and Spring framework. We'll also look at some other server implementations, like embedded Tomcat and Jetty.

2. Checking Port Status

Let's look at how we can check if a specific port is free or occupied using the java.net API.

2.1. Specific Port

We'll make use of the ServerSocket class from the java.net API to create a server socket, bound to the specified port. In its constructor, the ServerSocket accepts an explicit port number. The class also implements the Closeable interface, so it can be used in try-with-resources to automatically close the socket and free up the port:

try (ServerSocket serverSocket = new ServerSocket(FREE_PORT_NUMBER)) {
    assertThat(serverSocket).isNotNull();
    assertThat(serverSocket.getLocalPort()).isEqualTo(FREE_PORT_NUMBER);
} catch (IOException e) {
    fail("Port is not available");
}

In case we use a specific port twice, or it's already occupied by another application, the ServerSocket constructor will throw an IOException:

try (ServerSocket serverSocket = new ServerSocket(FREE_PORT_NUMBER)) {
    new ServerSocket(FREE_PORT_NUMBER);
    fail("Same port cannot be used twice");
} catch (IOException e) {
    assertThat(e).hasMessageContaining("Address already in use");
}

2.2. Port Range

Let's now check how we can make use of the thrown IOException, to create a server socket using the first free port from a given range of port numbers:

for (int port : FREE_PORT_RANGE) {
    try (ServerSocket serverSocket = new ServerSocket(port)) {
        assertThat(serverSocket).isNotNull();
        assertThat(serverSocket.getLocalPort()).isEqualTo(port);
        return;
    } catch (IOException e) {
        assertThat(e).hasMessageContaining("Address already in use");
    }
}
fail("No free port in the range found");

3. Finding a Free Port

Using an explicit port number is not always a good option, so let's look into possibilities to allocate a free port automatically.

3.1. Plain Java

We can use a special port number zero in the ServerSocket class constructor. As a result, the java.net API will automatically allocate a free port for us:

try (ServerSocket serverSocket = new ServerSocket(0)) {
    assertThat(serverSocket).isNotNull();
    assertThat(serverSocket.getLocalPort()).isGreaterThan(0);
} catch (IOException e) {
    fail("Port is not available");
}

3.2. Spring Framework

Spring framework contains a SocketUtils class that we can use to find an available free port. Its internal implementation uses the ServerSocket class, as shown in our previous examples:

int port = SocketUtils.findAvailableTcpPort();
try (ServerSocket serverSocket = new ServerSocket(port)) {
    assertThat(serverSocket).isNotNull();
    assertThat(serverSocket.getLocalPort()).isEqualTo(port);
} catch (IOException e) {
    fail("Port is not available");
}

4. Other Server Implementations

Let's now take a look at some other popular server implementations.

4.1. Jetty

Jetty is a very popular embedded server for Java applications. It will automatically allocate a free port for us unless we set it explicitly via the setPort method of the ServerConnector class:

Server jettyServer = new Server();
ServerConnector serverConnector = new ServerConnector(jettyServer);
jettyServer.addConnector(serverConnector);
try {
    jettyServer.start();
    assertThat(serverConnector.getLocalPort()).isGreaterThan(0);
} catch (Exception e) {
    fail("Failed to start Jetty server");
} finally {
    jettyServer.stop();
    jettyServer.destroy();
}

4.2. Tomcat

Tomcat, another popular Java embedded server, works a bit differently. We can specify an explicit port number via the setPort method of the Tomcat class. In case we provide a port number zero, Tomcat will automatically allocate a free port. However, if we don't set any port number, Tomcat will use its default port 8080. Note that the default Tomcat port could be occupied by other applications:

Tomcat tomcatServer = new Tomcat();
tomcatServer.setPort(0);
try {
    tomcatServer.start();
    assertThat(tomcatServer.getConnector().getLocalPort()).isGreaterThan(0);
} catch (LifecycleException e) {
    fail("Failed to start Tomcat server");
} finally {
    tomcatServer.stop();
    tomcatServer.destroy();
}

5. Conclusion

In this article, we explored how to check a specific port status. We also covered finding a free port from a range of port numbers and explained how to use an automatically allocated free port.

In the examples, we covered the basic ServerSocket class from the java.net API and other popular server implementations, including Jetty and Tomcat.

As always, the complete source code is available over on GitHub.

The post Finding a Free Port in Java first appeared on Baeldung.


Getting Database URL From JDBC Connection Object

$
0
0

1. Overview

In this quick tutorial, we'll discuss how we can get the database URL from a JDBC Connection object.

2. Example Class

To demonstrate this, we'll create a DBConfiguration class with a method getConnection:

public class DBConfiguration {
    public static Connection getConnection() throws Exception {
        Class.forName("org.h2.Driver");
        String url = "jdbc:h2:mem:testdb";
        return DriverManager.getConnection(url, "user", "password");
    }
}

3. The DatabaseMetaData#getURL Method

We can get the database URL by using the DatabaseMetaData#getURL method:

@Test
void givenConnectionObject_whenExtractMetaData_thenGetDbURL() throws Exception {
    Connection connection = DBConfiguration.getConnection();
    String dbUrl = connection.getMetaData().getURL();
    assertEquals("jdbc:h2:mem:testdb", dbUrl);
}

In the above example, we first obtain the Connection instance.

Then, we call the getMetaData method on our Connection to get the DatabaseMetaData.

Finally, we call the getURL method on the DatabaseMetaData instance. As we'd expect, it returns the URL of our database.

4. Conclusion

In this tutorial, we've seen how we can get the database URL from the JDBC Connection object.

As always, the complete code for this example is available over on GitHub.

The post Getting Database URL From JDBC Connection Object first appeared on Baeldung.


Apache Spark: Differences between Dataframes, Datasets and RDDs

$
0
0

1. Overview

Apache Spark is a fast, distributed data processing system. It does in-memory data processing and uses in-memory caching and optimized execution resulting in fast performance. It provides high-level APIs for popular programming languages like Scala, Python, Java, and R.

In this quick tutorial, we'll go through three of the Spark basic concepts: dataframes, datasets, and RDDs.

2. DataFrame

Spark SQL introduced a tabular data abstraction called a DataFrame since Spark 1.3. Since then, it has become one of the most important features in Spark. This API is useful when we want to handle structured and semi-structured, distributed data.

In section 3, we'll discuss Resilient Distributed Datasets (RDD). DataFrames store data in a more efficient manner than RDDs, this is because they use the immutable, in-memory, resilient, distributed, and parallel capabilities of RDDs but they also apply a schema to the data. DataFrames also translate SQL code into optimized low-level RDD operations.

We can create DataFrames in three ways:

  • Converting existing RDDs
  • Running SQL queries
  • Loading external data

Spark team introduced SparkSession in version 2.0, it unifies all different contexts assuring developers won't need to worry about creating different contexts:

SparkSession session = SparkSession.builder()
  .appName("TouristDataFrameExample")
  .master("local[*]")
  .getOrCreate();
DataFrameReader dataFrameReader = session.read();

We'll be analyzing the Tourist.csv file:

Dataset<Row> data = dataFrameReader.option("header", "true")
  .csv("data/Tourist.csv");

Since Spark 2.0 DataFrame became a Dataset of type Row, so we can use a DataFrame as an alias for a Dataset<Row>.

We can select specific columns that we are interested in. We can also filter and group by a given column:

data.select(col("country"), col("year"), col("value"))
  .show();
data.filter(col("country").equalTo("Mexico"))
  .show();
data.groupBy(col("country"))
  .count()
  .show();

3. Datasets

A dataset is a set of strongly-typed, structured data. They provide the familiar object-oriented programming style plus the benefits of type safety since datasets can check syntax and catch errors at compile time.

Dataset is an extension of DataFrame, thus we can consider a DataFrame an untyped view of a dataset.

The Spark team released the Dataset API in Spark 1.6 and as they mentioned: “the goal of Spark Datasets is to provide an API that allows users to easily express transformations on object domains, while also providing the performance and robustness advantages of the Spark SQL execution engine”.

First, we'll need to create a class of type TouristData:

public class TouristData {
    private String region;
    private String country;
    private String year;
    private String series;
    private Double value;
    private String footnotes;
    private String source;
    // ... getters and setters
}

To map each of our records to the specified type we will need to use an Encoder. Encoders translate between Java objects and Spark's internal binary format:

// SparkSession initialization and data load
Dataset<Row> responseWithSelectedColumns = data.select(col("region"), 
  col("country"), col("year"), col("series"), col("value").cast("double"), 
  col("footnotes"), col("source"));
Dataset<TouristData> typedDataset = responseWithSelectedColumns
  .as(Encoders.bean(TouristData.class));

As with DataFrame, we can filter and group by specific columns:

typedDataset.filter((FilterFunction) record -> record.getCountry()
  .equals("Norway"))
  .show();
typedDataset.groupBy(typedDataset.col("country"))
  .count()
  .show();

We can also do operations like filter by column matching a certain range or computing the sum of a specific column, to get the total value of it:

typedDataset.filter((FilterFunction) record -> record.getYear() != null 
  && (Long.valueOf(record.getYear()) > 2010 
  && Long.valueOf(record.getYear()) < 2017)).show();
typedDataset.filter((FilterFunction) record -> record.getValue() != null 
  && record.getSeries()
    .contains("expenditure"))
    .groupBy("country")
    .agg(sum("value"))
    .show();

4. RDDs

The Resilient Distributed Dataset or RDD is Spark's primary programming abstraction. It represents a collection of elements that is: immutable, resilient, and distributed.

An RDD encapsulates a large dataset, Spark will automatically distribute the data contained in RDDs across our cluster and parallelize the operations we perform on them.

We can create RDDs only through operations of data in stable storage or operations on other RDDs.

Fault tolerance is essential when we deal with large sets of data and the data is distributed on cluster machines. RDDs are resilient because of Spark's built-in fault recovery mechanics. Spark relies on the fact that RDDs memorize how they were created so that we can easily trace back the lineage to restore the partition.

There are two types of operations we can do on RDDs: Transformations and Actions.

4.1. Transformations

We can apply Transformations to an RDD to manipulate its data. After this manipulation is performed, we'll get a brand-new RDD, since RDDs are immutable objects.

We'll check how to implement Map and Filter, two of the most common transformations.

First, we need to create a JavaSparkContext and load the data as an RDD from the Tourist.csv file:

SparkConf conf = new SparkConf().setAppName("uppercaseCountries")
  .setMaster("local[*]");
JavaSparkContext sc = new JavaSparkContext(conf);
JavaRDD<String> tourists = sc.textFile("data/Tourist.csv");

Next, let's apply the map function to get the name of the country from each record and convert the name to uppercase. We can save this newly generated dataset as a text file on disk:

JavaRDD<String> upperCaseCountries = tourists.map(line -> {
    String[] columns = line.split(COMMA_DELIMITER);
    return columns[1].toUpperCase();
}).distinct();
upperCaseCountries.saveAsTextFile("data/output/uppercase.txt");

If we want to select only a specific country, we can apply the filter function on our original tourists RDD:

JavaRDD<String> touristsInMexico = tourists
  .filter(line -> line.split(COMMA_DELIMITER)[1].equals("Mexico"));
touristsInMexico.saveAsTextFile("data/output/touristInMexico.txt");

4.2. Actions

Actions will return a final value or save the results to disc, after doing some computation on the data.

Two of the recurrently used actions in Spark are Count and Reduce.

Let's count the total countries on our CSV file:

// Spark Context initialization and data load
JavaRDD<String> countries = tourists.map(line -> {
    String[] columns = line.split(COMMA_DELIMITER);
    return columns[1];
}).distinct();
Long numberOfCountries = countries.count();

Now, we'll calculate the total expenditure by country. We'll need to filter the records containing expenditure in their description.

Instead of using a JavaRDD, we'll use a JavaPairRDD. A pair of RDD is a type of RDD that can store key-value pairs. Let's check it next:

JavaRDD<String> touristsExpenditure = tourists
  .filter(line -> line.split(COMMA_DELIMITER)[3].contains("expenditure"));
JavaPairRDD<String, Double> expenditurePairRdd = touristsExpenditure
  .mapToPair(line -> {
      String[] columns = line.split(COMMA_DELIMITER);
      return new Tuple2<>(columns[1], Double.valueOf(columns[6]));
});
List<Tuple2<String, Double>> totalByCountry = expenditurePairRdd
  .reduceByKey((x, y) -> x + y)
  .collect();

5. Conclusion

To sum up, we should use DataFrames or Datasets when we need domain-specific APIs, we need high-level expressions such as aggregation, sum, or SQL queries. Or when we want type-safety at compile time.

On the other hand, we should use RDDs when data is unstructured and we don't need to implement a specific schema or when we need low-level transformations and actions.

As always, all of the code samples are available over on GitHub.

The post Apache Spark: Differences between Dataframes, Datasets and RDDs first appeared on Baeldung.


Guide to Jenkins Parameterized Builds

$
0
0

1. Introduction

Jenkins is one of the most popular CI/CD tools in use today. It allows us to automate every aspect of the software lifecycle, from building all the way to deploying.

In this tutorial, we'll look at one of the more powerful features of Jenkins: parameterized builds.

2. Defining Build Parameters

A build parameter allows us to pass data into our Jenkins jobs. Using build parameters, we can pass any data we want: git branch name, secret credentials, hostnames and ports, and so on.

Any Jenkins job or pipeline can be parameterized. All we have to do is check the box on the General settings tab that says This project is parameterized:

Then we click the Add Parameter button. From here, we must specify several pieces of information:

  • Type: the data type for the parameter (string, boolean, etc.)
  • Name: the name by which the parameter will be identified
  • Default value: an optional value that will be used when a user does not specify one
  • Description: optional text that describes how the parameter is used

A single Jenkins job or pipeline can have multiple parameters. The only restriction is the parameter name must be unique.

2.1. Types of Parameters

Jenkins supports several parameter types. Below is a list of the most common ones, but keep in mind that different plugins may add new parameter types:

  • String: any combination of characters and numbers
  • Choice: a pre-defined set of strings from which a user can pick a value
  • Credentials: a pre-defined Jenkins credential
  • File: the full path to a file on the filesystem
  • Multi-line String: same as String, but allows newline characters
  • Password: similar to the Credentials type, but allows us to pass a plain text parameter specific to the job or pipeline
  • Run: an absolute URL to a single run of another job

3. Using Build Parameters

Once we've defined one or more parameters, the next step is to utilize them. Below, we'll look at different ways to access parameter values.

3.1. Traditional Jobs

With a traditional Jenkins job, we define one or more build steps. The most common build step is executing a shell script or Windows batch commands.

Let's say we have a build parameter named packageType. Inside a shell script, we can access build parameters just like any other environment variable using the shell syntax:

${packageType}

And with batch commands, we use the native Windows syntax:

%packageType%

We can also create build steps that execute Gradle tasks or Maven goals. Both of these step types can access build parameters just like they would any other environment variable.

3.2. Pipelines

Inside a Jenkins Pipeline, accessing a build parameter can be done in multiple ways.

First, all build parameters are placed into a params variable. This means we can access a parameter value using dot notation:

pipeline {
    agent any
    stages {
        stage('Build') {
            when {
                expression { params.jdkVersion == "14" }
            }
        }
    }
}

Second, the build parameters are added to the environment of the pipeline. This means we can use the shorter shell syntax inside a step that executes a shell script:

pipeline {
    agent any
    stages {
        stage('Build') {
            steps {
                echo "${packageType}"
            }
        }
    }
}

4. Setting Parameter Values

So far, we've seen how to define parameters and use them inside our Jenkins jobs. The final step is to pass values for our parameters when we execute jobs.

4.1. Jenkins UI

Starting a job with the Jenkins UI is the easiest way to pass build parameters. All we do is log in, navigate to our job, and click the Build with Parameters link:

This will take us to a screen that asks for inputs for each parameter. Based on the type of parameter, the way we input its value will be different.

For example, String parameters will show up as a plain text field. Boolean parameters will be displayed as a checkbox. And Choice parameters are displayed as a dropdown list:

Once we provide a value for each parameter, all we have to do is click the Build button, and Jenkins begins executing the job.

4.2. Remote Execution

Jenkins jobs can also be executed with a remote API call. We do this by calling a special URL for the job on our Jenkins server:

http://<JENKINS_URL>/job/<JOB_NAME>/buildWithParameters/packageType=war&jdkVersion=11&debug=true

Note that these requests have to be sent as POST command. We also have to provide credentials using HTTP basic auth.

Let's see a full example using curl:

curl -X POST --user user:apiToken \
    http://<JENKINS_URL>/job/<JOB_NAME>/buildWithParameters/packageType=war&jdkVersion=11&debug=true

The user can be any Jenkins user, and the apiToken is any associated API token for that user.

5. Conclusion

In this article, we've seen how to use build parameters with both Jenkins jobs and pipelines. Build parameters are a powerful way to make any Jenkins job dynamic and are essential to building modern CI/CD pipelines.

The post Guide to Jenkins Parameterized Builds first appeared on Baeldung.

Object States in Hibernate’s Session

$
0
0

1. Introduction

Hibernate is a convenient framework for managing persistent data, but understanding how it works internally can be tricky at times.

In this tutorial, we'll learn about object states and how to move between them. We'll also look at the problems we can encounter with detached entities and how to solve them.

2. Hibernate's Session

The Session interface is the main tool used to communicate with Hibernate. It provides an API enabling us to create, read, update, and delete persistent objects. The session has a simple lifecycle. We open it, perform some operations, and then close it.

When we operate on the objects during the session, they get attached to that session. The changes we make are detected and saved upon closing. After closing, Hibernate breaks the connections between the objects and the session.

3. Object States

In the context of Hibernate's Session, objects can be in one of three possible states: transient, persistent, or detached.

3.1. Transient

An object we haven't attached to any session is in the transient state. Since it was never persisted, it doesn't have any representation in the database. Because no session is aware of it, it won't be saved automatically.

Let's create a user object with the constructor and confirm that it isn't managed by the session:

Session session = openSession();
UserEntity userEntity = new UserEntity("John");
assertThat(session.contains(userEntity)).isFalse();

3.2. Persistent

An object that we've associated with a session is in the persistent state. We either saved it or read it from a persistence context, so it represents some row in the database.

Let's create an object and then use the persist method to make it persistent:

Session session = openSession();
UserEntity userEntity = new UserEntity("John");
session.persist(userEntity);
assertThat(session.contains(userEntity)).isTrue();

Alternatively, we may use the save method. The difference is that the persist method will just save an object, and the save method will additionally generate its identifier if that's needed.

3.3. Detached

When we close the session, all objects inside it become detached. Although they still represent rows in the database, they're no longer managed by any session:

session.persist(userEntity);
session.close();
assertThat(session.isOpen()).isFalse();
assertThatThrownBy(() -> session.contains(userEntity));

Next, we'll learn how to save transient and detached entities.

4. Saving and Reattaching an Entity

4.1. Saving a Transient Entity

Let's create a new entity and save it to the database. When we first construct the object, it'll be in the transient state.

To persist our new entity, we'll use the persist method:

UserEntity userEntity = new UserEntity("John");
session.persist(userEntity);

Now, we'll create another object with the same identifier as the first one. This second object is transient because it's not yet managed by any session, but we can't make it persistent using the persist method. It's already represented in the database, so it's not really new in the context of the persistence layer.

Instead, we'll use the merge method to update the database and make the object persistent:

UserEntity onceAgainJohn = new UserEntity("John");
session.merge(onceAgainJohn);

4.2. Saving a Detached Entity

If we close the previous session, our objects will be in a detached state. Similarly to the previous example, they're represented in the database but they aren't currently managed by any session. We can make them persistent again using the merge method:

UserEntity userEntity = new UserEntity("John");
session.persist(userEntity);
session.close();
session.merge(userEntity);

5. Nested Entities

Things get more complicated when we consider nested entities. Let's say our user entity will also store information about his manager:

public class UserEntity {
    @Id
    private String name;
    @ManyToOne
    private UserEntity manager;
}

When we save this entity, we need to think not only about the state of the entity itself but also about the state of the nested entity. Let's create a persistent user entity and then set its manager:

UserEntity userEntity = new UserEntity("John");
session.persist(userEntity);
UserEntity manager = new UserEntity("Adam");
userEntity.setManager(manager);

If we try to update it now, we'll get an exception:

assertThatThrownBy(() -> {
            session.saveOrUpdate(userEntity);
            transaction.commit();
});
java.lang.IllegalStateException: org.hibernate.TransientPropertyValueException: object references an unsaved transient instance - save the transient instance before flushing : com.baeldung.states.UserEntity.manager -> com.baeldung.states.UserEntity

That's happening because Hibernate doesn't know what to do with the transient nested entity.

5.1. Persisting Nested Entities

One way to solve this problem is to explicitly persist nested entities:

UserEntity manager = new UserEntity("Adam");
session.persist(manager);
userEntity.setManager(manager);

Then, after committing the transaction, we'll be able to retrieve the correctly saved entity:

transaction.commit();
session.close();
Session otherSession = openSession();
UserEntity savedUser = otherSession.get(UserEntity.class, "John");
assertThat(savedUser.getManager().getName()).isEqualTo("Adam");

5.2. Cascading Operations

Transient nested entities can be persisted automatically if we configure the relationship's cascade property correctly in the entity class:

@ManyToOne(cascade = CascadeType.PERSIST)
private UserEntity manager;

Now when we persist the object, that operation will be cascaded to all nested entities:

UserEntityWithCascade userEntity = new UserEntityWithCascade("John");
session.persist(userEntity);
UserEntityWithCascade manager = new UserEntityWithCascade("Adam");
userEntity.setManager(manager); // add transient manager to persistent user
session.saveOrUpdate(userEntity);
transaction.commit();
session.close();
Session otherSession = openSession();
UserEntityWithCascade savedUser = otherSession.get(UserEntityWithCascade.class, "John");
assertThat(savedUser.getManager().getName()).isEqualTo("Adam");

6. Summary

In this tutorial, we took a closer look at how the Hibernate Session works with respect to object state. We then inspected some problems it can create and how to solve them.

As always, the source code is available over on GitHub.

The post Object States in Hibernate's Session first appeared on Baeldung.


Constants in Java: Patterns and Anti-Patterns

$
0
0

1. Introduction

In this article, we're going to learn about using constants in Java with a focus on common patterns and anti-patterns.

We'll start with some basic conventions for defining constants. From there, we'll move onto common anti-patterns before finishing with a look at common patterns.

2. Basics

A constant is a variable whose value won't change after it's been defined.

Let's look at the basics for defining a constant:

private static final int OUR_CONSTANT = 1;

Some of the patterns we'll look at will address the public or private access modifier decision. We make our constants static and final and give them an appropriate type, whether that's a Java primitive, a class, or an enum. The name should be all capital letters with the words separated by underscores, sometimes known as screaming snake case. Finally, we provide the value itself.

3. Anti-Patterns

First, let's start by learning what not to do. Let's look at a couple of common anti-patterns we might encounter when working with Java constants.

3.1. Magic Numbers

Magic numbers are are numeric literals in a block of code:

if (number == 3.14159265359) {
    // ...
}

They're hard for other developers to understand. Additionally, if we're using a number throughout our code, it's difficult to deal with changing the value. We should instead define the number as a constant.

3.2. A Large Global Constants Class

When we start a project, it might feel natural to create a class named Constants or Utils with the intention of defining all the constants for the application in there. For smaller projects, this might be ok, but let's consider a couple of reasons why this isn't an ideal solution.

First, let's imagine we have a hundred or more constants all in our constants class. If the class isn't maintained, both to keep up with documentation and to occasionally refactor the constants into logical groupings, it's going to get pretty unreadable. We could even end up with duplicate constants with slightly different names. This approach is likely to give us readability and maintainability problems in anything but the smallest projects.

In addition to the logistics of maintaining the Constants class itself, we're also inviting other maintainability problems by encouraging too much interdependency with this one global constants class and various other parts of our application.

On a more technical side, the Java compiler places the value of the constant into referencing variables in the classes in which we use them. So, if we change one of our constants in our constants class and only recompile that class and not the referencing class, we can get inconsistent constant values.

3.3. The Constant Interface Anti-Pattern

The constant interface pattern is when we define an interface that contains all of the constants for certain functionality and then have the classes that need those functionalities implement the interface.

Let's define a constant interface for a calculator:

public interface CalculatorConstants {
    double PI = 3.14159265359;
    double UPPER_LIMIT = 0x1.fffffffffffffP+1023;
    enum Operation {ADD, SUBTRACT, MULTIPLY, DIVIDE};
}

Next, we'll implement our CalculatorConstants interface:

public class GeometryCalculator implements CalculatorConstants {    
    public double operateOnTwoNumbers(double numberOne, double numberTwo, Operation operation) {
       // Code to do an operation
    }
}

The first argument against using a constant interface is that it goes against the purpose of an interface. We're meant to use interfaces to create a contract for the behavior our implementing classes are going to provide. When we create an interface full of constants, we're not defining any behavior.

Secondly, using a constant interface opens us up to run-time issues caused by field shadowing. Let's look at how that might happen by defining an UPPER_LIMIT constant within our GeometryCalculator class:

public static final double UPPER_LIMIT = 100000000000000000000.0;

Once we define that constant in our GeometryCalculator class, we hide the value in the CalculatorConstants interface for our class. We could then get unexpected results.

Another argument against this anti-pattern is that it causes namespace pollution. Our CalculatorConstants will now be in the namespace for any of our classes that implement the interface as well as any of their subclasses.

4. Patterns

Earlier, we looked at the appropriate form for defining constants. Let's look at some other good practices for defining constants within our applications.

4.1. General Good Practices

If constants are logically related to a class, we can just define them there. If we view a set of constants as members of an enumerated type, we can use an enum to define them.

Let's define some constants in a Calculator class:

public class Calculator {
    public static final double PI = 3.14159265359;
    private static final double UPPER_LIMIT = 0x1.fffffffffffffP+1023;
    public enum Operation {
        ADD,
        SUBTRACT,
        DIVIDE,
        MULTIPLY
    }
    public double operateOnTwoNumbers(double numberOne, double numberTwo, Operation operation) {
        if (numberOne > UPPER_LIMIT) {
            throw new IllegalArgumentException("'numberOne' is too large");
        }
        if (numberTwo > UPPER_LIMIT) {
            throw new IllegalArgumentException("'numberTwo' is too large");
        }
        double answer = 0;
        
        switch(operation) {
            case ADD:
                answer = numberOne + numberTwo;
                break;
            case SUBTRACT:
                answer = numberOne - numberTwo;
                break;
            case DIVIDE:
                answer = numberOne / numberTwo;
                break;
            case MULTIPLY:
                answer = numberOne * numberTwo;
                break;
        }
        
        return answer;
    }
}

In our example, we've defined a constant for UPPER_LIMIT that we're only planning on using in the Calculator class, so we've set it to private. We want other classes to be able to use PI and the Operation enum, so we've set those to public.

Let's consider some of the advantages of using an enum for Operation. The first advantage is that it limits the possible values. Imagine that our method takes a string for the operation value with the expectation that one of four constant strings is supplied. We can easily foresee a scenario where a developer calling the method sends their own string value. With the enum, the values are limited to those we define. We can also see that enums are especially well suited to use in switch statements.

4.2. Constants Class

Now that we've looked at some general good practices, let's consider the case when a constants class might be a good idea. Let's imagine our application contains a package of classes that need to do various kinds of mathematical calculations. In this case, it probably makes sense for us to define a constants class in that package for constants that we'll use in our calculations classes.

Let's create a MathConstants class:

public final class MathConstants {
    public static final double PI = 3.14159265359;
    static final double GOLDEN_RATIO = 1.6180;
    static final double GRAVITATIONAL_ACCELERATION = 9.8;
    static final double EULERS_NUMBER = 2.7182818284590452353602874713527;
    
    public enum Operation {
        ADD,
        SUBTRACT,
        DIVIDE,
        MULTIPLY
    }
    
    private MathConstants() {
        
    }
}

The first thing we should notice is that our class is final to prevent it from being extended. Additionally, we've defined a private constructor so it can't be instantiated. Finally, we can see that we've applied the other good practices we discussed earlier in the article. Our constant PI is public because we anticipate needing to access it outside of our package. The other constants we've left as package-private, so we can access them within our package. We've made all of our constants static and final and named them in screaming snake case. The operations are a specific set of values, so we've used an enum to define them.

We can see that our specific package-level constants class is different from a large global constants class because it's localized to our package and contains constants relevant to that package's classes.

5. Conclusion

In this article, we considered the pros and cons of some of the most popular patterns and anti-patterns seen when using constants in Java. We started out with some basic formatting rules, before covering anti-patterns. After learning about a couple of common anti-patterns, we looked at patterns that we often see applied to constants.

As always the code is available over on GitHub.

The post Constants in Java: Patterns and Anti-Patterns first appeared on Baeldung.


Performance of removeAll() in a HashSet

$
0
0

1. Overview

HashSet is a collection for storing unique elements.

In this tutorial, we'll discuss the performance of the removeAll() method in the java.util.HashSet class.

2. HashSet.removeAll()

The removeAll method removes all the elements, that are contained in the collection:

Set<Integer> set = new HashSet<Integer>();
set.add(1);
set.add(2);
set.add(3);
set.add(4);
Collection<Integer> collection = new ArrayList<Integer>();
collection.add(1);
collection.add(3);
set.removeAll(collection);
Integer[] actualElements = new Integer[set.size()];
Integer[] expectedElements = new Integer[] { 2, 4 };
assertArrayEquals(expectedElements, set.toArray(actualElements));

As a result, elements 1 and 3 will be removed from the set.

3. Internal Implementation and Time Complexity

The removeAll() method determines which one is smaller – the set or the collection. This is done by invoking the size() method on the set and the collection.

If the collection has fewer elements than the set, then it iterates over the specified collection with the time complexity O(n). It also checks if the element is present in the set with the time complexity O(1). And if the element is present, it's being removed from the set using the remove() method of the set, which again has a time complexity of O(1). So the overall time complexity is O(n).

If the set has fewer elements than the collection, then it iterates over this set using O(n). Then it checks if each element is present in the collection by invoking its contains() method. And if such an element is present, then the element is removed from the set. So this depends on the time complexity of the contains() method.

Now in this case, if the collection is an ArrayList, the time complexity of the contains() method is O(m). So overall time complexity to remove all elements present in the ArrayList from the set is O(n * m).

If the collection is again HashSet, the time complexity of the contains() method is O(1). So overall time complexity to remove all elements present in the HashSet from the set is O(n).

4. Performance

To see the performance difference between the above 3 cases, let's write a simple JMH benchmark test.

For the first case, we'll initialize the set and collection, where we have more elements in the set than the collection. In the second case, we'll initialize the set and the collection, where we have more elements in the collection than the set. And in the third case, we'll initialize 2 sets, where we'll have 2nd set having more number of elements than the 1st one:

@BenchmarkMode(Mode.AverageTime)
@OutputTimeUnit(TimeUnit.NANOSECONDS)
@Warmup(iterations = 5)
public class HashSetBenchmark {
    @State(Scope.Thread)
    public static class MyState {
        private Set employeeSet1 = new HashSet<>();
        private List employeeList1 = new ArrayList<>();
        private Set employeeSet2 = new HashSet<>();
        private List employeeList2 = new ArrayList<>();
        private Set<Employee> employeeSet3 = new HashSet<>();
        private Set<Employee> employeeSet4 = new HashSet<>();
        private long set1Size = 60000;
        private long list1Size = 50000;
        private long set2Size = 50000;
        private long list2Size = 60000;
        private long set3Size = 50000;
        private long set4Size = 60000;
        @Setup(Level.Trial)
        public void setUp() {
            // populating sets
        }
    }
}

After, we add our benchmark tests:

@Benchmark
public boolean given_SizeOfHashsetGreaterThanSizeOfCollection_whenRemoveAllFromHashSet_thenGoodPerformance(MyState state) {
    return state.employeeSet1.removeAll(state.employeeList1);
}
@Benchmark
public boolean given_SizeOfHashsetSmallerThanSizeOfCollection_whenRemoveAllFromHashSet_thenBadPerformance(MyState state) {
    return state.employeeSet2.removeAll(state.employeeList2);
}
@Benchmark
public boolean given_SizeOfHashsetSmallerThanSizeOfAnotherHashSet_whenRemoveAllFromHashSet_thenGoodPerformance(MyState state) {
    return state.employeeSet3.removeAll(state.employeeSet4);
}

And here are the results:

Benchmark                                              Mode  Cnt            Score            Error  Units
HashSetBenchmark.testHashSetSizeGreaterThanCollection  avgt   20      2700457.099 ±     475673.379  ns/op
HashSetBenchmark.testHashSetSmallerThanCollection      avgt   20  31522676649.950 ± 3556834894.168  ns/op
HashSetBenchmark.testHashSetSmallerThanOtherHashset    avgt   20      2672757.784 ±     224505.866  ns/op

We can see the HashSet.removeAll() performs pretty bad when the HashSet has fewer elements than the Collection, which is passed as an argument to the removeAll() method. But when the other collection is again HashSet, then the performance is good.

5. Conclusion

In this article, we saw the performance of removeAll() in HashSet. When the set has fewer elements than the collection, then the performance of removeAll() depends on the time complexity of the contains() method of the collection.

As usual, the complete code for this article is available over on GitHub.

The post Performance of removeAll() in a HashSet first appeared on Baeldung.

        
Viewing all 3798 articles
Browse latest View live


Latest Images

<script src="https://jsc.adskeeper.com/r/s/rssing.com.1596347.js" async> </script>