Quantcast
Channel: Baeldung
Viewing all 3787 articles
Browse latest View live

How to Import a .cer Certificate Into a Java KeyStore

$
0
0

1. Overview

A KeyStore, as the name suggests, is basically a repository of certificates, public and private keys. Moreover, JDK distributions are shipped with an executable to help manage them, the keytool.

On the other hand, certificates can have many extensions, but we need to keep in mind that a .cer file contains public X.509 keys and thus it can be used only for identity verification.

In this short article, we'll take a look at how to import a .cer file into a Java KeyStore.

2. Importing a Certificate

Without further ado, let's now import the Baeldung public certificate file inside a sample KeyStore.

The keytool has many options but the one we're interested in is importcert which is as straightforward as its name. Since there are usually different entries inside a KeyStore, we'll have to use the alias argument to assign it a unique name:

> keytool -importcert -alias baeldung_public_cert -file baeldung.cer -keystore sample_keystore
> Enter keystore password:
...
> Trust this certificate? [no]:  y
> Certificate was added to keystore

Although the command prompts for a password and a confirmation, we can bypass them by adding the storepass and noprompt arguments. This comes especially handy when running keytool from a script:

> keytool -importcert -alias baeldung_public_cert -file baeldung.cer -keystore sample_keystore -storepass pass123 -noprompt
> Certificate was added to keystore

Furthermore, if the KeyStore doesn't exist, it'll be automatically generated. In this case, we can set the format through the storetype argument. If not specified, the KeyStore format defaults to JKS if we're using Java 8 or older. From Java 9 on it defaults to PKCS12:

> keytool -importcert -alias baeldung_public_cert -file baeldung.cer -keystore sample_keystore -storetype PKCS12
> Enter keystore password:
> Re-enter new password:
...
> Trust this certificate? [no]: y
> Certificate was added to keystore

Here we've created a PKCS12 KeyStore. The main difference between JKS and PKCS12 is that JKS is a Java-specific format, while PKCS12 is a standardized way of storing keys and certificates

In case we need, we can also perform these operations programmatically.

3. Conclusion

In this tutorial, we went through how to import a .cer file inside a KeyStore. In order to do that, we used the keytool's importcert option.

The post How to Import a .cer Certificate Into a Java KeyStore first appeared on Baeldung.


Java Weekly, Issue 356

$
0
0

1. Spring and Java

>> JEP proposed to target JDK 16: Unix-Domain Socket Channels [mail.openjdk.java.net]

More channels for NIO: Java 16 will support Unix domain sockets as part of its NIO channels and server socket channels.

>> Hibernate & Testcontainers – A Perfect Match For Your Tests? [thorben-janssen.com]

Testing Hibernate entities with TestContainers: setting up, working with random ports, and faster integration tests.

Also worth reading:

Webinars and presentations:

Time to upgrade:

2. Technical

>> Building Netflix’s Distributed Tracing Infrastructure [netflixtechblog.com]

Meet Edgar: the Netflix way of tracing the chain of requests in a Microservices architecture at scale!

Also worth reading:

3. Musings

>> Do's and don'ts for conference organizers, a speaker's point-of-view [blog.frankel.ch]

How to organize an even better conference: a few pieces of advice to keep in mind for organizing our next conference! Yeah.

Also worth reading:

4. Comics

And my favorite Dilberts of the week:

>> Lucky Profits [dilbert.com]

>> Training Kicked In [dilbert.com]

>> When To Reply To Boss Text [dilbert.com]

5. Pick of the Week

>> How to Get Startup Ideas [paulgraham.com]

The post Java Weekly, Issue 356 first appeared on Baeldung.


Introduction to Netflix Mantis

$
0
0

1. Overview

In this article, we'll take a look at the Mantis platform developed by Netflix.

We'll explore the main Mantis concepts by creating, running, and investigating a stream processing job.

2. What Is Mantis?

Mantis is a platform for building stream-processing applications (jobs). It provides an easy way to manage the deployment and life-cycle of jobs. Moreover, it facilitates resource allocation, discovery, and communication between these jobs.

Therefore, developers can focus on actual business logic, all the while having the support of a robust and scalable platform to run their high volume, low latency, non-blocking applications.

A Mantis job consists of three distinct parts:

  • the source, responsible for retrieving the data from an external source
  • one or more stages, responsible for processing the incoming event streams
  • and a sink that collects the processed data

Let's now explore each of them.

3. Setup and Dependencies

Let's start by adding the mantis-runtime and jackson-databind dependencies:

<dependency>
    <groupId>io.mantisrx</groupId>
    <artifactId>mantis-runtime</artifactId>
</dependency>
<dependency>
    <groupId>com.fasterxml.jackson.core</groupId>
    <artifactId>jackson-databind</artifactId>
</dependency>

Now, for setting up our job's data source, let's implement the Mantis Source interface:

public class RandomLogSource implements Source<String> {
    @Override
    public Observable<Observable<String>> call(Context context, Index index) {
        return Observable.just(
          Observable
            .interval(250, TimeUnit.MILLISECONDS)
            .map(this::createRandomLogEvent));
    }
    private String createRandomLogEvent(Long tick) {
        // generate a random log entry string
        ...
    }
}

As we can see, it simply generates random log entries multiple times per second.

4. Our First Job

Let's now create a Mantis job that simply collects log events from our RandomLogSource. Later on, we'll add group and aggregation transformations for a more complex and interesting result.

To begin with, let's create a LogEvent entity:

public class LogEvent implements JsonType {
    private Long index;
    private String level;
    private String message;
    // ...
}

Then, let's add our TransformLogStage.

It's a simple stage that implements the ScalarComputation interface and splits a log entry to build a LogEvent. Also, it filters out any wrong formatted strings:

public class TransformLogStage implements ScalarComputation<String, LogEvent> {
    @Override
    public Observable<LogEvent> call(Context context, Observable<String> logEntry) {
        return logEntry
          .map(log -> log.split("#"))
          .filter(parts -> parts.length == 3)
          .map(LogEvent::new);
    }
}

4.1. Running the Job

At this point, we have enough building blocks for putting together our Mantis job:

public class LogCollectingJob extends MantisJobProvider<LogEvent> {
    @Override
    public Job<LogEvent> getJobInstance() {
        return MantisJob
          .source(new RandomLogSource())
          .stage(new TransformLogStage(), new ScalarToScalar.Config<>())
          .sink(Sinks.eagerSubscribe(Sinks.sse(LogEvent::toJsonString)))
          .metadata(new Metadata.Builder().build())
          .create();
    }
}

Let's take a closer look at our job.

As we can see, it extends MantisJobProvider. At first, it fetches data from our RandomLogSource and applies the TransformLogStage to the fetched data. Finally, it sends the processed data to the built-in sink that eagerly subscribes and delivers data over SSE.

Now, let's configure our job to execute locally on startup:

@SpringBootApplication
public class MantisApplication implements CommandLineRunner {
    // ...
 
    @Override
    public void run(String... args) {
        LocalJobExecutorNetworked.execute(new LogCollectingJob().getJobInstance());
    }
}

Let's run the application. We'll see a log message like:

...
Serving modern HTTP SSE server sink on port: 86XX

Let's now connect to the sink using curl:

$ curl localhost:86XX
data: {"index":86,"level":"WARN","message":"login attempt"}
data: {"index":87,"level":"ERROR","message":"user created"}
data: {"index":88,"level":"INFO","message":"user created"}
data: {"index":89,"level":"INFO","message":"login attempt"}
data: {"index":90,"level":"INFO","message":"user created"}
data: {"index":91,"level":"ERROR","message":"user created"}
data: {"index":92,"level":"WARN","message":"login attempt"}
data: {"index":93,"level":"INFO","message":"user created"}
...

4.2. Configuring the Sink

So far, we've used the built-in sink for collecting our processed data. Let's see if we can add more flexibility to our scenario by providing a custom sink.

What if, for example, we'd like to filter logs by message?

Let's create a LogSink that implements the Sink<LogEvent> interface:

public class LogSink implements Sink<LogEvent> {
    @Override
    public void call(Context context, PortRequest portRequest, Observable<LogEvent> logEventObservable) {
        SelfDocumentingSink<LogEvent> sink = new ServerSentEventsSink.Builder<LogEvent>()
          .withEncoder(LogEvent::toJsonString)
          .withPredicate(filterByLogMessage())
          .build();
        logEventObservable.subscribe();
        sink.call(context, portRequest, logEventObservable);
    }
    private Predicate<LogEvent> filterByLogMessage() {
        return new Predicate<>("filter by message",
          parameters -> {
            if (parameters != null && parameters.containsKey("filter")) {
                return logEvent -> logEvent.getMessage().contains(parameters.get("filter").get(0));
            }
            return logEvent -> true;
        });
    }
}

In this sink implementation, we configured a predicate that uses the filter parameter to only retrieve logs that contain the text set in the filter parameter:

$ curl localhost:8874?filter=login
data: {"index":93,"level":"ERROR","message":"login attempt"}
data: {"index":95,"level":"INFO","message":"login attempt"}
data: {"index":97,"level":"ERROR","message":"login attempt"}
...

Note Mantis also offers a powerful querying language, MQL, that can be used for querying, transforming, and analyzing stream data in a SQL fashion.

5. Stage Chaining

Let's now suppose we're interested in knowing how many ERROR, WARN, or INFO log entries we have in a given time interval. For this, we'll add two more stages to our job and chain them together.

5.1. Grouping

Firstly, let's create a GroupLogStage.

This stage is a ToGroupComputation implementation that receives a LogEvent stream data from the existing TransformLogStage. After that, it groups entries by logging level and sends them to the next stage:

public class GroupLogStage implements ToGroupComputation<LogEvent, String, LogEvent> {
    @Override
    public Observable<MantisGroup<String, LogEvent>> call(Context context, Observable<LogEvent> logEvent) {
        return logEvent.map(log -> new MantisGroup<>(log.getLevel(), log));
    }
    public static ScalarToGroup.Config<LogEvent, String, LogEvent> config(){
        return new ScalarToGroup.Config<LogEvent, String, LogEvent>()
          .description("Group event data by level")
          .codec(JacksonCodecs.pojo(LogEvent.class))
          .concurrentInput();
    }
    
}

We've also created a custom stage config by providing a description, the codec to use for serializing the output, and allowed this stage's call method to run concurrently by using  concurrentInput().

One thing to note is that this stage is horizontally scalable. Meaning we can run as many instances of this stage as needed. Also worth mentioning,  when deployed in a Mantis cluster, this stage sends data to the next stage so that all events belonging to a particular group will land on the same worker of the next stage.

5.2. Aggregating

Before we move on and create the next stage, let's first add a LogAggregate entity:

public class LogAggregate implements JsonType {
    private final Integer count;
    private final String level;
}

Now, let's create the last stage in the chain.

This stage implements GroupToScalarComputation and transforms a stream of log groups to a scalar LogAggregate. It does this by counting how many times each type of log appears in the stream. In addition, it also has a LogAggregationDuration parameter, which can be used to control the size of the aggregation window:

public class CountLogStage implements GroupToScalarComputation<String, LogEvent, LogAggregate> {
    private int duration;
    @Override
    public void init(Context context) {
        duration = (int)context.getParameters().get("LogAggregationDuration", 1000);
    }
    @Override
    public Observable<LogAggregate> call(Context context, Observable<MantisGroup<String, LogEvent>> mantisGroup) {
        return mantisGroup
          .window(duration, TimeUnit.MILLISECONDS)
          .flatMap(o -> o.groupBy(MantisGroup::getKeyValue)
            .flatMap(group -> group.reduce(0, (count, value) ->  count = count + 1)
              .map((count) -> new LogAggregate(count, group.getKey()))
            ));
    }
    public static GroupToScalar.Config<String, LogEvent, LogAggregate> config(){
        return new GroupToScalar.Config<String, LogEvent, LogAggregate>()
          .description("sum events for a log level")
          .codec(JacksonCodecs.pojo(LogAggregate.class))
          .withParameters(getParameters());
    }
    public static List<ParameterDefinition<?>> getParameters() {
        List<ParameterDefinition<?>> params = new ArrayList<>();
        params.add(new IntParameter()
          .name("LogAggregationDuration")
          .description("window size for aggregation in milliseconds")
          .validator(Validators.range(100, 10000))
          .defaultValue(5000)
          .build());
        return params;
    }
    
}

5.3. Configure and Run the Job

The only thing left to do now is to configure our job:

public class LogAggregationJob extends MantisJobProvider<LogAggregate> {
    @Override
    public Job<LogAggregate> getJobInstance() {
        return MantisJob
          .source(new RandomLogSource())
          .stage(new TransformLogStage(), TransformLogStage.stageConfig())
          .stage(new GroupLogStage(), GroupLogStage.config())
          .stage(new CountLogStage(), CountLogStage.config())
          .sink(Sinks.eagerSubscribe(Sinks.sse(LogAggregate::toJsonString)))
          .metadata(new Metadata.Builder().build())
          .create();
    }
}

As soon as we run the application and execute our new job, we can see the log counts being retrieved every few seconds:

$ curl localhost:8133
data: {"count":3,"level":"ERROR"}
data: {"count":13,"level":"INFO"}
data: {"count":4,"level":"WARN"}
data: {"count":8,"level":"ERROR"}
data: {"count":5,"level":"INFO"}
data: {"count":7,"level":"WARN"}
...

6. Conclusion

To sum up, in this article, we've seen what Netflix Mantis is and what it can be used for. Furthermore, we looked at the main concepts, used them to build jobs, and explored custom configurations for different scenarios.

As always, the complete code is available over on GitHub.

The post Introduction to Netflix Mantis first appeared on Baeldung.


Accessing Keycloak Endpoints Using Postman

$
0
0

1. Introduction

In this article, we start with a quick review of OAuth 2.0, OpenID, and Keycloak. Afterward, we'll learn about the Keycloak REST APIs and how to call them in Postman.

2. OAuth 2.0

OAuth 2.0 is an authorization framework that lets an authenticated user grant access to third parties via tokens. A token is usually limited to some scopes with a limited lifetime. Therefore, it's a safe alternative to the user's credentials.

OAuth 2.0 comes with four main components:

  • Resource Owner – the end-user or a system that owns a protected resource or data
  • Resource Server – the service exposes a protected resource usually through an HTTP-based API
  • Client – calls the protected resource on behalf of the resource owner
  • Authorization Server – issues an OAuth 2.0 token and delivers it to the client after authenticating the resource owner

OAuth 2.0 is a protocol with some standard flows, but we're especially interested in the authorization server component here.

3. OpenID C0nnect

OpenID Connect 1.0 (OIDC) is built on top of OAuth 2.0 to add an identity management layer to the protocol. Hence, it allows clients to verify the end user's identity and access basic profile information via a standard OAuth 2.0 flow. OIDC has introduced a few standard scopes to OAuth 2.0, like openid, profile, and email.

4. Keycloak as Authorization Server

JBoss has developed Keycloak as a Java-based open-source Identity and Access Management solution. Besides the support of both OAuth 2.0 and OIDC, it also offers features like identity brokering, user federation, and SSO.

We can use Keycloak as a standalone server with an admin console or embed it in a Spring application. Once we have our Keycloak running in either of these ways, we can try the endpoints.

5. Keycloak Endpoints

Keycloak exposes a variety of REST endpoints for OAuth 2.0 flows.

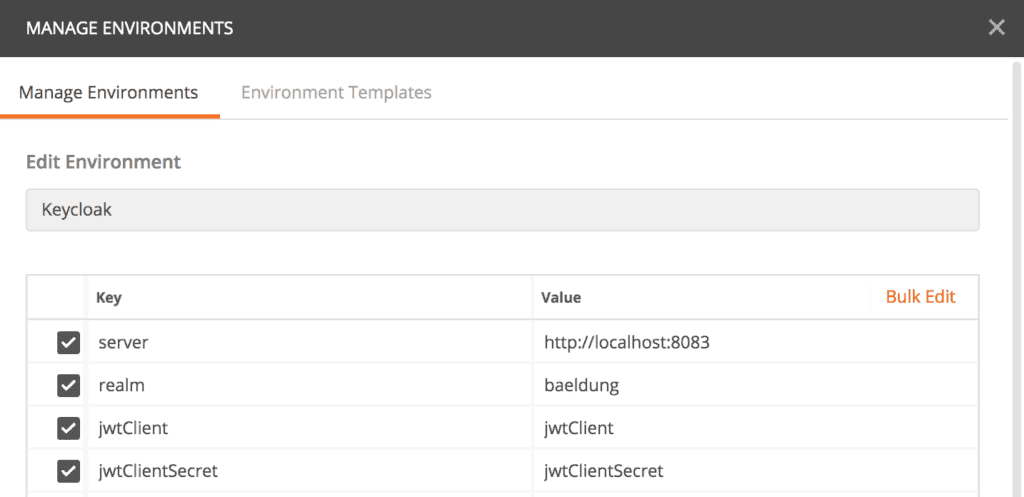
To use these endpoints with Postman, let's start with creating an Environment called “Keycloak“. Then we add some key/value entries for the Keycloak authorization server URL, the realm, OAuth 2.0 client id, and client password:

Then, let's create a collection where we can organize our Keycloak tests. Now, we're ready to explore available endpoints.

5.1. OpenID Configuration Endpoint

The configuration endpoint is like the root directory. It returns all other available endpoints, supported scopes and claims, and signing algorithms.

Let's create a request in Postman: {{server}}/auth/realms/{{realm}}/.well-known/openid-configuration. Postman sets values of {{server}} and {{realm}} from the selected environment during runtime:

Then we execute the request, and if everything goes well, we have a response:

{
    "issuer": "http://localhost:8083/auth/realms/baeldung",
    "authorization_endpoint": "http://localhost:8083/auth/realms/baeldung/protocol/openid-connect/auth",
    "token_endpoint": "http://localhost:8083/auth/realms/baeldung/protocol/openid-connect/token",
    "token_introspection_endpoint": "http://localhost:8083/auth/realms/baeldung/protocol/openid-connect/token/introspect",
    "userinfo_endpoint": "http://localhost:8083/auth/realms/baeldung/protocol/openid-connect/userinfo",
    "end_session_endpoint": "http://localhost:8083/auth/realms/baeldung/protocol/openid-connect/logout",
    "jwks_uri": "http://localhost:8083/auth/realms/baeldung/protocol/openid-connect/certs",
    "check_session_iframe": "http://localhost:8083/auth/realms/baeldung/protocol/openid-connect/login-status-iframe.html",
    "grant_types_supported": [...],
    ...
    "registration_endpoint": "http://localhost:8083/auth/realms/baeldung/clients-registrations/openid-connect",
    ...
    "introspection_endpoint": "http://localhost:8083/auth/realms/baeldung/protocol/openid-connect/token/introspect"
}

As mentioned before, we can see all available endpoints in the response — for example, “authorization_endpoint“, “token_endpoint“, and so on.

Moreover, there are other useful attributes in the response. For example, we can figure out all supported grant types from “grant_types_supported” or all supported scopes from “scopes_supported“.

5.2. Authorize Endpoint

Let's continue our journey with the authorize endpoint responsible for OAuth 2.0 Authorization Code Flow. It's available as “authorization_endpoint” in the OpenID configuration response.

The endpoint is:

{{server}}/auth/realms/{{realm}}/protocol/openid-connect/auth?response_type=code&client_id=jwtClient

Moreover, this endpoint accepts scope and redirect_uri as optional parameters.

We're not going to use this endpoint in Postman. Instead, we usually initiate the authorization code flow via a browser. Then Keycloak redirects the user to a login page if no active login cookie is available. Finally, the authorization code is delivered to the redirect URL.

Let's go to the next step to see how we can obtain an access token.

5.3. Token Endpoint

The token endpoint allows us to retrieve an access token, refresh token, or id token. OAuth 2.0 supports different grant types, like authorization_code, refresh_token, or password.

The token endpoint is: {{server}}/auth/realms/{{realm}}/protocol/openid-connect/token

However, each grant type needs some dedicated form parameters.

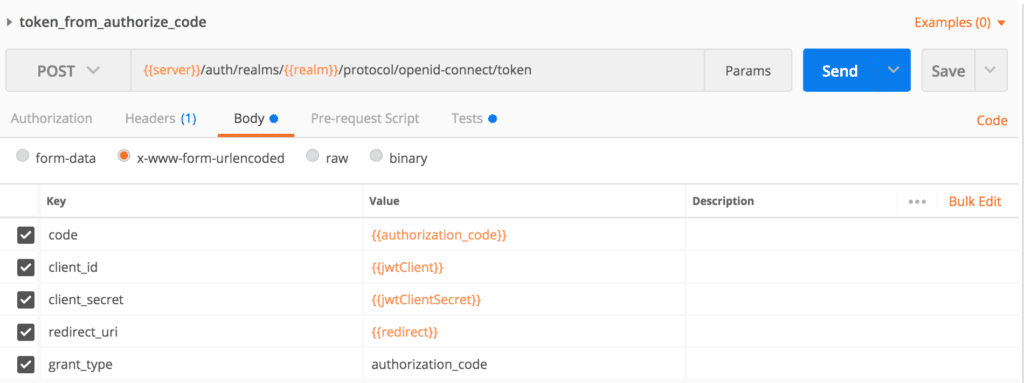
Let's first test our token endpoint to obtain an access token for our authorize code. We have to pass these form parameters in the request body: client_id, client_secret, grant_type, code, and redirect_uri. The token endpoint also accepts scope as an optional parameter:

Moreover, if we want to bypass the authorization code flow, the password grant type is the choice. Here we need user credentials, so we can use this flow when we have a built-in login page on our website or application.

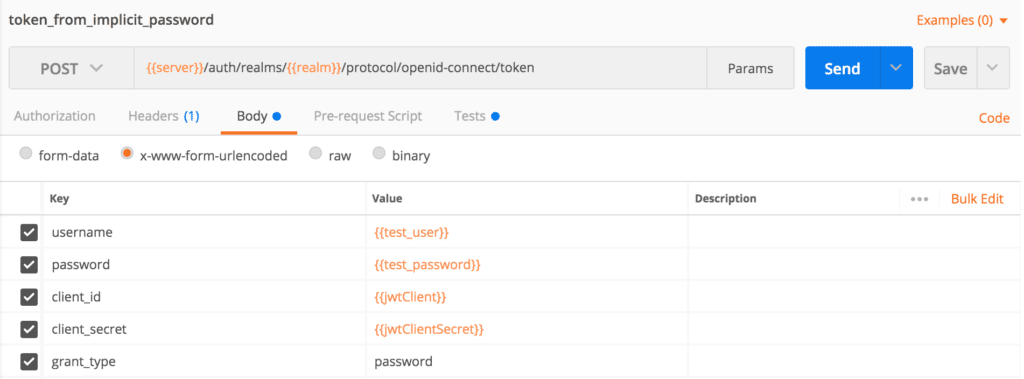
Let's create a Postman request and pass the form parameters client_id, client_secret, grant_type, username, and password in the body:

Before executing this request, we have to add the username and password variables to Postman's environment key/value pairs.

Another useful grant type is refresh_token. We can use this when we have a valid refresh token from a previous call to the token endpoint. The refresh token flow requires the parameters client_id, client_secret, grant_type, and refresh_token.

We need the response access_token to test other endpoints. To speed up our testing with Postman, we can write a script in the Tests section of our token endpoint requests:

var jsonData = JSON.parse(responseBody);
postman.setEnvironmentVariable("refresh_token", jsonData.refresh_token);
postman.setEnvironmentVariable("access_token", jsonData.access_token);

5.4. User Information Endpoint

We can retrieve user profile data from the user information endpoint when we have a valid access token.

The user information endpoint is available at: {{server}}/auth/realms/{{realm}}/protocol/openid-connect/userinfo

Let's create a Postman request for it and pass the access token in the Authorization header:

Then we execute the request. Here is the successful response:

{
    "sub": "a5461470-33eb-4b2d-82d4-b0484e96ad7f",
    "preferred_username": "john@test.com",
    "DOB": "1984-07-01",
    "organization": "baeldung"
}

5.5. Token Introspect Endpoint

If a resource server needs to verify that an access token is active or wants more metadata about it, especially for opaque access tokens, then the token introspect endpoint is the answer. In this case, the resource server integrates the introspect process with the security configuration.

We call Keycloak's introspect endpoint: {{server}}/auth/realms/{{realm}}/protocol/openid-connect/token/introspect

Let's create an introspect request in Postman and then pass client_id, client_secret, and token as form parameters:

If the access_token is valid, then we have our response:

{
    "exp": 1601824811,
    "iat": 1601824511,
    "jti": "d5a4831d-7236-4686-a17b-784cd8b5805d",
    "iss": "http://localhost:8083/auth/realms/baeldung",
    "sub": "a5461470-33eb-4b2d-82d4-b0484e96ad7f",
    "typ": "Bearer",
    "azp": "jwtClient",
    "session_state": "96030af2-1e48-4243-ba0b-dd4980c6e8fd",
    "preferred_username": "john@test.com",
    "email_verified": false,
    "acr": "1",
    "scope": "profile email read",
    "DOB": "1984-07-01",
    "organization": "baeldung",
    "client_id": "jwtClient",
    "username": "john@test.com",
    "active": true
}

However, if we use an invalid access token, then the response is:

{
    "active": false
}

6. Conclusion

In this article, with a running Keycloak Server, we created Postman requests for the authorization, token, user information, and introspect endpoints.

The complete examples of Postman requests are available as always over on GitHub.

The post Accessing Keycloak Endpoints Using Postman first appeared on Baeldung.


Get Names of Classes Inside a JAR File

$
0
0

1. Overview

Most Java libraries are available as JAR files. In this tutorial, we'll address how to get names of classes inside a given JAR file from the command line and from a Java program.

Then, we'll look at a Java program example of loading the classes from a given JAR file at runtime.

2. Example JAR File

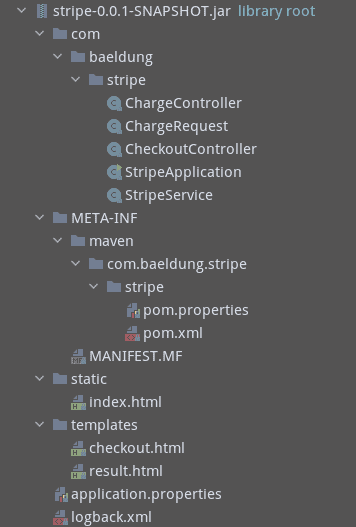
In this tutorial, we'll take the stripe-0.0.1-SNAPSHOT.jar file as an example to address how to get the class names in the JAR file:

3. Using the jar Command

JDK ships with a jar command. We can use this command with the t and f options to list the content of a JAR file:

$ jar tf stripe-0.0.1-SNAPSHOT.jar 
META-INF/
META-INF/MANIFEST.MF
...
templates/result.html
templates/checkout.html
application.properties
com/baeldung/stripe/StripeApplication.class
com/baeldung/stripe/ChargeRequest.class
com/baeldung/stripe/StripeService.class
com/baeldung/stripe/ChargeRequest$Currency.class
...

Since we're only interested in the *.class files in the archive, we can filter the output using the grep command:

$ jar tf stripe-0.0.1-SNAPSHOT.jar | grep '\.class$'
com/baeldung/stripe/StripeApplication.class
com/baeldung/stripe/ChargeRequest.class
com/baeldung/stripe/StripeService.class
com/baeldung/stripe/ChargeRequest$Currency.class
com/baeldung/stripe/ChargeController.class
com/baeldung/stripe/CheckoutController.class

This gives us a list of class files inside the JAR file.

4. Getting Class Names of a JAR File in Java

Using the jar command to print the class names from a JAR file is pretty straightforward. However, sometimes we want to load some classes from a JAR file in our Java program. In this case, the command-line output isn't enough.

To achieve our objective, we need to scan the JAR file from a Java program and get the class names.

Let's have a look at how to extract class names from our example JAR file using the JarFile and JarEntry classes:

public static Set<String> getClassNamesFromJarFile(File givenFile) throws IOException {
    Set<String> classNames = new HashSet<>();
    try (JarFile jarFile = new JarFile(givenFile)) {
        Enumeration<JarEntry> e = jarFile.entries();
        while (e.hasMoreElements()) {
            JarEntry jarEntry = e.nextElement();
            if (jarEntry.getName().endsWith(".class")) {
                String className = jarEntry.getName()
                  .replace("/", ".")
                  .replace(".class", "");
                classNames.add(className);
            }
        }
        return classNames;
    }
}

Now, let's take a closer look at the code in the method above and understand how it works:

  • try (JarFile jarFile = new JarFile(givenFile)) – Here, we used a try-with-resources statement to get the jarFile from the given File object
  • if (jarEntry.getName().endsWith(“.class”)){…} – We take each class jarEntry, and change the path of the class file into the qualified class name, for example change “package1/package2/SomeType.class” into “package1.package2.SomeType”

Let's verify if the method can extract the class names from our example JAR file through a unit test method:

private static final String JAR_PATH = "example-jar/stripe-0.0.1-SNAPSHOT.jar";
private static final Set<String> EXPECTED_CLASS_NAMES = Sets.newHashSet(
  "com.baeldung.stripe.StripeApplication",
  "com.baeldung.stripe.ChargeRequest",
  "com.baeldung.stripe.StripeService",
  "com.baeldung.stripe.ChargeRequest$Currency",
  "com.baeldung.stripe.ChargeController",
  "com.baeldung.stripe.CheckoutController");
@Test
public void givenJarFilePath_whenLoadClassNames_thenGetClassNames() throws IOException, URISyntaxException {
    File jarFile = new File(
      Objects.requireNonNull(getClass().getClassLoader().getResource(JAR_PATH)).toURI());
    Set<String> classNames = GetClassNamesFromJar.getClassNamesFromJarFile(jarFile);
    Assert.assertEquals(EXPECTED_CLASS_NAMES, classNames);
}

5. Getting Classes From a JAR File in Java

We've seen how to get the class names from a JAR file. Sometimes, we want to load some classes from a JAR file at runtime dynamically.

In this case, we can first get the class names from the given JAR file using our getClassNamesFromJarFile method.

Next, we can create a ClassLoader to load required classes by name:

public static Set<Class> getClassesFromJarFile(File jarFile) throws IOException, ClassNotFoundException {
    Set<String> classNames = getClassNamesFromJarFile(jarFile);
    Set<Class> classes = new HashSet<>(classNames.size());
    try (URLClassLoader cl = URLClassLoader.newInstance(
           new URL[] { new URL("jar:file:" + jarFile + "!/") })) {
        for (String name : classNames) {
            Class clazz = cl.loadClass(name); // Load the class by its name
            classes.add(clazz);
        }
    }
    return classes;
}

In the method above, we created a URLClassLoader object to load the classes. The implementation is pretty straightforward.

However, it's probably worth explaining the syntax for the JAR URL a little bit. A valid JAR URL contains three parts: “jar: + [the location of the JAR file] + !/”. 

The terminating “!/” indicates that the JAR URL refers to an entire JAR file.  Let's see a few JAR URL examples:

jar:http://www.example.com/some_jar_file.jar!/
jar:file:/local/path/to/some_jar_file.jar!/
jar:file:/C:/windows/path/to/some_jar_file.jar!/

In our getClassesFromJarFile method, the JAR file is located on the local filesystem, therefore, the prefix of the URL is “file:“.

Now, let's write a test method to verify if our method can get all expected Class objects:

@Test
public void givenJarFilePath_whenLoadClass_thenGetClassObjects()
  throws IOException, ClassNotFoundException, URISyntaxException {
    File jarFile
      = new File(Objects.requireNonNull(getClass().getClassLoader().getResource(JAR_PATH)).toURI());
    Set<Class> classes = GetClassNamesFromJar.getClassesFromJarFile(jarFile);
    Set<String> names = classes.stream().map(Class::getName).collect(Collectors.toSet());
    Assert.assertEquals(EXPECTED_CLASS_NAMES, names);
}

Once we have the required Class objects, we can use Java reflection to create instances of classes and invoke methods.

6. Conclusion

In this article, we've learned two different approaches to get class names from a given JAR file.

The jar command can print the class names. It's pretty handy if we need to check whether a JAR file contains a given class. However, if we need to get the class names from a running Java program, JarFile and JarEntry can help us achieve that.

At last, we've also seen an example of a Java program to load classes from a JAR file at runtime.

As always, the full source code of the article is available over on GitHub.

The post Get Names of Classes Inside a JAR File first appeared on Baeldung.


Retrofit 2 – Dynamic URL

$
0
0

1. Overview

In this short tutorial, we'll learn how to create a dynamic URL in Retrofit2.

2. @Url Annotation

There are cases when we need to use a dynamic URL in our application during runtime. Version 2 of the Retrofit library introduced the @Url annotation that allows us to pass a complete URL for an endpoint:

@GET
Call<ResponseBody> reposList(@Url String url);

This annotation is based on the HttpUrl class from OkHttp's library, and the URL address is solved like a link on a page using <a href=””>. When using the @Url parameter, we don't need to specify the address in the @GET annotation.

The @Url parameter replaces our baseUrl from the service implementation:

Retrofit retrofit = new Retrofit.Builder()
  .baseUrl("https://api.github.com/")
  .addConverterFactory(GsonConverterFactory.create()).build();

What is important is that if we want to use the @Url annotation, it must be set as the first parameter in the service method.

3. Path Param

If we know that some part of our base URL will be constant, but we don't know the extension of it or the number of parameters that will be used, we can use the @Path annotation and the encoded flag:

@GET("{fullUrl}")
Call<List<Contributor>> contributorsList(@Path(value = "fullUrl", encoded = true) String fullUrl);

This way, all “/” won't be replaced by %2F, as if we had not used the encoded parameter. However, all characters “?” in the passed address still will be replaced by %3F.

4. Summary

The Retrofit library allows us to easily provide a dynamic URL during application runtime by using only the @Url annotation.

As usual, all code examples can be found over on GitHub.

The post Retrofit 2 - Dynamic URL first appeared on Baeldung.


Set JWT with Spring Boot and Swagger UI

$
0
0

1. Introduction

In this short tutorial, we're going to see how to configure Swagger UI to include a JSON Web Token (JWT) when it calls our API.

2. Maven Dependencies

In this example, we'll be using springfox-boot-starter, which includes all the necessary dependencies to start working with Swagger and Swagger UI. Let's add it to our pom.xml file:

<dependency>
    <groupId>org.springframework.boot</groupId>
    <artifactId>spring-boot-starter-web</artifactId>
</dependency>
<dependency>
    <groupId>io.springfox</groupId>
    <artifactId>springfox-boot-starter</artifactId>
    <version>3.0.0</version>
</dependency>

3. Swagger Configuration

First, we need to define our ApiKey to include JWT as an authorization header:

private ApiKey apiKey() { 
    return new ApiKey("JWT", "Authorization", "header"); 
}

Next, let's configure the JWT SecurityContext with a global AuthorizationScope:

private SecurityContext securityContext() { 
    return SecurityContext.builder().securityReferences(defaultAuth()).build(); 
} 
private List<SecurityReference> defaultAuth() { 
    AuthorizationScope authorizationScope = new AuthorizationScope("global", "accessEverything"); 
    AuthorizationScope[] authorizationScopes = new AuthorizationScope[1]; 
    authorizationScopes[0] = authorizationScope; 
    return Arrays.asList(new SecurityReference("JWT", authorizationScopes)); 
}

And then, we configure our API Docket bean to include API info, security contexts, and security schemes:

@Bean
public Docket api() {
    return new Docket(DocumentationType.SWAGGER_2)
      .apiInfo(apiInfo())
      .securityContexts(Arrays.asList(securityContext()))
      .securitySchemes(Arrays.asList(apiKey()))
      .select()
      .apis(RequestHandlerSelectors.any())
      .paths(PathSelectors.any())
      .build();
}
private ApiInfo apiInfo() {
    return new ApiInfo(
      "My REST API",
      "Some custom description of API.",
      "1.0",
      "Terms of service",
      new Contact("Sallo Szrajbman", "www.baeldung.com", "salloszraj@gmail.com"),
      "License of API",
      "API license URL",
      Collections.emptyList());
}

4. REST Controller

In our ClientsRestController, let's write a simple getClients endpoint to return a list of clients:

@RestController(value = "/clients")
@Api( tags = "Clients")
public class ClientsRestController {
    @ApiOperation(value = "This method is used to get the clients.")
    @GetMapping
    public List<String> getClients() {
        return Arrays.asList("First Client", "Second Client");
    }
}

5. Swagger UI

Now, when we start our application, we can access the Swagger UI at the http://localhost:8080/swagger-ui/ URL.

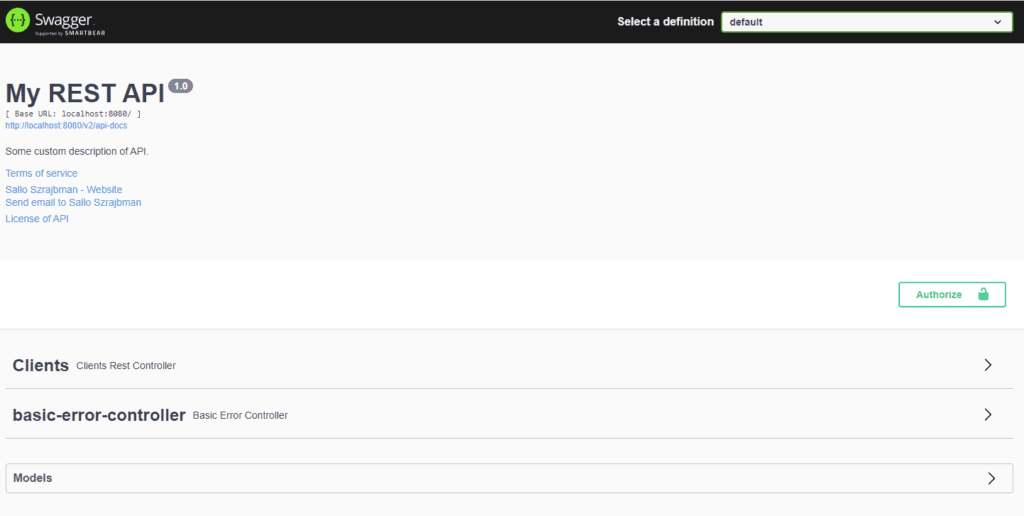
Here's a look at the Swagger UI with Authorize button:


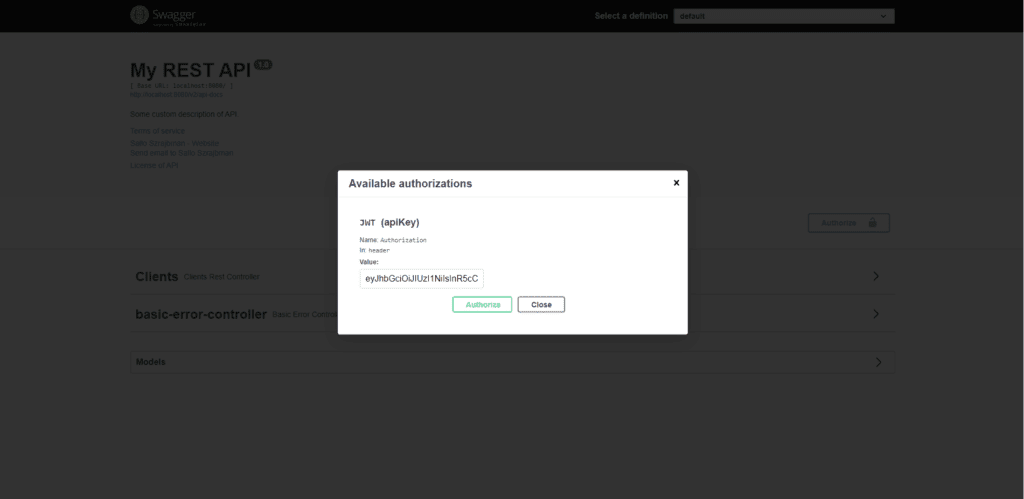
When we click the Authorize button, Swagger UI will ask for the JWT.

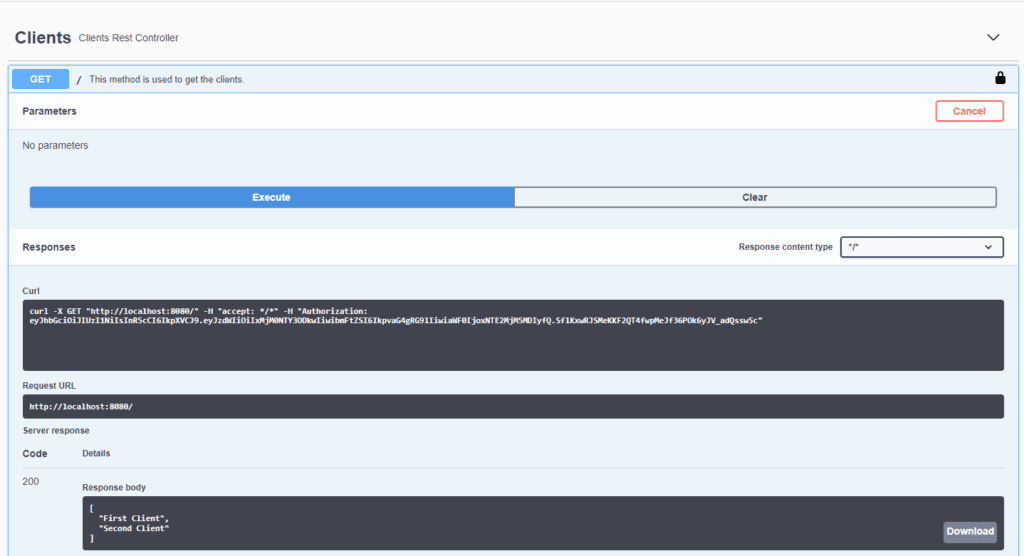
We just need to input our token and click on Authorize, and from then on, all the requests made to our API will automatically contain the token in the HTTP headers:


6. API Request with JWT

When sending the request to our API, we can see that there's an “Authorization” header with our token value:


7. Conclusion

In this article, we saw how Swagger UI provides custom configurations to set up JWT, which can be helpful when dealing with our application authorization. After authorizing in Swagger UI, all the requests will automatically include our JWT.

The source code in this article is available over on GitHub.

The post Set JWT with Spring Boot and Swagger UI first appeared on Baeldung.


Java Weekly, Issue 357

$
0
0

1. Spring and Java

>> The JPA and Hibernate first-level cache [vladmihalcea.com]

On the benefits of the first-level cache in JPA/Hibernate: write-behind cache, batching, and application-level repeatable reads.

>> Update on the state of Java modularization [blog.frankel.ch]

An analytical take on the adoption of the Java module system in some famous libraries in the Java ecosystem.

>> Managing Multiple JDK Installations With jEnv [reflectoring.io]

Struggling while working with the multiple Java versions? jEnv facilitates switching between multiple Java versions.

Also worth reading:

Webinars and presentations:

Time to upgrade:

2. Technical

>> Bulldozer: Batch Data Moving from Data Warehouse to Online Key-Value Stores [netflixtechblog.com]

Meet Bulldozer: how Netflix moves data efficiently at scale!

Also worth reading:

3. Musings

>> Falsehoods programmers believe about time zones [zainrizvi.io]

A delightful read on common fallacies and misconceptions about time and timezones.

Also worth reading:

4. Comics

And my favorite Dilberts of the week:

>> A Feeling You Are Doing It Wrong [dilbert.com]

>> Credit Goes To Boss [dilbert.com]

>> Hand Sanitizer [dilbert.com]

5. Pick of the Week

>> Computer Scientists Break Traveling Salesperson Record [quantamagazine.org]

The post Java Weekly, Issue 357 first appeared on Baeldung.


Dependency Management in Gradle

$
0
0

1. Overview

In this tutorial, we'll look at declaring dependencies in a Gradle build script. For our examples, we'll be using Gradle 6.7.

2. Typical Structure

Let's start with a simple Gradle script for Java projects:

plugins {
    id 'java'
}
repositories {
    mavenCentral()
}
dependencies {
    implementation 'org.springframework.boot:spring-boot-starter:2.3.4.RELEASE'
    testImplementation 'org.springframework.boot:spring-boot-starter-test:2.3.4.RELEASE'
}

As can be seen above, we have three code blocks: pluginsrepositories, and dependencies.

First, the plugins block tells us that this is a Java project. Secondly, the dependencies block declares version 2.3.4.RELEASE of the spring-boot-starter dependency needed to compile the project's production source code. Additionally, it also states that the project's test suite needs spring-boot-starter-test to compile.

The Gradle build pulls all dependencies down from the Maven Central repository, as defined by the repositories block.

Let's focus on how we can define dependencies.

3. Dependency Configurations

There are different configurations in which we can declare dependencies. In this regard, we can choose to be more or less precise, as we'll see later on.

3.1. How To Declare Dependencies

To start, the configuration has 4 parts:

  • group – identifier of an organization, company, or project
  • name – dependency identifier
  • version – the one we want to import
  • classifier – useful to distinguish dependencies with the same groupname, and version

We can declare dependencies in two formats. The contracted format allows us to declare a dependency as a String:

implementation 'org.springframework.boot:spring-boot-starter:2.3.4.RELEASE'

Instead, the extended format allows us to write it as a Map:

implementation group:'org.springframework.boot', name: 'spring-boot-starter', version: '2.3.4.RELEASE'

3.2. Types of Configuration

Furthermore, Gradle provides many dependencies configuration types:

  • api – used to make the dependencies explicit and expose them in the classpath. For instance, when implementing a library to be transparent to the library consumers'
  • implementation – required to compile the production source code and are purely internal. They aren't exposed outside the package
  • compileOnly – used when they need to be declared only at compile-time, such as source-only annotations or annotation processors. They don't appear in the runtime classpath or the test classpath
  • compileOnlyApi – used when required at compile time and when they need to be visible in the classpath for consumers
  • runtimeOnly – used to declare dependencies that are required only at runtime and aren't available at compile time
  • testImplementation – required to compile tests
  • testCompileOnly – required only at test compile time
  • testRuntimeOnly – required only at test runtime

We should note that the latest versions of Gradle deprecate some configurations like compile, testCompile, runtime, and testRuntime. At the time of writing, they're still available.

4. Types of External Dependencies

Let's delve into the types of external dependencies we encounter in a Gradle build script.

4.1. Module Dependencies

Basically, the most common way to declare a dependency is by referencing a repository. A Gradle repository is a collection of modules organized by groupname, and version.

As a matter of fact, Gradle pulls down the dependencies from the specified repository inside the repository block:

repositories {
    mavenCentral()
}
dependencies {
    implementation 'org.springframework.boot:spring-boot-starter:2.3.4.RELEASE'
}

4.2. File Dependencies

Given that projects don't always use automated dependency management, some projects organize dependencies as part of the source code or the local file system. Thus, we need to specify the exact location where the dependencies are.

For this purpose, we can use files to include a dependency collection:

dependencies {
    runtimeOnly files('libs/lib1.jar', 'libs/lib2.jar')
}

Similarly, we can use filetree to include a hierarchy of jar files in a directory:

dependencies {
    runtimeOnly fileTree('libs') { include '*.jar' }
}

4.3. Project Dependencies

Since one project can depend on another to reuse code, Gradle offers us the opportunity to do so.

Let's say we want to declare that our project depends on the shared project:

dependencies {
    implementation project(':shared')
}

4.4. Gradle Dependencies

In certain cases, such as developing a task or a plugin, we can define dependencies that belong to the Gradle version we are using:

dependencies {
    implementation gradleApi()
}

5. buildScript

As we saw before, we can declare the external dependencies of our source code and tests inside the dependencies block. Similarly, the buildScript block allows us to declare the Gradle build's dependencies, such as third-party plugins and task classes. Particularly, without a buildScript block, we can use only Gradle out-of-the-box features.

Below we declare that we want to use the Spring Boot plugin by downloading it from Maven Central:

buildscript {
    repositories {
        mavenCentral()
    }
    dependencies {
        classpath 'org.springframework.boot:spring-boot-gradle-plugin:2.3.4.RELEASE' 
    }
}
apply plugin: 'org.springframework.boot'

Hence we need to specify the source from which we'll download external dependencies because there isn't a default one.

What's described above is related to older versions of Gradle. Instead, in newer versions, it's possible to use a more concise form:

plugins {
    id 'org.springframework.boot' version '2.3.4.RELEASE'
}

6. Conclusion

In this article, we looked at Gradle dependencies, how to declare them, and the different configuration types.

Given these points, the source code for this article is available over on GitHub.

The post Dependency Management in Gradle first appeared on Baeldung.


Apache Commons Collections vs Google Guava

$
0
0

1. Overview

In this tutorial, we'll compare two Java-based open source libraries: Apache Commons and Google Guava. Both libraries have a rich feature set with lots of utility APIs majorly in the collections and I/O area.

For brevity, here we'll only describe a handful of the most commonly used ones from the collections framework along with code samples. We'll also see a summary of their differences.

Additionally, we have a collection of articles for a deep dive into various commons and Guava utilities.

2. A Brief History of the Two Libraries

Google Guava is a Google project, mainly developed by the organization's engineers, although it's been open-sourced now. The main motivation to start it was to include generics introduced in JDK 1.5 into Java Collections Framework, or JCF, and enhance its capability.

Since its inception, the library has expanded its capabilities and now includes graphs, functional programming, range objects, caching, and String manipulation.

Apache Commons started as a Jakarta project to supplement the core Java collections API and eventually became a project of the Apache Software Foundation. Over the years, it has expanded into a vast repertoire of reusable Java components in various other areas, including (but not limited to) imaging, I/O, cryptography, caching, networking, validation, and object pooling.

As this is an open-source project, developers from the Apache community keep adding to this library to expand its capabilities. However, they take great care to maintain backward compatibility.

3. Maven Dependency

To include Guava, we need to add its dependency to our pom.xml:

<dependency>
    <groupId>com.google.guava</groupId>
    <artifactId>guava</artifactId>
    <version>29.0-jre</version>
</dependency>

It's latest version information can be found on Maven.

For Apache Commons, it's a bit different. Depending on the utility we want to use, we have to add that particular one. For example, for collections, we need to add:

<dependency>
    <groupId>org.apache.commons</groupId>
    <artifactId>commons-collections4</artifactId>
    <version>4.4</version>
</dependency>

In our code samples, we'll be using commons-collections4.

Let's jump into the fun part now!

4. Bi-directional Maps

Maps that can be accessed by their keys, as well as values, are known as bi-directional maps. JCF does not have this feature.

Let's see how our two technologies offer them. In both cases, we'll take an example of days of the week to get the name of the day given its number and vice-versa.

4.1. Guava's BiMap

Guava offers an interface – BiMap, as a bi-directional map. It can be instantiated with one of its implementations EnumBiMap, EnumHashBiMap, HashBiMap, or ImmutableBiMap.

Here we're using HashBiMap:

BiMap<Integer, String> daysOfWeek = HashBiMap.create();

Populating it is similar to any map in Java:

daysOfWeek.put(1, "Monday");
daysOfWeek.put(2, "Tuesday");
daysOfWeek.put(3, "Wednesday");
daysOfWeek.put(4, "Thursday");
daysOfWeek.put(5, "Friday");
daysOfWeek.put(6, "Saturday");
daysOfWeek.put(7, "Sunday");

And here are some JUnit tests to prove the concept:

@Test
public void givenBiMap_whenValue_thenKeyReturned() {
    assertEquals(Integer.valueOf(7), daysOfWeek.inverse().get("Sunday"));
}
@Test
public void givenBiMap_whenKey_thenValueReturned() {
    assertEquals("Tuesday", daysOfWeek.get(2));
}

4.2. Apache's BidiMap

Similarly, Apache provides us with its BidiMap interface:

BidiMap<Integer, String> daysOfWeek = new TreeBidiMap<Integer, String>();

Here we're using TreeBidiMap. However, there're other implementations, such as DualHashBidiMap and DualTreeBidiMap as well.

To populate it, we can put the values as we did for BiMap above.

Its usage is also pretty similar:

@Test
public void givenBidiMap_whenValue_thenKeyReturned() {
    assertEquals(Integer.valueOf(7), daysOfWeek.inverseBidiMap().get("Sunday"));
}
@Test
public void givenBidiMap_whenKey_thenValueReturned() {
    assertEquals("Tuesday", daysOfWeek.get(2));
}

In a few simple performance tests, this bi-directional map lagged behind its Guava counterpart only in insertions. It was much faster in fetching keys as well as values.

5. Map Keys to Multiple Values

For a use case where we'd want to map multiple keys to different values, such as a grocery cart collection for fruits and vegetables, the two libraries offer us unique solutions.

5.1. Guava's MultiMap

First, let's see how to instantiate and initialize MultiMap:

Multimap<String, String> groceryCart = ArrayListMultimap.create();
groceryCart.put("Fruits", "Apple");
groceryCart.put("Fruits", "Grapes");
groceryCart.put("Fruits", "Strawberries");
groceryCart.put("Vegetables", "Spinach");
groceryCart.put("Vegetables", "Cabbage");

Then, we'll use a couple of JUnit tests to see it in action:

@Test
public void givenMultiValuedMap_whenFruitsFetched_thenFruitsReturned() {
    List<String> fruits = Arrays.asList("Apple", "Grapes", "Strawberries");
    assertEquals(fruits, groceryCart.get("Fruits"));
}
@Test
public void givenMultiValuedMap_whenVeggiesFetched_thenVeggiesReturned() {
    List<String> veggies = Arrays.asList("Spinach", "Cabbage");
    assertEquals(veggies, groceryCart.get("Vegetables"));
}

Additionally, MultiMap gives us the ability to remove a given entry or an entire set of values from the map:

@Test
public void givenMultiValuedMap_whenFuitsRemoved_thenVeggiesPreserved() {
    
    assertEquals(5, groceryCart.size());
    groceryCart.remove("Fruits", "Apple");
    assertEquals(4, groceryCart.size());
    groceryCart.removeAll("Fruits");
    assertEquals(2, groceryCart.size());
}

As we can see, here we first removed Apple from the Fruits set and then removed the entire Fruits set.

5.2. Apache's MultiValuedMap

Again, let's begin with instantiating a MultiValuedMap:

MultiValuedMap<String, String> groceryCart = new ArrayListValuedHashMap<>();

Since populating it is the same as we saw in the previous section, let's quickly look at the usage:

@Test
public void givenMultiValuedMap_whenFruitsFetched_thenFruitsReturned() {
    List<String> fruits = Arrays.asList("Apple", "Grapes", "Strawberries");
    assertEquals(fruits, groceryCart.get("Fruits"));
}
@Test
public void givenMultiValuedMap_whenVeggiesFetched_thenVeggiesReturned() {
    List<String> veggies = Arrays.asList("Spinach", "Cabbage");
    assertEquals(veggies, groceryCart.get("Vegetables"));
}

As we can see, its usage is also the same!

However, in this case, we don't have the flexibility to remove a single entry, such as Apple from Fruits. We can only remove the entire set of Fruits:

@Test
public void givenMultiValuedMap_whenFuitsRemoved_thenVeggiesPreserved() {
    assertEquals(5, groceryCart.size());
    groceryCart.remove("Fruits");
    assertEquals(2, groceryCart.size());
}

6. Map Multiple Keys to One Value

Here, we'll take an example of latitudes and longitudes to be mapped to respective cities:

cityCoordinates.put("40.7128° N", "74.0060° W", "New York");
cityCoordinates.put("48.8566° N", "2.3522° E", "Paris");
cityCoordinates.put("19.0760° N", "72.8777° E", "Mumbai");

Now, we'll see how to achieve this.

6.1. Guava's Table

Guava offers its Table that satisfies the above use case:

Table<String, String, String> cityCoordinates = HashBasedTable.create();

And here are some usages we can derive out of it:

@Test
public void givenCoordinatesTable_whenFetched_thenOK() {
    
    List expectedLongitudes = Arrays.asList("74.0060° W", "2.3522° E", "72.8777° E");
    assertArrayEquals(expectedLongitudes.toArray(), cityCoordinates.columnKeySet().toArray());
    List expectedCities = Arrays.asList("New York", "Paris", "Mumbai");
    assertArrayEquals(expectedCities.toArray(), cityCoordinates.values().toArray());
    assertTrue(cityCoordinates.rowKeySet().contains("48.8566° N"));
}

As we can see, we can get a Set view of the rows, columns, and values.

Table also offers us the ability to query its rows or columns.

Let's consider a movie table to demonstrate this:

Table<String, String, String> movies = HashBasedTable.create();
movies.put("Tom Hanks", "Meg Ryan", "You've Got Mail");
movies.put("Tom Hanks", "Catherine Zeta-Jones", "The Terminal");
movies.put("Bradley Cooper", "Lady Gaga", "A Star is Born");
movies.put("Keenu Reaves", "Sandra Bullock", "Speed");
movies.put("Tom Hanks", "Sandra Bullock", "Extremely Loud & Incredibly Close");

And here are some sample, self-explanatory searches that we can do on our movies Table:

@Test
public void givenMoviesTable_whenFetched_thenOK() {
    assertEquals(3, movies.row("Tom Hanks").size());
    assertEquals(2, movies.column("Sandra Bullock").size());
    assertEquals("A Star is Born", movies.get("Bradley Cooper", "Lady Gaga"));
    assertTrue(movies.containsValue("Speed"));
}

However, Table limits us to map only two keys to a value. We don't have an alternative as yet in Guava to map more than two keys to a single value.

6.2. Apache's MultiKeyMap

Coming back to our cityCoordinates example, here's how we can manipulate it using MultiKeyMap:

@Test
public void givenCoordinatesMultiKeyMap_whenQueried_thenOK() {
    MultiKeyMap<String, String> cityCoordinates = new MultiKeyMap<String, String>();
    // populate with keys and values as shown previously
    List expectedLongitudes = Arrays.asList("72.8777° E", "2.3522° E", "74.0060° W");
    List longitudes = new ArrayList<>();
    cityCoordinates.forEach((key, value) -> {
      longitudes.add(key.getKey(1));
    });
    assertArrayEquals(expectedLongitudes.toArray(), longitudes.toArray());
    List expectedCities = Arrays.asList("Mumbai", "Paris", "New York");
    List cities = new ArrayList<>();
    cityCoordinates.forEach((key, value) -> {
      cities.add(value);
    });
    assertArrayEquals(expectedCities.toArray(), cities.toArray());
}

As we can see from the above code snippet, to arrive at the same assertions as for Guava's Table, we had to iterate over the MultiKeyMap.

However, MultiKeyMap also offers the possibility to map more than two keys to a value. For example, it gives us the ability to map days of the week as weekdays or weekends:

@Test
public void givenDaysMultiKeyMap_whenFetched_thenOK() {
    days = new MultiKeyMap<String, String>();
    days.put("Monday", "Tuesday", "Wednesday", "Thursday", "Friday", "Weekday");
    days.put("Saturday", "Sunday", "Weekend");
    assertFalse(days.get("Saturday", "Sunday").equals("Weekday"));
}

7. Apache Commons Collections vs. Google Guava

As per its engineers, Google Guava was born out of the need to use generics in the library, which Apache Commons didn't offer. It also follows the collections API requirements to the tee. Another major advantage is that it's in active development with new releases coming out frequently.

However, Apache offers an edge when it comes to performance while fetching a value from a collection. Guava still takes the cake though, in terms of insertion times.

Although we compared only the collections APIs in our code samples, Apache Commons as a whole offers a much bigger gamut of features as compared to Guava.

8. Conclusion

In this tutorial, we compared some of the functionality offered by Apache Commons and Google Guava, specifically in the area of the collections framework.

Here, we merely scratched the surface of what the two libraries have to offer.

Moreover, it's not an either-or comparison. As our code samples demonstrated, there're features unique to each of the two, and there can be situations where both can coexist.

As always, the source code is available over on GitHub.

The post Apache Commons Collections vs Google Guava first appeared on Baeldung.


Storing Files Indexed by a Database

$
0
0

1. Overview

When we are building some sort of content management solution, we need to solve two problems. We need a place to store the files themselves, and we need some sort of database to index them.

It's possible to store the content of the files in the database itself, or we could store the content somewhere else and index it with the database.

In this article, we're going to illustrate both of these methods with a basic Image Archive Application. We'll also implement REST APIs for upload and download.

2. Use Case

Our Image Archive Application will allow us to upload and download JPEG images.

When we upload an image, the application will create a unique identifier for it. Then we can use this identifier to download it.

We'll use a relational database, with Spring Data JPA and Hibernate.

3. Database Storage

Let's start with our database.

3.1. Image Entity

First, let's create our Image entity:

@Entity
class Image {
    @Id
    @GeneratedValue
    Long id;
    @Lob
    byte[] content;
    String name;
    // Getters and Setters
}

The id field is annotated with @GeneratedValue. This means the database will create a unique identifier for each record we add. By indexing the images with these values, we don't need to worry about multiple uploads of the same image conflicting with each other.

Second, we have the Hibernate @Lob annotation. It's how we tell JPA our intention of storing a potentially large binary.

3.2. Image Repository

Next, we need a repository to connect to the database.

We'll use the spring JpaRepository:

@Repository
interface ImageDbRepository extends JpaRepository<Image, Long> {}

Now we're ready to save our images.  We just need a way to upload them to our application.

4. REST Controller

We will use a MultipartFile to upload our images. Uploading will return the imageId we can use to download the image later.

4.1. Image Upload

Let's start by creating our ImageController to support upload:

@RestController
class ImageController {
    @Autowired
    ImageDbRepository imageDbRepository;
    @PostMapping
    Long uploadImage(@RequestParam MultipartFile multipartImage) throws Exception {
        Image dbImage = new Image();
        dbImage.setName(multipartImage.getName());
        dbImage.setContent(multipartImage.getBytes());
        return imageDbRepository.save(dbImage)
            .getId();
    }
}

The MultipartFile object contains the content and original name of the file. We use this to construct our Image object for storing in the database.

This controller returns the generated id as the body of its response.

4.2. Image Download

Now, let's add a download route:

@GetMapping(value = "/image/{imageId}", produces = MediaType.IMAGE_JPEG_VALUE)
Resource downloadImage(@PathVariable Long imageId) {
    byte[] image = imageRepository.findById(imageId)
      .orElseThrow(() -> new ResponseStatusException(HttpStatus.NOT_FOUND))
      .getContent();
    return new ByteArrayResource(image);
}

The imageId path variable contains the id that was generated at upload. If an invalid id is provided, then we're using ResponseStatusException to return an HTTP response code 404 (Not Found). Otherwise, we're wrapping the stored file bytes in a ByteArrayResource which allows them to be downloaded.

5. Database Image Archive Test

Now we're ready to test our Image Archive.

First, let's build our application:

mvn package

Second, let's start it up:

java -jar target/image-archive-0.0.1-SNAPSHOT.jar

5.1. Image Upload Test

After our application is running, we'll use the curl command-line tool to upload our image:

curl -H "Content-Type: multipart/form-data" \
  -F "image=@baeldung.jpeg" http://localhost:8080/image

As the upload service response is the imageId, and this is our first request, the output will be:

1

5.2. Image Download Test

Then we can download our image:

curl -v http://localhost:8080/image/1 -o image.jpeg

The -o image.jpeg option will create a file named image.jpeg and store the response content in it:

% Total    % Received % Xferd  Average Speed   Time    Time     Time  Current
                                 Dload  Upload   Total   Spent    Left  Speed
  0     0    0     0    0     0      0      0 --:--:-- --:--:-- --:--:--     0*   Trying ::1...
* TCP_NODELAY set
* Connected to localhost (::1) port 8080 (#0)
> GET /image/1 HTTP/1.1
> Host: localhost:8080
> User-Agent: curl/7.54.0
> Accept: */*
> 
< HTTP/1.1 200 
< Accept-Ranges: bytes
< Content-Type: image/jpeg
< Content-Length: 9291

We got an HTTP/1.1 200, which means that our download was successful.

We could also try downloading the image in our browser by hitting http://localhost:8080/image/1.

6. Separate Content and Location

So far, we're capable of uploading and downloading images within a database.

Another good option is uploading the file content to a different location. Then we save only its filesystem location in the DB.

For that we'll need to add a new field to our Image entity:

String location;

This will contain the logical path to the file in some external storage. In our case, it will be the path on our server's filesystem. 

However, we can equally apply this idea to different Stores. For example, we could use cloud storage – Google Cloud Storage or Amazon S3. The location could also use a URI format, for example, s3://somebucket/path/to/file.

Our upload service, rather than writing the bytes of the file to the database, will store the file in the appropriate service – in this case, the filesystem – and will then put the location of the file into the database.

7. Filesystem Storage

Let's add the capability to store the images in the filesystem to our solution.

7.1. Saving in the Filesystem

First, we need to save our images to the filesystem:

@Repository
class FileSystemRepository {
    String RESOURCES_DIR = FileSystemRepository.class.getResource("/")
        .getPath();
    String save(byte[] content, String imageName) throws Exception {
        Path newFile = Paths.get(RESOURCES_DIR + new Date().getTime() + "-" + imageName);
        Files.createDirectories(newFile.getParent());
        Files.write(newFile, content);
        return newFile.toAbsolutePath()
            .toString();
    }
}

One important note – we need to make sure that each of our images has a unique location defined server-side at upload time. Otherwise, our uploads may overwrite each other.

The same rule would apply to any cloud storage, where we should create unique keys. In this example, we'll add the current date in milliseconds format to the image name:

/workspace/archive-achive/target/classes/1602949218879-baeldung.jpeg

7.2. Retrieving From Filesystem

Now let's implement the code to fetch our image from the filesystem:

FileSystemResource findInFileSystem(String location) {
    try {
        return new FileSystemResource(Paths.get(location));
    } catch (Exception e) {
        // Handle access or file not found problems.
        throw new RuntimeException();
    }
}

Here we're looking for the image using its location. Then we return a FileSystemResource.

Also, we're catching any exception that may happen while reading our file. We might also wish to throw exceptions with particular HTTP statuses.

7.3. Data Streaming and Spring's Resource

Our findInFileSystem method returns a FileSystemResource, an implementation of Spring's Resource interface.

It will start reading our file only when we use it. In our case, it'll be when sending it to the client via the RestController. Also, it'll stream the file content from the filesystem to the user, saving us from loading all the bytes into memory.

This approach is a good general solution for streaming files to a client. If we're using cloud storage instead of the filesystem, we can replace the FileSystemResource for another resource's implementation, like the InputStreamResource or ByteArrayResource.

8. Connecting the File Content and Location

Now that we have our FileSystemRepository, we need to link it with our ImageDbRepository.

8.1. Saving in the Database and Filesystem

Let's create a FileLocationService, starting with our save flow:

@Service
class FileLocationService {
    @Autowired
    FileSystemRepository fileSystemRepository;
    @Autowired
    ImageDbRepository imageDbRepository;
    Long save(byte[] bytes, String imageName) throws Exception {
        String location = fileSystemRepository.save(bytes, imageName);
        return imageDbRepository.save(new Image(imageName, location))
            .getId();
    }
}

First, we save the image in the filesystem. Then we save the record containing its location in the database.

8.2. Retrieving From Database and Filesystem

Now, let's create a method to find our image using its id:

FileSystemResource find(Long imageId) {
    Image image = imageDbRepository.findById(imageId)
      .orElseThrow(() -> new ResponseStatusException(HttpStatus.NOT_FOUND));
    return fileSystemRepository.findInFileSystem(image.getLocation());
}

First, we look for our image in the database. Then we get its location and fetch it from the filesystem.

If we don't find the imageId in the database, we're using ResponseStatusException to return an HTTP Not Found response.

9. Filesystem Upload and Download

Finally, let's create the FileSystemImageController:

@RestController
@RequestMapping("file-system")
class FileSystemImageController {
    @Autowired
    FileLocationService fileLocationService;
    @PostMapping("/image")
    Long uploadImage(@RequestParam MultipartFile image) throws Exception {
        return fileLocationService.save(image.getBytes(), image.getOriginalFilename());
    }
    @GetMapping(value = "/image/{imageId}", produces = MediaType.IMAGE_JPEG_VALUE)
    FileSystemResource downloadImage(@PathVariable Long imageId) throws Exception {
        return fileLocationService.find(imageId);
    }
}

First, we made our new path start with “/file-system“.

Then we created the upload route similar to that in our ImageController, but without the dbImage object.

Lastly, we have our download route, which uses the FileLocationService to find the image and returns the FileSystemResource as the HTTP response.

10. Filesystem Image Archive Test

Now, we can test our filesystem version the same way we did with our database version, though the paths now start with “file-system“:

curl -H "Content-Type: multipart/form-data" \
  -F "image=@baeldung.jpeg" http://localhost:8080/file-system/image
1

And then we download:

curl -v http://localhost:8080/file-system/image/1 -o image.jpeg

11. Conclusion

In this article, we learned how to save file information in a database, with the file content either in the same row or in an external location.

We also built and tested a REST API using multipart upload, and we provided a download feature using Resource to allow streaming the file to the caller.

As always, the code samples can be found over on GitHub.

The post Storing Files Indexed by a Database first appeared on Baeldung.


AbstractMethodError in Java

$
0
0

1. Overview

Sometimes, we may encounter AbstractMethodError at runtime in our application. If we don't know this error well, it might take a while to determine the cause of the problem.

In this tutorial, we'll take a closer look at AbstractMethodError. We'll understand what AbstractMethodError is and when it may happen.

2. Introduction to AbstractMethodError

AbstractMethodError is thrown when an application attempts to call an unimplemented abstract method. 

We know that if there are unimplemented abstract methods, the compiler will complain first. Therefore, the application won't get built at all.

We may ask how we can get this error at runtime?

First, let's have a look at where AbstractMethodError fits into the Java exception hierarchy:

java.lang.Object
|_java.lang.Throwable
  |_java.lang.Error
    |_java.lang.LinkageError
      |_java.lang.IncompatibleClassChangeError
        |_java.lang.AbstractMethodError

As the hierarchy above shows, this error is a subclass of IncompatibleClassChangeError. As its parent class's name implies, AbstractMethodError is usually thrown when incompatibilities exist between compiled classes or JAR files.

Next, let's understand how this error can happen.

3. How This Error May Happen

When we build an application, usually we'll import some libraries to make our work easier.

Let's say, in our application, we include a baeldung-queue library. The baeldung-queue library is a high-level specification library, which contains only one interface:

public interface BaeldungQueue {
    void enqueue(Object o);
    Object dequeue();
}

Also, to use the BaeldungQueue interface, we import a BaeldungQueue implementation library: good-queue. The good-queue library also has only one class:

public class GoodQueue implements BaeldungQueue {
    @Override
    public void enqueue(Object o) {
       //implementation 
    }
    @Override
    public Object dequeue() {
        //implementation 
    }
}

Now, if both good-queue and baeldung-queue are in the classpath, we may create a BaeldungQueue instance in our application:

public class Application {
    BaeldungQueue queue = new GoodQueue();
    public void someMethod(Object element) {
        queue.enqueue(element);
        // ...
        queue.dequeue();
        // ...
    }
}

So far, so good.

Someday, we've learned that baeldung-queue released version 2.0 and that it ships with a new method:

public interface BaeldungQueue {
    void enqueue(Object o);
    Object dequeue();
    int size();
}

We want to use the new size() method in our application. Therefore, we upgrade the baeldung-queue library from 1.0 to 2.0. However, we forget to check if there's a new version of the good-queue library that implements the BaeldungQueue interface changes.

Therefore, we have good-queue 1.0 and baeldung-queue 2.0 in the classpath.

Further, we start using the new method in our application:

public class Application {
    BaeldungQueue queue = new GoodQueue();
    public void someMethod(Object element) {
        // ...
        int size = queue.size(); //<-- AbstractMethodError will be thrown
        // ...
    }
}

Our code will be compiled without any problem.

However, when the line queue.size() is executed at runtime, an AbstractMethodError will be thrown. This is because the good-queue 1.0 library doesn't implement the method size() in the BaeldungQueue interface.

4. A Real-World Example

Through the simple BaeldungQueue and GoodQueue scenario, we may get the idea when an application may throw AbstractMethodError. 

In this section, we'll see a practical example of the AbstractMethodError.

java.sql.Connection is an important interface in the JDBC API. Since version 1.7, several new methods have been added to the Connection interface, such as getSchema().

The H2 database is a pretty fast open-source SQL database. Since version 1.4.192, it has added the support of the java.sql.Connection.getSchema() method. However, in previous versions, the H2 database hasn't implemented this method yet.

Next, we'll call the java.sql.Connection.getSchema() method from a Java 8 application on an older H2 database version 1.4.191. Let's see what will happen.

Let's create a unit-test class to verify if calling the Connection.getSchema() method will throw AbstractMethodError:

class AbstractMethodErrorUnitTest {
    private static final String url = "jdbc:h2:mem:A-DATABASE;INIT=CREATE SCHEMA IF NOT EXISTS myschema";
    private static final String username = "sa";
    @Test
    void givenOldH2Database_whenCallgetSchemaMethod_thenThrowAbstractMethodError() throws SQLException {
        Connection conn = DriverManager.getConnection(url, username, "");
        assertNotNull(conn);
        Assertions.assertThrows(AbstractMethodError.class, () -> conn.getSchema());
    }
}

If we run the test, it'll pass, confirming that the call to getSchema() throws AbstractMethodError.

5. Conclusion

Sometimes we may see AbstractMethodError at runtime. In this article, we've discussed when the error occurs through examples.

When we upgrade one library of our application, it's always a good practice to check if other dependencies are using the library and consider updating the related dependencies.

On the other hand, once we face AbstractMethodError, with a good understanding of this error, we may solve the problem quickly.

As always, the full source code of the article is available over on GitHub.

The post AbstractMethodError in Java first appeared on Baeldung.


Understanding the & 0xff Value in Java

$
0
0

1. Overview

0xff is a number represented in the hexadecimal numeral system (base 16). It's composed of two F numbers in hex. As we know, F in hex is equivalent to 1111 in the binary numeral system. So, 0xff in binary is 11111111.

In this article, we'll discover how to use the 0xff value. In addition, we'll see how to represent it using multiple data types and how to use it with the & operator. Finally, we'll review some of the benefits associated with using it.

2. Representing 0xff  With Different Data Types

Java allows us to define numbers interpreted as hex (base 16) by using the 0x prefix, followed by an integer literal.

The value 0xff is equivalent to 255 in unsigned decimal, -127 in signed decimal, and 11111111 in binary.

So, if we define an int variable with a value of 0xff, since Java represents integer numbers using 32 bits, the value of 0xff is 255:

int x = 0xff;
assertEquals(255, x);

However, if we define a byte variable with the value 0xff, since Java represents a byte using 8 bits and because a byte is a signed data type, the value of 0xff is -1:

byte y = (byte) 0xff;
assertEquals(-1, y);

As we see, when we define a byte variable with the 0xff value, we need to downcast it to a byte because the range of the byte data type is from -128 to 127.

3. Common Usage of & 0xff Operation

The & operator performs a bitwise AND operation. The output of bitwise AND is 1 if the corresponding bits of two operands is 1. On the other hand, if either bit of the operands is 0, then the result of the corresponding bit is evaluated to 0.

Since 0xff has eight ones in the last 8 bits, it makes it an identity element for the bitwise AND operation. So, if we apply the x & 0xff operation, it will give us the lowest 8 bits from x. Notice that, if the number x is less than 255, it'll still be the same. Otherwise, it'll be the lowest 8 bits from x.

In general, the & 0xff operation provides us with a simple way to extract the lowest 8 bits from a number. We can actually use it to extract any 8 bits we need because we can shift right any of the 8 bits we want to be the lowest bits. Then, we can extract them by applying the & 0xff operation.

Let's see an example to explain some of the benefits of using & 0xff in more detail.

4. Extracting RGBA Color Coordinates Using & 0xff

Let's assume that we have an integer number x, stored in 32 bits, that represents a color in the RGBA system, which means that it has 8 bits for each parameter (R, G, B, and A):

  • R = 16 (00010000 in binary)
  • G = 57  (00111001 in binary)
  • B = 168 (10101000 in binary)
  • A = 7 (00000111 in binary)

So, x in binary would be represented as 00010000 00111001 10101000 00000111 — which is the equivalent to 272214023 in decimal.

Now, we have our x value in decimal, and we want to extract the value for each parameter.

As we know, the >> operation shifts bits to the right. Therefore, when we do (10000000 00000000 >> 8), it gives us 10000000. As a result, we can extract the value of each parameter:

int rgba = 272214023;
int r = rgba >> 24 & 0xff;
assertEquals(16, r);
int g = rgba >> 16 & 0xff;
assertEquals(57, g);
int b = rgba >> 8 & 0xff;
assertEquals(168, b);
int a = rgba & 0xff;
assertEquals(7, a);

5. Conclusion

In this tutorial, we've discussed how the & 0xff operation effectively divides a variable in a way that leaves only the value in the last 8 bits and ignores the rest of the bits. As we've seen, this operation is especially helpful when we shift right a variable and need to extract the shifted bits.

As always, the code presented in this article is available over on GitHub.

The post Understanding the & 0xff Value in Java first appeared on Baeldung.


Distributed Performance Testing with JMeter

$
0
0

1. Overview

In this article, we'll explore distributed performance testing using JMeter.

2. What is Distributed Performance Testing?

Distributed performance testing means using multiple systems with the master-slave configuration to test a web application or a server's performance.

In this process, we'll use a local client as a master that handles the test execution using multiple remote clients, and each remote client acting as a slave will execute the test on our target server.

Each slave system executes the load tests following the exact condition set by the master. Therefore, the distributed performance testing helps us achieve a higher number of concurrent users requesting the target server.

In simple terms, the outline of the distributed performance testing using JMeter will look like:

3. Setup

3.1. Prerequisites

We should follow a few prerequisites for a smooth setup and test run:

  • Multiple computers with JMeter installed on each
  • Firewalls on the systems are turned off, or required ports are opened for connection
  • All systems (master/slave) are on the same subnet
  • JMeter on each system can access the target server
  • Use the same version of Java and JMeter on all systems (master and slave)
  • For simplicity, disable the SSL for RMI

Now that we have our systems ready, let's configure the slave and master systems.

3.2. Configure the Slave System

On the slave system, we'll go to the jmeter/bin directory and execute the jmeter-server.bat file on Windows. Or, we can run the jmeter-server file on Unix.

3.3. Configure the Master System

On the master system, we'll go to the jmeter/bin directory and edit the remote_hosts property in the jmeter.properties file to add IP addresses (comma-separated) of the slave systems:

remote_hosts=192.165.0.10,192.165.0.20,192.165.0.30

Here, we've added three slave systems.

So, by starting the JMeter (master) in the GUI mode, we can confirm all the slaves listed in the Run > Remote Start option:


That's it! We're ready to start the JMeter master system to execute tests on the target server using multiple clients.

4. Remote Testing

For remote testing, we can run JMeter in GUI mode for simplicity. However, we should run it using CLI mode when performing actual tests.

First, we'll create a simple test plan in the master system that contains the HTTP Request sampler to request our baeldung.com server, and a View Results Tree listener.

4.1. Starting a Single Slave

Then, we can choose which slave system to run using GUI mode by using the Run > Remote Start option:

4.2. Starting All Slaves

Similarly, we can choose to run all slave systems by using the Run > Remote Start All option:

Additionally, a few options are available to handle test execution on the slave systems like Remote Stop, Remote Stop All, and Remote Shutdown All.

4.3. Test Results

Finally, we can see the test results in the local JMeter (master) once test execution finishes:

Also, on the remote JMeter systems (slaves), we can find logs about the start/stop of the test execution:

Starting the test on host 192.165.0.10 @ Sun Oct 25 17:50:21 EET 2020
Finished the test on host 192.165.0.10 @ Sun Oct 25 17:50:25 EET 2020

5. Conclusion

In this quick tutorial, we've seen how to get started with distributed performance testing using JMeter.

First, we looked at a few prerequisites for a smooth setup and test run. Then, we configured our slaves and master systems for a distributed performance testing environment.

Last, we started the slave systems, ran tests from a master system, and observed the results.

The post Distributed Performance Testing with JMeter first appeared on Baeldung.


The transient Keyword in Java

$
0
0

1. Introduction

In this article, we'll first understand the transient keyword, and then we'll see its behavior through examples.

2. Usage of transient

Let's first understand the serialization before moving to transient as it is used in the context of serialization.

Serialization is the process of converting an object into a byte stream, and deserialization is the opposite of it.

When we mark any variable as transient, then that variable is not serialized. Therefore, the serialization process ignores the original value of the variables and saves default values for that data type.

The transient keyword is useful in a few scenarios:

  • We can use it for derived fields
  • It is useful for fields that do not represent the state of the object
  • We use it for any non-serializable references

3. Example

To see it in action, let's first create a Book class whose object we would like to serialize:

public class Book implements Serializable {
    private static final long serialVersionUID = -2936687026040726549L;
    private String bookName;
    private transient String description;
    private transient int copies;
    
    // getters and setters
}

Here, we have marked description and copies as transient fields.

After creating the class, we'll create an object of this class:

Book book = new Book();
book.setBookName("Java Reference");
book.setDescription("will not be saved");
book.setCopies(25);

Now, we'll serialize the object into a file:

public static void serialize(Book book) throws Exception {
    FileOutputStream file = new FileOutputStream(fileName);
    ObjectOutputStream out = new ObjectOutputStream(file);
    out.writeObject(book);
    out.close();
    file.close();
}

Let's deserialize the object now from the file:

public static Book deserialize() throws Exception {
    FileInputStream file = new FileInputStream(fileName);
    ObjectInputStream in = new ObjectInputStream(file);
    Book book = (Book) in.readObject();
    in.close();
    file.close();
    return book;
}

Finally, we'll verify the values of the book object:

assertEquals("Java Reference", book.getBookName());
assertNull(book.getDescription());
assertEquals(0, book.getCopies());

Here we see that bookName has been properly persisted. On the other hand, the copies field has value 0 and the description is null – the default values for their respective data types – instead of the original values.

4. Behavior With final

Now, let's see a special case where we'll use transient with the final keyword. For that, first, we'll add a final transient element in our Book class and then create an empty Book object:

public class Book implements Serializable {
    // existing fields    
    
    private final transient String bookCategory = "Fiction";
    // getters and setters
}
Book book = new Book();

When we verify the values after the deserialization, we'll observe that transient was ignored for this field, and the original value was persisted:

assertEquals("Fiction", book.getBookCategory());

5. Conclusion

In this article, we saw the usage of the transient keyword and its behavior in serialization and deserialization. We've also seen its different behavior with the final keyword.

As always, all the code is available over on GitHub.

The post The transient Keyword in Java first appeared on Baeldung.


Java Weekly, Issue 358

$
0
0

1. Spring and Java

>> From Reactor to Coroutines [blog.frankel.ch]

A practical take on how to migrate from Project Reactor to Kotlin coroutines: R2DBC and coroutine repositories, web handers and routing, and more!

>> Twelve-Factor Apps with Spring Boot [reflectoring.io]

Going cloud-native with Spring Boot and 12-factor apps: external configuration, statelessness, dev/prod parity, and many more!

>> I/O Stream Memory Overhead [javaspecialists.eu]

Experimenting with Project Loom: a solid read on the IO memory overhead with 2 million open sockets and also 2 million virtual threads!

Also worth reading:

Webinars and presentations:

Time to upgrade:

2. Technical

>> My advice to developers about working with databases: make it secure [techblog.bozho.net]

Best practices on working with databases: preventing SQL injection, encryption at rest and in transit, and rigorous auditing.  

Also worth reading:

3. Musings

>> Every article about software is wrong [mdswanson.com]

Context matters: on why we should incorporate generic advice or best practices with the context in mind!

Also worth reading:

4. Comics

And my favorite Dilberts of the week:

>> Boss Bluffs On Blockchain [dilbert.com]

>> Can You Zoom Now [dilbert.com]

>> Code Reuse [dilbert.com]

5. Pick of the Week

>> Real Unfair Advantages [asmartbear.com]

The post Java Weekly, Issue 358 first appeared on Baeldung.


Java (String) or .toString()?

$
0
0

1. Introduction

In this article, we'll provide a brief explanation of the differences between String casting and executing the toString() method. We'll briefly review both syntaxes and go through an example explaining the purposes of using each of them. Finally, we'll take a look at which one is a better approach.

2. String Type Casting and the toString() Method

Let's start by making a quick recap. Using the (String) syntax is strictly connected with type casting in Java. In short, the main task of using this syntax is casting a source variable into the String:

String str = (String) object;

As we know, every class in Java is an extension, either directly or indirectly, of the Object class, which implements the toString() method. We use it to get a String representation of any Object:

String str = object.toString();

Now that we've made a short recap let's go through some examples to help understand when to use each approach.

3. (String) vs toString()

Consider we have an Object variable, and we want to obtain a String. Which syntax should we use?

Before moving on, we should emphasize that the following utility method is only used to help explain our topic. In reality, we wouldn't use utility methods like this.

Firstly, we let's introduce a simple utility method to cast an Object into a String:

public static String castToString(Object object) {
    if (object instanceof String) {
        return (String) object;
    }
    return null;
}

As we can see, before casting, we have to check that our object variable is an instance of a String. If we don't, it might fail and generate a ClassCastException:

@Test(expected = ClassCastException.class)
public void givenIntegerObject_whenCastToObjectAndString_thenCastClassException() {
    Integer input = 1234;
    Object obj = input;
    String str = (String) obj;
}

However, this operation is null-safe. Using it on a non-instantiated variable, even if it hasn't been applied to a String variable before, will succeed:

@Test
public void givenNullInteger_whenCastToObjectAndString_thenSameAndNoException() {
    Integer input = null;
    Object obj = input;
    String str = (String) obj;
    assertEquals(obj, str);
    assertEquals(str, input);
    assertSame(input, str);
}

Now, it's time to implement another utility function calling toString() on the requested object:

public static String getStringRepresentation(Object object) {
    if (object != null) {
        return object.toString();
    }
    return null;
}

In this case, we don't need to know the object's type, and it can be successfully executed on an object without type casting. We only have to add a simple null check. If we don't add this check, we could get a NullPointerException when passing a non-instantiated variable to the method:

@Test(expected = NullPointerException.class)
public void givenNullInteger_whenToString_thenNullPointerException() {
    Integer input = null;
    String str = input.toString();
}

Moreover, due to the core String implementation, executing the toString() method on a String variable returns the same object:

@Test
public void givenString_whenToString_thenSame() {
    String str = "baeldung";
    assertEquals("baeldung", str.toString());
    assertSame(str, str.toString());
}

Let's get back to our question – which syntax should we use on our object variable? As we've seen above, if we know that our variable is a String instance, we should use type casting:

@Test
public void givenString_whenCastToObject_thenCastToStringReturnsSame() {
    String input = "baeldung";
    
    Object obj = input;
    
    assertSame(input, StringCastUtils.castToString(obj));
}

This approach is generally more efficient and quicker because we don't need to perform additional function calls. But, let's remember, we should never pass around a String as an Object. This would hint that we have a code smell.

When we pass any other object type, we need to call the toString() method explicitly. It is important to remember that it returns a String value according to the implementation:

@Test
public void givenIntegerNotNull_whenCastToObject_thenGetToStringReturnsString() {
    Integer input = 1234;
    Object obj = input;
    assertEquals("1234", StringCastUtils.getStringRepresentation(obj));
    assertNotSame("1234", StringCastUtils.getStringRepresentation(obj));
}

4. Conclusion

In this short tutorial, we've compared two approaches: String type casting and getting a string representation using the toString() method. Through the examples, we've explained the differences and explored when to use (String) or toString().

As always, the full source code of the article is available over on GitHub.

The post Java (String) or .toString()? first appeared on Baeldung.


Extending Enums in Java

$
0
0

1. Overview

The enum type, introduced in Java 5, is a special data type that represents a group of constants.

Using enums, we can define and use our constants in the way of type safety. It brings compile-time checking to the constants.

Further, it allows us to use the constants in the switch-case statement.

In this tutorial, we'll discuss extending enums in Java, for instance, adding new constant values and new functionalities.

2. Enums and Inheritance

When we want to extend a Java class, we'll typically create a subclass. In Java, enums are classes as well.

In this section, let's see if we can inherit an enum as we do with regular Java classes.

2.1. Extending an Enum Type

First of all, let's have a look at an example so that we can understand the problem quickly:

public enum BasicStringOperation {
    TRIM("Removing leading and trailing spaces."),
    TO_UPPER("Changing all characters into upper case."),
    REVERSE("Reversing the given string.");
    private String description;
    // constructor and getter
}

As the code above shows, we have an enum BasicStringOperation that contains three basic string operations.

Now, let's say we want to add some extension to the enum, such as MD5_ENCODE and BASE64_ENCODE. We may come up with this straightforward solution:

public enum ExtendedStringOperation extends BasicStringOperation {
    MD5_ENCODE("Encoding the given string using the MD5 algorithm."),
    BASE64_ENCODE("Encoding the given string using the BASE64 algorithm.");
    private String description;
    // constructor and getter
}

However, when we attempt to compile the class, we'll see the compiler error:

Cannot inherit from enum BasicStringOperation

2.2. Inheritance Is Not Allowed for Enums

Now, let's find out why we got our compiler error.

When we compile an enum, the Java compiler does some magic to it:

  • It turns the enum into a subclass of the abstract class java.lang.Enum
  • It compiles the enum as a final class

For example, if we disassemble our compiled BasicStringOperation enum using javap, we'll see it is represented as a subclass of java.lang.Enum<BasicStringOperation>:

$ javap BasicStringOperation  
public final class com.baeldung.enums.extendenum.BasicStringOperation 
    extends java.lang.Enum<com.baeldung.enums.extendenum.BasicStringOperation> {
  public static final com.baeldung.enums.extendenum.BasicStringOperation TRIM;
  public static final com.baeldung.enums.extendenum.BasicStringOperation TO_UPPER;
  public static final com.baeldung.enums.extendenum.BasicStringOperation REVERSE;
 ...
}

As we know, we can't inherit a final class in Java. Moreover, even if we could create the ExtendedStringOperation enum to inherit BasicStringOperation, our ExtendedStringOperation enum would extend two classes: BasicStringOperation and java.lang.Enum. That is to say, it would become a multiple inheritance situation, which is not supported in Java.

3. Emulate Extensible Enums With Interfaces

We've learned that we can't create a subclass of an existing enum. However, an interface is extensible. Therefore, we can emulate extensible enums by implementing an interface.

3.1. Emulate Extending the Constants

To understand this technique quickly, let's have a look at how to emulate extending our BasicStringOperation enum to have MD5_ENCODE and BASE64_ENCODE operations.

First, let's create an interface StringOperation:

public interface StringOperation {
    String getDescription();
}

Next, we make both enums implement the interface above:

public enum BasicStringOperation implements StringOperation {
    TRIM("Removing leading and trailing spaces."),
    TO_UPPER("Changing all characters into upper case."),
    REVERSE("Reversing the given string.");
    private String description;
    // constructor and getter override
}
public enum ExtendedStringOperation implements StringOperation {
    MD5_ENCODE("Encoding the given string using the MD5 algorithm."),
    BASE64_ENCODE("Encoding the given string using the BASE64 algorithm.");
    private String description;
    // constructor and getter override
}

Finally, let's have a look at how to emulate an extensible BasicStringOperation enum.

Let's say we have a method in our application to get the description of BasicStringOperation enum:

public class Application {
    public String getOperationDescription(BasicStringOperation stringOperation) {
        return stringOperation.getDescription();
    }
}

Now we can change the parameter type BasicStringOperation into the interface type StringOperation to make the method accept instances from both enums:

public String getOperationDescription(StringOperation stringOperation) {
    return stringOperation.getDescription();
}

3.2. Extending Functionalities

We've seen how to emulate extending constants of enums with interfaces.

Further, we can also add methods to the interface to extend the functionalities of the enums.

For example, we want to extend our StringOperation enums so that each constant can actually apply the operation to a given string:

public class Application {
    public String applyOperation(StringOperation operation, String input) {
        return operation.apply(input);
    }
    //...
}

To achieve that, first, let's add the apply() method to the interface:

public interface StringOperation {
    String getDescription();
    String apply(String input);
}

Next, we let each StringOperation enum implement this method:

public enum BasicStringOperation implements StringOperation {
    TRIM("Removing leading and trailing spaces.") {
        @Override
        public String apply(String input) { 
            return input.trim(); 
        }
    },
    TO_UPPER("Changing all characters into upper case.") {
        @Override
        public String apply(String input) {
            return input.toUpperCase();
        }
    },
    REVERSE("Reversing the given string.") {
        @Override
        public String apply(String input) {
            return new StringBuilder(input).reverse().toString();
        }
    };
    //...
}
public enum ExtendedStringOperation implements StringOperation {
    MD5_ENCODE("Encoding the given string using the MD5 algorithm.") {
        @Override
        public String apply(String input) {
            return DigestUtils.md5Hex(input);
        }
    },
    BASE64_ENCODE("Encoding the given string using the BASE64 algorithm.") {
        @Override
        public String apply(String input) {
            return new String(new Base64().encode(input.getBytes()));
        }
    };
    //...
}

A test method proves that this approach works as we expected:

@Test
public void givenAStringAndOperation_whenApplyOperation_thenGetExpectedResult() {
    String input = " hello";
    String expectedToUpper = " HELLO";
    String expectedReverse = "olleh ";
    String expectedTrim = "hello";
    String expectedBase64 = "IGhlbGxv";
    String expectedMd5 = "292a5af68d31c10e31ad449bd8f51263";
    assertEquals(expectedTrim, app.applyOperation(BasicStringOperation.TRIM, input));
    assertEquals(expectedToUpper, app.applyOperation(BasicStringOperation.TO_UPPER, input));
    assertEquals(expectedReverse, app.applyOperation(BasicStringOperation.REVERSE, input));
    assertEquals(expectedBase64, app.applyOperation(ExtendedStringOperation.BASE64_ENCODE, input));
    assertEquals(expectedMd5, app.applyOperation(ExtendedStringOperation.MD5_ENCODE, input));
}

4. Extending an Enum Without Changing the Code

We've learned how to extend an enum by implementing interfaces.

However, sometimes, we want to extend the functionalities of an enum without modifying it. For example, we'd like to extend an enum from a third-party library.

4.1. Associating Enum Constants and Interface Implementations

First, let's have a look at an enum example:

public enum ImmutableOperation {
    REMOVE_WHITESPACES, TO_LOWER, INVERT_CASE
}

Let's say the enum is from an external library, therefore, we can't change the code.

Now, in our Application class, we want to have a method to apply the given operation to the input string:

public String applyImmutableOperation(ImmutableOperation operation, String input) {...}

Since we can't change the enum code, we can use EnumMap to associate the enum constants and required implementations.

First, let's create an interface:

public interface Operator {
    String apply(String input);
}

Next, we'll create the mapping between enum constants and the Operator implementations using an EnumMap<ImmutableOperation, Operator>:

public class Application {
    private static final Map<ImmutableOperation, Operator> OPERATION_MAP;
    static {
        OPERATION_MAP = new EnumMap<>(ImmutableOperation.class);
        OPERATION_MAP.put(ImmutableOperation.TO_LOWER, String::toLowerCase);
        OPERATION_MAP.put(ImmutableOperation.INVERT_CASE, StringUtils::swapCase);
        OPERATION_MAP.put(ImmutableOperation.REMOVE_WHITESPACES, input -> input.replaceAll("\\s", ""));
    }
    public String applyImmutableOperation(ImmutableOperation operation, String input) {
        return operationMap.get(operation).apply(input);
    }

In this way, our applyImmutableOperation() method can apply the corresponding operation to the given input string:

@Test
public void givenAStringAndImmutableOperation_whenApplyOperation_thenGetExpectedResult() {
    String input = " He ll O ";
    String expectedToLower = " he ll o ";
    String expectedRmWhitespace = "HellO";
    String expectedInvertCase = " hE LL o ";
    assertEquals(expectedToLower, app.applyImmutableOperation(ImmutableOperation.TO_LOWER, input));
    assertEquals(expectedRmWhitespace, app.applyImmutableOperation(ImmutableOperation.REMOVE_WHITESPACES, input));
    assertEquals(expectedInvertCase, app.applyImmutableOperation(ImmutableOperation.INVERT_CASE, input));
}

4.2. Validating the EnumMap Object

Now, if the enum is from an external library, we don't know if it has been changed or not, such as by adding new constants to the enum. In this case, if we don't change our initialization of the EnumMap to contain the new enum value, our EnumMap approach may run into a problem if the newly added enum constant is passed to our application.

To avoid that, we can validate the EnumMap after its initialization to check if it contains all enum constants:

static {
    OPERATION_MAP = new EnumMap<>(ImmutableOperation.class);
    OPERATION_MAP.put(ImmutableOperation.TO_LOWER, String::toLowerCase);
    OPERATION_MAP.put(ImmutableOperation.INVERT_CASE, StringUtils::swapCase);
    // ImmutableOperation.REMOVE_WHITESPACES is not mapped
    if (Arrays.stream(ImmutableOperation.values()).anyMatch(it -> !OPERATION_MAP.containsKey(it))) {
        throw new IllegalStateException("Unmapped enum constant found!");
    }
}

As the code above shows, if any constant from ImmutableOperation is not mapped, an IllegalStateException will be thrown. Since our validation is in a static block, IllegalStateException will be the cause of ExceptionInInitializerError:

@Test
public void givenUnmappedImmutableOperationValue_whenAppStarts_thenGetException() {
    Throwable throwable = assertThrows(ExceptionInInitializerError.class, () -> {
        ApplicationWithEx appEx = new ApplicationWithEx();
    });
    assertTrue(throwable.getCause() instanceof IllegalStateException);
}

Thus, once the application fails to start with the mentioned error and cause, we should double-check the ImmutableOperation to make sure all constants are mapped.

5. Conclusion

The enum is a special data type in Java. In this article, we've discussed why enum doesn't support inheritance. After that, we addressed how to emulate extensible enums with interfaces.

Also, we've learned how to extend the functionalities of an enum without changing it.

As always, the full source code of the article is available over on GitHub.

The post Extending Enums in Java first appeared on Baeldung.


Check if a Java Program Is Running in 64-Bit or 32-Bit JVM

$
0
0

1. Overview

Although Java is platform-independent, there are times when we have to use native libraries. In those cases, we might need to identify the underlying platform and load the appropriate native libraries on startup.

In this tutorial, we'll learn different ways to check if a Java program is running on a 64-bit or 32-bit JVM.

First, we'll show how to achieve this using the System class.

Then, we'll see how to use the Java Native Access (JNA) API to check the bitness of the JVM. JNA is a community-developed library that enables all native access.

2. Using the sun.arch.data.model System Property

The System class in Java provides access to externally defined properties and environment variables. It maintains a Properties object that describes the configuration of the current working environment.

We can use the “sun.arch.data.model” system property to identify JVM bitness:

System.getProperty("sun.arch.data.model");

It contains “32” or “64” to indicate a 32-bit or 64-bit JVM, respectively. Although this approach is easy to use, It returns “unknown” if the property is not present. Hence, it will work only with Oracle Java versions.

Let's see the code:

public class JVMBitVersion {
    public String getUsingSystemClass() {
        return System.getProperty("sun.arch.data.model") + "-bit";
    }
 
    //... other methods
}

Let's check this approach through a unit test:

@Test
public void whenUsingSystemClass_thenOutputIsAsExpected() {
    if (System.getProperty("sun.arch.data.model") == "64") {
        assertEquals("64-bit", jvmVersion.getUsingSystemClass());
    } else if (System.getProperty("sun.arch.data.model") == "32") {
        assertEquals("32-bit", jvmVersion.getUsingSystemClass());
    }
}

3. Using the JNA API

JNA (Java Native Access) supports various platforms such as macOS, Microsoft Windows, Solaris, GNU, and Linux.

It uses native functions to load a library by name and retrieve a pointer to a function within that library.

3.1. Native Class

We can use POINTER_SIZE from the Native class. This constant specifies the size (in bytes) of a native pointer on the current platform.

A value of 4 indicates a 32-bit native pointer, while a value of 8 indicates a 64-bit native pointer:

if (com.sun.jna.Native.POINTER_SIZE == 4) {
    // 32-bit
} else if (com.sun.jna.Native.POINTER_SIZE == 8) {
    // 64-bit
}

3.2. Platform Class

Alternatively, we can use the Platform class, which provides simplified platform information.

It contains the is64Bit() method that detects whether the JVM is 64-bit or not.

Let see how it identifies the bitness:

public static final boolean is64Bit() {
    String model = System.getProperty("sun.arch.data.model",
                                      System.getProperty("com.ibm.vm.bitmode"));
    if (model != null) {
        return "64".equals(model);
    }
    if ("x86-64".equals(ARCH)
        || "ia64".equals(ARCH)
        || "ppc64".equals(ARCH) || "ppc64le".equals(ARCH)
        || "sparcv9".equals(ARCH)
        || "mips64".equals(ARCH) || "mips64el".equals(ARCH)
        || "amd64".equals(ARCH)
        || "aarch64".equals(ARCH)) {
        return true;
    }
    return Native.POINTER_SIZE == 8;
}

Here, the ARCH constant is derived from the “os.arch” property via the System class. It is used to get operating system architecture:

ARCH = getCanonicalArchitecture(System.getProperty("os.arch"), osType);

This approach works for different operating systems and also with different JDK vendors. Hence, it is more reliable than the “sun.arch.data.model” system property.

4. Conclusion

In this tutorial, we learned how to check the JVM bit version. We also observed how JNA simplified the solution for us on different platforms.

As always, the complete code is available over on GitHub.

The post Check if a Java Program Is Running in 64-Bit or 32-Bit JVM first appeared on Baeldung.


Functional Programming in Java

$
0
0

1. Introduction

In this tutorial, we'll understand the functional programming paradigm's core principles and how to practice them in the Java programming language. We'll also cover some of the advanced functional programming techniques.

This will also allow us to evaluate the benefits we get from functional programming, especially in Java.

2. What Is Functional Programming

Basically, functional programming is a style of writing computer programs that treat computations as evaluating mathematical functions. So, what is a function in mathematics?

A function is an expression that relates an input set to an output set.

Importantly, the output of a function depends only on its input. More interestingly, we can compose two or more functions together to get a new function.

2.1. Lambda Calculus

To understand why these definitions and properties of mathematical functions are important in programming, we'll have to go a little back in time. In the 1930s, mathematician Alonzo Chruch developed a formal system to express computations based on function abstraction. This universal model of computation came to be known as the Lambda Calculus.

Lambda calculus had a tremendous impact on developing the theory of programming languages, particularly functional programming languages. Typically, functional programming languages implement lambda calculus.

As lambda calculus focuses on function composition, functional programming languages provide expressive ways to compose software in function composition.

2.2. Categorization of Programming Paradigms

Of course, functional programming is not the only programming style in practice. Broadly speaking, programming styles can be categorized into imperative and declarative programming paradigms:

The imperative approach defines a program as a sequence of statements that change the program's state until it reaches the final state. Procedural programming is a type of imperative programming where we construct programs using procedures or subroutines. One of the popular programming paradigms known as object-oriented programming (OOP) extends procedural programming concepts.

In contrast, the declarative approach expresses the logic of a computation without describing its control flow in terms of a sequence of statements. Simply put, the declarative approach's focus is to define what the program has to achieve rather than how it should achieve it. Functional programming is a sub-set of the declarative programming languages.

These categories have further sub-categories, and the taxonomy gets quite complex, but we'll not get into that for this tutorial.

2.3. Categorization of Programming Languages

Any attempt to formally categorize the programming languages today is an academic effort in itself! However, we'll try to understand how programming languages are divided based on their support for functional programming for our purposes.

Pure functional languages, like Haskell, only allow pure functional programs.

Other languages, however, allow both functional and procedural programs and are considered impure functional languages. Many languages fall into this category, including Scala, Kotlin, and Java.

It's important to understand that most of the popular programming languages today are general-purpose languages, and hence they tend to support multiple programming paradigms.

3. Fundamental Principles and Concepts

This section will cover some of the basic principles of functional programming and how to adopt them in Java. Please note that many features we'll be using haven't always been part of Java, and it's advisable to be on Java 8 or later to exercise functional programming effectively.

3.1. First-Class and Higher-Order Functions

A programming language is said to have first-class functions if it treats functions as first-class citizens. Basically, it means that functions are allowed to support all operations typically available to other entities. These include assigning functions to variables, passing them as arguments to other functions, and returning them as values from other functions.

This property makes it possible to define higher-order functions in functional programming. Higher-order functions are capable of receiving function as arguments and returning a function as a result. This further enables several techniques in functional programming like function composition and currying.

Traditionally it was only possible to pass functions in Java using constructs like functional interfaces or anonymous inner classes. Functional interfaces have exactly one abstract method and are also known as Single Abstract Method (SAM) interfaces.

Let's say we have to provide a custom comparator to Collections.sort method:

Collections.sort(numbers, new Comparator<Integer>() {
    @Override
    public int compare(Integer n1, Integer n2) {
        return n1.compareTo(n2);
    }
});

As we can see, this is a tedious and verbose technique — certainly not something that encourages developers to adopt functional programming. Fortunately, Java 8 brought many new features to ease the process, like lambda expressions, method references, and predefined functional interfaces.

Let's see how a lambda expression can help us with the same task:

Collections.sort(numbers, (n1, n2) -> n1.compareTo(n2));

Definitely, this is more concise and understandable. However, please note that while this may give us the impression of using functions as first-class citizens in Java, that's not the case.

Behind the syntactic sugar of lambda expressions, Java still wraps these into functional interfaces. Hence, Java treats a lambda expression as an Object, which is, in fact, the true first-class citizen in Java.

3.2. Pure Functions

The definition of pure function emphasizes that a pure function should return a value based only on the arguments and should have no side effects. Now, this can sound quite contrary to all the best practices in Java.

Java, being an object-oriented language, recommends encapsulation as a core programming practice. It encourages hiding an object's internal state and exposing only necessary methods to access and modify it. Hence, these methods aren't strictly pure functions.

Of course, encapsulation and other object-oriented principles are only recommendations and not binding in Java. In fact, developers have recently started to realize the value of defining immutable states and methods without side-effects.

Let's say we want to find the sum of all the numbers we've just sorted:

Integer sum(List<Integer> numbers) {
    return numbers.stream().collect(Collectors.summingInt(Integer::intValue));
}

Now, this method depends only on the arguments it receives, hence, it's deterministic. Moreover, it doesn't produce any side effects.

Side effects can be anything apart from the intended behavior of the method. For instance, side-effects can be as simple as updating a local or global state or saving to a database before returning a value. Purists also treat logging as a side effect, but we all have our own boundaries to set!

We may, however, reason about how we deal with legitimate side effects. For instance, we may need to save the result in a database for genuine reasons. Well, there are techniques in functional programming to handle side effects while retaining pure functions.

We'll discuss some of them in later sections.

3.3. Immutability

Immutability is one of the core principles of functional programming, and it refers to the property that an entity can't be modified after being instantiated. Now in a functional programming language, this is supported by design at the language level. But, in Java, we have to make our own decision to create immutable data structures.

Please note that Java itself provides several built-in immutable types, for instance, String. This is primarily for security reasons, as we heavily use String in class loading and as keys in hash-based data structures. There are several other built-in immutable types like primitive wrappers and math types.

But what about the data structures we create in Java? Of course, they are not immutable by default, and we have to make a few changes to achieve immutability. The use of the final keyword is one of them, but it doesn't stop there:

public class ImmutableData {
    private final String someData;
    private final AnotherImmutableData anotherImmutableData;
    public ImmutableData(final String someData, final AnotherImmutableData anotherImmutableData) {
        this.someData = someData;
        this.anotherImmutableData = anotherImmutableData;
    }
    public String getSomeData() {
        return someData;
    }
    public AnotherImmutableData getAnotherImmutableData() {
        return anotherImmutableData;
    }
}
public class AnotherImmutableData {
    private final Integer someOtherData;
    public AnotherImmutableData(final Integer someData) {
        this.someOtherData = someData;
    }
    public Integer getSomeOtherData() {
        return someOtherData;
    }
}

Note that we have to observe a few rules diligently:

  • All fields of an immutable data structure must be immutable
  • This must apply to all the nested types and collections (including what they contain) as well
  • There should be one or more constructors for initialization as needed
  • There should only be accessor methods, possibly with no side-effects

It's not easy to get it completely right every time, especially when the data structures start to get complex. However, several external libraries can make working with immutable data in Java easier. For instance, Immutables and Project Lombok provide ready-to-use frameworks for defining immutable data structures in Java.

3.4. Referential Transparency

Referential transparency is perhaps one of the more difficult principles of functional programming to understand. The concept is pretty simple, though. We call an expression referentially transparent if replacing it with its corresponding value has no impact on the program's behavior.

This enables some powerful techniques in functional programming like higher-order functions and lazy evaluation. To understand this better, let's take an example:

public class SimpleData {
    private Logger logger = Logger.getGlobal();
    private String data;
    public String getData() {
        logger.log(Level.INFO, "Get data called for SimpleData");
        return data;
    }
    public SimpleData setData(String data) {
        logger.log(Level.INFO, "Set data called for SimpleData");
        this.data = data;
        return this;
    }
}

This is a typical POJO class in Java, but we're interested in finding if this provides referential transparency. Let's observe the following statements:

String data = new SimpleData().setData("Baeldung").getData();
logger.log(Level.INFO, new SimpleData().setData("Baeldung").getData());
logger.log(Level.INFO, data);
logger.log(Level.INFO, "Baeldung");

The three calls to logger are semantically equivalent but not referentially transparent. The first call is not referentially transparent as it produces a side-effect. If we replace this call with its value as in the third call, we'll miss the logs.

The second call is also not referentially transparent as SimpleData is mutable. A call to data.setData anywhere in the program would make it difficult for it to be replaced with its value.

So basically, for referential transparency, we need our functions to be pure and immutable. These are the two preconditions we've already discussed earlier. As an interesting outcome of referential transparency, we produce context-free code. In other words, we can execute them in any order and context, which leads to different optimization possibilities.

4. Functional Programming Techniques

The functional programming principles that we discussed earlier enable us to use several techniques to benefit from functional programming. In this section, we'll cover some of these popular techniques and understand how we can implement them in Java.

4.1. Function Composition

Function composition refers to composing complex functions by combining simpler functions. This is primarily achieved in Java using functional interfaces, which are, in fact, target types for lambda expressions and method references.

Typically, any interface with a single abstract method can serve as a functional interface. Hence, we can define a functional interface quite easily. However, Java 8 provides us many functional interfaces by default for different use cases under the package java.util.function.

Many of these functional interfaces provide support for function composition in terms of default and static methods. Let's pick the Function interface to understand this better. Function is a simple and generic functional interface that accepts one argument and produces a result.

It also provides two default methods, compose and andThen, which will help us in function composition:

Function<Double, Double> log = (value) -> Math.log(value);
Function<Double, Double> sqrt = (value) -> Math.sqrt(value);
Function<Double, Double> logThenSqrt = sqrt.compose(log);
logger.log(Level.INFO, String.valueOf(logThenSqrt.apply(3.14)));
// Output: 1.06
Function<Double, Double> sqrtThenLog = sqrt.andThen(log);
logger.log(Level.INFO, String.valueOf(sqrtThenLog.apply(3.14)));
// Output: 0.57

Both these methods allow us to compose multiple functions into a single function but offer different semantics. While compose applies the function passed in the argument first and then the function on which it's invoked, andThen does the same in reverse.

Several other functional interfaces have interesting methods to use in function composition, such as the default methods and, or, and negate in the Predicate interface. While these functional interfaces accept a single argument, there are two-arity specializations, like BiFunction and BiPredicate.

4.2. Monads

Many of the functional programming concepts derive from Category Theory, which is a general theory of functions in mathematics. It presents several concepts of categories like functors and natural transformations. For us, it's only important to know that this is the basis of using monads in functional programming.

Formally, a monad is an abstraction that allows structuring programs generically. So basically, a monad allows us to wrap a value, apply a set of transformations, and get the value back with all transformations applied. Of course, there are three laws that any monad needs to follow – left identity, right identity, and associativity – but we'll not get into the details.

In Java, there are a few monads that we use quite often, like Optional and Stream:

Optional.of(2).flatMap(f -> Optional.of(3).flatMap(s -> Optional.of(f + s)))

Now, why do we call Optional a monad? Here, Optional allows us to wrap a value using the method of and apply a series of transformations. We're applying the transformation of adding another wrapped value using the method flatMap.

If we want, we can show that Optional follows the three laws of monads. However, critics will be quick to point out that an Optional does break the monad laws under some circumstances. But, for most practical situations, it should be good enough for us.

If we understand monads' basics, we'll soon realize that there are many other examples in Java, like Stream and CompletableFuture. They help us achieve different objectives, but they all have a standard composition in which context manipulation or transformation is handled.

Of course, we can define our own monad types in Java to achieve different objectives like log monad, report monad, or audit monad. Remember how we discussed handling side-effects in functional programming? Well, as it appears, the monad is one of the functional programming techniques to achieve that.

4.3. Currying

Currying is a mathematical technique of converting a function that takes multiple arguments into a sequence of functions that take a single argument. But, why do we need them in functional programming? It gives us a powerful composition technique where we do not need to call a function with all its arguments.

Moreover, a curried function does not realize its effect until it receives all the arguments.

In pure functional programming languages like Haskell, currying is well supported. In fact, all functions are curried by default. However, in Java, it's not that straightforward:

Function<Double, Function<Double, Double>> weight = mass -> gravity -> mass * gravity;
Function<Double, Double> weightOnEarth = weight.apply(9.81);
logger.log(Level.INFO, "My weight on Earth: " + weightOnEarth.apply(60.0));
Function<Double, Double> weightOnMars = weight.apply(3.75);
logger.log(Level.INFO, "My weight on Mars: " + weightOnMars.apply(60.0));

Here, we've defined a function to calculate our weight on a planet. While our mass remains the same, gravity varies by the planet we're on. We can partially apply the function by passing just the gravity to define a function for a specific planet. Moreover, we can pass this partially applied function around as an argument or return value for arbitrary composition.

Currying depends upon the language to provide two fundamental features: lambda expressions and closures. Lambda expressions are anonymous functions that help us to treat code as data. We've seen earlier how to implement them using functional interfaces.

Now, a lambda expression may close upon its lexical scope, which we define as its closure. Let's see an example:

private static Function<Double, Double> weightOnEarth() {	
    final double gravity = 9.81;	
    return mass -> mass * gravity;
}

Please note how the lambda expression, which we return in the method above, depends on the enclosing variable, which we call closure. Unlike other functional programming languages, Java has a limitation that the enclosing scope has to be final or effectively final.

As an interesting outcome, currying also allows us to create a functional interface in Java of arbitrary arity.

4.4. Recursion

Recursion is another powerful technique in functional programming that allows us to break down a problem into smaller pieces. The main benefit of recursion is that it helps us eliminate the side effects, which is typical of any imperative style looping.

Let's see how we calculate the factorial of a number using recursion:

Integer factorial(Integer number) {
    return (number == 1) ? 1 : number * factorial(number - 1);
}

Here, we call the same function recursively until we reach the base case and then start to calculate our result. Notice that we're making the recursive call before calculating the result at each step or in words at the head of the calculation. Hence, this style of recursion is also known as head recursion.

A drawback of this type of recursion is that every step has to hold the state of all previous steps until we reach the base case. This is not really a problem for small numbers, but holding the state for large numbers can be inefficient.

A solution is a slightly different implementation of the recursion known as tail recursion. Here, we ensure that the recursive call is the last call a function makes. Let's see how we can rewrite the above function to use tail recursion:

Integer factorial(Integer number, Integer result) {
    return (number == 1) ? result : factorial(number - 1, result * number);
}

Notice the use of an accumulator in the function, eliminating the need to hold the state at every step of recursion. The real benefit of this style is to leverage compiler optimizations where the compiler can decide to let go of the current function's stack frame, a technique known as tail-call elimination.

While many languages like Scala supports tail-call elimination, Java still does not have support for this. This is part of the backlog for Java and will perhaps come in some shape as part of larger changes proposed under Project Loom.

5. Why Functional Programming Matters?

After going through the tutorial so far, we must wonder why we even want to take this much effort. For someone coming from a Java background, the shift that functional programming demands are not trivial. So, there should be some really promising advantages for adopting functional programming in Java.

The biggest advantage of adopting functional programming in any language, including Java, is pure functions and immutable states. If we think in retrospect, most of the programming challenges are rooted in the side-effects and mutable state one way or the other. Simply getting rid of them makes our program easier to read, reason about, test, and maintain.

Declarative programming, as such, leads to very concise and readable programs. Functional programming, being a subset of declarative programming, offers several constructs like higher-order functions, function composition, and function chaining. Think of the benefits that Stream API has brought into Java 8 for handling data manipulations.

But don't get tempted to switch over unless completely ready. Please note that functional programming is not a simple design pattern that we can immediately use and benefit from. Functional programming is more of a change in how we reason about problems and their solutions and how to structure the algorithm.

So, before we start using functional programming, we must train ourselves to think about our programs in terms of functions.

6. Is Java a Suitable Fit?

While it's difficult to deny functional programming benefits, we cannot help but ask ourselves if Java is a suitable choice for it. Historically, Java evolved as a general-purpose programming language more suitable for object-oriented programming. Even thinking of using functional programming before Java 8 was tedious! But things have definitely changed after Java 8.

The very fact that there are no true function types in Java goes against functional programming's basic principles. The functional interfaces in the disguise of lambda expressions make up for it largely, at least syntactically. Then, the fact that types in Java are inherently mutable and we have to write so much boilerplate to create immutable types does not help.

We expect other things from a functional programming language that are missing or difficult in Java. For instance, the default evaluation strategy for arguments in Java is eager. But, lazy evaluation is a more efficient and recommended way in functional programming.

We can still achieve lazy evaluation in Java using operator short-circuiting and functional interfaces, but it's more involved.

The list is certainly not complete and can include generics support with type-erasure, missing support for tail-call optimization, and other things. However, we get a broad idea. Java is definitely not suitable for starting a program from scratch in functional programming.

But what if we already have an existing program written in Java, probably in object-oriented programming? Nothing stops us from getting some of the benefits of functional programming, especially with Java 8.

This is where most of the benefits of functional programming lie for a Java developer. A combination of object-oriented programming with the benefits of functional programming can go a long way.

7. Conclusion

In this tutorial, we went through the basics of functional programming. We covered the fundamental principles and how we can adopt them in Java. Further, we discussed some popular techniques in functional programming with examples in Java.

Finally, we covered some of the benefits of adopting functional programming and answered if Java is suitable for the same.

The source code for the article is available over on GitHub.

The post Functional Programming in Java first appeared on Baeldung.

        
Viewing all 3787 articles
Browse latest View live


<script src="https://jsc.adskeeper.com/r/s/rssing.com.1596347.js" async> </script>