1. Overview
Creating a modal dialog in a web application is a common requirement for user interactions, such as displaying forms, confirming actions, or presenting information. In a Spring application with Thymeleaf, passing dynamic data to a modal dialog significantly enhances user interactivity.
In this article, we will walk through the process of implementing a modal dialog in Thymeleaf and passing an object to it.
2. Maven Dependencies
Before starting, let’s ensure that Thymeleaf is properly configured in our Spring MVC application. We need to include the thymeleaf and thymeleaf-spring5 dependencies in our pom.xml file:
<dependency>
    <groupId>org.thymeleaf</groupId>
    <artifactId>thymeleaf</artifactId>
    <version>3.1.2.RELEASE</version>
</dependency>
<dependency>
    <groupId>org.thymeleaf</groupId>
    <artifactId>thymeleaf-spring5</artifactId>
    <version>3.1.2.RELEASE</version>
</dependency>
These dependencies allow Spring MVC to handle Thymeleaf views and render dynamic content seamlessly
3. Defining the Data Model
Next, let’s define a Book model class. This class will represent the data we want to pass to the modal dialog. It contains properties such as id and name, which will be used to display relevant information about each book:
public class Book {
    private int id;
    private String name;
    // constructor
    // getters and setters
}
4. Creating the Controller
Now, let’s implement a Spring Controller that prepares a list of Book objects and passes them to the Thymeleaf view. This controller will handle the request and make the book data available to the template:
@GetMapping("/listBooksWithModal")
public String listBooks(Model model) {
    List<Book> books = new ArrayList<>();
    books.add(new Book(1, "Book 1"));
    books.add(new Book(1, "Book 2"));
    books.add(new Book(1, "Book 2"));
    model.addAttribute("books", books);
    return "listBooksWithModal.html";
}
The listBooks() method prepares a list of Book objects and adds them to the model, making the list accessible to the listBooksWithModal.html template.
5. Creating the Thymeleaf Template
Now, let’s focus on the Thymeleaf template that will display the list of books and open a modal dialog when the user clicks the “View Details” button.
In this template, we pass the Book object to a modal dialog, which displays details like the book’s ID and name:
<!DOCTYPE html>
<html xmlns:th="http://www.thymeleaf.org">
<head>
    <title>Book List with Modals</title>
</head>
<body>
<div>
    <h1>Book List</h1>
    <table border="1">
        <thead>
        <tr>
            <th>Book ID</th>
            <th>Book Name</th>
            <th>Action</th>
        </tr>
        </thead>
        <tbody>
        <tr th:each="book : ${books}">
            <td th:text="${book.id}"></td>
            <td th:text="${book.name}"></td>
            <td>
                <!-- Button to open modal for the selected book -->
                <button th:attr="onclick=|showModal('infoModal' + ${book.id})|">View Details</button>
            </td>
        </tr>
        </tbody>
    </table>
</div>
<!-- Modal template for each book -->
<div th:each="book : ${books}" th:attr="id=${'infoModal' + book.id}" style="display: none;">
    <div>
        <h3>Book Details</h3>
        <p><strong>ID:</strong> <span th:text="${book.id}"></span></p>
        <p><strong>Name:</strong> <span th:text="${book.name}"></span></p>
        <button th:attr="onclick=|hideModal('infoModal' + ${book.id})|">Close</button>
    </div>
</div>
<script>
    function showModal(modalId) {
        document.getElementById(modalId).style.display = 'block';
    }
    function hideModal(modalId) {
        document.getElementById(modalId).style.display = 'none';
    }
</script>
</body>
</html>
The template displays a list of books in a table, with each row corresponding to a specific book. This structure lets users easily view basic information about each book, such as its ID and name. Additionally, each book has a “View Details” button. When clicked, this button triggers the modal to display more detailed information about the selected book.
Inside the modal, Thymeleaf’s th:text attribute dynamically populates the content. When the user clicks a specific book’s “View Details” button, the modal shows the correct details for that book, such as its ID and name. The server generates the modal IDs via the model, and Thymeleaf renders the content, binding it to the modal’s HTML elements.
Furthermore, we assign a unique ID to each modal based on the book’s ID. This guarantees that the correct modal appears when the user interacts with the “View Details” button. The modal IDs are dynamically generated using the format infoModal{id}, where {id} is replaced with the actual book ID. Consequently, the correct modal is displayed for the selected book object.
Overall, the template structure helps the users to interact with the list of books. They can view more detailed information about each book without leaving the page, resulting in a smooth and efficient user experience.
6. Results
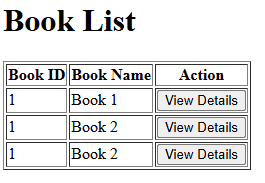
In this section, we’ll showcase the rendered template to illustrate how the Thymeleaf template looks in action. The table lists the books, with each row showing the book’s ID, name, and a “View Details” button:

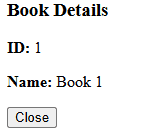
When a user clicks the button, the modal dialog displays detailed information about the selected book:

7. Conclusion
This article demonstrated how to pass an object to a modal dialog in a Spring MVC application using Thymeleaf. By creating unique modals for each object and using Thymeleaf’s dynamic data binding capabilities, we were able to pass relevant content to the modal and display it interactively.
As always, the code used in this article can be found over on GitHub.


