In this tutorial, we'll look at how we get and resolve Circular View Path errors in a Spring MVC application.
2. Dependencies
To demonstrate this, let's create a simple Spring Boot web project. First, we need to add the Spring Boot web starter dependency in our Maven project file:
Then, let's create a simple Spring Boot application with one Controller that resolves to one path:
@Controller
public class CircularViewPathController {

    @GetMapping("/path")
    public String path() {
        return "path";
    }
}
The return value is the view name that will produce response data. In our case, the return value is path which is associated with the path.html template:
After we start the server, we can reproduce the error by making a GET request to http://localhost:8080/path. The result will be the Circular View Path error:
{"timestamp":"2020-05-22T11:47:42.173+0000","status":500,"error":"Internal Server Error",
"message":"Circular view path [path]: would dispatch back to the current handler URL [/path]
again. Check your ViewResolver setup! (Hint: This may be the result of an unspecified view,
due to default view name generation.)","path":"/path"}
4. Solutions
By default, the Spring MVC framework applies the InternalResourceView class as the view resolver. As a result, if the @GetMapping value is the same as the view, the request will fail with the Circular View path error.
One possible solution would be to rename the view and change the return value in the controller method.
@Controller
public class CircularViewPathController {
  @GetMapping("/path")
  public String path() {
    return "path2";
  }
}
If we don't want to rename the view and change the return value in the controller method, then another solution is to choose another view processor for the project.
After rebuilding the project we can run it again, and the request is successful. In this case, Thymeleaf replaces the InternalResourceView class.
5. Conclusion
In this tutorial, we looked at the Circular View path error, why it happens, and how to resolve the issue. As always, the full source code of the article is available over on GitHub.
Bytecode analysis is a common practice among Java developers for many reasons, like finding problems with code, code profiling, and searching classes with specific annotations.
In this article, we'll explore ways to view the bytecode of a class file in Java.
2. What Is the Bytecode?
Bytecode is the intermediate representation of a Java program, allowing a JVM to translate a program into machine-level assembly instructions.
When a Java program is compiled, bytecode is generated in the form of a .class file. This .class file contains non-runnable instructions and relies on a JVM to be interpreted.
3. Using javap
The Java command-line comes with the javap tool that displays information about the fields, constructors, and methods of a class file.
Based on the options used, it can disassemble a class and show the instructions that comprise the Java bytecode.
3.1. javap
Let's use the javap command to view the bytecode of the most-common Object class:
$ javap java.lang.Object
The output of the command will show the bare-minimum construct of the Object class:
public class java.lang.Object {
  public java.lang.Object();
  public final native java.lang.Class<?> getClass();
  public native int hashCode();
  public boolean equals(java.lang.Object);
  protected native java.lang.Object clone() throws java.lang.CloneNotSupportedException;
  public java.lang.String toString();
  public final native void notify();
  public final native void notifyAll();
  public final native void wait(long) throws java.lang.InterruptedException;
  public final void wait(long, int) throws java.lang.InterruptedException;
  public final void wait() throws java.lang.InterruptedException;
  protected void finalize() throws java.lang.Throwable;
  static {};
}
By default, the bytecode output will not contain fields/methods with a privateaccess modifier.
3.2. javap -p
To view all classes and members, we can use the -p argument:
public class java.lang.Object {
  public java.lang.Object();
  private static native void registerNatives();
  public final native java.lang.Class<?> getClass();
  public native int hashCode();
  public boolean equals(java.lang.Object);
  protected native java.lang.Object clone() throws java.lang.CloneNotSupportedException;
  // ...
}
Here, we can observe a private method registerNatives is also shown in the bytecode of the Object class.
3.3. javap -v
Similarly, we can use the -v argument to view verbose information like stack size and arguments for methods of the Object class:
Classfile jar:file:/Library/Java/JavaVirtualMachines/jdk1.8.0_131.jdk/Contents/Home/jre/lib/rt.jar!/java/lang/Object.class
  Last modified Mar 15, 2017; size 1497 bytes
  MD5 checksum 5916745820b5eb3e5647da3b6cc6ef65
  Compiled from "Object.java"
public class java.lang.Object
  minor version: 0
  major version: 52
  flags: ACC_PUBLIC, ACC_SUPER
Constant pool:
   #1 = Class              #49            // java/lang/StringBuilder
   // ...
{
  public java.lang.Object();
    descriptor: ()V
    flags: ACC_PUBLIC
    Code:
      stack=0, locals=1, args_size=1
         0: return
      LineNumberTable:
        line 37: 0

  public final native java.lang.Class<?> getClass();
    descriptor: ()Ljava/lang/Class;
    flags: ACC_PUBLIC, ACC_FINAL, ACC_NATIVE
    Signature: #26                          // ()Ljava/lang/Class<*>;

  // ...
}
SourceFile: "Object.java"
3.4. javap -c
Also, the javap command allows disassembling the whole Java class by using the -c argument:
Compiled from "Object.java"
public class java.lang.Object {
  public java.lang.Object();
    Code:
       0: return
  public boolean equals(java.lang.Object);
    Code:
       0: aload_0
       1: aload_1
       2: if_acmpne     9
       5: iconst_1
       6: goto          10
       9: iconst_0
      10: ireturn
  protected native java.lang.Object clone() throws java.lang.CloneNotSupportedException;
  // ...
}
Further, the javap command allows us to check the system info, constants, and internal type signatures using various arguments.
We can list all arguments supported by the javap command by using the -help argument.
Now that we've seen a Java command-line solution for viewing the bytecode of a class file, let's examine a few bytecode-manipulation libraries.
4. Using ASM
ASM is a popular performance-oriented, low-level Java bytecode manipulation and analysis framework.
4.1. Setup
First, let's add the latest asm and asm-util Maven dependencies to our pom.xml:
Here, we've used the toString method on the objectClazz object to see bytecode in a concise format:
public class java.lang.Object
file name		java.lang.Object
compiled from		Object.java
compiler version	52.0
access flags		33
constant pool		78 entries
ACC_SUPER flag		true

Attribute(s):
    SourceFile: Object.java

14 methods:
    public void <init>()
    private static native void registerNatives()
    public final native Class getClass() [Signature: ()Ljava/lang/Class<*>;]
    public native int hashCode()
    public boolean equals(Object arg1)
    protected native Object clone()
      throws Exceptions: java.lang.CloneNotSupportedException
    public String toString()
    public final native void notify()

    // ...
Further, the JavaClass class provides methods like getConstantPool, getFields, and getMethods to view the details of the disassembled class.
assertEquals(objectClazz.getFileName(), "java.lang.Object");
assertEquals(objectClazz.getMethods().length, 14);
assertTrue(objectClazz.toString().contains("public class java.lang.Object"));
Similarly, set* methods are available for bytecode manipulation.
6. Using Javassist
Also, we can use the Javassist (Java Programming Assistant) library that provides high-level APIs to view/manipulate Java bytecode.
6.1. Maven Dependency
First, we'll add the latest javassist Maven dependency to our pom.xml:
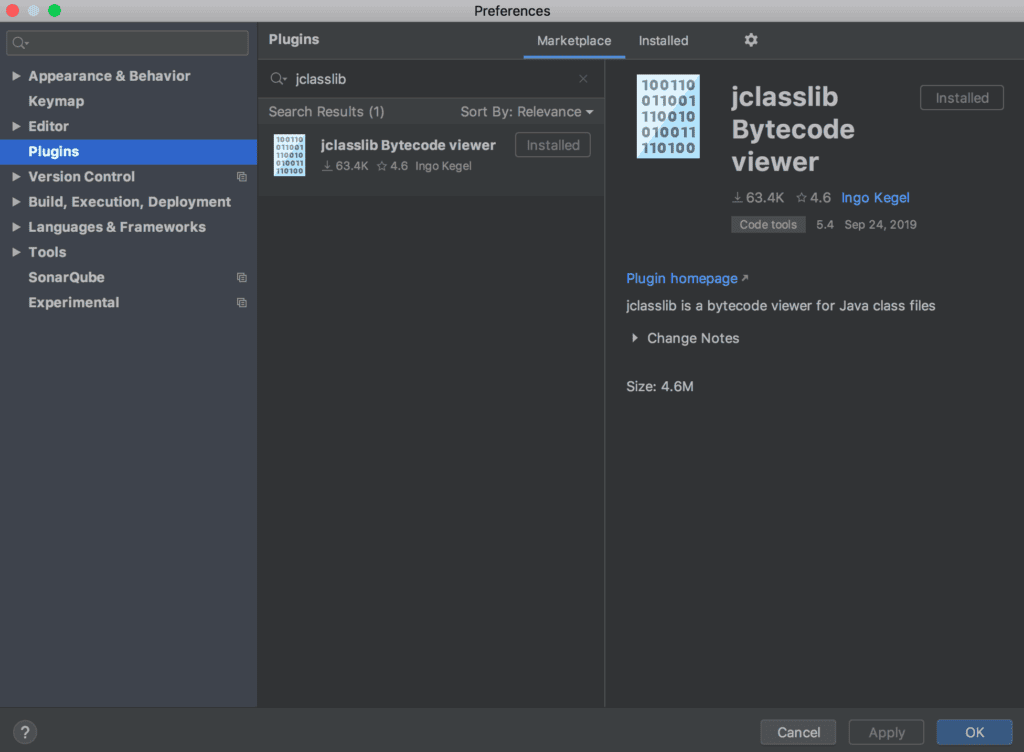
Additionally, we can use an IDE based plugin to view the bytecode of a class file. For instance, let's explore the jclasslib Bytecode viewer plugin available for IntelliJ IDEA.
7.1. Installation
First, we'll install the plugin using the Settings/Preferences dialog:
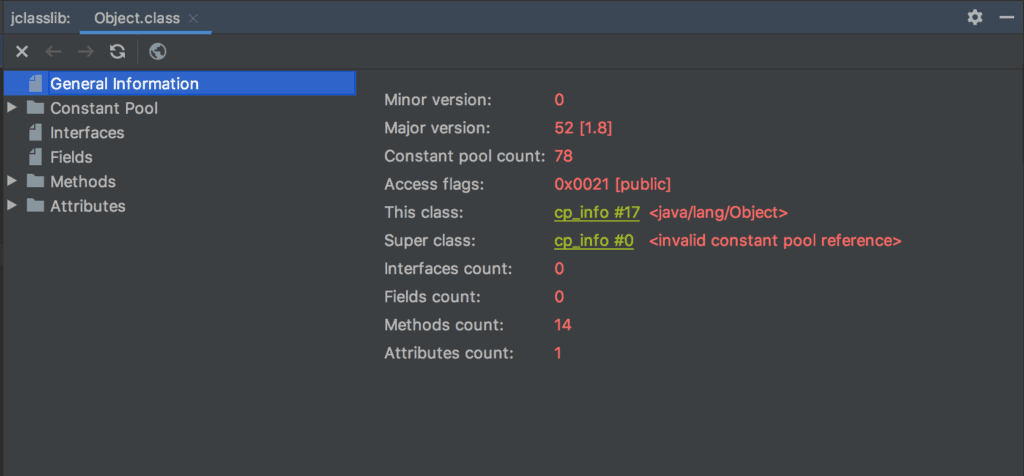
7.2. View Bytecode of the Object Class
Then, we can choose “Show Bytecode With Jclasslib” option under the View menu to view bytecode of the selected Object class:
Next, a dialog will open to show the bytecode of the Object class:
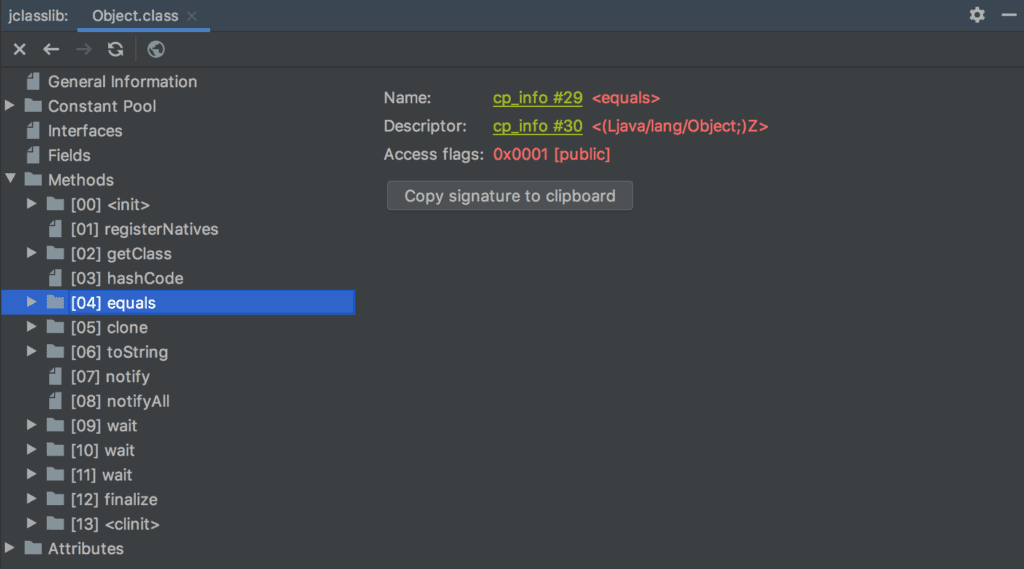
7.3. View Details
Also, we can see various details of the bytecode like constant pool, fields, and methods using the Jclasslib plugin dialog:
Similarly, we have the Bytecode Visualizer Plugin to view the bytecode of a class file using the Eclipse IDE.
8. Conclusion
In this tutorial, we explored ways to view the bytecode of a class file in Java.
First, we examined the javap command along with its various arguments. Then, we went through a few bytecode manipulation libraries that provide the features to view and manipulate the bytecode.
Last, we looked into an IDE based plugin Jclasslib that allows us to view bytecode in IntelliJ IDEA.
As usual, all the code implementations are available over on GitHub.
In this tutorial, we'll illustrate the moment when JPA assigns a value to the primary key. We'll clarify what the JPA specification says, and then, we'll show examples using various JPA strategies for primary key generation.
2. Problem Statement
As we know, JPA (Java Persistence API) uses the EntityManager to manage the lifecycle of an Entity. At some point, the JPA provider needs to assign acvalue to the primary key. So, we may find ourselves asking, when does this happen? And where is the documentation that states this?
The JPA specification says:
A new entity instance becomes both managed and persistent by invoking the persist method on it or by cascading the persist operation.
So, we'll focus on the EntityManager.persist() method in this article.
3. The Generate Value Strategy
When we invoke the EntityManager.persist() method, the entity's state is changed according to the JPA specification:
If X is a new entity, it becomes managed. The entity X will be entered into the database at or before transaction commit or as a result of the flush operation.
This means there are various ways to generate the primary key. Generally, there are two solutions:
Pre-allocate the primary key
Allocate primary key after persisting in the database
To be more specific, JPA offers four strategies to generate the primary key:
GenerationType.AUTO
GenerationType.IDENTITY
GenerationType.SEQUENCE
GenerationType.TABLE
Let's take a look at them one by one.
3.1. GenerationType.AUTO
AUTO is the default strategy for @GeneratedValue. If we just want to have a primary key, we can use the AUTO strategy. The JPA provider will choose an appropriate strategy for the underlying database:
@Entity
@Table(name = "app_admin")
public class Admin {

    @Id
    @GeneratedValue
    private Long id;

    @Column(name = "admin_name")
    private String name;

    // standard getters and setters
}
3.2. GenerationType.IDENTITY
The IDENTITY strategy relies on the database auto-increment column. The database generates the primary key after each insert operation. JPA assigns the primary key value after performing the insert operation or upon transaction commit:
@Entity
@Table(name = "app_user")
public class User {

    @Id
    @GeneratedValue(strategy = GenerationType.IDENTITY)
    private Long id;

    @Column(name = "user_name")
    private String name;

    // standard getters and setters
}
Here, we verify the id values before and after the transaction commit:
@Test
public void givenIdentityStrategy_whenCommitTransction_thenReturnPrimaryKey() {
    User user = new User();
    user.setName("TestName");

    entityManager.getTransaction().begin();
    entityManager.persist(user);
    Assert.assertNull(user.getId());
    entityManager.getTransaction().commit();

    Long expectPrimaryKey = 1L;
    Assert.assertEquals(expectPrimaryKey, user.getId());
}
The IDENTITY strategy is supported by MySQL, SQL Server, PostgreSQL, DB2, Derby, and Sybase.
3.3. GenerationType.SEQUENCE
By using the SEQUENCE strategy, JPA generates the primary key using a database sequence. We first need to create a sequence on the database side before applying this strategy:
CREATE SEQUENCE article_seq
  MINVALUE 1
  START WITH 50
  INCREMENT BY 50
JPA sets the primary key after we invoke the EntityManager.persist() method and before we commit the transaction.
Let's define an Article entity with the SEQUENCE strategy:
@Entity
@Table(name = "article")
public class Article {

    @Id
    @GeneratedValue(strategy = GenerationType.SEQUENCE, generator = "article_gen")
    @SequenceGenerator(name="article_gen", sequenceName="article_seq")
    private Long id;

    @Column(name = "article_name")
    private String name

    // standard getters and setters
}
The sequence starts from 50, so the first id will be the next value, 51.
Now, let's test the SEQUENCE strategy:
@Test
public void givenSequenceStrategy_whenPersist_thenReturnPrimaryKey() {
    Article article = new Article();
    article.setName("Test Name");

    entityManager.getTransaction().begin();
    entityManager.persist(article);
    Long expectPrimaryKey = 51L;
    Assert.assertEquals(expectPrimaryKey, article.getId());

    entityManager.getTransaction().commit();
}
The SEQUENCE strategy is supported by Oracle, PostgreSQL, and DB2.
3.4. GenerationType.TABLE
The TABLE strategy generates the primary key from a table and works the same regardless of the underlying database.
We need to create a generator table on the database side to generate the primary key. The table should at least have two columns: one column to represent the generator's name and another to store the primary key value.
Firstly, let's create a generator table:
@Table(name = "id_gen")
@Entity
public class IdGenerator {

    @Id
    @GeneratedValue(strategy = GenerationType.IDENTITY)
    private Long id;

    @Column(name = "gen_name")
    private String gen_name;

    @Column(name = "gen_value")
    private Long gen_value;

    // standard getters and setters
}
Then, we need to insert two initial values to the generator table:
INSERT INTO id_gen (gen_name, gen_val) VALUES ('id_generator', 0);
INSERT INTO id_gen (gen_name, gen_val) VALUES ('task_gen', 10000);
JPA assigns the primary key values after calling EntityManager.persist() method and before the transaction commit.
Let's now use the generator table with the TABLE strategy. We can use allocationSize to pre-allocate some primary keys:
@Entity
@Table(name = "task")
public class Task {

    @TableGenerator(name = "id_generator", table = "id_gen", pkColumnName = "gen_name", valueColumnName = "gen_value",
        pkColumnValue="task_gen", initialValue=10000, allocationSize=10)
    @Id
    @GeneratedValue(strategy = GenerationType.TABLE, generator = "id_generator")
    private Long id;

    @Column(name = "name")
    private String name;

    // standard getters and setters
}
And the id starts from 10,000 after we invoke the persist method:
@Test
public void givenTableStrategy_whenPersist_thenReturnPrimaryKey() {
    Task task = new Task();
    task.setName("Test Task");

    entityManager.getTransaction().begin();
    entityManager.persist(task);
    Long expectPrimaryKey = 10000L;
    Assert.assertEquals(expectPrimaryKey, task.getId());

    entityManager.getTransaction().commit();
}
4. Conclusion
This article illustrates the moment when JPA sets the primary key under different strategies. In addition, we also learned about the usage of each of these strategies through examples.
YAML is a human-friendly notation used in configuration files. Why would we prefer this data serialization over the properties file in Spring Boot? Besides readability and reduction of repetition, YAML is the perfect language to write Configuration as Code for the deployments.
In the same way, the use of YAML for Spring DevOps facilitates the storage of the configuration variables in the environment as the 12 Factor Authenticator recommends.
In this tutorial, we'll compare Spring YAML versus properties file in order to check the main advantages of using one over the other. But remember, the selection of YAML over properties file configuration is sometimes a decision of personal taste.
2. YAML Notation
YAML stands for a recursive acronym for “YAML Ain't Markup Language“. It provides the following characteristics:
More clarity and human-friendliness
Perfect for hierarchical configuration data
It supports enhance capabilities such as maps, lists, and scalar types
Those capabilities make YAML the perfect companion for Spring configuration files. A word of caution here for those starting out with YAML: writing it can be a bit tedious at the beginning due to its indentation rules.
Let's see how it works!
3. Spring YAML Configuration
As it was mentioned in the previous sections, YAML is an extraordinary data format for configuration files. It's much more readable, and it provides enhanced capabilities over the properties file. Therefore, it makes sense to recommend this notation over the properties file configuration. Furthermore, from version 1.2, YAML is a superset of JSON.
Spring profiles allow separating the environments and apply different properties to them. YAML adds the possibility to include several profiles in the same file.
In our case, for deployment purposes, we'll have three: testing, development, and production:
spring:
  profiles:
    active:
    - test

---

spring:
  profiles: test
name: test-YAML
environment: testing
servers:
  - www.abc.test.com
  - www.xyz.test.com

---

spring:
  profiles: prod
name: prod-YAML
environment: production
servers:
  - www.abc.com
  - www.xyz.com

---

spring:
    profiles: dev
name: ${DEV_NAME:dev-YAML}
environment: development
servers:
    - www.abc.dev.com
    - www.xyz.dev.com
Let's now check the spring.profiles.active property which assigns the test environment by default. We can redeploy the artifact using different profiles without building again the source code.
We'll see the relevance of this environment variable in the Testing section. Finally, we can configure YAML properties assigning directly the value from the environment:
name: ${DEV_NAME:dev-YAML}
We can see that if no environment variable is configured, a default value test-YAML is used.
4. Reduction of Repetition and Readability
The hierarchical structure of YAML provides ways of reducing the upper levels of the configuration properties file. Let's see the differences with an example:
component:
  idm:
    url: myurl
    user: user
    password: password
    description: >
      this should be a long
      description
  service:
    url: myurlservice
    token: token
    description: >
      this should be another long
      description
The same configuration would become redundant using properties file:
component.idm.url=myurl
component.idm.user=user
component.idm.password=password
component.idm.description=this should be a long \
                          description
component.service.url=myurlservice
component.service.token=token
component.service.description=this should be another long \
                              description
The hierarchical nature of YAML greatly enhances legibility. It is not only a question of avoiding repetitions but also the indentation, well used, perfectly describes what the configuration is about and what is for. With YAML, as in the case of properties file with a backslash \, it is possible to break the content into multiple lines with > character.
Again YAML version is more human-readable and clear.
In the same way, we can configure maps:
map:
  firstkey: key1
  secondkey: key2
6. Testing
Now, let's check if everything is working as expected. If we check the logging of the application, we can see that the environment selected by default is testing:
2020-06-11 13:58:28.846  INFO 10720 --- [main] com.baeldung.yaml.MyApplication: ...
using environment:testing
name:test-YAML
servers:[www.abc.test.com, www.xyz.test.com]
external:[www.abc.test.com, www.xyz.test.com]
map:{firstkey=key1, secondkey=key2}
Idm:
   Url: myurl
   User: user
   Password: password
   Description: this should be a long description

Service:
   Url: myurlservice
   Token: token
   Description: this should be another long description
We can overwrite the name by configuring DEV_NAME in the environment:
export DEV_NAME=new-dev-YAML
We can see that the name of the environment changes executing the application with dev profile:
2020-06-11 17:00:45.459  INFO 19636 --- [main] com.baeldung.yaml.MyApplication: ...
using environment:development
name:new-dev-YAML
servers:[www.abc.dev.com, www.xyz.dev.com]
Let's run for the production environment using SPRING_PROFILES_ACTIVE=prod:
export SPRING_PROFILES_ACTIVE=prod

2020-06-11 17:03:33.074  INFO 20716 --- [main] ...
using environment:production
name:prod-YAML
servers:[www.abc.com, www.xyz.com]
7. Conclusion
In this tutorial, we described the intricacies of the use of YAML configuration compared to the properties file.
We showed that YAML provides human friendliness capabilities, it reduces repetition and is more concise than its properties file variant.
As shown above, we first call the next() method to move the result cursor. Then we use the getLong() method to get the first column and convert it to long at the same time.
Moreover, it's also possible to use the same technique with normal Statements:
Also, it's worth mentioning that we're using try-with-resourcesextensively to let the compiler to clean up after us.
4. Returning Columns
As it turns out, we can also ask JDBC to return specific columns after issuing a query. In order to do that, we just have to pass an array of column names:
As shown above, we're telling the JDBC to return the value of id column after executing the given query. Similar to the previous example, we can fetch the id afterward:
In this quick article, we're going to see what is the footprint of a boolean value in the JVM in different circumstances.
First, we'll inspect the JVM to see the object sizes. Then, we'll understand the rationale behind those sizes.
2. Setup
To inspect the memory layout of objects in the JVM, we're going to use the Java Object Layout (JOL) extensively. Therefore, we need to add thejol-core dependency:
If we ask JOL to print the VM details in terms of Object Sizes:
System.out.println(VM.current().details());
When the compressed references are enabled (the default behavior), we'll see the output:
# Running 64-bit HotSpot VM.
# Using compressed oop with 3-bit shift.
# Using compressed klass with 3-bit shift.
# Objects are 8 bytes aligned.
# Field sizes by type: 4, 1, 1, 2, 2, 4, 4, 8, 8 [bytes]
# Array element sizes: 4, 1, 1, 2, 2, 4, 4, 8, 8 [bytes]
In the first few lines, we can see some general information about the VM. After that, we learn about object sizes:
Java references consume 4 bytes, booleans/bytes are 1 byte, chars/shorts are 2 bytes, ints/floats are 4 bytes, and finally, longs/doubles are 8 bytes
These types consume the same amount of memory even when we use them as array elements
So, in the presence of compressed references, each boolean value takes 1 byte. Similarly, each boolean in a boolean[] consumes 1 byte. However, alignment paddings and object headers can increase the space consumed by boolean and boolean[] as we'll see later.
3.1. No Compressed References
Even if we disable the compressed references via -XX:-UseCompressedOops, the boolean size won't change at all:
# Field sizes by type: 8, 1, 1, 2, 2, 4, 4, 8, 8 [bytes]
# Array element sizes: 8, 1, 1, 2, 2, 4, 4, 8, 8 [bytes]
On the other hand, Java references are taking twice the memory.
So despite what we might expect at first, booleans are consuming 1 byte instead of just 1 bit.
3.2. Word Tearing
In most architecture, there is no way to access a single bit atomically. Even if we wanted to do so, we probably would end up writing to adjacent bits while updating another one.
One of the design goals of the JVM is to prevent this phenomenon, known as word tearing. That is, in the JVM, every field and array element should be distinct; updates to one field or element must not interact with reads or updates of any other field or element.
To recap, addressability issues and word tearing are the main reasons why booleans are more than just one single bit.
4. Ordinary Object Pointers (OOPs)
Now that we know booleans are 1 byte, let's consider this simple class:
class BooleanWrapper {
    private boolean value;
}
If we inspect the memory layout of this class using JOL:
 OFFSET  SIZE      TYPE DESCRIPTION                               VALUE
      0    12           (object header)                           N/A
     12     1   boolean BooleanWrapper.value                      N/A
     13     3           (loss due to the next object alignment)
Instance size: 16 bytes
Space losses: 0 bytes internal + 3 bytes external = 3 bytes total
The BooleanWrapper layout consists of:
12 bytes for the header, including two mark words and one klass word. The HotSpot JVM uses the mark word to store the GC metadata, identity hashcode, and locking information. Also, it uses the klass word to store class metadata such as runtime type checks
1 byte for the actual boolean value
3 bytes of padding for alignment purposes
By default, object references should be aligned by 8 bytes. Therefore, the JVM adds 3 bytes to 13 bytes of header and boolean to make it 16 bytes.
Therefore, boolean fields may consume more memory because of their field alignment.
4.1. Custom Alignment
If we change the alignment value to 32 via -XX:ObjectAlignmentInBytes=32, then the same class layout changes to:
OFFSET  SIZE      TYPE DESCRIPTION                               VALUE
      0    12           (object header)                           N/A
     12     1   boolean BooleanWrapper.value                      N/A
     13    19           (loss due to the next object alignment)
Instance size: 32 bytes
Space losses: 0 bytes internal + 19 bytes external = 19 bytes total
As shown above, the JVM adds 19 bytes of padding to make the object size a multiple of 32.
5. Array OOPs
Let's see how the JVM lays out a boolean array in memory:
boolean[] value = new boolean[3];
System.out.println(ClassLayout.parseInstance(value).toPrintable());
This will print the instance layout as following:
OFFSET  SIZE      TYPE DESCRIPTION
      0     4           (object header)  # mark word
      4     4           (object header)  # mark word
      8     4           (object header)  # klass word
     12     4           (object header)  # array length
     16     3   boolean [Z.<elements>    # [Z means boolean array
     19     5           (loss due to the next object alignment)
In addition to two mark words and one klass word,array pointers contain an extra 4 bytes to store their lengths.
Since our array has three elements, the size of the array elements is 3 bytes. However, these 3 bytes will be padded by 5 field alignment bytes to ensure proper alignment.
Although each boolean element in an array is just 1 byte, the whole array consumes much more memory. In other words, we should consider the header and padding overhead while computing the array size.
6. Conclusion
In this quick tutorial, we saw that boolean fields are consuming 1 byte. Also, we learned that we should consider the header and padding overheads in object sizes.
In this tutorial, we'll explain the Hi/Lo Algorithm. It is used mostly as a database identifier generation strategy.
We'll start with the algorithm overview. Then, we'll show a practical example based on the Hibernate framework. Finally, we'll discuss the algorithm's use cases, its benefits, and its drawbacks.
2. Hi/Lo Algorithm Overview
2.1 Definition
The main purpose of the Hi/Lo algorithm is to create a range of numbers that can be safely used as database identifiers. In order to do that, it uses three number variables commonly called high, low, and incrementSize.
The incrementSize variable holds the maximum number of identifiers that can be generated in one batch. It should be treated as a constant value defined at the beginning of the algorithm. Any runtime modification might cause serious problems in environments where multiple clients use the same Hi/Lo configuration to persist entries.
The high variable is usually assigned from a database sequence. In that case, we're sure that no one will get the same number twice.
The low variable holds the currently assigned number in the range [0, incrementSize).
Given these points, the Hi/Lo algorithm generates values in range [(hi – 1) * incrementSize + 1, (hi * incrementSize)).
2.2 Pseudocode
Let’s take a look at the steps for generating a new value using the Hi/Lo algorithm:
if low is greater than or equal to incrementSize, assign a new value to high and reset low to 0
generate a new value with the formula: (high – 1) * incrementSize + low
increment low by 1
return the generated value
3. Practical Example
Let's see the Hi/Lo algorithm in action. To do that, we'll use the Hibernate framework and its Hi/Lo implementation.
First, let's define a database entity to work with:
@Entity
public class RestaurantOrder {
    @Id
    @GeneratedValue(strategy = GenerationType.SEQUENCE, generator = "hilo_sequence_generator")
    @GenericGenerator(
      name = "hilo_sequence_generator",
      strategy = "sequence",
      parameters = {
        @Parameter(name = "sequence_name", value = "hilo_seqeunce"),
        @Parameter(name = "initial_value", value = "1"),
        @Parameter(name = "increment_size", value = "3"),
        @Parameter(name = "optimizer", value = "hilo")
      }
    )
    private Long id;
}
It's a simple restaurant order with one id field. To correctly define the Hi/Lo algorithm in Hibernate, in the definition of the id field, we must choose a sequence strategy – hilo optimizer – and specify the increment_size parameter.
To show the Hi/Lo algorithm in action, we'll persist nine restaurant orders in a loop:
public void persist() {
    Transaction transaction = session.beginTransaction();
    for (int i = 0; i < 9; i++) {
        session.persist(new RestaurantOrder());
        session.flush();
    }
    transaction.commit();
}
According to the specified increment size in the entity, we should have only three calls to the database for the next high value. Assuming the database sequence starts from 1, the first batch of generated identifiers will be in the range [1,3].
When the Hi/Lo algorithm returns 3 and Hibernate asks for the next identifier's value, the value of the low variable is equal to the incrementSize constant. In that case, the next call to the database for the new high value must be made. Having 2 as the new high value, the algorithm generates values in the range [4,6].
Finally, the last call to the database for the next high value is made, and values in the range [7, 9] are assigned to the entities.
Hibernate logs captured during the execution of the persist() method confirm those values:
Hibernate: call next value for hilo_seqeunce
org.hibernate.id.enhanced.SequenceStructure  - Sequence value obtained: 1
org.hibernate.event.internal.AbstractSaveEventListener  - Generated identifier: 1, using strategy: org.hibernate.id.enhanced.SequenceStyleGenerator
org.hibernate.event.internal.AbstractSaveEventListener  - Generated identifier: 2, using strategy: org.hibernate.id.enhanced.SequenceStyleGenerator
org.hibernate.event.internal.AbstractSaveEventListener  - Generated identifier: 3, using strategy: org.hibernate.id.enhanced.SequenceStyleGenerator
Hibernate: call next value for hilo_seqeunce
org.hibernate.id.enhanced.SequenceStructure  - Sequence value obtained: 2
org.hibernate.event.internal.AbstractSaveEventListener  - Generated identifier: 4, using strategy: org.hibernate.id.enhanced.SequenceStyleGenerator
org.hibernate.event.internal.AbstractSaveEventListener  - Generated identifier: 5, using strategy: org.hibernate.id.enhanced.SequenceStyleGenerator
org.hibernate.event.internal.AbstractSaveEventListener  - Generated identifier: 6, using strategy: org.hibernate.id.enhanced.SequenceStyleGenerator
Hibernate: call next value for hilo_seqeunce
org.hibernate.id.enhanced.SequenceStructure  - Sequence value obtained: 3
org.hibernate.event.internal.AbstractSaveEventListener  - Generated identifier: 7, using strategy: org.hibernate.id.enhanced.SequenceStyleGenerator
org.hibernate.event.internal.AbstractSaveEventListener  - Generated identifier: 8, using strategy: org.hibernate.id.enhanced.SequenceStyleGenerator
org.hibernate.event.internal.AbstractSaveEventListener  - Generated identifier: 9, using strategy: org.hibernate.id.enhanced.SequenceStyleGenerator
4. Algorithm Benefits and Drawbacks
The main advantage of the Hi/Lo algorithm is the reduced number of database calls for the next sequence values. Increasing the value of incrementSize decreases the number of round-trips to the database. Obviously, that means a performance gain in our application. In addition to that, the Hi/Lo algorithm is a preferred choice in environments with a weak Internet connection.
On the other hand, the Hi/Lo algorithm isn't the best choice in environments where multiple different clients persist data to the same table in a database. Third-party applications might be unaware of the Hi/Lo strategy we're using to generate identifiers. As a result, they might use entity ids from the generated range of numbers used currently in our application. In that case, when persisting data, we may encounter errors that are difficult to fix.
5. Conclusion
In this tutorial, we discussed the Hi/Lo algorithm.
First, we explained how it works and discussed its pseudocode implementation. Then, we showed a practical example using Hibernate's algorithm implementation. Finally, we listed Hi/Lo benefits and drawbacks.
As always, the code shown in this article is available over on GitHub.
In this tutorial, we'll explore concurrency in reactive programs written with Spring WebFlux.
We'll begin by discussing concurrency in relation to reactive programming. After that, we'll explore how Spring WebFlux offers concurrency abstractions over different reactive server libraries.
2. The Motivation for Reactive Programming
A typical web application comprises of several complex, interacting parts. Many of these interactions are blocking in nature like, for example, those involving a database call to fetch or update data. Several others, however, are independent and can be performed concurrently, possibly in parallel.
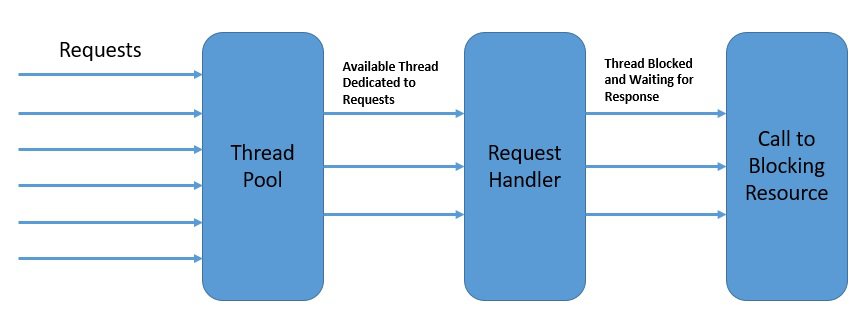
For instance, two user requests to a web server can be handled by different threads. On a multi-core platform, this has an obvious benefit in terms of the overall response time. Hence, this model of concurrency is known as the thread-per-request model:
In the diagram above, each thread handles a single request at a time.
While thread-based concurrency solves a part of the problem for us, it does nothing to address the fact that most of our interactions within a single thread are still blocking. Moreover, the native threads we use to achieve concurrency in Java come at a significant cost in terms of context switches.
Meanwhile, as web applications face more and more requests, the thread-per-request model starts to fall short of expectations.
Consequently, what we need is a concurrency model which can help us handle increasingly more requests with relatively less number of threads. This is one of the primary motivations for adopting reactive programing.
3. Concurrency in Reactive Programming
Reactive programming helps us structure the program in terms of data flows and the propagation of change through them. Hence, in a completely non-blocking environment, this can enable us to achieve higher concurrency with better resource utilization.
However, is reactive programming a complete departure from thread-based concurrency? While this is a strong statement to make, reactive programming certainly has a very different approach to the usage of threads to achieve concurrency. So, the fundamental difference that reactive programming brings on is asynchronicity.
In other words, the program flow transforms from a sequence of synchronous operations, into an asynchronous stream of events.
For instance, under the reactive model, a read call to the database does not block the calling thread while data is fetched. The call immediately returns a publisher that others can subscribe to. The subscriber can process the event after it occurs and may even further generate events itself:
Above all, reactive programming does not emphasize on which thread events should be generated and consumed. Emphasis is, rather, on structuring the program as an asynchronous event stream.
The publisher and subscriber here do not need to be part of the same thread. This helps us in getting better utilization of available threads and hence higher overall concurrency.
4. Event Loop
There are several programming models that describe a reactive approach to concurrency.
In this section, we'll examine a few of them to understand how reactive programming achieves higher concurrency with fewer threads.
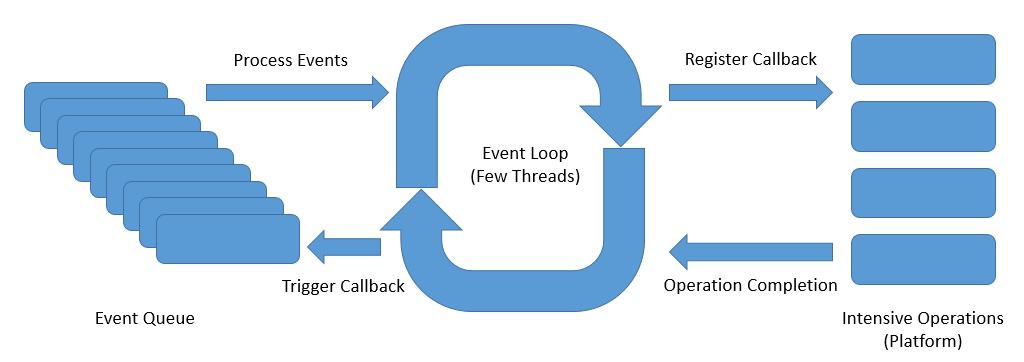
One of such reactive asynchronous programming model for servers is the event loopmodel:
Above, is an abstract design of an event loop that presents the ideas of reactive asynchronous programming:
The event loop runs continuously in a single thread, although we can have as many event loops as the number of available cores
The event loop process the events from an event queue sequentially and returns immediately after registering the callback with the platform
The platform can trigger the completion of an operation like a database call or an external service invocation
The event loop can trigger the callback on the operation completion notification and send back the result to the original caller
The event loopmodel is implemented in a number of platforms including Node.js, Netty, and Ngnix. They offer much better scalability than traditional platforms like Apache HTTP Server, Tomcat, or JBoss.
5. Reactive Programming with Spring WebFlux
Now, we have enough insights into reactive programming and its concurrency model, to explore the subject in Spring WebFlux.
WebFlux isthe Spring‘sreactive-stack web framework, which was added in version 5.0.
Let's explore the server-side stack of Spring WebFlux to understand how it complements the traditional web stack in Spring:
As we can see, Spring WebFlux sits parallel to the traditional web framework in Spring and does not necessarily replace it.
There are a few important points to note here:
Spring WebFlux extends the traditional annotation-based programming model with functional routing
Moreover, it adapts the underlying HTTP runtimes to the Reactive Streams API making the runtimes interoperable
Hence, it's able to support a wide variety of reactive runtimes including Servlet 3.1+ containers like Tomcat, Reactor, Netty, or Undertow
Lastly, it includes WebClient, a reactive and non-blocking client for HTTP requests offering functional and fluent APIs
6. Threading Model in Supported Runtimes
As we have discussed earlier, reactive programs tend to work with just a few threads and make the most of them. However, the number and nature of threads depend upon the actual Reactive Stream API runtime that we choose.
To clarify, Spring WebFlux can adapt to different runtimes through a common API provided by HttpHandler. This API is a simple contract with just one method that provides an abstraction over different server APIs like Reactor Netty, Servlet 3.1 API, or Undertow APIs.
Let's now understand the threading model implemented in a few of them.
While Netty is the default server in a WebFlux application, it's just a matter of declaring the right dependency to switch to any other supported server:
While it's possible to observe the threads created in a Java Virtual Machine in a number of ways, it's quite easy just to pull them from the Thread class itself:
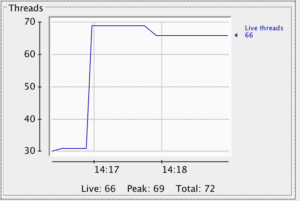
As we said, Reactor Netty is the default embedded server in the Spring Boot WebFlux starter. Let's try to see the threads that Netty creates by default. Hence, in the beginning, we'll not add any other dependencies or use WebClient. So, if we start a Spring WebFlux application created using its SpringBoot starter, we can expect to see some default threads it creates:
Note that, apart from a normal thread for the server, Netty spawns a bunch of worker threads for request processing. These typically are not more than available CPU cores. This is the output on a quad-core machine. We'd also see a bunch of housekeeping threads typical to a JVM environment, but they are not important here.
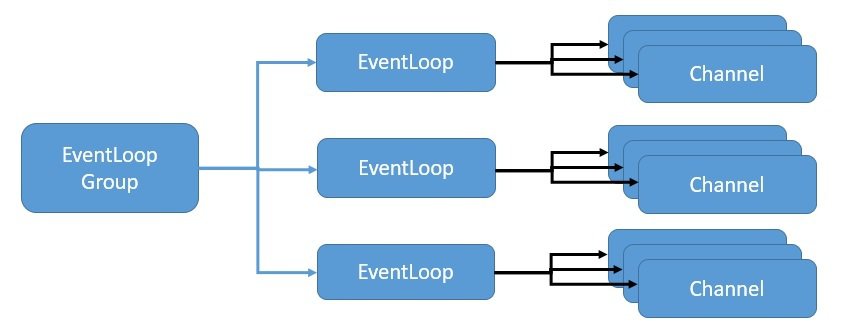
Netty uses the event loop model to provide highly scalable concurrency in a reactive asynchronous manner. Let's see how Netty implements event loop levering Java NIO to provide this scalability:
Here, EventLoopGroup manages one or more EventLoop which must be continuously running. Hence, it's not recommended to create more EventLoops than the number of available cores.
The EventLoopGroup further assigns an EventLoop to each newly created Channel. Thus, for the lifetime of a Channel, all operations are executed by the same thread.
6.2. Apache Tomcat
Spring WebFlux is also supported on a traditional Servlet Container like Apache Tomcat.
WebFlux relies on the Servlet 3.1 API with non-blocking I/O. While it uses Servlet API behind a low-level adapter, Servlet API is not available for direct usage.
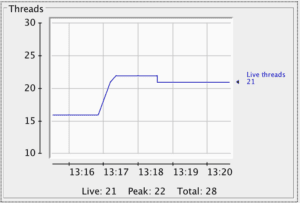
Let's see what kind of threads we expect in a WebFlux application running on Tomcat:
The number and type of threads which we can see here are quite different from what we observed earlier.
To begin with, Tomcat starts with more worker threads, which defaults to ten. Of course, we'll also see some housekeeping threads typical to the JVM, and the Catalina container, which we can ignore for this discussion.
Let's understand the architecture of Tomcat with Java NIO to correlate it with the threads we see above.
Tomcat 5 onward supports NIO in its Connector component, which is primarily responsible for receiving the requests.
The other Tomcat component is the Container component, which is responsible for the container management functions.
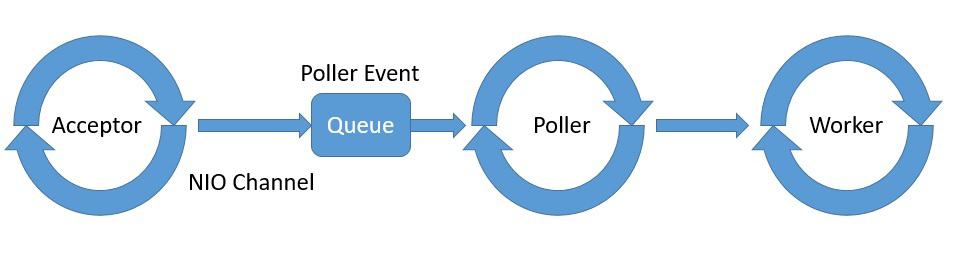
The point of interest for us here is the threading model that the Connector component implements to support NIO. It is comprised of Acceptor, Poller, and Worker as part of the NioEndpoint module:
Tomcat spawns one or more threads for Acceptor, Poller, and Worker with typically a thread pool dedicated to Worker.
While a detailed discussion on Tomcat architecture is beyond the scope of this tutorial, we should now have enough insights to understand the threads we saw earlier.
7. Threading Model in WebClient
WebClientis the reactive HTTP client that is part of Spring WebFlux. We can use it anytime we require REST-based communication and enables us to create applications that are end-to-endreactive.
As we have seen before, reactive applications work with just a few threads, and so, there is no margin for any part of the application to block a thread. Hence, WebClient plays a vital role in helping us realize the potential of WebFlux.
7.1. Using WebClient
Using WebClient is quite simple as well. We do not need to include any specific dependencies as it's part of Spring WebFlux.
Let's create a simple REST endpoint which returns a Mono:
@GetMapping("/index")
public Mono<String> getIndex() {
    return Mono.just("Hello World!");
}
Then, we'll use WebClient to call this REST endpoint and consume the data reactively:
Here, we're also printing the threads that are created using the method we discussed earlier.
7.2. Understanding the Threading Model
So, how does the threading model work in the case of WebClient?
Well, not surprisingly, WebClient also implements concurrency using the event loop model. Of course, it relies on the underlying runtime to provide the necessary infrastructure.
If we're running WebClient on the Reactor Netty, it shares the event loop that Netty uses for the server. Hence, in this case, we may not notice much difference in the threads that are created.
However, WebClient is also supported on a Servlet 3.1+ container like Jetty, but the way it works there is different.
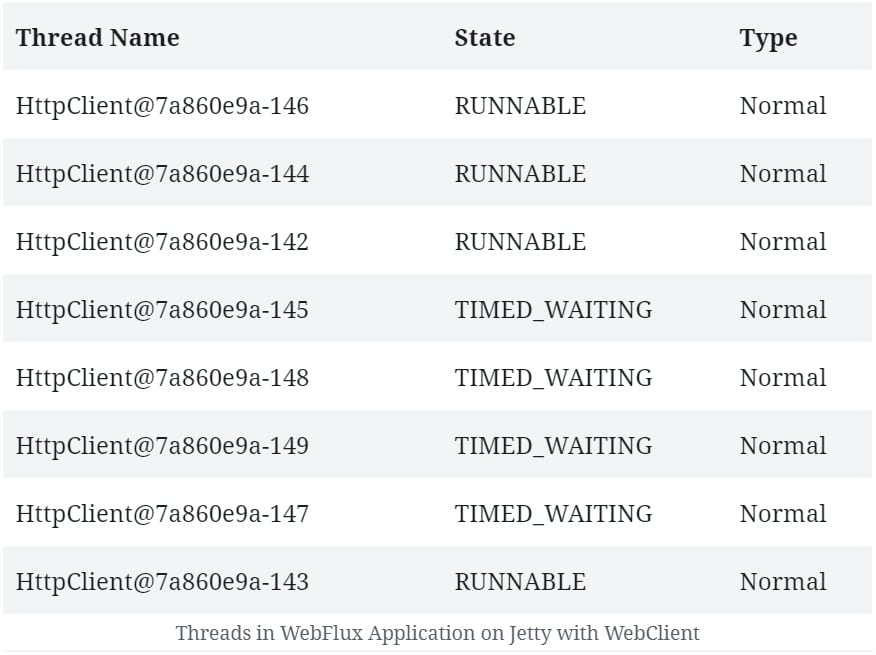
If we compare the threads that are created on a WebFlux application running Jetty with and without WebClient, we'll notice a few additional threads.
Here, WebClient has to create its event loop. So, we can see a fixed number of processing threads that this event loop creates:
In some cases,having a separate thread pool for client and server can provide better performance. While it's not the default behavior with Netty, it's always possible to declare a dedicated thread pool for WebClient if needed.
We'll see how this is possible in a later section.
8. Threading Model in Data Access Libraries
As we have seen earlier, even a simple application usually consists of several parts that need to be connected.
Typical examples of these parts include databases and message brokers. The existing libraries to connect with many of them are still blocking, but that is changing fast.
There are several databases now that offer reactive libraries for connectivity. Many of these libraries are available within Spring Data, while we can use others directly as well.
The threading model these libraries use is of particular interest to us.
8.1. Spring Data MongoDB
Spring Data MongoDB provides reactive repository support for MongoDB built on top of the MongoDB Reactive Streams driver. Most notably, this driver fully implements the Reactive Streams API to provide asynchronous stream processing with non-blocking back-pressure.
Setting up support for the reactive repository for MongoDB in a Spring Boot application is as simple as adding a dependency:
This will allow us to create a repository, and use it to perform some basic operations on MongoDB in a non-blocking manner:
public interface PersonRepository extends ReactiveMongoRepository<Person, ObjectId> {
}
.....
personRepository.findAll().doOnComplete(this::printThreads);
So, what kind of threads can we expect to see when we run this application on the Netty server?
Well, not surprisingly, we'll not see much difference as aSpring Data reactive repository makes use of the same event loop that is available for the server.
8.2. Reactor Kafka
Spring is still in the process of building full-fledged support for reactive Kafka. However, we do have options available outside Spring.
Reactor Kafka is a reactive API for Kafka based on Reactor. Reactor Kafka enables messages to be published and consumed using functional APIs, also with non-blocking back-pressure.
First, we need to add the required dependency in our application to start using Reactor Kafka:
We're subscribing to a topic reactive-test in Kafka and getting a Flux of messages.
The interesting thing for us is the threads that get created:
We can see a few threads that are not typical to the Netty server.
This indicates that Reactor Kafka manages its own thread pool, with a few worker threads, that participate in Kafka message processing exclusively. Of course, we'll see a bunch of other threads related to Netty and the JVM that we can ignore.
Kafka producers use a separate network thread for sending requests to the broker. Further, they deliver responses to the application on a single-threaded pooled scheduler.
Kafka consumer, on the other hand, has one thread per consumer group – that blocks to listen for incoming messages. The incoming messages are then scheduled for processing on a different thread pool.
9. Scheduling Options in WebFlux
We have seen so far that reactive programming really shines in a completely non-blocking environment with just a few threads. But, this also means that, if there is indeed a part that is blocking, it will result in far worse performance. This is because a blocking operation can freeze the event loop entirely.
So, how do we handle long-running processes or blocking operations in reactive programming?
Honestly, the best option would be just to avoid them. However, this may not be always possible, and we may need a dedicated scheduling strategy for those parts of our application.
Spring WebFlux offers a mechanism to switch processing to a different thread pool in between a data flow chain. This can provide us precise control over the scheduling strategy that we want for certain tasks. Of course, WebFlux is able to offer this based on the thread pool abstractions, known as schedulers, available in the underlying reactive libraries.
9.1. Reactor
In Reactor, the Scheduler class defines the execution model as well as where the execution takes place.
The Schedulers class provides a number of execution contexts like immediate, single, elastic, and parallel.
These provide different types of thread pools which can be useful for different jobs. Moreover, we can always create our own Scheduler with a preexisting ExecutorService.
While Schedulers gives us several execution contexts, Reactor also provides us different ways to switch the execution context. They are the methods publishOn and subscribeOn.
We can use publishOn with a Scheduler anywhere in the chain, with that Scheduler affecting all the subsequent operators.
While we can also use subscribeOn with a Scheduler anywhere in the chain, it will only affect the context of the source of emission.
If we recall, WebClient on Netty shares the same event loop created for the server as a default behavior. However, we may have valid reasons to create a dedicated thread pool for WebClient.
Let's see how we can achieve this in Reactor which is the default reactive library in WebFlux:
Earlier, we did not observe any difference in the threads created on Netty with or without WebClient. However, if we now run the code above, we'll observe a few new threads being created:
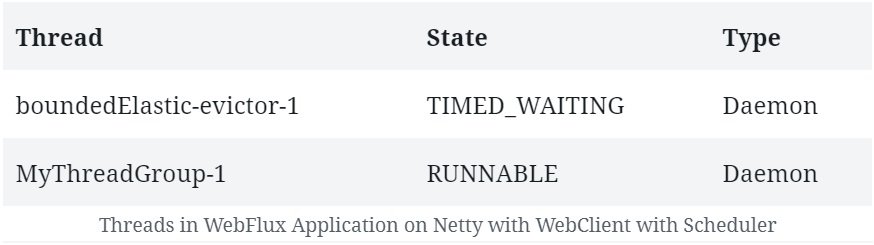
Here, we can see the threads created as part of our bounded elastic thread pool. It is where responses from the WebClient are published once subscribed.
This leaves the main thread pool for handling the server requests.
9.2. RxJava
The default behavior in RxJava is not very different than that of Reactor.
The Observable, and the chain of operators we apply on it, do their work – and notify the observers – on the same thread where the subscription was invoked. Also, RxJava, like Reactor, offers ways to introduce prefixed or custom scheduling strategies into the chain.
RxJava also features a class Schedulers, which offers a number of execution models for the Observable chain. These include new thread, immediate, trampoline, io, computation, and test. Of course, it also allows us to define a Schedulerfrom a Java Executor.
Moreover, RxJava also offers two extension methods to achieve this, subscribeOn and observeOn.
The subscribeOn method changes the default behavior by specifying a different Scheduler on which Observable should operate.
The observeOn method, on the other hand, specifies a different Scheduler that the Observable can use to send notifications to the observers.
As we have discussed before Spring WebFlux uses Reactor as its reactive library by default. But, since it's fully compatible with Reactive Streams API, it's possible to switch to another Reactive Streams implementation like RxJava (for RxJava 1.x with its Reactive Streams adapter).
As a result, if we run this application, apart from the regular Netty and JVM related threads we should see a few threads related to our RxJava Scheduler:
10. Conclusion
In this article, we explored the premise of reactive programming from the context of concurrency.
We observed the difference in the concurrency model in traditional and reactive programming. This allowed us to examine the concurrency model in Spring WebFlux, and its take on the threading model to achieve it.
Further, we explored the threading model in WebFlux in combination with different HTTP runtime and reactive libraries.
We also discussed how the threading model differs when we use WebClient or a data access library.
Lastly, we touched upon the options for controlling the scheduling strategy in our reactive program within WebFlux.
As always, the source code for this article can be found over on GitHub.
In this tutorial, we'll walk through how we can use properties defined in a YAML file to configure values for a Map in our POJO classes.
2. POJO and YAML
POJO classes are Plain Old Java Objects. YAML is a human-readable structured data format that uses indentation to indicate nesting.
2.1. Simple Map Example
Let's imagine that we are running an online store, and we are creating a service that translates clothing sizes. At first, we are only selling clothes in the UK. We want to know what UK size the label “S”, “M”, “L” and so on refers to. We create our POJO configuration class:
@ConfigurationProperties(prefix = "t-shirt-size")
public class TshirtSizeConfig {
    private Map<String, Integer> simpleMapping;
    public TshirtSizeConfig(Map<String, Integer> simpleMapping) {
        this.simpleMapping = simpleMapping;
    }

    //getters and setters..
}
Notice the @ConfigurationProperties with the prefix value. We'll define our mapping under that same root value in our YAML file, as we can see in the next section.
We also need to remember to enable configuration properties with the following annotation on our Application.class:
@EnableConfigurationProperties(TshirtSizeConfig.class)
public class DemoApplication {
    public static void main(String[] args) {
        SpringApplication.run(DemoApplication.class, args);
    }
}
2.2. YAML Configuration
Now we add t-shirt-size to our YAML configuration.
We can use the following structure in our application.yml file:
Notice the indentation and the spaces. YAML uses indentation to indicate nesting. The recommended syntax is two spaces for each nested level.
Notice how we're using simple-mapping with the dash, but our property name in our class is called simpleMapping. YAML properties with dashes will automatically translate to the camel-case equivalent in code.
2.3. More Complex Map Example
After our successful UK shops, we now need to consider translating sizes to other countries' measurements. For example, we now want to know what size is the label “S” in France and the US. We need to add another layer of data to our configuration.
We can alter our application.yml with a more complex mapping:
In this tutorial, we'll look at the java.lang.NoSuchMethodError and some ways to handle it.
2. NoSuchMethodError
As the name suggests, the NoSuchMethodError occurs when a particular method is not found. This method can either be an instance method or a static method.
In most cases,we're able to catch this error at compile-time. Hence, it's not a big issue. However, sometimes it could be thrown at runtime, then finding it becomes a bit difficult. According to the Oracle documentation, this error may occur at runtime if a class has been incompatibly changed.
Hence, we may encounter this error in the following cases. Firstly, if we do just a partial recompilation of our code. Secondly, if there is version incompatibility with the dependencies in our application, such as the external jars.
Note that the NoSuchMethodError inheritance tree includes IncompatibleClassChangeError and LinkageError. These errors are associated with an incompatible class change after compilation.
3. Example of NoSuchMethodError
Let’s see this error in action with an example. For this, we'll create two classes. First is SpecialToday which will list the specials for the day in a restaurant:
public class SpecialToday {
    private static String desert = "Chocolate Cake";
    public static String getDesert() {
        return desert;
    }
}
The second class MainMenu calls methods from SpecialsToday:
public class MainMenu {
    public static void main(String[] args) {
        System.out.println("Today's Specials: " + getSpecials());
    }
    public static String getSpecials() {
        return SpecialToday.getDesert();
    }
}
Here the output will be:
Today's Specials: Chocolate Cake
Next, we’ll delete the method getDesert() in SpecialToday and recompile only this updated class. This time when we run our MainMenu, we notice the following runtime error:
Exception in thread "main" java.lang.NoSuchMethodError: SpecialToday.getDesert()Ljava/lang/String;
4. How to Handle NoSuchMethodError
Now let's see how we can handle this. For the above code, let’s do a full clean-compile, including both the classes. We'll notice that the error will be caught while we're compiling. If we use an IDE like Eclipse, it will be detected even earlier, as soon as we update SpecialsToday.
Hence if we run into this error with our applications, as a first step, we'll do a full clean compile. With maven, we'll run the mvn clean install command.
Sometimes the issue is with the external dependencies of our application. In this case, we'll first check the order of the jars in the build path pulled by the classpath loader. And we'll trace and update the inconsistent jar.
However, if we still encounter this error at runtime, we'll have to dig deeper. We'll have to ensure that the Compile-time and the Runtime classes and jars have the same versions. For this, we can run the application with -verbose: class option to check the loaded classes. We can run the command as follows:
Using this information about all the classes being loaded in the individual jars, during runtime, we can trace the incompatible dependency.
We should also make sure that there are no duplicate classes in two or more jars. In most cases, maven will help control conflicting dependencies directly. Furthermore, we can run the mvn dependency: tree command to get the dependency tree of our project as follows:
We can check the libraries and their versions in the list generated by this command. Moreover, we can also manage dependencies using maven tags. Using the <exclusions> tag, we can exclude the problematic dependency. Using the <optional> tag, we can prevent unwanted dependencies from being bundled in the jar or war.
5. Conclusion
In this article, we addressed NoSuchMethodError. We discussed the cause of this error and also ways to handle it. For more details on how to handle errors properly, please refer to our article on catching Java errors.
As always, the code presented in this article is available over on GitHub.
Working effectively with Kotlin and Testcontainers: overcoming the recursive generic type definition and of course, the new @DynamicPropertySource annotation.
Meet the Write-Ahead Log (WAL) Pattern: overcoming failures in flushing storage data structures in distributed systems, or any other data-intensive system.
In this tutorial, we'll see how Leadership Election with Consul helps to ensure data stability. We'll provide a practical example of how to manage distributed locking in concurrent applications.
2. What Is Consul?
Consul is an open-source tool that provides service registry and discovery based on health checking. Furthermore, it includes a Web Graphical User Interface (GUI) to view and easily interact with Consul. It also covers extra capabilities of session management and Key-Value (KV) store.
In the next sections, we'll focus on how we can use Consul's session management and KV store to select the leader in applications with multiple instances.
3. Consul Fundamentals
The Consul agent is the most important component running on each node of a Consul cluster. It's in charge of health checking; registering, discovering, and resolving services; storing configuration data; and much more.
Consul agent can run in two different modes — Server and Agent.
The main responsibilities of the Consul Server are to respond to the queries coming from the agents and to elect the leader. The leadership is selected using the consensus protocol to provide Consistency (as defined by CAP) based on the Raft algorithm.
It's not in the scope of this article to go into detail on how the consensus works. Nevertheless, it's worth mentioning that the nodes can be in one of three states: leader, candidate, or follower. It also stores the data and responds to queries coming from the agents.
Agent is more lightweight than the Consul server. It's responsible for running the health checking of the registered services and forwarding queries to the server. Let's see a simple diagram of a Consul cluster:
Consul can also help in other ways — for instance, in concurrent applications in which one instance must be the leader.
Let's see in the coming sections how Consul, through session management and KV store, can provide this important capability.
4. Leadership Election With Consul
In distributed deployments, the service holding the lock is the leader. Therefore, for highly available systems, it is critical to managing locks and leaders.
Consul provides an easy-to-use KV store and session management. Those functionalities serve to build leader election, so let's learn the principles behind them.
4.1. Leadership Contention
The first thing all the instances belonging to the distributed system do is compete for the leadership. The contention for being a leader includes a series of steps:
All the instances must agree on a common key to contend.
Next, the instance creates a session using the agreed key through Consul session management and KV capabilities.
Third, they should acquire the session. If the return value is true, the lock belongs to the instance, and if false, the instance is a follower.
The instances need to continually watch for the session to acquire the leadership again in case of failure or release.
Finally, the leader can release the session, and the process begins again.
Once the leader is elected, the rest of the instances use Consul KV and session management to discover the leader by:
Retrieving the agreed key
Getting session information to know the leader
4.2. A Practical Example
We need to create the key and the value together with the session in Consul with multiple instances running. To help with this, we'll use the Kinguin Digital Limited Leadership Consul open-source Java implementation.
We excluded the consul-api dependency to avoid collisions on the different versions in Java.
For the common key, we'll use:
services/%s/leader
Let's test all of the process with a simple snippet:
new SimpleConsulClusterFactory()
    .mode(SimpleConsulClusterFactory.MODE_MULTI)
    .debug(true)
    .build()
    .asObservable()
    .subscribe(i -> System.out.println(i));
Then we create a cluster with multiple instances with asObservable() to access to events by subscribers. The leader creates a session in Consul, and all the instances verify the session to confirm leadership.
Finally, we customize the consul configuration and session management, and the agreed key between the instances to elect the leader:
There are several options to install Consul and run an agent.
One of the possibilities to deploy Consul is through containers. We'll use the Consul Docker image available in Docker Hub, the world's largest repository for container images.
We'll deploy Consul using Docker by running the command:
docker run -d --name consul -p 8500:8500 -e CONSUL_BIND_INTERFACE=eth0 consul
Consul is now running, and it should be available at localhost:8500.
Let's execute the snippet and check the steps done:
The leader creates a session in Consul.
Then it is elected (elected.first).
The rest of the instances watch until the session is released:
INFO: multi mode active
INFO: Session created e11b6ace-9dc7-4e51-b673-033f8134a7d4
INFO: Session refresh scheduled on 7 seconds frequency
INFO: Vote frequency setup on 10 seconds frequency
ElectionMessage(status=elected, vote=Vote{sessionId='e11b6ace-9dc7-4e51-b673-033f8134a7d4', serviceName='cluster-app', serviceId='node-1'}, error=null)
ElectionMessage(status=elected.first, vote=Vote{sessionId='e11b6ace-9dc7-4e51-b673-033f8134a7d4', serviceName='cluster-app', serviceId='node-1'}, error=null)
ElectionMessage(status=elected, vote=Vote{sessionId='e11b6ace-9dc7-4e51-b673-033f8134a7d4', serviceName='cluster-app', serviceId='node-1'}, error=null)
Consul also provides a Web GUI available at http://localhost:8500/ui.
Let's open a browser and click the key-value section to confirm that the session is created:
Therefore, one of the concurrent instances created a session using the agreed key for the application. Only when the session is released can the process start over, and a new instance can become a leader.
5. Conclusion
In this article, we showed the Leadership Election fundamentals in high-performance applications with multiple instances. We demonstrated how session management and KV store capabilities of Consul can help acquire the lock and select the leader.
Spring Boot provides a few different ways to inspect the status and health of a running application and its components. Among those approaches, the HealthContributorand HealthIndicatorAPIs are two of the notable ones.
In this tutorial, we're going to get familiar with these APIs, learn how they work, and see how we can contribute custom information to them.
Out of the box, Spring Boot registers many HealthIndicators to report the healthiness of a particular application aspect.
Some of those indicators are almost always registered, such as DiskSpaceHealthIndicatoror PingHealthIndicator. The former reports the current state of the disk and the latter serves as a ping endpoint for the application.
On the other hand, Spring Boot registers some indicators conditionally. That is if some dependencies are on the classpath or some other conditions are met, Spring Boot might register a few other HealthIndicators, too. For instance, if we're using relational databases, then Spring Boot registers DataSourceHealthIndicator. Similarly, it'll register CassandraHealthIndicatorif we happen to use Cassandra as our data store.
In order to inspect the health status of a Spring Boot application, we can call the /actuator/health endpoint. This endpoint will report an aggregated result of all registered HealthIndicators.
Also, to see the health report from one specific indicator, we can call the /actuator/health/{name} endpoint. For instance, calling the /actuator/health/diskSpace endpoint will return a status report from the DiskSpaceHealthIndicator:
In addition to the built-in ones, we can register custom HealthIndicators to report the health of a component or subsystem. In order to that, all we have to do is to register an implementation of the HealthIndicator interface as a Spring bean.
For instance, the following implementation reports a failure randomly:
@Component
public class RandomHealthIndicator implements HealthIndicator {
    @Override
    public Health health() {
        double chance = ThreadLocalRandom.current().nextDouble();
        Health.Builder status = Health.up();
        if (chance > 0.9) {
            status = Health.down();
        }
        return status.build();
    }
}
According to the health report from this indicator, the application should be up only 90% of the time. Here we're using Healthbuilders to report the health information.
In reactive applications, however, we should register a bean of type ReactiveHealthIndicator. The reactive health() method returns a Mono<Health>instead of a simple Health. Other than that, other details are the same for both web application types.
4.1. Indicator Name
To see the report for this particular indicator, we can call the /actuator/health/random endpoint. For instance, here's what the API response might look like:
{"status": "UP"}
The random in the /actuator/health/random URL is the identifier for this indicator. The identifier for a particular HealthIndicator implementation is equal to the bean name without the HealthIndicator suffix. Since the bean name is randomHealthIdenticator, the random prefix will be the identifier.
With this algorithm, if we change the bean name to, say, rand:
@Component("rand")
public class RandomHealthIndicator implements HealthIndicator {
    // omitted
}
Then the indicator identifier will be rand instead of random.
4.2. Disabling the Indicator
To disable a particular indicator, we can set the “management.health.<indicator_identifier>.enabled” configuration property to false. For instance, if we add the following to our application.properties:
management.health.random.enabled=false
Then Spring Boot will disable the RandomHealthIndicator. To activate this configuration property, we should also add the @ConditionalOnEnabledHealthIndicatorannotation on the indicator:
@Component
@ConditionalOnEnabledHealthIndicator("random")
public class RandomHealthIndicator implements HealthIndicator {
    // omitted
}
Now if we call the /actuator/health/random, Spring Boot will return a 404 Not Found HTTP response:
Please note that disabling built-in or custom indicators is similar to each other. Therefore, we can apply the same configuration to the built-in indicators, too.
4.3. Additional Details
In addition to reporting the status, we can attach additional key-value details using the withDetail(key, value):
public Health health() {
    double chance = ThreadLocalRandom.current().nextDouble();
    Health.Builder status = Health.up();
    if (chance > 0.9) {
        status = Health.down();
    }
    return status
      .withDetail("chance", chance)
      .withDetail("strategy", "thread-local")
      .build();
}
Here we're adding two pieces of information to the status report. Also, we can achieve the same thing by passing a Map<String, Object> to the withDetails(map)method:
Sometimes an exception occurs while communicating to a system component such as Database or Disk. We can report such exceptions using the withException(ex)method:
if (chance > 0.9) {
    status.withException(new RuntimeException("Bad luck"));
}
We can also pass the exception to the down(ex)method we saw earlier:
if (chance > 0.9) {
    status = Health.down(new RuntimeException("Bad Luck"));
}
Now the health report will contain the stack trace:
The management.endpoint.health.show-details configuration property controls the level of details each health endpoint can expose.
For instance, if we set this property to always, then Spring Boot will always return the details field in the health report, just like the above example.
On the other hand, if we set this property to never, then Spring Boot will always omit the details from the output. There is also the when_authorized value which exposes the additional details only for authorized users. A user is authorized if and only if:
She's authenticated
And she possesses the roles specified in the management.endpoint.health.roles configuration property
4.5. Health Status
By default, Spring Boot defines four different values as the health Status:
UP — The component or subsystem is working as expected
DOWN — The component is not working
OUT_OF_SERVICE — The component is out of service temporarily
UNKNOWN — The component state is unknown
These states are declared as public static finalinstances instead of Java enums. So it's possible to define our own custom health states. To do that, we can use the status(name)method:
The health status affects the HTTP status code of the health endpoint. By default, Spring Boot maps the DOWN, and OUT_OF_SERVICE states to throw a 503 status code. On the other hand, UP and any other unmapped statuses will be translated to a 200 OK status code.
To customize this mapping, we can set the management.endpoint.health.status.http-mapping.<status> configuration property to the desired HTTP status code number:
Similarly, we can register a bean of type HttpCodeStatusMapperto customize the HTTP status code mapping:
@Component
public class CustomStatusCodeMapper implements HttpCodeStatusMapper {
    @Override
    public int getStatusCode(Status status) {
        if (status == Status.DOWN) {
            return 500;
        }

        if (status == Status.OUT_OF_SERVICE) {
            return 503;
        }

        if (status == Status.UNKNOWN) {
            return 500;
        }
        return 200;
    }
}
The getStatusCode(status) method takes the health status as the input and returns the HTTP status code as the output. Also, it's possible to map custom Status instances:
if (status.getCode().equals("WARNING")) {
    return 500;
}
By default, Spring Boot registers a simple implementation of this interface with default mappings. The SimpleHttpCodeStatusMapperis also capable of reading the mappings from the configuration files, as we saw earlier.
5. Health Information vs Metrics
Non-trivial applications usually contain a few different components. For instance, consider a Spring Boot applications using Cassandra as its database, Apache Kafka as its pub-sub platform, and Hazelcast as its in-memory data grid.
We should use HealthIndicators to see whether the application can communicate with these components or not. If the communication link fails or the component itself is down or slow, then we have an unhealthy component that we should be aware of. In other words, these indicators should be used to report the healthiness of different components or subsystems.
On the contrary, we should avoid using HealthIndicators to measure values, count events, or measure durations. That's why we have metrics. Put simply, metrics are a better tool to report CPU usage, load average, heap size, HTTP response distributions, and so on.
6. Conclusion
In this tutorial, we saw how to contribute more health information to actuator health endpoints. Moreover, we had in-depth coverage of different components in the health APIs such as Health, Status, and the status to HTTP status mapping.
To wrap things up, we had a quick discussion on the difference between health information and metrics and also, learned when to use each of them.
As usual, all the examples are available over on GitHub.
Here, each line is a single configuration. Therefore, we must express hierarchical data by using the same prefixes for our keys. And, in this example, every key belongs to spring.datasource.
2.1. Placeholders in Properties
Within our values, we can use placeholders with the ${} syntax to refer to the contents of other keys, system properties, or environment variables.
app.name=MyApp
app.description=${app.name} is a Spring Boot application
2.2. List Structure
If we have the same kind of properties with different values, we can represent the list structure with array indices:
As well as Java properties files, we can also use YAML based configuration files in our Spring Boot application. YAML is a convenient format for specifying hierarchical configuration data.
Now, let's take the same example from our properties file and convert it to YAML:
spring:
    datasource:
        password: password
        url: jdbc:h2:dev
        username: SA
This can be more readable than its property file alternative as it does not contain repeated prefixes.
3.2. List Structure
YAML has a more concise format for expressing lists:
A bonus of using YAML is that it can store multiple profiles in the same file. And, in YAML, three dashes indicate the start of a new document. So, all the profiles can be described in the same file:
In this example, we have two spring sections with different profiles tagged. Also, we can have a common set of properties at the root level — in this case, the logging.file.name property will be the same in all profiles.
3.4. Profiles Across Multiple Files
As an alternative to having different profiles in the same file, we can store multiple profiles across different files. And, this is the only method available when using properties files.
We achieve this by putting the name of the profile in the file name — for example, application-dev.yml or application-dev.properties.
4. Spring Boot Usage
Now that we've defined our configurations let's see how to access them.
4.1. Value Annotation
We can inject the values of our properties using the @Value annotation:
Here, the property key.something is injected via field injection into one of our objects.
4.2. Environment Abstraction
We can also obtain the value of a property using the Environment API:
@Autowired
private Environment env;
public String getSomeKey(){
    return env.getProperty("key.something");
}
4.3. ConfigurationProperties Annotation
Finally, we can also use the @ConfigurationProperties annotation to bind our properties to type-safe structured objects:
@ConfigurationProperties(prefix = "mail")
public class ConfigProperties {
    String name;
    String description;
...
5. Conclusion
In this article, we've seen some differences between properties and yml Spring Boot configuration files. We also saw how their values could refer to other properties. Finally, we looked at how to inject the values into our runtime.
As always, all the code examples are available over on GitHub.
In this quick tutorial, we're going to see how we can configure Spring Boot applications to handle shutdowns more gracefully.
2. Graceful Shutdown
As of Spring Boot 2.3, Spring Boot now supports the graceful shutdown feature for all four embedded web servers (Tomcat, Jetty, Undertow, and Netty) on both servlet and reactive platforms.
To enable the graceful shutdown, all we have to do is to set the server.shutdown property to graceful in our application.properties file:
server.shutdown=graceful
Then, Tomcat, Netty, and Jetty will stop accepting new requests at the network layer. Undertow, on the other hand, will continue to accept new requests but send an immediate 503 Service Unavailable response to the clients.
By default, the value of this property is equal to immediate, which means the server gets shut down immediately.
Some requests might get accepted just before the graceful shutdown phase begins. In that case, the server will wait for those active requests to finish their work up to a specified amount of time. We can configure this grace period using the spring.lifecycle.timeout-per-shutdown-phase configuration property:
spring.lifecycle.timeout-per-shutdown-phase=1m
If we add this, the server will wait up to one minute for active requests to complete. The default value for this property is 30 seconds.
3. Conclusion
In this short tutorial, we saw how we could take advantage of the new graceful shutdown feature in Spring Boot 2.3.
In this quick article, we're going to look at different ways of reading a line at a given line number inside a file.
2. Input File
Let's start by creating a simple file named inputLines.txt that we'll use in all of our examples:
Line 1
Line 2
Line 3
Line 4
Line 5
3. Using BufferedReader
Let's look at the well known BufferedReader class and its advantage of not storing the entire file into memory.
We can read a file line by line and stop when we desire:
@Test
public void givenFile_whenUsingBufferedReader_thenExtractedLineIsCorrect() {
    try (BufferedReader br = Files.newBufferedReader(Paths.get(FILE_PATH))) {
        for (int i = 0; i < 3; i++) {
            br.readLine();
        }
        String extractedLine = br.readLine();
        assertEquals("Line 4", extractedLine);
    }
}
4. Using Scanner
Another similar approach we can take is using a Scanner:
@Test
public void givenFile_whenUsingScanner_thenExtractedLineIsCorrect() {
    try (Scanner scanner = new Scanner(new File(FILE_PATH))) {
        for (int i = 0; i < 3; i++) {
            scanner.nextLine();
        }
        String extractedLine = scanner.nextLine();
        assertEquals("Line 4", extractedLine);
    }
}
Although on small files, the difference between BufferedReader and Scanner might not be noticeable, on larger files, the Scanner will be slower since it also does parsing and has a smaller buffer size.
5. Using the File API
5.1. Small Files
We can use Files.readAllLines() from the File API to easily read the contents of a file into memory and extract the line we desire:
We can also use the IOUtils class to achieve the same result, except this time, the whole content is returned as a String, and we have to do the splitting ourselves:
In this tutorial, we'll explore the @Async annotation in Spring MVC, and then we'll get familiar with Spring WebFlux. Our goal is to have a better understanding of the difference between these two.
2. Implementation Scenario
Here, we want to choose a scenario to show how we can implement a simple web application with each of these APIs. Moreover, we're especially interested to see more about thread management and blocking or non-blocking I/O in each case.
Let's choose a web application with one endpoint that returns a string result. The point here is that the request will pass through a Filter with a small 200ms delay, and then the Controller needs 500ms to calculate and return the result.
Next, we're going to simulate a load with Apache ab on both endpoints and monitor our app behavior with JConsole.
It may worth mentioning that in this article, our goal is not a benchmark between these two APIs, just a small load test so we can trace the thread management.
3. Spring MVC Async
Spring 3.0 introduced the @Async annotation. @Async‘s goal is to allow the application to run heavy-load jobs on a separate thread. Also, the caller can wait for the result if interested. Hence the return type must not be void, and it be can be any of Future, CompletableFuture, or ListenableFuture.
Moreover, Spring 3.2 introduced the org.springframework.web.context.request.async package that, together with Servlet 3.0, brings the joy of the asynchronous process to the web layer. Thus, since Spring 3.2, @Async can be used in classes annotated as @Controller or @RestController.
When the client initiates a request, it goes through all matched filters in the filter chain until it arrives at the DispatcherServlet instance.
Then, the servlet takes care of the async dispatching of the request. It marks the request as started by calling AsyncWebRequest#startAsync, transfers the request handling to an instance of WebSyncManager, and finishes its job without committing the response. The filter chain also is traversed in the reverse direction to the root.
WebAsyncManager submits the request processing job in its associated ExecutorService. Whenever the result is ready, it notifies DispatcherServlet for returning the response to the client.
4. Spring Async Implementation
Let's start the implementation by writing our application class, AsyncVsWebFluxApp. Here, @EnableAsync does the magic of enabling async for our Spring Boot application:
@SpringBootApplication
@EnableAsync
public class AsyncVsWebFluxApp {
    public static void main(String[] args) {
        SpringApplication.run(AsyncVsWebFluxApp.class, args);
    }
}
Then we have AsyncFilter, which implements javax.servlet.Filter. Don't forget to simulate the delay in the doFilter method:
@Component
public class AsyncFilter implements Filter {
    ...
    @Override
    public void doFilter(ServletRequest servletRequest, ServletResponse servletResponse, FilterChain filterChain)
      throws IOException, ServletException {
        // sleep for 200ms
        filterChain.doFilter(servletRequest, servletResponse);
    }
}
Finally, we develop our AsyncController with the “/async_result” endpoint:
@RestController
public class AsyncController {
    @GetMapping("/async_result")
    @Async
    public CompletableFuture getResultAsyc(HttpServletRequest request) {
        // sleep for 500 ms
        return CompletableFuture.completedFuture("Result is ready!");
    }
}
Test time! Let's run the application, install Apache ab, or any tools to simulate the load. Then we can send a bunch of concurrent requests over the “async_result” endpoint. We can execute JConsole and attach it to our java application to monitor the process:
Spring WebFlux supports reactive backpressure and Servlet 3.1+ with its non-blocking I/O. Hence, it can be run on Netty, Undertow, Jetty, Tomcat, or any Servlet 3.1+ compatible server.
Although all servers don't use the same thread management and concurrency control model, Spring WebFlux will work fine as long as they are supporting non-blocking I/O and reactive backpressure.
Spring WebFlux allows us to decompose the logic in a declarative way with Mono, Flux, and their rich operator sets. Moreover, we can have functional endpoints besides its @Controller annotated ones.
6. Spring WebFlux Implementation
For WebFlux implementation, we go the same path as async. So at first, let's create the AsyncVsWebFluxApp:
@SpringBootApplication
public class AsyncVsWebFluxApp {
    public static void main(String[] args) {
        SpringApplication.run(AsyncVsWebFluxApp.class, args);
    }
}
Then let's write our WebFluxFilter, which implements WebFilter. We'll generate an intentional delay and then pass the request to the filter chain:
@Component
public class WebFluxFilter implements org.springframework.web.server.WebFilter {
    @Override
    public Mono filter(ServerWebExchange serverWebExchange, WebFilterChain webFilterChain) {
        return Mono
          .delay(Duration.ofMillis(200))
          .then(
            webFilterChain.filter(serverWebExchange)
          );
    }
}
At last, we have our WebFluxController. It exposes an endpoint called “/flux_result” and returns a Mono<String> as the response:
@RestController
public class WebFluxController {
    @GetMapping("/flux_result")
    public Mono getResult(ServerHttpRequest request) {
       return Mono.defer(() -> Mono.just("Result is ready!"))
         .delaySubscription(Duration.ofMillis(500));
    }
}
For the test, we're taking the same approach as with our async sample application. Here's the sample result for:
ab -n 1600 -c 40 localhost:8080/flux_result
7. What's the Difference?
Spring Async supports Servlet 3.0 specifications, but Spring WebFlux supports Servlet 3.1+. It brings a number of differences:
Spring Async I/O model during its communication with the client is blocking. It may cause a performance problem with slow clients. On the other hand, Spring WebFlux provides a non-blocking I/O model.
Reading the request body or request parts is blocking in Spring Async, whiles it is non-blocking in Spring WebFlux.
In Spring Async, Filters and Servlets are working synchronously, but Spring WebFlux supports full asynchronous communication.
Spring WebFlux is compatible with wider ranges of Web/Application servers than Spring Async, like Netty, and Undertow.
Moreover, Spring WebFlux supports reactive backpressure, so we have more control over how we should react to fast producers than both Spring MVC Async and Spring MVC.
Spring Flux also has a tangible shift towards functional coding style and declarative API decomposition thanks to Reactor API behind it.
Do all of these items lead us to use Spring WebFlux? Well, Spring Async or even Spring MVC might be the right answer to a lot of projects out there, depending on the desired load scalability or availability of the system.
Regarding scalability, Spring Async gives us better results than synchronous Spring MVC implementation. Spring WebFlux, because of its reactive nature, provides us elasticity and higher availability.
8. Conclusion
In this article, we learned more about Spring Async and Spring WebFlux, then we had a comparison of them theoretically and practically with a basic load test.
The Swagger user interface allows us to view information about our REST services. This can be very convenient for development. However, owing to security concerns, we might not want to allow this behavior in our public environments.
In this short tutorial, we'll look at how toturn Swagger off in production.
Let's try using a SpEL expression to match the “swagger” profile, but not the “prod” profile:
@Profile({"!prod && swagger"})
This forces us to be explicit about environments where we want to activate Swagger. It also helps to prevent accidentally turning it on in production.
We can add the annotation to our configuration:
@Configuration
@Profile({"!prod && swagger"})
@EnableSwagger2
public class SwaggerConfig implements WebMvcConfigurer {
    ...
}
Now, let's test that it works, by launching our application with different settings for the spring.profiles.active property:
  -Dspring.profiles.active=prod // Swagger is disabled
  -Dspring.profiles.active=prod,anyOther // Swagger is disabled
  -Dspring.profiles.active=swagger // Swagger is enabled
  -Dspring.profiles.active=swagger,anyOtherNotProd // Swagger is enabled
  none // Swagger is disabled
4. Using Conditionals
Spring Profiles can be too coarse-grained a solution for feature toggles. This approach can lead to configuration errors and lengthy, unmanageable lists of profiles.
As an alternative, we can use @ConditionalOnExpression, which allows specifying custom properties for enabling a bean:
@Configuration
@ConditionalOnExpression(value = "${useSwagger:false}")
@EnableSwagger2
public class SwaggerConfig implements WebMvcConfigurer {
    ...
}
If the “useSwagger” property is missing, the default here is false.
To test this, we can either set the property in the application.properties (or application.yaml) file, or set it as a VM option:
-DuseSwagger=true
We should note that this example does not include any way of guaranteeing that our production instance cannot accidentally have useSwagger set to true.
5. Avoiding Pitfalls
If enabling Swagger is a security concern, then we need to choose a strategy that's mistake-proof, but easy to use.
Some SpEL expressions can work against these aims when we use @Profile:
@Profile({"!prod"}) // Leaves Swagger enabled by default with no way to disable it in other profiles
@Profile({"swagger"}) // Allows activating Swagger in prod as well
@Profile({"!prod", "swagger"}) // Equivalent to {"!prod || swagger"} so it's worse than {"!prod"} as it provides a way to activate Swagger in prod too
This is why our @Profile example used:
@Profile({"!prod && swagger"})
This solution is probably the most rigorous, as it makes Swagger disabled by default and guarantees it cannot be enabled in “prod”.
6. Conclusion
In this article, we looked at solutions for disabling Swagger in production.
We looked at how to toggle the bean that turns Swagger on, via the @Profile and @ConditionalOnExpression annotations. We also considered how to protect against misconfiguration and undesirable defaults.
As always, the example code from this article can be found over on GitHub.
In this article, we'll show how to check the architecture of a system using ArchUnit.
2. What is ArchUnit?
The link between architecture traits and maintainability is a well-studied topic in the software industry. Defining a sound architecture for our systems is not enough, though. We need to verify that the code implemented adheres to it.
Simply put, ArchUnit is a test library that allows us to verify that an application adheres to a given set of architectural rules. But, what is an architectural rule? Even more, what do we mean by architecture in this context?
Let's start with the latter. Here, we use the term architecture to refer tothe way we organize the different classes in our application into packages.
The architecture of a system also defines how packages or groups of packages – also known as layers – interact. In more practical terms, it defines whether code in a given package can call a method in a class belonging to another one. For instance, let's suppose that our application's architecture contains three layers: presentation, service, and persistence.
One way to visualize how those layers interact is by using a UML package diagram with a package representing each layer:
Just by looking at this diagram, we can figure out some rules:
Presentation classes should only depend on service classes
Service classes should only depend on persistence classes
Persistence classes should not depend on anyone else
Looking at those rules, we can now go back and answer our original question. In this context, an architectural rule is an assertion about the way our application classes interact with each other.
So now, how do we check that our implementation observes those rules? Here is where ArchUnit comes in. It allows us to express our architectural constraints using a fluent API and validate them alongside other tests during a regular build.
3. ArchUnit Project Setup
ArchUnit integrates nicely with the JUnit test framework, and so, they are typically used together. All we have to do is add the archunit-junit4 dependency to match our JUnit version:
Once we've added the appropriate dependency to our project, let's start writing our architecture tests. Our test application will be a simple SpringBoot REST application that queries Smurfs. For simplicity, this test application only contains the Controller, Service, and Repository classes.
We want to verify that this application complies with the rules we've mentioned before. So, let's start with a simple test for the “presentation classes should only depend on service classes” rule.
4.1. Our First Test
The first step is to create a set of Java classes that will be checked for rules violations. We do this by instantiating the ClassFileImporter class and then using one of its importXXX() methods:
JavaClasses jc = new ClassFileImporter()
  .importPackages("com.baeldung.archunit.smurfs");
In this case, the JavaClasses instance contains all classes from our main application package and its sub-packages. We can think of this object as being analogous to a typical test subject used in regular unit tests, as it will be the target for rule evaluations.
Architectural rules use one of the static methods from the ArchRuleDefinition class as the starting point for its fluent API calls. Let's try to implement the first rule defined above using this API. We'll use the classes() method as our anchor and add additional constraints from there:
Notice that we need to call the check() method of the rule we've created to run the check. This method takes a JavaClasses object and will throw an exception if there's a violation.
This all looks good, but we'll get a list of errors if we try to run it against our code:
java.lang.AssertionError: Architecture Violation [Priority: MEDIUM] -
  Rule 'classes that reside in a package '..presentation..' should only
  depend on classes that reside in a package '..service..'' was violated (6 times):
... error list omitted
Why? The main problem with this rule is the onlyDependsOnClassesThat(). Despite what we've put in the package diagram, our actual implementation has dependencies on JVM and Spring framework classes, hence the error.
4.2. Rewriting Our First Test
One way to solve this error is to add a clause that takes into account those additional dependencies:
With this change, our check will stop failing. This approach, however, suffers from maintainability issues and feels a bit hacky. We can avoid those issues rewriting our rule using the noClasses() static method as our starting point:
Of course, we can also point that this approach is deny-based instead of the allow-based one we had before. The critical point is that whatever approach we choose, ArchUnit will usually be flexible enough to express our rules.
5. Using the LibraryAPI
ArchUnit makes the creation of complex architectural rules an easy task thanks to its built-in rules. Those, in turn, can also be combined, allowing us to create rules using a higher level of abstraction. Out of the box, ArchUnit offers the Library API, a collection of prepackaged rules that address common architecture concerns:
Architectures: Support for layered and onion (a.k.a. Hexagonal or “ports and adapters”) architectures rule checks
Slices: Used to detect circular dependencies, or “cycles”
General: Collection of rules related to best coding practices such as logging, use of exceptions, etc.
PlantUML: Checks whether our code base adheres to a given UML model
Freeze Arch Rules: Save violations for later use, allowing to report only new ones. Particularly useful to manage technical debts
Covering all those rules is out of scope for this introduction, but let's take a look at the Architecture rule package. In particular, let's rewrite the rules in the previous section using the layered architecture rules. Using these rules requires two steps: first, we define the layers of our application. Then, we define which layer accesses are allowed:
Here, layeredArchitecture() is a static method from the Architectures class. When invoked, it returns a new LayeredArchitecture object, which we then use to define names layers and assertions regarding their dependencies. This object implements the ArchRule interface so that we can use it just like any other rule.
The cool thing about this particular API is that it allows us to create in just a few lines of code rules that would otherwise require us to combine multiple individual rules.
6. Conclusion
In this article, we've explored the basics of using ArchUnit in our projects. Adopting this tool is a relatively simple task that can have a positive impact on overall quality and reduce maintenance costs in the long run.
Keycloak is a third-party authorization server used to manage our web or mobile applications' authentication and authorization requirements. It uses a default login page to sign-in users on our app's behalf.
In this tutorial, we'll focus on how we can customize the login page for our Keycloak server so that we can have a different look and feel for it. We'll see this for both standalone as well as embedded servers.
Once the server is started, we only need to refresh the page to see our changes reflected, thanks to the modifications we previously made to the standalone.xml.
Now let's create a new folder, named login, inside the themes/custom directory. To keep things simple, we'll first copy all the contents of the themes/keycloak/login directory here. This is the default login page theme.
Then, we'll go to the admin console, key-in the initial1/zaq1!QAZ credentials and go to the Themes tab for our realm:
We'll select custom for the Login Theme and save our changes.
With that set, we can now try some customizations. But before that, let's have a look at the default login page:
2.2. Adding Customizations
Now let's say we need to change the background. For that, we'll open login/resources/css/login.css and change the class definition:
.login-pf body {
    background: #39a5dc;
    background-size: cover;
    height: 100%;
}
To see the effect, let's refresh the page:
Next, let's try to change the labels for the username and password.
To achieve that, we need to create a new file, messages_en.properties in the theme/login/messages folder. This file overrides the default message bundle being used for the given properties:
Suppose we want to change the entire HTML or a part of it, we'll need to override the freemarker templates that Keycloak uses by default. The default templates for the login page are kept in the base/login directory.
Let's say we want WELCOME TO BAELDUNG to be displayed in place of SPRINGBOOTKEYCLOAK.
For that, we'll need to copy base/login/template.ftl to our custom/login folder.
As we can see, all the customizations done earlier for the standalone server, such as the background, label names, and page title, are appearing here.
4. Bypassing Keycloak Login Page
Technically, we can completely bypass the Keycloak login page by using the password or direct access grant flow. However, it's strongly recommended that this grant type shouldn't be used at all.
In this case, there is no intermediary step of getting an authorization code, and then receiving the access token in exchange. Instead, we can directly send the user credentials via a REST API call and get the access token in response.
This effectively means that we can use our login page to collect the user's id and password, and along with the client id and secret, send it to Keycloak in a POST to its token endpoint.
But again, since Keycloak provides a rich feature set of login options – such as remember me, password reset, and MFA – to name a few, there is little reason to bypass it.
5. Conclusion
In this tutorial, we learned how to change the default login page for Keycloak and add our customizations.
We saw this for both a standalone and an embedded instance.
Lastly, we briefly went over how to bypass Keycloak's login page entirely and why not to do that.