Quantcast
Channel: Baeldung
Viewing all 3761 articles
Browse latest View live

Guide to MapDB

$
0
0

1. Introduction

In this article, we’ll look at the MapDB library — an embedded database engine accessed through a collection-like API.

We start by exploring the core classes DB and DBMaker that help configure, open, and manage our databases. Then, we’ll dive into some examples of MapDB data structures that store and retrieve data.

Finally, we’ll look at some of the in-memory modes before comparing MapDB to traditional databases and Java Collections.

2. Storing Data in MapDB

First, let’s introduce the two classes that we’ll be using constantly throughout this tutorial — DB and DBMaker. The DB class represents an open database. Its methods invoke actions for creating and closing storage collections to handle database records, as well as handling transactional events.

DBMaker handles database configuration, creation, and opening. As part of the configuration, we can choose to host our database either in-memory or on our file system.

2.1. A Simple HashMap Example

To understand how this works, let’s instantiate a new database in memory.

First, let’s create a new in-memory database using the DBMaker class:

DB db = DBMaker.memoryDB().make();

Once our DB object is up and running, we can use it to build an HTreeMap to work with our database records:

String welcomeMessageKey = "Welcome Message";
String welcomeMessageString = "Hello Baeldung!";

HTreeMap myMap = db.hashMap("myMap").createOrOpen();
myMap.put(welcomeMessageKey, welcomeMessageString);

HTreeMap is MapDB’s HashMap implementation. So, now that we have data in our database, we can retrieve it using the get method:

String welcomeMessageFromDB = (String) myMap.get(welcomeMessageKey);
assertEquals(welcomeMessageString, welcomeMessageFromDB);

Finally, now that we’re finished with the database, we should close it to avoid further mutation:

db.close();

To store our data in a file, rather than in memory, all we need to do is change the way that our DB object is instantiated:

DB db = DBMaker.fileDB("file.db").make();

Our example above uses no type parameters. As a result, we’re stuck with casting our results to work with specific types. In our next example, we’ll introduce Serializers to eliminate the need for casting.

2.2. Collections

MapDB includes different collection types. To demonstrate, let’s add and retrieve some data from our database using a NavigableSet, which works as you might expect of a Java Set:

Let’s start with a simple instantiation of our DB object:

DB db = DBMaker.memoryDB().make();

Next, let’s create our NavigableSet:

NavigableSet<String> set = db
  .treeSet("mySet")
  .serializer(Serializer.STRING)
  .createOrOpen();

Here, the serializer ensures that the input data from our database is serialized and deserialized using String objects.

Next, let’s add some data:

set.add("Baeldung");
set.add("is awesome");

Now, let’s check that our two distinct values have been added to the database correctly:

assertEquals(2, set.size());

Finally, since this is a set, let’s add a duplicate string and verify that our database still contains only two values:

set.add("Baeldung");

assertEquals(2, set.size());

2.3. Transactions

Much like traditional databases, the DB class provides methods to commit and rollback the data we add to our database.

To enable this functionality, we need to initialize our DB with the transactionEnable method:

DB db = DBMaker.memoryDB().transactionEnable().make();

Next, let’s create a simple set, add some data, and commit it to the database:

NavigableSet<String> set = db
  .treeSet("mySet")
  .serializer(Serializer.STRING)
  .createOrOpen();

set.add("One");
set.add("Two");

db.commit();

assertEquals(2, set.size());

Now, let’s add a third, uncommitted string to our database:

set.add("Three");

assertEquals(3, set.size());

If we’re not happy with our data, we can rollback the data using DB’s rollback method:

db.rollback();

assertEquals(2, set.size());

2.4. Serializers

MapDB offers a large variety of serializers, which handle the data within the collection. The most important construction parameter is the name, which identifies the individual collection within the DB object:

HTreeMap<String, Long> map = db.hashMap("indentification_name")
  .keySerializer(Serializer.STRING)
  .valueSerializer(Serializer.LONG)
  .create();

While serialization is recommended, it is optional and can be skipped. However, it’s worth noting that this will lead to a slower generic serialization process.

3. HTreeMap

MapDB’s HTreeMap provides HashMap and HashSet collections for working with our database. HTreeMap is a segmented hash tree and does not use a fixed-size hash table. Instead, it uses an auto-expanding index tree and does not rehash all of its data as the table grows. To top it off, HTreeMap is thread-safe and supports parallel writes using multiple segments.

To begin, let’s instantiate a simple HashMap that uses String for both keys and values:

DB db = DBMaker.memoryDB().make();

HTreeMap<String, String> hTreeMap = db
  .hashMap("myTreeMap")
  .keySerializer(Serializer.STRING)
  .valueSerializer(Serializer.STRING)
  .create();

Above, we’ve defined separate serializers for the key and the value. Now that our HashMap is created, let’s add data using the put method:

hTreeMap.put("key1", "value1");
hTreeMap.put("key2", "value2");

assertEquals(2, hTreeMap.size());

As HashMap works on an Object’s hashCode method, adding data using the same key causes the value to be overwritten:

hTreeMap.put("key1", "value3");

assertEquals(2, hTreeMap.size());
assertEquals("value3", hTreeMap.get("key1"));

4. SortedTableMap

MapDB’s SortedTableMap stores keys in a fixed-size table and uses binary search for retrieval. It’s worth noting that once prepared, the map is read-only.

Let’s walk through the process of creating and querying a SortedTableMap. We’ll start by creating a memory-mapped volume to hold the data, as well as a sink to add data. On the first invocation of our volume, we’ll set the read-only flag to false, ensuring we can write to the volume:

String VOLUME_LOCATION = "sortedTableMapVol.db";

Volume vol = MappedFileVol.FACTORY.makeVolume(VOLUME_LOCATION, false);

SortedTableMap.Sink<Integer, String> sink =
  SortedTableMap.create(
    vol,
    Serializer.INTEGER,
    Serializer.STRING)
    .createFromSink();

Next, we’ll add our data and call the create method on the sink to create our map:

for(int i = 0; i < 100; i++){
  sink.put(i, "Value " + Integer.toString(i));
}

sink.create();

Now that our map exists, we can define a read-only volume and open our map using SortedTableMap’s open method:

Volume openVol = MappedFileVol.FACTORY.makeVolume(VOLUME_LOCATION, true);

SortedTableMap<Integer, String> sortedTableMap = SortedTableMap
  .open(
    openVol,
    Serializer.INTEGER,
    Serializer.STRING);

assertEquals(100, sortedTableMap.size());

4.1. Binary Search

Before we move on, let’s understand how the SortedTableMap utilizes binary search in more detail.

SortedTableMap splits the storage into pages, with each page containing several nodes comprised of keys and values. Within these nodes are the key-value pairs that we define in our Java code.

SortedTableMap performs three binary searches to retrieve the correct value:

  1. Keys for each page are stored on-heap in an array. The SortedTableMap performs a binary search to find the correct page.
  2. Next, decompression occurs for each key in the node. A binary search establishes the correct node, according to the keys.
  3. Finally, the SortedTableMap searches over the keys within the node to find the correct value.

5. In-Memory Mode

MapDB offers three types of in-memory store. Let’s take a quick look at each mode, understand how it works, and study its benefits.

5.1. On-Heap

The on-heap mode stores objects in a simple Java Collection Map. It does not employ serialization and can be very fast for small datasets. 

However, since the data is stored on-heap, the dataset is managed by garbage collection (GC). The duration of GC rises with the size of the dataset, resulting in performance drops.

Let’s see an example specifying the on-heap mode:

DB db = DBMaker.heapDB().make();

5.2. Byte[]

The second store type is based on byte arrays. In this mode, data is serialized and stored into arrays up to 1MB in size. While technically on-heap, this method is more efficient for garbage collection.

This is recommended by default, and was used in our ‘Hello Baeldung’ example:

DB db = DBMaker.memoryDB().make();

5.3. DirectByteBuffer

The final store is based on DirectByteBuffer. Direct memory, introduced in Java 1.4, allows the passing of data directly to native memory rather than Java heap. As a result, the data will be stored completely off-heap.

We can invoke a store of this type with:

DB db = DBMaker.memoryDirectDB().make();

6. Why MapDB?

So, why use MapDB?

6.1. MapDB vs Traditional Database

MapDB offers a large array of database functionality configured with just a few lines of Java code. When we employ MapDB, we can avoid the often time-consuming setup of various services and connections needed to get our program to work.

Beyond this, MapDB allows us to access the complexity of a database with the familiarity of a Java Collection. With MapDB, we do not need SQL, and we can access records with simple get method calls.

6.2. MapDB vs Simple Java Collections

Java Collections will not persist the data of our application once it stops executing. MapDB offers a simple, flexible, pluggable service that allows us to quickly and easily persist the data in our application while maintaining the utility of Java collection types.

7. Conclusion

In this article, we’ve taken a deep dive into MapDB’s embedded database engine and collection framework.

We started by looking at the core classes DB and DBMaker to configure, open and manage our database. Then, we walked through some examples of data structures that MapDB offers to work with our records. Finally, we looked at the advantages of MapDB over a traditional database or Java Collection.

As always, the example code is available over on GitHub.


The Java SecureRandom Class

$
0
0

1. Introduction

In this short tutorial, we’ll learn about java.security.SecureRandom, a class that provides a cryptographically strong random number generator.

2. Comparison to java.util.Random

Standard JDK implementations of java.util.Random use a Linear Congruential Generator (LCG) algorithm for providing random numbers. The problem with this algorithm is that it’s not cryptographically strong. In other words, the generated values are much more predictable, therefore attackers could use it to compromise our system.

To overcome this issue, we should use java.security.SecureRandom in any security decisions. It produces cryptographically strong random values by using a cryptographically strong pseudo-random number generator (CSPRNG).

For a better understanding of the difference between LCG and CSPRNG, please look at the below chart presenting a distribution of values for both algorithms:

3. Generating Random Values

The most common way of using SecureRandom is to generate int, long, float, double or boolean values:

int randomInt = secureRandom.nextInt();
long randomLong = secureRandom.nextLong();
float randomFloat = secureRandom.nextFloat();
double randomDouble = secureRandom.nextDouble();
boolean randomBoolean = secureRandom.nextBoolean();

For generating int values we can pass an upper bound as a parameter:

int randomInt = secureRandom.nextInt(upperBound);

In addition, we can generate a stream of values for int, double and long:

IntStream randomIntStream = secureRandom.ints();
LongStream randomLongStream = secureRandom.longs();
DoubleStream randomDoubleStream = secureRandom.doubles();

For all streams we can explicitly set the stream size:

IntStream intStream = secureRandom.ints(streamSize);

and the origin (inclusive) and bound (exclusive) values as well:

IntStream intStream = secureRandom.ints(streamSize, originValue, boundValue);

We can also generate a sequence of random bytes. The nextBytes() function takes user-supplied byte array and fills it with random bytes:

byte[] values = new byte[124];
secureRandom.nextBytes(values);

4. Choosing An Algorithm

By default, SecureRandom uses the SHA1PRNG algorithm to generate random values. We can explicitly make it use another algorithm by invoking the getInstance() method:

SecureRandom secureRandom = SecureRandom.getInstance("NativePRNG");

Creating SecureRandom with the new operator is equivalent to SecureRandom.getInstance(“SHA1PRNG”).

All random number generators available in Java can be found on the official docs page.

5. Seeds

Every instance of SecureRandom is created with an initial seed. It works as a base for providing random values and changes every time we generate a new value.

Using the new operator or calling SecureRandom.getInstance() will get the default seed from /dev/urandom.

We can change the seed by passing it as a constructor parameter:

byte[] seed = getSecureRandomSeed();
SecureRandom secureRandom = new SecureRandom(seed);

or by invoking a setter method on the already created object:

byte[] seed = getSecureRandomSeed();
secureRandom.setSeed(seed);

Remember that if we create two instances of SecureRandom with the same seed, and the same sequence of method calls is made for each, they will generate and return identical sequences of numbers.

6. Conclusion

In this tutorial, we’ve learned how the SecureRandom works and how to use it for generating random values.

As always, all code presented in this tutorial can be found over on GitHub.

JWS + JWK in a Spring Security OAuth2 Application

$
0
0

1. Overview

In this tutorial, we’ll learn about JSON Web Signature (JWS), and how it can be implemented using the JSON Web Key (JWK) specification on applications configured with Spring Security OAuth2.

We should keep in mind that even though Spring is working to migrate all the Spring Security OAuth features to the Spring Security framework, this guide is still a good starting point to understand the basic concepts of these specifications and it should come in handy at the time of implementing them on any framework.

First, we’ll try to understand the basic concepts; like what’s JWS and JWK, their purpose and how we can easily configure a Resource Server to use this OAuth solution.

Then we’ll go deeper, we’ll analyze the specifications in detail by analyzing what OAuth2 Boot is doing behind the scenes, and by setting up an Authorization Server to use JWK.

2. Understanding the Big Picture of JWS and JWK

Before starting, it’s important that we understand correctly some basic concepts. It’s advisable to go through our OAuth and our JWT articles first since these topics are not part of the scope of this tutorial.

JWS is a specification created by the IETF that describes different cryptographic mechanisms to verify the integrity of data, namely the data in a JSON Web Token (JWT). It defines a JSON structure that contains the necessary information to do so.

It’s a key aspect in the widely-used JWT spec since the claims need to be either signed or encrypted in order to be considered effectively secured.

In the first case, the JWT is represented as a JWS. While if it’s encrypted, the JWT will be encoded in a JSON Web Encryption (JWE) structure.

The most common scenario when working with OAuth is having just signed JWTs. This is because we don’t usually need to “hide” information but simply verify the integrity of the data.

Of course, whether we’re handling signed or encrypted JWTs, we need formal guidelines to be able to transmit public keys efficiently.

This is the purpose of JWK, a JSON structure that represents a cryptographic key, defined also by the IETF.

Many Authentication providers offer a “JWK Set” endpoint, also defined in the specifications. With it, other applications can find information on public keys to process JWTs.

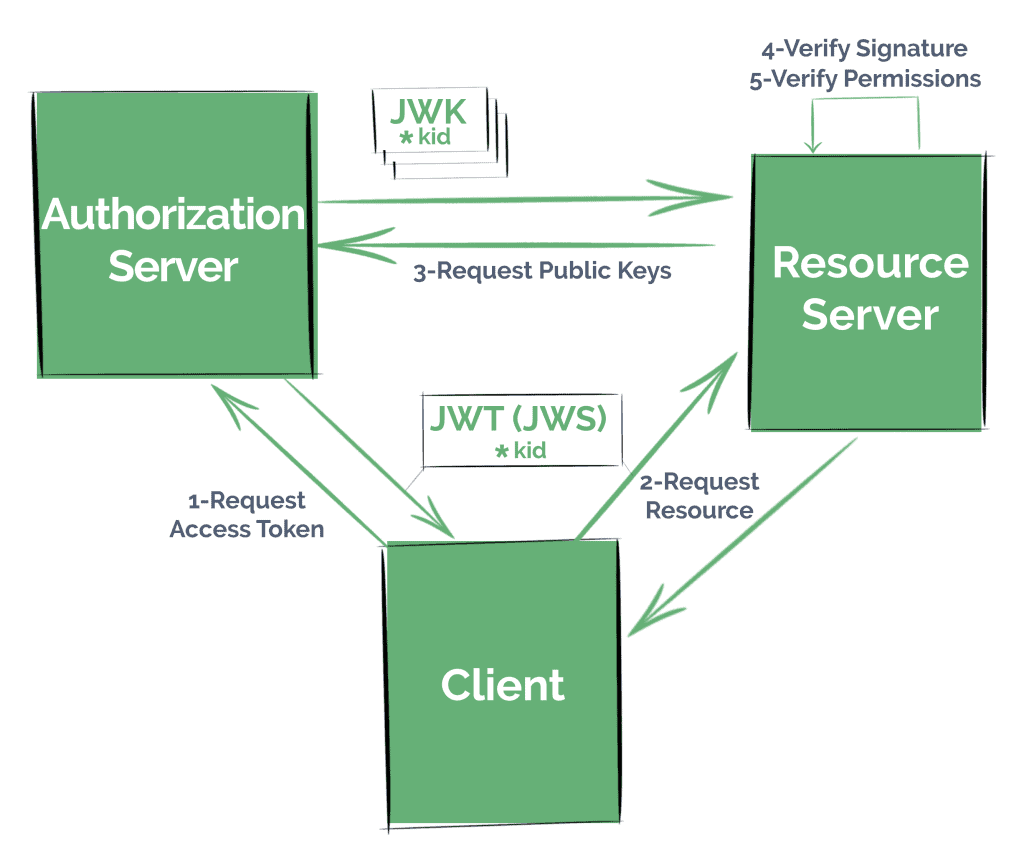
For instance, a Resource Server uses the kid (Key Id) field present in the JWT to find the correct key in the JWK set.

2.1. Implementing a Solution Using JWK

Commonly, if we want our application to serve resource in a secure manner, like by using a standard security protocol such as OAuth 2.0, we’ll need to follow the next steps:

  1. Register Clients in an Authorization Server – either in our own service, or in a well-known provider like Okta, Facebook or Github
  2. These Clients will request an access token from the Authorization Server, following any of the OAuth strategies we might have configured
  3. They will then try to access the resource presenting the token (in this case, as a JWT) to the Resource Server
  4. The Resource Server has to verify that the token hasn’t been manipulated by checking its signature as well as validate its claims
  5. And finally, our Resource Server retrieves the resource, now being sure that the Client has the correct permissions

3. JWK and the Resource Server Configuration

Later on, we’ll see how to set up our own Authorization server that serves JWTs and a ‘JWK Set’ endpoint.

At this point, though, we’ll focus on the simplest – and probably most common – scenario where we’re pointing at an existing Authorization server.

All we have to do is indicate how the service has to validate the access token it receives, like what public key it should use to verify the JWT’s signature.

We’ll use Spring Security OAuth’s Autoconfig features to achieve this in a simple and clean way, using only application properties.

3.1. Maven Dependency

We’ll need to add the OAuth2 auto-configuration dependency to our Spring application’s pom file:

<dependency>
    <groupId>org.springframework.security.oauth.boot</groupId>
    <artifactId>spring-security-oauth2-autoconfigure</artifactId>
    <version>2.1.6.RELEASE</version>
</dependency>

As usual, we can check the latest version of the artifact in Maven Central.

Note that this dependency is not managed by Spring Boot, and therefore we need to specify its version.

It should match the version of Spring Boot we’re using anyway.

3.2. Configuring the Resource Server

Next, we’ll have to enable the Resource Server features in our application with the @EnableResourceServer annotation:

@SpringBootApplication
@EnableResourceServer
public class ResourceServerApplication {

    public static void main(String[] args) {
        SpringApplication.run(ResourceServerApplication.class, args);
    }
}

Now we need to indicate how our application can obtain the public key necessary to validate the signature of the JWTs it receives as Bearer tokens.

OAuth2 Boot offers different strategies to verify the token.

As we said before, most Authorization servers expose a URI with a collection of keys that other services can use to validate the signature.

We’ll configure the JWK Set endpoint of a local Authorization Server we’ll work on further ahead.

Let’s add the following in our application.properties:

security.oauth2.resource.jwk.key-set-uri=
  http://localhost:8081/sso-auth-server/.well-known/jwks.json

We’ll have a look at other strategies as we analyze this subject in detail.

Note: the new Spring Security 5.1 Resource Server only supports JWK-signed JWTs as authorization, and Spring Boot also offers a very similar property to configure the JWK Set endpoint:

spring.security.oauth2.resourceserver.jwk-set-uri=
  http://localhost:8081/sso-auth-server/.well-known/jwks.json

3.3. Spring Configurations Under the Hood

The property we added earlier translates in the creation of a couple of Spring beans.

More precisely, OAuth2 Boot will create:

  • a JwkTokenStore with the only ability to decode a JWT and verifying its signature
  • DefaultTokenServices instance to use the former TokenStore

4. The JWK Set Endpoint in the Authorization Server

Now we’ll go deeper on this subject, analyzing some key aspects of JWK and JWS as we configure an Authorization Server that issues JWTs and serves its JWK Set endpoint.

Note that since Spring Security doesn’t yet offer features to set up an Authorization Server, creating one using Spring Security OAuth capabilities is the only option at this stage. It will be compatible with Spring Security Resource Server, though.

4.1. Enabling Authorization Server Features

The first step is configuring our Authorization server to issue access tokens when required.

We’ll also add the spring-security-oauth2-autoconfigure dependency as we did with Resource Server.

First, we’ll use the @EnableAuthorizationServer annotation to configure the OAuth2 Authorization Server mechanisms:

@Configuration
@EnableAuthorizationServer
public class JwkAuthorizationServerConfiguration {

    // ...

}

And we’ll register an OAuth 2.0 Client using properties:

security.oauth2.client.client-id=bael-client
security.oauth2.client.client-secret=bael-secret

With this, our application will retrieve random tokens when requested with the corresponding credentials:

curl bael-client:bael-secret\
  @localhost:8081/sso-auth-server/oauth/token \
  -d grant_type=client_credentials \
  -d scope=any

As we can see, Spring Security OAuth retrieves a random string value by default, not JWT-encoded:

"access_token": "af611028-643f-4477-9319-b5aa8dc9408f"

4.2. Issuing JWTs

We can easily change this by creating a JwtAccessTokenConverter bean in the context:

@Bean
public JwtAccessTokenConverter accessTokenConverter() {
    return new JwtAccessTokenConverter();
}

and using it in a JwtTokenStore instance:

@Bean
public TokenStore tokenStore() {
    return new JwtTokenStore(accessTokenConverter());
}

So with these changes, let’s request a new access token, and this time we’ll obtain a JWT, encoded as a JWS, to be accurate.

We can easily identify JWSs; their structure consists of three fields (header, payload, and signature) separated by a dot:

"access_token":"eyJhbGciOiJIUzI1NiIsInR5cCI6IkpXVCJ9
  .
  eyJzY29wZSI6WyJhbnkiXSwiZXhwIjoxNTYxOTcy...
  .
  XKH70VUHeafHLaUPVXZI9E9pbFxrJ35PqBvrymxtvGI"

By default, Spring signs the header and payload using a Message Authentication Code (MAC) approach.

We can verify this by analyzing the JWT in one of the many JWT decoder/verifier online tools we can find out there.

If we decode the JWT we obtained, we’ll see that the value of the alg attribute is HS256, which indicates an HMAC-SHA256 algorithm was used to sign the token.

In order to understand why we don’t need JWKs with this approach, we have to understand how MAC hashing function works.

4.3. The Default Symmetric Signature

MAC hashing uses the same key to sign the message and to verify its integrity; it’s a symmetric hashing function.

Therefore, for security purposes, the application can’t publicly share its signing key.

Only for academic reasons, we’ll make public the Spring Security OAuth /oauth/token_key endpoint:

security.oauth2.authorization.token-key-access=permitAll()

And we’ll customize the signing key value when we configure the JwtAccessTokenConverter bean:

converter.setSigningKey("bael");

To know exactly which symmetric key is being used.

Note: even if we don’t publish the signing key, setting up a weak signing key is a potential threat to dictionary attacks.

Once we know the signing key, we can manually verify the token integrity using the online tool we mentioned before.

The Spring Security OAuth library also configures a /oauth/check_token endpoint which validates and retrieves the decoded JWT.

This endpoint is also configured with a denyAll() access rule and should be secured consciously. For this purpose, we could use the security.oauth2.authorization.check-token-access property as we did for the token key before.

4.4. Alternatives for the Resource Server Configuration

Depending on our security needs, we might consider that securing one of the recently mentioned endpoints properly – whilst making them accessible to the Resource Servers – is enough.

If that’s the case, then we can leave the Authorization Server as-is, and choose another approach for the Resource Server.

The Resource Server will expect the Authorization Server to have secured endpoints, so for starters, we’ll need to provide the client credentials, with the same properties we used in the Authorization Server:

security.oauth2.client.client-id=bael-client
security.oauth2.client.client-secret=bael-secret

Then we can choose to use the /oauth/check_token endpoint (a.k.a. the introspection endpoint) or obtain a single key from /oauth/token_key:

## Single key URI:
security.oauth2.resource.jwt.key-uri=
  http://localhost:8081/sso-auth-server/oauth/token_key
## Introspection endpoint:
security.oauth2.resource.token-info-uri=
  http://localhost:8081/sso-auth-server/oauth/check_token

Alternatively, we can just configure the key that will be used to verify the token in the Resource Service:

## Verifier Key
security.oauth2.resource.jwt.key-value=bael

With this approach, there will be no interaction with the Authorization Server, but of course, this means less flexibility on changes with the Token signing configuration.

As with the key URI strategy, this last approach might be recommended only for asymmetric signing algorithms.

4.5. Creating a Keystore File

Let’s not forget our final objective. We want to provide a JWK Set endpoint as the most well-known providers do.

If we’re going to share keys, it’ll be better if we use asymmetric cryptography (particularly, digital signature algorithms) to sign the tokens.

The first step towards this is creating a keystore file.

One easy way to achieve this is:

  1. open the command line in the /bin directory of any JDK or JRE you have in handy:
cd $JAVA_HOME/bin
  1. run the keytool command, with the corresponding parameters:
./keytool -genkeypair \
  -alias bael-oauth-jwt \
  -keyalg RSA \
  -keypass bael-pass \
  -keystore bael-jwt.jks \
  -storepass bael-pass

Notice we used an RSA algorithm here, which is asymmetric.

  1. answer the interactive questions and generate the keystore file

4.6. Adding the Keystore File to Our Application

We have to add the keystore to our project resources.

This is a simple task, but keep in mind this is a binary file. That means it can’t be filtered, or it’ll become corrupted.

If we’re using Maven, one alternative is to put the text files in a separate folder and configure the pom.xml accordingly:

<build>
    <resources>
        <resource>
            <directory>src/main/resources</directory>
            <filtering>false</filtering>
        </resource>
        <resource>
            <directory>src/main/resources/filtered</directory>
            <filtering>true</filtering>
        </resource>
    </resources>
</build>

4.7. Configuring the TokenStore

The next step is configuring our TokenStore with the pair of keys; the private to sign the tokens, and the public to validate the integrity.

We’ll create a KeyPair instance employing the keystore file in the classpath, and the parameters we used when we created the .jks file:

ClassPathResource ksFile =
  new ClassPathResource("bael-jwt.jks");
KeyStoreKeyFactory ksFactory =
  new KeyStoreKeyFactory(ksFile, "bael-pass".toCharArray());
KeyPair keyPair = ksFactory.getKeyPair("bael-oauth-jwt");

And we’ll configure it in our JwtAccessTokenConverter bean, removing any other configuration:

converter.setKeyPair(keyPair);

We can request and decode a JWT again to check the alg parameter changed.

If we have a look at the Token Key endpoint, we’ll see the public key obtained from the keystore.

It’s easily identifiable by the PEM “Encapsulation Boundary” header; the string starting with “—–BEGIN PUBLIC KEY—–.

4.8. The JWK Set Endpoint Dependencies

The Spring Security OAuth library doesn’t support JWK out of the box.

Consequently, we’ll need to add another dependency to our project, nimbus-jose-jwt which provides some basic JWK implementations:

<dependency>
    <groupId>com.nimbusds</groupId>
    <artifactId>nimbus-jose-jwt</artifactId>
    <version>7.3</version>
</dependency>

Remember we can check the latest version of the library using the Maven Central Repository Search Engine.

4.9. Creating the JWK Set Endpoint

Let’s start by creating a JWKSet bean using the KeyPair instance we configured previously:

@Bean
public JWKSet jwkSet() {
    RSAKey.Builder builder = new RSAKey.Builder((RSAPublicKey) keyPair().getPublic())
      .keyUse(KeyUse.SIGNATURE)
      .algorithm(JWSAlgorithm.RS256)
      .keyID("bael-key-id");
    return new JWKSet(builder.build());
}

Now creating the endpoint is quite simple:

@RestController
public class JwkSetRestController {

    @Autowired
    private JWKSet jwkSet;

    @GetMapping("/.well-known/jwks.json")
    public Map<String, Object> keys() {
        return this.jwkSet.toJSONObject();
    }
}

The Key Id field we configured in the JWKSet instance translates into the kid parameter.

This kid is an arbitrary alias for the key, and it’s usually used by the Resource Server to select the correct entry from the collection since the same key should be included in the JWT Header.

We face a new problem now; since Spring Security OAuth doesn’t support JWK, the issued JWTs won’t include the kid Header.

Let’s find a workaround to solve this.

4.9. Adding the kid Value to the JWT Header

We’ll create a new class extending the JwtAccessTokenConverter we’ve been using, and that allows adding header entries to the JWTs:

public class JwtCustomHeadersAccessTokenConverter
  extends JwtAccessTokenConverter {

    // ...

}

First of all, we’ll need to:

  • configure the parent class as we’ve been doing, setting up the KeyPair we configured
  • obtain a Signer object that uses the private key from the keystore
  • of course, a collection of custom headers we want to add to the structure

Let’s configure the constructor based on this:

private Map<String, String> customHeaders = new HashMap<>();
final RsaSigner signer;

public JwtCustomHeadersAccessTokenConverter(
  Map<String, String> customHeaders,
  KeyPair keyPair) {
    super();
    super.setKeyPair(keyPair);
    this.signer = new RsaSigner((RSAPrivateKey) keyPair.getPrivate());
    this.customHeaders = customHeaders;
}

Now we’ll override the encode method. Our implementation will be the same as the parent one, with the only difference that we’ll also pass the custom headers when creating the String token:

private JsonParser objectMapper = JsonParserFactory.create();

@Override
protected String encode(OAuth2AccessToken accessToken,
  OAuth2Authentication authentication) {
    String content;
    try {
        content = this.objectMapper
          .formatMap(getAccessTokenConverter()
          .convertAccessToken(accessToken, authentication));
    } catch (Exception ex) {
        throw new IllegalStateException(
          "Cannot convert access token to JSON", ex);
    }
    String token = JwtHelper.encode(
      content,
      this.signer,
      this.customHeaders).getEncoded();
    return token;
}

We’re ready to go. Remember to change the Resource Server’s properties back. We need to use only the key-set-uri property we set up at the beginning of the tutorial.

We can ask for an Access Token, check it’s kid value, and use it to request a resource.

Once the public key is retrieved, the Resource Server stores it internally, mapping it to the Key Id for future requests.

5. Conclusion

We’ve learned quite a lot in this comprehensive guide about JWT, JWS, and JWK. Not only Spring-specific configurations, but also general Security concepts, seeing them in action with a practical example.

We’ve seen the basic configuration of a Resource Server that handles JWTs using a JWK Set endpoint.

Lastly, we’ve extended the basic Spring Security OAuth features, by setting up an Authorization Server exposing a JWK Set endpoint efficiently.

We can find both services in our OAuth Github repo, as always.

Working with Enums in Thymeleaf

$
0
0

1. Introduction

In this quick tutorial, we’re going to learn how to work with enums in Thymeleaf.

We’ll start by listing enum values in a dropdown. After that, we’ll look at using our enum for flow control within our templates.

2. Setup

Let’s start by adding the Spring Boot starter for Thymeleaf to our pom.xml file:

<dependency>
    <groupId>org.springframework.boot</groupId>
    <artifactId>spring-boot-starter-thymeleaf</artifactId>
    <versionId>2.1.6.RELEASE</versionId>
</dependency>

We’re going to be working with widgets that have a few choices of color, so let’s define our Color enum:

public enum Color {
    BLACK, BLUE, RED, YELLOW, GREEN, ORANGE, PURPLE, WHITE
}

Now, let’s create our Widget class:

public class Widget {
    private String name;
    private Color color;

    // Standard getters/setters
}

Let’s use select and option to create a dropdown that uses our Color enum:

<select name="color">
    <option th:each="colorOpt : ${T(com.baeldung.thymeleaf.model.Color).values()}" 
        th:value="${colorOpt}" th:text="${colorOpt}"></option>
</select>

The T operator is part of the Spring Expression Language for specifying an instance of a class or accessing static methods.

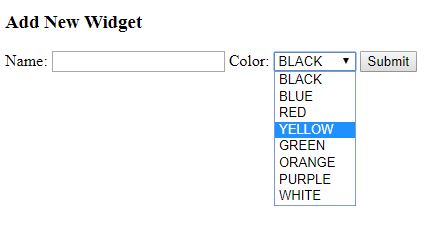
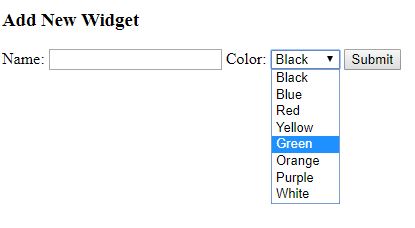
If we run our application and navigate to our widget entry page, we’ll see all our colors in the Color dropdown:

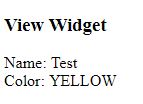
When we submit our form, our Widget object will be populated with the selected color:

4. Using a Display Name

Since all capital letters can be a bit jarring, let’s expand on our example to provide more user-friendly dropdown labels.

We’ll start by modifying our Color enum to provide a display name:

public enum Color {
    BLACK("Black"), 
    BLUE("Blue"), 
    RED("Red"), 
    YELLOW("Yellow"), 
    GREEN("Green"),
    ORANGE("Orange"), 
    PURPLE("Purple"), 
    WHITE("White");
    
    private final String displayValue;
    
    private Color(String displayValue) {
        this.displayValue = displayValue;
    }
    
    public String getDisplayValue() {
        return displayValue;
    }
}

Next, let’s head over to our Thymeleaf template and update our dropdown to use the new displayValue:

<select name="color">
    <option th:each="colorOpt : ${T(com.baeldung.thymeleaf.model.Color).values()}" 
        th:value="${colorOpt}" th:text="${colorOpt.displayValue}"></option>
</select>

Our dropdown now displays with the more readable color names:

5. If Statements

Sometimes we might want to vary what we’re displaying based on the values of an enum. We can use our Color enum with Thymeleaf conditional statements.

Let’s imagine that we have opinions on some of the possible widget colors.

We can use a Thymeleaf if statement with our Color enum to conditionally display text:

<div th:if="${widget.color == T(com.baeldung.thymeleaf.model.Color).RED}">
    This color screams danger.
</div>

Another option is to use a String comparison:

<div th:if="${widget.color.name() == 'GREEN'}">
    Green is for go.
</div>

6. Switch-Case Statements

In addition to if statements, Thymeleaf supports a switch-case statement.

Let’s use a switch-case statement with our Color enum:

<div th:switch="${widget.color}">
    <span th:case="${T(com.baeldung.thymeleaf.model.Color).RED}"
      style="color: red;">Alert</span>
    <span th:case="${T(com.baeldung.thymeleaf.model.Color).ORANGE}"
      style="color: orange;">Warning</span>
    <span th:case="${T(com.baeldung.thymeleaf.model.Color).YELLOW}"
      style="color: yellow;">Caution</span>
    <span th:case="${T(com.baeldung.thymeleaf.model.Color).GREEN}"
      style="color: green;">All Good</span>
</div>

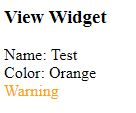
If we enter an orange widget, we should see our warning statement:

7. Conclusion

In this tutorial, we started by using Thymeleaf to create a dropdown using the Color enum we defined in our application. From there, we learned how to make the drop down display values more readable.

After going over the input side with the dropdown, we moved on to the output side and learned how to work with enums in control structures.  We used both if and switch-case statements to condition some elements based on our Color enum.

The full example is available over on GitHub.

How to Reverse a String in Java

$
0
0

1. Overview

In this tutorial, we’re going to see how we can reverse a String in Java.

We’ll start to do this processing using plain Java solutions. Next, we’ll have a look at the options that the third-party libraries like Apache Commons provide.

Furthermore, we’ll demonstrate how to reverse the order of words in a sentence.

2. A Traditional for Loop

We know that strings are immutable in Java. An immutable object is an object whose internal state remains constant after it has been entirely created.

Therefore, we cannot reverse a String by modifying it. We need to create another String for this reason.

First, let’s see a basic example using a for loop. We’re going to iterate over the String input from the last to the first element and concatenate every character into a new String:

public String reverse(String input) {

    if (input == null) {
        return input;
    }

    String output = "";

    for (int i = input.length() - 1; i >= 0; i--) {
        output = output + input.charAt(i);
    }

    return output;
}

As we can see, we need to be careful at the corner cases and treat them separately.

In order to better understand the example, we can build a unit test:

@Test
public void whenReverseIsCalled_ThenCorrectStringIsReturned() {
    String reversed = ReverseStringExamples.reverse("cat");
    String reversedNull = ReverseStringExamples.reverse(null);
    String reversedEmpty = ReverseStringExamples.reverse(StringUtils.EMPTY);

    assertEquals("tac", reversed);
    assertEquals(null, reversedNull);
    assertEquals(StringUtils.EMPTY, reversedEmpty);
}

3. A StringBuilder

Java also offers some mechanisms like StringBuilder and StringBuffer that create a mutable sequence of characters. These objects have a reverse() method that helps us achieve the desired result.

Here, we need to create a StringBuilder from the String input and then call the reverse() method:

public String reverseUsingStringBuilder(String input) {
    if (input == null) {
        return null;
    }

    StringBuilder output = new StringBuilder(input).reverse();
    return output.toString();
}

4. Apache Commons

Apache Commons is a popular Java library with a lot of utility classes including string manipulation.

As usual, to get started using Apache Commons, we first need to add the Maven dependency:

<dependency>
    <groupId>org.apache.commons</groupId>
    <artifactId>commons-lang3</artifactId>
    <version>3.9</version>
</dependency>

The StringUtils class is what we need here because it provides the reverse() method similar to StringBuilder.

One advantage of using this library is that its utility methods perform null-safe operations. So, we don’t have to treat the edge cases separately.

Let’s create a method that fulfills our purpose and uses the StringUtils class:

public String reverseUsingApacheCommons(String input) {
    return StringUtils.reverse(input);
}

Now, looking at these three methods, we can certainly say that the third one is the simplest and the least error-prone way to reverse a String.

5. Reversing the Order of Words in a Sentence

Now, let’s assume we have a sentence with words separated by spaces and no punctuation marks. We need to reverse the order of words in this sentence.

We can solve this problem in two steps: splitting the sentence by the space delimiter and then concatenating the words in reverse order.

First, we’ll show a classic approach. We’re going to use the String.split() method in order to fulfill the first part of our problem. Next, we’ll iterate backward through the resulting array and concatenate the words using a StringBuilder. Of course, we also need to add a space between these words:

public String reverseTheOrderOfWords(String sentence) {
    if (sentence == null) {
        return null;
    }

    StringBuilder output = new StringBuilder();
    String[] words = sentence.split(" ");

    for (int i = words.length - 1; i >= 0; i--) {
        output.append(words[i]);
        output.append(" ");
    }

    return output.toString().trim();
}

Second, we’ll consider using the Apache Commons library. Once again, it helps us achieve a more readable and less error-prone code. We only need to call the StringUtils.reverseDelimited() method with the input sentence and the delimiter as arguments:

public String reverseTheOrderOfWordsUsingApacheCommons(String sentence) {
    return StringUtils.reverseDelimited(sentence, ' ');
}

6. Conclusion

In this tutorial, we’ve first looked at different ways of reversing a String in Java. We went through some examples using core Java, as well as using a popular third-party library like Apache Commons.

Next, we’ve seen how to reverse the order of words in a sentence in two steps. These steps can also be helpful in achieving other permutations of a sentence.

As usual, all the code samples shown in this tutorial are available over on GitHub.

Spring @Qualifier Annotation

$
0
0

1. Overview

In this article, we’ll explore what the @Qualifier annotation can help us with, which problems it solves, and how to use it. We’ll also explain how it’s different from the @Primary annotation and from autowiring by name.

2. Autowire Need for Disambiguation

The @Autowired annotation is a great way of making the need to inject a dependency in Spring explicit. And although it’s useful, there are use cases for which this annotation alone isn’t enough for Spring to understand which bean to inject. By default, Spring resolves autowired entries by type.

If more than one bean of the same type is available in the container, the framework will throw NoUniqueBeanDefinitionException, indicating that more than one bean is available for autowiring.

Let’s imagine a situation in which two possible candidates exist for Spring to inject as bean collaborators in a given instance:

@Component("fooFormatter")
public class FooFormatter implements Formatter {
 
    public String format() {
        return "foo";
    }
}

@Component("barFormatter")
public class BarFormatter implements Formatter {
 
    public String format() {
        return "bar";
    }
}

@Component
public class FooService {
     
    @Autowired
    private Formatter formatter;
}

If we try to load FooService into our context, the Spring framework will throw a NoUniqueBeanDefinitionException. This is because Spring doesn’t know which bean to inject. To avoid this problem, there are several solutions. The @Qualifier annotation is one of them.

3. @Qualifier Annotation

By using the @Qualifier annotation, we can eliminate the issue of which bean needs to be injected.

Let’s revisit our previous example and see how we solve the problem by including the @Qualifier annotation to indicate which bean we want to use:

public class FooService {
     
    @Autowired
    @Qualifier("fooFormatter")
    private Formatter formatter;
}

By including the @Qualifier annotation together with the name of the specific implementation we want to use – in this example, Foo – we can avoid ambiguity when Spring finds multiple beans of the same type.

We need to take into consideration that the qualifier name to be used is the one declared in the @Component annotation.

Note that we could’ve also used the @Qualifier annotation on the Formatter implementing classes, instead of specifying the names in their @Component annotations, to obtain the same effect:

@Component
@Qualifier("fooFormatter")
public class FooFormatter implements Formatter {
    //...
}

@Component
@Qualifier("barFormatter")
public class BarFormatter implements Formatter {
    //...
}

4. @Qualifier vs @Primary

There’s another annotation called @Primary that we can use to decide which bean to inject when ambiguity is present regarding dependency injection.

This annotation defines a preference when multiple beans of the same type are present. The bean associated with the @Primary annotation will be used unless otherwise indicated.

Let’s see an example:

@Configuration
public class Config {
 
    @Bean
    public Employee johnEmployee() {
        return new Employee("John");
    }
 
    @Bean
    @Primary
    public Employee tonyEmployee() {
        return new Employee("Tony");
    }
}

In this example, both methods return the same Employee type. The bean that Spring will inject is the one returned by the method tonyEmployee. This is because it contains the @Primary annotation. This annotation is useful when we want to specify which bean of a certain type should be injected by default.

And in case we require the other bean at some injection point, we would need to specifically indicate it. We can do that via the @Qualifier annotation. For instance, we could specify that we want to use the bean returned by the johnEmployee method by using the @Qualifier annotation.

It’s worth noting that if both the @Qualifier and @Primary annotations are present, then the @Qualifier annotation will have precedence. Basically, @Primary defines a default, while @Qualifier is very specific.

Let’s see another way of using the @Primary annotation, this time using the initial example:

@Component
@Primary
public class FooFormatter implements Formatter {
    //...
}

@Component
public class BarFormatter implements Formatter {
    //...
}

In this case, the @Primary annotation is placed in one of the implementing classes and will disambiguate the scenario.

5. @Qualifier vs Autowiring by Name

Another way to decide between multiple beans when autowiring is by using the name of the field to inject. This is the default in case there are no other hints for Spring. Let’s see some code based on our initial example:

public class FooService {
     
    @Autowired
    private Formatter fooFormatter;
}

In this case, Spring will determine that the bean to inject is the FooFormatter one since the field name is matched to the value that we used in the @Component annotation for that bean.

6. Conclusion

We’ve described the scenarios in which we need to disambiguate which beans to inject. In particular, we described the @Qualifier annotation and compared it with other similar ways of determining which beans need to be used.

As usual, the complete code for this article is available on GitHub.

Programmatic Transaction Management in Spring

$
0
0

1. Overview

Spring's @Transactional annotation provides a nice declarative API to mark transactional boundaries.

Behind the scenes, an aspect takes care of creating and maintaining transactions as they are defined in each occurrence of the @Transactional annotation. This approach makes it easy to decouple our core business logic from cross-cutting concerns like transaction management.

In this tutorial, we'll see that this isn't always the best approach. We'll explore what programmatic alternatives Spring provides, like TransactionTemplate, and our reasons for using them.

2. Trouble in Paradise

Let's suppose we're mixing two different types of I/O in a simple service:

@Transactional
public void initialPayment(PaymentRequest request) {
    savePaymentRequest(request); // DB
    callThePaymentProviderApi(request); // API
    updatePaymentState(request); // DB
    saveHistoryForAuditing(request); // DB
}

Here, we have a few database calls alongside a possibly expensive REST API call. At first glance, it might make sense to make the whole method transactional, since we may want to use one EntityManager to perform the whole operation atomically.

However, if that external API takes longer than usual to respond, for whatever reason, we may soon run out of database connections!

2.1. The Harsh Nature of Reality

Here's what happens when we call the initialPayment method:

  1. The transactional aspect creates a new EntityManager and starts a new transaction – so, it borrows one Connection from the connection pool
  2. After the first database call, it calls the external API while keeping the borrowed Connection
  3. Finally, it uses that Connection to perform the remaining database calls

If the API call responds very slowly for a while, this method would hog the borrowed Connection while waiting for the response.

Imagine that during this period, we get a burst of calls to the initialPayment method. Then, all Connections may wait for a response from the API call. That's why we may run out of database connections — because of a slow back-end service!

Mixing the database I/O with other types of I/O in a transactional context is a bad smell. So, the first solution for these sorts of problems is to separate these types of I/O altogether. If for whatever reason we can't separate them, we can still use Spring APIs to manage transactions manually.

3. Using TransactionTemplate

TransactionTemplate provides a set of callback-based APIs to manage transactions manually. In order to use it, first, we should initialize it with a PlatformTransactionManager. 

For example, we can set up this template using dependency injection:

// test annotations
class ManualTransactionIntegrationTest {

    @Autowired
    private PlatformTransactionManager transactionManager;

    private TransactionTemplate transactionTemplate;

    @BeforeEach
    void setUp() {
        transactionTemplate = new TransactionTemplate(transactionManager);
    }

    // omitted
}

The PlatformTransactionManager helps the template to create, commit, or rollback transactions.

When using Spring Boot, an appropriate bean of type PlatformTransactionManager will be automatically registered, so we just need to simply inject it. Otherwise, we should manually register a PlatformTransactionManager bean.

3.1. Sample Domain Model

From now on, for the sake of demonstration, we're going to use a simplified payment domain model. In this simple domain, we have a Payment entity to encapsulate each payment's details:

@Entity
public class Payment {

    @Id
    @GeneratedValue
    private Long id;

    private Long amount;

    @Column(unique = true)
    private String referenceNumber;

    @Enumerated(EnumType.STRING)
    private State state;

    // getters and setters

    public enum State {
        STARTED, FAILED, SUCCESSFUL
    }
}

Also, we'll run all tests inside a test class, using the Testcontainers library to run a PostgreSQL instance before each test case:

@DataJpaTest
@Testcontainers
@ActiveProfiles("test")
@AutoConfigureTestDatabase(replace = NONE)
@Transactional(propagation = NOT_SUPPORTED) // we're going to handle transactions manually
public class ManualTransactionIntegrationTest {

    @Autowired 
    private PlatformTransactionManager transactionManager;

    @Autowired 
    private EntityManager entityManager;

    @Container
    private static PostgreSQLContainer<?> pg = initPostgres();

    private TransactionTemplate transactionTemplate;

    @BeforeEach
    public void setUp() {
        transactionTemplate = new TransactionTemplate(transactionManager);
    }

    // tests

    private static PostgreSQLContainer<?> initPostgres() {
        PostgreSQLContainer<?> pg = new PostgreSQLContainer<>("postgres:11.1")
                .withDatabaseName("baeldung")
                .withUsername("test")
                .withPassword("test");
        pg.setPortBindings(singletonList("54320:5432"));

        return pg;
    }
}

3.2. Transactions with Results

The TransactionTemplate offers a method called execute, which can run any given block of code inside a transaction and then return some result:

@Test
void givenAPayment_WhenNotDuplicate_ThenShouldCommit() {
    Long id = transactionTemplate.execute(status -> {
        Payment payment = new Payment();
        payment.setAmount(1000L);
        payment.setReferenceNumber("Ref-1");
        payment.setState(Payment.State.SUCCESSFUL);

        entityManager.persist(payment);

        return payment.getId();
    });

    Payment payment = entityManager.find(Payment.class, id);
    assertThat(payment).isNotNull();
}

Here, we're persisting a new Payment instance into the database and then returning its auto-generated id.

Similar to the declarative approach, the template can guarantee atomicity for us. That is, if one of the operations inside a transaction fails to complete, it rolls back all of them:

@Test
void givenTwoPayments_WhenRefIsDuplicate_ThenShouldRollback() {
    try {
        transactionTemplate.execute(status -> {
            Payment first = new Payment();
            first.setAmount(1000L);
            first.setReferenceNumber("Ref-1");
            first.setState(Payment.State.SUCCESSFUL);

            Payment second = new Payment();
            second.setAmount(2000L);
            second.setReferenceNumber("Ref-1"); // same reference number
            second.setState(Payment.State.SUCCESSFUL);

            entityManager.persist(first); // ok
            entityManager.persist(second); // fails

            return "Ref-1";
        });
    } catch (Exception ignored) {}

    assertThat(entityManager.createQuery("select p from Payment p").getResultList()).isEmpty();
}

Since the second referenceNumber is a duplicate, the database rejects the second persist operation, causing the whole transaction to rollback. Therefore, the database does not contain any payments after the transaction. It's also possible to manually trigger a rollback by calling the setRollbackOnly() on TransactionStatus:

@Test
void givenAPayment_WhenMarkAsRollback_ThenShouldRollback() {
    transactionTemplate.execute(status -> {
        Payment payment = new Payment();
        payment.setAmount(1000L);
        payment.setReferenceNumber("Ref-1");
        payment.setState(Payment.State.SUCCESSFUL);

        entityManager.persist(payment);
        status.setRollbackOnly();

        return payment.getId();
    });

    assertThat(entityManager.createQuery("select p from Payment p").getResultList()).isEmpty();
}

3.3. Transactions without Results

If we don't intend to return anything from the transaction, we can use the TransactionCallbackWithoutResult callback class:

@Test
void givenAPayment_WhenNotExpectingAnyResult_ThenShouldCommit() {
    transactionTemplate.execute(new TransactionCallbackWithoutResult() {
        @Override
        protected void doInTransactionWithoutResult(TransactionStatus status) {
            Payment payment = new Payment();
            payment.setReferenceNumber("Ref-1");
            payment.setState(Payment.State.SUCCESSFUL);

            entityManager.persist(payment);
        }
    });

    assertThat(entityManager.createQuery("select p from Payment p").getResultList()).hasSize(1);
}

3.4. Custom Transaction Configurations

Up until now, we used the TransactionTemplate with its default configuration. Although this default is more than enough most of the time, it's still possible to change configuration settings.

For example, we can set the transaction isolation level:

transactionTemplate = new TransactionTemplate(transactionManager);
transactionTemplate.setIsolationLevel(TransactionDefinition.ISOLATION_REPEATABLE_READ);

Similarly, we can change the transaction propagation behavior:

transactionTemplate.setPropagationBehavior(TransactionDefinition.PROPAGATION_REQUIRES_NEW);

Or we can set a timeout, in seconds, for the transaction:

transactionTemplate.setTimeout(1000);

It's even possible to benefit from optimizations for read-only transactions:

transactionTemplate.setReadOnly(true);

Anyway, once we create a TransactionTemplate with a configuration, all transactions will use that configuration to execute. So, if we need multiple configurations, we should create multiple template instances.

4. Using PlatformTransactionManager

In addition to the TransactionTemplate, we can use an even lower-level API like PlatformTransactionManager to manage transactions manually. Quite interestingly, both @Transactional and TransactionTemplate use this API to manage their transactions internally.

4.1. Configuring Transactions

Before using this API, we should define how our transaction is going to look. For example, we can set a three-second timeout with the repeatable read transaction isolation level:

DefaultTransactionDefinition definition = new DefaultTransactionDefinition();
definition.setIsolationLevel(TransactionDefinition.ISOLATION_REPEATABLE_READ);
definition.setTimeout(3);

Transaction definitions are similar to TransactionTemplate configurations. Howeverwe can use multiple definitions with just one PlatformTransactionManager.

4.2. Maintaining Transactions

After configuring our transaction, we can programmatically manage transactions:

@Test
void givenAPayment_WhenUsingTxManager_ThenShouldCommit() {
 
    // transaction definition

    TransactionStatus status = transactionManager.getTransaction(definition);
    try {
        Payment payment = new Payment();
        payment.setReferenceNumber("Ref-1");
        payment.setState(Payment.State.SUCCESSFUL);

        entityManager.persist(payment);
        transactionManager.commit(status);
    } catch (Exception ex) {
        transactionManager.rollback(status);
    }

    assertThat(entityManager.createQuery("select p from Payment p").getResultList()).hasSize(1);
}

5. Conclusion

In this tutorial, first, we saw when one should choose programmatic transaction management over the declarative approach. Then, by introducing two different APIs, we learned how to manually create, commit, or rollback any given transaction.

As usual, the sample code is available over on GitHub.
Manipulating Strings in Linux with tr

$
0
0

1. Overview

In this tutorial, we'll see how to manipulate strings using the tr in Linux.

Note that we've tested these commands using Bash, but should work on any POSIX-compliant terminal.

2. Lower Case to Upper Case

First of all, let's see the synopsis of the command and how to use a predefined SET of the tool.

tr [OPTION]... SET1 [SET2]

Where SET1 and SET2 each represent a SET of characters and a parameter inside [] means it's optional. The tr command is normally combined with pipes in order to manipulate standard input and get a processed standard output.

In this case, let's transform a string from lower case to upper case:

echo "Baeldung is in the top 10" | tr [a-z] [A-Z]

The output of the command will be:

BAELDUNG IS IN THE TOP 10

3. Translate Whitespaces to Tabs

Another option that we can try with tr is translating all whitespace occurrences to tabs, continuing with the same example but a little bit tuned for this purpose:

echo "Baeldung is in the top 10" | tr [:space:] '\t'

And we'll get the translated string:

Baeldung    is    in    the    top    10

4. Delete Characters

Suppose that we are using the Linux terminal, we have the string “Baeldung is in the top 10”, and we want to delete all the occurrences of the character “e”. We can easily do this by specifying the -d parameter and the character that we want to delete from the phrase:

echo "Baeldung is in the top 10" | tr -d 'e'

And our result is:

Baldung is in th top 10

In addition, we can delete multiple characters by putting them all in a single set. Let's say that we want to remove all the vowels:

echo "Baeldung is in the top 10" | tr -d 'aeiou'

Let's check the output:

Bldng s n th tp 10

Now, imagine we want to delete all the digits that appear in the phrase. We can do this by using the same -d parameter plus the references to the digits set:

echo "Baeldung is in the top 10" | tr -d [:digit:]

Once again, we can see the output of the command:

Baeldung is in the top

5. Complementing Sets

We can also complement any of the sets that tr gives us.

Let's continue with the previous example of deleting the vowels. If, instead of deleting the vowels, we want to do the opposite – that is, the complementary operation – we just need to add the -c parameter and this will do the magic:

echo "Baeldung is in the top 10" | tr -cd 'aeiou'

Now the output will be the deletion of all characters except the vowels:

aeuiieo

6. Conclusion

In this tutorial, we've looked at how easy it is to manipulate strings using tr in a Bash shell.

For more info, check out the tr man page online or by typing man tr in the terminal.


Guide to Stream Redirections in Linux

$
0
0

1. Introduction

Whenever we work on the Linux command line, we often have to pass data from one command to another, like feeding a list of find results into a grep. This is where streams come into play.

In this tutorial, we'll take a look at what streams are and how we work with them.

2. What are Streams

We can think of a stream in its simplest form as a pipe that carries data – especially character data – from one point to another.

Some examples of input streams are the keyboard, text data stored in files and input from I/O devices. We can deliver output to files, commands, windows, and other I/O devices.

3. Sample Data

Let's create some sample files to use in the subsequent sections:

$ echo -e "tables\nladders\nchairs" > streamdata1
$ echo -e "planes\ntrains\nautomobiles" > streamdata2

We've created the streamdata1 and streamdata2 files and populated them with some data:

$ cat streamdata1
tables
ladders
chairs

$ cat streamdata2 
planes
trains
automobiles

4. Redirecting Input

The first stream that we're going to look at is STDIN.

STDIN refers to the standard input stream; usually, input from the keyboard. STDIN has a filehandle of 0 (zero).

The < operator is used to pass input from a file or I/O device data to a command.

Let's say that we want to count the number of lines in a file without passing the file name through as a parameter to the wc command. We can do it by redirecting STDIN:

$ wc -l < streamdata1

5. Redirecting Output

Next, let's take a look at STDOUT, the standard output stream. All output from this stream is typically sent to our terminal window. The filehandle for STDOUT is 1.

The > operator is used to direct output from a command to a source; usually a file. By default, a single > will:

  • Create a new file if it doesn't already exist
  • Overwrite any pre-existing data in the file if the file already exists

Let's see how we can use the cat command to emit the contents of streamdata1 and send the output to a new file:

$ cat streamdata1 > combinedstreamdata

When we print the contents of the combinestreamdata file it should look exactly like streamdata1:

$ cat combinedstreamdata
tables
ladders
chairs

6. Appending to an Existing File

While > overwrites data, the >> operator preserves data by appending to an existing file.

Let's see how we can add the contents of streamdata2 to the combinedstreamdata file:

$ cat streamdata2 >> combinedstreamdata

The combinedstreamdata file now contains the contents of both our streamdata1 and streamdata2 files:

$ cat combinedstreamdata
tables
ladders
chairs
planes
trains
automobiles

7. Piping Output to Input

Chaining together multiple tasks is a common use case when working with Linux commands.

With the | (pipe) operator, we can chain many commands together by passing the output from one through as input to the next.

Let's try using the | operator to stream the output from the cat command to the input stream of the wc command:

$ cat streamdata2 | wc -l

8. Redirecting Error

Now that we've got the basics of stream redirection down, let's look at how we can work with multiple output files.

Let's attempt to execute a script that does not exist and pipe its imaginary output to a log file:

$ exec doesnotexist.sh > out.log

We get this error message:

exec: doesnotexist.sh: not found

Let's take a look and see what our command wrote to out.log:

$ cat out.log

Hmm, our log file is empty. But, we did see an error message – we might want to log that, too.

Let's see how we can redirect STDOUT and STDERR to capture the output and error output:

$ exec doesnotexist.sh >out.log 2>err.log

In the above statement, we direct standard output to out.log and standard error to err.log.

More specifically, we referenced the standard error stream using its filehandle – 2>err.log. We didn't have to specify the filehandle for standard output because its filehandle is the default.

Let's check to see what the command wrote to err.log:

$ cat err.log
exec: doesnotexist.sh: not found

Our error message was successfully redirected to our error log file.

In this example, we handled both output streams (STDOUT, STDERR) and directed each to its own log file.

9. Merging Output and Error

Although we can direct STDOUT and STDERR to their own log files, we often prefer the simplicity of having a single log file to deal with.

The >& operator is a special operator that is used for directing output from one stream to anotherWe can use it to pipe the output of STDERR to STDOUT: 

Let's see how we can leverage file handles and >& to give us a single log file that contains the output of STDOUT and STDERR:

$ cat streamdata1 streamdata2 streamdata3 2>&1>out.log
$ cat out.log
tables
ladders
chairs
planes
trains
automobiles
cat: streamdata3: No such file or directory

As expected, the contents of streamdata1 and streamdata2 are found in out.log along with the anticipated error message since streamdata3 does, in fact, not exist.

10. Conclusion

In this tutorial, we looked at what Linux streams are and saw how to use them. We worked through a few scenarios that demonstrated the different capabilities of stream redirection.

How to Count Duplicate Elements in Arraylist

$
0
0

1. Overview

In this short tutorial, we'll look at some different ways to count the duplicated elements in an ArrayList.

2. Loop with Map.put()

Our expected result would be a Map object, which contains all elements from the input list as keys and the count of each element as value.

The most straightforward solution to achieve this would be to loop through the input list and for each element:

  • if the resultMap contains the element, we increment a counter by 1
  • otherwise, we put a new map entry (element, 1) to the map
public <T> Map<T, Long> countByClassicalLoop(List<T> inputList) {
    Map<T, Long> resultMap = new HashMap<>();
    for (T element : inputList) {
        if (resultMap.containsKey(element)) {
            resultMap.put(element, resultMap.get(element) + 1L);
        } else {
            resultMap.put(element, 1L);
        }
    }
    return resultMap;
}

This implementation has the best compatibility, as it works for all modern Java versions.

Next, let's create an input list to test the method:

private List<String> INPUT_LIST = Lists.list(
  "expect1",
  "expect2", "expect2",
  "expect3", "expect3", "expect3",
  "expect4", "expect4", "expect4", "expect4");

And now let's verify it:

private void verifyResult(Map<String, Long> resultMap) {
    assertThat(resultMap)
      .isNotEmpty().hasSize(4)
      .containsExactly(
        entry("expect1", 1L),
        entry("expect2", 2L),
        entry("expect3", 3L),
        entry("expect4", 4L));
}

We'll reuse this test harness for the rest of our approaches.

3. Loop with Map.compute()

The solution in the previous section has the best compatibility, however, it looks a little bit lengthy.

Since JDK 8, the handy compute() method was introduced to the Map interface. We can make use of this method to simplify the containsKey() check:

public <T> Map<T, Long> countByClassicalLoopWithMapCompute(List<T> inputList) {
    Map<T, Long> resultMap = new HashMap<>();
    for (T element : inputList) {
        resultMap.compute(element, (k, v) -> v == null ? 1 : v + 1);
    }
    return resultMap;
}

4. Stream API Collectors.toMap()

Since we've already talked about JDK 8, we won't forget the powerful Stream API. Thanks to the Stream API, we can solve the problem in a very compact way.

The toMap() collector helps us to convert the input list into a Map:

public <T> Map<T, Long> countByStreamToMap(List<T> inputList) {
    return inputList.stream().collect(Collectors.toMap(Function.identity(), v -> 1L, Long::sum));
}

The toMap() is a convenient collector, which can help us to transform the stream into different Map implementations.

5. Stream API Collectors.groupingBy() and Collectors.counting()

Except for the toMap(), our problem can be solved by two other collectors, groupingBy() and counting():

public <T> Map<T, Long> countByStreamGroupBy(List<T> inputList) {
    return inputList.stream().collect(Collectors.groupingBy(k -> k, Collectors.counting()));
}

The proper usage of Java 8 Collectors makes our codes compact and easy to read.

6. Conclusion

In this quick article, we illustrated various ways to calculate the count of duplicate elements in a list. As always, the complete source code is available over on GitHub.
Best Practices for REST API Error Handling

$
0
0

1. Introduction

REST is a stateless architecture in which clients can access and manipulate resources on a server. Generally, REST services utilize HTTP to advertise a set of resources that they manage and provide an API that allows clients to obtain or alter the state of these resources.

In this tutorial, we'll learn about some of the best practices for handling REST API errors, including useful approaches for providing users with relevant information, examples from large-scale websites, and a concrete implementation using an example Spring REST application.

2. HTTP Status Codes

When a client makes a request to an HTTP server — and the server successfully receives the request — the server must notify the client if the request was successfully handled or not. HTTP accomplishes this with five categories of status codes:

  • 100-level (Informational) — Server acknowledges a request
  • 200-level (Success) — Server completed the request as expected
  • 300-level (Redirection) — Client needs to perform further actions to complete the request
  • 400-level (Client error) — Client sent an invalid request
  • 500-level (Server error) — Server failed to fulfill a valid request due to an error with server

Based on the response code, a client can surmise the result of a particular request.

3. Handling Errors

The first step in handling errors is to provide a client with a proper status code. Additionally, we may need to provide more information in the response body.

3.1. Basic Responses

The simplest way we handle errors is to respond with an appropriate status code.

Some common response codes include:

  • 400 Bad Request — Client sent an invalid request — such as lacking required request body or parameter
  • 401 Unauthorized — Client failed to authenticate with the server
  • 403 Forbidden — Client authenticated but does not have permission to access the requested resource
  • 404 Not Found — The requested resource does not exist
  • 412 Precondition Failed — One or more conditions in the request header fields evaluated to false
  • 500 Internal Server Error — A generic error occurred on the server
  • 503 Service Unavailable — The requested service is not available

Generally, we should not expose 500 errors to clients. 500 errors signal that some issue occurred on the server, such as an unexpected exception in our REST service while handling a request. Therefore, this internal error is not our client's business.

Instead, we should diligently attempt to handle or catch internal errors and respond with some 400 level response. For example, if an exception occurs because a requested resource doesn't exist, we should expose this as a 404 error, not a 500 error.

While basic, these codes allow a client to understand the broad nature of the error that occurred. For example, we know if we receive a 403 error that we lack permissions to access the resource we requested.

In many cases, though, we need to provide supplemental details in our responses.

3.2. Default Spring Error Responses

These principles are so ubiquitous that Spring has codified them in its default error handling mechanism.

To demonstrate, suppose we have a simple Spring REST application that manages books, with an endpoint to retrieve a book by its ID:

curl -X GET -H "Accept: application/json" http://localhost:8080/api/book/1

If there is no book with an ID of 1, we expect that our controller will throw a BookNotFoundException. Performing a GET on this endpoint, we see that this exception was thrown and the response body is:

{
    "timestamp":"2019-09-16T22:14:45.624+0000",
    "status":500,
    "error":"Internal Server Error",
    "message":"No message available",
    "path":"/api/book/1"
}

Note that this default error handler includes a timestamp of when the error occurred, the HTTP status code, a title (the error field), a message (which is blank by default), and the URL path where the error occurred.

These fields provide a client or developer with information to help troubleshoot the problem and also constitute a few of the fields that make up standard error handling mechanisms.

Additionally, note that Spring automatically returns an HTTP status code of 500 when our BookNotFoundException is thrown. Although some APIs will return a 500 status code — or 400 status code, as we will see with the Facebook and Twitter APIs — for all errors for the sake of simplicity, it is best to use the most specific error code when possible.

3.3. More Detailed Responses

As seen in the above Spring example, sometimes a status code is not enough to show the specifics of the error. When needed, we can use the body of the response to provide the client with additional information. When providing detailed responses, we should include:

  • Error — A unique identifier for the error
  • Message — A brief human-readable message
  • Detail — A lengthier explanation of the error

For example, if a client sends a request with incorrect credentials, we can send a 403 response with a body of:

{
    "error": "auth-0001",
    "message": "Incorrect username and password",
    "detail": "Ensure that the username and password included in the request are correct"
}

The error field should not match the response code. Instead, it should be an error code unique to our application. Generally, there is no convention for the error field, expect that it be unique.

Usually, this field contains only alphanumerics and connecting characters, such as dashes or underscores. For example, 0001auth-0001, and incorrect-user-pass are canonical examples of error codes.

The message portion of the body is usually considered presentable on user interfaces. Therefore we should translate this title if we support internationalization. So, if a client sends a request with an Accept-Language header corresponding to French, the title value should be translated to French.

The detail portion is intended for use by developers of clients and not the end-user, so translation is not necessary.

Additionally, we could also provide a URL — such as the help field — that clients can follow to discover more information:

{
    "error": "auth-0001",
    "message": "Incorrect username and password",
    "detail": "Ensure that the username and password included in the request are correct",
    "help": "https://example.com/help/error/auth-0001"
}

Sometimes, we may want to report more than one error for a request. In this case, we should return the errors in a list:

{
    "errors": [
        {
            "error": "auth-0001",
            "message": "Incorrect username and password",
            "detail": "Ensure that the username and password included in the request are correct",
            "help": "https://example.com/help/error/auth-0001"
        },
        ...
    ]
}

And when a single error occurs, we respond with a list containing one element. Note that responding with multiple errors may be too complicated for simple applications. In many cases, responding with the first or most significant error is sufficient.

3.4. Standardized Response Bodies

While most REST APIs follow similar conventions, specifics usually vary, including the names of fields and the information included in the response body. These differences make it difficult for libraries and frameworks to handle errors uniformly.

In an effort to standardize REST API error handling, the IETF devised RFC 7807, which creates a generalized error-handling schema.

This schema is composed of five parts:

  1. type — A URI identifier that categorizes the error
  2. title — A brief, human-readable message about the error
  3. status — The HTTP response code (optional)
  4. detail — A human-readable explanation of the error
  5. instance — A URI that identifies the specific occurrence of the error

Instead of using our custom error response body, we can convert our body to:

{
    "type": "/errors/incorrect-user-pass",
    "title": "Incorrect username or password.",
    "status": 403,
    "detail": "Authentication failed due to incorrect username or password.",
    "instance": "/login/log/abc123"
}

Note that the type field categorizes the type of error, while instance identifies a specific occurrence of the error in a similar fashion to classes and objects, respectively.

By using URIs, clients can follow these paths to find more information about the error in the same way that HATEOAS links can be used to navigate a REST API.

Adhering to RFC 7807 is optional, but it is advantageous if uniformity is desired.

4. Examples

The above practices are common throughout some of the most popular REST APIs. While the specific names of fields or formats may vary between sites, the general patterns are nearly universal.

4.1. Twitter

For example, let's send a GET request without supplying the required authentication data:

curl -X GET https://api.twitter.com/1.1/statuses/update.json?include_entities=true

The Twitter API responds with a 400 error with the following body:

{
    "errors": [
        {
            "code":215,
            "message":"Bad Authentication data."
        }
    ]
}

This response includes a list containing a single error, with its error code and message. In Twitter's case, no detailed message is present and a general 400 error — rather than a more specific 401 error — is used to denote that authentication failed.

Sometimes a more general status code is easier to implement, as we'll see in our Spring example below. It allows developers to catch groups of exceptions and not differentiate the status code that should be returned. When possible, though, the most specific status code should be used.

4.2. Facebook

Similar to Twitter, Facebook's Graph REST API also includes detailed information in its responses.

For example, let's perform a POST request to authenticate with the Facebook Graph API:

curl -X GET https://graph.facebook.com/oauth/access_token?client_id=foo&client_secret=bar&grant_type=baz

We receive the following error:

{
    "error": {
        "message": "Missing redirect_uri parameter.",
        "type": "OAuthException",
        "code": 191,
        "fbtrace_id": "AWswcVwbcqfgrSgjG80MtqJ"
    }
}

Like Twitter, Facebook also uses a generic 400 error — rather than a more specific 400-level error — to denote a failure. In addition to a message and numeric code, Facebook also includes a type field that categorizes the error and a trace ID (fbtrace_id) that acts as an internal support identifier.

5. Conclusion

In this article, we examined some of the best practices of REST API error handling, including:

  • Providing specific status codes
  • Including additional information in response bodies
  • Handling exceptions in a uniform manner

While the details of error handling will vary by application, these general principles apply to nearly all REST APIs and should be adhered to when possible.

Not only does this allow clients to handle errors in a consistent manner, but it also simplifies the code we create when implementing a REST API.

The code referenced in this article is available over on GitHub.

Intro to Spring Data Geode

$
0
0

1. Overview

Apache Geode provides data management solutions through a distributed cloud architecture. It would be ideal to utilize the Spring Data APIs for the data access through the Apache Geode server.

In this tutorial, we'll explore Spring Data Geode for the configuration and development of an Apache Geode Java client application.

2. Spring Data Geode

The Spring Data Geode library empowers a Java application to configure an Apache Geode server through XML and annotations. At the same time, the library is also handy for creating an Apache Geode cache client-server application.

The Spring Data Geode library is similar to Spring Data Gemfire. Apart from subtle differences, the latter provides integration with Pivotal Gemfire, which is a commercial version of Apache Geode.

Along the way, we'll explore a few Spring Data Geode annotations to configure a Java application into an Apache Geode's cache client.

3. Maven Dependency

Let's add the latest spring-geode-starter dependency to our pom.xml:

<dependency>
    <groupId>org.springframework.geode</groupId>
    <artifactId>spring-geode-starter</artifactId>
    <version>1.1.1.RELEASE</version>
</dependency>

4. Apache Geode's @ClientCacheApplication with Spring Boot

First, let's create a Spring Boot ClientCacheApp by using @SpringBootApplication:

@SpringBootApplication 
public class ClientCacheApp {
    public static void main(String[] args) {
        SpringApplication.run(ClientCacheApp.class, args); 
    } 
}

Then, to transform the ClientCacheApp class into the Apache Geode cache client, we'll add the Spring Data Geode provided @ClientCacheApplication:

@ClientCacheApplication
// existing annotations
public class ClientCacheApp {
    // ...
}

That's it! The cache client app is ready to run.

However, before starting our app, we'll need to start the Apache Geode server.

5. Start an Apache Geode Server

Assuming that Apache Geode and gfsh command-line interface are already set up, we can start a locator named basicLocator and then a server named basicServer.

To do so, let's run the following commands in the gfsh CLI:

gfsh>start locator --name="basicLocator"
gfsh>start server --name="basicServer"

Once the server starts running, we can list all the members:

gfsh>list members

The gfsh CLI output should list the locator and the server:

    Name     | Id
------------ | ------------------------------------------------------------------
basicLocator | 10.25.3.192(basicLocator:25461:locator)<ec><v0>:1024 [Coordinator]
basicServer  | 10.25.3.192(basicServer:25546)<v1>:1025

Voila! We're all set to run our cache client app using the Maven command:

mvn spring-boot:run

6. Configuration

Let's configure our cache client app to access data through the Apache Geode server.

6.1. Region

First, we'll create an entity named Author and then define it as an Apache Geode Region. A Region is similar to a table in the RDBMS:

@Region("Authors")
public class Author {
    @Id
    private Long id;
    
    private String firstName;
    private String lastName;
    private int age;
}

Let's review the Spring Data Geode annotations declared in the Author entity.

To begin with, @Region will create the Authors region in the Apache Geode server to persist the Author object.

Then, @Id will mark the property as a primary key.

6.2. Entity

We can enable the Author entity by adding @EnableEntityDefinedRegions.

Also, we'll add @EnableClusterConfiguration to let the application create the regions in the Apache Geode server:

@EnableEntityDefinedRegions(basePackageClasses = Author.class)
@EnableClusterConfiguration
// existing annotations
public class ClientCacheApp {
    // ...
}

Therefore, restarting the app will create the regions automatically:

gfsh>list regions

List of regions
---------------
Authors

6.3. Repository

Next, we'll add CRUD operations on the Author entity.

To do so, let's create a repository named AuthorRepository, which extends Spring Data's CrudRepository:

public interface AuthorRepository extends CrudRepository<Author, Long> {
}

Then, we'll enable the AuthorRepository by adding @EnableGemfireRepositories:

@EnableGemfireRepositories(basePackageClasses = AuthorRepository.class)
// existing annotations
public class ClientCacheApp {
    // ...
}

Now, we're all set to perform CRUD operations on the Author entity using methods like save and findById provided by CrudRepository.

6.4. Indexes

Spring Data Geode provides an easy way to create and enable the indexes in the Apache Geode server.

First, we'll add @EnableIndexing to the ClientCacheApp class:

@EnableIndexing
// existing annotations
public class ClientCacheApp {
    // ...
}

Then, let's add @Indexed to a property in the Author class:

public class Author {
    @Id
    private Long id;

    @Indexed
    private int age;

    // existing data members
}

Here, Spring Data Geode will automatically implement the indexes based on the annotations defined in the Author entity.

Hence, @Id will implement the primary key index for the id. Similarly, @Indexed will implement the hash index for the age.

Now, let's restart the application and confirm the indexes created in the Apache Geode server:

gfsh> list indexes

Member Name | Region Path |       Name        | Type  | Indexed Expression | From Clause | Valid Index
----------- | ----------- | ----------------- | ----- | ------------------ | ----------- | -----------
basicServer | /Authors    | AuthorsAgeKeyIdx  | RANGE | age                | /Authors    | true
basicServer | /Authors    | AuthorsIdHashIdx  | RANGE | id                 | /Authors    | true

Likewise, we can use @LuceneIndexed to create an Apache Geode Lucene index for the String typed properties.

6.5. Continuous Query

The continuous query enables the application to receive automatic notifications when data gets changed in the server. It matches the query and relies on the subscription model.

To add the capability, we'll create the AuthorService and add @ContinuousQuery with the matching query:

@Service
public class AuthorService {
    @ContinuousQuery(query = "SELECT * FROM /Authors a WHERE a.id = 1")
    public void process(CqEvent event) {
        System.out.println("Author #" + event.getKey() + " updated to " + event.getNewValue());
    }
}

To use the continuous queries, we'll enable server-to-client subscriptions:

@ClientCacheApplication(subscriptionEnabled = true)
// existing annotations
public class ClientCacheApp {
    // ...
}

Hence, our app will receive automatic notification at the process method, whenever we modify an Author object with an id equal to 1.

7. Additional Annotations

Let's explore a few handy annotations additionally available in the Spring Data Geode library.

7.1. @PeerCacheApplication

So far, we've examined a Spring Boot application as an Apache Geode cache client. At times, we may require our application to be an Apache Geode peer cache application.

Then, we should annotate the main class with @PeerCacheApplication in place of @CacheClientApplication.

Also, @PeerCacheApplication will automatically create an embedded peer cache instance to connect with.

7.2. @CacheServerApplication

Similarly, to have our Spring Boot application as both a peer member and a server, we can annotate the main class with @CacheServerApplication.

7.3. @EnableHttpService

We can enable Apache Geode's embedded HTTP server for both of @PeerCacheApplication and @CacheServerApplication.

To do so, we need to annotate the main class with @EnableHttpService. By default, the HTTP service starts on port 7070.

7.4. @EnableLogging

We can enable the logging by simply adding @EnableLogging to the main class. At the same time, we can use the logLevel and logFile attributes to set the corresponding properties.

7.5. @EnablePdx

Also, we can enable Apache Geode's PDX serialization technique for all our domains, by merely adding @EnablePdx to the main class.

7.6. @EnableSsl and @EnableSecurity

We can use @EnableSsl to switch on Apache Geode's TCP/IP Socket SSL. Similarly, @EnableSecurity can be used to enable Apache Geode's security for authentication and authorization.

8. Conclusion

In this tutorial, we've explored Spring Data for Apache Geode.

To begin with, we've created a Spring Boot application to serve as the Apache Geode cache client application.

At the same time, we've examined a few handy annotations provided by Spring Data Geode to configure and enable Apache Geode features.

Last, we've explored a few additional annotations like @PeerCacheApplication and @CacheServerApplication to change the application to a peer or server in the cluster configuration.

As usual, all the code implementations are available over on GitHub.

Concatenating Files in Linux

$
0
0

1. Introduction

Sometimes, we need to do some operations that require using multiple files at the same time. This can be something as common as searching for some text in multiple files or merging multiple files into a new one.

In this quick tutorial, we'll show some useful operations that can make our life easier when concatenating files in Linux.

2. The cat Command

The most frequently used command to concatenate files in Linux is probably cat, whose name comes from concatenate.

The command syntax follows the form:

cat [options] [files]

In the next sections, we'll dig deeper into the command and the options we can use.

3. Displaying a File

Let's first go quickly over the basics of the cat command. The most straightforward operation we can do is to display a file:

cat myfile

This displays myfile in the standard output:

This is a text file.

4. Creating a File

We can also use cat to create new files without a text editor.

It's as easy as using the redirection operator:

cat > newfile

After that, we can start typing what we want to add to the file:

creating a new file.

When we want to save the file, we have to press CTRL+D. Notice that if the file exists, it will be overwritten.

5. Concatenating Files

One of the most common functions of the cat command is to concatenate files, as its name suggests.

The most simple concatenation is to display multiple files in the standard output:

cat file1 file2

The command above displays the files sequentially:

My file 1 
My file 2

We can also use wildcards to display all the files that match a common pattern:

cat file*

So far, we've been displaying the files in the standard output, but we can write the output into a new file:

cat file1 file2 > file3

Also, we can append a file to an existing file:

cat file1 >> file2

Another useful option is to read from the standard input, which we represent by using ‘-‘ :

cat - file1 > file2

Then, we can type the text we want to concatenate before file1:

text from standard input

Now, if we type cat file2 to display the file, we can see the text we've introduced concatenated with file1:

text from standard input
My file 1

Also, we could append the standard input after the file instead of before:

cat file1 - > file2

If we go a bit further, we can also concatenate the output of any other command to cat:

ls -la | cat > file1

Finally, we can pipe cat output to other utilities to create more powerful commands:

cat file1 file2 file3 | sort > file4

In this case, we've concatenated three files, sorted the result of the concatenation, and written the sorted output to a new file called file4.

6. Other Options

In the help of the cat command, we can find some other useful options that we can add to our commands:

cat --help
Usage: cat [OPTION]... [FILE]...
Concatenate FILE(s) to standard output.

With no FILE, or when FILE is -, read standard input.

  -A, --show-all           equivalent to -vET
  -b, --number-nonblank    number nonempty output lines, overrides -n
  -e                       equivalent to -vE
  -E, --show-ends          display $ at end of each line
  -n, --number             number all output lines
  -s, --squeeze-blank      suppress repeated empty output lines
  -t                       equivalent to -vT
  -T, --show-tabs          display TAB characters as ^I
  -u                       (ignored)
  -v, --show-nonprinting   use ^ and M- notation, except for LFD and TAB
      --help     display this help and exit
      --version  output version information and exit

For instance, we can use the -n option:

cat -n myfile

That displays the number of each line:

1 This is a test file. 
2 It contains multiple lines.

Alternatively, we can use -e:

cat -e myfile

In this case, it shows a at the end of each line:

This is a test file.$ 
It contains multiple lines.$

These are just some quick examples that show how to use these options.

7. Conclusion

In this quick tutorial, we've shown some examples of how to use the cat command in Linux. We covered the basics pretty quickly to focus later on the file concatenation. We've also seen that cat can be handy when combined with other commands and can be used in many different situations.

File System Mocking with Jimfs

$
0
0

1. Overview

Typically, when testing components that make heavy use of I/O operations, our tests can suffer from several issues such as poor performance, platform dependency, and unexpected state.

In this tutorial, we'll take a look at how we can alleviate these problems using the in-memory file system Jimfs.

2. Introduction to Jimfs

and supports almost every feature of it. This is particularly useful, as it means we can emulate a virtual in-memory filesystem and interact with it using our existing java.nio layer.

As we're going to see, it may be beneficial to use a mocked file system instead of a real one in order to:

  • avoid being dependent on the file system that is currently running the test
  • ensure the filesystem gets assembled with the expected state on each test run
  • help speed up our tests

As file systems vary considerably, using Jimfs also facilitates easily testing with file systems from different operating systems.

3. Maven Dependencies

First of all, let’s add the project dependencies we'll need for our examples:

<dependency>
    <groupId>com.google.jimfs</groupId>
    <artifactId>jimfs</artifactId>
    <version>1.1</version>
</dependency>

The jimfs dependency contains everything that we need in order to use our mocked file system. Additionally, we'll be writing tests using JUnit5.

4. A Simple File Repository

We'll start by defining a simple FileRepository class that implements some standard CRUD operations:

public class FileRepository {

    void create(Path path, String fileName) {
        Path filePath = path.resolve(fileName);
        try {
            Files.createFile(filePath);
        } catch (IOException ex) {
            throw new UncheckedIOException(ex);
        }
    }

    String read(Path path) {
        try {
            return new String(Files.readAllBytes(path));
        } catch (IOException ex) {
            throw new UncheckedIOException(ex);
        }
    }

    String update(Path path, String newContent) {
        try {
            Files.write(path, newContent.getBytes());
            return newContent;
        } catch (IOException ex) {
            throw new UncheckedIOException(ex);
        }
    }

    void delete(Path path) {
        try {
            Files.deleteIfExists(path);
        } catch (IOException ex) {
            throw new UncheckedIOException(ex);
        }
    }
}

As we can see, each method is making use of standard java.nio classes.

4.1. Creating a File

In this section, we'll write a test that tests the create method from our repository:

@Test
@DisplayName("Should create a file on a file system")
void givenUnixSystem_whenCreatingFile_thenCreatedInPath() {
    FileSystem fileSystem = Jimfs.newFileSystem(Configuration.unix());
    String fileName = "newFile.txt";
    Path pathToStore = fileSystem.getPath("");

    fileRepository.create(pathToStore, fileName);

    assertTrue(Files.exists(pathToStore.resolve(fileName)));
}

In this example, we've used the static method Jimfs.newFileSystem() to create a new in-memory file system. We pass a configuration object Configuration.unix(), which creates an immutable configuration for a Unix file system. This includes important OS-specific information such as path separators and information about symbolic links.

Now that we've created a file, we're able to check if the file was created successfully on the Unix-based system.

4.2. Reading a File

Next, we'll test the method that reads the content of the file:

@Test
@DisplayName("Should read the content of the file")
void givenOSXSystem_whenReadingFile_thenContentIsReturned() throws Exception {
    FileSystem fileSystem = Jimfs.newFileSystem(Configuration.osX());
    Path resourceFilePath = fileSystem.getPath(RESOURCE_FILE_NAME);
    Files.copy(getResourceFilePath(), resourceFilePath);

    String content = fileRepository.read(resourceFilePath);

    assertEquals(FILE_CONTENT, content);
}

This time around, we've checked if it's possible to read the content of the file on a macOS (formerly OSX) system by simply using a different type of configuration — Jimfs.newFileSystem(Configuration.osX()).

4.3. Updating a File

We can also use Jimfs to test the method that updates the content of the file:

@Test
@DisplayName("Should update the content of the file")
void givenWindowsSystem_whenUpdatingFile_thenContentHasChanged() throws Exception {
    FileSystem fileSystem = Jimfs.newFileSystem(Configuration.windows());
    Path resourceFilePath = fileSystem.getPath(RESOURCE_FILE_NAME);
    Files.copy(getResourceFilePath(), resourceFilePath);
    String newContent = "I'm updating you.";

    String content = fileRepository.update(resourceFilePath, newContent);

    assertEquals(newContent, content);
    assertEquals(newContent, fileRepository.read(resourceFilePath));
}

Likewise, this time we've checked how the method behaves on a Windows-based system by using Jimfs.newFileSystem(Configuration.windows()).

4.4. Deleting a File

To conclude testing our CRUD operations, let's test the method that deletes the file:

@Test
@DisplayName("Should delete file")
void givenCurrentSystem_whenDeletingFile_thenFileHasBeenDeleted() throws Exception {
    FileSystem fileSystem = Jimfs.newFileSystem();
    Path resourceFilePath = fileSystem.getPath(RESOURCE_FILE_NAME);
    Files.copy(getResourceFilePath(), resourceFilePath);

    fileRepository.delete(resourceFilePath);

    assertFalse(Files.exists(resourceFilePath));
}

Unlike previous examples, we've used Jimfs.newFileSystem() without specifying a file system configuration. In this case, Jimfs will create a new in-memory file system with a default configuration appropriate to the current operating system.

5. Moving a File

In this section, we'll learn how to test a method that moves a file from one directory to another.

Firstly, let's implement the move method using the standard java.nio.file.File class:

void move(Path origin, Path destination) {
    try {
        Files.createDirectories(destination);
        Files.move(origin, destination, StandardCopyOption.REPLACE_EXISTING);
    } catch (IOException ex) {
        throw new UncheckedIOException(ex);
    }
}

We're going to use a parameterized test to ensure that this method works on several different file systems:

private static Stream<Arguments> provideFileSystem() {
    return Stream.of(
            Arguments.of(Jimfs.newFileSystem(Configuration.unix())),
            Arguments.of(Jimfs.newFileSystem(Configuration.windows())),
            Arguments.of(Jimfs.newFileSystem(Configuration.osX())));
}

@ParameterizedTest
@DisplayName("Should move file to new destination")
@MethodSource("provideFileSystem")
void givenEachSystem_whenMovingFile_thenMovedToNewPath(FileSystem fileSystem) throws Exception {
    Path origin = fileSystem.getPath(RESOURCE_FILE_NAME);
    Files.copy(getResourceFilePath(), origin);
    Path destination = fileSystem.getPath("newDirectory", RESOURCE_FILE_NAME);

    fileManipulation.move(origin, destination);

    assertFalse(Files.exists(origin));
    assertTrue(Files.exists(destination));
}

As we can see, we've also been able to use Jimfs to test that we can move files on a variety of different file systems from a single unit test.

6. Operating System Dependent Tests

To demonstrate another benefit of using Jimfs, let's create a FilePathReader class. The class is responsible for returning the real system path, which is, of course, OS-dependent:

class FilePathReader {

    String getSystemPath(Path path) {
        try {
            return path
              .toRealPath()
              .toString();
        } catch (IOException ex) {
            throw new UncheckedIOException(ex);
        }
    }
}

Now, let's add a test for this class:

class FilePathReaderUnitTest {

    private static String DIRECTORY_NAME = "baeldung";

    private FilePathReader filePathReader = new FilePathReader();

    @Test
    @DisplayName("Should get path on windows")
    void givenWindowsSystem_shouldGetPath_thenReturnWindowsPath() throws Exception {
        FileSystem fileSystem = Jimfs.newFileSystem(Configuration.windows());
        Path path = getPathToFile(fileSystem);

        String stringPath = filePathReader.getSystemPath(path);

        assertEquals("C:\\work\\" + DIRECTORY_NAME, stringPath);
    }

    @Test
    @DisplayName("Should get path on unix")
    void givenUnixSystem_shouldGetPath_thenReturnUnixPath() throws Exception {
        FileSystem fileSystem = Jimfs.newFileSystem(Configuration.unix());
        Path path = getPathToFile(fileSystem);

        String stringPath = filePathReader.getSystemPath(path);

        assertEquals("/work/" + DIRECTORY_NAME, stringPath);
    }

    private Path getPathToFile(FileSystem fileSystem) throws Exception {
        Path path = fileSystem.getPath(DIRECTORY_NAME);
        Files.createDirectory(path);

        return path;
    }
}

As we can see, the output for Windows differs from the one of Unix, as we'd expect. Moreover, we didn't have to run these tests using two different file systems — Jimfs mocked it for us automatically.

It's worth mentioning that Jimfs doesn't support the toFile() method that returns a java.io.File. It's the only method from the Path class that isn't supported. Therefore, it might be better to operate on an InputStream rather than a File.

7. Conclusion

In this article, we've learned how to use use the in-memory file system Jimfs to mock file system interactions from our unit tests.

First, we started by defining a simple file repository with several CRUD operations. Then we saw examples of how to test each of the methods using a different file system type. Finally, we saw an example of how we can use Jimfs to test OS-dependent file system handling.

As always, the code for these examples is available over on Github.

Testing a Spring Batch Job

$
0
0

1. Introduction

Unlike other Spring-based applications, testing batch jobs comes with some specific challenges, mostly due to the asynchronous nature of how jobs are executed.

In this tutorial, we're going to explore the various alternatives for testing a Spring Batch job.

2. Required Dependencies

We're using spring-boot-starter-batch, so first let's set up the required dependencies in our pom.xml:

<dependency>
    <groupId>org.springframework.boot</groupId>
    <artifactId>spring-boot-starter-batch</artifactId>
    <version>2.1.9.RELEASE</version>
</dependency>
<dependency>
    <groupId>org.springframework.boot</groupId>
    <artifactId>spring-boot-starter-test</artifactId>
    <version>2.1.9.RELEASE</version>
    <scope>test</scope>
</dependency>
<dependency>
    <groupId>org.springframework.batch</groupId>
    <artifactId>spring-batch-test</artifactId>
    <version>4.2.0.RELEASE</version>
    <scope>test</scope>
</dependency>

We included the spring-boot-starter-test and spring-batch-test which bring in some necessary helper methods, listeners and runners for testing Spring Batch applications.

3. Defining the Spring Batch Job

Let's create a simple application to show how Spring Batch solves some of the testing challenges.

Our application uses a two-step Job that reads a CSV input file with structured book information and outputs books and book details.

3.1. Defining the Job Steps

The two subsequent Steps extract specific information from BookRecords and then map these to Books (step1) and BookDetails (step2):

@Bean
public Step step1(
  ItemReader<BookRecord> csvItemReader, ItemWriter<Book> jsonItemWriter) throws IOException {
    return stepBuilderFactory
      .get("step1")
      .<BookRecord, Book> chunk(3)
      .reader(csvItemReader)
      .processor(bookItemProcessor())
      .writer(jsonItemWriter)
      .build();
}

@Bean
public Step step2(
  ItemReader<BookRecord> csvItemReader, ItemWriter<BookDetails> listItemWriter) {
    return stepBuilderFactory
      .get("step2")
      .<BookRecord, BookDetails> chunk(3)
      .reader(csvItemReader)
      .processor(bookDetailsItemProcessor())
      .writer(listItemWriter)
      .build();
}

3.2. Defining the Input Reader and Output Writer

Let's now configure the CSV file input reader using a FlatFileItemReader to de-serialize the structured book information into BookRecord objects:

private static final String[] TOKENS = { 
  "bookname", "bookauthor", "bookformat", "isbn", "publishyear" };

@Bean
@StepScope
public FlatFileItemReader<BookRecord> csvItemReader(
  @Value("#{jobParameters['file.input']}") String input) {
    FlatFileItemReaderBuilder<BookRecord> builder = new FlatFileItemReaderBuilder<>();
    FieldSetMapper<BookRecord> bookRecordFieldSetMapper = new BookRecordFieldSetMapper();
    return builder
      .name("bookRecordItemReader")
      .resource(new FileSystemResource(input))
      .delimited()
      .names(TOKENS)
      .fieldSetMapper(bookRecordFieldSetMapper)
      .build();
}

There are a couple of important things in this definition, which will have implications on the way we test.

First of all, we annotated the FlatItemReader bean with @StepScope, and as a result, this object will share its lifetime with StepExecution.

This also allows us to inject dynamic values at runtime so that we can pass our input file from the JobParameters in line 4. In contrast, the tokens used for the BookRecordFieldSetMapper are configured at compile-time.

We then similarly define the JsonFileItemWriter output writer:

@Bean
@StepScope
public JsonFileItemWriter<Book> jsonItemWriter(
  @Value("#{jobParameters['file.output']}") String output) throws IOException {
    JsonFileItemWriterBuilder<Book> builder = new JsonFileItemWriterBuilder<>();
    JacksonJsonObjectMarshaller<Book> marshaller = new JacksonJsonObjectMarshaller<>();
    return builder
      .name("bookItemWriter")
      .jsonObjectMarshaller(marshaller)
      .resource(new FileSystemResource(output))
      .build();
}

For the second Step, we use a Spring Batch-provided ListItemWriter that just dumps stuff to an in-memory list.

3.3. Defining the Custom JobLauncher

Next, let's disable the default Job launching configuration of Spring Boot Batch by setting spring.batch.job.enabled=false in our application.properties.

We configure our own JobLauncher to pass a custom JobParameters instance when launching the Job:

@SpringBootApplication
public class SpringBatchApplication implements CommandLineRunner {

    // autowired jobLauncher and transformBooksRecordsJob

    @Value("${file.input}")
    private String input;

    @Value("${file.output}")
    private String output;

    @Override
    public void run(String... args) throws Exception {
        JobParametersBuilder paramsBuilder = new JobParametersBuilder();
        paramsBuilder.addString("file.input", input);
        paramsBuilder.addString("file.output", output);
        jobLauncher.run(transformBooksRecordsJob, paramsBuilder.toJobParameters());
   }

   // other methods (main etc.)
}

4. Testing the Spring Batch Job

The spring-batch-test dependency provides a set of useful helper methods and listeners that can be used to configure the Spring Batch context during testing.

Let's create a basic structure for our test:

@RunWith(SpringRunner.class)
@SpringBatchTest
@EnableAutoConfiguration
@ContextConfiguration(classes = { SpringBatchConfiguration.class })
@TestExecutionListeners({ DependencyInjectionTestExecutionListener.class, 
  DirtiesContextTestExecutionListener.class})
@DirtiesContext(classMode = ClassMode.AFTER_CLASS)
public class SpringBatchIntegrationTest {

    // other test constants
 
    @Autowired
    private JobLauncherTestUtils jobLauncherTestUtils;
  
    @Autowired
    private JobRepositoryTestUtils jobRepositoryTestUtils;
  
    @After
    public void cleanUp() {
        jobRepositoryTestUtils.removeJobExecutions();
    }

    private JobParameters defaultJobParameters() {
        JobParametersBuilder paramsBuilder = new JobParametersBuilder();
        paramsBuilder.addString("file.input", TEST_INPUT);
        paramsBuilder.addString("file.output", TEST_OUTPUT);
        return paramsBuilder.toJobParameters();
   }

The @SpringBatchTest annotation provides the JobLauncherTestUtils and JobRepositoryTestUtils helper classes. We use them to trigger the Job and Steps in our tests.

Our application uses Spring Boot auto-configuration, which enables a default in-memory JobRepository. As a result, running multiple tests in the same class requires a cleanup step after each test run.

Finally, if we want to run multiple tests from several test classes, we need to mark our context as dirty. This is required to avoid the clashing of several JobRepository instances using the same data source.

4.1. Testing the End-To-End Job

The first thing we'll test is a complete end-to-end Job with a small data-set input.

We can then compare the results with an expected test output:

@Test
public void givenReferenceOutput_whenJobExecuted_thenSuccess() throws Exception {
    // given
    FileSystemResource expectedResult = new FileSystemResource(EXPECTED_OUTPUT);
    FileSystemResource actualResult = new FileSystemResource(TEST_OUTPUT);

    // when
    JobExecution jobExecution = jobLauncherTestUtils.launchJob(defaultJobParameters());
    JobInstance actualJobInstance = jobExecution.getJobInstance();
    ExitStatus actualJobExitStatus = jobExecution.getExitStatus();
  
    // then
    assertThat(actualJobInstance.getJobName(), is("transformBooksRecords"));
    assertThat(actualJobExitStatus.getExitCode(), is("COMPLETED"));
    AssertFile.assertFileEquals(expectedResult, actualResult);
}

Spring Batch Test provides a useful file comparison method for verifying outputs using the AssertFile class.

4.2. Testing Individual Steps

Sometimes it's quite expensive to test the complete Job end-to-end and so it makes sense to test individual Steps instead:

@Test
public void givenReferenceOutput_whenStep1Executed_thenSuccess() throws Exception {
    // given
    FileSystemResource expectedResult = new FileSystemResource(EXPECTED_OUTPUT);
    FileSystemResource actualResult = new FileSystemResource(TEST_OUTPUT);

    // when
    JobExecution jobExecution = jobLauncherTestUtils.launchStep(
      "step1", defaultJobParameters()); 
    Collection actualStepExecutions = jobExecution.getStepExecutions();
    ExitStatus actualJobExitStatus = jobExecution.getExitStatus();

    // then
    assertThat(actualStepExecutions.size(), is(1));
    assertThat(actualJobExitStatus.getExitCode(), is("COMPLETED"));
    AssertFile.assertFileEquals(expectedResult, actualResult);
}

@Test
public void whenStep2Executed_thenSuccess() {
    // when
    JobExecution jobExecution = jobLauncherTestUtils.launchStep(
      "step2", defaultJobParameters());
    Collection actualStepExecutions = jobExecution.getStepExecutions();
    ExitStatus actualExitStatus = jobExecution.getExitStatus();

    // then
    assertThat(actualStepExecutions.size(), is(1));
    assertThat(actualExitStatus.getExitCode(), is("COMPLETED"));
    actualStepExecutions.forEach(stepExecution -> {
        assertThat(stepExecution.getWriteCount(), is(8));
    });
}

Notice that we use the launchStep method to trigger specific steps.

Remember that we also designed our ItemReader and ItemWriter to use dynamic values at runtime, which means we can pass our I/O parameters to the JobExecution (lines 9 and 23).

For the first Step test, we compare the actual output with an expected output.

On the other hand, in the second test, we verify the StepExecution for the expected written items.

4.3. Testing Step-scoped Components

Let's now test the FlatFileItemReader. Recall that we exposed it as @StepScope bean, so we'll want to use Spring Batch's dedicated support for this:

// previously autowired itemReader

@Test
public void givenMockedStep_whenReaderCalled_thenSuccess() throws Exception {
    // given
    StepExecution stepExecution = MetaDataInstanceFactory
      .createStepExecution(defaultJobParameters());

    // when
    StepScopeTestUtils.doInStepScope(stepExecution, () -> {
        BookRecord bookRecord;
        itemReader.open(stepExecution.getExecutionContext());
        while ((bookRecord = itemReader.read()) != null) {

            // then
            assertThat(bookRecord.getBookName(), is("Foundation"));
            assertThat(bookRecord.getBookAuthor(), is("Asimov I."));
            assertThat(bookRecord.getBookISBN(), is("ISBN 12839"));
            assertThat(bookRecord.getBookFormat(), is("hardcover"));
            assertThat(bookRecord.getPublishingYear(), is("2018"));
        }
        itemReader.close();
        return null;
    });
}

The MetadataInstanceFactory creates a custom StepExecution that is needed to inject our Step-scoped ItemReader.

Because of this, we can check the behavior of the reader with the help of the doInTestScope method.

Next, let's test the JsonFileItemWriter and verify its output:

@Test
public void givenMockedStep_whenWriterCalled_thenSuccess() throws Exception {
    // given
    FileSystemResource expectedResult = new FileSystemResource(EXPECTED_OUTPUT_ONE);
    FileSystemResource actualResult = new FileSystemResource(TEST_OUTPUT);
    Book demoBook = new Book();
    demoBook.setAuthor("Grisham J.");
    demoBook.setName("The Firm");
    StepExecution stepExecution = MetaDataInstanceFactory
      .createStepExecution(defaultJobParameters());

    // when
    StepScopeTestUtils.doInStepScope(stepExecution, () -> {
        jsonItemWriter.open(stepExecution.getExecutionContext());
        jsonItemWriter.write(Arrays.asList(demoBook));
        jsonItemWriter.close();
        return null;
    });

    // then
    AssertFile.assertFileEquals(expectedResult, actualResult);
}

Unlike the previous tests, we are now in full control of our test objects. As a result, we're responsible for opening and closing the I/O streams.

5. Conclusion

In this tutorial, we've explored the various approaches of testing a Spring Batch job.

End-to-end testing verifies the complete execution of the job. Testing individual steps may help in complex scenarios.

Finally, when it comes to Step-scoped components, we can use a bunch of helper methods provided by spring-batch-test. They will assist us in stubbing and mocking Spring Batch domain objects.

As usual, we can explore the complete codebase over on GitHub.


Mapping a Single Entity to Multiple Tables in JPA

$
0
0

1. Introduction

JPA makes dealing with relational database models from our Java applications less painful. Things are simple when we map every table to a single entity class. But, sometimes we have reasons to model our entities and tables differently:

In this short tutorial, we'll see how to tackle this last scenario.

2. Data Model

Let's say we run a restaurant, and we want to store data about every meal we serve:

  • name
  • description
  • price
  • what kind of allergens it contains

Since there are many possible allergens, we're going to group this dataset together. Furthermore, we'll also model this using the following table definitions:

Now let's see how can we map these tables to entities using standard JPA annotations.

3. Creating Multiple Entities

The most obvious solution is to create an entity for both classes.

Let's start by defining the Meal entity:

@Entity
@Table(name = "meal")
class Meal {

    @Id
    @GeneratedValue(strategy = GenerationType.IDENTITY)
    @Column(name = "id")
    Long id;

    @Column(name = "name")
    String name;

    @Column(name = "description")
    String description;

    @Column(name = "price")
    BigDecimal price;

    @OneToOne(mappedBy = "meal")
    Allergens allergens;

    // standard getters and setters
}

Next, we'll add the Allergens entity:

@Entity
@Table(name = "allergens")
class Allergens {

    @Id
    @GeneratedValue(strategy = GenerationType.IDENTITY)
    @Column(name = "meal_id")
    Long mealId;

    @OneToOne
    @PrimaryKeyJoinColumn(name = "meal_id")
    Meal meal;

    @Column(name = "peanuts")
    boolean peanuts;

    @Column(name = "celery")
    boolean celery;

    @Column(name = "sesame_seeds")
    boolean sesameSeeds;

    // standard getters and setters
}

In the above example, we can see that meal_id is both the primary key and also the foreign key. That means we need to define the one-to-one relationship column using @PrimaryKeyJoinColumn.

However, this solution has two problems:

  • We always want to store allergens for a meal, and this solution doesn't enforce this rule
  • The meal and allergen data belong together logically – therefore we might want to store this information in the same Java class even though we created multiple tables for them

One possible resolution to the first problem is to add the @NotNull annotation to the allergens field on our Meal entity. JPA won't let us persist the Meal if we have a null Allergens.

However, this is not an ideal solution; we want a more restrictive one, where we don't even have the opportunity to try to persist a Meal without Allergens.

4. Creating a Single Entity with @SecondaryTable

We can create a single entity specifying that we have columns in different tables using the @SecondaryTable annotation:

@Entity
@Table(name = "meal")
@SecondaryTable(name = "allergens", pkJoinColumns = @PrimaryKeyJoinColumn(name = "meal_id"))
class Meal {

    @Id
    @GeneratedValue(strategy = GenerationType.IDENTITY)
    @Column(name = "id")
    Long id;

    @Column(name = "name")
    String name;

    @Column(name = "description")
    String description;

    @Column(name = "price")
    BigDecimal price;

    @Column(name = "peanuts", table = "allergens")
    boolean peanuts;

    @Column(name = "celery", table = "allergens")
    boolean celery;

    @Column(name = "sesame_seeds", table = "allergens")
    boolean sesameSeeds;

    // standard getters and setters

}

Behind the scenes, JPA joins the primary table with the secondary table and populates the fields. This solution is similar to the @OneToOne relationship, but this way, we can have all of the properties in the same class.

It's important to note that if we have a column that is in a secondary table, we have to specify it with the table argument of the @Column annotation. If a column is in the primary table, we can omit the table argument as JPA looks for columns in the primary table by default.

Also, note that we can have multiple secondary tables if we embed them in @SecondaryTables. Alternatively, from Java 8, we can mark the entity with multiple @SecondaryTable annotations since it's a repeatable annotation.

5. Combining @SecondaryTable With @Embedded

As we've seen, @SecondaryTable maps multiple tables to the same entity. We also know that @Embedded and @Embeddable to do the opposite and map a single table to multiple classes.

Let's see what we get when we combine @SecondaryTable with @Embedded and @Embeddable:

@Entity
@Table(name = "meal")
@SecondaryTable(name = "allergens", pkJoinColumns = @PrimaryKeyJoinColumn(name = "meal_id"))
class Meal {

    @Id
    @GeneratedValue(strategy = GenerationType.IDENTITY)
    @Column(name = "id")
    Long id;

    @Column(name = "name")
    String name;

    @Column(name = "description")
    String description;

    @Column(name = "price")
    BigDecimal price;

    @Embedded
    Allergens allergens;

    // standard getters and setters

}

@Embeddable
class Allergens {

    @Column(name = "peanuts", table = "allergens")
    boolean peanuts;

    @Column(name = "celery", table = "allergens")
    boolean celery;

    @Column(name = "sesame_seeds", table = "allergens")
    boolean sesameSeeds;

    // standard getters and setters

}

It's a similar approach to what we saw using @OneToOne. However, it has a couple of advantages:

  • JPA manages the two tables together for us, so we can be sure that there will be a row for each meal in both tables
  • Also, the code is a bit simpler, since we need less configuration

Nevertheless, this one-to-one like solution works only when the two tables have matching ids.

It's worth mentioning that if we want to reuse the Allergens class, it would be better if we defined the columns of the secondary table in the Meal class with @AttributeOverride.

6. Conclusion

In this short tutorial, we've seen how we can map multiple tables to the same entity using the @SecondaryTable JPA annotation.

We also saw the advantages of combining @SecondaryTable with @Embedded and @Embeddable to get a relationship similar to one-to-one.

As usual, the examples are available over on GitHub.

Converting Java Date to OffsetDateTime

$
0
0

1. Introduction

In this tutorial, we learn about the difference between Date and OffsetDateTime. We also learn how to convert from one to the other.

2. Difference between Date and OffsetDateTime

OffsetDateTime was introduced in JDK 8 as a modern alternative to java.util.Date.

OffsetDateTime is a thread-safe class that stores date and time to a precision of nanoseconds. Date, on the other hand, is not thread-safe and stores time to millisecond precision.

OffsetDateTime is a value-based class, which means that we need to use equals when comparing references instead of the typical ==.

The output of OffsetDateTime‘s toString method is in ISO-8601 format, while Date‘s toString is in a custom non-standard format.

Let's call toString on of both classes to see the difference:

Date: Sat Oct 19 17:12:30 2019
OffsetDateTime: 2019-10-19T17:12:30.174Z

Date can't store timezones and corresponding offsets. The only thing that a Date object contains is the number of milliseconds since 1 January 1970, 00:00:00 UTC, so if our time isn't in UTC we should store the timezone in a helper class. On the contrary, OffsetDateTime stores the ZoneOffset internally.

3. Converting Date to OffsetDateTime

Converting Date to OffsetDateTime is pretty simple. If our Date is in UTC, we can convert it with a single expression:

Date date = new Date();
OffsetDateTime offsetDateTime = date.toInstant()
  .atOffset(ZoneOffset.UTC);

If the original Date isn't in UTC, we can provide the offset (stored in a helper object, because as mentioned earlier Date class can't store timezones).

Let's say our original Date is +3:30 (Tehran time):

int hour = 3;
int minute = 30;
offsetDateTime = date.toInstant()
  .atOffset(ZoneOffset.ofHoursMinutes(hour, minute));

OffsetDateTime provides many useful methods that can be used afterward. For example, we can simply getDayOfWeek(), getDayOfMonth(), and getDayOfYear(). It's also very easy to compare two OffsetDateTime objects with isAfter and isBefore methods.

Above all, it's a good practice to avoid the deprecated Date class entirely.

4. Conclusion

In this tutorial, we learned how simple it is to convert from Date to OffsetDateTime. The code is available over on Github.

Java Scanner hasNext() vs. hasNextLine()

$
0
0

1. Overview

The Scanner class is a handy tool that can parse primitive types and strings using regular expressions and was introduced into the java.util package in Java 5.

In this short tutorial, we'll talk about its hasNext() and hasNextLine() methods. Even though these two methods may look pretty similar at first, they're actually doing quite different checks.

2. hasNext()

2.1. Basic Usage

The hasNext() method checks if the Scanner has another token in its input. A Scanner breaks its input into tokens using a delimiter pattern, which matches whitespace by default. That is, hasNext() checks the input and returns true if it has another non-whitespace character.

We should also note a few details about the default delimiter:

  • Whitespace includes not only the space character, but also tab space (\t), line feed (\n), and even more characters
  • Continuous whitespace characters are treated as a single delimiter
  • The blank lines at the end of the input are not printed — that is, hasNext() returns false for blank lines

Let's take a look at an example of how hasNext() works with the default delimiter. First, we'll prepare an input string to help us explore Scanner‘s parsing result:

String INPUT = new StringBuilder()
    .append("magic\tproject\n")
    .append("     database: oracle\n")
    .append("dependencies:\n")
    .append("spring:foo:bar\n")
    .append("\n")  // Note that the input ends with a blank line
    .toString();

Next, let's parse the input and print the result:

Scanner scanner = new Scanner(INPUT);
while (scanner.hasNext()) {
    log.info(scanner.next());
}
log.info("--------OUTPUT--END---------")

If we run the above code, we'll see the console output:

[DEMO]magic
[DEMO]project
[DEMO]database:
[DEMO]oracle
[DEMO]dependencies:
[DEMO]spring:foo:bar
[DEMO]--------OUTPUT--END---------

2.2. With Custom Delimiter

So far, we've looked at hasNext() with the default delimiter. The Scanner class provides a useDelimiter(String pattern) method that allows us to change the delimiter. Once the delimiter is changed, the hasNext() method will do the check with the new delimiter instead of the default one.

Let's see another example of how hasNext() and next() work with a custom delimiter. We'll reuse the input from the last example.

After the scanner parses a token matching the string “dependencies:“, we'll change the delimiter to a colon ( : ) so that we can parse and extract each value of the dependencies:

while (scanner.hasNext()) {
    String token = scanner.next();
    if ("dependencies:".equals(token)) {
        scanner.useDelimiter(":");
    }
    log.info(token);
}
log.info("--------OUTPUT--END---------");

Let's see the resulting output:

[DEMO]magic
[DEMO]project
[DEMO]database:
[DEMO]oracle
[DEMO]dependencies:
[DEMO]
spring
[DEMO]foo
[DEMO]bar


[DEMO]--------OUTPUT--END---------

Great! We've successfully extracted the values in “dependencies“, however, there are some unexpected line-break problems. We'll see how to avoid those in the next section.

2.3. With regex as Delimiter

Let's review the output in the last section. First, we noticed that there's a line break (\n) before “spring“. We've changed the delimiter to “:” after the “dependencies:” token was fetched. The line break after the “dependencies:” now becomes the part of the next token. Therefore, hasNext() returned true and the line break was printed out.

For the same reason, the line feed after “hibernate” and the last blank line become the part of the last token, so two blank lines are printed out together with “hibernate“.

If we can make both colon and whitespace as the delimiter, then the “dependencies” values will be correctly parsed and our problem will be solved. To achieve that, let's change the useDelimiter(“:”) call:

scanner.useDelimiter(":|\\s+");

The “:|\\s+” here is a regular expression matching a single “:” or one or more whitespace characters. With this fix, the output turns into:

[DEMO]magic
[DEMO]project
[DEMO]database:
[DEMO]oracle
[DEMO]dependencies:
[DEMO]spring
[DEMO]foo
[DEMO]bar
[DEMO]--------OUTPUT--END---------

3. hasNextLine()

The hasNextLine() method checks to see if there's another line in the input of the Scanner object, no matter if the line is blank or not.

Let's take the same input again. This time, we'll add line numbers in front of each line in the input using hasNextLine() and nextLine() methods:

int i = 0;
while (scanner.hasNextLine()) {
    log.info(String.format("%d|%s", ++i, scanner.nextLine()));
}
log.info("--------OUTPUT--END---------");

Now, let's take a look at our output:

[DEMO]1|magic	project
[DEMO]2|     database: oracle
[DEMO]3|dependencies:
[DEMO]4|spring:foo:bar
[DEMO]5|
[DEMO]--------OUTPUT--END---------

As we expected, the line numbers are printed, and the last blank line is there, too.

4. Conclusion

In this article, we've learned that Scanner‘s hasNextLine() method checks if there is another line in the input, no matter if the line is blank or not, while hasNext() uses a delimiter to check for another token.

As always, the complete source code for the examples is available over on GitHub.

Customizing the Result of JPA Queries with Aggregation Functions

$
0
0

1. Overview

While Spring Data JPA can abstract the creation of queries to retrieve entities from the database in specific situations, we sometimes need to customize our queries, such as when we add aggregation functions.

In this tutorial, we'll focus on how to convert the results of those queries into an object. We'll explore two different solutions — one involving the JPA specification and a POJO, and another using Spring Data Projection.

2. JPA Queries and the Aggregation Problem

JPA queries typically produce their results as instances of a mapped entity. However, queries with aggregation functions normally return the result as Object[].

To understand the problem, let's define a domain model based on the relationship between posts and comments:

@Entity
public class Post {
    @Id
    private Integer id;
    private String title;
    private String content;
    @OneToMany(mappedBy = "post")
    private List comments;

    // additional properties
    // standard constructors, getters, and setters
}

@Entity
public class Comment {
    @Id
    private Integer id;
    private Integer year;
    private boolean approved;
    private String content;
    @ManyToOne
    private Post post;

    // additional properties
    // standard constructors, getters, and setters
}

Our model defines that a post can have many comments, and each comment belongs to one post. Let's use a Spring Data Repository with this model:

@Repository
public interface CommentRepository extends JpaRepository<Comment, Integer> {
    // query methods
}

Now, let's count the comments grouped by year:

@Query("SELECT c.year, COUNT(c.year) FROM Comment AS c GROUP BY c.year ORDER BY c.year DESC")
List<Object[]> countTotalCommentsByYear();

The result of the previous JPA query cannot be loaded into an instance of Comment, because the result is a different shape. The year and COUNT specified in the query do not match our entity object.

While we can still access the results in the general-purpose Object[] returned in the list, doing so will result in messy, error-prone code.

3. Customizing the Result with Class Constructors

The JPA specification allows us to customize results in an object-oriented fashion. Therefore, we can use a JPQL constructor expression to set the result:

@Query("SELECT new com.baeldung.aggregation.model.custom.CommentCount(c.year, COUNT(c.year)) "
  + "FROM Comment AS c GROUP BY c.year ORDER BY c.year DESC")
List<CommentCount> countTotalCommentsByYearClass();

This binds the output of the SELECT statement to a POJO. The class specified needs to have a constructor that matches the projected attributes exactly, but it's not required to be annotated with @Entity.

We can also see that the constructor declared in the JPQL must have a fully qualified name:

package com.baeldung.aggregation.model.custom;

public class CommentCount {
    private Integer year;
    private Long total;

    public CommentCount(Integer year, Long total) {
        this.year = year;
        this.total = total;
    }
    // getters and setters
}

4. Customizing the Result with Spring Data Projection

Another possible solution is to customize the result of JPA queries with Spring Data Projection. This functionality allows us to project query results with considerably less code.

4.1. Customizing the Result of JPA Queries

To use interface-based projection, we must define a Java interface composed of getter methods that match the projected attribute names. Let's define an interface for our query result:

public interface ICommentCount {
    Integer getYearComment();
    Long getTotalComment();
}

Now, let's express our query with the result returned as List<ICommentCount>:

@Query("SELECT c.year AS yearComment, COUNT(c.year) AS totalComment "
  + "FROM Comment AS c GROUP BY c.year ORDER BY c.year DESC")
List<ICommentCount> countTotalCommentsByYearInterface();

To allow Spring to bind the projected values to our interface, we need to give aliases to each projected attribute with the property name found in the interface.

Spring Data will then construct the result on-the-fly and return a proxy instance for each row of the result.

4.2. Customizing the Result of Native Queries

We can face situations where JPA queries are not as fast as native SQL or cannot use some specific features of our database engine. To solve this, we use native queries.

One advantage of interface-based projection is that we can use it for native queries. Let's use ICommentCount again and bind it to a SQL query:

@Query(value = "SELECT c.year AS yearComment, COUNT(c.*) AS totalComment "
  + "FROM comment AS c GROUP BY c.year ORDER BY c.year DESC", nativeQuery = true)
List<ICommentCount> countTotalCommentsByYearNative();

This works identically to JPQL queries.

5. Conclusion

In this article, we evaluated two different solutions to address mapping the results of JPA Queries with aggregation functions. First, we used the JPA standard, involving a POJO class, and in the second solution, we used the lightweight Spring Data projections with an interface.

Spring Data projections allow us to write less code, both in Java and in JPQL.

As always, the example code for this tutorial is available over on GitHub.

Guide to the Linux find Command

$
0
0

1. Introduction

The Linux find command can be used to find files and directories on a disk. It provides several command-line options that make it a powerful tool. In this tutorial, we'll look at how to use the find command.

2. Syntax

Let's quickly take a look at the basic syntax of the find command:

find [path...] [expression]

Both path and expression are optional.

The path argument specifies one or more directories to search. The default is the current working directory.

The expression argument is what determines which files and directories to include in the output, as well as what action to take on them. The default is to print all non-hidden files and directories.

We'll take a closer look at expressions in the next section.

Note that different Linux distributions and versions may use slightly different syntax or offer different options.

3. Expressions

The expression argument is made up of options, tests, and actions. A single expression can combine any number of these using traditional boolean operators such as and and or.

Let's take a look at each of these in more detail.

3.1. Options

Options affect the overall operation of find, rather than the processing of a specific file during the search.

Some of the most important options are:

  • -d, -depth: performs a depth-first traversal by processing subdirectories before files in the directory itself
  • -daystart: measure time from the beginning of the day instead of 24 hours ago
  • -help: prints a simple command-line usage and then exits
  • -mindepth, -maxdepth: controls how many directory levels to search before stopping (default mindepth is 0, and maxdepth defaults to unlimited)

3.2. Tests

Tests are the core of the find command. Applied to each file that is found, tests return true or false depending on whether that particular file passes or not.

We can use tests to look at various file attributes such as modified times, pattern matches, permissions, size, and more. Let's look at some of the more popular tests we can perform.

First, there are tests for matching files by name or type:

  • -name: tests if the file name matches a pattern (uses a simple pattern match and only looks at the file name)
  • -regex: tests if the file name matches a pattern (uses standard Emacs regular expressions and looks at full file path)
  • -type: tests if the file is a specific type (regular file, directory, symbolic link, etc.)

Let's use find with the -name test to find all XML files in the current directory:

> find . -name "*.xml"
src/main/resources/applicationContext.xml
src/test/resources/applicationContext-test.xml

Notice the default output is simply the full path of each file.

Now, let's find only directories in the /tmp directory:

find /tmp -type d

There are also several tests that can match files using time comparisons:

  • -amin, -anewer, -atime: tests the last access time of the file against a relative time or another file
  • -cmin, -cnewer, -ctime: tests the created time of the file against a relative time or another file
  • -mmin, -mnewer, -mtime: tests the modified time of the file against a relative time or another file
  • -newer: tests if the file is newer than another file

Here's an example find command that uses –ctime to find all JAR files created in the past year in a directory named lib:

find lib -name "*.jar" -ctime -365

Or we can find all files in the current directory that are newer than a file named testfile:

find . -newer testfile

A few other handy tests can match based on other file properties like permissions or size:

  • -perm: tests if the file permissions match a given permissions mode
  • -size: tests the size of the file

Here, we'll use -perm to find all files in the current directory that match the permission mode 700:

find . -perm 700

And let's use -size to find all files larger than 1 kilobyte in a directory named properties:

find properties -size 1k

3.3. Actions

Actions are executed on files that match all tests. The default action is to simply print the file name and path.

There are a few other actions we can use to print more details about the matching files:

  • -ls: perform a standard directory listing of the file
  • -print, -print0, -printf: print the details of the to stdout
  • -fprint, -fprint0, -fprintf: print details of the file to a file

To demonstrate, let's use the -ls action to perform a directory listing of all .jar files in the target directory:

> find target -name "*.jar" -ls
4316430646    88112 -rw-r--r--    1 mike staff 45110374 Oct 14 15:01 target/app.jar

And we can use -printf with a format string to print only the file size and name on each line:

> find lib -name "*.jar" -printf '%s %p\n'
12345 file1.jar
24543 file2.jar

Some of the more advanced actions we can use with the find command are:

  • -delete: remove the file from disk
  • -exec: execute any arbitrary command

Suppose we want to delete all .tmp files from the /tmp directory:

find /tmp -name "*.tmp" -delete

Or to find all .java files containing the word “interface”:

find src -name "*.java" -type f -exec grep -l interface {} \;

Notice the “;” on the end. This causes the grep command to be executed for each file one at a time (the “\” is required because semi-colons will be interpreted by the shell). We could also use a “+” instead, which would cause multiple files to be passed into grep at the same time.

3.4. Operators

All of the expression types above can be combined using traditional boolean operators.

Here's a quick list of the supported operators, in order of precedence:

  • (expr): parenthesis force the execution of the expression inside before any other expression; be careful to avoid shell interpolation by using quotes
  • !, -not: negates an expression; be careful to avoid shell interpolation by using quotes
  • -a, -and: performs a boolean and operation on two expressions, returning true only if both expressions are true
  • -o, -or: performs a boolean or operation on two expressions, returning true if either expression is true

For example, we can find any file that is not a directory in the src directory:

find src ! -type d

Or we can find all files with either a .xml or .yaml extension in the properties directory:

find properties -name "*yaml" -o -name "*.xml"

4. Advanced Options

In addition to the path and expressions, most versions of find offer more advanced options:

find [-H] [-L] [-P] [-Olevel] [-D help|tree|search|stat|rates|opt|exec] [path] [expressions]

First, the -H, -L, and -P options specify how the find command handles symbolic links. The default is to use -P, which means file information of the link itself will be used by tests.

The -O option is used to specify a query optimization level. This parameter changes how find re-orders expressions to help speed up the command without changing the output. We can specify any value between 0 and 3 inclusive. The default value is 1, which is sufficient for most use cases.

Finally, the -D option specifies a debug level — it prints diagnostic information that can help us diagnose why the find command is not working as expected.

5. Conclusion

In this tutorial, we've seen how to use the Linux find command.

By using a combination of expressions and boolean logic, the find command can help us locate files and directories efficiently. The find command is powerful enough on its own, but when combined with other Linux commands, it is one of the most useful command-line tools available.

Viewing all 3761 articles
Browse latest View live


<script src="https://jsc.adskeeper.com/r/s/rssing.com.1596347.js" async> </script>