Quantcast
Channel: Baeldung
Viewing all 3739 articles
Browse latest View live

RSocket Using Spring Boot

$
0
0

1. Overview

RSocket is an application protocol providing Reactive Streams semantics – it functions, for example, as an alternative to HTTP.

In this tutorial, we’re going to look at RSocket using Spring Boot, and specifically how it helps abstract away the lower-level RSocket API.

2. Dependencies

Let’s start with adding the spring-boot-starter-rsocket dependency:

<dependency>
    <groupId>org.springframework.boot</groupId>
    <artifactId>spring-boot-starter-rsocket</artifactId>
</dependency>

This will transitively pull in RSocket related dependencies such as rsocket-core and rsocket-transport-netty.

3. Sample Application

Now we’ll continue with our sample application. To highlight the interaction models RSocket provides, we’re going to create a trader application. Our trader application will consist of a client and a server.

3.1. Server Setup

First, let’s set up the server, which will be a Spring Boot application bootstrapping an RSocket server.

Since we have the spring-boot-starter-rsocket dependency, Spring Boot autoconfigures an RSocket server for us. As usual with Spring Boot, we can change default configuration values for the RSocket server in a property-driven fashion.

For example, let’s change the port of our RSocket server by adding the following line to our application.properties file:

spring.rsocket.server.port=7000

We can also change other properties to further modify our server according to our needs.

3.2. Client Setup

Next, let’s set up the client which will also be a Spring Boot application.

Although Spring Boot auto-configures most of the RSocket related components, we should also define some beans to complete the setup:

@Configuration
public class ClientConfiguration {

    @Bean
    public RSocket rSocket() {
        return RSocketFactory
          .connect()
          .mimeType(MimeTypeUtils.APPLICATION_JSON_VALUE, MimeTypeUtils.APPLICATION_JSON_VALUE)
          .frameDecoder(PayloadDecoder.ZERO_COPY)
          .transport(TcpClientTransport.create(7000))
          .start()
          .block();
    }

    @Bean
    RSocketRequester rSocketRequester(RSocketStrategies rSocketStrategies) {
        return RSocketRequester.wrap(rSocket(), MimeTypeUtils.APPLICATION_JSON, rSocketStrategies);
    }
}

Here we’re creating the RSocket client and configuring it to use TCP transport on port 7000. Note that this is the server port we’ve configured previously.

Next, we’re defining an RSocketRequester bean which is a wrapper around RSocket. This bean will help us while interacting with the RSocket server.

After defining these bean configurations, we have a bare-bones structure.

Next, we’ll explore different interaction models and see how Spring Boot helps us there.

4. Request/Response with RSocket and Spring Boot

Let’s start with Request/Response. This is probably the most common and familiar interaction model since HTTP also employs this type of communication.

In this interaction model, the client initiates the communication and sends a request. Afterward, the server performs the operation and returns a response to the client – thus the communication completes.

In our trader application, a client will ask for the current market data of a given stock. In return, the server will pass the requested data.

4.1. Server

On the server side, we should first create a controller to hold our handler methods. But instead of @RequestMapping or @GetMapping annotations like in Spring MVC, we will use the @MessageMapping annotation:

@Controller
public class MarketDataRSocketController {

    private final MarketDataRepository marketDataRepository;

    public MarketDataRSocketController(MarketDataRepository marketDataRepository) {
        this.marketDataRepository = marketDataRepository;
    }

    @MessageMapping("currentMarketData")
    public Mono<MarketData> currentMarketData(MarketDataRequest marketDataRequest) {
        return marketDataRepository.getOne(marketDataRequest.getStock());
    }
}

So let’s investigate our controller.

We’re using the @Controller annotation to define a handler which should process incoming RSocket requests. Additionally, the @MessageMapping annotation lets us define which route we’re interested in and how to react upon a request.

In this case, the server listens for the currentMarketData route, which returns a single result to the client as a Mono<MarketData>.

4.2. Client

Next, our RSocket client should ask for the current price of a stock and get a single response.

To initiate the request, we should use the RSocketRequester class:

@RestController
public class MarketDataRestController {

    private final RSocketRequester rSocketRequester;

    public MarketDataRestController(RSocketRequester rSocketRequester) {
        this.rSocketRequester = rSocketRequester;
    }

    @GetMapping(value = "/current/{stock}")
    public Publisher<MarketData> current(@PathVariable("stock") String stock) {
        return rSocketRequester
          .route("currentMarketData")
          .data(new MarketDataRequest(stock))
          .retrieveMono(MarketData.class);
    }
}

Note that in our case, the RSocket client is also a REST controller from which we call our RSocket server. So, we’re using @RestController and @GetMapping to define our request/response endpoint.

In the endpoint method, we’re using RSocketRequester and specifying the route. In fact, this is the route which the RSocket server expects. Then we’re passing the request data. And lastly, when we call the retrieveMono() method, Spring Boot initiates a request/response interaction.

5. Fire And Forget with RSocket and Spring Boot

Next, we’ll look at the fire-and-forget interaction model. As the name implies, the client sends a request to the server but doesn’t expect a response back.

In our trader application, some clients will serve as a data source and will push market data to the server.

5.1. Server

Let’s create another endpoint in our server application:

@MessageMapping("collectMarketData")
public Mono<Void> collectMarketData(MarketData marketData) {
    marketDataRepository.add(marketData);
    return Mono.empty();
}

Again, we’re defining a new @MessageMapping with the route value of collectMarketData. Furthermore, Spring Boot automatically converts the incoming payload to a MarketData instance.

The big difference here, though, is that we return a Mono<Void> since the client doesn’t need a response from us.

5.2. Client

Let’s see how we can initiate our fire-and-forget request.

We’ll create another REST endpoint:

@GetMapping(value = "/collect")
public Publisher<Void> collect() {
    return rSocketRequester
      .route("collectMarketData")
      .data(getMarketData())
      .send();
}

Here we’re specifying our route and our payload will be a MarketData instance. Since we’re using the send() method to initiate the request instead of retrieveMono(), the interaction model becomes fire-and-forget.

6. Request Stream with RSocket and Spring Boot

Request streaming is a more involved interaction model, where the client sends a request but gets multiple responses over the course of time from the server.

To simulate this interaction model, a client will ask for all market data of a given stock.

6.1. Server

Let’s start with our server. We’ll add another message mapping method:

@MessageMapping("feedMarketData")
public Flux<MarketData> feedMarketData(MarketDataRequest marketDataRequest) {
    return marketDataRepository.getAll(marketDataRequest.getStock());
}

As we can see, this handler method is very similar to the other ones. The different part is that we returning a Flux<MarketData> instead of a Mono<MarketData>. In the end, our RSocket server will send multiple responses to the client.

6.2. Client

On the client side, we should create an endpoint to initiate our request/stream communication:

@GetMapping(value = "/feed/{stock}", produces = MediaType.TEXT_EVENT_STREAM_VALUE)
public Publisher<MarketData> feed(@PathVariable("stock") String stock) {
    return rSocketRequester
      .route("feedMarketData")
      .data(new MarketDataRequest(stock))
      .retrieveFlux(MarketData.class);
}

Let’s investigate our RSocket request.

First, we’re defining the route and request payload. Then, we’re defining our response expectation with the retrieveFlux() method call. This is the part which determines the interaction model.

Also note that, since our client is also a REST server, it defines response media type as MediaType.TEXT_EVENT_STREAM_VALUE.

7. Exception Handling

Now let’s see how we can handle exceptions in our server application in a declarative way.

When doing request/response, we can simply use the @MessageExceptionHandler annotation:

@MessageExceptionHandler
public Mono<MarketData> handleException(Exception e) {
    return Mono.just(MarketData.fromException(e));
}

Here we’ve annotated our exception handler method with @MessageExceptionHandler. As a result, it will handle all types of exceptions since the Exception class is the superclass of all others.

We can be more specific and create different exception handler methods for different exception types.

This is of course for the request/response model, and so we’re returning a Mono<MarketData>. We want our return type here to match the return type of our interaction model.

8. Summary

In this tutorial, we’ve covered Spring Boot’s RSocket support and detailed different interaction models RSocket provides.

Check out all the code samples over on GitHub.


Intro to OData with Olingo

$
0
0

1. Introduction

This tutorial is a follow-up to our OData Protocol Guide, where we’ve explored the basics of the OData protocol.

Now, we’ll see how to implement a simple OData service using the Apache Olingo library.

This library provides a framework to expose data using the OData protocol, thus allowing easy, standards-based access to information that would otherwise be locked away in internal databases.

2. What is Olingo?

Olingo is one of the “featured” OData implementations available for the Java environment – the other being the SDL OData Framework. It is maintained by the Apache Foundation and is comprised of three main modules:

  • Java V2 – client and server libraries supporting OData V2
  • Java V4 – server libraries supporting OData V4
  • Javascript V4 – Javascript, client-only library supporting OData V4

In this article, we’ll cover only the server-side V2 Java libraries, which support direct integration with JPA. The resulting service supports CRUD operations and other OData protocol features, including ordering, paging and filtering.

Olingo V4, on the other hand, only handles the lower-level aspects of the protocol, such as content-type negotiation and URL parsing. This means that it’ll be up to us, developers, to code all nitty-gritty details regarding things like metadata generation, generating back-end queries based on URL parameters, etc.

As for the JavaScript client library, we’re leaving it out for now because, since OData is an HTTP-based protocol, we can use any REST library to access it.

3. An Olingo Java V2 Service

Let’s create a simple OData service with the two EntitySets that we’ve used in our brief introduction to the protocol itself. At its core, Olingo V2 is simply a set of JAX-RS resources and, as such, we need to provide the required infrastructure in order to use it. Namely, we need a JAX-RS implementation and a compatible servlet container.

For this example, we’ve opted to use Spring Boot as it provides a quick way to create a suitable environment to host our service. We’ll also use Olingo’s JPA adapter, which “talks” directly to a user-supplied EntityManager in order do gather all data needed to create the OData’s EntityDataModel.

While not a strict requirement, including the JPA adapter greatly simplifies the task of creating our service. Besides standard Spring Boot dependencies, we need to add a couple of Olingo’s jars:

<dependency>
    <groupId>org.apache.olingo</groupId>
    <artifactId>olingo-odata2-core</artifactId>
    <version>2.0.11</version>
    <exclusions>
        <exclusion>
            <groupId>javax.ws.rs</groupId>
            <artifactId>javax.ws.rs-api</artifactId>
         </exclusion>
    </exclusions>
</dependency>
<dependency>
    <groupId>org.apache.olingo</groupId>
    <artifactId>olingo-odata2-jpa-processor-core</artifactId>
    <version>2.0.11</version>
</dependency>
<dependency>
    <groupId>org.apache.olingo</groupId>
    <artifactId>olingo-odata2-jpa-processor-ref</artifactId>
    <version>2.0.11</version>
    <exclusions>
        <exclusion>
            <groupId>org.eclipse.persistence</groupId>
            <artifactId>eclipselink</artifactId>
        </exclusion>
    </exclusions>
</dependency>

The latest version of those libraries is available at Maven’s Central repository:

We need those exclusions in this list because Olingo has dependencies on EclipseLink as its JPA provider and also uses a different JAX-RS version than Spring Boot.

3.1. Domain Classes

The first step to implement a JPA-based OData service with Olingo is to create our domain entities. In this simple example, we’ll create just two classes – CarMaker and CarModel – with a single one-to-many relationship:

@Entity
@Table(name="car_maker")
public class CarMaker {    
    @Id @GeneratedValue(strategy=GenerationType.IDENTITY)    
    private Long id;
    @NotNull
    private String name;
    @OneToMany(mappedBy="maker",orphanRemoval = true,cascade=CascadeType.ALL)
    private List<CarModel> models;
    // ... getters, setters and hashcode omitted 
}

@Entity
@Table(name="car_model")
public class CarModel {
    @Id @GeneratedValue(strategy=GenerationType.AUTO)
    private Long id;
    @NotNull
    private String name;
    @NotNull
    private Integer year;
    @NotNull
    private String sku;
    @ManyToOne(optional=false,fetch=FetchType.LAZY) @JoinColumn(name="maker_fk")
    private CarMaker maker;
    // ... getters, setters and hashcode omitted
}

3.2. ODataJPAServiceFactory Implementation

The key component we need to provide to Olingo in order to serve data from a JPA domain is a concrete implementation of an abstract class called ODataJPAServiceFactory. This class should extend ODataServiceFactory and works as an adapter between JPA and OData. We’ll name this factory CarsODataJPAServiceFactory, after the main topic for our domain:

@Component
public class CarsODataJPAServiceFactory extends ODataJPAServiceFactory {
    // other methods omitted...

    @Override
    public ODataJPAContext initializeODataJPAContext() throws ODataJPARuntimeException {
        ODataJPAContext ctx = getODataJPAContext();
        ODataContext octx = ctx.getODataContext();
        HttpServletRequest request = (HttpServletRequest) octx.getParameter(
          ODataContext.HTTP_SERVLET_REQUEST_OBJECT);
        EntityManager em = (EntityManager) request
          .getAttribute(EntityManagerFilter.EM_REQUEST_ATTRIBUTE);
        ctx.setEntityManager(em);
        ctx.setPersistenceUnitName("default");
        ctx.setContainerManaged(true);                
        return ctx;
    }
}

Olingo calls the initializeJPAContext() method if this class to get a new ODataJPAContext  used to handle every OData request. Here, we use the getODataJPAContext() method from the base classe to get a “plain” instance which we then do some customization.

This process is somewhat convoluted, so let’s draw a UML sequence to visualize how all this happens:

Note that we’re intentionally using setEntityManager() instead of setEntityManagerFactory(). We could get one from Spring but, if we pass it to Olingo, it’ll conflict with the way that Spring Boot handles its lifecycle – especially when dealing with transactions.

For this reason, we’ll resort to pass an already existing EntityManager instance and inform it that its lifecycle its externally managed. The injected EntityManager instance comes from an attribute available at the current request. We’ll later see how to set this attribute.

3.3. Jersey Resource Registration

The next step is to register our ServiceFactory with Olingo’s runtime and register Olingo’s entry point with the JAX-RS runtime. We’ll do it inside a ResourceConfig derived class, where we also define the OData path for our service to be /odata:

@Component
@ApplicationPath("/odata")
public class JerseyConfig extends ResourceConfig {
    public JerseyConfig(CarsODataJPAServiceFactory serviceFactory, EntityManagerFactory emf) {        
        ODataApplication app = new ODataApplication();        
        app
          .getClasses()
          .forEach( c -> {
              if ( !ODataRootLocator.class.isAssignableFrom(c)) {
                  register(c);
              }
          });        
        register(new CarsRootLocator(serviceFactory)); 
        register(new EntityManagerFilter(emf));
    }
    // ... other methods omitted
}

Olingo’s provided ODataApplication is a regular JAX-RS Application class that registers a few providers using the standard callback getClasses()

We can use all but the ODataRootLocator class as-is. This particular one is responsible for instantiating our ODataJPAServiceFactory implementation using Java’s newInstance() method. But, since we want Spring to manage it for us, we need to replace it by a custom locator.

This locator is a very simple JAX-RS resource that extends Olingo’s stock ODataRootLocator and it returns our Spring-managed ServiceFactory when needed:

@Path("/")
public class CarsRootLocator extends ODataRootLocator {
    private CarsODataJPAServiceFactory serviceFactory;
    public CarsRootLocator(CarsODataJPAServiceFactory serviceFactory) {
        this.serviceFactory = serviceFactory;
    }

    @Override
    public ODataServiceFactory getServiceFactory() {
       return this.serviceFactory;
    } 
}

3.4. EntityManager Filter

The last remaining piece for our OData service the EntityManagerFilter. This filter injects an EntityManager in the current request, so it is available to the ServiceFactory. It’s a simple JAX-RS @Provider class that implements both ContainerRequestFilter and ContainerResponseFilter interfaces, so it can properly handle transactions:

@Provider
public static class EntityManagerFilter implements ContainerRequestFilter, 
  ContainerResponseFilter {

    public static final String EM_REQUEST_ATTRIBUTE = 
      EntityManagerFilter.class.getName() + "_ENTITY_MANAGER";
    private final EntityManagerFactory emf;

    @Context
    private HttpServletRequest httpRequest;

    public EntityManagerFilter(EntityManagerFactory emf) {
        this.emf = emf;
    }

    @Override
    public void filter(ContainerRequestContext ctx) throws IOException {
        EntityManager em = this.emf.createEntityManager();
        httpRequest.setAttribute(EM_REQUEST_ATTRIBUTE, em);
        if (!"GET".equalsIgnoreCase(ctx.getMethod())) {
            em.getTransaction().begin();
        }
    }

    @Override
    public void filter(ContainerRequestContext requestContext, 
      ContainerResponseContext responseContext) throws IOException {
        EntityManager em = (EntityManager) httpRequest.getAttribute(EM_REQUEST_ATTRIBUTE);
        if (!"GET".equalsIgnoreCase(requestContext.getMethod())) {
            EntityTransaction t = em.getTransaction();
            if (t.isActive() && !t.getRollbackOnly()) {
                t.commit();
            }
        }
        em.close();
    }
}

The first filter() method, called at the start of a resource request, uses the provided EntityManagerFactory to create a new EntityManager instance, which is then put under an attribute so it can later be recovered by the ServiceFactory. We also skip GET requests since should not have any side effects, and so we won’t need a transaction.

The second filter()  method is called after Olingo has finished processing the request. Here we also check the request method, too, and commit the transaction if required.


3.5. Testing

Let’s test our implementation using simple curl commands. The first this we can do is get the services $metadata document:

curl http://localhost:8080/odata/$metadata

As expected, the document contains two types – CarMaker and CarModel – and an association. Now, let’s play a bit more with our service, retrieving top-level collections and entities:

curl http://localhost:8080/odata/CarMakers
curl http://localhost:8080/odata/CarModels
curl http://localhost:8080/odata/CarMakers(1)
curl http://localhost:8080/odata/CarModels(1)
curl http://localhost:8080/odata/CarModels(1)/CarMakerDetails

Now, let’s test a simple query returning all CarMakers where its name starts with ‘B’:

curl http://localhost:8080/odata/CarMakers?$filter=startswith(Name,'B')

A more complete list of example URLs is available at our OData Protocol Guide article.

5. Conclusion

In this article, we’ve seen how to create a simple OData service backed by a JPA domain using Olingo V2.

As of this writing, there is an open issue on Olingo’s JIRA tracking the works on a JPA module for V4, but the last comment dates back to 2016. There’s also a third-party open-source JPA adapter hosted at SAP’s GitHub repository which, although unreleased, seems to be more feature-complete at this point than Olingo’s one.

As usual, all code for this article is available at our GitHub repo.

A First Experience Working with an AI Assistant in Java

$
0
0


I started using Codota recently, and have been highly impressed with what the tool can do.

Simply put, the goal of Codota is to make development simpler, and most importantly – a lot faster. Working through an implementation with the tool helping in the background is just a lot less time intensive.

1. What is Codota

The best I can describe it is – Codota is learning as I’m writing code, and helping me code better. It’s using AI and machine learning under the hood, and it basically gives relevant suggestions, as I’m working.

2. Coding with Codota

But, ultimately, it’s the quality of these suggestions that really makes or breaks a product like this.

And the fact that Codota actually gets these right and whenever it does have a suggestion – it’s almost invariably the right one – is the amazing part. It’s also why I accepted them as the second ever sponsor on the site.


I did a quick implementation here, consuming a REST API with OkHttp, using Codota:

3. Strengths and Limitations

Coding with Codota in the background changes the core of the programming experience – sometimes.

When using some libraries, and some frameworks, working with Codota in the background is incredible, as I’m sure you saw in the video above. Suggestions are spot on, and I’m significantly faster – as I simply have to do a lot less exploration of the API or reading.

Oh, and it’s free 🙂

But, of course, there are areas where Codota is still growing and getting refind. Understanding annotations, for example, is still work-in-progress, so the suggestions of the tool on annotation-heavy frameworks aren’t as good.

4. The Road Forward

In the time I took to use the tool, learn its ins and outs and create this video, the Codota team shipped something like 6 or so updates to the plugin. Full line suggestions weren’t a thing when I started, just a few months ago. Now, they’re in and highly useful.

The potential and ambition of the tool are quite high, and they’re moving fast, so I’m personally optimistic that the tool is only going to get better.

But, at the end of the day, I’m coding today, not in the future. And, today, Codota is a must-have plugin – simply install it in your IDE and let it run in the background and help.

Java Weekly, Issue 282

$
0
0

Here we go…

1. Spring and Java

>> Reactive Transactions with Spring [spring.io]

A couple of milestone releases that let you play with Spring Reactive’s transactional support, using either RDBC2 or MongoDB.

>> Why do we need the volatile keyword? [vmlens.com]

And a reminder that there’s still a use case for volatile, even with the cache available in modern processors.

Also worth reading:

Webinars and presentations:

Time to upgrade:

2. Technical and Musings

>> TechnicalDebt [martinfowler.com]

A good write-up about dealing with “cruft” — the deficiencies in internal quality that make software systems harder to modify and extend.

>> 737 Max 8 [blog.cleancoder.com]

And a stern note that we programmers have a responsibility to foresee and prevent injury, loss, or death that might occur due to errors in our code.

Also worth reading:

3. Comics

And my favorite Dilberts of the week:

>> Wally Has Best Excuse [dilbert.com]

>> Worthless Suggestions [dilbert.com]

>> Blinking Tell [dilbert.com]

4. Pick of the Week

I recently discovered Codota – a really cool (and free) coding assistant with surprisingly strong suggestions – and explored it in a new video here:

>> A First Experience Working with Codota – an AI Assistant that Actually Works [youtube.com]

Understanding NumberFormatException in Java

$
0
0

1. Introduction

Java throws NumberFormatException – an unchecked exception – when it cannot convert a String to a number type.

Since it’s unchecked, Java does not force us to handle or declare it.

In this tutorial, we’ll describe and demonstrate what causes NumberFormatException in Java and how to avoid or deal with it.

2. Causes of NumberFormatException

There are various issues that cause NumberFormatException. For instance, some constructors and methods in Java throw this exception.

We’ll discuss most of them in the sections below.

2.1. Non-Numeric Data Passed to Constructor

Let’s look at an attempt to construct an Integer or Double object with non-numeric data.

Both of these statements will throw NumberFormatException:

Integer aIntegerObj = new Integer("one");
Double doubleDecimalObj = new Double("two.2");

Let’s see the stack trace we got when we passed invalid input “one” to the Integer constructor in line 1:

Exception in thread "main" java.lang.NumberFormatException: For input string: "one"
	at java.lang.NumberFormatException.forInputString(NumberFormatException.java:65)
	at java.lang.Integer.parseInt(Integer.java:580)
	at java.lang.Integer.<init>(Integer.java:867)
	at MainClass.main(MainClass.java:11)

It threw NumberFormatException. The Integer constructor failed while trying to understand input using parseInt() internally.

The Java Number API doesn’t parse words into numbers, so we can correct the code by simply by changing it to an expected value:

Integer aIntegerObj = new Integer("1");
Double doubleDecimalObj = new Double("2.2");

2.2. Parsing Strings Containing Non-Numeric Data

Similar to Java’s support for parsing in the constructor, we’ve got dedicated parse methods like parseInt(), parseDouble(), valueOf(), and decode().

If we try and do the same kinds of conversion with these:

int aIntPrim = Integer.parseInt("two");
double aDoublePrim = Double.parseDouble("two.two");
Integer aIntObj = Integer.valueOf("three");
Long decodedLong = Long.decode("64403L");

Then we’ll see the same kind of erroneous behavior.

And, we can fix them in similar ways:

int aIntPrim = Integer.parseInt("2");
double aDoublePrim = Double.parseDouble("2.2");
Integer aIntObj = Integer.valueOf("3");
Long decodedLong = Long.decode("64403");

2.3. Passing Strings with Extraneous Characters

Or, if we try to convert a string to a number with extraneous data in input, like whitespace or special characters:

Short shortInt = new Short("2 ");
int bIntPrim = Integer.parseInt("_6000");

Then, we’ll have the same issue as before.

We could correct these with a bit of string manipulation:

Short shortInt = new Short("2 ".trim());
int bIntPrim = Integer.parseInt("_6000".replaceAll("_", ""));
int bIntPrim = Integer.parseInt("-6000");

Note here in line 3 that negative numbers are allowed, using the hyphen character as a minus sign.

2.4. Locale-Specific Number Formats

Let’s see a special case of locale-specific numbers. In European regions, a comma may represent a decimal place. For example, “4000,1 ” may represent the decimal number “4000.1”.

By default, we’ll get NumberFormatException by trying to parse a value containing a comma:

double aDoublePrim = Double.parseDouble("4000,1");

We need to allow commas and avoid the exception in this case. To make this possible, Java needs to understand the comma here as a decimal.

We can allow commas for the European region and avoid the exception by using NumberFormat.

Let’s see it in action using the Locale for France as an example:

NumberFormat numberFormat = NumberFormat.getInstance(Locale.FRANCE);
Number parsedNumber = numberFormat.parse("4000,1");
assertEquals(4000.1, parsedNumber.doubleValue());
assertEquals(4000, parsedNumber.intValue());

3. Best Practices

Let’s talk about a few good practices that can help us to deal with NumberFormatException:

  1. Don’t try to convert alphabetic or special characters into numbers – the Java Number API cannot do that.
  2. We may want to validate an input string using regular expressions and throw the exception for the invalid characters.
  3. We can sanitize input against foreseeable known issues with methods like trim() and replaceAll().
  4. In some cases, special characters in input may be valid. So, we do special processing for that, using NumberFormat, for example, which supports numerous formats.

4. Conclusion

In this tutorial, we discussed NumberFormatException in Java and what causes it. Understanding this exception can help us to create more robust applications.

Furthermore, we learned strategies for avoiding the exception with some invalid input strings.

Finally, we saw a few best practices for dealing with NumberFormatException.

As usual, the source code used in the examples can be found on GitHub.

Composite Primary Keys in JPA

$
0
0

1. Introduction

In this tutorial, we’ll learn about Composite Primary Keys and the corresponding annotations in JPA.

2. Composite Primary Keys

A composite primary key – also called a composite key – is a combination of two or more columns to form a primary key for a table.

In JPA, we have two options to define the composite keys: The @IdClass and @EmbeddedId annotations.

In order to define the composite primary keys, we should follow some rules:

  • The composite primary key class must be public
  • It must have a no-arg constructor
  • It must define equals() and hashCode() methods
  • It must be Serializable

3. The IdClass Annotation

Let’s say we have a table called Account and it has two columns – accountNumber, accountType – that form the composite key. Now we have to map it in JPA.

As per the JPA specification, let’s create an AccountId class with these primary key fields:

public class AccountId implements Serializable {
    private String accountNumber;

    private String accountType;

    // default constructor

    public AccountId(String accountNumber, String accountType) {
        this.accountNumber = accountNumber;
        this.accountType = accountType;
    }

    // equals() and hashCode()
}

Next, let’s associate the AccountId class with the entity Account.

In order to do that, we need to annotate the entity with the @IdClass annotation. We must also declare the fields from the AccountId class in the entity Account and annotate them with @Id:

@Entity
@IdClass(AccountId.class)
public class Account {
    @Id
    private String accountNumber;

    @Id
    private String accountType;

    // other fields, getters and setters
}

4. The EmbeddedId Annotation

@EmbeddedId is an alternative to the @IdClass annotation.

Let’s consider another example where we have to persist some information of a Book with title and language as the primary key fields.

In this case, the primary key class, BookId, must be annotated with @Embeddable:

@Embeddable
public class BookId implements Serializable {
    private String title;
    private String language;

    // default constructor

    public BookId(String title, String language) {
        this.title = title;
        this.language = language;
    }

    // getters, equals() and hashCode() methods
}

Then, we need to embed this class in the Book entity using @EmbeddedId:

@Entity
public class Book {
    @EmbeddedId
    private BookId bookId;

    // constructors, other fields, getters and setters
}

5. @IdClass vs @EmbeddedId

As we just saw, the difference on the surface between these two is that with @IdClass, we had to specify the columns twice – once in AccountId and again in Account. But, with @EmbeddedId we didn’t.

There are some other tradeoffs, though.

For example, these different structures affect the JPQL queries that we write.

For example, with @IdClass, the query is a bit simpler:

SELECT account.accountNumber FROM Account account

With @EmbeddedId, we have to do one extra traversal:

SELECT book.bookId.title FROM Book book

Also, @IdClass can be quite useful in places where we are using a composite key class that we can’t modify.

Finally, if we’re going to access parts of the composite key individually, we can make use of @IdClass, but in places where we frequently use the complete identifier as an object, @EmbeddedId is preferred.

6. Conclusion

In this tutorial, we learned about the Composite primary keys in JPA and the options to define them.

The complete code for this article can be found on Github.

Explore Jersey Request Parameters

$
0
0

1. Introduction

Jersey is a popular Java framework for creating RESTful web services.

In this tutorial, we’ll explore how to read different request parameter types via a simple Jersey project.

2. Project Setup

Using Maven archetypes, we’ll be able to generate a working project for our article:

mvn archetype:generate -DarchetypeArtifactId=jersey-quickstart-grizzly2
  -DarchetypeGroupId=org.glassfish.jersey.archetypes -DinteractiveMode=false
  -DgroupId=com.example -DartifactId=simple-service -Dpackage=com.example
  -DarchetypeVersion=2.28

The generated Jersey project will run on top of a Grizzly container.

Now, by default, the endpoint for our app will be http://localhost:8080/myapp.

Let’s add an items resource, which we’ll use for our experiments:

@Path("items")
public class ItemsController {
    // our endpoints are defined here
}

Note, by the way, that Jersey also works great with Spring controllers.

3. Annotated Parameters Types

So, before we actually read any request parameters, let’s clarify a few rules. The allowed types of parameters are:

  • Primitive types, like float and char
  • Types that have a constructor with a single String argument
  • Types that have either a fromString or valueOf static method; for those, a single String argument is mandatory
  • Collections – like List, Set, and SortedSet – of the types described above

Also, we can register an implementation of the ParamConverterProvider JAX-RS extension SPI. The return type must be a ParamConverter instance capable of a conversion from a String to a type.

We can resolve cookie values in our Jersey methods using the @CookieParam annotation:

@GET
public String jsessionid(@CookieParam("JSESSIONId") String jsessionId) {
    return "Cookie parameter value is [" + jsessionId+ "]";
}
If we start up our container, we can cURL this endpoint to see the response:
> curl --cookie "JSESSIONID=5BDA743FEBD1BAEFED12ECE124330923" http://localhost:8080/myapp/items
Cookie parameter value is [5BDA743FEBD1BAEFED12ECE124330923]

Or, we can resolve HTTP headers with the @HeaderParam annotation:

@GET
public String contentType(@HeaderParam("Content-Type") String contentType) {
    return "Header parameter value is [" + contentType+ "]";
}

Let’s test again:

> curl --header "Content-Type: text/html" http://localhost:8080/myapp/items
Header parameter value is [text/html]

6. Path Parameters

Especially with RESTful APIs, it’s common to include information in the path.

We can extract path elements with @PathParam:

@GET
@Path("/{id}")
public String itemId(@PathParam("id") Integer id) {
    return "Path parameter value is [" + id + "]";
}

Let’s send another curl command with the value 3:

> curl http://localhost:8080/myapp/items/3
Path parameter value is [3]

7. Query Parameters

We commonly use query parameters in RESTful APIs for optional information.

To read such values we can use the @QueryParam annotation:

@GET
public String itemName(@QueryParam("name") String name) {
    return "Query parameter value is [" + name + "]";
}

So, now we can test with curl, like before:

> curl http://localhost:8080/myapp/items?name=Toaster
Query parameter value if [Toaster]

8. Form Parameters

For reading parameters from a form submission, we’ll use the @FormParam annotation:
@POST
public String itemShipment(@FormParam("deliveryAddress") String deliveryAddress, 
  @FormParam("quantity") Long quantity) {
    return "Form parameters are [deliveryAddress=" + deliveryAddress+ ", quantity=" + quantity + "]";
}

We also need to set the proper Content-Type to mimic the form submission action. Let’s set the form parameters using the -d flag:

> curl -X POST -H 'Content-Type:application/x-www-form-urlencoded' \
  -d 'deliveryAddress=Washington nr 4&quantity=5' \
  http://localhost:8080/myapp/items
Form parameters are [deliveryAddress=Washington nr 4, quantity=5]

9. Matrix Parameters

A matrix parameter is a more flexible query parameter as they can be added anywhere in the URL.

For example, in http://localhost:8080/myapp;name=value/items, the matrix parameter is name.

To read such values, we can use the available @MatrixParam annotation:

@GET
public String itemColors(@MatrixParam("colors") List<String> colors) {
    return "Matrix parameter values are " + Arrays.toString(colors.toArray());
}

And now we’ll test again our the endpoint:

> curl http://localhost:8080/myapp/items;colors=blue,red
Matrix parameter values are [blue,red]

10. Bean Parameters

Finally, we’ll check how to combine request parameters using bean parameters. To clarify, a bean parameter is actually an object that combines different types of request parameters.

We’ll use a header parameter, a path and a form one in here:

public class ItemOrder {
    @HeaderParam("coupon")
    private String coupon;

    @PathParam("itemId")
    private Long itemId;

    @FormParam("total")
    private Double total;

    //getter and setter

    @Override
    public String toString() {
        return "ItemOrder {coupon=" + coupon + ", itemId=" + itemId + ", total=" + total + '}';
    }
}

Also, to get such a combination of parameters, we’ll use the @BeanParam annotation:

@POST
@Path("/{itemId}")
public String itemOrder(@BeanParam ItemOrder itemOrder) {
    return itemOrder.toString();
}

In the curl command, we’ve added those three types of parameters and we’ll end up with a single ItemOrder object:

> curl -X POST -H 'Content-Type:application/x-www-form-urlencoded' \
  --header 'coupon:FREE10p' \
  -d total=70 \
  http://localhost:8080/myapp/items/28711
ItemOrder {coupon=FREE10p, itemId=28711, total=70}

11. Conclusion

To sum it up, we’ve created a simple setup for a Jersey project to help us explore how to read different parameters from a request using Jersey.

The implementation of all these snippets is available over on Github.

Double Dispatch in DDD

$
0
0

1. Overview

Double dispatch is a technical term to describe the process of choosing the method to invoke based both on receiver and argument types.

A lot of developers often confuse double dispatch with Strategy Pattern.

Java doesn’t support double dispatch, but there are techniques we can employ to overcome this limitation.

In this tutorial, we’ll focus on showing examples of double dispatch in the context of Domain-driven Design (DDD) and Strategy Pattern.

2. Double Dispatch

Before we discuss double dispatch, let’s review some basics and explain what Single Dispatch actually is.

2.1. Single Dispatch

Single dispatch is a way to choose the implementation of a method based on the receiver runtime type. In Java, this is basically the same thing as polymorphism.

For example, let’s take a look at this simple discount policy interface:

public interface DiscountPolicy {
    double discount(Order order);
}

The DiscountPolicy interface has two implementations. The flat one, which always returns the same discount:

public class FlatDiscountPolicy implements DiscountPolicy {
    @Override
    public double discount(Order order) {
        return 0.01;
    }
}

And the second implementation, which returns the discount based on the total cost of the order:

public class AmountBasedDiscountPolicy implements DiscountPolicy {
    @Override
    public double discount(Order order) {
        if (order.totalCost()
            .isGreaterThan(Money.of(CurrencyUnit.USD, 500.00))) {
            return 0.10;
        } else {
            return 0;
        }
    }
}

For the needs of this example, let’s assume the Order class has a totalCost() method.

Now, single dispatch in Java is just a very well-known polymorphic behavior demonstrated in the following test:

@DisplayName(
    "given two discount policies, " +
    "when use these policies, " +
    "then single dispatch chooses the implementation based on runtime type"
    )
@Test
void test() throws Exception {
    // given
    DiscountPolicy flatPolicy = new FlatDiscountPolicy();
    DiscountPolicy amountPolicy = new AmountBasedDiscountPolicy();
    Order orderWorth501Dollars = orderWorthNDollars(501);

    // when
    double flatDiscount = flatPolicy.discount(orderWorth501Dollars);
    double amountDiscount = amountPolicy.discount(orderWorth501Dollars);

    // then
    assertThat(flatDiscount).isEqualTo(0.01);
    assertThat(amountDiscount).isEqualTo(0.1);
}

If this all seems pretty straight-forward, stay tuned. We’ll use the same example later.

We’re now ready to introduce double dispatch.

2.2. Double Dispatch vs Method Overloading

Double dispatch determines the method to invoke at runtime based both on the receiver type and the argument types.

Java doesn’t support double dispatch.

Note that double dispatch is often confused with method overloading, which is not the same thing. Method overloading chooses the method to invoke based only on compile-time information, like the declaration type of the variable.

The following example explains this behavior in detail.

Let’s introduce a new discount interface called SpecialDiscountPolicy:

public interface SpecialDiscountPolicy extends DiscountPolicy {
    double discount(SpecialOrder order);
}

SpecialOrder simply extends Order with no new behavior added.

Now, when we create an instance of SpecialOrder but declare it as normal Order, then the special discount method is not used:

@DisplayName(
    "given discount policy accepting special orders, " +
    "when apply the policy on special order declared as regular order, " +
    "then regular discount method is used"
    )
@Test
void test() throws Exception {
    // given
    SpecialDiscountPolicy specialPolicy = new SpecialDiscountPolicy() {
        @Override
        public double discount(Order order) {
            return 0.01;
        }

        @Override
        public double discount(SpecialOrder order) {
            return 0.10;
        }
    };
    Order specialOrder = new SpecialOrder(anyOrderLines());

    // when
    double discount = specialPolicy.discount(specialOrder);

    // then
    assertThat(discount).isEqualTo(0.01);
}

Therefore, method overloading is not double dispatch.

Even if Java doesn’t support double dispatch, we can use a pattern to achieve similar behavior: Visitor.

2.3. Visitor Pattern

The Visitor pattern allows us to add new behavior to the existing classes without modifying them. This is possible thanks to the clever technique of emulating double dispatch.

Let’s leave the discount example for a moment so we can introduce the Visitor pattern.

Imagine we’d like to produce HTML views using different templates for each kind of order. We could add this behavior directly to the order classes, but it’s not the best idea due to being an SRP violation.

Instead, we’ll use the Visitor pattern.

First, we need to introduce the Visitable interface:

public interface Visitable<V> {
    void accept(V visitor);
}

We’ll also use a visitor interface, in our cased named OrderVisitor:

public interface OrderVisitor {
    void visit(Order order);
    void visit(SpecialOrder order);
}

However, one of the drawbacks of the Visitor pattern is that it requires visitable classes to be aware of the Visitor.

If classes were not designed to support the Visitor, it might be hard (or even impossible if source code is not available) to apply this pattern.

Each order type needs to implement the Visitable interface and provide its own implementation which is seemingly identical, another drawback.

Notice that the added methods to Order and SpecialOrder are identical:

public class Order implements Visitable<OrderVisitor> {
    @Override
    public void accept(OrderVisitor visitor) {
        visitor.visit(this);        
    }
}

public class SpecialOrder extends Order {
    @Override
    public void accept(OrderVisitor visitor) {
        visitor.visit(this);
    }
}

It might be tempting to not re-implement accept in the subclass. However, if we didn’t, then the OrderVisitor.visit(Order) method would always get used, of course, due to polymorphism.

Finally, let’s see the implementation of OrderVisitor responsible for creating HTML views:

public class HtmlOrderViewCreator implements OrderVisitor {
    
    private String html;
    
    public String getHtml() {
        return html;
    }

    @Override
    public void visit(Order order) {
        html = String.format("<p>Regular order total cost: %s</p>", order.totalCost());
    }

    @Override
    public void visit(SpecialOrder order) {
        html = String.format("<h1>Special Order</h1><p>total cost: %s</p>", order.totalCost());
    }

}

The following example demonstrates the use of HtmlOrderViewCreator:

@DisplayName(
        "given collection of regular and special orders, " +
        "when create HTML view using visitor for each order, " +
        "then the dedicated view is created for each order"   
    )
@Test
void test() throws Exception {
    // given
    List<OrderLine> anyOrderLines = OrderFixtureUtils.anyOrderLines();
    List<Order> orders = Arrays.asList(new Order(anyOrderLines), new SpecialOrder(anyOrderLines));
    HtmlOrderViewCreator htmlOrderViewCreator = new HtmlOrderViewCreator();

    // when
    orders.get(0)
        .accept(htmlOrderViewCreator);
    String regularOrderHtml = htmlOrderViewCreator.getHtml();
    orders.get(1)
        .accept(htmlOrderViewCreator);
    String specialOrderHtml = htmlOrderViewCreator.getHtml();

    // then
    assertThat(regularOrderHtml).containsPattern("<p>Regular order total cost: .*</p>");
    assertThat(specialOrderHtml).containsPattern("<h1>Special Order</h1><p>total cost: .*</p>");
}

3. Double Dispatch in DDD

In previous sections, we discussed double dispatch and the Visitor pattern.

We’re now finally ready to show how to use these techniques in DDD.

Let’s go back to the example of orders and discount policies.

3.1. Discount Policy as a Strategy Pattern

Earlier, we introduced the Order class and its totalCost() method that calculates the sum of all order line items:

public class Order {
    public Money totalCost() {
        // ...
    }
}

There’s also the DiscountPolicy interface to calculate the discount for the order. This interface was introduced to allow using different discount policies and change them at runtime.

This design is much more supple than simply hardcoding all possible discount policies in Order classes:

public interface DiscountPolicy {
    double discount(Order order);
}

We haven’t mentioned this explicitly so far, but this example uses the Strategy pattern. DDD often uses this pattern to conform to the Ubiquitous Language principle and achieve low coupling. In the DDD world, the Strategy pattern is often named Policy.

Let’s see how to combine the double dispatch technique and discount policy.

3.2. Double Dispatch and Discount Policy

To properly use the Policy pattern, it’s often a good idea to pass it as an argument. This approach follows the Tell, Don’t Ask principle which supports better encapsulation.

For example, the Order class might implement totalCost like so:

public class Order /* ... */ {
    // ...
    public Money totalCost(SpecialDiscountPolicy discountPolicy) {
        return totalCost().multipliedBy(1 - discountPolicy.discount(this), RoundingMode.HALF_UP);
    }
    // ...
}

Now, let’s assume we’d like to process each type of order differently.

For example, when calculating the discount for special orders, there are some other rules requiring information unique to the SpecialOrder class. We want to avoid casting and reflection and at the same time be able to calculate total costs for each Order with the correctly applied discount.

We already know that method overloading happens at compile-time. So, the natural question arises: how can we dynamically dispatch order discount logic to the right method based on the runtime type of the order?

The answer? We need to modify order classes slightly.

The root Order class needs to dispatch to the discount policy argument at runtime. The easiest way to achieve this is to add a protected applyDiscountPolicy method:

public class Order /* ... */ {
    // ...
    public Money totalCost(SpecialDiscountPolicy discountPolicy) {
        return totalCost().multipliedBy(1 - applyDiscountPolicy(discountPolicy), RoundingMode.HALF_UP);
    }

    protected double applyDiscountPolicy(SpecialDiscountPolicy discountPolicy) {
        return discountPolicy.discount(this);
    }
   // ...
}

Thanks to this design, we avoid duplicating business logic in the totalCost method in Order subclasses.

Let’s show a demo of usage:

@DisplayName(
    "given regular order with items worth $100 total, " +
    "when apply 10% discount policy, " +
    "then cost after discount is $90"
    )
@Test
void test() throws Exception {
    // given
    Order order = new Order(OrderFixtureUtils.orderLineItemsWorthNDollars(100));
    SpecialDiscountPolicy discountPolicy = new SpecialDiscountPolicy() {

        @Override
        public double discount(Order order) {
            return 0.10;
        }

        @Override
        public double discount(SpecialOrder order) {
            return 0;
        }
    };

    // when
    Money totalCostAfterDiscount = order.totalCost(discountPolicy);

    // then
    assertThat(totalCostAfterDiscount).isEqualTo(Money.of(CurrencyUnit.USD, 90));
}

This example still uses the Visitor pattern but in a slightly modified version. Order classes are aware that SpecialDiscountPolicy (the Visitor) has some meaning and calculates the discount.

As mentioned previously, we want to be able to apply different discount rules based on the runtime type of Order. Therefore, we need to override the protected applyDiscountPolicy method in every child class.

Let’s override this method in SpecialOrder class:

public class SpecialOrder extends Order {
    // ...
    @Override
    protected double applyDiscountPolicy(SpecialDiscountPolicy discountPolicy) {
        return discountPolicy.discount(this);
    }
   // ...
}

We can now use extra information about SpecialOrder in the discount policy to calculate the right discount:

@DisplayName(
    "given special order eligible for extra discount with items worth $100 total, " +
    "when apply 20% discount policy for extra discount orders, " +
    "then cost after discount is $80"
    )
@Test
void test() throws Exception {
    // given
    boolean eligibleForExtraDiscount = true;
    Order order = new SpecialOrder(OrderFixtureUtils.orderLineItemsWorthNDollars(100), 
      eligibleForExtraDiscount);
    SpecialDiscountPolicy discountPolicy = new SpecialDiscountPolicy() {

        @Override
        public double discount(Order order) {
            return 0;
        }

        @Override
        public double discount(SpecialOrder order) {
            if (order.isEligibleForExtraDiscount())
                return 0.20;
            return 0.10;
        }
    };

    // when
    Money totalCostAfterDiscount = order.totalCost(discountPolicy);

    // then
    assertThat(totalCostAfterDiscount).isEqualTo(Money.of(CurrencyUnit.USD, 80.00));
}

Additionally, since we are using polymorphic behavior in order classes, we can easily modify the total cost calculation method.

4. Conclusion

In this article, we’ve learned how to use double dispatch technique and Strategy (aka Policy) pattern in Domain-driven design.

The full source code of all the examples is available over on GitHub.


Java Weekly, Issue 283

$
0
0

Here we go…

1. Spring and Java

>> Feature toggles in a microservice environment – Part 2: Implementation [blog.codecentric.de]

A quick look at Unleash, a Node.js service for managing feature toggles across a collection of microservices, with a simple Java-based configuration example.

>> MBD-to-MDB Messaging: Harness the Power of the River Delta [tomitribe.com]

A good write-up showing how messaging between Message-Driven Beans can lead to powerful, asynchronous architectures.

>> A boost for Java on the Client [gluonhq.com]

And Gluon announces their client plugin for Maven and Gradle, which will compile a Java app and its dependencies to native code.

Also worth reading:

Webinars and presentations:

Time to upgrade:

2. Technical and Musings

>> Using Intel Analytics Zoo to Inject AI into Customer Service Platform (Part II) [infoq.com]

An exercise in developing a Question Answering (QA) solution using Analytics Zoo on Azure’s Big Data platform.

>> Why AWS access and secret keys should not be in the codebase [advancedweb.hu]

And a few good reasons why secret keys should come from environment variables and should never be hard-coded.

Also worth reading:

3. Comics

And my favorite Dilberts of the week:

>> If You Can Dream [dilbert.com]

>> Wally and His Priorities [dilbert.com]

>> Counting Morons [dilbert.com]

4. Pick of the Week

Last week, I wrote about Codota – a really interesting coding assistant I found and have been using.

The response to the video was overwhelmingly positive, which is always super cool to see.

Here’s Codota directly, in case you missed it. My suggestion is to simply install it and have it running in the background, as you’re coding normally:

>> Codota – an AI Assistant that Actually Works [codota.com]

Enabling Transaction Locks in Spring Data JPA

$
0
0

1. Overview

In this quick tutorial, we’ll discuss enabling transaction locks in Spring Data JPA for custom query methods and predefined repository CRUD methods.

We will also have a look at different lock types and setting transaction lock timeouts.

2. Lock Types

JPA has two main lock types defined, which are Pessimistic Locking and Optimistic Locking.

2.1 Pessimistic Locking

When we are using Pessimistic Locking in a transaction and access an entity, it will be locked immediately. The transaction releases the lock either by committing or rolling back the transaction.

2.2 Optimistic Locking

In Optimistic Locking, the transaction doesn’t lock the entity immediately. Instead, the transaction commonly saves the entity’s state with a version number assigned to it.

When we try to update the entity’s state in a different transaction, the transaction compares the saved version number with the existing version number during an update.

At this point, if the version number differs, it means that the entity can’t be modified. If there is an active transaction then that transaction will be rolled back and the underlying JPA implementation will throw an OptimisticLockException.

Apart from the version number approach, we can use other approaches such as timestamps, hash value computation, or serialized checksum, depending on which approach is the most suitable for our current development context.

3. Enabling Transaction Locks on Query Methods

To acquire a lock on an entity, we can annotate the target query method with a Lock annotation by passing the required lock mode type.

Lock mode types are enum values to be specified while locking an entity. The specified lock mode is then propagated to the database to apply the corresponding lock on the entity object.

To specify a lock on a custom query method of a Spring Data JPA repository, we can annotate the method with @Lock and specify the required lock mode type:

@Lock(LockModeType.OPTIMISTIC_FORCE_INCREMENT)
@Query("SELECT c FROM Customer c WHERE c.orgId = ?1")
public List<Customer> fetchCustomersByOrgId(Long orgId);

To enforce the lock on predefined repository methods such as findAll or findById(id), we have to declare the method within the repository and annotate the method with the Lock annotation:

@Lock(LockModeType.PESSIMISTIC_READ)
public Optional<Customer> findById(Long customerId);

When the lock is explicitly enabled and there is no active transaction, the underlying JPA implementation will throw a TransactionRequiredException.

In case the lock cannot be granted and the locking conflict doesn’t result in a transaction rollback, JPA throws a LockTimeoutException. But it doesn’t mark the active transaction for rollback.

4. Setting Transaction Lock Timeouts

When using Pessimistic Locking, the database will try to lock the entity immediately. The underlying JPA implementation throws a LockTimeoutException when the lock cannot be obtained immediately. To avoid such exceptions, we can specify the lock timeout value.

In Spring Data JPA, the lock timeout can be specified using the QueryHints annotation by placing a QueryHint on query methods:

@Lock(LockModeType.PESSIMISTIC_READ)
@QueryHints({@QueryHint(name = "javax.persistence.lock.timeout", value = "3000")})
public Optional<Customer> findById(Long customerId);

Further details on setting the lock timeout hint at different scopes can be found in this ObjectDB article.

5. Conclusion

In this tutorial, we’ve learned the different types of transaction lock modes. We’ve learned how to enable transaction locks in Spring Data JPA. We’ve also covered setting lock timeouts.

Applying the right transaction locks at the right places can help to maintain data integrity in high-volume concurrent usage applications.

When the transaction needs to adhere to ACID rules strictly, we should use Pessimistic Locking. Optimistic Locking should be applied when we need to allow multiple concurrent reads and when eventual consistency is acceptable within the application context.

Of course, sample code for both Pessimistic Locking and Optimistic Locking can be found over on Github.

Refactoring in Eclipse

$
0
0

1. Overview

On refactoring.com, we read that “refactoring is a disciplined technique for restructuring an existing body of code, altering its internal structure without changing its external behavior.”

Typically, we might want to rename variables or methods, or we may want to make our code more object-oriented by introducing design patterns. Modern IDEs have many built-in features to help us achieve these kinds of refactoring objectives and many others.

In this tutorial, we’ll focus on refactoring in Eclipse, a free popular Java IDE.

Before we start any refactoring, it’s advisable to have a solid suite of tests so as to check that we didn’t break anything while refactoring.

2. Renaming

2.1. Renaming Variables and Methods

We can rename variables and methods by following these simple steps:

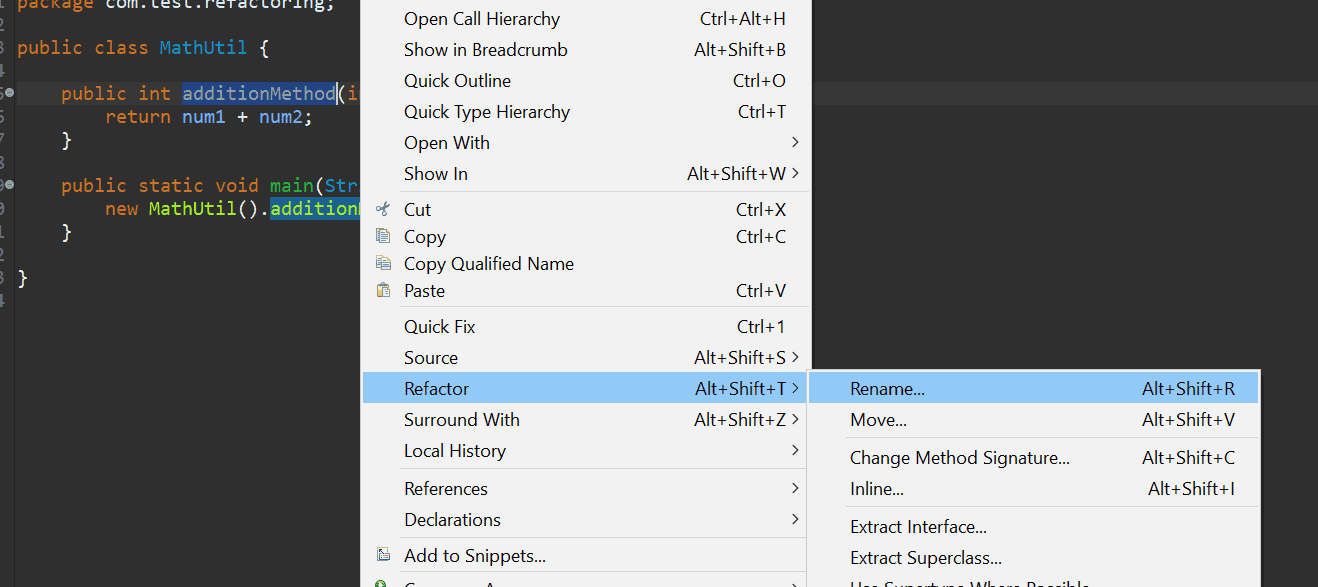
    • Select the element
    • Right-click the element
    • Click the Refactor > Rename option
  • Type the new name
  • Press Enter

We can also perform the second and third steps by using the shortcut key, Alt+Shift+R.

When the above action is performed, Eclipse will find every usage of that element in that file and replace them all in place.

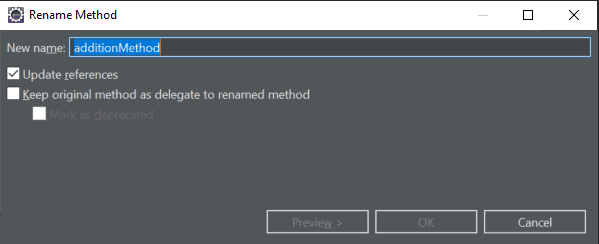
We can also use an advanced feature to update the reference in other classes by hovering over the item when the refactor is on and clicking on Options:

This will open up a pop-up where we can both rename the variable or method and have the option to update the reference in other classes:

2.2. Renaming Packages

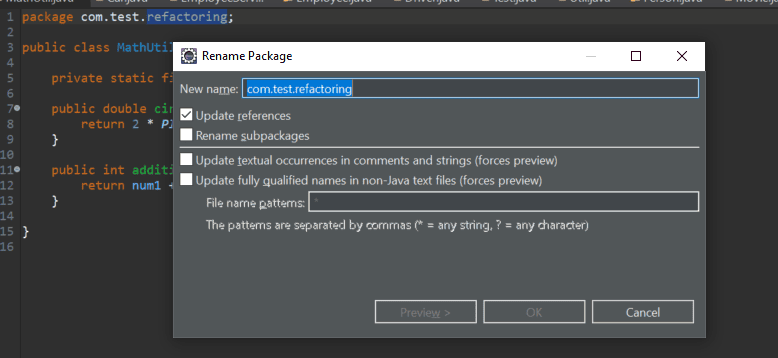
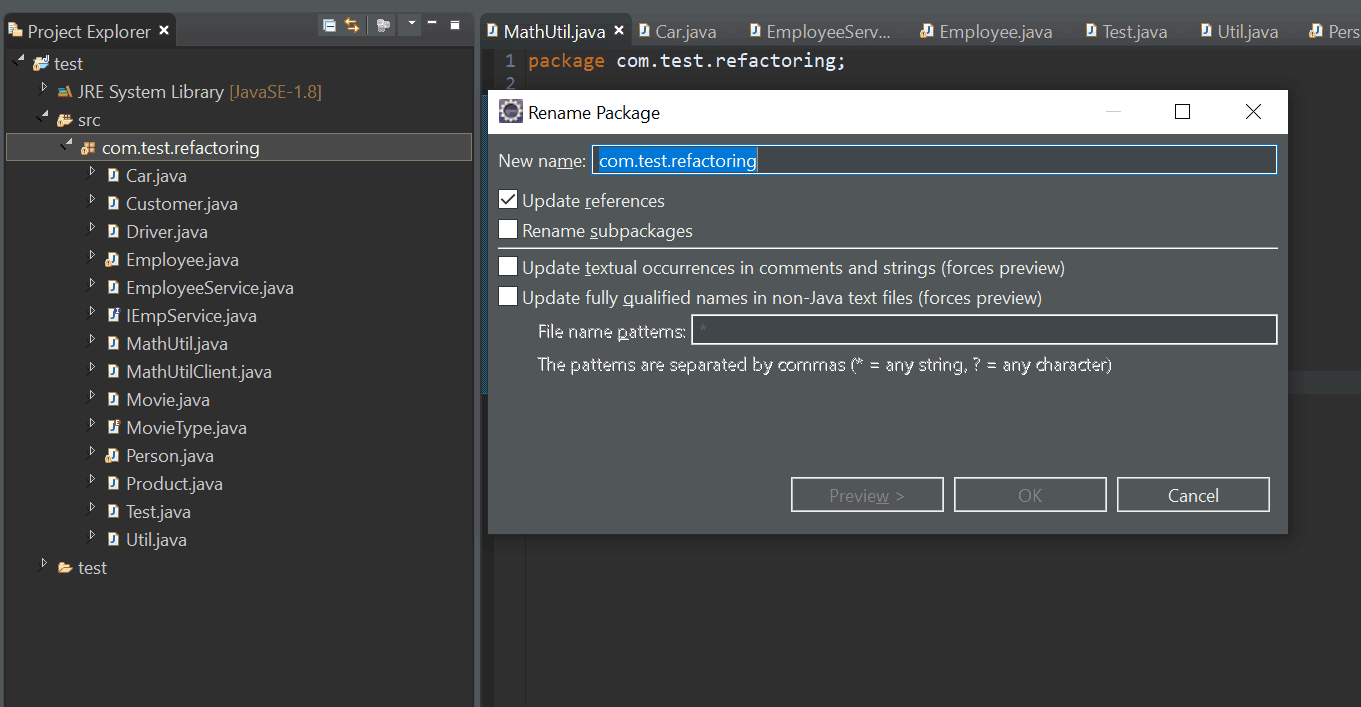
We can rename a package by selecting the package name and performing the same actions as in the previous example. A pop-up will appear right away where we can rename the package, with options like updating references and renaming subpackages.

We can also rename the package from the Project Explorer view by pressing F2:

2.3. Renaming Classes and Interfaces

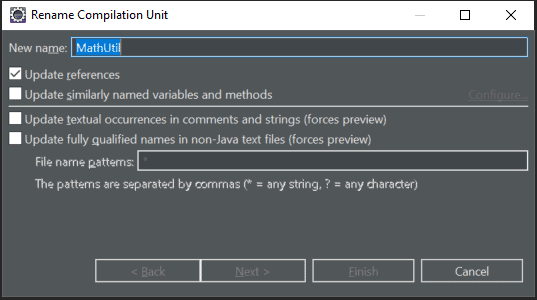
We can rename a class or interface by using the same actions or just by pressing F2 from Project Explorer. This will open up a pop-up with options to update references, along with a few advanced options:

3. Extracting

Now, let’s talk about extraction. Extracting code means taking a piece of code and moving it.

For example, we can extract code into a different class, superclass or interface. We could even extract code to a variable or method in the same class.

Eclipse provides a variety of ways to achieve extractions, which we’ll demonstrate in the following sections.

3.1. Extract Class

Suppose we have the following Car class in our codebase:

public class Car {

    private String licensePlate;
    private String driverName;
    private String driverLicense;

    public String getDetails() {
        return "Car [licensePlate=" + licensePlate + ", driverName=" + driverName
          + ", driverLicense=" + driverLicense + "]";
    }

    // getters and setters
}

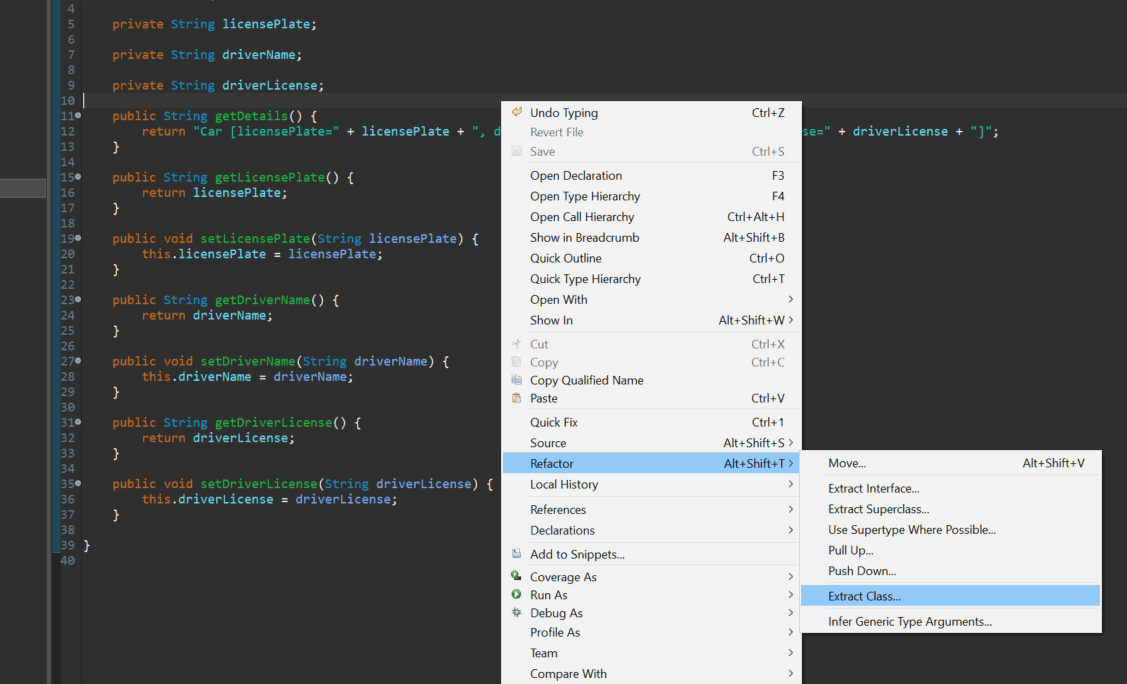
Now, suppose we want to extract out the driver details to a different class. We can do this by right-clicking anywhere within the class and choosing the Refactor > Extract Class option:

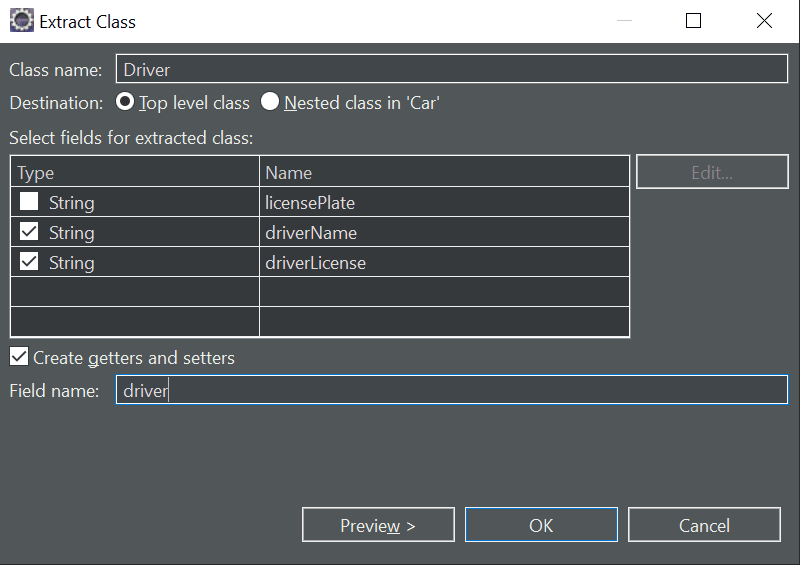
This will open up a pop-up where we can name the class and select which fields we want to move, along with few other options:

We can also preview the code before moving forward. When we click OK, Eclipse will create a new class named Driver, and the previous code will be refactored to:

public class Car {

    private String licensePlate;

    private Driver driver = new Driver();

    public String getDetails() {
        return "Car [licensePlate=" + licensePlate + ", driverName=" + driver.getDriverName()
          + ", driverLicense=" + driver.getDriverLicense() + "]";
    }

    //getters and setters
}

3.2. Extract Interface

We can also extract an interface in a similar fashion. Suppose we have the following EmployeeService class:

public class EmployeeService {

    public void save(Employee emp) {
    }

    public void delete(Employee emp) {
    }

    public void sendEmail(List<Integer> ids, String message) {
    }
}

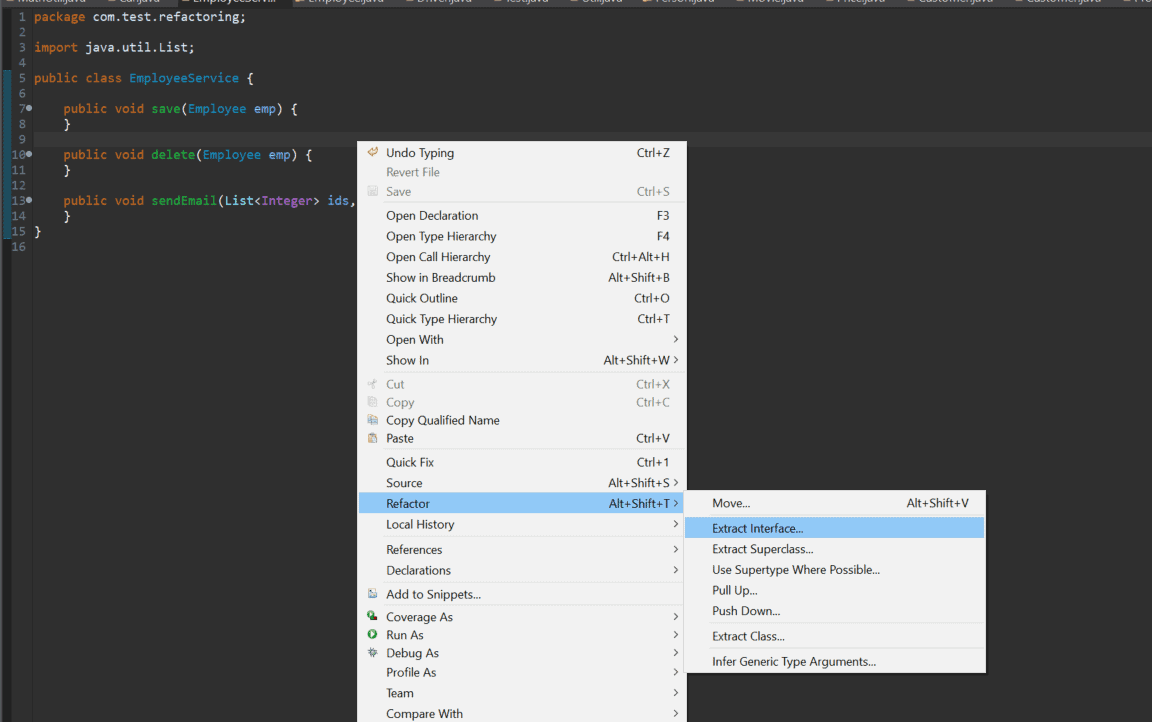
We can extract an interface by right-clicking anywhere within the class and choosing the Refactor > Extract Interface option, or we can use the Alt+Shift+T shortcut key command to bring up the menu directly:

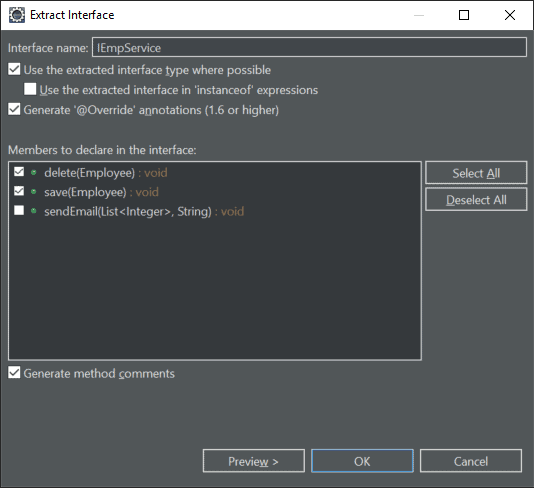
This will open up a pop-up where we can enter the interface name and decide which members to declare in the interface:

As a result of this refactoring, we’ll have an interface IEmpService, and our EmployeeService class will be changed as well:

public class EmployeeService implements IEmpService {

    @Override
    public void save(Employee emp) {
    }

    @Override
    public void delete(Employee emp) {
    }

    public void sendEmail(List<Integer> ids, String message) {
    }
}

3.3. Extract Superclass

Suppose we have an Employee class containing several properties that aren’t necessarily about the person’s employment:

public class Employee {

    private String name;

    private int age;

    private int experienceInMonths;

    public String getName() {
        return name;
    }

    public int getAge() {
        return age;
    }

    public int getExperienceInMonths() {
        return experienceInMonths;
    }
}

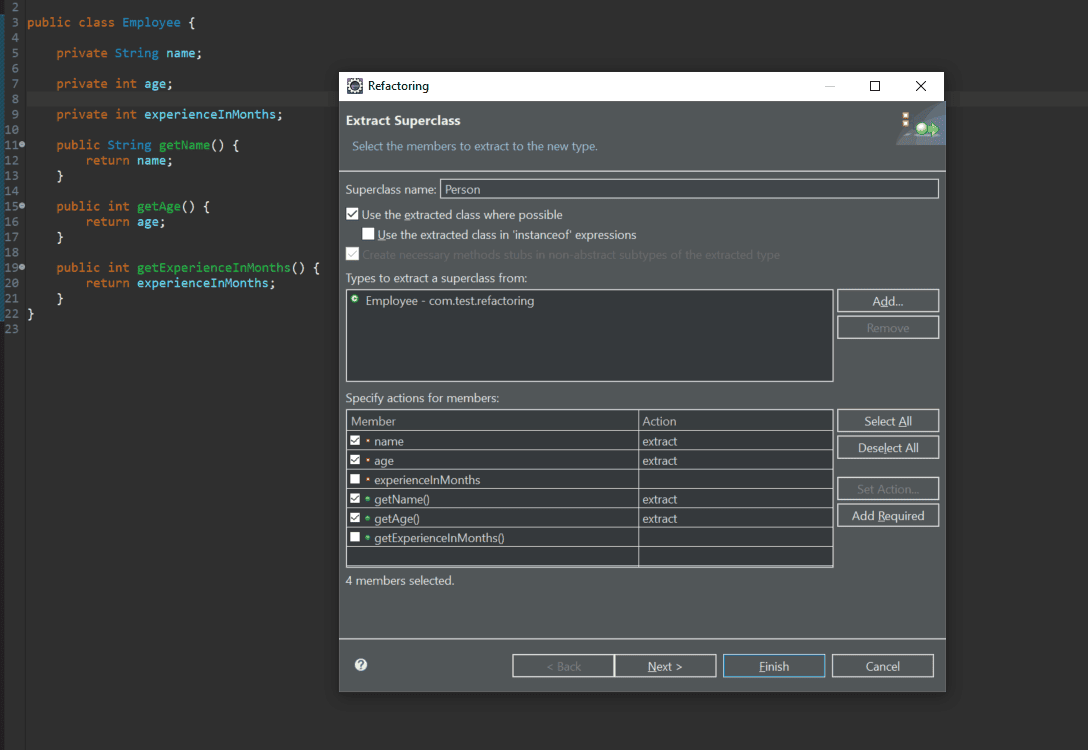
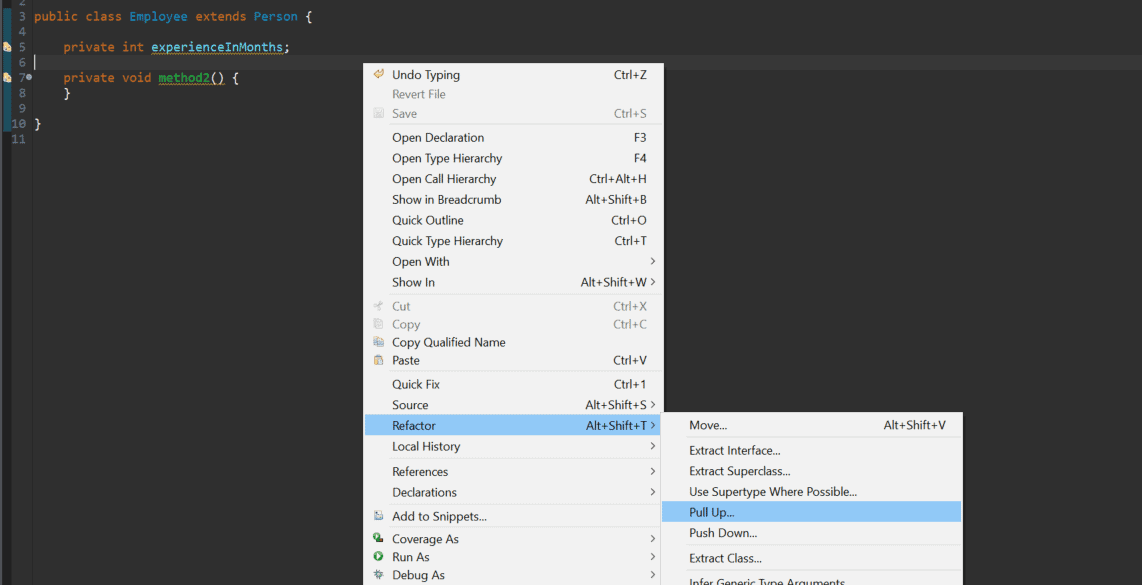
We may want to extract the non-employment-related properties to a Person superclass. To extract items to a superclass, we can  right-click anywhere in the class and choose the Refactor > Extract Superclass option, or use Alt+Shift+T to bring up the menu directly:

This will create a new Person class with our selected variables and method, and the Employee class will be refactored to:

public class Employee extends Person {

    private int experienceInMonths;

    public int getExperienceInMonths() {
        return experienceInMonths;
    }
}

3.4. Extract Method

Sometimes, we might want to extract a certain piece of code inside our method to a different method to keep our code clean and easy to maintain.

Let’s say, for example, that we have a for loop embedded in our method:

public class Test {
    public static void main(String[] args) {
        for (int i = 0; i < args.length; i++) {
            System.out.println(args[i]);
        }
    }
}

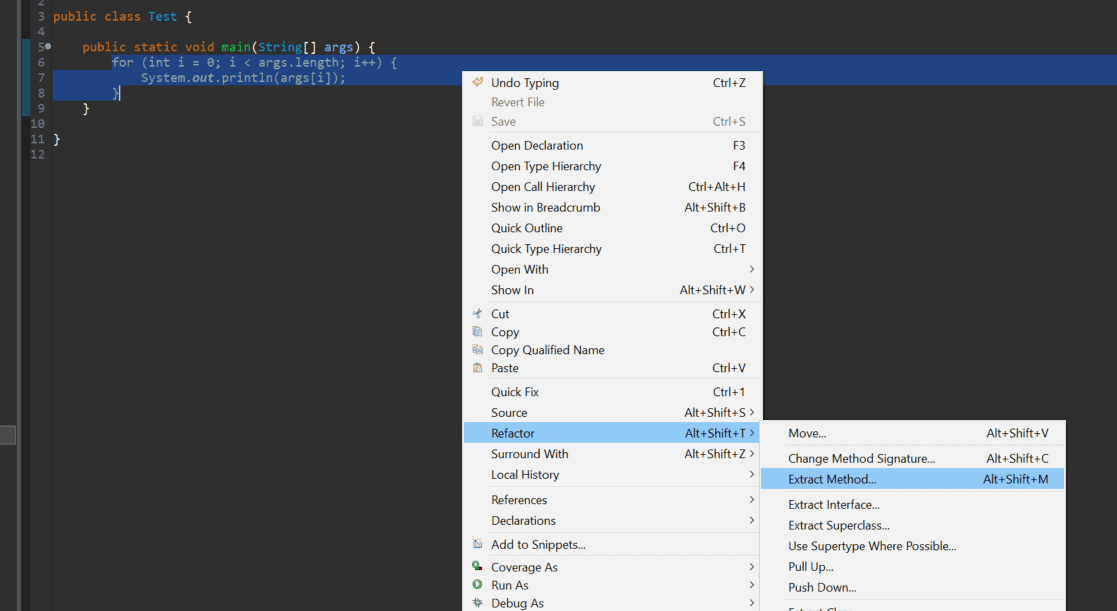
To invoke the Extract Method wizard, we need to perform the following steps:

  • Select the lines of code we want to extract
  • Right-click the selected area
  • Click the Refactor > Extract Method option

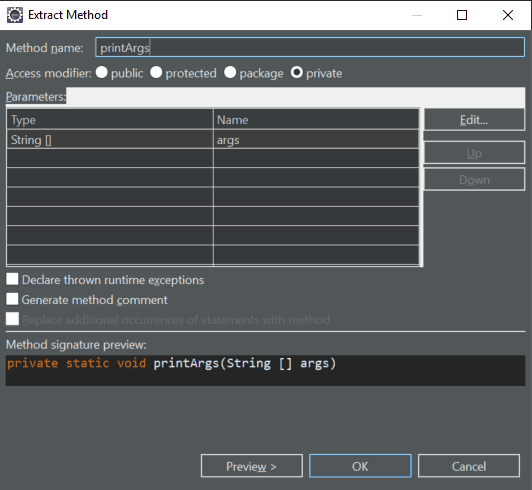
The last two steps can also be achieved by keyboard shortcut Alt+Shift+M. Let’s see the Extract Method dialog:

This will refactor our code to:

public class Test {

    public static void main(String[] args) {
        printArgs(args);
    }

    private static void printArgs(String[] args) {
        for (int i = 0; i < args.length; i++) {
            System.out.println(args[i]);
        }
    }
}

3.5. Extract Local Variables

We can extract certain items as local variables to make our code more readable.

This is handy when we have a String literal:

public class Test {

    public static void main(String[] args) {
        System.out.println("Number of Arguments passed =" + args.length);
    }
}

and we want to extract it to a local variable.

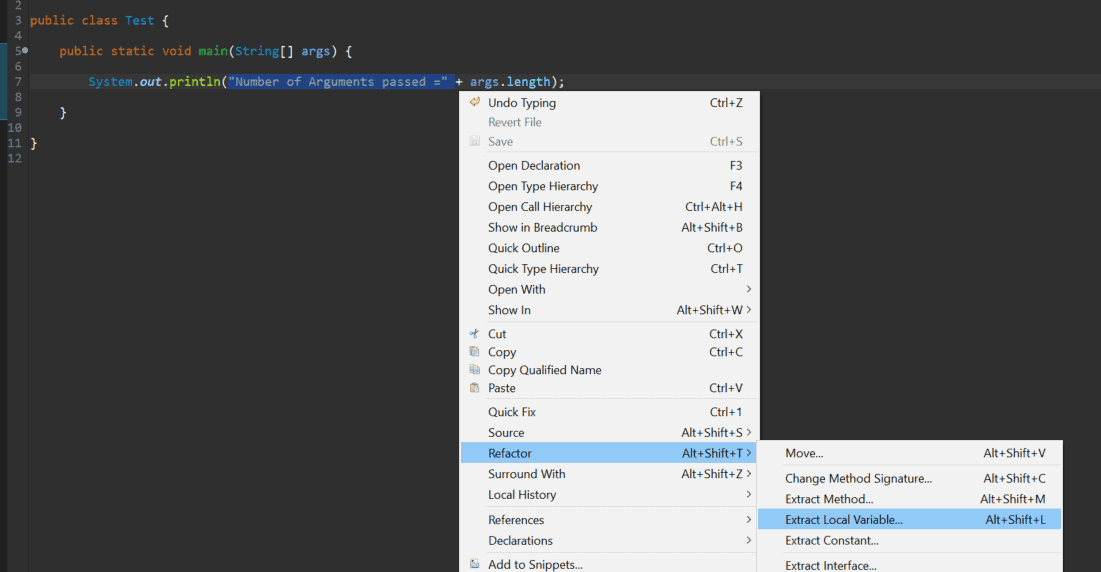
To do this, we need to:

  • Select the item
  • Right-click and choose Refactor > Extract Local Variable

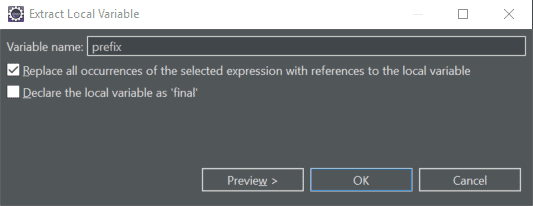
The last step can also be achieved by the keyboard shortcut Alt+Shift+L. Now, we can extract our local variable:

And here’s the result of this refactoring:

public class Test {

    public static void main(String[] args) {
        final String prefix = "Number of Arguments passed =";
        System.out.println(prefix + args.length);
    }
}

3.6. Extract Constant

Or, we can extract expressions and literal values to static final class attributes.

We could extract the 3.14 value into a local variable, as we just saw:

public class MathUtil {

    public double circumference(double radius) {
        return 2 * 3.14 * radius;
    }
}

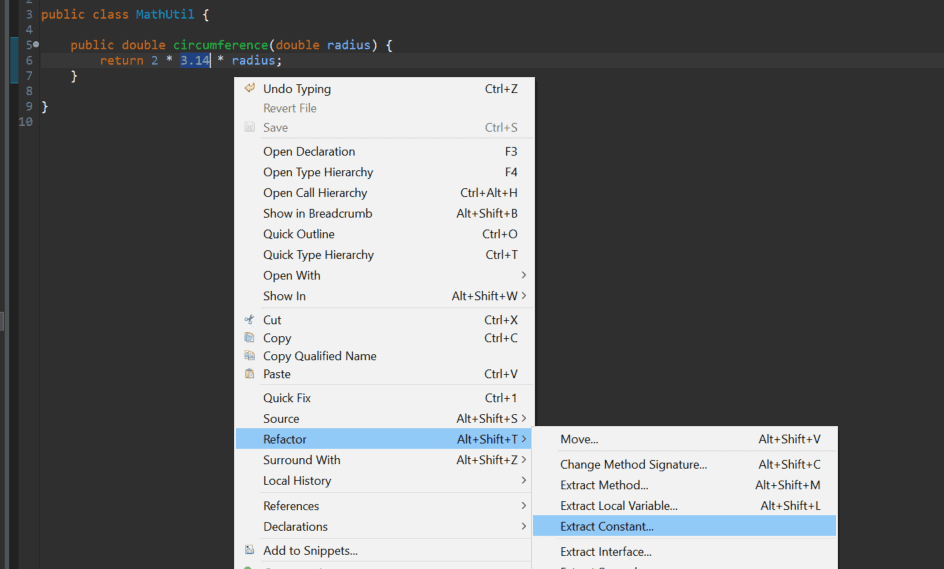
But, it might be better to extract it as a constant, for which we need to:

  • Select the item
  • Right-click and choose Refactor > Extract Constant

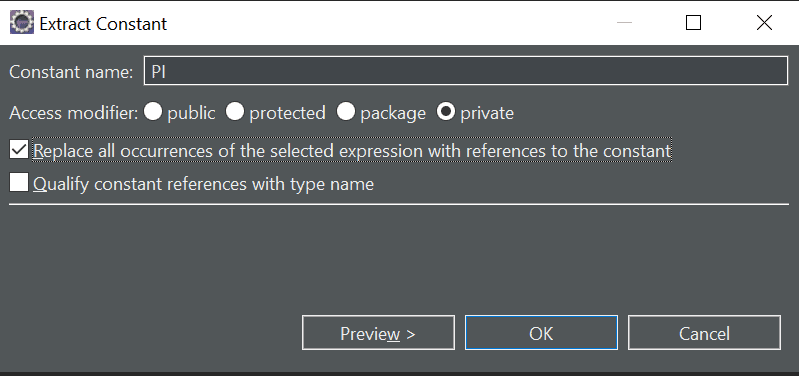
This will open a dialog where we can give the constant a name and set its visibility, along with a couple of other options:

Now, our code looks a little more readable:

public class MathUtil {

    private static final double PI = 3.14;

    public double circumference(double radius) {
        return 2 * PI * radius;
    }
}

4. Inlining

We can also go the other way and inline code.

Consider a Util class that has a local variable that’s only used once:

public class Util {

    public void isNumberPrime(int num) {
        boolean result = isPrime(num);
        if (result) {
            System.out.println("Number is Prime");
        } else {
            System.out.println("Number is Not Prime");
        }
    }

    // isPrime method
}

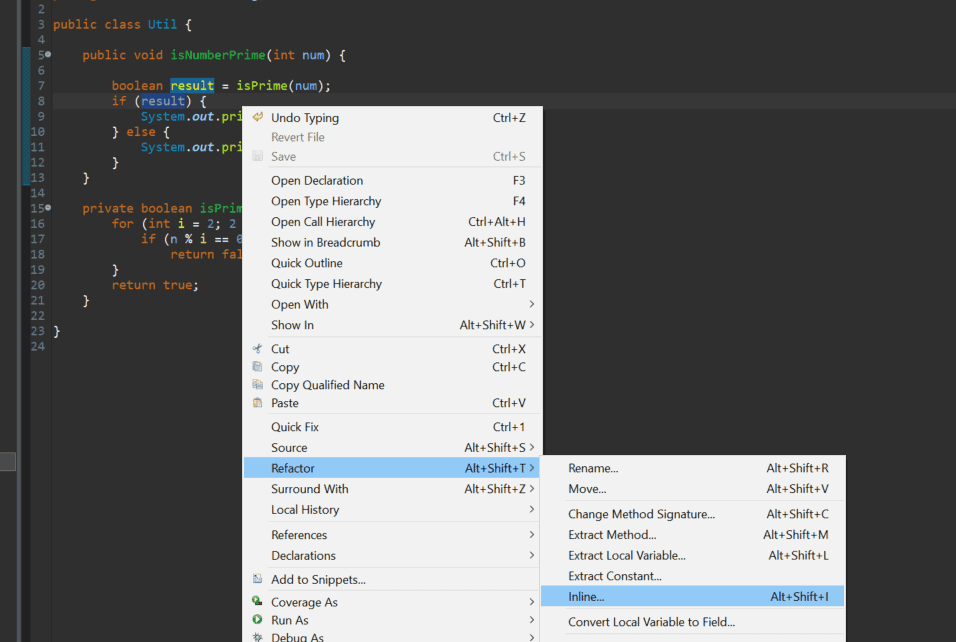
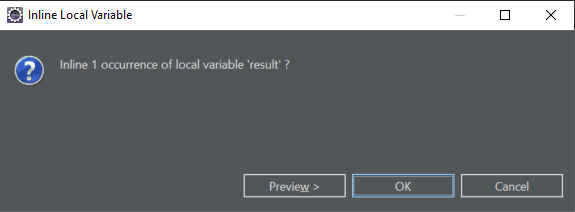
We want to remove the result local variable and inline the isPrime method call. To do this, we follow these steps:

  • Select the item we want to inline
  • Right-click and choose the Refactor > Inline option

The last step can also be achieved by keyboard shortcut Alt+Shift+I:

Afterward, we have one less variable to keep track of:

public class Util {

    public void isNumberPrime(int num) {
        if (isPrime(num)) {
            System.out.println("Number is Prime");
        } else {
            System.out.println("Number is Not Prime");
        }
    }

    // isPrime method
}

5. Push Down and Pull Up

If we have a parent-child relationship (like our previous Employee and Person example) between our classes, and we want to move certain methods or variables among them, we can use the push/pull options provided by Eclipse.

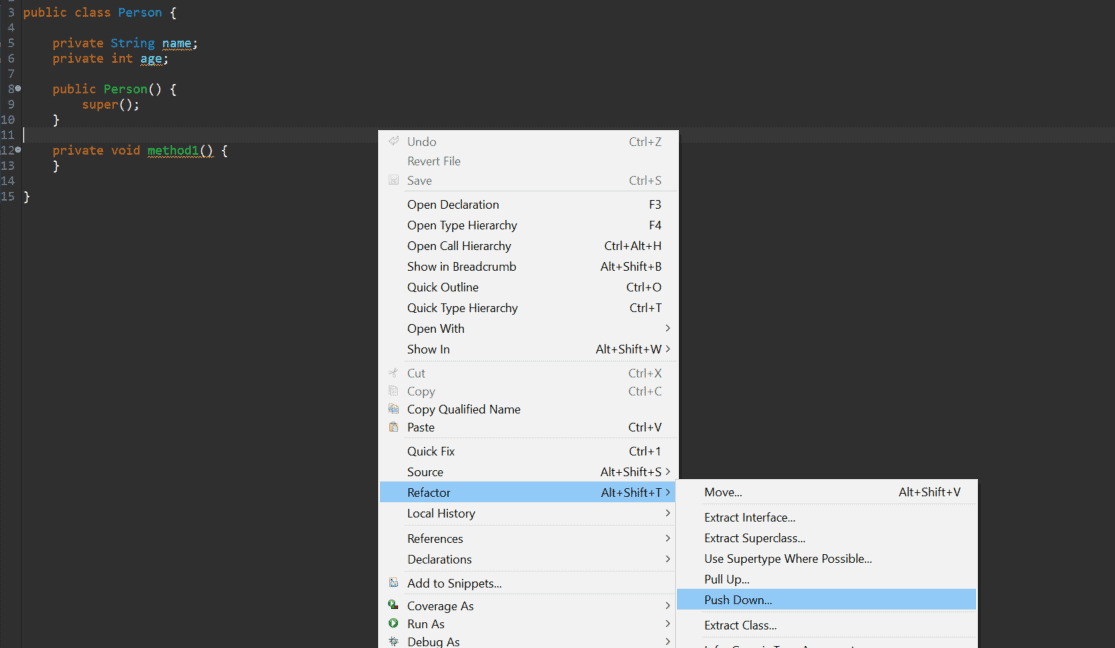
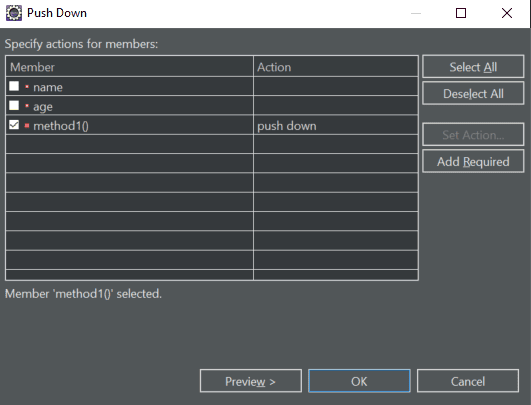
As the name suggests, the Push Down option moves methods and fields from a parent class to all child classes, while Pull Up moves methods and fields from a particular child class to parent, thus making that method available to all the child classes.

For moving methods down to child classes, we need to right-click anywhere in the class and choose the Refactor > Push Down option:

This will open up a wizard where we can select items to push down:

Similarly, for moving methods from a child class to parent class, we need to right-click anywhere in the class and choose Refactor > Pull Up:

This will open up a similar wizard where we can select items to pull up:

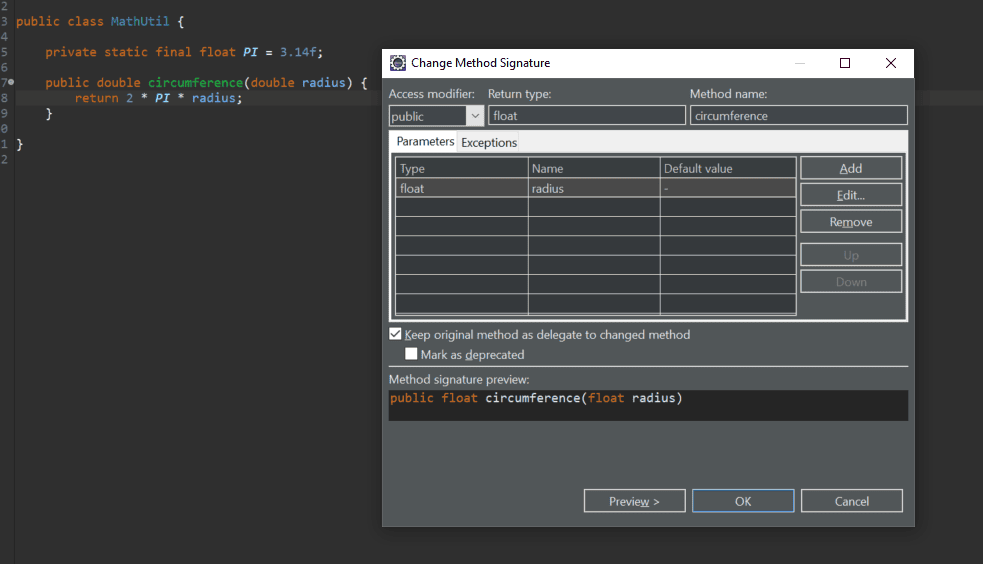
6. Changing a Method Signature

To change the method signature of an existing method, we can follow a few simple steps:

  • Select the method or place the cursor somewhere inside
  • Right-click and choose Refactor > Change Method Signature

The last step can also be achieved by keyboard shortcut Alt+Shift+C.

This will open a popup where you can change the method signature accordingly:

7. Moving

Sometimes, we simply want to move methods to another existing class to make our code more object-oriented.

Consider the scenario where we have a Movie class:

public class Movie {

    private String title;
    private double price;
    private MovieType type;

    // other methods
}

And MovieType is a simple enum:

public enum MovieType {
    NEW, REGULAR
}

Suppose also that we have a requirement that if a Customer rents a movie that is NEW, it will be charged two dollars more, and that our Customer class has the following logic to calculate the totalCost():

public class Customer {

    private String name;
    private String address;
    private List<Movie> movies;

    public double totalCost() {
        double result = 0;
        for (Movie movie : movies) {
            result += movieCost(movie);
        }
        return result;
    }

    private double movieCost(Movie movie) {
        if (movie.getType()
            .equals(MovieType.NEW)) {
            return 2 + movie.getPrice();
        }
        return movie.getPrice();
    }

    // other methods
}

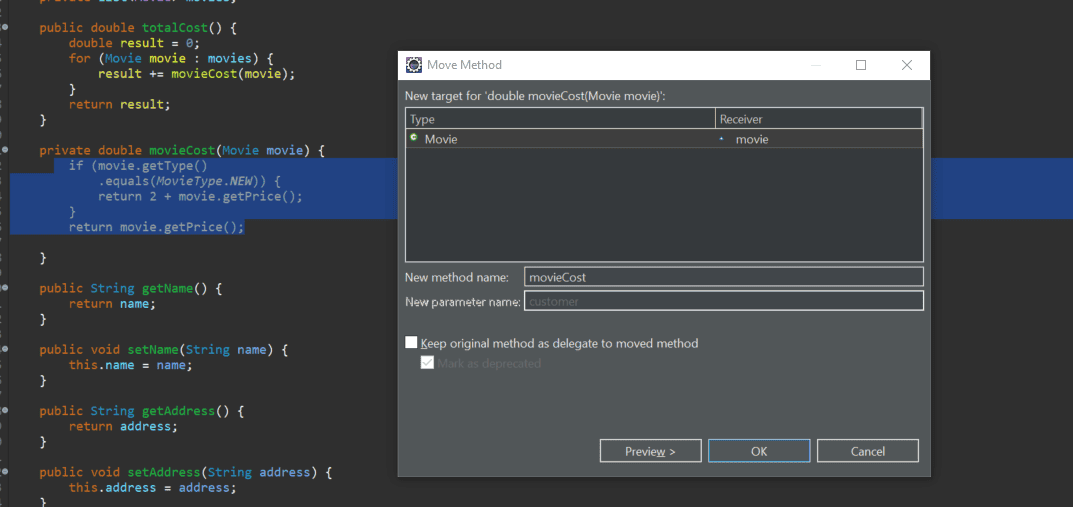
Clearly, the calculation of the movie cost based on the MovieType would be more appropriately placed in the Movie class and not the Customer class. We can easily move this calculation logic in Eclipse:

  • Select the lines you want to move
  • Right-click and choose the Refactor > Move option

The last step can also be achieved by keyboard shortcut Alt+Shift+V:

Eclipse is smart enough to realize that this logic should be in our Movie class. We can change the method name if we want, along with other advanced options.

The final Customer class code will be refactored to:

public class Customer {

    private String name;
    private String address;
    private List<Movie> movies;

    public double totalCost() {
        double result = 0;
        for (Movie movie : movies) {
            result += movie.movieCost();
        }
        return result;
    }

    // other methods
}

As we can see, the movieCost method has been moved to our Movie class and is being used in the refactored Customer class.

8. Conclusion

In this tutorial, we looked into some of the main refactoring techniques provided by Eclipse. We started with some basic refactoring like renaming and extracting. Later on, we saw moving methods and fields around different classes.

To learn more, we can always refer to the official Eclipse documentation on refactoring.

Geospatial Support in MongoDB

$
0
0

1. Overview

In this tutorial, we’ll explore the Geospatial support in MongoDB.

We’ll discuss how to store geospatial data, geo indexing, and geospatial search. We’ll also use multiple geospatial search queries like near, geoWithin, and geoIntersects.

2. Storing Geospatial Data

First, let’s see how to store geospatial data in MongoDB.

MongoDB supports multiple GeoJSON types to store geospatial data. Throughout our examples, we’ll mainly use the Point and Polygon types.

2.1. Point

This is the most basic and common GeoJSON type, and it’s used to represent one specific point on the grid.

Here, we have a simple object, in our places collection, that has field location as a Point:

{
  "name": "Big Ben",
  "location": {
    "coordinates": [-0.1268194, 51.5007292],
    "type": "Point"
  }
}

Note that the longitude value comes first, then the latitude.

2.2. Polygon

Polygon is a bit more complex GeoJSON type.

We can use Polygon to define an area with its exterior borders and also interior holes if needed.

Let’s see another object that has its location defined as a Polygon:

{
  "name": "Hyde Park",
  "location": {
    "coordinates": [
      [
        [-0.159381, 51.513126],
        [-0.189615, 51.509928],
        [-0.187373, 51.502442],
        [-0.153019, 51.503464],
        [-0.159381, 51.513126]
      ]
    ],
    "type": "Polygon"
  }
}

In this example, we defined an array of points that represent exterior bounds. We also have to close the bound so that the last point equals the first point.

Note that we need to define the exterior bounds points in counterclockwise direction and hole bounds in a clockwise direction.

In addition to these types, there are also many other types like LineString, MultiPoint, MultiPolygon, MultiLineString, and GeometryCollection.

3. Geospatial Indexing

To perform search queries on the geospatial data we stored, we need to create a geospatial index on our location field.

We basically have two options: 2d and 2dsphere.

But first, let’s define our places collection:

MongoClient mongoClient = new MongoClient();
MongoDatabase db = mongoClient.getDatabase("myMongoDb");
collection = db.getCollection("places");

3.1. 2d Geospatial Index

The 2d index enables us to perform search queries that work based on 2d plane calculations.

We can create a 2d index on the location field in our Java application as follows:

collection.createIndex(Indexes.geo2d("location"));

Of course, we can do the same in the mongo shell:

db.places.createIndex({location:"2d"})

3.2. 2dsphere Geospatial Index

The 2dsphere index supports queries that work based on sphere calculations.

Similarly, we can create a 2dsphere index in Java using the same Indexes class as above:

collection.createIndex(Indexes.geo2dsphere("location"));

Or in the mongo shell:

db.places.createIndex({location:"2dsphere"})

4. Searching Using Geospatial Queries

Now, for the exciting part, let’s search for objects based on their location using geospatial queries.

4.1. Near Query

Let’s start with near. We can use the near query to search for places within a given distance.

The near query works with both 2d and 2dsphere indices.

In the next example, we’ll search for places that are less than 1 km and more than 10 meters away from the given position:

@Test
public void givenNearbyLocation_whenSearchNearby_thenFound() {
    Point currentLoc = new Point(new Position(-0.126821, 51.495885));
 
    FindIterable<Document> result = collection.find(
      Filters.near("location", currentLoc, 1000.0, 10.0));

    assertNotNull(result.first());
    assertEquals("Big Ben", result.first().get("name"));
}

And the corresponding query in the mongo shell:

db.places.find({
  location: {
    $near: {
      $geometry: {
        type: "Point",
        coordinates: [-0.126821, 51.495885]
      },
      $maxDistance: 1000,
      $minDistance: 10
    }
  }
})

Note that the results are sorted from nearest to farthest.

Similarly, if we use a very far away location, we won’t find any nearby places:

@Test
public void givenFarLocation_whenSearchNearby_thenNotFound() {
    Point currentLoc = new Point(new Position(-0.5243333, 51.4700223));
 
    FindIterable<Document> result = collection.find(
      Filters.near("location", currentLoc, 5000.0, 10.0));

    assertNull(result.first());
}

We also have the nearSphere method, which acts exactly like near, except it calculates the distance using spherical geometry.

4.2. Within Query

Next, we’ll explore the geoWithin query.

The geoWithin query enables us to search for places that fully exist within a given Geometry, like a circle, box, or polygon. This also works with both 2d and 2dsphere indices.

In this example, we’re looking for places that exist within a 5 km radius from the given center position:

@Test
public void givenNearbyLocation_whenSearchWithinCircleSphere_thenFound() {
    double distanceInRad = 5.0 / 6371;
 
    FindIterable<Document> result = collection.find(
      Filters.geoWithinCenterSphere("location", -0.1435083, 51.4990956, distanceInRad));

    assertNotNull(result.first());
    assertEquals("Big Ben", result.first().get("name"));
}

Note that we need to transform the distance from km to radian (just divide by Earth’s radius).

And the resulting query:

db.places.find({
  location: {
    $geoWithin: {
      $centerSphere: [
        [-0.1435083, 51.4990956],
        0.0007848061528802386
      ]
    }
  }
})

Next, we’ll search for all places that exist within a rectangle “box”. We need to define the box by its lower left position and upper right position:

@Test
public void givenNearbyLocation_whenSearchWithinBox_thenFound() {
    double lowerLeftX = -0.1427638;
    double lowerLeftY = 51.4991288;
    double upperRightX = -0.1256209;
    double upperRightY = 51.5030272;

    FindIterable<Document> result = collection.find(
      Filters.geoWithinBox("location", lowerLeftX, lowerLeftY, upperRightX, upperRightY));

    assertNotNull(result.first());
    assertEquals("Big Ben", result.first().get("name"));
}

Here’s the corresponding query in mongo shell:

db.places.find({
  location: {
    $geoWithin: {
      $box: [
        [-0.1427638, 51.4991288],
        [-0.1256209, 51.5030272]
      ]
    }
  }
})

Finally, if the area we want to search within isn’t a rectangle or a circle, we can use a polygon to define a more specific area:

@Test
public void givenNearbyLocation_whenSearchWithinPolygon_thenFound() {
    ArrayList<List<Double>> points = new ArrayList<List<Double>>();
    points.add(Arrays.asList(-0.1439, 51.4952));
    points.add(Arrays.asList(-0.1121, 51.4989));
    points.add(Arrays.asList(-0.13, 51.5163));
    points.add(Arrays.asList(-0.1439, 51.4952));
 
    FindIterable<Document> result = collection.find(
      Filters.geoWithinPolygon("location", points));

    assertNotNull(result.first());
    assertEquals("Big Ben", result.first().get("name"));
}

And here’s the corresponding query:

db.places.find({
  location: {
    $geoWithin: {
      $polygon: [
        [-0.1439, 51.4952],
        [-0.1121, 51.4989],
        [-0.13, 51.5163],
        [-0.1439, 51.4952]
      ]
    }
  }
})

We only defined a polygon with its exterior bounds, but we can also add holes to it. Each hole will be a List of Points:

geoWithinPolygon("location", points, hole1, hole2, ...)

4.3. Intersect Query

Finally, let’s look at the geoIntersects query.

The geoIntersects query finds objects that at least intersect with a given Geometry. By comparison, geoWithin finds objects that fully exist within a given Geometry.

This query works with the 2dsphere index only.

Let’s see this in practice, with an example of looking for any place that intersects with a Polygon:

@Test
public void givenNearbyLocation_whenSearchUsingIntersect_thenFound() {
    ArrayList<Position> positions = new ArrayList<Position>();
    positions.add(new Position(-0.1439, 51.4952));
    positions.add(new Position(-0.1346, 51.4978));
    positions.add(new Position(-0.2177, 51.5135));
    positions.add(new Position(-0.1439, 51.4952));
    Polygon geometry = new Polygon(positions);
 
    FindIterable<Document> result = collection.find(
      Filters.geoIntersects("location", geometry));

    assertNotNull(result.first());
    assertEquals("Hyde Park", result.first().get("name"));
}

The resulting query:

db.places.find({
  location:{
    $geoIntersects:{
      $geometry:{
        type:"Polygon",
          coordinates:[
          [
            [-0.1439, 51.4952],
            [-0.1346, 51.4978],
            [-0.2177, 51.5135],
            [-0.1439, 51.4952]
          ]
        ]
      }
    }
  }
})

5. Conclusion

In this article, we learned how to store geospatial data in MongoDB and looked at the difference between 2d and 2dsphere geospatial indices. We also learned how to search in MongoDB using geospatial queries.

As usual, the full source code for the examples is available over on GitHub.

Will an Error Be Caught by Catch Block in Java?

$
0
0

1. Overview

In this short article, we’re going to show how to properly catch Java errors, and we’ll explain when it doesn’t make sense to do so.

For detailed information about Throwables in Java, please have a look at our article on Exception Handling in Java.

2. Catching Errors

Since the java.lang.Error class in Java doesn’t inherit from java.lang.Exception, we must declare the Error base class – or the specific Error subclass we’d like to capture – in the catch statement in order to catch it.

Therefore, if we run the following test case, it will pass:

@Test(expected = AssertionError.class)
public void whenError_thenIsNotCaughtByCatchException() {
    try {
        throw new AssertionError();
    } catch (Exception e) {
        Assert.fail(); // errors are not caught by catch exception
    }
}

The following unit test, however, expects the catch statement to catch the error:

@Test
public void whenError_thenIsCaughtByCatchError() {
    try {
        throw new AssertionError();
    } catch (Error e) {
        // caught! -> test pass
    }
}

Please note that the Java Virtual Machine throws errors to indicate severe problems from which it can’t recover, such as lack of memory and stack overflows, among others.

Thus, we must have a very, very good reason to catch an error!

3. Conclusion

In this article, we saw when and how Errors can be caught in Java. The code example can be found in the GitHub project.

Guide to ApplicationContextRunner in Spring Boot

$
0
0

1. Overview

It’s well known that auto-configuration is one of the key features in Spring Boot, but testing auto-configuration scenarios can be tricky.

In the following sections, we’ll show how ApplicationContextRunner simplifies auto-configuration testing.

2. Test Auto-Configuration Scenarios

ApplicationContextRunner is a utility class which runs the ApplicationContext and provides AssertJ style assertions. It’s best used as a field in test class for shared configuration and we make customizations in each test afterward:

private final ApplicationContextRunner contextRunner = new ApplicationContextRunner();

Let’s move on to show its magic by testing a few cases.

2.1. Test Class Condition

In this section, we’re going to test some auto-configuration classes which use @ConditionalOnClass and @ConditionalOnMissingClass annotations:

@Configuration
@ConditionalOnClass(ConditionalOnClassIntegrationTest.class)
protected static class ConditionalOnClassConfiguration {
    @Bean
    public String created() {
        return "This is created when ConditionalOnClassIntegrationTest is present on the classpath";
    }
}

@Configuration
@ConditionalOnMissingClass("com.baeldung.autoconfiguration.ConditionalOnClassIntegrationTest")
protected static class ConditionalOnMissingClassConfiguration {
    @Bean
    public String missed() {
        return "This is missed when ConditionalOnClassIntegrationTest is present on the classpath";
    }
}

We’d like to test whether the auto-configuration properly instantiates or skips the created and missed beans given expected conditions.

ApplicationContextRunner gives us the withUserConfiguration method where we can provide an auto-configuration on demand to customize the ApplicationContext for each test.

The run method takes a ContextConsumer as a parameter which applies the assertions to the context.  The ApplicationContext will be closed automatically when the test exits:

@Test
public void whenDependentClassIsPresent_thenBeanCreated() {
    this.contextRunner.withUserConfiguration(ConditionalOnClassConfiguration.class)
        .run(context -> {
            assertThat(context).hasBean("created");
            assertThat(context.getBean("created"))
              .isEqualTo("This is created when ConditionalOnClassIntegrationTest is present on the classpath");
        });
}

@Test
public void whenDependentClassIsPresent_thenBeanMissing() {
    this.contextRunner.withUserConfiguration(ConditionalOnMissingClassConfiguration.class)
        .run(context -> {
            assertThat(context).doesNotHaveBean("missed");
        });
}

Through the preceding example, we see the simpleness of testing the scenarios in which a certain class is present on the classpath. But how are we going to test the converse, when the class is absent on the classpath?

This is where FilteredClassLoader kicks in. It’s used to filter specified classes on the classpath at runtime:

@Test
public void whenDependentClassIsNotPresent_thenBeanMissing() {
    this.contextRunner.withUserConfiguration(ConditionalOnClassConfiguration.class)
        .withClassLoader(new FilteredClassLoader(ConditionalOnClassIntegrationTest.class))
        .run((context) -> {
            assertThat(context).doesNotHaveBean("created");
            assertThat(context).doesNotHaveBean(ConditionalOnClassIntegrationTest.class);
        });
}

@Test
public void whenDependentClassIsNotPresent_thenBeanCreated() {
    this.contextRunner.withUserConfiguration(ConditionalOnMissingClassConfiguration.class)
        .withClassLoader(new FilteredClassLoader(ConditionalOnClassIntegrationTest.class))
        .run((context) -> {
            assertThat(context).hasBean("missed");
            assertThat(context).getBean("missed")
              .isEqualTo("This is missed when ConditionalOnClassIntegrationTest is present on the classpath");
            assertThat(context).doesNotHaveBean(ConditionalOnClassIntegrationTest.class);
        });
}

2.2. Test Bean Condition

We’ve just looked at testing @ConditionalOnClass and @ConditionalOnMissingClass annotations, now let’s see what things look like when we are using @ConditionalOnBean and @ConditionalOnMissingBean annotations.

To make a start, we similarly need a few auto-configuration classes:

@Configuration
protected static class BasicConfiguration {
    @Bean
    public String created() {
        return "This is always created";
    }
}
@Configuration
@ConditionalOnBean(name = "created")
protected static class ConditionalOnBeanConfiguration {
    @Bean
    public String createOnBean() {
        return "This is created when bean (name=created) is present";
    }
}
@Configuration
@ConditionalOnMissingBean(name = "created")
protected static class ConditionalOnMissingBeanConfiguration {
    @Bean
    public String createOnMissingBean() {
        return "This is created when bean (name=created) is missing";
    }
}

Then, we’d call the withUserConfiguration method like the preceding section and send in our custom configuration class to test if the auto-configuration appropriately instantiates or skips createOnBean or createOnMissingBean beans in different conditions:

@Test
public void whenDependentBeanIsPresent_thenConditionalBeanCreated() {
    this.contextRunner.withUserConfiguration(BasicConfiguration.class, ConditionalOnBeanConfiguration.class)
    // ommitted for brevity
}
@Test
public void whenDependentBeanIsNotPresent_thenConditionalMissingBeanCreated() {
    this.contextRunner.withUserConfiguration(ConditionalOnMissingBeanConfiguration.class)
    // ommitted for brevity
}

2.3. Test Property Condition

In this section, let’s test the auto-configuration classes which use @ConditionalOnProperty annotations.

First, we need a property for this test:

com.baeldung.service=custom

After that, we write nested auto-configuration classes to create beans based on the preceding property:

@Configuration
@TestPropertySource("classpath:ConditionalOnPropertyTest.properties")
protected static class SimpleServiceConfiguration {
    @Bean
    @ConditionalOnProperty(name = "com.baeldung.service", havingValue = "default")
    @ConditionalOnMissingBean
    public DefaultService defaultService() {
        return new DefaultService();
    }
    @Bean
    @ConditionalOnProperty(name = "com.baeldung.service", havingValue = "custom")
    @ConditionalOnMissingBean
    public CustomService customService() {
        return new CustomService();
    }
}

Now, we’re calling the withPropertyValues method to override the property value in each test:

@Test
public void whenGivenCustomPropertyValue_thenCustomServiceCreated() {
    this.contextRunner.withPropertyValues("com.baeldung.service=custom")
        .withUserConfiguration(SimpleServiceConfiguration.class)
        .run(context -> {
            assertThat(context).hasBean("customService");
            SimpleService simpleService = context.getBean(CustomService.class);
            assertThat(simpleService.serve()).isEqualTo("Custom Service");
            assertThat(context).doesNotHaveBean("defaultService");
        });
}

@Test
public void whenGivenDefaultPropertyValue_thenDefaultServiceCreated() {
    this.contextRunner.withPropertyValues("com.baeldung.service=default")
        .withUserConfiguration(SimpleServiceConfiguration.class)
        .run(context -> {
            assertThat(context).hasBean("defaultService");
            SimpleService simpleService = context.getBean(DefaultService.class);
            assertThat(simpleService.serve()).isEqualTo("Default Service");
            assertThat(context).doesNotHaveBean("customService");
        });
}

3. Conclusion

To sum up, this tutorial just showed how to use ApplicationContextRunner to run the ApplicationContext with customizations and apply assertions.

We covered the most frequently used scenarios in here instead of an exhaustive list of how to customize the ApplicationContext.

In the meantime, please bear in mind that the ApplicationConetxtRunner is for non-web applications, so consider WebApplicationContextRunner for servlet-based web applications and ReactiveWebApplicationContextRunner for reactive web applications.

The source code for this tutorial can be found over on GitHub.

Introduction to Docker Compose

$
0
0

1. Overview

When using Docker extensively, the management of several different containers quickly becomes cumbersome.

Docker Compose is a tool that helps us overcome this problem and easily handle multiple containers at once.

In this tutorial, we’ll have a look at its main features and powerful mechanisms.

2. The YAML Configuration Explained

In short, Docker Compose works by applying many rules declared within a single docker-compose.yml configuration file.

These YAML rules, both human-readable and machine-optimized, provide us an effective way to snapshot the whole project from ten-thousand feet in a few lines.

Almost every rule replaces a specific Docker command so that in the end we just need to run:

docker-compose up

We can get dozens of configurations applied by Compose under the hood. This will save us the hassle of scripting them with Bash or something else.

In this file, we need to specify the version of the Compose file format, at least one service, and optionally volumes and networks:

version: "3.7"
services:
  ...
volumes:
  ...
networks:
  ...

Let’s see what these elements actually are.

2.1. Services

First of all, services refer to containers’ configuration.

For example, let’s take a dockerized web application consisting of a front end, a back end, and a database: We’d likely split those components into three images and define them as three different services in the configuration:

services:
  frontend:
    image: my-vue-app
    ...
  backend:
    image: my-springboot-app
    ...
  db:
    image: postgres
    ...

There are multiple settings that we can apply to services, and we’ll explore them deeply later on.

2.2. Volumes & Networks

Volumes, on the other hand, are physical areas of disk space shared between the host and a container, or even between containers. In other words, a volume is a shared directory in the host, visible from some or all containers.

Similarly, networks define the communication rules between containers, and between a container and the host. Common network zones will make containers’ services discoverable by each other, while private zones will segregate them in virtual sandboxes.

Again, we’ll learn more about them in the next section.

3. Dissecting a Service

Let’s now begin to inspect the main settings of a service.

3.1. Pulling an Image

Sometimes, the image we need for our service has already been published (by us or by others) in Docker Hub, or another Docker Registry.

If that’s the case, then we refer to it with the image attribute, by specifying the image name and tag:

services: 
  my-service:
    image: ubuntu:latest
    ...

3.2. Building an Image

Instead, we might need to build an image from the source code by reading its Dockerfile.

This time, we’ll use the build keyword, passing the path to the Dockerfile as the value:

services: 
  my-custom-app:
    build: /path/to/dockerfile/
    ...

We can also use a URL instead of a path:

services: 
  my-custom-app:
    build: https://github.com/my-company/my-project.git
    ...

Additionally, we can specify an image name in conjunction with the build attribute, which will name the image once created, making it available to be used by other services:

services: 
  my-custom-app:
    build: https://github.com/my-company/my-project.git
    image: my-project-image
    ...

3.3. Configuring the Networking

Docker containers communicate between themselves in networks created, implicitly or through configuration, by Docker Compose. A service can communicate with another service on the same network by simply referencing it by container name and port (for example network-example-service:80), provided that we’ve made the port accessible through the expose keyword:

services:
  network-example-service:
    image: karthequian/helloworld:latest
    expose:
      - "80"

In this case, by the way, it would also work without exposing it, because the expose directive is already in the image Dockerfile.

To reach a container from the host, the ports must be exposed declaratively through the ports keyword, which also allows us to choose if exposing the port differently in the host:

services:
  network-example-service:
    image: karthequian/helloworld:latest
    ports:
      - "80:80"
    ...
  my-custom-app:
    image: myapp:latest
    ports:
      - "8080:3000"
    ...
  my-custom-app-replica:
    image: myapp:latest
    ports:
      - "8081:3000"
    ...

Port 80 will now be visible from the host, while port 3000 of the other two containers will be available on ports 8080 and 8081 in the host. This powerful mechanism allows us to run different containers exposing the same ports without collisions.

Finally, we can define additional virtual networks to segregate our containers:

services:
  network-example-service:
    image: karthequian/helloworld:latest
    networks: 
      - my-shared-network
    ...
  another-service-in-the-same-network:
    image: alpine:latest
    networks: 
      - my-shared-network
    ...
  another-service-in-its-own-network:
    image: alpine:latest
    networks: 
      - my-private-network
    ...
networks:
  my-shared-network: {}
  my-private-network: {}

In this last example, we can see that another-service-in-the-same-network will be able to ping and to reach port 80 of network-example-service, while another-service-in-its-own-network won’t.

3.4. Setting Up the Volumes

There are three types of volumes: anonymous, named, and host ones.

Docker manages both anonymous and named volumes, automatically mounting them in self-generated directories in the host. While anonymous volumes were useful with older versions of Docker (pre 1.9), named ones are the suggested way to go nowadays. Host volumes also allow us to specify an existing folder in the host.

We can configure host volumes at the service level and named volumes in the outer level of the configuration, in order to make the latter visible to other containers and not only to the one they belong:

services:
  volumes-example-service:
    image: alpine:latest
    volumes: 
      - my-named-global-volume:/my-volumes/named-global-volume
      - /tmp:/my-volumes/host-volume
      - /home:/my-volumes/readonly-host-volume:ro
    ...
  another-volumes-example-service:
    image: alpine:latest
    volumes:
      - my-named-global-volume:/another-path/the-same-named-global-volume
    ...
volumes:
  my-named-global-volume: 

Here, both containers will have read/write access to the my-named-global-volume shared folder, no matter the different paths they’ve mapped it to. The two host volumes, instead, will be available only to volumes-example-service.

The /tmp folder of the host’s file system is mapped to the /my-volumes/host-volume folder of the container.
This portion of the file system is writeable, which means that the container can not only read but also write (and delete) files in the host machine.

We can mount a volume in read-only mode by appending :ro to the rule, like for the /home folder (we don’t want a Docker container erasing our users by mistake).

3.5. Declaring the Dependencies

Often, we need to create a dependency chain between our services, so that some services get loaded before (and unloaded after) other ones. We can achieve this result through the depends_on keyword:

services:
  kafka:
    image: wurstmeister/kafka:2.11-0.11.0.3
    depends_on:
      - zookeeper
    ...
  zookeeper:
    image: wurstmeister/zookeeper
    ...

We should be aware, however, that Compose will not wait for the zookeeper service to finish loading before starting the kafka service: it will simply wait for it to start. If we need a service to be fully loaded before starting another service, we need to get deeper control of startup and shutdown order in Compose.

4. Managing Environment Variables

Working with environment variables is easy in Compose. We can define static environment variables, and also define dynamic variables with the ${} notation:

services:
  database: 
    image: "postgres:${POSTGRES_VERSION}"
    environment:
      DB: mydb
      USER: "${USER}"

There are different methods to provide those values to Compose.

For example, one is setting them in a .env file in the same directory, structured like a .properties file, key=value:

POSTGRES_VERSION=alpine
USER=foo

Otherwise, we can set them in the OS before calling the command:

export POSTGRES_VERSION=alpine
export USER=foo
docker-compose up

Finally, we might find handy using a simple one-liner in the shell:

POSTGRES_VERSION=alpine USER=foo docker-compose up

We can mix the approaches, but let’s keep in mind that Compose uses the following priority order, overwriting the less important with the higher ones:

  1. Compose file
  2. Shell environment variables
  3. Environment file
  4. Dockerfile
  5. Variable not defined

5. Scaling & Replicas

In older Compose versions, we were allowed to scale the instances of a container through the docker-compose scale command. Newer versions deprecated it and replaced it with the scale option.

On the other side, we can exploit Docker Swarm – a cluster of Docker Engines – and autoscale our containers declaratively through the replicas attribute of the deploy section:

services:
  worker:
    image: dockersamples/examplevotingapp_worker
    networks:
      - frontend
      - backend
    deploy:
      mode: replicated
      replicas: 6
      resources:
        limits:
          cpus: '0.50'
          memory: 50M
        reservations:
          cpus: '0.25'
          memory: 20M
      ...

Under deploy, we can also specify many other options, like the resources thresholds. Compose, however, considers the whole deploy section only when deploying to Swarm, and ignores it otherwise.

6. A Real-World Example: Spring Cloud Data Flow

While small experiments help us understanding the single gears, seeing the real-world code in action will definitely unveil the big picture.

Spring Cloud Data Flow is a complex project, but simple enough to be understandable. Let’s download its YAML file and run:

DATAFLOW_VERSION=2.1.0.RELEASE SKIPPER_VERSION=2.0.2.RELEASE docker-compose up 

Compose will download, configure, and start every component, and then intersect the container’s logs into a single flow in the current terminal.

It’ll also apply unique colors to each one of them for a great user experience:

We might get the following error running a brand new Docker Compose installation:

lookup registry-1.docker.io: no such host

While there are different solutions to this common pitfall, using 8.8.8.8 as DNS is probably the simplest.

7. Lifecycle Management

Let’s finally take a closer look at the syntax of Docker Compose:

docker-compose [-f <arg>...] [options] [COMMAND] [ARGS...]

While there are many options and commands available, we need at least to know the ones to activate and deactivate the whole system correctly.

7.1. Startup

We’ve seen that we can create and start the containers, the networks, and the volumes defined in the configuration with up:

docker-compose up

After the first time, however, we can simply use start to start the services:

docker-compose start

In case our file has a different name than the default one (docker-compose.yml), we can exploit the -f and file flags to specify an alternate file name:

docker-compose -f custom-compose-file.yml start

Compose can also run in the background as a daemon when launched with the -d option:

docker-compose up -d

7.2. Shutdown

To safely stop the active services, we can use stop, which will preserve containers, volumes, and networks, along with every modification made to them:

docker-compose stop

To reset the status of our project, instead, we simply run down, which will destroy everything with only the exception of external volumes:

docker-compose down

8. Conclusion

In this tutorial, we’ve learned about Docker Compose and how it works.

As usual, we can find the source docker-compose.yml file on GitHub, along with a helpful battery of tests immediately available in the following image:


Java 8 Collectors toMap

$
0
0

1. Introduction

In this tutorial, we’re going to talk about the toMap() method of the Collectors class. We use it to collect Streams into a Map instance.

For all the examples covered in here, we’ll use a list of books as a starting point and transform it into different Map implementations.

2. List to Map

We’ll start with the simplest case, by transforming a List into a Map.

Our Book class is defined as:

class Book {
    private String name;
    private int releaseYear;
    private String isbn;
    //getters and setters
}

And we’ll create a list of books to validate our code:

List<Book> bookList = new ArrayList<>();
bookList.add(new Book("The Fellowship of the Ring", 1954, "0395489318"));
bookList.add(new Book("The Two Towers", 1954, "0345339711"));
bookList.add(new Book("The Return of the King", 1955, "0618129111"));

For this scenario we’ll use the following overload of the toMap() method:

Collector<T, ?, Map<K,U>> toMap(Function<? super T, ? extends K> keyMapper,
  Function<? super T, ? extends U> valueMapper)

With toMap, we can indicate strategies for how to get the key and value for the map:

public Map<String, String> listToMap(List<Book> books) {
    return books.stream().collect(Collectors.toMap(Book::getIsbn, Book::getName));
}

And we can easily validate it works with:

@Test
public void whenConvertFromListToMap() {
    assertTrue(convertToMap.listToMap(bookList).size() == 3);
}

3. Solving Key Conflicts

The example above worked well, but what would happen if there’s a duplicate key?

Let’s imagine that we keyed our Map by each Book‘s release year:

public Map<Integer, Book> listToMapWithDupKeyError(List<Book> books) {
    return books.stream().collect(Collectors.toMap(Book::getReleaseYear, Function.identity()));
}

Given our earlier list of books, we’d see an IllegalStateException:

@Test(expected = IllegalStateException.class)
public void whenMapHasDuplicateKey_without_merge_function_then_runtime_exception() {
    convertToMap.listToMapWithDupKeyError(bookList);
}

To resolve it, we need to use a different method with an additional parameter, the mergeFunction:

Collector<T, ?, M> toMap(Function<? super T, ? extends K> keyMapper,
  Function<? super T, ? extends U> valueMapper,
  BinaryOperator<U> mergeFunction)

Let’s introduce a merge function that indicates that, in the case of a collision, we keep the existing entry:

public Map<Integer, Book> listToMapWithDupKey(List<Book> books) {
    return books.stream().collect(Collectors.toMap(Book::getReleaseYear, Function.identity(),
      (existing, replacement) -> existing));
}

Or, in other words, we get first-win behavior:

@Test
public void whenMapHasDuplicateKeyThenMergeFunctionHandlesCollision() {
    Map<Integer, Book> booksByYear = convertToMap.listToMapWithDupKey(bookList);
    assertEquals(2, booksByYear.size());
    assertEquals("0395489318", booksByYear.get(1954).getIsbn());
}

4. Other Map Types

By default, a toMap() method will return a HashMap.

But can we return different Map implementations? The answer is yes:

Collector<T, ?, M> toMap(Function<? super T, ? extends K> keyMapper,
  Function<? super T, ? extends U> valueMapper,
  BinaryOperator<U> mergeFunction,
  Supplier<M> mapSupplier)

Where the mapSupplier is a function that returns a new, empty Map with the results.

4.1. List to ConcurrentMap

Let’s take the same example as above and add a mapSupplier function to return a ConcurrentHashMap:

public Map<Integer, Book> listToConcurrentMap(List<Book> books) {
    return books.stream().collect(Collectors.toMap(Book::getReleaseYear, Function.identity(),
      (o1, o2) -> o1, ConcurrentHashMap::new));
}

Let’s go on and test our code:

@Test
public void whenCreateConcurrentHashMap() {
    assertTrue(convertToMap.listToConcurrentMap(bookList) instanceof ConcurrentHashMap);
}

4.2. Sorted Map

Lastly, let’s see how to return a sorted map. For that we’ll need to sort a list and use a TreeMap as a mapSupplier parameter:

public TreeMap<String, Book> listToSortedMap(List<Book> books) {
    return books.stream() 
      .sorted(Comparator.comparing(Book::getName))
      .collect(Collectors.toMap(Book::getName, Function.identity(), (o1, o2) -> o1, TreeMap::new));
}

The code above will sort the list based on the book name and then collect the results to a TreeMap:

@Test
public void whenMapisSorted() {
    assertTrue(convertToMap.listToSortedMap(bookList).firstKey().equals("The Fellowship of the Ring"));
}

5. Conclusion

In this article, we looked into the toMap() method of the Collectors class. It allows us to create a new Map from a Stream. We also learned how to resolve key conflicts and create different map implementations.

As always the code is available on GitHub.

Using SpringJUnit4ClassRunner with Parameterized

$
0
0

1. Overview

In this article, we’ll see how to parameterize a Spring integration test implemented in JUnit4 with a Parameterized JUnit test runner.

2. SpringJUnit4ClassRunner

SpringJUnit4ClassRunner is an implementation of JUnit4’s ClassRunner that embeds Spring’s TestContextManager into a JUnit test.

TestContextManager is the entry point into the Spring TestContext framework and therefore manages the access to Spring ApplicationContext and dependency injection in a JUnit test class. Thus, SpringJUnit4ClassRunner enables developers to implement integration tests for Spring components like controllers and repositories.

For example, we can implement an integration test for our RestController:

@RunWith(SpringJUnit4ClassRunner.class)
@WebAppConfiguration
@ContextConfiguration(classes = WebConfig.class)
public class RoleControllerIntegrationTest {

    @Autowired
    private WebApplicationContext wac;

    private MockMvc mockMvc;

    private static final String CONTENT_TYPE = "application/text;charset=ISO-8859-1";

    @Before
    public void setup() throws Exception {
        this.mockMvc = MockMvcBuilders.webAppContextSetup(this.wac).build();
    }

    @Test
    public void givenEmployeeNameJohnWhenInvokeRoleThenReturnAdmin() throws Exception {
        this.mockMvc.perform(MockMvcRequestBuilders
          .get("/role/John"))
          .andDo(print())
          .andExpect(MockMvcResultMatchers.status().isOk())
          .andExpect(MockMvcResultMatchers.content().contentType(CONTENT_TYPE))
          .andExpect(MockMvcResultMatchers.content().string("ADMIN"));
    }
}

As can be seen from the test, our Controller accepts a user name as a path parameter and returns the user role accordingly.

Now, in order to test this REST service with a different user name/role combination, we would have to implement a new test:

@Test
public void givenEmployeeNameDoeWhenInvokeRoleThenReturnEmployee() throws Exception {
    this.mockMvc.perform(MockMvcRequestBuilders
      .get("/role/Doe"))
      .andDo(print())
      .andExpect(MockMvcResultMatchers.status().isOk())
      .andExpect(MockMvcResultMatchers.content().contentType(CONTENT_TYPE))
      .andExpect(MockMvcResultMatchers.content().string("EMPLOYEE"));
}

This can quickly get out of hand for services where a large number of input combinations are possible.

To avoid this kind of repetition in our test classes, let’s see how to use Parameterized for implementing JUnit tests that accept multiple inputs.

3. Using Parameterized

3.1. Defining Parameters

Parameterized is a custom JUnit test runner that allows us to write a single test case and have it run against multiple input parameters:

@RunWith(Parameterized.class)
@WebAppConfiguration
@ContextConfiguration(classes = WebConfig.class)
public class RoleControllerParameterizedIntegrationTest {

    @Parameter(value = 0)
    public String name;

    @Parameter(value = 1)
    public String role;

    @Parameters
    public static Collection<Object[]> data() {
        Collection<Object[]> params = new ArrayList();
        params.add(new Object[]{"John", "ADMIN"});
        params.add(new Object[]{"Doe", "EMPLOYEE"});

        return params;
    }

    //...
}

As shown above, we used the @Parameters annotation to prepare the input parameters to be injected into the JUnit test. We also provided the mapping of these values in the @Parameter fields name and role.

But now, we have another problem to solve — JUnit doesn’t allow multiple runners in one JUnit test class. This means we can’t take advantage of SpringJUnit4ClassRunner to embed the TestContextManager into our test class. We’ll have to find another way to embed TestContextManager.

Fortunately, Spring provides a couple of options for achieving this. We’ll discuss these in the following sections.

3.2. Initializing the TextContextManager Manually

The first option is quite simple, as Spring allows us to initialize TestContextManager manually:

@RunWith(Parameterized.class)
@WebAppConfiguration
@ContextConfiguration(classes = WebConfig.class)
public class RoleControllerParameterizedIntegrationTest {

    @Autowired
    private WebApplicationContext wac;

    private MockMvc mockMvc;

    private TestContextManager testContextManager;

    @Before
    public void setup() throws Exception {
        this.testContextManager = new TestContextManager(getClass());
        this.testContextManager.prepareTestInstance(this);

        this.mockMvc = MockMvcBuilders.webAppContextSetup(this.wac).build();
    }

    //...
}

Notably, in this example, we used the Parameterized runner instead of the SpringJUnit4ClassRunner. Next, we initialized the TestContextManager in the setup() method.

Now, we can implement our parameterized JUnit test:

@Test
public void givenEmployeeNameWhenInvokeRoleThenReturnRole() throws Exception {
    this.mockMvc.perform(MockMvcRequestBuilders
      .get("/role/" + name))
      .andDo(print())
      .andExpect(MockMvcResultMatchers.status().isOk())
      .andExpect(MockMvcResultMatchers.content().contentType(CONTENT_TYPE))
      .andExpect(MockMvcResultMatchers.content().string(role));
}

JUnit will execute this test case twice — once for each set of inputs we defined using the @Parameters annotation.

3.3. SpringClassRule and SpringMethodRule

Generally, it is not recommended to initialize the TestContextManager manually. Instead, Spring recommends using SpringClassRule and SpringMethodRule.

SpringClassRule implements JUnit’s TestRule — an alternate way to write test cases. TestRule can be used to replace the setup and cleanup operations that were previously done with @Before, @BeforeClass, @After, and @AfterClass methods.

SpringClassRule embeds class-level functionality of TestContextManager in a JUnit test class. It initializes the TestContextManager and invokes the setup and cleanup of the Spring TestContext. Therefore, it provides dependency injection and access to the ApplicationContext.

In addition to SpringClassRule, we must also use SpringMethodRule. which provides the instance-level and method-level functionality for TestContextManager.

SpringMethodRule is responsible for the preparation of the test methods. It also checks for test cases that are marked for skipping and prevents them from running.

Let’s see how to use this approach in our test class:

@RunWith(Parameterized.class)
@WebAppConfiguration
@ContextConfiguration(classes = WebConfig.class)
public class RoleControllerParameterizedClassRuleIntegrationTest {
    @ClassRule
    public static final SpringClassRule scr = new SpringClassRule();

    @Rule
    public final SpringMethodRule smr = new SpringMethodRule();

    @Before
    public void setup() throws Exception {
        this.mockMvc = MockMvcBuilders.webAppContextSetup(this.wac).build();
    }

    //...
}

4. Conclusion

In this article, we discussed two ways to implement Spring integration tests using the Parameterized test runner instead of SpringJUnit4ClassRunner. We saw how to initialize TestContextManager manually, and we saw an example using SpringClassRule with SpringMethodRule, the approach recommended by Spring.

Although we only discussed the Parameterized runner in this article, we can actually use either of these approaches with any JUnit runner to write Spring integration tests.

As usual, all the example code is available over on GitHub.

Introduction to Quasar in Kotlin

$
0
0

1. Introduction

Quasar is a Kotlin library that brings some asynchronous concepts to Kotlin in an easier to manage way. This includes lightweight threads, Channels, Actors, and more.

2. Setting Up the Build

To use the most recent version of Quasar, you need to run on a JDK version 11 or newer. Older versions support JDK 7, for situations where you can’t yet upgrade to Java 11.

Quasar comes with four dependencies that we need, depending on precisely what functionality you are using. When combining these, it’s essential that we use the same version for each of them.

To work correctly, Quasar needs to perform some bytecode instrumentation. This can be done either at runtime using a Java agent or at compile time. The Java agent is the preferred approach since this has no special build requirements and can work with any setup. However, this has the downside since Java only supports a single Java agent at a time.

2.1. Running from the Command Line

When running an application using Quasar, we specify the Java agent using the -javaagent flag to the JVM. This takes the full path to the quasar-core.jar file as a parameter:

$ java -javaagent:quasar-core.jar -cp quasar-core.jar:quasar-kotlin.jar:application.jar fully.qualified.main.Class

2.2. Running Our Application from Maven

If we want to, we can also use Maven to add the Java agent.

We can accomplish this with Maven in a few steps.

First, we set up the Dependency Plugin to generate a property pointing to the quasar-core.jar file:

<plugin>
    <artifactId>maven-dependency-plugin</artifactId>
    <version>3.1.1</version>
    <executions>
        <execution>
            <id>getClasspathFilenames</id>
            <goals>
               <goal>properties</goal>
            </goals>
        </execution>
    </executions>
</plugin>

Then, we use the Exec plugin to actually launch our application:

<plugin>
    <groupId>org.codehaus.mojo</groupId>
    <artifactId>exec-maven-plugin</artifactId>
    <version>1.3.2</version>
    <configuration>
        <workingDirectory>target/classes</workingDirectory>
        <executable>echo</executable>
        <arguments>
            <argument>-javaagent:${co.paralleluniverse:quasar-core:jar}</argument>
            <argument>-classpath</argument> <classpath/>
            <argument>com.baeldung.quasar.QuasarHelloWorldKt</argument>
        </arguments>
    </configuration>
</plugin>

We then need to run Maven with the correct call to make use of this:

mvn compile dependency:properties exec:exec

This ensures that the latest code is compiled and that the property pointing to our Java agent is available before we execute the application.

2.3. Running Unit Tests

It’d be great to get the same benefit in our unit tests that we get from the Quasar agent.

We can set up Surefire to make use of this same property when running the tests:

<plugin>
    <groupId>org.apache.maven.plugins</groupId>
    <artifactId>maven-surefire-plugin</artifactId>
    <version>2.22.1</version>
    <configuration>
        <argLine>-javaagent:${co.paralleluniverse:quasar-core:jar}</argLine>
    </configuration>
</plugin>

We can do the same for Failsafe if we’re using that for our integration tests as well.

3. Fibers

The core functionality of Quasar is that of fibers. These are similar in concept to threads but serve a subtly different purpose. Fibers are significantly lighter weight than threads – taking dramatically less memory and CPU time than standard threads require.

Fibers are not meant to be a direct replacement for threads. They are a better choice in some situations and worse in others.

Specifically, they are designed for scenarios where the executing code will spend a lot of time blocking on other fibers, threads, or processes – for example, waiting for a result from a database.

Fibers are similar, but not the same as green threads. Green threads are designed to work the same as OS threads but do not map directly on to OS threads. This means that green threads are best used in situations where they are always processing, as opposed to fibers that are designed to be used in situations that are normally blocking.

When necessary, it’s possible to use fibers and threads together to achieve the result needed.

3.1. Launching Fibers

We launch fibers in a very similar way to how we’d launch threads. We create an instance of the Fiber<V> class that wraps our code to execute – in the form of a SuspendableRunnable – and then call the start method:

class MyRunnable : SuspendableRunnable {
    override fun run() {
        println("Inside Fiber")
    }
}
Fiber<Void>(MyRunnable()).start()

Kotlin allows us to replace the SuspendableRunnable instance with a lambda if we wish:

val fiber = Fiber<Void> {
    println("Inside Fiber Lambda")
}
fiber.start()

And there is even a special helper DSL that does all of the above in an even simpler form:

fiber @Suspendable {
    println("Inside Fiber DSL")
}

This creates the fiber, creates the SuspendableRunnable wrapping the provided block, and starts it running.

The use of the DSL is much preferred over the lambda if you want to be doing it in-place. With the lambda option, we can pass the lambda around as a variable if needed.

3.2. Returning Values from Fibers

The use of a SuspendableRunnable with fibers is the direct equivalent of Runnable with threads. We can also use a SuspensableCallable<V> with fibers, which equates to Callable with threads.

We can do this in the same way as above, with an explicit type, a lambda or using the DSL:

class MyCallable : SuspendableCallable<String> {
    override fun run(): String {
        println("Inside Fiber")
        return "Hello"
    }
}
Fiber<String>(MyCallable()).start()

fiber @Suspendable {
    println("Inside Fiber DSL")
    "Hello"
}

The use of a SuspendableCallable instead of a SuspendableRunnable means that our fiber now has a generic return type – in the above, we’ve got a Fiber<String> instead of a Fiber<Unit>.

Once we’ve got a Fiber<V> in our hands, we can extract the value from it – which is the value returned by the SuspendableCallable – by using the get() method on the fiber:

val pi = fiber @Suspendable {
    computePi()
}.get()

The get() method works the same as on a java.util.concurrent.Future – and it works directly in terms of one. This means that it will block until the value is present.

3.3. Waiting on Fibers

On other occasions, we might want to wait for a fiber to have finished executing. This is typically against the reason for us using asynchronous code, but there are occasions where we need to do so.

In the same way as Java threads, we have a join() method that we can call on a Fiber<V> that will block until it has finished executing:

val fiber = Fiber<Void>(Runnable()).start()
fiber.join()

We can also provide a timeout, so that if the fiber takes longer to finish than expected, then we don’t block indefinitely:

fiber @Suspendable {
    TimeUnit.SECONDS.sleep(5)
}.join(2, TimeUnit.SECONDS)

If the fiber does take too long, the join() method will throw a TimeoutException to indicate this has happened. We can also provide these timeouts to the get() method we saw earlier in the same way.

3.4. Scheduling Fibers

Fibers are all run on a scheduler. Specifically, by some instance of a FiberScheduler or a subclass thereof. If one isn’t specified, then a default will be used instead, which is directly available as DefaultFiberScheduler.instance.

There are several system properties that we can use to configure our scheduler:

  • co.paralleluniverse.fibers.DefaultFiberPool.parallelism – The number of threads to use.
  • co.paralleluniverse.fibers.DefaultFiberPool.exceptionHandler – The exception handler to use if a fiber throws an exception
  • co.paralleluniverse.fibers.DefaultFiberPool.monitor – The means to monitor the fibers
  • co.paralleluniverse.fibers.DefaultFiberPool.detailedFiberInfo – Whether the monitor gets detailed information or not.

By default, this will be a FiberForkJoinScheduler which runs one thread per CPU core available and provides brief monitoring information via JMX.

This is a good choice for most cases, but on occasion, you might want a different choice. The other standard choice is FiberExecutorScheduler which runs the fibers on a provided Java Executor to run on a thread pool, or you could provide your own if needed – for example, you might need to run them all on a specific thread in an AWT or Swing scenario.

3.5. Suspendable Methods

Quasar works in terms of a concept known as Suspendable Methods. These are specially tagged methods that are allowed to be suspended, and thus are allowed to run inside fibers.

Typically these methods are any that declare that they throw a SuspendException. However, because this is not always possible, we have some other special cases that we can use:

  • Any method that we annotate with the @Suspendable annotation
  • Anything that ends up as a Java 8 lambda method – these can not declare exceptions and so are treated specially
  • Any call made by reflection, since these are computed at runtime and not compile time

Additionally, it’s not allowed to use a constructor or class initializer as a suspendable method.

We can also not use synchronized blocks along with suspendable methods. This means that we can’t mark the method itself as synchronized, we can’t call synchronized methods from inside it, and we can’t use synchronized blocks inside the method.

In the same way that we can’t use synchronized within suspendable methods, they should not be directly blocking the thread of execution in other ways – for example, using Thread.sleep(). Doing so will lead to performance problems and potentially to system instability.

Doing any of these will generate an error from the Quasar java agent. In the default case, we’ll see output to the console indicating what happened:

WARNING: fiber Fiber@10000004:fiber-10000004[task: ParkableForkJoinTask@40c7e038(Fiber@10000004), target: co.paralleluniverse.kotlin.KotlinKt$fiber$sc$1@7d289a68, scheduler: co.paralleluniverse.fibers.FiberForkJoinScheduler@5319f44e] is blocking a thread (Thread[ForkJoinPool-default-fiber-pool-worker-3,5,main]).
	at java.base@11/java.lang.Thread.sleep(Native Method)
	at java.base@11/java.lang.Thread.sleep(Thread.java:339)
	at java.base@11/java.util.concurrent.TimeUnit.sleep(TimeUnit.java:446)
	at app//com.baeldung.quasar.SimpleFiberTest$fiberTimeout$1.invoke(SimpleFiberTest.kt:43)
	at app//com.baeldung.quasar.SimpleFiberTest$fiberTimeout$1.invoke(SimpleFiberTest.kt:12)
	at app//co.paralleluniverse.kotlin.KotlinKt$fiber$sc$1.invoke(Kotlin.kt:32)
	at app//co.paralleluniverse.kotlin.KotlinKt$fiber$sc$1.run(Kotlin.kt:65535)
	at app//co.paralleluniverse.fibers.Fiber.run(Fiber.java:1099)

4. Strands

Strands are a concept in Quasar that combines both fibers and threads. They allow us to interchange threads and fibers as needed without other parts of our application caring.

We create a Strand by wrapping the thread or fiber instance in a Strand class, using Strand.of():

val thread: Thread = ...
val strandThread = Strand.of(thread)

val fiber: Fiber = ...
val strandFiber = Strand.of(fiber)

Alternatively, we can get a Strand instance for the currently executing thread or fiber using Strand.currentStrand():

val myFiber = fiber @Suspendable {
    // Strand.of(myFiber) == Strand.currentStrand()
}

Once done, we can interact with both using the same API, allowing us to interrogate the strand, wait until it’s finished executing and so on:

strand.id // Returns the ID of the Fiber or Thread
strand.name // Returns the Name of the Fiber or Thread
strand.priority // Returns the Priority of the Fiber or Thread

strand.isAlive // Returns if the Fiber or Thread is currently alive
strand.isFiber // Returns if the Strand is a Fiber

strand.join() // Block until the Fiber or Thread is completed
strand.get() // Returns the result of the Fiber or Thread

5. Wrapping Callbacks

One of the major uses for fibers is to wrap asynchronous code that uses callbacks to return the status to the caller.

Quasar provides a class called FiberAsync<T, E> which we can use for exactly this case. We can extend it to provide a fiber-based API instead of a callback based one for the same code.

This is done by writing a class that implements our callback interface, extends the FiberAsync class and delegates the callback methods to the FiberAsync class to handle:

interface PiCallback {
    fun success(result: BigDecimal)
    fun failure(error: Exception)
}

class PiAsync : PiCallback, FiberAsync<BigDecimal, Exception>() {
    override fun success(result: BigDecimal) {
        asyncCompleted(result)
    }

    override fun failure(error: Exception) {
        asyncFailed(error)
    }

    override fun requestAsync() {
        computePi(this)
    }
}

We now have a class that we can use to compute our result, where we can treat this as if it were a simple call and not a callback-based API:

val result = PiAsync().run()

This will either return the success value – the value that we passed to asyncCompleted() – or else throw the failure exception – the one that we passed to asyncFailed.

When we use this, Quasar will launch a new fiber that is directly tied to the current one and will suspend the current fiber until the result is available. This means that we must use it from within a fiber and not within a thread. It also means that the instance of FiberAsync must be both created and run from within the same fiber for it to work.

Additionally, they are not reusable – we can’t restart them once they’ve completed.

6. Channels

Quasar introduces the concept of channels to allow message passing between different strands. These are very similar to Channels in the Go programming language.

6.1. Creating Channels

We can create channels using the static method Channels.newChannel.

Channels.newChannel(bufferSize, overflowPolicy, singleProducerOptimized, singleConsumerOptimized);

So, an example that blocks when the buffer is full and targets a single producer and consumer would be:

Channels.newChannel<String>(1024, Channels.OverflowPolicy.BLOCK, true, true);

There are also some special methods for creating channels of certain primitive types – newIntChannel, newLongChannel, newFloatChannel and newDoubleChannel. We can use these if we are sending messages of these specific types and get a more efficient flow between fibers. Note that we can never use these primitive channels from multiple consumers – that is part of the efficiency that Quasar gives with them.

6.2. Using Channels

The resulting Channel object implements two different interfaces – SendPort and ReceivePort.

We can use the ReceivePort interface from the strands that are consuming messages:

fiber @Suspendable {
    while (true) {
        val message = channel.receive()
        println("Received: $message")
    }
}

We can then use the SendPort interface of the same channel to produce messages that will be consumed by the above:

channel.send("Hello")
channel.send("World")

For obvious reasons, we can’t use both of these from the same strand, but we can share the same channel instance between different strands to allow message sharing between the two. In this case, the strand can be either a fiber or a thread.

6.3. Closing Channels

In the above, we had an infinite loop reading from the channel. This is obviously not ideal.

What we should prefer doing is to loop all the while the channel is actively producing messages, and stop when then the channel is finished. We can do this using the close() to mark the channel as closed, and the isClosed property to see if the channel is closed:

fiber @Suspendable {
    while (!channel.isClosed) {
        val message = channel.receive()
        println("Received: $message")
    }
    println("Stopped receiving messages")
}

channel.send("Hello")
channel.send("World")

channel.close()

6.4. Blocking Channels

Channels are, by their very nature, blocking concepts. The ReceivePort will block until a message is available to process, and we can configure the SendPort to block until the message can be buffered.

This leverages a crucial concept of fibers – that they are suspendable. When any of these blocking actions occur, Quasar will use very lightweight mechanisms to suspend the fiber until it can continue its work, instead of repeatedly polling the channel. This allows the system resources to be used elsewhere – for processing other fibers, for example.

6.5. Waiting on Multiple Channels

We have seen that Quasar can block on a single channel until an action can be performed. Quasar also offers the ability to wait across multiple channels.

We do this using the Selector.select statement. This concept might be familiar from both Go and from Java NIO.

The select() method takes a collection of SelectAction instances and will block until one of these actions is performed:

fiber @Suspendable {
    while (!channel1.isClosed && !channel2.isClosed) {
        val received = Selector.select(
          Selector.receive(channel1), 
          Selector.receive(channel2)
        )

        println("Received: $received")
    }
}

In the above, we can then have multiple channels written to, and our fiber will read immediately on any of them that have a message available. The selector will only consume the first message that is available so that no messages will get dropped.

We can also use this for sending to multiple channels:

fiber @Suspendable {
    for (i in 0..10) {
        Selector.select(
          Selector.send(channel1, "Channel 1: $i"),
          Selector.send(channel2, "Channel 2: $i")
        )
    }
}

As with receive, this will block until the first action can be performed and then will perform that action. This has the interesting side effect that the message will send to exactly one channel, but the channel that it is sent to happens to be the first one that has buffer space available for it. This allows us to distribute messages across multiple channels based exactly on backpressure from the receiving ends of those channels.

6.6. Ticker Channels

A special kind of channel that we can create is the ticker channel. These are similar in concept to stock exchange tickers – it’s not important that the consumer sees every message, as newer ones replace older ones.

These are useful when we have a constant flow of status updates – for example, stock exchange prices or percentage completed.

We create these as normal channels, but we use the OverflowPolicy.DISPLACE setting. In this case, if the buffer is full when producing a new message, then the oldest message is silently dropped to make room for it.

We can only consume these channels from a single strand. However, we can create a TickerChannelConsumer to read from this channel across multiple strands:

val channel = Channels.newChannel<String>(3, Channels.OverflowPolicy.DISPLACE)

for (i in 0..10) {
    val tickerConsumer = Channels.newTickerConsumerFor(channel)
    fiber @Suspendable {
        while (!tickerConsumer.isClosed) {
            val message = tickerConsumer.receive()
            println("Received on $i: $message")
        }
        println("Stopped receiving messages on $i")
    }
}

for (i in 0..50) {
    channel.send("Message $i")
}

channel.close()

Every instance of the TickerChannelConsumer will potentially receive all the messages sent to the wrapped channel – allowing for any dropped by the overflow policy.

We’ll always receive messages in the correct order, and we can consume each TickerChannelConsumer at the rate that we need to work at – one fiber running slowly will not affect any others.

We will also know when the wrapped channel is closed so that we can stop reading from our TickerChannelConsumer. This allows the producer to not care about the way that the consumers are reading the messages, nor the type of channel that’s being used.

6.7. Functional Transformations to Channels

We’re all used to functional transformations in Java, using streams. We can apply these same standard transformations on channels – both as send and receive variations.

These actions that can apply include:
  • filter – Filter out messages that don’t fit a given lambda
  • map – Convert messages as they flow through the channel
  • flatMap – The same as map, but converting one message into multiple messages
  • reduce – Apply a reduction function to a channel

For example, we can convert a ReceivePort<String> into one that reverses all the strings flowing through it using the following:

val transformOnReceive = Channels.map(channel, Function<String, String> { msg: String? -> msg?.reversed() })

This will not affect the messages on the original channel, and they can still be consumed elsewhere without seeing the effect of this transformation.

Alternatively, we can convert a SendPort<String> into one that forces all the strings to uppercase as we write them to the channel as follows:

val transformOnSend = Channels.mapSend(channel, Function<String, String> { msg: String? -> msg?.toUpperCase() })

This will affect messages as they are written, and in this case, the wrapped channel will only ever see the transformed message. However, we could still write directly to the channel that is being wrapped to bypass this transformation if needed.

7. Data Flow

Quasar Core gives us a couple of tools to support reactive programming. These are not as powerful as something like RxJava, but more than enough for the majority of cases.

We have access to two concepts – Val and VarVal represents a constant value, and Var represents a varying one.

Both types are constructed with either no value or a SuspendableCallable which will be used in fiber to compute the value:

val a = Var<Int>()
val b = Val<Int>()

val c = Var<Int> { a.get() + b.get() }
val d = Var<Int> { a.get() * b.get() }

// (a*b) - (a+b)
val initialResult = Val<Int> { d.get() - c.get() }
val currentResult = Var<Int> { d.get() - c.get() }

Initially, initialResult and currentResult will have no values, and attempting to get value out of them will block the current strand. As soon as we give a and b values, we can read values from both initialResult and currentResult.

In addition to this, if we further change a then currentResult will update to reflect this but initialResult won’t:

a.set(2)
b.set(4)

Assert.assertEquals(2, initialResult.get())
Assert.assertEquals(2, currentResult.get())

a.set(3)

Assert.assertEquals(2, initialResult.get()) // Unchanged
Assert.assertEquals(5, currentResult.get()) // New Value

If we try to change b, then we’ll get an exception thrown instead, because Val is can only have a single value assigned to it.

8. Conclusion

This article has given an introduction to the Quasar library that we can use for asynchronous programming. What we’ve seen here is only the basics of what we can achieve with Quasar. Why not try it out on the next project?

Examples of some of the concepts we’ve covered here can be found over on GitHub.
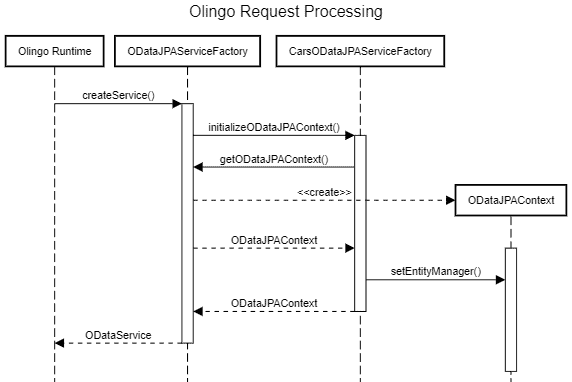
A Guide to Crawler4j

$
0
0

1. Introduction

We see web crawlers in use every time we use our favorite search engine. They’re also commonly used to scrape and analyze data from websites.

In this tutorial, we’re going to learn how to use crawler4j to set up and run our own web crawlers. crawler4j is an open source Java project that allows us to do this easily.

2. Setup

Let’s use Maven Central to find the most recent version and bring in the Maven dependency:

<dependency>
    <groupId>edu.uci.ics</groupId>
    <artifactId>crawler4j</artifactId>
    <version>4.4.0</version>
</dependency>

3. Creating Crawlers

3.1. Simple HTML Crawler

We’re going to start by creating a basic crawler that crawls the HTML pages on https://baeldung.com.

Let’s create our crawler by extending WebCrawler in our crawler class and defining a pattern to exclude certain file types:

public class HtmlCrawler extends WebCrawler {

    private final static Pattern EXCLUSIONS
      = Pattern.compile(".*(\\.(css|js|xml|gif|jpg|png|mp3|mp4|zip|gz|pdf))$");

    // more code
}

In each crawler class, we must override and implement two methods: shouldVisit and visit.

Let’s create our shouldVisit method now using the EXCLUSIONS pattern we created:

@Override
public boolean shouldVisit(Page referringPage, WebURL url) {
    String urlString = url.getURL().toLowerCase();
    return !EXCLUSIONS.matcher(urlString).matches() 
      && urlString.startsWith("https://www.baeldung.com/");
}

Then, we can do our processing for visited pages in the visit method:

@Override
public void visit(Page page) {
    String url = page.getWebURL().getURL();

    if (page.getParseData() instanceof HtmlParseData) {
        HtmlParseData htmlParseData = (HtmlParseData) page.getParseData();
        String title = htmlParseData.getTitle();
        String text = htmlParseData.getText();
        String html = htmlParseData.getHtml();
        Set<WebURL> links = htmlParseData.getOutgoingUrls();

        // do something with collected data
    }
}

Once we have our crawler written, we need to configure and run it:

File crawlStorage = new File("src/test/resources/crawler4j");
CrawlConfig config = new CrawlConfig();
config.setCrawlStorageFolder(crawlStorage.getAbsolutePath());

int numCrawlers = 12;

PageFetcher pageFetcher = new PageFetcher(config);
RobotstxtConfig robotstxtConfig = new RobotstxtConfig();
RobotstxtServer robotstxtServer= new RobotstxtServer(robotstxtConfig, pageFetcher);
CrawlController controller = new CrawlController(config, pageFetcher, robotstxtServer);

controller.addSeed("https://www.baeldung.com/");

CrawlController.WebCrawlerFactory<HtmlCrawler> factory = HtmlCrawler::new;

controller.start(factory, numCrawlers);

We configured a temporary storage directory, specified the number of crawling threads, and seeded the crawler with a starting URL.

We should also note that the CrawlController.start() method is a blocking operation. Any code after that call will only execute after the crawler has finished running.

3.2. ImageCrawler

By default, crawler4j doesn’t crawl binary data. In this next example, we’ll turn on that functionality and crawl all the JPEGs on Baeldung.

Let’s start by defining the ImageCrawler class with a constructor that takes a directory for saving images:

public class ImageCrawler extends WebCrawler {
    private final static Pattern EXCLUSIONS
      = Pattern.compile(".*(\\.(css|js|xml|gif|png|mp3|mp4|zip|gz|pdf))$");
    
    private static final Pattern IMG_PATTERNS = Pattern.compile(".*(\\.(jpg|jpeg))$");
    
    private File saveDir;
    
    public ImageCrawler(File saveDir) {
        this.saveDir = saveDir;
    }

    // more code

}

Next, let’s implement the shouldVisit method:

@Override
public boolean shouldVisit(Page referringPage, WebURL url) {
    String urlString = url.getURL().toLowerCase();
    if (EXCLUSIONS.matcher(urlString).matches()) {
        return false;
    }

    if (IMG_PATTERNS.matcher(urlString).matches() 
        || urlString.startsWith("https://www.baeldung.com/")) {
        return true;
    }

    return false;
}

Now, we’re ready to implement the visit method:

@Override
public void visit(Page page) {
    String url = page.getWebURL().getURL();
    if (IMG_PATTERNS.matcher(url).matches() 
        && page.getParseData() instanceof BinaryParseData) {
        String extension = url.substring(url.lastIndexOf("."));
        int contentLength = page.getContentData().length;

        // write the content data to a file in the save directory
    }
}

Running our ImageCrawler is similar to running the HttpCrawler, but we need to configure it to include binary content:

CrawlConfig config = new CrawlConfig();
config.setIncludeBinaryContentInCrawling(true);

// ... same as before
        
CrawlController.WebCrawlerFactory<ImageCrawler> factory = () -> new ImageCrawler(saveDir);
        
controller.start(factory, numCrawlers);

3.3. Collecting Data

Now that we’ve looked at a couple of basic examples, let’s expand on our HtmlCrawler to collect some basic statistics during our crawl.

First, let’s define a simple class to hold a couple of statistics:

public class CrawlerStatistics {
    private int processedPageCount = 0;
    private int totalLinksCount = 0;
    
    public void incrementProcessedPageCount() {
        processedPageCount++;
    }
    
    public void incrementTotalLinksCount(int linksCount) {
        totalLinksCount += linksCount;
    }
    
    // standard getters
}

Next, let’s modify our HtmlCrawler to accept a CrawlerStatistics instance via a constructor:

private CrawlerStatistics stats;
    
public HtmlCrawler(CrawlerStatistics stats) {
    this.stats = stats;
}

With our new CrawlerStatistics object, let’s modify the visit method to collect what we want:

@Override
public void visit(Page page) {
    String url = page.getWebURL().getURL();
    stats.incrementProcessedPageCount();

    if (page.getParseData() instanceof HtmlParseData) {
        HtmlParseData htmlParseData = (HtmlParseData) page.getParseData();
        String title = htmlParseData.getTitle();
        String text = htmlParseData.getText();
        String html = htmlParseData.getHtml();
        Set<WebURL> links = htmlParseData.getOutgoingUrls();
        stats.incrementTotalLinksCount(links.size());

        // do something with collected data
    }
}

Now, let’s head back to our controller and provide the HtmlCrawler with an instance of CrawlerStatistics:

CrawlerStatistics stats = new CrawlerStatistics();
CrawlController.WebCrawlerFactory<HtmlCrawler> factory = () -> new HtmlCrawler(stats);

3.4. Multiple Crawlers

Building on our previous examples, let’s now have a look at how we can run multiple crawlers from the same controller.

It’s recommended that each crawler use its own temporary storage directory, so we need to create separate configurations for each one we’ll be running.

The CrawlControllers can share a single RobotstxtServer, but otherwise, we basically need a copy of everything.

So far, we’ve used the CrawlController.start method to run our crawlers and noted that it’s a blocking method. To run multiples, we’ll use CrawlerControlller.startNonBlocking in conjunction with CrawlController.waitUntilFinish.

Now, let’s create a controller to run HtmlCrawler and ImageCrawler concurrently:

File crawlStorageBase = new File("src/test/resources/crawler4j");
CrawlConfig htmlConfig = new CrawlConfig();
CrawlConfig imageConfig = new CrawlConfig();
        
// Configure storage folders and other configurations
        
PageFetcher pageFetcherHtml = new PageFetcher(htmlConfig);
PageFetcher pageFetcherImage = new PageFetcher(imageConfig);
        
RobotstxtConfig robotstxtConfig = new RobotstxtConfig();
RobotstxtServer robotstxtServer = new RobotstxtServer(robotstxtConfig, pageFetcherHtml);

CrawlController htmlController
  = new CrawlController(htmlConfig, pageFetcherHtml, robotstxtServer);
CrawlController imageController
  = new CrawlController(imageConfig, pageFetcherImage, robotstxtServer);
        
// add seed URLs
        
CrawlerStatistics stats = new CrawlerStatistics();
CrawlController.WebCrawlerFactory<HtmlCrawler> htmlFactory = () -> new HtmlCrawler(stats);
        
File saveDir = new File("src/test/resources/crawler4j");
CrawlController.WebCrawlerFactory<ImageCrawler> imageFactory
  = () -> new ImageCrawler(saveDir);
        
imageController.startNonBlocking(imageFactory, 7);
htmlController.startNonBlocking(htmlFactory, 10);

htmlController.waitUntilFinish();
imageController.waitUntilFinish();

4. Configuration

We’ve already seen some of what we can configure. Now, let’s go over some other common settings.

Settings are applied to the CrawlConfig instance we specify in our controller.

4.1. Limiting Crawl Depth

By default, our crawlers will crawl as deep as they can. To limit how deep they’ll go, we can set the crawl depth:

crawlConfig.setMaxDepthOfCrawling(2);

Seed URLs are considered to be at depth 0, so a crawl depth of 2 will go two layers beyond the seed URL.

4.2. Maximum Pages to Fetch

Another way to limit how many pages our crawlers will cover is to set the maximum number of pages to crawl:

crawlConfig.setMaxPagesToFetch(500);

4.3. Maximum Outgoing Links

We can also limit the number of outgoing links followed off each page:

crawlConfig.setMaxOutgoingLinksToFollow(2000);

4.4. Politeness Delay

Since very efficient crawlers can easily be a strain on web servers, crawler4j has what it calls a politeness delay. By default, it’s set to 200 milliseconds. We can adjust this value if we need to:

crawlConfig.setPolitenessDelay(300);

4.5. Include Binary Content

We already used the option for including binary content with our ImageCrawler:

crawlConfig.setIncludeBinaryContentInCrawling(true);

4.6. Include HTTPS

By default, crawlers will include HTTPS pages, but we can turn that off:

crawlConfig.setIncludeHttpsPages(false);

4.7. Resumable Crawling

If we have a long-running crawler and we want it to resume automatically, we can set resumable crawling. Turning it on may cause it to run slower:

crawlConfig.setResumableCrawling(true);

4.8. User-Agent String

The default user-agent string for crawler4j is crawler4j. Let’s customize that:

crawlConfig.setUserAgentString("baeldung demo (https://github.com/yasserg/crawler4j/)");

We’ve just covered some of the basic configurations here. We can look at CrawConfig class if we’re interested in some of the more advanced or obscure configuration options.

5. Conclusion

In this article, we’ve used crawler4j to create our own web crawlers. We started with two simple examples of crawling HTML and images. Then, we built on those examples to see how we can gather statistics and run multiple crawlers concurrently.

The full code examples are available on GitHub.

Java Weekly, Issue 284

$
0
0

Here we go…

1. Spring and Java

>> Introducing Spring Cloud App Broker [spring.io]

With this Spring Cloud Services 3.0 release, it’s even easier to develop your own service broker with less boilerplate.

>> Running TestProject Tests on a Local Development Environment [petrikainulainen.net]

A step-by-step guide, from obtaining a developer key to writing a custom runner class, and finally, running and debugging tests locally.

>> Tuning Spring Petclinic JPA and Hibernate configuration with Hypersistence Optimizer [vladmihalcea.com]

And a great automated tool to help discover and address performance issues long before launching into production. Very cool.

Also worth reading:

Webinars and presentations:

Time to upgrade:

2. Technical and Musings

>> An Exercise Program for the Fat Web [blog.codinghorror.com]

An intro to Pi-Hole, an ad-blocking DHCP and DNS server for your home network, built on the Raspberry Pi platform.

>> Sustainable Operations in Complex Systems with Production Excellence [infoq.com]

And a quick look at how developers can help achieve a culture of production excellence, by cultivating a basic fluency in operations.

Also worth reading:

3. Comics

And my favorite Dilberts of the week:

>> Try Adding Some Variables [dilbert.com]

>> Winners Never Quit [dilbert.com]

>> Service Human and Pay [dilbert.com]

4. Pick of the Week

An internal pick this week:

>> The Baeldung YouTube Channel [youtube.com]

I don’t release new videos super often, but the ones I do release are, hopefully, cool and helpful, so definitely subscribe if YouTube is your thing.

Viewing all 3739 articles
Browse latest View live


<script src="https://jsc.adskeeper.com/r/s/rssing.com.1596347.js" async> </script>