Quantcast
Channel: Baeldung
Viewing all 3783 articles
Browse latest View live

Method Handles in Java

$
0
0

1. Introduction

In this article, we’re going to explore an important API that was introduced in Java 7 and enhanced in the following versions, the java.lang.invoke.MethodHandles.

In particular, we’ll learn what method handles are, how to create them and how to use them.

2. What are Method Handles?

Coming to its definition, as stated in the API documentation:

A method handle is a typed, directly executable reference to an underlying method, constructor, field, or similar low-level operation, with optional transformations of arguments or return values.

In a simpler way, method handles are a low-level mechanism for finding, adapting and invoking methods.

Method handles are immutable and have no visible state.

For creating and using a MethodHandle, 4 steps are required:

  • Creating the lookup
  • Creating the method type
  • Finding the method handle
  • Invoking the method handle

2.1. Method Handles vs Reflection

Method handles were introduced in order to work alongside the existing java.lang.reflect API, as they serve different purposes and have different characteristics.

From a performance standpoint, the MethodHandles API can be much faster than the Reflection API since the access checks are made at creation time rather than at execution time. This difference gets amplified if a security manager is present, since member and class lookups are subject to additional checks.

However, considering that performance isn’t the only suitability measure for a task, we have also to consider that the MethodHandles API is harder to use due to the lack of mechanisms such as member class enumeration, accessibility flags inspection and more.

Even so, the MethodHandles API offers the possibility to curry methods, change the types of parameters and change their order.

Having a clear definition and goals of the MethodHandles API, we can now begin to work with them, starting from the lookup.

3. Creating the Lookup

The first thing to do when we want to create a method handle is to retrieve the lookup, the factory object that is responsible for creating method handles for methods, constructors, and fields, that are visible to the lookup class.

Through the MethodHandles API, it’s possible to create the lookup object, with different access modes.

Let’s create the lookup that provides access to public methods:

MethodHandles.Lookup publicLookup = MethodHandles.publicLookup();

However, in case we want to have access also to private and protected methods, we can use, instead, the lookup() method:

MethodHandles.Lookup lookup = MethodHandles.lookup();

4. Creating a MethodType

In order to be able to create the MethodHandle, the lookup object requires a definition of its type and this is achieved through the MethodType class.

In particular, MethodType represents the arguments and return type accepted and returned by a method handle or passed and expected by a method handle caller.

The structure of a MethodType is simple and it’s formed by a return type together with an appropriate number of parameter types that must be properly matched between a method handle and all its callers.

In the same way as MethodHandle, even the instances of a MethodType are immutable.

Let’s see how it’s possible to define a MethodType that specifies a java.util.List class as return type and an Object array as input type:

MethodType mt = MethodType.methodType(List.class, Object[].class);

In case the method returns a primitive type or void as its return type, we will use the class representing those types (void.class, int.class …).

Let’s define a MethodType that returns an int value and accepts an Object:

MethodType mt = MethodType.methodType(int.class, Object.class);

We can now proceed to create MethodHandle.

5. Finding a MethodHandle

Once we’ve defined our method type, in order to create a MethodHandle, we have to find it through the lookup or publicLookup object, providing also the origin class and the method name.

In particular, the lookup factory provides a set of methods that allow us to find the method handle in an appropriate way considering the scope of our method. Starting with the simplest scenario, let’s explore the principal ones.

5.1. Method Handle for Methods

Using the findVirtual() method allow us to create a MethodHandle for an object method. Let’s create one, based on the concat() method of the String class:

MethodType mt = MethodType.methodType(String.class, String.class);
MethodHandle concatMH = publicLookup.findVirtual(String.class, "concat", mt);

5.2. Method Handle for Static Methods

When we want to gain access to a static method, we can instead use the findStatic() method:

MethodType mt = MethodType.methodType(List.class, Object[].class);

MethodHandle asListMH = publicLookup.findStatic(Arrays.class, "asList", mt);

In this case, we created a method handle that converts an array of Objects to a List of them.

5.3. Method Handle for Constructors

Gaining access to a constructor can be done using the findConstructor() method.

Let’s create a method handles that behaves as the constructor of the Integer class, accepting a String attribute:

MethodType mt = MethodType.methodType(void.class, String.class);

MethodHandle newIntegerMH = publicLookup.findConstructor(Integer.class, mt);

5.4. Method Handle for Fields

Using a method handle it’s possible to gain access also to fields.

Let’s start defining the Book class:

public class Book {
    
    String id;
    String title;

    // constructor

}

Having as precondition a direct access visibility between the method handle and the declared property, we can create a method handle that behaves as a getter:

MethodHandle getTitleMH = lookup.findGetter(Book.class, "title", String.class);

For further information on handling variables/fields, give a look at the Java 9 Variable Handles Demystified, where we discuss the java.lang.invoke.VarHandle API, added in Java 9.

5.5. Method Handle for Private Methods

Creating a method handle for a private method can be done, with the help of the java.lang.reflect API.

Let’s start adding a private method to the Book class:

private String formatBook() {
    return id + " > " + title;
}

Now we can create a method handle that behaves exactly as the formatBook() method:

Method formatBookMethod = Book.class.getDeclaredMethod("formatBook");
formatBookMethod.setAccessible(true);

MethodHandle formatBookMH = lookup.unreflect(formatBookMethod);

6. Invoking a Method Handle

Once we’ve created our method handles, use them is the next step. In particular, the MethodHandle class provides 3 different way to execute a method handle: invoke(), invokeWithArugments() and invokeExact().

Let’s start with the invoke option.

6.1. Invoking a Method Handle

When using the invoke() method, we enforce the number of the arguments (arity) to be fixed but we allow the performing of casting and boxing/unboxing of the arguments and return types.

Let’s see how it’s possible to use the invoke() with a boxed argument:

MethodType mt = MethodType.methodType(String.class, char.class, char.class);
MethodHandle replaceMH = publicLookup.findVirtual(String.class, "replace", mt);

String output = (String) replaceMH.invoke("jovo", Character.valueOf('o'), 'a');

assertEquals("java", output);

In this case, the replaceMH requires char arguments, but the invoke() performs an unboxing on the Character argument before its execution.

6.2. Invoking with Arguments

Invoking a method handle using the invokeWithArguments method, is the least restrictive of the three options.

In fact, it allows a variable arity invocation, in addition to the casting and boxing/unboxing of the arguments and of the return types.

Coming to practice, this allows us to create a List of Integer starting from an array of int values:

MethodType mt = MethodType.methodType(List.class, Object[].class);
MethodHandle asList = publicLookup.findStatic(Arrays.class, "asList", mt);

List<Integer> list = (List<Integer>) asList.invokeWithArguments(1,2);

assertThat(Arrays.asList(1,2), is(list));

6.3. Invoking Exact

In case we want to be more restrictive in the way we execute a method handle (number of arguments and their type), we have to use the invokeExact() method.

In fact, it doesn’t provide any casting to the class provided and requires a fixed number of arguments.

Let’s see how we can sum two int values using a method handle:

MethodType mt = MethodType.methodType(int.class, int.class, int.class);
MethodHandle sumMH = lookup.findStatic(Integer.class, "sum", mt);

int sum = (int) sumMH.invokeExact(1, 11);

assertEquals(12, sum);

If in this case, we decide to pass to the invokeExact method a number that isn’t an int, the invocation will lead to WrongMethodTypeException.

7. Working with Array

MethodHandles aren’t intended to work only with fields or objects, but also with arrays. As a matter of fact, with the asSpreader() API, it’s possible to make an array-spreading method handle.

In this case, the method handle accepts an array argument, spreading its elements as positional arguments, and optionally the length of the array.

Let’s see how we can spread a method handle to check if the elements within an array are equals:

MethodType mt = MethodType.methodType(boolean.class, Object.class);
MethodHandle equals = publicLookup.findVirtual(String.class, "equals", mt);

MethodHandle methodHandle = equals.asSpreader(Object[].class, 2);

assertTrue((boolean) methodHandle.invoke(new Object[] { "java", "java" }));

8. Enhancing a Method Handle

Once we’ve defined a method handle, it’s possible to enhance it by binding the method handle to an argument without actually invoking it.

For example, in Java 9, this kind of behaviour is used to optimize String concatenation.

Let’s see how we can perform a concatenation, binding a suffix to our concatMH:

MethodType mt = MethodType.methodType(String.class, String.class);
MethodHandle concatMH = publicLookup.findVirtual(String.class, "concat", mt);

MethodHandle bindedConcatMH = concatMH.bindTo("Hello ");

assertEquals("Hello World!", bindedConcatMH.invoke("World!"));

9. Java 9 Enhancements

With Java 9, few enhancements were made to the MethodHandles API with the aim to make it much easier to use.

The enhancements affected 3 main topics:

  • Lookup functions – allowing class lookups from different contexts and support non-abstract methods in interfaces
  • Argument handling – improving the argument folding, argument collecting and argument spreading functionalities
  • Additional combinations – adding loops (loopwhileLoop, doWhileLoop…) and a better exception handling support with the tryFinally

These changes resulted in few additional benefits:

  • Increased JVM compiler optimizations
  • Instantiation reduction
  • Enabled precision in the usage of the MethodHandles API

Details of the enhancements made are available at the MethodHandles API Javadoc.

10. Conclusion

In this article, we covered the MethodHandles API, what they’re and how we can use them.

We also discussed how it relates to the Reflection API and since the method handles allow low-level operations, it should be better to avoid using them, unless they fit perfectly the scope of the job.

As always, the complete source code for this article is available over on Github.

JDBC with Groovy

$
0
0

1. Introduction

In this article, we’re going to look at how to query relational databases with JDBC, using idiomatic Groovy.

JDBC, while relatively low-level, is the foundation of most ORMs and other high-level data access libraries on the JVM. And we can use JDBC directly in Groovy, of course; however, it has a rather cumbersome API.

Fortunately for us, the Groovy standard library builds upon JDBC to present an interface that is clean, simple, yet powerful. So, we’ll be exploring the Groovy SQL module.

We’re going to look at JDBC in plain Groovy, not considering any framework such as Spring, for which we have other guides.

2. JDBC and Groovy Setup

We have to include the groovy-sql module among our dependencies:

<dependency>
    <groupId>org.codehaus.groovy</groupId>
    <artifactId>groovy</artifactId>
    <version>2.4.13</version>
</dependency>
<dependency>
    <groupId>org.codehaus.groovy</groupId>
    <artifactId>groovy-sql</artifactId>
    <version>2.4.13</version>
</dependency>

It’s not necessary to list it explicitly if we’re using groovy-all:

<dependency>
    <groupId>org.codehaus.groovy</groupId>
    <artifactId>groovy-all</artifactId>
    <version>2.4.13</version>
</dependency>

We can find the latest version of groovy, groovy-sql and groovy-all on Maven Central.

3. Connecting to the Database

The first thing we have to do in order to work with the database is connecting to it.

Let’s introduce the groovy.sql.Sql class, which we’ll use for all operations on the database with the Groovy SQL module.

An instance of Sql represents a database on which we want to operate.

However, an instance of Sql isn’t a single database connection. We’ll talk about connections later, let’s not worry about them now; let’s just assume everything magically works.

3.1. Specifying Connection Parameters

Throughout this article, we’re going to use an HSQL Database, which is a lightweight relational DB that is mostly used in tests.

A database connection needs a URL, a driver, and access credentials:

Map dbConnParams = [
  url: 'jdbc:hsqldb:mem:testDB',
  user: 'sa',
  password: '',
  driver: 'org.hsqldb.jdbc.JDBCDriver']

Here, we’ve chosen to specify those using a Map, although it’s not the only possible choice.

We can then obtain a connection from the Sql class:

def sql = Sql.newInstance(dbConnParams)

We’ll see how to use it in the following sections.

When we’re finished, we should always release any associated resources:

sql.close()

3.2. Using a DataSource

It is common, especially in programs running inside an application server, to use a datasource to connect to the database.

Also, when we want to pool connections or to use JNDI, a datasource is the most natural option.

Groovy’s Sql class accepts datasources just fine:

def sql = Sql.newInstance(datasource)

3.3. Automatic Resource Management

Remembering to call close() when we’re done with an Sql instance is tedious; machines remember stuff much better than we do, after all.

With Sql we can wrap our code in a closure and have Groovy call close() automatically when control leaves it, even in case of exceptions:

Sql.withInstance(dbConnParams) {
    Sql sql -> haveFunWith(sql)
}

4. Issuing Statements Against the Database

Now, we can go on to the interesting stuff.

The most simple and unspecialized way to issue a statement against the database is the execute method:

sql.execute "create table PROJECT (id integer not null, name varchar(50), url varchar(100))"

In theory it works both for DDL/DML statements and for queries; however, the simple form above does not offer a way to get back query results. We’ll leave queries for later.

The execute method has several overloaded versions, but, again, we’ll look at the more advanced use cases of this and other methods in later sections.

4.1. Inserting Data

For inserting data in small amounts and in simple scenarios, the execute method discussed earlier is perfectly fine.

However, for cases when we have generated columns (e.g., with sequences or auto-increment) and we want to know the generated values, a dedicated method exists: executeInsert.

As for execute, we’ll now look at the most simple method overload available, leaving more complex variants for a later section.

So, suppose we have a table with an auto-increment primary key (identity in HSQLDB parlance):

sql.execute "create table PROJECT (ID IDENTITY, NAME VARCHAR (50), URL VARCHAR (100))"

Let’s insert a row in the table and save the result in a variable:

def ids = sql.executeInsert """
  INSERT INTO PROJECT (NAME, URL) VALUES ('tutorials', 'github.com/eugenp/tutorials')
"""

executeInsert behaves exactly like execute, but what does it return?

It turns out that the return value is a matrix: its rows are the inserted rows (remember that a single statement can cause multiple rows to be inserted) and its columns are the generated values.

It sounds complicated, but in our case, which is by far the most common one, there is a single row and a single generated value:

assertEquals(0, ids[0][0])

A subsequent insertion would return a generated value of 1:

ids = sql.executeInsert """
  INSERT INTO PROJECT (NAME, URL)
  VALUES ('REST with Spring', 'github.com/eugenp/REST-With-Spring')
"""

assertEquals(1, ids[0][0])

4.2. Updating and Deleting Data

Similarly, a dedicated method for data modification and deletion exists: executeUpdate.

Again, this differs from execute only in its return value, and we’ll only look at its simplest form.

The return value, in this case, is an integer, the number of affected rows:

def count = sql.executeUpdate("UPDATE PROJECT SET URL = 'https://' + URL")

assertEquals(2, count)

5. Querying the Database

Things start getting Groovy when we query the database.

Dealing with the JDBC ResultSet class is not exactly fun. Luckily for us, Groovy offers a nice abstraction over all of that.

5.1. Iterating Over Query Results

While loops are so old style… we’re all into closures nowadays.

And Groovy is here to suit our tastes:

sql.eachRow("SELECT * FROM PROJECT") { GroovyResultSet rs ->
    haveFunWith(rs)
}

The eachRow method issues our query against the database and calls a closure over each row.

As we can see, a row is represented by an instance of GroovyResultSet, which is an extension of plain old ResultSet with a few added goodies. Read on to find more about it.

5.2. Accessing Result Sets

In addition to all of the ResultSet methods, GroovyResultSet offers a few convenient utilities.

Mainly, it exposes named properties matching column names:

sql.eachRow("SELECT * FROM PROJECT") { rs ->
    assertNotNull(rs.name)
    assertNotNull(rs.URL)
}

Note how property names are case-insensitive.

GroovyResultSet also offers access to columns using a zero-based index:

sql.eachRow("SELECT * FROM PROJECT") { rs ->
    assertNotNull(rs[0])
    assertNotNull(rs[1])
    assertNotNull(rs[2])
}

5.3. Pagination

We can easily page the results, i.e., load only a subset starting from some offset up to some maximum number of rows. This is a common concern in web applications, for example.

eachRow and related methods have overloads accepting an offset and a maximum number of returned rows:

def offset = 1
def maxResults = 1
def rows = sql.rows('SELECT * FROM PROJECT ORDER BY NAME', offset, maxResults)

assertEquals(1, rows.size())
assertEquals('REST with Spring', rows[0].name)

Here, the rows method returns a list of rows rather than iterating over them like eachRow.

6. Parameterized Queries and Statements

More often than not, queries and statements are not fully fixed at compile time; they usually have a static part and a dynamic part, in the form of parameters.

If you’re thinking about string concatenation, stop now and go read about SQL injection!

We mentioned earlier that the methods that we’ve seen in previous sections have many overloads for various scenarios.

Let’s introduce those overloads that deal with parameters in SQL queries and statements.

6.1. Strings with Placeholders

In style similar to plain JDBC, we can use positional parameters:

sql.execute(
    'INSERT INTO PROJECT (NAME, URL) VALUES (?, ?)',
    'tutorials', 'github.com/eugenp/tutorials')

or we can use named parameters with a map:

sql.execute(
    'INSERT INTO PROJECT (NAME, URL) VALUES (:name, :url)',
    [name: 'REST with Spring', url: 'github.com/eugenp/REST-With-Spring'])

This works for execute, executeUpdate, rows and eachRow. executeInsert supports parameters, too, but its signature is a little bit different and trickier.

6.2. Groovy Strings

We can also opt for a Groovier style using GStrings with placeholders.

All the methods we’ve seen don’t substitute placeholders in GStrings the usual way; rather, they insert them as JDBC parameters, ensuring the SQL syntax is correctly preserved, with no need to quote or escape anything and thus no risk of injection.

This is perfectly fine, safe and Groovy:

def name = 'REST with Spring'
def url = 'github.com/eugenp/REST-With-Spring'
sql.execute "INSERT INTO PROJECT (NAME, URL) VALUES (${name}, ${url})"

7. Transactions and Connections

So far we’ve skipped over a very important concern: transactions.

In fact, we haven’t talked at all about how Groovy’s Sql manages connections, either.

7.1. Short-Lived Connections

In the examples presented so far, each and every query or statement was sent to the database using a new, dedicated connection. Sql closes the connection as soon as the operation terminates.

Of course, if we’re using a connection pool, the impact on performance might be small.

Still, if we want to issue multiple DML statements and queries as a single, atomic operation, we need a transaction.

Also, for a transaction to be possible in the first place, we need a connection that spans multiple statements and queries.

7.2. Transactions with a Cached Connection

Groovy SQL does not allow us to create or access transactions explicitly.

Instead, we use the withTransaction method with a closure:

sql.withTransaction {
    sql.execute """
        INSERT INTO PROJECT (NAME, URL)
        VALUES ('tutorials', 'github.com/eugenp/tutorials')
    """
    sql.execute """
        INSERT INTO PROJECT (NAME, URL)
        VALUES ('REST with Spring', 'github.com/eugenp/REST-With-Spring')
    """
}

Inside the closure, a single database connection is used for all queries and statements.

Furthermore, the transaction is automatically committed when the closure terminates, unless it exits early due to an exception.

However, we can also manually commit or rollback the current transaction with methods in the Sql class:

sql.withTransaction {
    sql.execute """
        INSERT INTO PROJECT (NAME, URL)
        VALUES ('tutorials', 'github.com/eugenp/tutorials')
    """
    sql.commit()
    sql.execute """
        INSERT INTO PROJECT (NAME, URL)
        VALUES ('REST with Spring', 'github.com/eugenp/REST-With-Spring')
    """
    sql.rollback()
}

7.3. Cached Connections Without a Transaction

Finally, to reuse a database connection without the transaction semantics described above, we use cacheConnection:

sql.cacheConnection {
    sql.execute """
        INSERT INTO PROJECT (NAME, URL)
        VALUES ('tutorials', 'github.com/eugenp/tutorials')
    """
    throw new Exception('This does not roll back')
}

8. Conclusions and Further Reading

In this article, we’ve looked at the Groovy SQL module and how it enhances and simplifies JDBC with closures and Groovy strings.

We can then safely conclude that plain old JDBC looks a bit more modern with a sprinkle of Groovy!

We haven’t talked about every single feature of Groovy SQL; for example, we’ve left out batch processing, stored procedures, metadata, and other things.

For further information, see the Groovy documentation.

The implementation of all these examples and code snippets can be found in the GitHub project – this is a Maven project, so it should be easy to import and run as is.

An MVC Example with Servlets and JSP

$
0
0

1. Overview

In this quick article, we’ll create a small web application that implements the Model View Controller (MVC) design pattern, using basic Servlets and JSPs.

We’ll explore a little bit about how MVC works, and its key features before we move on to the implementation.

2. Introduction to MVC

Model-View-Controller (MVC) is a pattern used in software engineering to separate the application logic from the user interface. As the name implies, the MVC pattern has three layers.

The Model defines the business layer of the application, the Controller manages the flow of the application, and the View defines the presentation layer of the application.

Although the MVC pattern isn’t specific to web applications, it fits very well in this type of applications. In a Java context, the Model consists of simple Java classes, the Controller consists of servlets and the View consists of JSP pages.

Here’re some key features of the pattern:

  • It separates the presentation layer from business layer
  • The Controller performs the action of invoking the Model and sending data to View
  • The Model is not even aware that it is used by some web application or a desktop application

Let’s have a look at each layer.

2.1. The Model Layer

This is the data layer which contains business logic of the system, and also represents the state of the application.

It’s independent of the presentation layer, the controller fetches the data from the Model layer and sends it to the View layer.

2.2. The Controller Layer

Controller layer acts as an interface between View and Model. It receives requests from the View layer and processes them, including the necessary validations.

The requests are further sent to Model layer for data processing, and once they are processed, the data is sent back to the Controller and then displayed on the View.

2.3. The View Layer

This layer represents the output of the application, usually some form of UI. The presentation layer is used to display the Model data fetched by the Controller.

3. MVC with Servlets and JSP

To implement a web application based on MVC design pattern, we’ll create the Student and StudentService classes – which will act as our Model layer.

StudentServlet class will act as a Controller, and for the presentation layer, we’ll create student-record.jsp page.

Now, let’s write these layers one by one and start with Student class:

public class Student {
    private int id;
    private String firstName;
    private String lastName;
	
    // constructors, getters and setters goes here
}

Let’s now write our StudentService which will process our business logic:

public class StudentService {

    public Optional<Student> getStudent(int id) {
        switch (id) {
            case 1:
                return Optional.of(new Student(1, "John", "Doe"));
            case 2:
                return Optional.of(new Student(2, "Jane", "Goodall"));
            case 3:
                return Optional.of(new Student(3, "Max", "Born"));
            default:
                return Optional.empty();
        }
    }
}

Now let’s create our Controller class StudentServlet:

@WebServlet(
  name = "StudentServlet", 
  urlPatterns = "/student-record")
public class StudentServlet extends HttpServlet {

    private StudentService studentService = new StudentService();

    private void processRequest(
      HttpServletRequest request, HttpServletResponse response) 
      throws ServletException, IOException {

        String studentID = request.getParameter("id");
        if (studentID != null) {
            int id = Integer.parseInt(studentID);
            studentService.getStudent(id)
              .ifPresent(s -> request.setAttribute("studentRecord", s));
        }

        RequestDispatcher dispatcher = request.getRequestDispatcher(
          "/WEB-INF/jsp/student-record.jsp");
        dispatcher.forward(request, response);
    }

    @Override
    protected void doGet(
      HttpServletRequest request, HttpServletResponse response) 
      throws ServletException, IOException {

        processRequest(request, response);
    }

    @Override
    protected void doPost(
      HttpServletRequest request, HttpServletResponse response) 
      throws ServletException, IOException {

        processRequest(request, response);
    }
}

This servlet is the controller of our web application.

First, it reads a parameter id from the request. If the id is submitted, a Student object is fetched from the business layer.

Once it retrieves the necessary data from the Model, it puts this data in the request using the setAttribute() method.

Finally, the Controller forwards the request and response objects to a JSP, the view of the application.

Next, let’s write our presentation layer student-record.jsp:

<html>
    <head>
        <title>Student Record</title>
    </head>
    <body>
    <% 
        if (request.getAttribute("studentRecord") != null) {
            Student student = (Student) request.getAttribute("studentRecord");
    %>
 
    <h1>Student Record</h1>
    <div>ID: <%= student.getId()%></div>
    <div>First Name: <%= student.getFirstName()%></div>
    <div>Last Name: <%= student.getLastName()%></div>
        
    <% 
        } else { 
    %>

    <h1>No student record found.</h1>
         
    <% } %>	
    </body>
</html>

And, of course, the JSP is the view of the application; it receives all the information it needs from the Controller, it doesn’t need to interact with the business layer directly.

4. Conclusion

In this tutorial, we’ve learned about the MVC i.e. Model View Controller architecture, and we focused on how to implement a simple example.

As usual, the code presented here can be found over on GitHub.

Guide to Inheritance in Java

$
0
0

1. Overview

One of the core principles of Object Oriented Programming – inheritance – enables us to reuse existing code or extend an existing type.

Simply put, in Java, a class can inherit another class and multiple interfaces, while an interface can inherit other interfaces.

In this article, we’ll start with the need of inheritance, moving to how inheritance works with classes and interfaces.

Then, we’ll cover how the variable/ method names and access modifiers affect the members that are inherited.

And at the end, we’ll see what it means to inherit a type.

2. The Need for Inheritance

Imagine, as a car manufacturer, you offer multiple car models to your customers. Even though different car models might offer different features like a sunroof or bulletproof windows, they would all include common components and features, like engine and wheels.

It makes sense to create a basic design and extend it to create their specialized versions, rather than designing each car model separately, from scratch.

In a similar manner, with inheritance, we can create a class with basic features and behavior and create its specialized versions, by creating classes, that inherit this base class. In the same way, interfaces can extend existing interfaces.

We’ll notice the use of multiple terms to refer to a type which is inherited by another type, specifically:

  • a base type is also called a super or a parent type
  • a derived type is referred to as an extended, sub or a child type

3. Inheritance with Classes

3.1. Extending a Class

A class can inherit another class and define additional members.

Let’s start by defining a base class Car:

public class Car {
    int wheels;
    String model;
    void start() {
        // Check essential parts
    }
}

The class ArmoredCar can inherit the members of Car class by using the keyword extends in its declaration:

public class ArmoredCar extends Car {
    int bulletProofWindows;
    void remoteStartCar() {
	// this vehicle can be started by using a remote control
    }
}

Classes in Java support single inheritance; the ArmoredCar class can’t extend multiple classes. In the absence of an extends keyword, a class implicitly inherits class java.lang.Object.

3.2. What Is Inherited

Basically, a derived class inherits the protected and public members from the base class, which are not static. In addition, the members with default and package access are inherited if the two classes are in the same package.

A base class doesn’t allow all of its code to be accessed by the derived classes.

The private and static members of a class aren’t inherited by a derived class. Also, if base class and derived classes are defined in separate packages, members with default or package access in the base class aren’t inherited in the derived class.

3.3. Access Parent Class Members from a Derived Class

It’s simple. Just use them (we don’t need a reference to the base class to access its members). Here’s a quick example:

public class ArmoredCar extends Car {
    public String registerModel() {
        return model;
    }
}

3.4. Hidden Base Class Instance Members

What happens if both our base class and derived class define a variable or method with the same name? Don’t worry; we can still access both of them. However, we must make our intent clear to Java, by prefixing the variable or method with the keywords this or super.

The this keyword refers to the instance in which it’s used. The super keyword (as it seems obvious) refers to the parent class instance:

public class ArmoredCar extends Car {
    private String model;
    public String getAValue() {
    	return super.model;   // returns value of model defined in base class Car
    	// return this.model;   // will return value of model defined in ArmoredCar
    	// return model;   // will return value of model defined in ArmoredCar
    }
}

A lot of developers use this and super keywords to explicitly state which variable or method they’re referring to. However, using them with all members can make our code look cluttered.

3.5. Hidden Base Class Static Members

What happens when our base class and derived classes define static variables and methods with the same name? Can we access a static member from the base class, in the derived class, the way we do for the instance variables?

Let’s find out using an example:

public class Car {
    public static String msg() {
        return "Car";
    }
}
public class ArmoredCar extends Car {
    public static String msg() {
        return super.msg(); // this won't compile.
    }
}

No, we can’t. The static members belong to a class and not to instances. So we can’t use the non-static super keyword in msg().

Since static members belong to a class, we can modify the preceding call as follows:

return Car.msg();

Consider the following example, in which both the base class and derived class define a static method msg() with the same signature:

public class Car {
    public static String msg() {
        return "Car";
    }
}
public class ArmoredCar extends Car {
    public static String msg() {
        return "ArmoredCar";
    }
}

Here’s how we can call them:

Car first = new ArmoredCar();
ArmoredCar second = new ArmoredCar();

For the preceding code, first.msg() will output “Car and second.msg() will output “ArmoredCar”. The static message that is called depends on the type of the variable used to refer to ArmoredCar instance.

4. Inheritance with Interfaces

4.1. Implementing Multiple Interfaces

Although classes can inherit only one class, they can implement multiple interfaces.

Imagine the ArmoredCar that we defined in the preceding section is required for a super spy. So the Car manufacturing company thought of adding flying and floating functionality:

public interface Floatable {
    void floatOnWater();
}
public interface Flyable {
    void fly();
}
public class ArmoredCar extends Car implements Floatable, Flyable{
    public void floatOnWater() {
        System.out.println("I can float!");
    }
 
    public void fly() {
        System.out.println("I can fly!");
    }
}

In the example above, we notice the use of the keyword implements to inherit from an interface.

4.2. Issues with Multiple Inheritance

Multiple inheritance with interfaces is allowed in Java.

Until Java 7, this wasn’t an issue. Interfaces could only define abstract methods, that is, methods without any implementation. So if a class implemented multiple interfaces with the same method signature, it was not a problem. The implementing class eventually had just one method to implement.

Let’s see how this simple equation changed with the introduction of default methods in interfaces, with Java 8.

Starting with Java 8, interfaces could choose to define default implementations for its methods (an interface can still define abstract methods). This means that if a class implements multiple interfaces, which define methods with the same signature, the child class would inherit separate implementations. This sounds complex and is not allowed.

Java disallows inheritance of multiple implementations of the same methods, defined in separate interfaces.

Here’s an example:

public interface Floatable {
    default void repair() {
    	System.out.println("Repairing Floatable object");	
    }
}
public interface Flyable {
    default void repair() {
    	System.out.println("Repairing Flyable object");	
    }
}
public class ArmoredCar extends Car implements Floatable, Flyable {
    // this won't compile
}

If we do want to implement both interfaces, we’ll have to override the repair() method.

If the interfaces in the preceding examples define variables with the same name, say duration, we can’t access them without preceding the variable name with the interface name:

public interface Floatable {
    int duration = 10;
}
public interface Flyable {
    int duration = 20;
}
public class ArmoredCar extends Car implements Floatable, Flyable {
 
    public void aMethod() {
    	System.out.println(duration); // won't compile
    	System.out.println(Floatable.duration); // outputs 10
    	System.out.println(Flyable.duration); // outputs 20
    }
}

4.3. Interfaces Extending Other Interfaces

An interface can extend multiple interfaces. Here’s an example:

public interface Floatable {
    void floatOnWater();
}
interface interface Flyable {
    void fly();
}
public interface SpaceTraveller extends Floatable, Flyable {
    void remoteControl();
}

An interface inherits other interfaces by using the keyword extends. Classes use the keyword implements to inherit an interface.

5. Inheriting Type

When a class inherits another class or interfaces, apart from inheriting their members, it also inherits their type. This also applies to an interface that inherits other interfaces.

This is a very powerful concept, which allows developers to program to an interface (base class or interface), rather than programming to their implementations (concrete or derived classes).

For an example, imagine a condition, where an organization maintains a list of the cars owned by its employees. Of course, all employees might own different car models. So how can we refer to different car instances? Here’s the solution:

public class Employee {
    private String name;
    private Car car;
    
    // standard constructor
}

Because all derived classes of Car inherit the type Car, the derived class instances can be referred by using a variable of class Car:

Employee e1 = new Employee("Shreya", new ArmoredCar());
Employee e2 = new Employee("Paul", new SpaceCar());
Employee e3 = new Employee("Pavni", new BMW());

6. Conclusion

In this article, we covered a core aspect of the Java language – how inheritance works.

We say how Java supports single inheritance with classes and multiple inheritance with interfaces and discussed the intricacies of how the mechanism works in the language.

As always, the full source code for the examples is available over on GitHub.

An Intro to Spring Cloud Contract

$
0
0

1. Introduction

Spring Cloud Contract is a project that, simply put, helps us write Consumer-Driven Contracts (CDC).

This ensures the contract between a Producer and a Consumer, in a distributed system – for both HTTP-based and message-based interactions.

In this quick article, we’ll explore writing producer and consumer side test cases for Spring Cloud Contract through an HTTP interaction.

2. Producer – Server Side

We’re going to write a producer side CDC, in the form of an EvenOddController – which just tells whether the number parameter is even or odd:

@RestController
public class EvenOddController {

    @GetMapping("/validate/prime-number")
    public String isNumberPrime(@RequestParam("number") Integer number) {
        return Integer.parseInt(number) % 2 == 0 ? "Even" : "Odd";
    }
}

2.1. Maven Dependencies

For our producer side, we’ll need the spring-cloud-starter-contract-verifier dependency:

<dependency>
    <groupId>org.springframework.cloud</groupId>
    <artifactId>spring-cloud-starter-contract-verifier</artifactId>
    <version>Edgware.SR1</version>
    <scope>test</scope>
</dependency>

And we’ll need to configure spring-cloud-contract-maven-plugin with the name of our base test class, which we’ll describe in the next section:

<plugin>
    <groupId>org.springframework.cloud</groupId>
    <artifactId>spring-cloud-contract-maven-plugin</artifactId>
    <version>1.2.2.RELEASE</version>
    <extensions>true</extensions>
    <configuration>
        <baseClassForTests>
            com.baeldung.spring.cloud.springcloudcontractproducer.BaseTestClass
        </baseClassForTests>
    </configuration>
</plugin>

2.2. Producer Side Setup

We need to add a base class in the test package that loads our Spring context:

@RunWith(SpringRunner.class)
@SpringBootTest(webEnvironment = SpringBootTest.WebEnvironment.MOCK)
@DirtiesContext
@AutoConfigureMessageVerifier
public class BaseTestClass {

    @Autowired
    private EvenOddController evenOddController;

    @Before
    public void setup() {
        StandaloneMockMvcBuilder standaloneMockMvcBuilder 
          = MockMvcBuilders.standaloneSetup(evenOddController);
        RestAssuredMockMvc.standaloneSetup(standaloneMockMvcBuilder);
    }
}

In the /src/test/resources/contracts/ package, we’ll add the test stubs, such as this one in the file shouldReturnEvenWhenRequestParamIsEven.groovy:

import org.springframework.cloud.contract.spec.Contract
Contract.make {
    description "should return even when number input is even"
    request{
        method GET()
        url("/validate/prime-number") {
            queryParameters {
                parameter("number", "2")
            }
        }
    }
    response {
        body("Even")
        status 200
    }
}

When we run the build, the plugin automatically generates a test class named ContractVerifierTest that extends our BaseTestClass and puts it in /target/generated-test-sources/contracts/.

The names of the test methods are derived from the prefix “validate_” concatenated with the names of our Groovy test stubs. For the above Groovy file, the generated method name will be “validate_shouldReturnEvenWhenRequestParamIsEven”.

Let’s have a look at this auto-generated test class:

public class ContractVerifierTest extends BaseTestClass {

@Test
public void validate_shouldReturnEvenWhenRequestParamIsEven() throws Exception {
    // given:
    MockMvcRequestSpecification request = given();

    // when:
    ResponseOptions response = given().spec(request)
      .queryParam("number","2")
      .get("/validate/prime-number");

    // then:
    assertThat(response.statusCode()).isEqualTo(200);
    
    // and:
    String responseBody = response.getBody().asString();
    assertThat(responseBody).isEqualTo("Even");
}

The build will also add the stub jar in our local Maven repository so that it can be used by our consumer.

Stubs will be present in the output folder under stubs/mapping/.

3. Consumer – Client Side

The consumer side of our CDC will consume stubs generated by the producer side through HTTP interaction to maintain the contract, so any changes on the producer side would break the contract.

We’ll add BasicMathController, which will make an HTTP request to get the response from the generated stubs:

@RestController
public class BasicMathController {

    @Autowired
    private RestTemplate restTemplate;

    @GetMapping("/calculate")
    public String checkOddAndEven(@RequestParam("number") Integer number) {
        HttpHeaders httpHeaders = new HttpHeaders();
        httpHeaders.add("Content-Type", "application/json");

        ResponseEntity<String> responseEntity = restTemplate.exchange(
          "http://localhost:8090/validate/prime-number?number=" + number,
          HttpMethod.GET,
          new HttpEntity<>(httpHeaders),
          String.class);

        return responseEntity.getBody();
    }
}

3.1. The Maven Dependencies

For our consumer, we’ll need to add the spring-cloud-contract-wiremock and spring-cloud-contract-stub-runner dependencies:

<dependency>
    <groupId>org.springframework.cloud</groupId>
    <artifactId>spring-cloud-contract-wiremock</artifactId>
    <version>1.2.2.RELEASE</version>
    <scope>test</scope>
</dependency>
<dependency>
    <groupId>org.springframework.cloud</groupId>
    <artifactId>spring-cloud-contract-stub-runner</artifactId>
    <version>1.2.2.RELEASE</version>
    <scope>test</scope>
</dependency>

3.2. Consumer Side Setup

Now it’s time to configure our stub runner, which will inform our consumer of the available stubs in our local Maven repository:

@RunWith(SpringRunner.class)
@SpringBootTest(webEnvironment = SpringBootTest.WebEnvironment.MOCK)
@AutoConfigureMockMvc
@AutoConfigureJsonTesters
@AutoConfigureStubRunner(
  workOffline = true,
  ids = "com.baeldung.spring.cloud:spring-cloud-contract-producer:+:stubs:8090")
public class BasicMathControllerIntegrationTest {

    @Autowired
    private MockMvc mockMvc;

    @Test
    public void given_WhenPassEvenNumberInQueryParam_ThenReturnEven()
      throws Exception {
 
        mockMvc.perform(MockMvcRequestBuilders.get("/calculate?number=2")
          .contentType(MediaType.APPLICATION_JSON))
          .andExpect(status().isOk())
          .andExpect(content().string("Even"));
    }
}

Note that the ids property of the @AutoConfigureStubRunner annotation specifies:

  • com.baeldung.spring.cloud — the groupId of our artifact
  • spring-cloud-contract-producer — the artifactId of the producer stub jar
  • 8090 — the port on which the generated stubs will run

4. When the Contract is Broken

If we make any changes on the producer side that directly impact the contract without updating the consumer side, this can result in contract failure.

For example, suppose we’re to change the EvenOddController request URI to /validate/change/prime-number on our producer side.

If we fail to inform our consumer of this change, the consumer will still send its request to the /validate/prime-number URI, and the consumer side test cases will throw org.springframework.web.client.HttpClientErrorException: 404 Not Found.

5. Summary

We’ve seen how Spring Cloud Contract can help us maintain contracts between a service consumer and producer so that we can push out new code without any worry of breaking the contracts.

And, as always, the full implementation of this tutorial can be found over on GitHub.

How to TDD a List Implementation in Java

$
0
0

1. Overview

In this tutorial, we’ll walk through a custom List implementation using the Test-Driven Development (TDD) process.

This is not an intro to TDD, so we’re assuming you already have some basic idea of what it means and the sustained interest to get better at it.

Simply put, TDD is a design tool, enabling us to drive our implementation with the help of tests.

A quick disclaimer – we’re not focusing on creating efficient implementation here – just using it as an excuse to display TDD practices.

2. Getting Started

First, let’s define the skeleton for our class:

public class CustomList<E> implements List<E> {
    private Object[] internal = {};
    // empty implementation methods
}

The CustomList class implements the List interface, hence it must contain implementations for all the methods declared in that interface.

To get started, we can just provide empty bodies for those methods. If a method has a return type, we can return an arbitrary value of that type, such as null for Object or false for boolean.

For the sake of brevity, we’ll omit optional methods, together with some obligatory methods that aren’t often used.

3. TDD Cycles

Developing our implementation with TDD means that we need to create test cases first, thereby defining requirements for our implementation. Only then we’ll create or fix the implementation code to make those tests pass.

In a very simplified manner, the three main steps in each cycle are:

  1. Writing tests – define requirements in the form of tests
  2. Implementing features – make the tests pass without focusing too much on the elegance of the code
  3. Refactoring – improve the code to make it easier to read and maintain while still passing the tests

We’ll go through these TDD cycles for some methods of the List interface, starting with the simplest ones.

4. The isEmpty Method

The isEmpty method is probably the most straightforward method defined in the List interface. Here’s our starting implementation:

@Override
public boolean isEmpty() {
    return false;
}

This initial method definition is enough to compile. The body of this method will be “forced” to improve when more and more tests are added.

4.1. The First Cycle

Let’s write the first test case which makes sure that the isEmpty method returns true when the list doesn’t contain any element:

@Test
public void givenEmptyList_whenIsEmpty_thenTrueIsReturned() {
    List<Object> list = new CustomList<>();

    assertTrue(list.isEmpty());
}

The given test fails since the isEmpty method always returns false. We can make it pass just by flipping the return value:

@Override
public boolean isEmpty() {
    return true;
}

4.2. The Second Cycle

To confirm that the isEmpty method returns false when the list isn’t empty, we need to add at least one element:

@Test
public void givenNonEmptyList_whenIsEmpty_thenFalseIsReturned() {
    List<Object> list = new CustomList<>();
    list.add(null);

    assertFalse(list.isEmpty());
}

An implementation of the add method is now required. Here’s the add method we start with:

@Override
public boolean add(E element) {
    return false;
}

This method implementation doesn’t work as no changes to the internal data structure of the list are made. Let’s update it to store the added element:

@Override
public boolean add(E element) {
    internal = new Object[] { element };
    return false;
}

Our test still fails since the isEmpty method hasn’t been enhanced. Let’s do that:

@Override
public boolean isEmpty() {
    if (internal.length != 0) {
        return false;
    } else {
        return true;
    }
}

The non-empty test passes at this point.

4.3. Refactoring

Both test cases we’ve seen so far pass, but the code of the isEmpty method could be more elegant.

Let’s refactor it:

@Override
public boolean isEmpty() {
    return internal.length == 0;
}

We can see that tests pass, so the implementation of the isEmpty method is complete now.

5. The size Method

This is our starting implementation of the size method enabling the CustomList class to compile:

@Override
public int size() {
    return 0;
}

5.1. The First Cycle

Using the existing add method, we can create the first test for the size method, verifying that the size of a list with a single element is 1:

@Test
public void givenListWithAnElement_whenSize_thenOneIsReturned() {
    List<Object> list = new CustomList<>();
    list.add(null);

    assertEquals(1, list.size());
}

The test fails as the size method is returning 0. Let’s make it pass with a new implementation:

@Override
public int size() {
    if (isEmpty()) {
        return 0;
    } else {
        return internal.length;
    }
}

5.2. Refactoring

We can refactor the size method to make it more elegant:

@Override
public int size() {
    return internal.length;
}

The implementation of this method is now complete.

6. The get Method

Here’s the starting implementation of get:

@Override
public E get(int index) {
    return null;
}

6.1. The First Cycle

Let’s take a look at the first test for this method, which verifies the value of the single element in the list:

@Test
public void givenListWithAnElement_whenGet_thenThatElementIsReturned() {
    List<Object> list = new CustomList<>();
    list.add("baeldung");
    Object element = list.get(0);

    assertEquals("baeldung", element);
}

The test will pass with this implementation of the get method:

@Override
public E get(int index) {
    return (E) internal[0];
}

6.2. Improvement

Usually, we’d add more tests before making additional improvements to the get method. Those tests would need other methods of the List interface to implement proper assertions.

However, these other methods aren’t mature enough, yet, so we break the TDD cycle and create a complete implementation of the get method, which is, in fact, not very hard.

It’s easy to imagine that get must extract an element from the internal array at the specified location using the index parameter:

@Override
public E get(int index) {
    return (E) internal[index];
}

7. The add Method

This is the add method we created in section 4:

@Override
public boolean add(E element) {
    internal = new Object[] { element };
    return false;
}

7.1. The First Cycle

The following is a simple test that verifies the return value of add:

@Test
public void givenEmptyList_whenElementIsAdded_thenGetReturnsThatElement() {
    List<Object> list = new CustomList<>();
    boolean succeeded = list.add(null);

    assertTrue(succeeded);
}

We must modify the add method to return true for the test to pass:

@Override
public boolean add(E element) {
    internal = new Object[] { element };
    return true;
}

Although the test passes, the add method doesn’t cover all cases yet. If we add a second element to the list, the existing element will be lost.

7.2. The Second Cycle

Here’s another test adding the requirement that the list can contain more than one element:

@Test
public void givenListWithAnElement_whenAnotherIsAdded_thenGetReturnsBoth() {
    List<Object> list = new CustomList<>();
    list.add("baeldung");
    list.add(".com");
    Object element1 = list.get(0);
    Object element2 = list.get(1);

    assertEquals("baeldung", element1);
    assertEquals(".com", element2);
}

The test will fail since the add method in its current form doesn’t allow more than one element to be added.

Let’s change the implementation code:

@Override
public boolean add(E element) {
    Object[] temp = Arrays.copyOf(internal, internal.length + 1);
    temp[internal.length] = element;
    internal = temp;
    return true;
}

The implementation is elegant enough, hence we don’t need to refactor it.

8. Conclusion

This tutorial went through a test-driven development process to create part of a custom List implementation. Using TDD, we can implement requirements step by step, while keeping the test coverage at a very high level. Also, the implementation is guaranteed to be testable, since it was created to make the tests pass.

Note that the custom class created in this article is just used for demonstration purposes and should not be adopted in a real-world project.

The complete source code for this tutorial, including the test and implementation methods left out for the sake of brevity, can be found over on GitHub.

Multi-Swarm Optimization Algorithm in Java

$
0
0

1. Introduction

In this article, we’ll take a look at a Multi-swarm optimization algorithm. Like other algorithms of the same class, its purpose is to find the best solution to a problem by maximizing or minimizing a specific function, called a fitness function.

Let’s start with some theory.

2. How Multi-Swarm Optimization Works

The Multi-swarm is a variation of the Swarm algorithm. As the name suggests, the Swarm algorithm solves a problem by simulating the movement of a group of objects in the space of possible solutions. In the multi-swarm version, there are multiple swarms instead of just one.

The basic component of a swarm is called a particle. The particle is defined by its actual position, which is also a possible solution to our problem, and its speed, which is used to calculate the next position.

The speed of the particle constantly changes, leaning towards the best position found among all the particles in all the swarms with a certain degree of randomness to increase the amount of space covered.

This ultimately leads most particles to a finite set of points which are local minima or maxima in the fitness function, depending on whether we’re trying to minimize or maximize it.

Although the point found is always a local minimum or maximum of the function, it’s not necessarily a global one since there’s no guarantee that the algorithm has completely explored the space of solutions.

For this reason, the multi-swarm is said to be a metaheuristic – the solutions it finds are among the best, but they may not be the absolute best.

3. Implementation

Now that we know what a multi-swarm is and how it works let’s take a look at how to implement it.

For our example, we’ll try to address this real-life optimization problem posted on StackExchange:

In League of Legends, a player’s Effective Health when defending against physical damage is given by E=H(100+A)/100, where H is health and A is armor.

Health costs 2.5 gold per unit, and Armor costs 18 gold per unit. You have 3600 gold, and you need to optimize the effectiveness E of your health and armor to survive as long as possible against the enemy team’s attacks. How much of each should you buy?

3.1. Particle

We start off by modeling our base construct, a particle. The state of a particle includes its current position, which is a pair of health and armor values that solve the problem, the speed of the particle on both axes and the particle fitness score.

We’ll also store the best position and fitness score we find since we’ll need them to update the particle speed:

public class Particle {
    private long[] position;
    private long[] speed;
    private double fitness;
    private long[] bestPosition;	
    private double bestFitness = Double.NEGATIVE_INFINITY;

    // constructors and other methods
}

We choose to use long arrays to represent both speed and position because we can deduce from the problem statement that we can’t buy fractions of armor or health, hence the solution must be in the integer domain.

We don’t want to use int because that can cause overflow problems during calculations.

3.2. Swarm

Next up, let’s define a swarm as a collection of particles. Once again we’ll also store the historical best position and score for later computation.

The swarm will also need to take care of its particles’ initialization by assigning a random initial position and speed to each one.

We can roughly estimate a boundary for the solution, so we add this limit to the random number generator.

This will reduce the computational power and time needed to run the algorithm:

public class Swarm {
    private Particle[] particles;
    private long[] bestPosition;
    private double bestFitness = Double.NEGATIVE_INFINITY;
    
    public Swarm(int numParticles) {
        particles = new Particle[numParticles];
        for (int i = 0; i < numParticles; i++) {
            long[] initialParticlePosition = { 
              random.nextInt(Constants.PARTICLE_UPPER_BOUND),
              random.nextInt(Constants.PARTICLE_UPPER_BOUND) 
            };
            long[] initialParticleSpeed = { 
              random.nextInt(Constants.PARTICLE_UPPER_BOUND),
              random.nextInt(Constants.PARTICLE_UPPER_BOUND) 
            };
            particles[i] = new Particle(
              initialParticlePosition, initialParticleSpeed);
        }
    }

    // methods omitted
}

3.3. Multiswarm

Finally, let’s conclude our model by creating a Multiswarm class.

Similarly to the swarm, we’ll keep track of a collection of swarms and the best particle position and fitness found among all the swarms.

We’ll also store a reference to the fitness function for later use:

public class Multiswarm {
    private Swarm[] swarms;
    private long[] bestPosition;
    private double bestFitness = Double.NEGATIVE_INFINITY;
    private FitnessFunction fitnessFunction;

    public Multiswarm(
      int numSwarms, int particlesPerSwarm, FitnessFunction fitnessFunction) {
        this.fitnessFunction = fitnessFunction;
        this.swarms = new Swarm[numSwarms];
        for (int i = 0; i < numSwarms; i++) {
            swarms[i] = new Swarm(particlesPerSwarm);
        }
    }

    // methods omitted
}

3.4. Fitness Function

Let’s now implement the fitness function.

To decouple the algorithm logic from this specific problem, we’ll introduce an interface with a single method.

This method takes a particle position as an argument and returns a value indicating how good it is:

public interface FitnessFunction {
    public double getFitness(long[] particlePosition);
}

Provided that the found result is valid according to the problem constraints, measuring the fitness is just a matter of returning the computed effective health which we want to maximize.

For our problem, we have the following specific validation constraints:

  • solutions must only be positive integers
  • solutions must be feasible with the provided amount of gold

When one of these constraints is violated, we return a negative number that tells how far away we’re from the validity boundary.

This is either the number found in the former case or the amount of unavailable gold in the latter:

public class LolFitnessFunction implements FitnessFunction {

    @Override
    public double getFitness(long[] particlePosition) {
        long health = particlePosition[0];
        long armor = particlePosition[1];

        if (health < 0 && armor < 0) {
            return -(health * armor);
        } else if (health < 0) {
            return health;
        } else if (armor < 0) {
            return armor;
        }

        double cost = (health * 2.5) + (armor * 18);
        if (cost > 3600) {
            return 3600 - cost;
        } else {
            long fitness = (health * (100 + armor)) / 100;
            return fitness;
        }
    }
}

3.5. Main Loop

The main program will iterate between all particles in all swarms and do the following:

  • compute the particle fitness
  • if a new best position has been found, update the particle, swarm and multiswarm history
  • compute the new particle position by adding the current speed to each dimension
  • compute the new particle speed

For the moment, we’ll leave the speed updating to the next section by creating a dedicated method:

public void mainLoop() {
    for (Swarm swarm : swarms) {
        for (Particle particle : swarm.getParticles()) {
            long[] particleOldPosition = particle.getPosition().clone();
            particle.setFitness(fitnessFunction.getFitness(particleOldPosition));
       
            if (particle.getFitness() > particle.getBestFitness()) {
                particle.setBestFitness(particle.getFitness());				
                particle.setBestPosition(particleOldPosition);
                if (particle.getFitness() > swarm.getBestFitness()) {						
                    swarm.setBestFitness(particle.getFitness());
                    swarm.setBestPosition(particleOldPosition);
                    if (swarm.getBestFitness() > bestFitness) {
                        bestFitness = swarm.getBestFitness();
                        bestPosition = swarm.getBestPosition().clone();
                    }
                }
            }

            long[] position = particle.getPosition();
            long[] speed = particle.getSpeed();
            position[0] += speed[0];
            position[1] += speed[1];
            speed[0] = getNewParticleSpeedForIndex(particle, swarm, 0);
            speed[1] = getNewParticleSpeedForIndex(particle, swarm, 1);
        }
    }
}

3.6. Speed Update

It’s essential for the particle to change its speed since that’s how it manages to explore different possible solutions.

The speed of the particle will need to make the particle move towards the best position found by itself, by its swarm and by all the swarms, assigning a certain weight to each of these. We’ll call these weights, cognitive weight, social weight and global weight, respectively.

To add some variation, we’ll multiply each of these weights with a random number between 0 and 1. We’ll also add an inertia factor to the formula which incentivizes the particle not to slow down too much:

private int getNewParticleSpeedForIndex(
  Particle particle, Swarm swarm, int index) {
 
    return (int) ((Constants.INERTIA_FACTOR * particle.getSpeed()[index])
      + (randomizePercentage(Constants.COGNITIVE_WEIGHT)
      * (particle.getBestPosition()[index] - particle.getPosition()[index]))
      + (randomizePercentage(Constants.SOCIAL_WEIGHT) 
      * (swarm.getBestPosition()[index] - particle.getPosition()[index]))
      + (randomizePercentage(Constants.GLOBAL_WEIGHT) 
      * (bestPosition[index] - particle.getPosition()[index])));
}

Accepted values for inertia, cognitive, social and global weights are 0.729, 1.49445, 1.49445 and 0.3645, respectively.

4. Conclusion

In this tutorial, we went through the theory and the implementation of a swarm algorithm. We also saw how to design a fitness function according to a specific problem.

If you want to read more about this topic, have a look at this book and this article which were also used as information sources for this article.

As always, all the code of the example is available over on the GitHub project.

Jersey Filters and Interceptors

$
0
0


1. Introduction

In this article, we’re going to explain how filters and interceptors work in the Jersey framework, as well as the main differences between these.

We’ll use Jersey 2 here, and we’ll test our application using a Tomcat 9 server.

2. Application Setup

Let’s first create a simple resource on our server:

@Path("/greetings")
public class Greetings {

    @GET
    public String getHelloGreeting() {
        return "hello";
    }
}

Also, let’s create the corresponding server configuration for our application:

@ApplicationPath("/*")
public class ServerConfig extends ResourceConfig {

    public ServerConfig() {
        packages("com.baeldung.jersey.server");
    }
}

If you want to dig deeper into how to create an API with Jersey, you can check out this article.

You can also have a look at our client-focused article and learn how to create a Java client with Jersey.

3. Filters

Now, let’s get started with filters.

Simply put, filters let us modify the properties of requests and responses – for example, HTTP headers. Filters can be applied both in the server and client side.

Keep in mind that filters are always executed, regardless of whether the resource was found or not.

3.1. Implementing a Request Server Filter

Let’s start with the filters on the server side and create a request filter.

We’ll do that by implementing the ContainerRequestFilter interface and registering it as a Provider in our server:

@Provider
public class RestrictedOperationsRequestFilter implements ContainerRequestFilter {
    
    @Override
    public void filter(ContainerRequestContext ctx) throws IOException {
        if (ctx.getLanguage() != null && "EN".equals(ctx.getLanguage()
          .getLanguage())) {
 
            ctx.abortWith(Response.status(Response.Status.FORBIDDEN)
              .entity("Cannot access")
              .build());
        }
    }
}

This simple filter just rejects the requests with the language “EN” in the request by calling the abortWith() method.

As the example shows, we had to implement only one method that receives the context of the request, which we can modify as we need.

Let’s keep in mind that this filter is executed after the resource was matched.

In case we want to execute a filter before the resource matching, we can use a pre-matching filter by annotating our filter with the @PreMatching annotation:

@Provider
@PreMatching
public class PrematchingRequestFilter implements ContainerRequestFilter {

    @Override
    public void filter(ContainerRequestContext ctx) throws IOException {
        if (ctx.getMethod().equals("DELETE")) {
            LOG.info("\"Deleting request");
        }
    }
}

If we try to access our resource now, we can check that our pre-matching filter is executed first:

2018-02-25 16:07:27,800 [http-nio-8080-exec-3] INFO  c.b.j.s.f.PrematchingRequestFilter - prematching filter
2018-02-25 16:07:27,816 [http-nio-8080-exec-3] INFO  c.b.j.s.f.RestrictedOperationsRequestFilter - Restricted operations filter

3.2. Implementing a Response Server Filter

We’ll now implement a response filter on the server side that will merely add a new header to the response.

To do that, our filter has to implement the ContainerResponseFilter interface and implement its only method:

@Provider
public class ResponseServerFilter implements ContainerResponseFilter {

    @Override
    public void filter(ContainerRequestContext requestContext, 
      ContainerResponseContext responseContext) throws IOException {
        responseContext.getHeaders().add("X-Test", "Filter test");
    }
}

Notice that the ContainerRequestContext parameter is just used as read-only – since we’re already processing the response.

2.3. Implementing a Client Filter

We’ll work now with filters on the client side. These filters work in the same way as server filters, and the interfaces we have to implement are very similar to the ones for the server side.

Let’s see it in action with a filter that adds a property to the request:

@Provider
public class RequestClientFilter implements ClientRequestFilter {

    @Override
    public void filter(ClientRequestContext requestContext) throws IOException {
        requestContext.setProperty("test", "test client request filter");
    }
}

Let’s also create a Jersey client to test this filter:

public class JerseyClient {

    private static String URI_GREETINGS = "http://localhost:8080/jersey/greetings";

    public static String getHelloGreeting() {
        return createClient().target(URI_GREETINGS)
          .request()
          .get(String.class);
    }

    private static Client createClient() {
        ClientConfig config = new ClientConfig();
        config.register(RequestClientFilter.class);

        return ClientBuilder.newClient(config);
    }
}

Notice that we have to add the filter to the client configuration to register it.

Finally, we’ll also create a filter for the response in the client.

This works in a very similar way as the one in the server, but implementing the ClientResponseFilter interface:

@Provider
public class ResponseClientFilter implements ClientResponseFilter {

    @Override
    public void filter(ClientRequestContext requestContext, 
      ClientResponseContext responseContext) throws IOException {
        responseContext.getHeaders()
          .add("X-Test-Client", "Test response client filter");
    }

}

Again, the ClientRequestContext is for read-only purposes.

4. Interceptors

Interceptors are more connected with the marshalling and unmarshalling of the HTTP message bodies that are contained in the requests and the responses. They can be used both in the server and in the client side.

Keep in mind that they’re executed after the filters and only if a message body is present.

There are two types of interceptors: ReaderInterceptor and WriterInterceptor, and they are the same for both the server and the client side.

Next, we’re going to create another resource on our server – which is accessed via a POST and receives a parameter in the body, so interceptors will be executed when accessing it:

@POST
@Path("/custom")
public Response getCustomGreeting(String name) {
    return Response.status(Status.OK.getStatusCode())
      .build();
}

We’ll also add a new method to our Jersey client – to test this new resource:

public static Response getCustomGreeting() {
    return createClient().target(URI_GREETINGS + "/custom")
      .request()
      .post(Entity.text("custom"));
}

4.1. Implementing a ReaderInterceptor

Reader interceptors allow us to manipulate inbound streams, so we can use them to modify the request on the server side or the response on the client side.

Let’s create an interceptor on the server side to write a custom message in the body of the request intercepted:

@Provider
public class RequestServerReaderInterceptor implements ReaderInterceptor {

    @Override
    public Object aroundReadFrom(ReaderInterceptorContext context) 
      throws IOException, WebApplicationException {
        InputStream is = context.getInputStream();
        String body = new BufferedReader(new InputStreamReader(is)).lines()
          .collect(Collectors.joining("\n"));

        context.setInputStream(new ByteArrayInputStream(
          (body + " message added in server reader interceptor").getBytes()));

        return context.proceed();
    }
}

Notice that we have to call the proceed() method to call the next interceptor in the chain. Once all the interceptors are executed, the appropriate message body reader will be called.

3.2. Implementing a WriterInterceptor

Writer interceptors work in a very similar way to reader interceptors, but they manipulate the outbound streams – so that we can use them with the request in the client side or with the response in the server side.

Let’s create a writer interceptor to add a message to the request, on the client side:

@Provider
public class RequestClientWriterInterceptor implements WriterInterceptor {

    @Override
    public void aroundWriteTo(WriterInterceptorContext context) 
      throws IOException, WebApplicationException {
        context.getOutputStream()
          .write(("Message added in the writer interceptor in the client side").getBytes());

        context.proceed();
    }
}

Again, we have to call the method proceed() to call the next interceptor.

When all the interceptors are executed, the appropriate message body writer will be called.

Don’t forget that you have to register this interceptor in the client configuration, as we did before with the client filter:

private static Client createClient() {
    ClientConfig config = new ClientConfig();
    config.register(RequestClientFilter.class);
    config.register(RequestWriterInterceptor.class);

    return ClientBuilder.newClient(config);
}

5. Execution Order

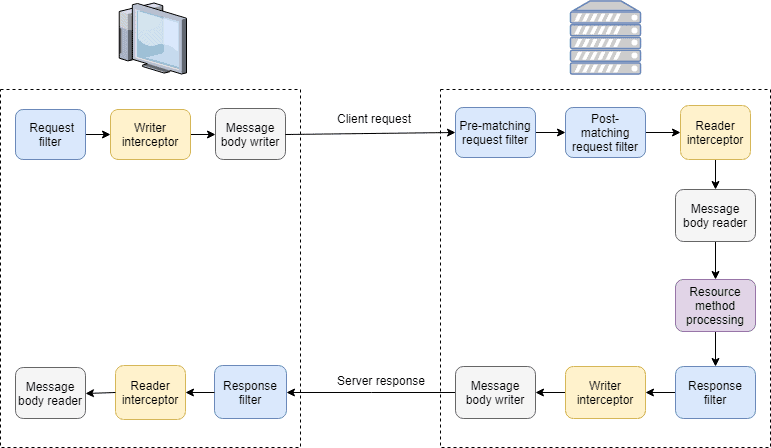
Let’s summarize all that we’ve seen so far in a diagram that shows when the filters and interceptors are executed during a request from a client to a server:

As we can see, the filters are always executed first, and the interceptors are executed right before calling the appropriate message body reader or writer.

If we take a look at the filters and interceptors that we’ve created, they will be executed in the following order:

  1. RequestClientFilter
  2. RequestClientWriterInterceptor
  3. PrematchingRequestFilter
  4. RestrictedOperationsRequestFilter
  5. RequestServerReaderInterceptor
  6. ResponseServerFilter
  7. ResponseClientFilter

Furthermore, when we have several filters or interceptors, we can specify the exact executing order by annotating them with the @Priority annotation.

The priority is specified with an Integer and sorts the filters and interceptors in ascending order for the requests and in descending order for the responses.

Let’s add a priority to our RestrictedOperationsRequestFilter:

@Provider
@Priority(Priorities.AUTHORIZATION)
public class RestrictedOperationsRequestFilter implements ContainerRequestFilter {
    // ...
}

Notice that we’ve used a predefined priority for authorization purposes.

6. Name Binding

The filters and interceptors that we’ve seen so far are called global because they’re executed for every request and response.

However, they can also be defined to be executed only for specific resource methods, which is called name binding.

6.1. Static Binding

One way to do the name binding is statically by creating a particular annotation that will be used in the desired resource. This annotation has to include the @NameBinding meta-annotation.

Let’s create one in our application:

@NameBinding
@Retention(RetentionPolicy.RUNTIME)
public @interface HelloBinding {
}

After that, we can annotate some resources with this @HelloBinding annotation:

@GET
@HelloBinding
public String getHelloGreeting() {
    return "hello";
}

Finally, we’re going to annotate one of our filters with this annotation too, so this filter will be executed only for requests and responses that are accessing the getHelloGreeting() method:

@Provider
@Priority(Priorities.AUTHORIZATION)
@HelloBinding
public class RestrictedOperationsRequestFilter implements ContainerRequestFilter {
    // ...
}

Keep in mind that our RestrictedOperationsRequestFilter won’t be triggered for the rest of the resources anymore.

6.2. Dynamic Binding

Another way to do this is by using a dynamic binding, which is loaded in the configuration during startup.

Let’s first add another resource to our server for this section:

@GET
@Path("/hi")
public String getHiGreeting() {
    return "hi";
}

Now, let’s create a binding for this resource by implementing the DynamicFeature interface:

@Provider
public class HelloDynamicBinding implements DynamicFeature {

    @Override
    public void configure(ResourceInfo resourceInfo, FeatureContext context) {
        if (Greetings.class.equals(resourceInfo.getResourceClass()) 
          && resourceInfo.getResourceMethod().getName().contains("HiGreeting")) {
            context.register(ResponseServerFilter.class);
        }
    }
}

In this case, we’re associating the getHiGreeting() method to the ResponseServerFilter that we had created before.

It’s important to remember that we had to delete the @Provider annotation from this filter since we’re now configuring it via DynamicFeature.

If we don’t do this, the filter will be executed twice: one time as a global filter and another time as a filter bound to the getHiGreeting() method.

7. Conclusion

In this tutorial, we focused on understanding how filters and interceptors work in Jersey 2 and how we can use them in an web application.

As always, the full source code for the examples is available over on GitHub.


Security In Spring Integration

$
0
0

1. Introduction

In this article, we’ll focus on how we can use Spring Integration and Spring Security together in an integration flow.

Therefore, we’ll set up a simple secured message flow to demonstrate the use of Spring Security in Spring Integration. Also, we’ll provide the example of SecurityContext propagation in multithreading message channels.

For more details of using the framework, you can refer to our introduction to Spring Integration.

2. Spring Integration Configuration

2.1. Dependencies

Firstly, we need to add the Spring Integration dependencies to our project.

Since we’ll set up a simple message flows with DirectChannelPublishSubscribeChannel, and ServiceActivator, we need spring-integration-core dependency.

Also, we also need the spring-integration-security dependency to be able to use Spring Security in Spring Integration:

<dependency>
    <groupId>org.springframework.integration</groupId>
    <artifactId>spring-integration-security</artifactId>
    <version>5.0.3.RELEASE</version>
</dependency>

And we ‘re also using Spring Security, so we’ll add spring-security-config to our project:

<dependency>
    <groupId>org.springframework.security</groupId>
    <artifactId>spring-security-config</artifactId>
    <version>5.0.3.RELEASE</version>
</dependency>

We can check out the latest version of all above dependencies at Maven Central: spring-integration-security, spring-security-config.

2.2. Java-Based Configuration

Our example will use basic Spring Integration components. Thus, we only need to enable Spring Integration in our project by using @EnableIntegration annotation:

@Configuration
@EnableIntegration
public class SecuredDirectChannel {
    //...
}

3. Secured Message Channel

First of all, we need an instance of ChannelSecurityInterceptor which will intercept all send and receive calls on a channel and decide if that call can be executed or denied:

@Autowired
@Bean
public ChannelSecurityInterceptor channelSecurityInterceptor(
  AuthenticationManager authenticationManager, 
  AccessDecisionManager customAccessDecisionManager) {

    ChannelSecurityInterceptor 
      channelSecurityInterceptor = new ChannelSecurityInterceptor();

    channelSecurityInterceptor
      .setAuthenticationManager(authenticationManager);

    channelSecurityInterceptor
      .setAccessDecisionManager(customAccessDecisionManager);

    return channelSecurityInterceptor;
}

The AuthenticationManager and AccessDecisionManager beans are defined as:

@Configuration
@EnableGlobalMethodSecurity(prePostEnabled = true)
public class SecurityConfig extends GlobalMethodSecurityConfiguration {

    @Override
    @Bean
    public AuthenticationManager 
      authenticationManager() throws Exception {
        return super.authenticationManager();
    }

    @Bean
    public AccessDecisionManager customAccessDecisionManager() {
        List<AccessDecisionVoter<? extends Object>> 
          decisionVoters = new ArrayList<>();
        decisionVoters.add(new RoleVoter());
        decisionVoters.add(new UsernameAccessDecisionVoter());
        AccessDecisionManager accessDecisionManager
          = new AffirmativeBased(decisionVoters);
        return accessDecisionManager;
    }
}

Here, we use two AccessDecisionVoter: RoleVoter and a custom UsernameAccessDecisionVoter.

Now, we can use that ChannelSecurityInterceptor to secure our channel. What we need to do is decorating the channel by @SecureChannel annotation:

@Bean(name = "startDirectChannel")
@SecuredChannel(
  interceptor = "channelSecurityInterceptor", 
  sendAccess = { "ROLE_VIEWER","jane" })
public DirectChannel startDirectChannel() {
    return new DirectChannel();
}

@Bean(name = "endDirectChannel")
@SecuredChannel(
  interceptor = "channelSecurityInterceptor", 
  sendAccess = {"ROLE_EDITOR"})
public DirectChannel endDirectChannel() {
    return new DirectChannel();
}

The @SecureChannel accepts three properties:

  • The interceptor property: refers to a ChannelSecurityInterceptor bean.
  • The sendAccess and receiveAccess properties: contains the policy for invoking send or receive action on a channel.

In the example above, we expect only users who have ROLE_VIEWER or have username jane can send a message from the startDirectChannel.

Also, only users who have ROLE_EDITOR can send a message to the endDirectChannel.

We achieve this with the support of our custom AccessDecisionManager: either RoleVoter or UsernameAccessDecisionVoter returns an affirmative response, the access is granted.

4. Secured ServiceActivator

It’s worth to mention that we also can secure our ServiceActivator by Spring Method Security. Therefore, we need to enable method security annotation:

@Configuration
@EnableGlobalMethodSecurity(prePostEnabled = true)
public class SecurityConfig extends GlobalMethodSecurityConfiguration {
    //....
}

For simplicity, in this article, we’ll only use Spring pre and post annotations, so we’ll add the @EnableGlobalMethodSecurity annotation to our configuration class and set prePostEnabled to true.

Now we can secure our ServiceActivator with a @PreAuthorization annotation:

@ServiceActivator(
  inputChannel = "startDirectChannel", 
  outputChannel = "endDirectChannel")
@PreAuthorize("hasRole('ROLE_LOGGER')")
public Message<?> logMessage(Message<?> message) {
    Logger.getAnonymousLogger().info(message.toString());
    return message;
}

The ServiceActivator here receives the message from startDirectChannel and output the message to endDirectChannel.

Besides, the method is accessible only if the current Authentication principal has role ROLE_LOGGER.

5. Security Context Propagation

Spring SecurityContext is thread-bound by default. It means the SecurityContext won’t be propagated to a child-thread.

For all above examples, we use both DirectChannel and ServiceActivator – which all run in a single thread; thus, the SecurityContext is available throughout the flow.

However, when using QueueChannel, ExecutorChannel, and PublishSubscribeChannel with an Executor, messages will be transferred from one thread to others threads. In this case, we need to propagate the SecurityContext to all threads receiving the messages.

Let create another message flow which starts with a PublishSubscribeChannel channel, and two ServiceActivator subscribes to that channel:

@Bean(name = "startPSChannel")
@SecuredChannel(
  interceptor = "channelSecurityInterceptor", 
  sendAccess = "ROLE_VIEWER")
public PublishSubscribeChannel startChannel() {
    return new PublishSubscribeChannel(executor());
}

@ServiceActivator(
  inputChannel = "startPSChannel", 
  outputChannel = "finalPSResult")
@PreAuthorize("hasRole('ROLE_LOGGER')")
public Message<?> changeMessageToRole(Message<?> message) {
    return buildNewMessage(getRoles(), message);
}

@ServiceActivator(
  inputChannel = "startPSChannel", 
  outputChannel = "finalPSResult")
@PreAuthorize("hasRole('ROLE_VIEWER')")
public Message<?> changeMessageToUserName(Message<?> message) {
    return buildNewMessage(getUsername(), message);
}

In the example above, we have two ServiceActivator subscribe to the startPSChannel. The channel requires an Authentication principal with role ROLE_VIEWER to be able to send a message to it.

Likewise, we can invoke the changeMessageToRole service only if the Authentication principal has the ROLE_LOGGER role.

Also, the changeMessageToUserName service can only be invoked if the Authentication principal has the role ROLE_VIEWER.

Meanwhile, the startPSChannel will run with the support of a ThreadPoolTaskExecutor:

@Bean
public ThreadPoolTaskExecutor executor() {
    ThreadPoolTaskExecutor pool = new ThreadPoolTaskExecutor();
    pool.setCorePoolSize(10);
    pool.setMaxPoolSize(10);
    pool.setWaitForTasksToCompleteOnShutdown(true);
    return pool;
}

Consequently, two ServiceActivator will run in two different threads. To propagate the SecurityContext to those threads, we need to add to our message channel a SecurityContextPropagationChannelInterceptor:

@Bean
@GlobalChannelInterceptor(patterns = { "startPSChannel" })
public ChannelInterceptor securityContextPropagationInterceptor() {
    return new SecurityContextPropagationChannelInterceptor();
}

Notice how we decorated the SecurityContextPropagationChannelInterceptor with the @GlobalChannelInterceptor annotation. We also added our startPSChannel to its patterns property.

Therefore, above configuration states that the SecurityContext from the current thread will be propagated to any thread derived from startPSChannel.

6. Testing

Let’s start verifying our message flows using some JUnit tests.

6.1. Dependency

We, of course, need the spring-security-test dependency at this point:

<dependency>
    <groupId>org.springframework.security</groupId>
    <artifactId>spring-security-test</artifactId>
    <version>5.0.3.RELEASE</version>
    <scope>test</scope>
</dependency>

Likewise, the latest version can be checked out from Maven Central: spring-security-test.

6.2. Test Secured Channel

Firstly, we try to send a message to our startDirectChannel:

@Test(expected = AuthenticationCredentialsNotFoundException.class)
public void 
  givenNoUser_whenSendToDirectChannel_thenCredentialNotFound() {

    startDirectChannel
      .send(new GenericMessage<String>(DIRECT_CHANNEL_MESSAGE));
}

Since the channel is secured, we expect an AuthenticationCredentialsNotFoundException exception when sending the message without providing an authentication object.

Next, we provide a user who has role ROLE_VIEWER, and sends a message to our startDirectChannel:

@Test
@WithMockUser(roles = { "VIEWER" })
public void 
  givenRoleViewer_whenSendToDirectChannel_thenAccessDenied() {
    expectedException.expectCause
      (IsInstanceOf.<Throwable> instanceOf(AccessDeniedException.class));

    startDirectChannel
      .send(new GenericMessage<String>(DIRECT_CHANNEL_MESSAGE));
 }

Now, even though our user can send the message to startDirectChannel because he has role ROLE_VIEWER, but he cannot invoke the logMessage service which requests user with role ROLE_LOGGER.

In this case, a MessageHandlingException which has the cause is AcessDeniedException will be thrown.

The test will throw MessageHandlingException with the cause is AccessDeniedExcecption. Hence, we use an instance of ExpectedException rule to verify the cause exception.

Next, we provide a user with username jane and two roles: ROLE_LOGGER and ROLE_EDITOR.

Then try to send a message to startDirectChannel again:

@Test
@WithMockUser(username = "jane", roles = { "LOGGER", "EDITOR" })
public void 
  givenJaneLoggerEditor_whenSendToDirectChannel_thenFlowCompleted() {
    startDirectChannel
      .send(new GenericMessage<String>(DIRECT_CHANNEL_MESSAGE));
    assertEquals
      (DIRECT_CHANNEL_MESSAGE, messageConsumer.getMessageContent());
}

The message will travel successfully throughout our flow starting with startDirectChannel to logMessage activator, then go to endDirectChannel. That’s because the provided authentication object has all required authorities to access those components.

6.3. Test SecurityContext Propagation

Before declaring the test case, we can review the whole flow of our example with the PublishSubscribeChannel:

  • The flow starts with a startPSChannel which have the policy sendAccess = “ROLE_VIEWER”
  • Two ServiceActivator subscribe to that channel: one has security annotation @PreAuthorize(“hasRole(‘ROLE_LOGGER’)”) , and one has security annotation @PreAuthorize(“hasRole(‘ROLE_VIEWER’)”)

And so, first we provide a user with role ROLE_VIEWER and try to send a message to our channel:

@Test
@WithMockUser(username = "user", roles = { "VIEWER" })
public void 
  givenRoleUser_whenSendMessageToPSChannel_thenNoMessageArrived() 
  throws IllegalStateException, InterruptedException {
 
    startPSChannel
      .send(new GenericMessage<String>(DIRECT_CHANNEL_MESSAGE));

    executor
      .getThreadPoolExecutor()
      .awaitTermination(2, TimeUnit.SECONDS);

    assertEquals(1, messageConsumer.getMessagePSContent().size());
    assertTrue(
      messageConsumer
      .getMessagePSContent().values().contains("user"));
}

Since our user only has role ROLE_VIEWER, the message can only pass through startPSChannel and one ServiceActivator.

Hence, at the end of the flow, we only receive one message.

Let’s provide a user with both roles ROLE_VIEWER and ROLE_LOGGER:

@Test
@WithMockUser(username = "user", roles = { "LOGGER", "VIEWER" })
public void 
  givenRoleUserAndLogger_whenSendMessageToPSChannel_then2GetMessages() 
  throws IllegalStateException, InterruptedException {
    startPSChannel
      .send(new GenericMessage<String>(DIRECT_CHANNEL_MESSAGE));

    executor
      .getThreadPoolExecutor()
      .awaitTermination(2, TimeUnit.SECONDS);

    assertEquals(2, messageConsumer.getMessagePSContent().size());
    assertTrue
      (messageConsumer
      .getMessagePSContent()
      .values().contains("user"));
    assertTrue
      (messageConsumer
      .getMessagePSContent()
      .values().contains("ROLE_LOGGER,ROLE_VIEWER"));
}

Now, we can receive both messages at the end of our flow because the user has all required authorities it needs.

7. Conclusion

In this tutorial, we’ve explored the possibility of using Spring Security in Spring Integration to secure message channel and ServiceActivator.

As always, we can find all examples over on Github.

ASCII Art in Java

$
0
0

1. Overview

In this article, we’ll discuss creating a graphical print of ASCII characters or Strings in Java, using concepts from the 2D graphics support of the language.

2. Drawing Strings with 2D Graphics

With the help of the Graphics2D class, it’s possible to draw a String as an image, achieved invoking the drawString() method.

Because Graphics2D is abstract, we can create an instance by extending it and implementing the various methods associated with the Graphics class.

While this is a tedious task, it’s often done by creating a BufferedImage instance in Java and retrieving its underlying Graphics instance from it:

BufferedImage bufferedImage = new BufferedImage(
  width, height, 
  BufferedImage.TYPE_INT_RGB);
Graphics graphics = bufferedImage.getGraphics();

2.1. Replacing Image Matrix Indices With ASCII Character

When drawing Strings, the Graphics2D class uses a simple matrix-like technique where regions which carve out the designed Strings are assigned a particular value while others are given a zeroth value.

For us to be able to replace the carved area with desired ASCII character, we need to detect the values of the carved region as a single data point (e.g. integer) and not the RGB color values.

To have the image’s RGB color represented as an integer, we set the image type to integer mode:

BufferedImage bufferedImage = new BufferedImage(
  width, height, 
  BufferedImage.TYPE_INT_RGB);

The fundamental idea is to replace the values assigned to non-zero indices of the image matrix with the desired artistic character.

While indices of the matrix representing the zero value will be assigned a single space character. The zero equivalent of the integer mode is -16777216.

3. ASCII Art Generator

Let’s consider a case where we need to make an ASCII art of the “BAELDUNG” string.

We begin by creating an empty image with desired width/height and the image type set to integer mode as mention in section 2.1.

To be able to use advanced rendering options of 2D graphics in Java, we cast our Graphics object to a Graphics2D instance. We then set the desired rendering parameters before invoking the drawString() method with the “BAELDUNG” String:

Graphics2D graphics2D = (Graphics2D) graphics;
graphics2D.setRenderingHint(RenderingHints.KEY_TEXT_ANTIALIASING, 
  RenderingHints.VALUE_TEXT_ANTIALIAS_ON);
graphics2D.drawString("BAELDUNG", 12, 24);

In the above, 12 and 24 represent respectively, the x and y coordinates for the point on the image where the text printing should start from.

Now, we have a 2D graphics whose underlying matrix contains two types of discriminated values; non-zero and zero indices.

But for us to get the concept, we will go through the 2-dimensional array (or matrix) and replace all values with the ASCII character “*” by:

for (int y = 0; y < settings.height; y++) {
    StringBuilder stringBuilder = new StringBuilder();

    for (int x = 0; x < settings.width; x++) {
        stringBuilder.append("*");
    }

    if (stringBuilder.toString().trim().isEmpty()) {
        continue;
    }

    System.out.println(stringBuilder);
}

The output of the above shows just a block of asterisks (*) as seen below:


If we discriminate the replacement with “*” by replacing only the integer values equal to -16777216 with “*” and the rest with ” “:

for (int y = 0; y < settings.height; y++) {
    StringBuilder stringBuilder = new StringBuilder();

    for (int x = 0; x < settings.width; x++) {
        stringBuilder.append(image.getRGB(x, y) == -16777216 ? "*" : " ");
    }

    if (stringBuilder.toString().trim().isEmpty()) {
        continue;
    }

    System.out.println(stringBuilder);
}

We obtain a different ASCII art which corresponds to our string “BAELDUNG” but in an inverted carving like this:

Finally, we invert the discrimination by replacing the integer values equal to -16777216 with ” ” and the rest with “*”:

for (int y = 0; y < settings.height; y++) {
    StringBuilder stringBuilder = new StringBuilder();

    for (int x = 0; x < settings.width; x++) {
        stringBuilder.append(image.getRGB(x, y) == -16777216 ? " " : "*");
    }

    if (stringBuilder.toString().trim().isEmpty()) {
        continue;
    }

    System.out.println(stringBuilder);
}

This gives us an ASCII art of the desired String:


4. Conclusion

In this quick tutorial, we had a look at how to create ASCII art in Java using the inbuilt 2D graphics library.

While we have shown specifically for the text; “BAELDUNG”, the source code on Github provides a utility function that accepts any String.

Source code, as always, can be found over on GitHub.

RxJava StringObservable

$
0
0

1. Introduction to StringObservable

Working with String sequences in RxJava may be challenging; luckily RxJavaString provides us with all necessary utilities.

In this article, we’ll cover StringObservable which contains some helpful String operators. Therefore, before getting started, it’s advised to have a look at the Introduction to RxJava first.

2. Maven Setup

To get started, let’s include RxJavaString amongst our dependencies:

<dependency>
  <groupId>io.reactivex</groupId>
  <artifactId>rxjava-string</artifactId>
  <version>1.1.1</version>
</dependency>

The latest version of rxjava-string is available over on Maven Central.

3. StringObservable

StringObservable is a handy operator for representing a potentially infinite sequence of encoded Strings.

The operator from reads an input stream creating an Observable which emits character-bounded sequences of byte arrays:

We can create an Observable straight from an InputStream using a from operator:

TestSubscriber testSubscriber = new TestSubscriber();
ByteArrayInputStream is = new ByteArrayInputStream("Lorem ipsum loream, Lorem ipsum lore".getBytes());
Observable<byte[]> observableByteStream = StringObservable.from(is);

// emits 8 byte array items
observableByteStream.subscribe(testSubscriber);

4. Converting Bytes into Strings

Encoding/decoding infinite sequences from different charsets can be done using decode and encode operators.

As their name may suggest, these will simply create an Observable that emits an encoded or decoded sequence of byte arrays or Strings, therefore, we could use it if we need to handle Strings in different charsets:

Decoding a byte array Observable:

TestSubscriber testSubscriber = new TestSubscriber();
ByteArrayInputStream is = new ByteArrayInputStream(
  "Lorem ipsum loream, Lorem ipsum lore".getBytes());
Observable<byte[]> byteArrayObservable = StringObservable.from(is);
Observable<String> stringObservable = StringObservable
  .decode(byteArrayObservable, StandardCharsets.UTF_8);

// emits UTF-8 decoded strings,"Lorem ipsum loream, Lorem ipsum lore"
stringObservable.subscribe(testSubscriber);

5. Splitting Strings

StringObservable has also some convenient operators for splitting String sequences: split and byLine, both create a new Observable which chunks input data outputting items following a pattern:

TestSubscriber testSubscriber = new TestSubscriber();
Observable<String> sourceObservable = Observable.just("Lorem ipsum loream,Lorem ipsum ", "lore");
Observable<String> splittedObservable = StringObservable.split(sourceObservable, ",");

// emits 2 strings "Lorem ipsum loream", "Lorem ipsum lore"
splittedObservable.subscribe(testSubscriber);

6. Joining Strings

Complementary to previous section’s operators are join and stringConcat which concatenate items from a String Observable emitting a single string given a separator.

Also, note that these will consume all items before emitting an output.

TestSubscriber testSubscriber = new TestSubscriber();
Observable<String> sourceObservable = Observable.just("Lorem ipsum loream", "Lorem ipsum lore");
Observable<String> joinedObservable = StringObservable.join(sourceObservable, ",");

// emits single string "Lorem ipsum loream,Lorem ipsum lore"
joinedObservable.subscribe(testSubscriber);

7. Conclusion

This brief introduction to StringObservable demonstrated a few use cases of String manipulation using RxJavaString.

Examples in this tutorial and other examples on how to use StringObservable operators can be found over on Github.

A Custom Task in Gradle

$
0
0

1. Overview

In this article, we’ll cover how to create a custom task in Gradle. We’ll show a new task definition using a build script or a custom task type.

For the introduction to the Gradle, please see this article. It contains the basics of Gradle and – what’s the most important for this article – the introduction to Gradle tasks.

2. Custom Task Definition inside build.gradle

To create a straightforward Gradle task, we need to add its definition to our build.gradle file:

task welcome {
    doLast {
        println 'Welcome in the Baeldung!'
    }
}

The main goal of the above task is just to print text “Welcome in the Baeldung!”. We can check if this task is available by running gradle tasks –all command:

gradle tasks --all

The task is on the list under the group Other tasks:

Other tasks
-----------
welcome

It can be executed just like any other Gradle task:

gradle welcome

The output is as expected – the “Welcome in the Baeldung!” message.

Remark: if option –all is not set, then tasks which belong to “Other” category aren’t visible. Custom Gradle task can belong to a different group than “Other” and can contain a description.

3. Set Group and Description

Sometimes it’s handy to group tasks by function, so they are visible under one category. We can quickly set group for our custom tasks, just by defining a group property:

task welcome {
    group 'Sample category'
    doLast {
        println 'Welcome on the Baeldung!'
    }
}

Now when we run Gradle command to list all available tasks (–all option isn’t needed anymore), we’ll see our task under new group:

Sample category tasks
---------------------
welcome

However, it’s also beneficial for others to see what a task is responsible for. We can create a description which contains short information:

task welcome {
    group 'Sample category'
    description 'Tasks which shows a welcome message'
    doLast {
        println 'Welcome in the Baeldung!'
    }
}

When we print a list of the available tasks the output will be as follow:

Sample category tasks
---------------------
welcome - Tasks which shows a welcome message

This kind of task definition is called ad-hoc definition.

Coming further, it’s beneficial to create a customizable task which definition can be reused. We’ll cover how to create a task from a type and how to make some customization available to the users of this task.

4. Define Gradle Task Type inside build.gradle

The above “welcome” task cannot be customized, thus, in most cases, it’s not very useful. We can run it, but if we need it in a different project (or subproject), then we need to copy and paste its definition.

We can quickly enable customization of the task by creating a task type. Merely, a task type is defined inside the build script:

class PrintToolVersionTask extends DefaultTask {
    String tool

    @TaskAction
    void printToolVersion() {
        switch (tool) {
            case 'java':
                println System.getProperty("java.version")
                break
            case 'groovy':
                println GroovySystem.version
                break
            default:
                throw new IllegalArgumentException("Unknown tool")
        }
    }
}

A custom task type is a simple Groovy class which extends DefaultTask – the class which defines standard task implementation. There are other task types which we can extend from, but in most cases, the DefaultTask class is the appropriate choice.

PrintToolVersionTask task contains tool property which can be customized by instances of this task:

String tool

We can add as many properties as we want – keep in mind it is just a simple Groovy class field.

Additionally, it contains method annotated with @TaskAction. It defines what this task is doing. In this simple example it prints version of installed Java or Groovy – depends on the given parameter value.

To run a custom task based on created task type we need to create a new task instance of this type:

task printJavaVersion(type : PrintToolVersionTask) {
    tool 'java'
}

The most important parts are:

  • our task is a PrintToolVersionTask type,  so when executed it’ll trigger the action defined in the method annotated with @TaskAction
  • we added a customized tool property value (java) which will be used by PrintToolVersionTask

When we run the above task the output is as expected (depends on the Java version installed):

> Task :printJavaVersion 
9.0.1

Now let’s create a task which prints the installed version of Groovy:

task printGroovyVersion(type : PrintToolVersionTask) {
    tool 'groovy'
}

It uses the same task type as we defined before, but it has a different tool property value. When we execute this task it prints the Groovy version:

> Task :printGroovyVersion 
2.4.12

If we have not too many custom tasks, then we can define them directly in the build.gradle file (like we did above). However, if there are more than a few then our build.gradle file becomes hard to read and understand.

Luckily, Gradle provides some solutions for that.

5. Define Task Type in the buildSrc Folder

We can define task types in the buildSrc folder which is located at the root project level. Gradle compiles everything that is inside and adds types to the classpath so our build script can use it.

Our task type which we defined before (PrintToolVersionTask) can be moved into the buildSrc/src/main/groovy/com/baeldung/PrintToolVersionTask.groovy. We have to only add some imports from Gradle API into a moved class.

We can define an unlimited number of tasks types in the buildSrc folder. It’s easier to maintain, read, and the task type declaration isn’t in the same place as the task instantiation.

We can use these types the same way we’re using types defined directly in the build script. We have to remember only to add appropriate imports.

6. Define Task Type in the Plugin

We can define a custom task types inside a custom Gradle plugin. Please refer to this article, which describes how to define a custom Gradle plugin, defined in the:

  • build.gradle file
  • buildSrc folder as other Groovy classes

These custom tasks will be available for our build when we define a dependency to this plugin. Please note that ad-hoc tasks are also available – not only custom task types.

7. Conclusion

In this tutorial, we covered how to create a custom task in Gradle. There are a lot of plugins available which you can use in your build.gradle file that will provide a lot of custom task types you need.

As always, code snippets are available over on Github.

Introduction to JSON-Java (org.json)

$
0
0

1. Introduction to JSON-Java

JSON (an acronym for JavaScript Object Notation) is a lightweight data-interchange format and is most commonly used for client-server communication. It’s both easy to read/write and language-independent. A JSON value can be another JSON object, array, number, string, boolean (true/false) or null.

In this tutorial, we’ll see how we can create, manipulate and parse JSON using one of the available JSON processing libraries, i.e., JSON-Java library is also known as org.json.

2. Pre-Requisite

Before we get started, we’ll need to add the following dependency in our pom.xml:

<dependency>
    <groupId>org.json</groupId>
    <artifactId>json</artifactId>
    <version>20180130</version>
</dependency>

The latest version can be found in the Maven Central repository.

Note that this package has already been included in Android SDK, so we shouldn’t include it while using the same.

3. JSON in Java [package org.json]

The JSON-Java library is also known as org.json (not to be confused with Google’s org.json.simple) provides us with classes that are used to parse and manipulate JSON in Java.

Furthermore, this library can also convert between JSON, XML, HTTP Headers, Cookies, Comma-Delimited List or Text, etc.

In this tutorial, we’ll have a look at:

  1. JSONObject – similar to Java’s native Map like object which stores unordered key-value pairs
  2. JSONArray – an ordered sequence of values similar to Java’s native Vector implementation
  3. JSONTokener – a tool that breaks a piece of text into a series of tokens which can be used by JSONObject or JSONArray to parse JSON strings
  4. CDL – a tool that provides methods to convert comma-delimited text into a JSONArray and vice versa
  5. Cookie – converts from JSON String to cookies and vice versa
  6. HTTP – used to convert from JSON String to HTTP headers and vice versa
  7. JSONException – this is a standard exception thrown by this library

4. JSONObject

JSONObject is an unordered collection of key and value pairs, resembling Java’s native Map implementations.

  • Keys are unique Strings that cannot be null
  • Values can be anything from a Boolean, Number, String, JSONArray or even a JSONObject.NULL object
  • JSONObject can be represented by a String enclosed within curly braces with keys and values separated by a colon, and pairs separated by a comma
  • It has several constructors with which to construct a JSONObject

It also supports the following main methods:

  1. get(String key) – gets the object associated with the supplied key, throws JSONException if the key is not found
  2. opt(String key)- gets the object associated with the supplied key, null otherwise
  3. put(String key, Object value) – inserts or replaces a key-value pair in current JSONObject. 

The put() method is an overloaded method which accepts a key of type String and multiple types for the value.

For the complete list of methods supported by JSONObject, visit the official documentation.

Let’s now discuss some of the main operations supported by this class.

4.1. Creating JSON Directly from JSONObject

JSONObject exposes an API similar to Java’s Map interface. We can use the put() method and supply the key and value as an argument:

JSONObject jo = new JSONObject();
jo.put("name", "jon doe");
jo.put("age", "22");
jo.put("city", "chicago");

Now our JSONObject would look like:

{"city":"chicago","name":"jon doe","age":"22"}

There are seven different overloaded signatures of JSONObject.put() method. While the key can only be unique, non-null String, the value can be anything.

4.2. Creating JSON from Map

Instead of directly putting key and values in a JSONObject, we can construct a custom Map and then pass it as an argument to JSONObject‘s constructor.

This example will produce same results as above:

Map<String, String> map = new HashMap<>();
map.put("name", "jon doe");
map.put("age", "22");
map.put("city", "chicago");
JSONObject jo = new JSONObject(map);

4.3. Creating JSONObject from JSON String

To parse a JSON String to a JSONObject, we can just pass the String to the constructor.

This example will produce same results as above:

JSONObject jo = new JSONObject(
  "{\"city\":\"chicago\",\"name\":\"jon doe\",\"age\":\"22\"}"
);

The passed String argument must be a valid JSON otherwise this constructor may throw a JSONException.

4.4. Serialize Java Object to JSON

One of JSONObject’s constructors takes a POJO as its argument. In the example below, the package uses the getters from the DemoBean class and creates an appropriate JSONObject for the same.

To get a JSONObject from a Java Object, we’ll have to use a class that is a valid Java Bean:

DemoBean demo = new DemoBean();
demo.setId(1);
demo.setName("lorem ipsum");
demo.setActive(true);

JSONObject jo = new JSONObject(demo);

The JSONObject jo for this example is going to be:

{"name":"lorem ipsum","active":true,"id":1}

Although we have a way to serialize a Java object to JSON string, there is no way to convert it back using this library.

If we want that kind of flexibility, we can switch to other libraries such as Jackson.

5. JSONArray

A JSONArray is an ordered collection of values, resembling Java’s native Vector implementation.

  • Values can be anything from a Number, String, Boolean, JSONArray, JSONObject or even a JSONObject.NULL object
  • It’s represented by a String wrapped within Square Brackets and consists of a collection of values separated by commas
  • Like JSONObject, it has a constructor that accepts a source String and parses it to construct a JSONArray

The following are the primary methods of the JSONArray class:

  1. get(int index) – returns the value at the specified index(between 0 and total length – 1), otherwise throws a JSONException
  2. opt(int index) – returns the value associated with an index (between 0 and total length – 1). If there’s no value at that index, then a null is returned
  3. put(Object value) – append an object value to this JSONArray. This method is overloaded and supports a wide range of data types

For a complete list of methods supported by JSONArray, visit the official documentation.

5.1. Creating JSONArray

Once we’ve initialized a JSONArray object, we can simply add and retrieve elements using the put() and get() methods:

JSONArray ja = new JSONArray();
ja.put(Boolean.TRUE);
ja.put("lorem ipsum");

JSONObject jo = new JSONObject();
jo.put("name", "jon doe");
jo.put("age", "22");
jo.put("city", "chicago");

ja.put(jo);

Following would be contents of our JSONArray(code is formatted for clarity):

[
    true,
    "lorem ipsum",
    {
        "city": "chicago",
        "name": "jon doe",
        "age": "22"
    }
]

5.2. Creating JSONArray Directly from JSON String

Like JSONObject the JSONArray also has a constructor that creates a Java object directly from a JSON String:

JSONArray ja = new JSONArray("[true, \"lorem ipsum\", 215]");

This constructor may throw a JSONException if the source String isn’t a valid JSON String.

5.3. Creating JSONArray Directly from a Collection or an Array

The constructor of JSONArray also supports collection and array objects as arguments.

We simply pass them as an argument to the constructor and it will return a JSONArray object:

List<String> list = new ArrayList<>();
list.add("California");
list.add("Texas");
list.add("Hawaii");
list.add("Alaska");

JSONArray ja = new JSONArray(list);

Now our JSONArray consists of:

["California","Texas","Hawaii","Alaska"]

6. JSONTokener

A JSONTokener takes a source String as input to its constructor and extracts characters and tokens from it. It’s used internally by classes of this package (like JSONObject, JSONArray) to parse JSON Strings.

There may not be many situations where we’ll directly use this class as the same functionality can be achieved using other simpler methods (like string.toCharArray()):

JSONTokener jt = new JSONTokener("lorem");

while(jt.more()) {
    Log.info(jt.next());
}

Now we can access a JSONTokener like an iterator, using the more() method to check if there are any remaining elements and next() to access the next element.

The tokens received from the previous example will be:

l
o
r
e
m

7. CDL

We’re provided with a CDL (Comma Delimited List) class to convert comma delimited text into a JSONArray and vice versa.

7.1. Producing JSONArray Directly from Comma Delimited Text

In order to produce a JSONArray directly from the comma-delimited text, we can use the static method rowToJSONArray() which accepts a JSONTokener:

JSONArray ja = CDL.rowToJSONArray(new JSONTokener("England, USA, Canada"));

Our JSONArray now consists of:

["England","USA","Canada"]

7.2. Producing Comma Delimited Text from JSONArray

In order to reverse of the previous step and get back the comma-delimited text from JSONArray, we can use:

JSONArray ja = new JSONArray("[\"England\",\"USA\",\"Canada\"]");
String cdt = CDL.rowToString(ja);

The String cdt now contains:

England,USA,Canada

7.3. Producing JSONArray of JSONObjects Using Comma Delimited Text

To produce a JSONArray of JSONObjects, we’ll use a text String containing both headers and data separated by commas.

The different lines are separated using a carriage return (\r) or line feed (\n).

The first line is interpreted as a list of headers and all the subsequent lines are treated as data:

String string = "name, city, age \n" +
  "john, chicago, 22 \n" +
  "gary, florida, 35 \n" +
  "sal, vegas, 18";

JSONArray result = CDL.toJSONArray(string);

The object JSONArray result now consists of (output formatted for the sake of clarity):

[
    {
        "name": "john",
        "city": "chicago",
        "age": "22"
    },
    {
        "name": "gary",
        "city": "florida",
        "age": "35"
    },
    {
        "name": "sal",
        "city": "vegas",
        "age": "18"
    }
]

Notice that in this example, both data and header were supplied within the same String. There’s an alternative way of doing this where we can achieve the same functionality by supplying a JSONArray that would be used to get the headers and a comma-delimited String working as the data.

Different lines are separated using a carriage return (\r) or line feed (\n):

JSONArray ja = new JSONArray();
ja.put("name");
ja.put("city");
ja.put("age");

String string = "john, chicago, 22 \n"
  + "gary, florida, 35 \n"
  + "sal, vegas, 18";

JSONArray result = CDL.toJSONArray(ja, string);

Here we’ll get the contents of object result exactly as before.

The Cookie class deals with web browser cookies and has methods to convert a browser cookie into a JSONObject and vice versa.

Here are the main methods of the Cookie class:

  1. toJsonObject(String sourceCookie) – converts a cookie string into a JSONObject
  2. toString(JSONObject jo) – this is reverse of the previous method, converts a JSONObject into a cookie String.

8.1. Converting a Cookie String into a JSONObject

To convert a cookie String to a JSONObject, well use the static method Cookie.toJSONObject():

String cookie = "username=John Doe; expires=Thu, 18 Dec 2013 12:00:00 UTC; path=/";
JSONObject cookieJO = Cookie.toJSONObject(cookie);

8.2. Converting a JSONObject into Cookie String

Now we’ll convert a JSONObject into cookie String. This is reverse of the previous step:

String cookie = Cookie.toString(cookieJO);

9. HTTP

The HTTP class contains static methods that are used to convert HTTP headers to JSONObject and vice versa.

This class also has two main methods:

  1. toJsonObject(String sourceHttpHeader) – converts a HttpHeader String to JSONObject
  2. toString(JSONObject jo) – converts the supplied JSONObject to String

9.1. Converting JSONObject to HTTP Header

HTTP.toString() method is used to convert a JSONObject to HTTP header String:

JSONObject jo = new JSONObject();
jo.put("Method", "POST");
jo.put("Request-URI", "http://www.example.com/");
jo.put("HTTP-Version", "HTTP/1.1");
String httpStr = HTTP.toString(jo);

Here, our String httpStr will consist of:

POST "http://www.example.com/" HTTP/1.1

Note that while converting an HTTP request header, the JSONObject must contain “Method”, “Request-URI” and “HTTP-Version” keys, whereas, for response header, the object must contain “HTTP-Version”, “Status-Code” and “Reason-Phrase” parameters.

9.2. Converting HTTP Header String Back to JSONObject

Here we will convert the HTTP string that we got in the previous step back to the very JSONObject that we created in that step:

JSONObject obj = HTTP.toJSONObject("POST \"http://www.example.com/\" HTTP/1.1");

10. JSONException

The JSONException is the standard exception thrown by this package whenever any error is encountered.

This is used across all classes from this package. The exception is usually followed by a message that states what exactly went wrong.

11. Conclusion

In this tutorial, we looked at a JSON using Java – org.json – and we focused on some of the core functionality available here.

The complete code snippets used in this article can be found over on GitHub.

Kotlin Dependency Injection with Kodein

$
0
0

1. Overview

In this article, we’ll introduce Kodein — a pure Kotlin dependency injection (DI) framework — and compare it with other popular DI frameworks.

2. Dependency

First, let’s add the Kodein dependency to our pom.xml:

<dependency>
    <groupId>com.github.salomonbrys.kodein</groupId>
    <artifactId>kodein</artifactId>
    <version>4.1.0</version>
</dependency>

Please note that the latest available version is available either on Maven Central or jCenter.

3. Configuration

We’ll use the model below for illustrating Kodein-based configuration:

class Controller(private val service : Service)

class Service(private val dao: Dao, private val tag: String)

interface Dao

class JdbcDao : Dao

class MongoDao : Dao

4. Binding Types

The Kodein framework offers various binding types. Let’s take a closer look at how they work and how to use them.

4.1. Singleton

With Singleton binding, a target bean is instantiated lazily on the first access and re-used on all further requests:

var created = false;
val kodein = Kodein {
    bind<Dao>() with singleton { MongoDao() }
}

assertThat(created).isFalse()

val dao1: Dao = kodein.instance()

assertThat(created).isFalse()

val dao2: Dao = kodein.instance()

assertThat(dao1).isSameAs(dao2)

Note: we can use Kodein.instance() for retrieving target-managed beans based on a static variable type.

4.2. Eager Singleton

This is similar to the Singleton binding. The only difference is that the initialization block is called eagerly:

var created = false;
val kodein = Kodein {
    bind<Dao>() with singleton { MongoDao() }
}

assertThat(created).isTrue()
val dao1: Dao = kodein.instance()
val dao2: Dao = kodein.instance()

assertThat(dao1).isSameAs(dao2)

4.3. Factory

With Factory binding, the initialization block receives an argument, and a new object is returned from it every time:

val kodein = Kodein {
    bind<Dao>() with singleton { MongoDao() }
    bind<Service>() with factory { tag: String -> Service(instance(), tag) }
}
val service1: Service = kodein.with("myTag").instance()
val service2: Service = kodein.with("myTag").instance()

assertThat(service1).isNotSameAs(service2)

Note: we can use Kodein.instance() for configuring transitive dependencies.

4.4. Multiton

Multiton binding is very similar to Factory binding. The only difference is that the same object is returned for the same argument in subsequent calls:

val kodein = Kodein {
    bind<Dao>() with singleton { MongoDao() }
    bind<Service>() with multiton { tag: String -> Service(instance(), tag) }
}
val service1: Service = kodein.with("myTag").instance()
val service2: Service = kodein.with("myTag").instance()

assertThat(service1).isSameAs(service2)

4.5. Provider

This is a no-arg Factory binding:

val kodein = Kodein {
    bind<Dao>() with provider { MongoDao() }
}
val dao1: Dao = kodein.instance()
val dao2: Dao = kodein.instance()

assertThat(dao1).isNotSameAs(dao2)

4.6. Instance

We can register a pre-configured bean instance in the container:

val dao = MongoDao()
val kodein = Kodein {
    bind<Dao>() with instance(dao)
}
val fromContainer: Dao = kodein.instance()

assertThat(dao).isSameAs(fromContainer)

4.7. Tagging

We can also register more than one bean of the same type under different tags:

val kodein = Kodein {
    bind<Dao>("dao1") with singleton { MongoDao() }
    bind<Dao>("dao2") with singleton { MongoDao() }
}
val dao1: Dao = kodein.instance("dao1")
val dao2: Dao = kodein.instance("dao2")

assertThat(dao1).isNotSameAs(dao2)

4.8. Constant

This is syntactic sugar over tagged binding and is assumed to be used for configuration constants — simple types without inheritance:

val kodein = Kodein {
    constant("magic") with 42
}
val fromContainer: Int = kodein.instance("magic")

assertThat(fromContainer).isEqualTo(42)

5. Bindings Separation

Kodein allows us to configure beans in separate blocks and combine them.

5.1. Modules

We can group components by particular criteria — for example, all classes related to data persistence — and combine the blocks to build a resulting container:

val jdbcModule = Kodein.Module {
    bind<Dao>() with singleton { JdbcDao() }
}
val kodein = Kodein {
    import(jdbcModule)
    bind<Controller>() with singleton { Controller(instance()) }
    bind<Service>() with singleton { Service(instance(), "myService") }
}

val dao: Dao = kodein.instance()
assertThat(dao).isInstanceOf(JdbcDao::class.java)

Note: as modules contain binding rules, target beans are re-created when the same module is used in multiple Kodein instances.

5.2. Composition

We can extend one Kodein instance from another — this allows us to re-use beans:

val persistenceContainer = Kodein {
    bind<Dao>() with singleton { MongoDao() }
}
val serviceContainer = Kodein {
    extend(persistenceContainer)
    bind<Service>() with singleton { Service(instance(), "myService") }
}
val fromPersistence: Dao = persistenceContainer.instance()
val fromService: Dao = serviceContainer.instance()

assertThat(fromPersistence).isSameAs(fromService)

5.3. Overriding

We can override bindings — this can be useful for testing:

class InMemoryDao : Dao

val commonModule = Kodein.Module {
    bind<Dao>() with singleton { MongoDao() }
    bind<Service>() with singleton { Service(instance(), "myService") }
}
val testContainer = Kodein {
    import(commonModule)
    bind<Dao>(overrides = true) with singleton { InMemoryDao() }
}
val dao: Dao = testContainer.instance()

assertThat(dao).isInstanceOf(InMemoryDao::class.java)

6. Multi-Bindings

We can configure more than one bean with the same common (super-)type in the container:

val kodein = Kodein {
    bind() from setBinding<Dao>()
    bind<Dao>().inSet() with singleton { MongoDao() }
    bind<Dao>().inSet() with singleton { JdbcDao() }
}
val daos: Set<Dao> = kodein.instance()

assertThat(daos.map {it.javaClass as Class<*>})
  .containsOnly(MongoDao::class.java, JdbcDao::class.java)

7. Injector

Our application code was unaware of Kodein in all the examples we used before — it used regular constructor arguments that were provided during the container’s initialization.

However, the framework allows an alternative way to configure dependencies through delegated properties and Injectors:

class Controller2 {
    private val injector = KodeinInjector()
    val service: Service by injector.instance()
    fun injectDependencies(kodein: Kodein) = injector.inject(kodein)
}
val kodein = Kodein {
    bind<Dao>() with singleton { MongoDao() }
    bind<Service>() with singleton { Service(instance(), "myService") }
}
val controller = Controller2()
controller.injectDependencies(kodein)

assertThat(controller.service).isNotNull

In other words, a domain class defines dependencies through an injector and retrieves them from a given container. Such an approach is useful in specific environments like Android.

8. Using Kodein with Android

In Android, the Kodein container is configured in a custom Application class, and later on, it is bound to the Context instance. All components (activities, fragments, services, broadcast receivers) are assumed to be extended from the utility classes like KodeinActivity and KodeinFragment:

class MyActivity : Activity(), KodeinInjected {
    override val injector = KodeinInjector()

    val random: Random by instance()

    override fun onCreate(savedInstanceState: Bundle?) {
        inject(appKodein())
    }
}

9. Analysis

In this section, we’ll see how Kodein compares with popular DI frameworks.

9.1. Spring Framework

The Spring Framework is much more feature-rich than Kodein. For example, Spring has a very convenient component-scanning facility. When we mark our classes with particular annotations like @Component, @Service, and @Named, the component scan picks up those classes automatically during container initialization.

Spring also has powerful meta-programming extension pointsBeanPostProcessor and BeanFactoryPostProcessor, which might be crucial when adapting a configured application to a particular environment.

Finally, Spring provides some convenient technologies built on top of it, including AOP, Transactions, Test Framework, and many others. If we want to use these, it’s worth sticking with the Spring IoC container.

9.2. Dagger 2

The Dagger 2 framework is not as feature-rich as Spring Framework, but it’s popular in Android development due to its speed (it generates Java code which performs the injection and just executes it in runtime) and size.

Let’s compare the libraries’ method counts and sizes:

Kodein:Note that the kotlin-stdlib dependency accounts for the bulk of these numbers. When we exclude it, we get 1282 methods and 244 KB DEX size.


Dagger 2:

We can see that the Dagger 2 framework adds far fewer methods and its JAR file is smaller.

Regarding the usage — it’s very similar in that the user code configures dependencies (through Injector in Kodein and JSR-330 annotations in Dagger 2) and later on injects them through a single method call.

However, a key feature of Dagger 2 is that it validates the dependency graph at compile time, so it won’t allow the application to compile if there is a configuration error.

10. Conclusion

We now know how to use Kodein for dependency injection, what configuration options it provides, and how it compares with a couple of other popular DI frameworks. However, it’s up to you to decide whether to use it in real projects.

As always, the source code for the samples above can be found over on GitHub.

Java Weekly, Issue 219

$
0
0

Let’s jump right in…

1. Spring and Java

>> Monitor your Java application with Datadog 

Optimize performance with end-to-end tracing and out-of-the-box support for popular Java frameworks, application servers, and databases. Try it free:


>> Using Spring Security 5 to integrate with OAuth 2-secured services such as Facebook and GitHub [spring.io]

One of the key features of Spring Security 5 is the significantly improved and streamlined OAuth2 support. This is quite a useful exploration of that functionality.

>> Event sourcing using Kafka [blog.softwaremill.com]

It’s clear that Kafka can be used as a solid base for implementing event-sourced systems, without a lot of effort.

>> Representing the Impractical and Impossible with JDK 10 “var” [benjiweber.co.uk]

Java 10’s “var” will make it possible to declare variables with types that were cumbersome and very impractical to represent before. Good stuff coming.


Also worth reading:


Webinars and presentations:


Time to upgrade:

2. Technical and Musings

>> Continuous Delivery Sounds Great, but Will It Work Here? [queue.acm.org]

A good, practical-minded intro to CD, along with a realistic look at adoption and challenges.

>> The Mercenary’s Guide to Should I Stay or Should I Go? [daedtech.com]

When the enthusiasms level go down and you stop caring about where and on what you are working on, it’s probably time to move on :). Also, don’t expect your current company to become what you’d want it to be like – that rarely happens.


Also worth reading:

3. Comics

And my favorite Dilberts of the week:

>> Elbonian Slave Labor [dilbert.com]

>> No Economic Value [dilbert.com]

>> Boss Loves Criticism [dilbert.com]

4. Pick of the Week

A very cool GitHub feature introduced a few months back and already useful:

>> Introducing security alerts on GitHub [blog.github.com]


Using Hamcrest Number Matchers

$
0
0

1. Overview

Hamcrest provides static matchers to help make unit test assertions simpler and more legible. You can get started exploring some of the available matchers here.

In this article, we’ll dive deeper into the number-related matchers.

2. Setup

To get Hamcrest, we just need to add the following Maven dependency to our pom.xml:

<dependency>
    <groupId>org.hamcrest</groupId>
    <artifactId>java-hamcrest</artifactId>
    <version>2.0.0.0</version>
</dependency>

The latest Hamcrest version can be found on Maven Central.

3. Proximity Matchers

The first set of matchers that we’re going to take a look at are the ones that check if some element is close to a value +/- an error.

More formally:

value - error <= element <= value + error

If the comparison above is true, the assertion will pass.

Let’s see it in action!

3.1. isClose with Double Values

Let’s say that we have a number stored in a double variable called actual. And, we want to test if actual is close to 1 +/- 0.5.

That is:

1 - 0.5 <= actual <= 1 + 0.5
    0.5 <= actual <= 1.5

Now let’s create a unit test using isClose matcher:

@Test
public void givenADouble_whenCloseTo_thenCorrect() {
    double actual = 1.3;
    double operand = 1;
    double error = 0.5;
 
    assertThat(actual, closeTo(operand, error));
}

As 1.3 is between 0.5 and 1.5, the test will pass. Same way, we can test the negative scenario:

@Test
public void givenADouble_whenNotCloseTo_thenCorrect() {
    double actual = 1.6;
    double operand = 1;
    double error = 0.5;
 
    assertThat(actual, not(closeTo(operand, error)));
}

Now, let’s take a look at a similar situation with a different type of variables.

3.2. isClose with BigDecimal Values

isClose is overloaded and can be used same as with double values, but with BigDecimal objects:

@Test
public void givenABigDecimal_whenCloseTo_thenCorrect() {
    BigDecimal actual = new BigDecimal("1.0003");
    BigDecimal operand = new BigDecimal("1");
    BigDecimal error = new BigDecimal("0.0005");
    
    assertThat(actual, is(closeTo(operand, error)));
}

@Test
public void givenABigDecimal_whenNotCloseTo_thenCorrect() {
    BigDecimal actual = new BigDecimal("1.0006");
    BigDecimal operand = new BigDecimal("1");
    BigDecimal error = new BigDecimal("0.0005");
    
    assertThat(actual, is(not(closeTo(operand, error))));
}

Please note that the is matcher only decorates other matchers without adding extra logic. It just makes the whole assertion more readable.

That’s about it for proximity matchers. Next, we’ll take a look at order matchers.

4. Order Matchers

As their name says, these matchers help make assertions regarding the order.

There are five of them:

  • comparesEqualTo
  • greaterThan
  • greaterThanOrEqualTo
  • lessThan
  • lessThanOrEqualTo

They’re pretty much self-explanatory, but let’s see some examples.

4.1. Order Matchers with Integer Values

The most common scenario would be using these matchers with numbers.

So, let’s go ahead and create some tests:

@Test
public void given5_whenComparesEqualTo5_thenCorrect() {
    Integer five = 5;
    
    assertThat(five, comparesEqualTo(five));
}

@Test
public void given5_whenNotComparesEqualTo7_thenCorrect() {
    Integer seven = 7;
    Integer five = 5;

    assertThat(five, not(comparesEqualTo(seven)));
}

@Test
public void given7_whenGreaterThan5_thenCorrect() {
    Integer seven = 7;
    Integer five = 5;
 
    assertThat(seven, is(greaterThan(five)));
}

@Test
public void given7_whenGreaterThanOrEqualTo5_thenCorrect() {
    Integer seven = 7;
    Integer five = 5;
 
    assertThat(seven, is(greaterThanOrEqualTo(five)));
}

@Test
public void given5_whenGreaterThanOrEqualTo5_thenCorrect() {
    Integer five = 5;
 
    assertThat(five, is(greaterThanOrEqualTo(five)));
}

@Test
public void given3_whenLessThan5_thenCorrect() {
   Integer three = 3;
   Integer five = 5;
 
   assertThat(three, is(lessThan(five)));
}

@Test
public void given3_whenLessThanOrEqualTo5_thenCorrect() {
   Integer three = 3;
   Integer five = 5;
 
   assertThat(three, is(lessThanOrEqualTo(five)));
}

@Test
public void given5_whenLessThanOrEqualTo5_thenCorrect() {
   Integer five = 5;
 
   assertThat(five, is(lessThanOrEqualTo(five)));
}

Makes sense, right? Please note how simple is to understand what the predicates are asserting.

4.2. Order Matchers with String Values

Even though comparing numbers makes complete sense, many times it’s useful to compare other types of elements. That’s why order matchers can be applied to any class that implements the Comparable interface.

Let’s see some examples with Strings:

@Test
public void givenBenjamin_whenGreaterThanAmanda_thenCorrect() {
    String amanda = "Amanda";
    String benjamin = "Benjamin";
 
    assertThat(benjamin, is(greaterThan(amanda)));
}

@Test
public void givenAmanda_whenLessThanBenajmin_thenCorrect() {
    String amanda = "Amanda";
    String benjamin = "Benjamin";
 
    assertThat(amanda, is(lessThan(benjamin)));
}

String implements alphabetical order in compareTo method from the Comparable interface.

So, it makes sense that the word “Amanda” comes before the word “Benjamin”.

4.3. Order Matchers with LocalDate Values

Same as with Strings, we can compare dates. Let’s take a look at the same examples we created above but using LocalDate objects:

@Test
public void givenToday_whenGreaterThanYesterday_thenCorrect() {
    LocalDate today = LocalDate.now();
    LocalDate yesterday = today.minusDays(1);
 
    assertThat(today, is(greaterThan(yesterday)));
}

@Test
public void givenToday_whenLessThanTomorrow_thenCorrect() {
    LocalDate today = LocalDate.now();
    LocalDate tomorrow = today.plusDays(1);
    
    assertThat(today, is(lessThan(tomorrow)));
}

It’s very nice to see that the statement assertThat(today, is(lessThan(tomorrow))) is close to regular English.

4.4. Order Matchers with Custom Classes

So, why not create our own class and implement Comparable? That way, we can leverage order matchers to be used with custom order rules.

Let’s start by creating a Person bean:

public class Person {
    String name;
    int age;

    // standard constructor, getters and setters
}

Now, let’s implement Comparable:

public class Person implements Comparable<Person> {
        
    // ...

    @Override
    public int compareTo(Person o) {
        if (this.age == o.getAge()) return 0;
        if (this.age > o.getAge()) return 1;
        else return -1;
    }
}

Our compareTo implementation compares two people by their age. Let’s now create a couple of new tests:

@Test
public void givenAmanda_whenOlderThanBenjamin_thenCorrect() {
    Person amanda = new Person("Amanda", 20);
    Person benjamin = new Person("Benjamin", 18);
 
    assertThat(amanda, is(greaterThan(benjamin)));
}

@Test
public void 
givenBenjamin_whenYoungerThanAmanda_thenCorrect() {
    Person amanda = new Person("Amanda", 20);
    Person benjamin = new Person("Benjamin", 18);
 
    assertThat(benjamin, is(lessThan(amanda)));
}

Matchers will now work based on our compareTo logic.

5. NaN Matcher

Hamcrest provides one extra number matcher to define if a number is actually, not a number:

@Test
public void givenNaN_whenIsNotANumber_thenCorrect() {
    double zero = 0d;
    
    assertThat(zero / zero, is(notANumber()));
}

6. Conclusions

As you can see, number matchers are very useful to simplify common assertions.

What’s more, Hamcrest matchers in general, are self-explanatory and easy to read.

All this, plus the ability to combine matchers with custom comparison logic, make them a powerful tool for most projects out there.

The full implementation of the examples from this article can be found in the GitHub project.

Injecting Prototype Beans into a Singleton Instance in Spring

$
0
0

1. Overview

In this quick article, we’re going to show different approaches of injecting prototype beans into a singleton instance. We’ll discuss the use cases and the advantages/disadvantages of each scenario.

By default, Spring beans are singletons. The problem arises when we try to wire beans of different scopes. For example, a prototype bean into a singleton. This is known as the scoped bean injection problem.

To learn more about bean scopes, this write-up is a good place to start.

2. Prototype Bean Injection Problem

In order to describe the problem, let’s configure the following beans:

@Configuration
public class AppConfig {

    @Bean
    @Scope(ConfigurableBeanFactory.SCOPE_PROTOTYPE)
    public PrototypeBean prototypeBean() {
        return new PrototypeBean();
    }

    @Bean
    public SingletonBean singletonBean() {
        return new SingletonBean();
    }
}

Notice that the first bean has a prototype scope, the other one is a singleton.

Now, let’s inject the prototype-scoped bean into the singleton – and then expose if via the getPrototypeBean() method:

public class SingletonBean {

    // ..

    @Autowired
    private PrototypeBean prototypeBean;

    public SingletonBean() {
        logger.info("Singleton instance created");
    }

    public PrototypeBean getPrototypeBean() {
        logger.info(String.valueOf(LocalTime.now()));
        return prototypeBean;
    }
}

Then, let’s load up the ApplicationContext and get the singleton bean twice:

public static void main(String[] args) throws InterruptedException {
    AnnotationConfigApplicationContext context 
      = new AnnotationConfigApplicationContext(AppConfig.class);
    
    SingletonBean firstSingleton = context.getBean(SingletonBean.class);
    PrototypeBean firstPrototype = firstSingleton.getPrototypeBean();
    
    // get singleton bean instance one more time
    SingletonBean secondSingleton = context.getBean(SingletonBean.class);
    PrototypeBean secondPrototype = secondSingleton.getPrototypeBean();

    isTrue(firstPrototype.equals(secondPrototype), "The same instance should be returned");
}

Here’s the output from the console:

Singleton Bean created
Prototype Bean created
11:06:57.894
// should create another prototype bean instance here
11:06:58.895

Both beans were initialized only once, at the startup of the application context.

3. Injecting ApplicationContext 

We can also inject the ApplicationContext directly into a bean.

To achieve this, either use the @Autowire annotation or implement the ApplicationContextAware interface:

public class SingletonAppContextBean implements ApplicationContextAware {

    private ApplicationContext applicationContext;

    public PrototypeBean getPrototypeBean() {
        return applicationContext.getBean(PrototypeBean.class);
    }

    @Override
    public void setApplicationContext(ApplicationContext applicationContext) 
      throws BeansException {
        this.applicationContext = applicationContext;
    }
}

Every time the getPrototypeBean() method is called, a new instance of PrototypeBean will be returned from the ApplicationContext.

However, this approach has serious disadvantages. It contradicts the principle of inversion of control, as we request the dependencies from the container directly.

Also, we fetch the prototype bean from the applicationContext within the SingletonAppcontextBean class. This means coupling the code to the Spring Framework.

4. Method Injection

Another way to solve the problem is method injection with the @Lookup annotation:

@Component
public class SingletonLookupBean {

    @Lookup
    public PrototypeBean getPrototypeBean() {
        return null;
    }
}

Spring will override the getPrototypeBean() method annotated with @Lookup. It then registers the bean into the application context. Whenever we request the getPrototypeBean() method, it returns a new PrototypeBean instance.

It will use CGLIB to generate the bytecode responsible for fetching the PrototypeBean from the application context.

5. javax.inject API

The setup along with required dependencies are described in this Spring wiring article.

Here’s the singleton bean:

public class SingletonProviderBean {

    @Autowired
    private Provider<PrototypeBean> myPrototypeBeanProvider;

    public PrototypeBean getPrototypeInstance() {
        return myPrototypeBeanProvider.get();
    }
}

We use Provider interface to inject the prototype bean. For each getPrototypeInstance() method call, the myPrototypeBeanProvider.get() method returns a new instance of PrototypeBean.

6. Scoped Proxy

By default, Spring holds a reference to the real object to perform the injection. Here, we create a proxy object to wire the real object with the dependent one.

Each time the method on the proxy object is called, the proxy decides itself whether to create a new instance of the real object or reuse the existing one.

To set up this, we modify the Appconfig class to add a new @Scope annotation:

@Scope(
  value = ConfigurableBeanFactory.SCOPE_PROTOTYPE, 
  proxyMode = ScopedProxyMode.TARGET_CLASS)

By default, Spring uses CGLIB library to directly subclass the objects. To avoid CGLIB usage, we can configure the proxy mode with ScopedProxyMode.INTERFACES, to use the JDK dynamic proxy instead.

7. ObjectFactory Interface

Spring provides the ObjectFactory<T> interface to produce on demand objects of the given type:

public class SingletonObjectFactoryBean {

    @Autowired
    private ObjectFactory<PrototypeBean> prototypeBeanObjectFactory;

    public PrototypeBean getPrototypeInstance() {
        return prototypeBeanObjectFactory.getObject();
    }
}

Let’s have a look at getPrototypeInstance() method; getObject() returns a brand new instance of PrototypeBean for each request. Here, we have more control over initialization of the prototype.

Also, the ObjectFactory is a part of the framework; this means avoiding additional setup in order to use this option.

8. Testing

Let’s now write a simple JUnit test to exercise the case with ObjectFactory interface:

@Test
public void givenPrototypeInjection_WhenObjectFactory_ThenNewInstanceReturn() {

    AbstractApplicationContext context
     = new AnnotationConfigApplicationContext(AppConfig.class);

    SingletonObjectFactoryBean firstContext
     = context.getBean(SingletonObjectFactoryBean.class);
    SingletonObjectFactoryBean secondContext
     = context.getBean(SingletonObjectFactoryBean.class);

    PrototypeBean firstInstance = firstContext.getPrototypeInstance();
    PrototypeBean secondInstance = secondContext.getPrototypeInstance();

    assertTrue("New instance expected", firstInstance != secondInstance);
}

After successfully launching the test, we can see that each time getPrototypeInstance() method called, a new prototype bean instance created.

9. Conclusion

In this short tutorial, we learned several ways to inject the prototype bean into the singleton instance.

As always, the complete code for this tutorial can be found on GitHub project.

Introduction to OpenCSV

$
0
0

1. Introduction

This quick article introduces OpenCSV 4, a fantastic library for writing, reading, serializing, deserializing, and/or parsing .csv files! Below, we’ll go through several examples demonstrating how to set up and use OpenCSV 4 for your endeavors.

2. Set-Up

Here’s how to add OpenCSV to your project by way of a pom.xml dependency:

<dependency>
    <groupId>com.opencsv</groupId>
    <artifactId>opencsv</artifactId>
    <version>4.1</version>
</dependency>

The .jars for OpenCSV can be found at the official site or through a quick search over at Maven Repository.

Our .csv file will be really simple, we’ll keep it to two columns and four rows:

colA, ColB
A, B
C, D
G, G
G, F

3. To Bean or Not to Bean

After adding OpenCSV to your pom.xml, we can implement CSV-handling methods in two convenient ways:

  1. using the handy CSVReader and CSVWriter objects (for simpler operations) or
  2. using CsvToBean to convert .csv files into beans (which are implemented as annotated plain-old-java-objects).

We’ll stick with synchronous (or blocking) examples for this article so we can focus on the basics.

Remember, a synchronous method will prevent surrounding or subsequent code from executing until it’s done. Any production environment will likely use asynchronous or (non-blocking) methods that will allow other processes or methods to complete while the asynchronous method finishes up.

We’ll dive into asynchronous examples for OpenCSV in a future article.

3.1. The CSVReader

CSVReader – through the supplied readAll() and readNext() methods! Let’s take a look at how to use readAll() synchronously:

public List<String[]> readAll(Reader reader) throws Exception {
    CSVReader csvReader = new CSVReader(reader);
    List<String[]> list = new ArrayList<>();
    list = csvReader.readAll();
    reader.close();
    csvReader.close();
    return list;
}

Then we can call that method by passing in a BufferedReader:

public String readAllExample() throws Exception {
    Reader reader = Files.newBufferedReader(
      ClassLoader.getSystemResource("csv/twoColumn.csv").toURI());
    return CsvReaderExamples.readAll(reader).toString();
}

Similarly, we can abstract readNext() which reads a supplied .csv line by line:

public List<String[]> oneByOne(Reader reader) throws Exception {
    List<String[]> list = new ArrayList<>();
    CSVReader csvReader = new CSVReader(reader);
    String[] line;
    while ((line = csvReader.readNext()) != null) {
        list.add(line);
    }
    reader.close();
    csvReader.close();
    return list;
}

And we can call that method here by passing in a BufferReader:

public String oneByOneExample() throws Exception {
    Reader reader = Files.newBufferedReader(
      ClassLoader.getSystemResource("csv/twoColumn.csv").toURI());
    return CsvReaderExamples.oneByOne(reader).toString();
}

For greater flexibility and configuration options you can alternatively use CSVReaderBuilder:

CSVParser parser = new CSVParserBuilder()
    .withSeparator(',')
    .withIgnoreQuotations(true)
    .build();

CSVReader csvReader = new CSVReaderBuilder(reader)
    .withSkipLines(0)
    .withCSVParser(parser)
    .build();

CSVReaderBuilder allows one to skip the column headings and set parsing rules through CSVParserBuilder.

Using CSVParserBuilder, we can choose a custom column separator, ignore or handle quotations marks, state how we’ll handle null fields, and how to interpret escaped characters. For more information on these configuration settings please refer to the official specification docs.

As always, please remember to close all your Readers to prevent memory leaks!

3.2. The CSVWriter

CSVWriter similarly supplies the ability to write to a .csv file all at once or line by line.

Let’s take a look at how to do write to a .csv line by line:

public String csvWriterOneByOne(List<String[]> stringArray, Path path) throws Exception {
    CSVWriter writer = new CSVWriter(new FileWriter(path.toString()));
    for (String[] array : stringArray) {
        writer.writeNext(array);
    }
    
    writer.close();
    return Helpers.readFile(path);
}

Now, let’s specify where we want to save that file and call the method we just wrote:

public String csvWriterOneByOne() throws Exception{
    Path path = Paths.get(
      ClassLoader.getSystemResource("csv/writtenOneByOne.csv").toURI()); 
    return CsvWriterExamples.csvWriterOneByOne(Helpers.fourColumnCsvString(), path); 
}

We can also write our .csv all at once by passing in a List of String arrays representing the rows of our .csv. :

public String csvWriterAll(List<String[]> stringArray, Path path) throws Exception {
     CSVWriter writer = new CSVWriter(new FileWriter(path.toString()));
     writer.writeAll(stringArray);
     writer.close();
     return Helpers.readFile(path);
}

And here’s how we call it:

public String csvWriterAll() throws Exception {
    Path path = Paths.get(
      ClassLoader.getSystemResource("csv/writtenAll.csv").toURI()); 
    return CsvWriterExamples.csvWriterAll(Helpers.fourColumnCsvString(), path);
}

That’s it!

3.3. Bean-Based Reading

OpenCSV is able to serialize .csv files into preset and reusable schemas implemented as annotated Java pojo beans. CsvToBean is constructed using CsvToBeanBuilder. As of OpenCSV 4, CsvToBeanBuilder is the recommended way to work with com.opencsv.bean.CsvToBean.

Here’s a simple bean we can use to serialize our two-column .csv from section 2.:

public class SimplePositionBean  {
    @CsvBindByPosition(position = 0)
    private String exampleColOne;

    @CsvBindByPosition(position = 1)
    private String exampleColTwo;

    // getters and setters
}

Each column in the .csv file is associated with a field in the bean. The mappings between .csv column headings can be performed using the @CsvBindByPosition or the @CsvBindByName annotations which specify a mapping by position or heading string match, respectively.

First, let’s create a superclass called CsvBean – this will allow us to reuse and generalize the methods we’ll build below:

public class CsvBean { }

An example child class:

public class NamedColumnBean extends CsvBean {

    @CsvBindByName(column = "name")
    private String name;

    @CsvBindByName
    private int age;

    // getters and setters
}

Let’s abstract a synchronously returned List using the CsvToBean:

 public List<CsvBean> beanBuilderExample(Path path, Class clazz) throws Exception {
     CsvTransfer csvTransfer = new CsvTransfer();
     ColumnPositionMappingStrategy ms = new ColumnPositionMappingStrategy();
     ms.setType(clazz);

     Reader reader = Files.newBufferedReader(path);
     CsvToBean cb = new CsvToBeanBuilder(reader)
       .withType(clazz)
       .withMappingStrategy(ms)
       .build();

    csvTransfer.setCsvList(cb.parse());
    reader.close();
    return csvTransfer.getCsvList();
}

We pass in our bean (clazz) and set that as the ColumnPositionMappingStrategy. In doing so, we associate the fields of our beans with the respective columns of our .csv rows.

We can call that here using the SimplePositionBean subclass of the CsvBean we wrote above:

public String simplePositionBeanExample() throws Exception {
    Path path = Paths.get(
      ClassLoader.getSystemResource("csv/twoColumn.csv").toURI()); 
    return BeanExamples.beanBuilderExample(path, SimplePositionBean.class).toString(); 
}

or here using the NamedColumnBean – another subclass of the CsvBean:

public String namedColumnBeanExample() throws Exception {
    Path path = Paths.get(
      ClassLoader.getSystemResource("csv/namedColumn.csv").toURI()); 
    return BeanExamples.beanBuilderExample(path, NamedColumnBean.class).toString();
}

3.4. Bean-Based Writing

Lastly, let’s take a look at how to use the StatefulBeanToCsv class to write to a .csv file:

public String writeCsvFromBean(Path path) throws Exception {
    Writer writer  = new FileWriter(path.toString());

    StatefulBeanToCsv sbc = new StatefulBeanToCsvBuilder(writer)
       .withSeparator(CSVWriter.DEFAULT_SEPARATOR)
       .build();

    List<CsvBean> list = new ArrayList<>();
    list.add(new WriteExampleBean("Test1", "sfdsf", "fdfd"));
    list.add(new WriteExampleBean("Test2", "ipso", "facto"));

    sbc.write(list);
    writer.close();
    return Helpers.readFile(path);
}

Here, we are specifying how we will delimit our data which is supplied as a List of specified CsvBean objects.

We can then call our method writeCsvFromBean() after passing in the desired output file path:

public String writeCsvFromBeanExample() {
    Path path = Paths.get(
      ClassLoader.getSystemResource("csv/writtenBean.csv").toURI()); 
    return BeanExamples.writeCsvFromBean(path); 
}

4. Conclusion

There we go – synchronous code examples for OpenCSV using beans, CSVReader, and CSVWriter. Check out the official docs here.

As always, the code samples are provided over on GitHub.

Working with JSON in Groovy

$
0
0

1. Introduction

In this article, we’re going to describe and see examples of how to work with JSON in a Groovy application.

First of all, to get the examples of this article up and running, we need to set up our pom.xml:

<build>
    <plugins>
        // ...
        <plugin>
            <groupId>org.codehaus.gmavenplus</groupId>
            <artifactId>gmavenplus-plugin</artifactId>
            <version>1.6</version>
        </plugin>
    </plugins>
</build>
<dependencies>
    // ...
    <dependency>
        <groupId>org.codehaus.groovy</groupId>
        <artifactId>groovy-all</artifactId>
        <version>2.4.13</version>
    </dependency>
</dependencies>

The most recent Maven plugin can be found here and the latest version of the groovy-all here.

2. Parsing Groovy Objects to JSON

Converting Objects to JSON in Groovy is pretty simple, let’s assume we have an Account class:

class Account {
    String id
    BigDecimal value
    Date createdAt
}

To convert an instance of that class to a JSON String, we need to use the JsonOutput class and make a call to the static method toJson():

Account account = new Account(
    id: '123', 
    value: 15.6,
    createdAt: new SimpleDateFormat('MM/dd/yyyy').parse('01/01/2018')
) 
println JsonOutput.toJson(account)

As a result, we’ll get the parsed JSON String:

{"value":15.6,"createdAt":"2018-01-01T02:00:00+0000","id":"123"}

2.1. Customizing the JSON Output

As we can see, the date output isn’t what we wanted. For that purpose, starting with version 2.5, the package groovy.json comes with a dedicated set of tools.

With the JsonGenerator class, we can define options to the JSON output:

JsonGenerator generator = new JsonGenerator.Options()
  .dateFormat('MM/dd/yyyy')
  .excludeFieldsByName('value')
  .build()

println generator.toJson(account)

As a result, we’ll get the formatted JSON without the value field we excluded and with the formatted date:

{"createdAt":"01/01/2018","id":"123"}

 2.2. Formatting the JSON Output

With the methods above we saw that the JSON output was always in a single line, and it can get confusing if a more complex object has to be dealt with.

However, we can format our output using the prettyPrint method:

String json = generator.toJson(account)
println JsonOutput.prettyPrint(json)

And we get the formatted JSON bellow:

{
    "value": 15.6,
    "createdAt": "01/01/2018",
    "id": "123"
}

3. Parsing JSON to Groovy Objects

We’re going to use Groovy class JsonSlurper to convert from JSON to Objects.

Also, with JsonSlurper we have a bunch of overloaded parse methods and a few specific methods like parseText, parseFile, and others.

We’ll use the parseText to parse a String to an Account class:

def jsonSlurper = new JsonSlurper()

def account = jsonSlurper.parseText('{"id":"123", "value":15.6 }') as Account

In the above code, we have a method that receives a JSON String and returns an Account object, which can be any Groovy Object.

Also, we can parse a JSON String to a Map, calling it without any cast, and with the Groovy dynamic typing, we can have the same as the object.

3.1. Parsing JSON Input

The default parser implementation for JsonSlurper is JsonParserType.CHAR_BUFFER, but in some cases, we’ll need to deal with a parsing problem.

Let’s look at an example for this: given a JSON String with a date property, JsonSlurper will not correctly create the Object because it will try to parse the date as String:

def jsonSlurper = new JsonSlurper()
def account = jsonSlurper.parseText('{"id":"123","createdAt":"2018-01-01T02:00:00+0000"}') as Account

As a result, the code above will return an Account object with all properties containing null values.

To resolve that problem, we can use the JsonParserType.INDEX_OVERLAY.

As a result, it will try as hard as possible to avoid creation of String or char arrays:

def jsonSlurper = new JsonSlurper(type: JsonParserType.INDEX_OVERLAY)
def account = jsonSlurper.parseText('{"id":"123","createdAt":"2018-01-01T02:00:00+0000"}') as Account

Now, the code above will return an Account instance appropriately created.

3.2 Parser Variants

Also, inside the JsonParserType, we have some other implementations:

  • JsonParserType.LAX will allow a more relaxed JSON parsing, with comments, no quote strings, etc.
  • JsonParserType.CHARACTER_SOURCE is used for large file parsing.

4. Conclusion

We’ve covered a lot of the JSON processing in a Groovy application with a couple of simple examples.

For more information about the groovy.json package classes we can have a look at the Groovy Documentation.

Check the source code of the classes used in this article, as well as some unit tests, in our GitHub repository.

Content Analysis with Apache Tika

$
0
0

1. Overview

Apache Tika is a toolkit for extracting content and metadata from various types of documents, such as Word, Excel, and PDF or even multimedia files like JPEG and MP4.

All text-based and multimedia files can be parsed using a common interface, making Tika a powerful and versatile library for content analysis.

In this article, we’ll give an introduction to Apache Tika, including its parsing API and how it automatically detects the content type of a document. Working examples will also be provided to illustrate operations of this library.

2. Getting Started

In order to parse documents using Apache Tika, we need only one Maven dependency:

<dependency>
    <groupId>org.apache.tika</groupId>
    <artifactId>tika-parsers</artifactId>
    <version>1.17</version>
</dependency>

The latest version of this artifact can be found here.

3. The Parser API

The Parser API is the heart of Apache Tika, abstracting away the complexity of the parsing operations. This API relies on a single method:

void parse(
  InputStream stream, 
  ContentHandler handler, 
  Metadata metadata, 
  ParseContext context) 
  throws IOException, SAXException, TikaException

The meanings of this method’s parameters are:

  • stream an InputStream instance created from the document to be parsed
  • handlerContentHandler object receiving a sequence of XHTML SAX events parsed from the input document; this handler will then process events and export the result in a particular form
  • metadata a Metadata object conveying metadata properties in and out of the parser
  • context a ParseContext instance carrying context-specific information, used to customize the parsing process

The parse method throws an IOException if it fails to read from the input stream, a TikaException if the document taken from the stream cannot be parsed and a SAXException if the handler is unable to process an event.

When parsing a document, Tika attempts to reuse existing parser libraries such as Apache POI or PDFBox as much as possible. As a result, most of the Parser implementation classes are just adapters to such external libraries.

In section 5, we’ll see how the handler and metadata parameters can be used to extract content and metadata of a document.

For convenience, we can use the facade class Tika to access the functionality of the Parser API.

4. Auto-Detection

Apache Tika can automatically detect the type of a document and its language based on the document itself rather than on additional information.

4.1. Document Type Detection

The detection of document types can be done using an implementation class of the Detector interface, which has a single method:

MediaType detect(java.io.InputStream input, Metadata metadata) 
  throws IOException

This method takes a document, and its associated metadata – then returns a MediaType object describing the best guess regarding the type of the document.

Metadata isn’t the only source of information on which a detector relies. The detector can also make use of magic bytes, which are a special pattern near the beginning of a file or delegate the detection process to a more suitable detector.

In fact, the algorithm used by the detector is implementation dependent.

For instance, the default detector works with magic bytes first, then metadata properties. If the content type hasn’t been found at this point, it will use the service loader to discover all available detectors and try them in turn.

4.2. Language Detection

In addition to the type of a document, Tika can also identify its language even without help from metadata information.

In previous releases of Tika, the language of the document is detected using a LanguageIdentifier instance.

However, LanguageIdentifier has been deprecated in favor of web services, which is not made clear in the Getting Started docs.

Language detection services are now provided via subtypes of the abstract class LanguageDetector. Using web services, you can also access fully-fledged online translation services, such as Google Translate or Microsoft Translator.

For the sake of brevity, we won’t go over those services in detail.

5. Tika in Action

This section illustrates Apache Tika features using working examples.

The illustration methods will be wrapped in a class:

public class TikaAnalysis {
    // illustration methods
}

5.1. Detecting Document Types

Here’s the code we can use to detect the type of a document read from an InputStream:

public static String detectDocTypeUsingDetector(InputStream stream) 
  throws IOException {
    Detector detector = new DefaultDetector();
    Metadata metadata = new Metadata();

    MediaType mediaType = detector.detect(stream, metadata);
    return mediaType.toString();
}

Assume we have a PDF file named tika.txt in the classpath. The extension of this file has been changed to try to trick our analysis tool. The real type of the document can still be found and confirmed by a test:

@Test
public void whenUsingDetector_thenDocumentTypeIsReturned() 
  throws IOException {
    InputStream stream = this.getClass().getClassLoader()
      .getResourceAsStream("tika.txt");
    String mediaType = TikaAnalysis.detectDocTypeUsingDetector(stream);

    assertEquals("application/pdf", mediaType);

    stream.close();
}

It’s clear that a wrong file extension can’t keep Tika from finding the correct media type, thanks to the magic bytes %PDF at the start of the file.

For convenience, we can re-write the detection code using the Tika facade class with the same result:

public static String detectDocTypeUsingFacade(InputStream stream) 
  throws IOException {
 
    Tika tika = new Tika();
    String mediaType = tika.detect(stream);
    return mediaType;
}

5.2. Extracting Content

Let’s now extract the content of a file and return the result as a String – using the Parser API:

public static String extractContentUsingParser(InputStream stream) 
  throws IOException, TikaException, SAXException {
 
    Parser parser = new AutoDetectParser();
    ContentHandler handler = new BodyContentHandler();
    Metadata metadata = new Metadata();
    ParseContext context = new ParseContext();

    parser.parse(stream, handler, metadata, context);
    return handler.toString();
}

Given a Microsoft Word file in the classpath with this content:

Apache Tika - a content analysis toolkit
The Apache Tika™ toolkit detects and extracts metadata and text ...

The content can be extracted and verified:

@Test
public void whenUsingParser_thenContentIsReturned() 
  throws IOException, TikaException, SAXException {
    InputStream stream = this.getClass().getClassLoader()
      .getResourceAsStream("tika.docx");
    String content = TikaAnalysis.extractContentUsingParser(stream);

    assertThat(content, 
      containsString("Apache Tika - a content analysis toolkit"));
    assertThat(content, 
      containsString("detects and extracts metadata and text"));

    stream.close();
}

Again, the Tika class can be used to write the code more conveniently:

public static String extractContentUsingFacade(InputStream stream) 
  throws IOException, TikaException {
 
    Tika tika = new Tika();
    String content = tika.parseToString(stream);
    return content;
}

5.3. Extracting Metadata

In addition to the content of a document, the Parser API can also extract metadata:

public static Metadata extractMetadatatUsingParser(InputStream stream) 
  throws IOException, SAXException, TikaException {
 
    Parser parser = new AutoDetectParser();
    ContentHandler handler = new BodyContentHandler();
    Metadata metadata = new Metadata();
    ParseContext context = new ParseContext();

    parser.parse(stream, handler, metadata, context);
    return metadata;
}

When a Microsoft Excel file exists in the classpath, this test case confirms that the extracted metadata is correct:

@Test
public void whenUsingParser_thenMetadataIsReturned() 
  throws IOException, TikaException, SAXException {
    InputStream stream = this.getClass().getClassLoader()
      .getResourceAsStream("tika.xlsx");
    Metadata metadata = TikaAnalysis.extractMetadatatUsingParser(stream);

    assertEquals("org.apache.tika.parser.DefaultParser", 
      metadata.get("X-Parsed-By"));
    assertEquals("Microsoft Office User", metadata.get("Author"));

    stream.close();
}

Finally, here’s another version of the extraction method using the Tika facade class:

public static Metadata extractMetadatatUsingFacade(InputStream stream) 
  throws IOException, TikaException {
    Tika tika = new Tika();
    Metadata metadata = new Metadata();

    tika.parse(stream, metadata);
    return metadata;
}

6. Conclusion

This tutorial focused on content analysis with Apache Tika. Using the Parser and Detector APIs, we can automatically detect the type of a document, as well as extract its content and metadata.

For advanced use cases, we can create custom Parser and Detector classes to have more control over the parsing process.

The complete source code for this tutorial can be found over on GitHub.

Viewing all 3783 articles
Browse latest View live


<script src="https://jsc.adskeeper.com/r/s/rssing.com.1596347.js" async> </script>