Quantcast
Channel: Baeldung
Viewing all 3691 articles
Browse latest View live

Using Conditions with AssertJ Assertions

$
0
0

1. Overview

In this tutorial, we’ll take a look at the AssertJ library, especially at defining and using conditions to create readable and maintainable tests.

AssertJ basics can be found here.

2. Class Under Test

Let’s have a look at the target class against which we’ll write test cases:

public class Member {
    private String name;
    private int age;

    // constructors and getters
}

3. Creating Conditions

We can define an assertion condition by simply instantiating the Condition class with appropriate arguments.

The most convenient way to create a Condition is to use the constructor that takes a Predicate as a parameter. Other constructors require us to create a subclass and override the matches method, which is less handy.

When constructing a Condition object, we must specify a type argument, which is the type of the value against which the condition is evaluated.

Let’s declare a condition for the age field of our Member class:

Condition<Member> senior = new Condition<>(
  m -> m.getAge() >= 60, "senior");

The senior variable now references a Condition instance which tests if a Person is senior based on its age.

The second argument to the constructor, the String “senior”, is a short description that will be used by AssertJ itself to build a user-friendly error message if the condition fails.

Another condition, checking whether a Person has the name “John”, looks like this:

Condition<Member> nameJohn = new Condition<>(
  m -> m.getName().equalsIgnoreCase("John"), 
  "name John"
);

4. Test Cases

Now, let’s see how to make use of Condition objects in our test class. Assume that the conditions senior and nameJohn are available as fields in our test class.

4.1. Asserting Scalar Values

The following test should pass as the age value is above the seniority threshold:

Member member = new Member("John", 65);
assertThat(member).is(senior);

Since the assertion with the is method passes, an assertion using isNot with the same argument will fail:

// assertion fails with an error message containing "not to be <senior>"
assertThat(member).isNot(senior);

Using the nameJohn variable, we can write two similar tests:

Member member = new Member("Jane", 60);
assertThat(member).doesNotHave(nameJohn);

// assertion fails with an error message containing "to have:\n <name John>"
assertThat(member).has(nameJohn);

The is and has methods, as well as the isNot and doesNotHave methods have the same semantics. Which we use is just a matter of choice. Nevertheless, it is recommended to pick the one that makes our test code more readable.

4.2. Asserting Collections

Conditions don’t work only with scalar values, but they can also verify the existence or non-existence of elements in a collection. Let’s take a look at a test case:

List<Member> members = new ArrayList<>();
members.add(new Member("Alice", 50));
members.add(new Member("Bob", 60));

assertThat(members).haveExactly(1, senior);
assertThat(members).doNotHave(nameJohn);

The haveExactly method asserts the exact number of elements meeting the given Condition, while the doNotHave method checks for the absence of elements.

The methods haveExactly and doNotHave are not the only ones working with collection conditions. For a complete list of those methods, see the AbstractIterableAssert class in the API documentation.

4.3. Combining Conditions

We can combine various conditions using three static methods of the Assertions class:

  • not – creates a condition that is met if the specified condition is not met
  • allOf – creates a condition that is met only if all of the specified conditions are met
  • anyOf – creates a condition that is met if at least one of the specified conditions is met

Here’s how the not and allOf methods can be used to combine conditions:

Member john = new Member("John", 60);
Member jane = new Member("Jane", 50);
        
assertThat(john).is(allOf(senior, nameJohn));
assertThat(jane).is(allOf(not(nameJohn), not(senior)));

Similarly, we can make use of anyOf:

Member john = new Member("John", 50);
Member jane = new Member("Jane", 60);
        
assertThat(john).is(anyOf(senior, nameJohn));
assertThat(jane).is(anyOf(nameJohn, senior));

5. Conclusion

This tutorial gave a guide to AssertJ conditions and how to use them to create very readable assertions in your test code.

The implementation of all the examples and code snippets can be found over on GitHub.


JPA Attribute Converters

$
0
0

1. Introduction

In this quick article, we’ll cover the usage of the Attribute Converters available in JPA 2.1 – which, simply put, allow us to map JDBC types to Java classes.

We’ll use Hibernate 5 as our JPA implementation here.

2. Creating a Converter

We’re going to show how to implement an attribute converter for a custom Java class.

First, let’s create a PersonName class – that will be converted later:

public class PersonName implements Serializable {

    private String name;
    private String surname;

    // getters and setters
}

Then, we’ll add an attribute of type PersonName to an @Entity class:

@Entity(name = "PersonTable")
public class Person {
   
    private PersonName personName;

    //...
}

Now we need to create a converter that transforms the PersonName attribute to a database column and vice-versa. In our case, we’ll convert the attribute to a String value that contains both name and surname fields.

To do so we have to annotate our converter class with @Converter and implement the AttributeConverter interface. We’ll parametrize the interface with the types of the class and the database column, in that order:

@Converter
public class PersonNameConverter implements 
  AttributeConverter<PersonName, String> {

    private static final String SEPARATOR = ", ";

    @Override
    public String convertToDatabaseColumn(PersonName personName) {
        if (personName == null) {
            return null;
        }

        StringBuilder sb = new StringBuilder();
        if (personName.getSurname() != null && !personName.getSurname()
            .isEmpty()) {
            sb.append(personName.getSurname());
            sb.append(SEPARATOR);
        }

        if (personName.getName() != null 
          && !personName.getName().isEmpty()) {
            sb.append(personName.getName());
        }

        return sb.toString();
    }

    @Override
    public PersonName convertToEntityAttribute(String dbPersonName) {
        if (dbPersonName == null || dbPersonName.isEmpty()) {
            return null;
        }

        String[] pieces = dbPersonName.split(SEPARATOR);

        if (pieces == null || pieces.length == 0) {
            return null;
        }

        PersonName personName = new PersonName();        
        String firstPiece = !pieces[0].isEmpty() ? pieces[0] : null;
        if (dbPersonName.contains(SEPARATOR)) {
            personName.setSurname(firstPiece);

            if (pieces.length >= 2 && pieces[1] != null 
              && !pieces[1].isEmpty()) {
                personName.setName(pieces[1]);
            }
        } else {
            personName.setName(firstPiece);
        }

        return personName;
    }
}

Notice that we had to implement 2 methods: convertToDatabaseColumn() and convertToEntityAttribute().

The two methods are used to convert from the attribute to a database column and vice-versa.

3. Using the Converter

To use our converter, we just need to add the @Convert annotation to the attribute and specify the converter class we want to use:

@Entity(name = "PersonTable")
public class Person {

    @Convert(converter = PersonNameConverter.class)
    private PersonName personName;
    
    // ...
}

Finally, let’s create a unit test to see that it really works.

To do so, we’ll first store a Person object in our database:

@Test
public void givenPersonName_whenSaving_thenNameAndSurnameConcat() {
    String name = "name";
    String surname = "surname";

    PersonName personName = new PersonName();
    personName.setName(name);
    personName.setSurname(surname);

    Person person = new Person();
    person.setPersonName(personName);

    Long id = (Long) session.save(person);

    session.flush();
    session.clear();
}

Next, we’re going to test that the PersonName was stored as we defined it in the converter – by retrieving that field from the database table:

@Test
public void givenPersonName_whenSaving_thenNameAndSurnameConcat() {
    // ...

    String dbPersonName = (String) session.createNativeQuery(
      "select p.personName from PersonTable p where p.id = :id")
      .setParameter("id", id)
      .getSingleResult();

    assertEquals(surname + ", " + name, dbPersonName);
}

Let’s also test that the conversion from the value stored in the database to the PersonName class works as defined in the converter by writing a query that retrieves the whole Person class:

@Test
public void givenPersonName_whenSaving_thenNameAndSurnameConcat() {
    // ...

    Person dbPerson = session.createNativeQuery(
      "select * from PersonTable p where p.id = :id", Person.class)
        .setParameter("id", id)
        .getSingleResult();

    assertEquals(dbPerson.getPersonName()
      .getName(), name);
    assertEquals(dbPerson.getPersonName()
      .getSurname(), surname);
}

4. Conclusion

In this brief tutorial, we showed how to use the newly introduced Attribute Converters in JPA 2.1.

As always, the full source code for the examples is available over on GitHub.

Introduction to Jinq with Spring

$
0
0

1. Introduction

Jinq provides an intuitive and handy approach for querying databases in Java. In this tutorial, we’ll explore how to configure a Spring project to use Jinq and some of its features illustrated with simple examples.

2. Maven Dependencies

We’ll need to add the Jinq dependency in the pom.xml file:

<dependency>
    <groupId>org.jinq</groupId>
    <artifactId>jinq-jpa</artifactId>
    <version>1.8.22</version>
</dependency>

For Spring, we’ll add the Spring ORM dependency in the pom.xml file:

<dependency>
    <groupId>org.springframework</groupId>
    <artifactId>spring-orm</artifactId>
    <version>5.0.3.RELEASE</version>
</dependency>

Finally, for testing, we’ll use an H2 in-memory database, so let’s also add this dependency to the pom.xml file:

<dependency>
    <groupId>com.h2database</groupId>
    <artifactId>h2</artifactId>
    <version>1.4.196</version>
</dependency>

3. Understanding Jinq

Jinq helps us to write easier and more readable database queries by exposing a fluent API that’s internally based on the Java Stream API.

Let’s see an example where we’re filtering cars by model:

jinqDataProvider.streamAll(entityManager, Car.class)
  .where(c -> c.getModel().equals(model))
  .toList();

Jinq translates the above code snippet into a SQL query in an efficient way, so the final query in this example would be:

select c.* from car c where c.model=?

Since we’re not using plain-text for writing queries and use a type-safe API instead this approach is less prone to errors.

Plus, Jinq aims to allow faster development by using common, easy-to-read expressions.

Nevertheless, it has some limitations in the number of types and operations we can use, as we’ll see next.

3.1. Limitations

Jinq supports only the basic types in JPA and a concrete list of SQL functions. It works by translating the lambda operations into a native SQL query by mapping all objects and methods into a JPA data type and a SQL function.

Therefore, we can’t expect the tool to translate every custom type or all methods of a type.

3.2. Supported Data Types

Let’s see the supported data types and methods supported:

  • String – equals(), compareTo() methods only
  • Primitive Data Types – arithmetic operations
  • Enums and custom classes – supports == and != operations only
  • java.util.Collection – contains()
  • Date API – equals(), before(), after() methods only

Note: if we wanted to customize the conversion from a Java object to a database object, we’d need to register our concrete implementation of an AttributeConverter in Jinq.

4. Integrating Jinq with Spring

Jinq needs an EntityManager instance to get the persistence context. In this tutorial, we’ll introduce a simple approach with Spring to make Jinq work with the EntityManager provided by Hibernate.

4.1. Repository Interface

Spring uses the concept of repositories to manage entities. Let’s look at our CarRepository interface where we have a method to retrieve a Car for a given model:

public interface CarRepository {
    Optional<Car> findByModel(String model);
}

4.2. Abstract Base Repository

Next, we’ll need a base repository to provide all the Jinq capabilities:

public abstract class BaseJinqRepositoryImpl<T> {
    @Autowired
    private JinqJPAStreamProvider jinqDataProvider;

    @PersistenceContext
    private EntityManager entityManager;

    protected abstract Class<T> entityType();

    public JPAJinqStream<T> stream() {
        return streamOf(entityType());
    }

    protected <U> JPAJinqStream<U> streamOf(Class<U> clazz) {
        return jinqDataProvider.streamAll(entityManager, clazz);
    }
}

4.3. Implementing the Repository

Now, all we need for Jinq is an EntityManager instance and the entity type class.

Let’s see the Car repository implementation using our Jinq base repository that we just defined:

@Repository
public class CarRepositoryImpl 
  extends BaseJinqRepositoryImpl<Car> implements CarRepository {

    @Override
    public Optional<Car> findByModel(String model) {
        return stream()
          .where(c -> c.getModel().equals(model))
          .findFirst();
    }

    @Override
    protected Class<Car> entityType() {
        return Car.class;
    }
}

4.4. Wiring the JinqJPAStreamProvider

In order to wire the JinqJPAStreamProvider instance, we’ll add the Jinq provider configuration:

@Configuration
public class JinqProviderConfiguration {

    @Bean
    @Autowired
    JinqJPAStreamProvider jinqProvider(EntityManagerFactory emf) {
        return new JinqJPAStreamProvider(emf);
    }
}

4.5. Configuring the Spring Application

The final step is to configure our Spring application using Hibernate and our Jinq configuration. As a reference, see our application.properties file, in which we use an in-memory H2 instance as the database:

spring.datasource.url=jdbc:h2:~/jinq
spring.datasource.username=sa
spring.datasource.password=
spring.jpa.hibernate.ddl-auto=create-drop

5. Query Guide

Jinq provides many intuitive options to customize the final SQL query with select, where, joins and more. Note that these have the same limitations that we have already introduced above.

5.1. Where

The where clause allows applying multiple filters to a data collection.

In the next example, we want to filter cars by model and description:

stream()
  .where(c -> c.getModel().equals(model)
    && c.getDescription().contains(desc))
  .toList();

And this is the SQL that Jinq translates:

select c.model, c.description from car c where c.model=? and locate(?, c.description)>0

5.2. Select

In case we want to retrieve only a few columns/fields from the database, we need to use the select clause.

In order to map multiple values, Jinq provides a number of Tuple classes with up to eight values:

stream()
  .select(c -> new Tuple3<>(c.getModel(), c.getYear(), c.getEngine()))
  .toList()

And the translated SQL:

select c.model, c.year, c.engine from car c

5.3. Joins

Jinq is able to resolve one-to-one and many-to-one relationships if the entities are properly linked.

For example, if we add the manufacturer entity in Car:

@Entity(name = "CAR")
public class Car {
    //...
    @OneToOne
    @JoinColumn(name = "name")
    public Manufacturer getManufacturer() {
        return manufacturer;
    }
}

And the Manufacturer entity with the list of Cars:

@Entity(name = "MANUFACTURER")
public class Manufacturer {
    // ...
    @OneToMany(mappedBy = "model")
    public List<Car> getCars() {
        return cars;
    }
}

We’re now able to get the Manufacturer for a given model:

Optional<Manufacturer> manufacturer = stream()
  .where(c -> c.getModel().equals(model))
  .select(c -> c.getManufacturer())
  .findFirst();

As expected, Jinq will use an inner join SQL clause in this scenario:

select m.name, m.city from car c inner join manufacturer m on c.name=m.name where c.model=?

In case we need to have more control over the join clauses in order to implement more complex relationships over the entities, like a many-to-many relation, we can use the join method:

List<Pair<Manufacturer, Car>> list = streamOf(Manufacturer.class)
  .join(m -> JinqStream.from(m.getCars()))
  .toList()

Finally, we could use a left outer join SQL clause by using the leftOuterJoin method instead of the join method.

5.4. Aggregations

All the examples we have introduced so far are using either the toList or the findFirst methods – to return the final result of our query in Jinq.

Besides these methods, we also have access to other methods to aggregate results.

For example, let’s use the count method to get the total count of the cars for a concrete model in our database:

long total = stream()
  .where(c -> c.getModel().equals(model))
  .count()

And the final SQL is using the count SQL method as expected:

select count(c.model) from car c where c.model=?

Jinq also provides aggregation methods like sum, average, min, max, and the possibility to combine different aggregations.

5.5. Pagination

In case we want to read data in batches, we can use the limit and skip methods.

Let’s see an example where we want to skip the first 10 cars and get only 20 items:

stream()
  .skip(10)
  .limit(20)
  .toList()

And the generated SQL is:

select c.* from car c limit ? offset ?

6. Conclusion

There we go. In this article, we’ve seen an approach for setting up a Spring application with Jinq using Hibernate (minimally).

We’ve also briefly explored Jinq’s benefits and some of its main features.

As always, the sources can be found over on GitHub.

Regular Expressions in Kotlin

$
0
0

1. Introduction

We can find use (or abuse) of regular expressions in pretty much every kind of software, from quick scripts to incredibly complex applications.

In this article, we’ll see how to use regular expressions in Kotlin.

We won’t be discussing regular expression syntax; a familiarity with regular expressions, in general, is required to adequately follow the article, and knowledge of the Java Pattern syntax specifically is recommended.

2. Setup

While regular expressions aren’t part of the Kotlin language, they do come with its standard library.

We probably already have it as a dependency of our project:

<dependency>
    <groupId>org.jetbrains.kotlin</groupId>
    <artifactId>kotlin-stdlib</artifactId>
    <version>1.2.21</version>
</dependency>

We can find the latest version of kotlin-stdlib on Maven Central.

3. Creating a Regular Expression Object

Regular expressions are instances of the kotlin.text.Regex class. We can create one in several ways.

A possibility is to call the Regex constructor:

Regex("a[bc]+d?")

or we can call the toRegex method on a String:

"a[bc]+d?".toRegex()

Finally, we can use a static factory method:

Regex.fromLiteral("a[bc]+d?")

Save from a difference explained in the next section, these options are equivalent and amount to personal preference. Just remember to be consistent!

Tip: regular expressions often contain characters that would be interpreted as escape sequences in String literals. We can thus use raw Strings to forget about multiple levels of escaping:

"""a[bc]+d?\W""".toRegex()

3.1. Matching Options

Both the Regex constructor and the toRegex method allow us to specify a single additional option or a set:

Regex("a(b|c)+d?", CANON_EQ)
Regex("a(b|c)+d?", setOf(DOT_MATCHES_ALL, COMMENTS))
"a(b|c)+d?".toRegex(MULTILINE)
"a(b|c)+d?".toRegex(setOf(IGNORE_CASE, COMMENTS, UNIX_LINES))

Options are enumerated in the RegexOption class, which we conveniently imported statically in the example above:

  • IGNORE_CASE – enables case-insensitive matching
  • MULTILINE – changes the meaning of ^ and $ (see Pattern)
  • LITERAL – causes metacharacters or escape sequences in the pattern to be given no special meaning
  • UNIX_LINES – in this mode, only the \n is recognized as a line terminator
  • COMMENTS – permits whitespace and comments in the pattern
  • DOT_MATCHES_ALL – causes the dot to match any character, including a line terminator
  • CANON_EQ – enables equivalence by canonical decomposition (see Pattern)

4. Matching

We use regular expressions primarily to match input Strings, and sometimes to extract or replace parts of them.

We’ll now look in detail at the methods offered by Kotlin’s Regex class for matching Strings.

4.1. Checking Partial or Total Matches

In these use cases, we’re interested in knowing whether a String or a portion of a String satisfies our regular expression.

If we only need a partial match, we can use containsMatchIn:

val regex = """a([bc]+)d?""".toRegex()

assertTrue(regex.containsMatchIn("xabcdy"))

If we want the whole String to match instead, we use matches:

assertTrue(regex.matches("abcd"))

Note that we can use matches as an infix operator as well:

assertFalse(regex matches "xabcdy")

4.2. Extracting Matching Components

In these use cases, we want to match a String against a regular expression and extract parts of the String.

We might want to match the entire String:

val matchResult = regex.matchEntire("abbccbbd")

Or we might want to find the first substring that matches:

val matchResult = regex.find("abcbabbd")

Or maybe to find all the matching substrings at once, as a Set:

val matchResults = regex.findAll("abcb abbd")

In either case, if the match is successful, the result will be one or more instances of the MatchResult class. In the next section, we’ll see how to use it.

If the match is not successful, instead, these methods return null or the empty Set in case of findAll.

4.3. The MatchResult Class

Instances of the MatchResult class represent successful matches of some input string against a regular expression; either complete or partial matches (see the previous section).

As such, they have a value, which is the matched String or substring:

val regex = """a([bc]+)d?""".toRegex()
val matchResult = regex.find("abcb abbd")

assertEquals("abcb", matchResult.value)

And they have a range of indices to indicate what portion of the input was matched:

assertEquals(IntRange(0, 3), matchResult.range)

4.4. Groups and Destructuring

We can also extract groups (matched substrings) from MatchResult instances.

We can obtain them as Strings:

assertEquals(listOf("abcb", "bcb"), matchResult.groupValues)

Or we can also view them as MatchGroup objects consisting of a value and a range:

assertEquals(IntRange(1, 3), matchResult.groups[1].range)

The group with index 0 is always the entire matched String. Indices greater than 0, instead, represent groups in the regular expression, delimited by parentheses, such as ([bc]+) in our example.

We can also destructure MatchResult instances in an assignment statement:

val regex = """([\w\s]+) is (\d+) years old""".toRegex()
val matchResult = regex.find("Mickey Mouse is 95 years old")
val (name, age) = matchResult!!.destructured

assertEquals("Mickey Mouse", name)
assertEquals("95", age)

4.5. Multiple Matches

MatchResult also has a next method that we can use to obtain the next match of the input String against the regular expression, if there is any:

val regex = """a([bc]+)d?""".toRegex()
var matchResult = regex.find("abcb abbd")

assertEquals("abcb", matchResult!!.value)

matchResult = matchResult.next()
assertEquals("abbd", matchResult!!.value)

matchResult = matchResult.next()
assertNull(matchResult)

As we can see, next returns null when there are no more matches.

5. Replacing

Another common use of regular expressions is replacing matching substrings with other Strings.

For this purpose, we have two methods readily available in the standard library.

One, replace, is for replacing all occurrences of a matching String:

val regex = """(red|green|blue)""".toRegex()
val beautiful = "Roses are red, Violets are blue"
val grim = regex.replace(beautiful, "dark")

assertEquals("Roses are dark, Violets are dark", grim)

The other, replaceFirst, is for replacing only the first occurrence:

val shiny = regex.replaceFirst(beautiful, "rainbow")

assertEquals("Roses are rainbow, Violets are blue", shiny)

5.1. Complex Replacements

For more advanced scenarios, when we don’t want to replace matches with constant Strings, but we want to apply a transformation instead, Regex still gives us what we need.

Enter the replace overload taking a closure:

val reallyBeautiful = regex.replace(beautiful) {
    m -> m.value.toUpperCase() + "!"
}

assertEquals("Roses are RED!, Violets are BLUE!", reallyBeautiful)

As we can see, for each match, we can compute a replacement String using that match.

6. Splitting

Finally, we might want to split a String into a list of substrings according to a regular expression. Again, Kotlin’s Regex has got us covered:

val regex = """\W+""".toRegex()
val beautiful = "Roses are red, Violets are blue"

assertEquals(listOf(
  "Roses", "are", "red", "Violets", "are", "blue"), regex.split(beautiful))

Here, the regular expression matches one or more non-word characters, so the result of the split operation is a list of words.

We can also put a limit on the length of the resulting list:

assertEquals(listOf("Roses", "are", "red", "Violets are blue"), regex.split(beautiful, 4))

7. Java Interoperability

If we need to pass our regular expression to Java code, or some other JVM language API that expects an instance of java.util.regex.Pattern, we can simply convert our Regex:

regex.toPattern()

8. Conclusions

In this article, we’ve examined the regular expression support in the Kotlin standard library.

For further information, see the Kotlin reference.

The implementation of all these examples and code snippets can be found in the GitHub project – this is a Maven project, so it should be easy to import and run as it’s.

Reliable Messaging with JGroups

$
0
0

1. Overview

JGroups is a Java API for reliable messages exchange. It features a simple interface that provides:

  • a flexible protocol stack, including TCP and UDP
  • fragmentation and reassembly of large messages
  • reliable unicast and multicast
  • failure detection
  • flow control

As well as many other features.

In this tutorial, we’ll create a simple application for exchanging String messages between applications and supplying shared state to new applications as they join the network.

2. Setup

2.1. Maven Dependency

We need to add a single dependency to our pom.xml:

<dependency>
    <groupId>org.jgroups</groupId>
    <artifactId>jgroups</artifactId>
    <version>4.0.10.Final</version>
</dependency>

The latest version of the library can be checked on Maven Central.

2.2. Networking

JGroups will try to use IPV6 by default. Depending on our system configuration, this may result in applications not being able to communicate.

To avoid this, we’ll set the java.net.preferIPv4Stack to true property when running our applications here:

java -Djava.net.preferIPv4Stack=true com.baeldung.jgroups.JGroupsMessenger

3. JChannels

Our connection to a JGroups network is a JChannel. The channel joins a cluster and sends and receives messages, as well as information about the state of the network.

3.1. Creating a Channel

We create a JChannel with a path to a configuration file. If we omit the file name, it will look for udp.xml in the current working directory.

We’ll create a channel with an explicitly named configuration file:

JChannel channel = new JChannel("src/main/resources/udp.xml");

JGroups configuration can be very complicated, but the default UDP and TCP configurations are sufficient for most applications. We’ve included the file for UDP in our code and will use it for this tutorial.

For more information on configuring the transport see the JGroups manual here.

3.2. Connecting a Channel

After we’ve created our channel, we need to join a cluster. A cluster is a group of nodes that exchange messages.

Joining a cluster requires a cluster name:

channel.connect("Baeldung");

The first node that attempts to join a cluster will create it if it doesn’t exist. We’ll see this process in action below.

3.3. Naming a Channel

Nodes are identified by a name so that peers can send directed messages and receive notifications about who is entering and leaving the cluster. JGroups will assign a name automatically, or we can set our own:

channel.name("user1");

We’ll use these names below, to track when nodes enter and leave the cluster.

3.4. Closing a Channel

Channel cleanup is essential if we want peers to receive timely notification that we have exited.

We close a JChannel with its close method:

channel.close()

4. Cluster View Changes

With a JChannel created we’re now ready to see the state of peers in the cluster and exchange messages with them.

JGroups maintains cluster state inside the View class. Each channel has a single View of the network. When the view changes, it’s delivered via the viewAccepted() callback.

For this tutorial, we’ll extend the ReceiverAdaptor API class that implements all of the interface methods required for an application.

It’s the recommended way to implement callbacks.

Let’s add viewAccepted to our application:

public void viewAccepted(View newView) {

    private View lastView;

    if (lastView == null) {
        System.out.println("Received initial view:");
        newView.forEach(System.out::println);
    } else {
        System.out.println("Received new view.");

        List<Address> newMembers = View.newMembers(lastView, newView);
        System.out.println("New members: ");
        newMembers.forEach(System.out::println);

        List<Address> exMembers = View.leftMembers(lastView, newView);
        System.out.println("Exited members:");
        exMembers.forEach(System.out::println);
    }
    lastView = newView;
}

Each View contains a List of Address objects, representing each member of the cluster. JGroups offers convenience methods for comparing one view to another, which we use to detect new or exited members of the cluster.

5. Sending Messages

Message handling in JGroups is straightforward. A Message contains a byte array and Address objects corresponding to the sender and the receiver.

For this tutorial we’re using Strings read from the command line, but it’s easy to see how an application could exchange other data types.

5.1. Broadcast Messages

A Message is created with a destination and a byte array; JChannel sets the sender for us. If the target is null the entire cluster will receive the message.

We’ll accept text from the command line and send it to the cluster:

System.out.print("Enter a message: ");
String line = in.readLine().toLowerCase();
Message message = new Message(null, line.getBytes());
channel.send(message);

If we run multiple instances of our program and send this message (after we implement the receive() method below), all of them would receive it, including the sender.

5.2. Blocking Our Messages

If we don’t want to see our messages, we can set a property for that:

channel.setDiscardOwnMessages(true);

When we run the previous test, the message sender does not receive its broadcast message.

5.3. Direct Messages

Sending a direct message requires a valid Address. If we’re referring to nodes by name, we need a way to look up an Address. Fortunately, we have the View for that.

The current View is always available from the JChannel:

private Optional<address> getAddress(String name) { 
    View view = channel.view(); 
    return view.getMembers().stream()
      .filter(address -> name.equals(address.toString()))
      .findAny(); 
}

Address names are available via the class toString() method, so we merely search the List of cluster members for the name we want.

So we can accept a name on from the console, find the associated destination, and send a direct message:

Address destination = null;
System.out.print("Enter a destination: ");
String destinationName = in.readLine().toLowerCase();
destination = getAddress(destinationName)
  .orElseThrow(() -> new Exception("Destination not found"); 
Message message = new Message(destination, "Hi there!"); 
channel.send(message);

6. Receiving Messages

We can send messages, now let’s add try to receive them now.

Let’s override ReceiverAdaptor’s empty receive method:

public void receive(Message message) {
    String line = Message received from: " 
      + message.getSrc() 
      + " to: " + message.getDest() 
      + " -> " + message.getObject();
    System.out.println(line);
}

Since we know the message contains a String, we can safely pass getObject() to System.out.

7. State Exchange

When a node enters the network, it may need to retrieve state information about the cluster. JGroups provides a state transfer mechanism for this.

When a node joins the cluster, it simply calls getState(). The cluster usually retrieves the state from the oldest member in the group – the coordinator.

Let’s add a broadcast message count to our application. We’ll add a new member variable and increment it inside receive():

private Integer messageCount = 0;

public void receive(Message message) {
    String line = "Message received from: " 
      + message.getSrc() 
      + " to: " + message.getDest() 
      + " -> " + message.getObject();
    System.out.println(line);

    if (message.getDest() == null) {
        messageCount++;
        System.out.println("Message count: " + messageCount);
    }
}

We check for a null destination because if we count direct messages, each node will have a different number.

Next, we override two more methods in ReceiverAdaptor:

public void setState(InputStream input) {
    try {
        messageCount = Util.objectFromStream(new DataInputStream(input));
    } catch (Exception e) {
        System.out.println("Error deserialing state!");
    }
    System.out.println(messageCount + " is the current messagecount.");
}

public void getState(OutputStream output) throws Exception {
    Util.objectToStream(messageCount, new DataOutputStream(output));
}

Similar to messages, JGroups transfers state as an array of bytes.

JGroups supplies an InputStream to the coordinator to write the state to, and an OutputStream for the new node to read. The API provides convenience classes for serializing and deserializing the data.

Note that in production code access to state information must be thread-safe.

Finally, we add the call to getState() to our startup, after we connect to the cluster:

channel.connect(clusterName);
channel.getState(null, 0);

getState() accepts a destination from which to request the state and a timeout in milliseconds. A null destination indicates the coordinator and 0 means do not timeout.

When we run this app with a pair of nodes and exchange broadcast messages, we see the message count increment.

Then if we add a third client or stop and start one of them, we’ll see the newly connected node print the correct message count.

8. Conclusion

In this tutorial, we used JGroups to create an application for exchanging messages. We used the API to monitor which nodes connected to and left the cluster and also to transfer cluster state to a new node when it joined.

Code samples, as always, can be found over on GitHub.

Introduction to ActiveWeb

$
0
0

1. Overview

In this article, we’re going to illustrate the Activeweb – a full stack web framework from JavaLite – providing everything necessary for the development of dynamic web applications or REST-ful web services.

2. Basic Concepts and Principles

Activeweb leverages “convention over configuration” – which means it’s configurable, but has sensible defaults and doesn’t require additional configuration. We just need to follow a few predefined conventions, like naming classes, methods, and fields in a certain predefined format.

It also simplifies development by recompiling and reloading the source into the running container (Jetty by default).

For dependency management, it uses Google Guice as the DI framework; to learn more about Guice, have a look at our guide here.

3. Maven Setup

To get started, let’s add the necessary dependencies first:

<dependency>
    <groupId>org.javalite</groupId>
    <artifactId>activeweb</artifactId>
    <version>1.15</version>
</dependency>

The latest version can be found here.

Additionally, for testing the application, we’ll need the activeweb-testing dependency:

<dependency>
    <groupId>org.javalite</groupId>
    <artifactId>activeweb-testing</artifactId>
    <version>1.15</version>
    <scope>test</scope>
</dependency>

Check out the latest version here.

4. Application Structure

As we discussed, the application structure needs to follow a certain convention; here’s what that looks like for a typical MVC application:

As we can see, controllers, service, config, and models should be located in their own sub-package in the app package.

The views should be located in WEB-INF/views directory, each having is own subdirectory based on the controller name. For example app.controllers.ArticleController should have an article/ sub-directory containing all the view files for that controller.

The deployment descriptor or the web.xml should typically contain a <filter> and the corresponding <filter-mapping>. Since the framework is a servlet filter, instead of a <servlet> configuration there is a filter configuration:

...
<filter>
    <filter-name>dispatcher</filter-name>
    <filter-class>org.javalite.activeweb.RequestDispatcher</filter-class>
...
</filter>
...

We also need an <init-param> root_controller to define the default controller for the application – akin to a home controller:

...
<init-param>
    <param-name>root_controller</param-name>
    <param-value>home</param-value>
</init-param>
...

5. Controllers

Controllers are the primary components of an ActiveWeb Application; and, as mentioned earlier all controllers should be located inside the app.controllers package:

public class ArticleController extends AppController {
    // ...
}

Notice that the controller is extending org.javalite.activeweb.AppController.

5.1. Controller URL Mapping

The controllers are mapped to a URL automatically based on the convention. For example, ArticleController will get mapped to:

http://host:port/contextroot/article

Now, this would be mapped them to the default a default action in the controller. Actions are nothing but methods inside the controller. Name the default method as index():

public class ArticleController extends AppController {
    // ...
    public void index() {
        render("articles");    
    }
    // ...
}

For other methods or actions append the method name to the URL:

public class ArticleController extends AppController {
    // ...
    
    public void search() {
        render("search");
    }
}

The URL:

http://host:port/contextroot/article/search

We can even have controller actions based on HTTP methods. Just annotate the method with either of @POST, @PUT, @DELETE, @GET, @HEAD. If we don’t annotate an action, it’s considered a GET by default.

5.2. Controller URL Resolution

The framework uses controller name and the sub-package name to generate the controller URL. For example app.controllers.ArticleController.java the URL:

http://host:port/contextroot/article

If the controller is inside a sub-package, the URL simply becomes:

http://host:port/contextroot/baeldung/article

For a controller name having more than a single word (for example app.controllers.PublishedArticleController.java), the URL will get separated using an underscore:

http://host:port/contextroot/published_article

5.3. Retrieving Request Parameters

Inside a controller, we get access to the request parameters using the param() or params() methods from the AppController class. The first method takes a String argument – the name of the param to retrieve:

public void search() {

    String keyword = param("key");  
    view("search",articleService.search(keyword));

}

And we can use the later to get all parameters if we need to:

public void search() {
        
    Map<String, String[]> criterion = params();
    // ...
}

6. Views

In ActiveWeb terminology, views are often referred as templates; this is mostly because it uses Apache FreeMarker template engine instead of JSPs. You can read more about FreeMarker in our guide, here.

Place the templates in WEB-INF/views directory. Every controller should have a sub-directory by its name holding all templates required by it.

6.1. Controller View Mapping

When a controller is hit, the default action index() gets executed and the framework will choose the WEB-INF/views/article/index.ftl template the from views directory for that controller. Similarly, for any other action, the view would be chosen based on the action name.

This isn’t always what we would like. Sometimes we might want to return some views based on internal business logic. In this scenario, we can control the process with the render() method from the parent org.javalite.activeweb.AppController class:

public void index() {
    render("articles");    
}

Note that the location of the custom views should also be in the same view directory for that controller. If it is not the case, prefix the template name with the directory name where the template resides and pass it to the render() method:

render("/common/error");

6.3. Views with Data

To send data to the views, the org.javalite.activeweb.AppController provides the view() method:

view("articles", articleService.getArticles());

This takes two params. First, the object name used to access the object in the template and second an object containing the data.

We can also use assign() method to pass data to the views. There is absolutely no difference between view() and assign() methods – we may choose any one of them:

assign("article", articleService.search(keyword));

Let’s map the data in the template:

<@content for="title">Articles</@content>
...
<#list articles as article>
    <tr>
        <td>${article.title}</td>
        <td>${article.author}</td>
        <td>${article.words}</td>
        <td>${article.date}</td>
    </tr>
</#list>
</table>

7. Managing Dependencies

In order to manage objects and instances, ActiveWeb uses Google Guice as a dependency management framework.

Let’s say we need a service class in our application; this would separate the business logic from the controllers.

Let’s first create a service interface:

public interface ArticleService {
    
    List<Article> getArticles();   
    Article search(String keyword);
    
}

And the implementation:

public class ArticleServiceImpl implements ArticleService {

    public List<Article> getArticles() {
        return fetchArticles();
    }

    public Article search(String keyword) {
        Article ar = new Article();
        ar.set("title", "Article with "+keyword);
        ar.set("author", "baeldung");
        ar.set("words", "1250");
        ar.setDate("date", Instant.now());
        return ar;
    }
}

Now, let’s bind this service as a Guice module:

public class ArticleServiceModule extends AbstractModule {

    @Override
    protected void configure() {
        bind(ArticleService.class).to(ArticleServiceImpl.class)
          .asEagerSingleton();
    }
}

Finally, register this in the application context and inject it into the controller, as required:

public class AppBootstrap extends Bootstrap {

    public void init(AppContext context) {
    }

    public Injector getInjector() {
        return Guice.createInjector(new ArticleServiceModule());
    }
}

Note that this config class name must be AppBootstrap and it should be located in the app.config package.

Finally, here’s how we inject it into the controller:

@Inject
private ArticleService articleService;

8. Testing

Unit tests for an ActiveWeb application are written using the JSpec library from JavaLite.

We’ll use the org.javalite.activeweb.ControllerSpec class from JSpec to test our controller, and we’ll name the test classes following a similar convention:

public class ArticleControllerSpec extends ControllerSpec {
    // ...
}

Notice, that the name is similar to the controller it is testing with a “Spec” at the end.

Here’s the test case:

@Test
public void whenReturnedArticlesThenCorrect() {
    request().get("index");
    a(responseContent())
      .shouldContain("<td>Introduction to Mule</td>");
}

Notice that the request() method simulates the call to the controller, and the corresponding HTTP method get(), takes the action name as an argument.

We can also pass parameters to the controller using the params() method:

@Test
public void givenKeywordWhenFoundArticleThenCorrect() {
    request().param("key", "Java").get("search");
    a(responseContent())
      .shouldContain("<td>Article with Java</td>");
}

To pass multiple parameters, we can chain method as well, with this fluent API.

9. Deploying the Application

It’s possible to deploy the application in any servlet container like Tomcat, WildFly or Jetty. Of course, the simplest way to deploy and test would be using the Maven Jetty plugin:

...
<plugin>
    <groupId>org.eclipse.jetty</groupId>
    <artifactId>jetty-maven-plugin</artifactId>
    <version>9.4.8.v20171121</version>
    <configuration>
        <reload>manual</reload>
        <scanIntervalSeconds>10000</scanIntervalSeconds>
    </configuration>
</plugin>
...

The latest version of the plugin is here.

Now, finally – we can fire it up:

mvn jetty:run

10. Conclusion

In this article, we learned about the basic concepts and conventions of the ActiveWeb framework. In addition to these, the framework has more features and capabilities than what we have discussed in here.

Please refer the official documentation for more details.

And, as always, the sample code used in the article is available over on GitHub.

Check if a String is a Palindrome

$
0
0

1. Introduction

In this article, we’re going to see how we can check whether a given String is a palindrome using Java.

A palindrome is a word, phrase, number, or other sequences of characters which reads the same backward as forward, such as “madam” or “racecar”.

2. Solutions

In the following sections, we’ll look at the various ways of checking if a given String is a palindrome or not.

2.1. A Simple Approach

We can simultaneously start iterating the given string forward and backward, one character at a time. If the there is a match the loop continues; otherwise, the loop exits:

public boolean isPalindrome(String text) {
    String clean = text.replaceAll("\\s+", "").toLowerCase();
    int length = clean.length();
    int forward = 0;
    int backward = length - 1;
    while (backward > forward) {
        char forwardChar = clean.charAt(forward++);
        char backwardChar = clean.charAt(backward--);
        if (forwardChar != backwardChar)
            return false;
    }
    return true;
}

2.2. Reversing the String

There are a few different implementations that fit this use case: we can make use of the API methods from StringBuilder and StringBuffer classes when checking for palindromes, or we can reverse the String without these classes.

Let’s take a look at the code implementations without the helper APIs first:

public boolean isPalindromeReverseTheString(String text) {
    StringBuilder reverse = new StringBuilder();
    String clean = text.replaceAll("\\s+", "").toLowerCase();
    char[] plain = clean.toCharArray();
    for (int i = plain.length - 1; i >= 0; i--) {
        reverse.append(plain[i]);
    }
    return (reverse.toString()).equals(clean);
}

In the above snippet, we simply iterate the given String from the last character and append each character to the next character, all the way through to the first character thereby reversing the given String. 

Finally, we test for equality between the given String and reversed String.

The same behavior could be achieved using API methods.

Let’s see a quick demonstration:

public boolean isPalindromeUsingStringBuilder(String text) {
    String clean = text.replaceAll("\\s+", "").toLowerCase();
    StringBuilder plain = new StringBuilder(clean);
    StringBuilder reverse = plain.reverse();
    return (reverse.toString()).equals(clean);
}

public boolean isPalindromeUsingStringBuffer(String text) {
    String clean = text.replaceAll("\\s+", "").toLowerCase();
    StringBuffer plain = new StringBuffer(clean);
    StringBuffer reverse = plain.reverse();
    return (reverse.toString()).equals(clean);
}

In the code snippet, we invoke the reverse() method from the StringBuilder and StringBuffer API to reverse the given String and test for equality.

2.3. Using Stream API

We can also use an IntStream to provide a solution:

public boolean isPalindromeUsingIntStream(String text) {
    String temp  = text.replaceAll("\\s+", "").toLowerCase();
    return IntStream.range(0, temp.length() / 2)
      .noneMatch(i -> temp.charAt(i) != temp.charAt(temp.length() - i - 1));
}

In the snippet above, we verify that none of the pairs of characters from each end of the String fulfills the Predicate condition.

2.4. Using Recursion

Recursion is a very popular method to solve these kinds of problems. In the example demonstrated we recursively iterate the given String and test to find out whether it’s a palindrome or not:

public boolean isPalindromeRecursive(String text){
    String clean = text.replaceAll("\\s+", "").toLowerCase();
    return recursivePalindrome(clean,0,clean.length()-1);
}

private boolean recursivePalindrome(String text, int forward, int backward) {
    if (forward == backward) {
        return true;
    }
    if ((text.charAt(forward)) != (text.charAt(backward))) {
        return false;
    }
    if (forward < backward + 1) {
        return recursivePalindrome(text, forward + 1, backward - 1);
    }

    return true;
}

3. Conclusion

In this quick tutorial, we saw how to find out whether a given String is a palindrome or not.

As always, the code examples for this article are available over on GitHub.

Introduction to Smooks

$
0
0

1. Overview

In this tutorial, we’ll introduce the Smooks framework.

We’ll describe what it’s, list its key features, and eventually learn how to use some of its more advanced functionality.

First of all, let’s briefly explain what the framework is meant to achieve.

2. Smooks

Smooks is a framework for data processing applications – dealing with structured data such as XML or CSV.

It provides both APIs and a configuration model that allow us to define transformations between predefined formats (for example XML to CSV, XML to JSON and more).

We can also use a number of tools to set up our mapping – including FreeMarker or Groovy scripts.

Besides transformations, Smooks also delivers other features like message validations or data splitting.

2.1. Key Features

Let’s take a look at Smooks’ main use cases:

  • Message conversion – transformation of data from various source formats to various output formats
  • Message enrichment – filling out the message with additional data, which comes from external data source like database
  • Data splitting – processing big files (GBs) and splitting them into smaller ones
  • Java binding – constructing and populating Java objects from messages
  • Message validation – performing validations like regex, or even creating your own validation rules

3. Initial Configuration

Let’s start with the Maven dependency we need to add to our pom.xml:

<dependency>
    <groupId>org.milyn</groupId>
    <artifactId>milyn-smooks-all</artifactId>
    <version>1.7.0</version>
</dependency>

The latest version can be found on Maven Central.

4. Java Binding

Let’s now start by focusing on binding messages to Java classes. We’ll go through a simple XML to Java conversion here.

4.1. Basic Concepts

We’ll start with a simple example. Consider the following XML:

<order creation-date="2018-01-14">
    <order-number>771</order-number>
    <order-status>IN_PROGRESS</order-status>
</order>

In order to accomplish this task with Smooks, we have to do two things: prepare the POJOs and the Smooks configuration.

Let’s see what our model looks like:

public class Order {

    private Date creationDate;
    private Long number;
    private Status status;
    // ...
}

public enum Status {
    NEW, IN_PROGRESS, FINISHED
}

Now, let’s move on to Smooks mappings.

Basically, the mappings are an XML file which contains transformation logic. In this article, we’ll use three different types of rules:

  • bean – defines the mapping of a concrete structured section to Java class
  • value – defines the mapping for the particular property of the bean. Can contain more advanced logic like decoders, which are used to map values to some data types (like date or decimal format)
  • wiring – allows us to wire a bean to other beans (for example Supplier bean will be wired to Order bean)

Let’s take a look at the mappings we’ll use in our case here:

<?xml version="1.0"?>
<smooks-resource-list 
  xmlns="http://www.milyn.org/xsd/smooks-1.1.xsd"
  xmlns:jb="http://www.milyn.org/xsd/smooks/javabean-1.2.xsd">

    <jb:bean beanId="order" 
      class="com.baeldung.smooks.model.Order" createOnElement="order">
        <jb:value property="number" data="order/order-number" />
        <jb:value property="status" data="order/order-status" />
        <jb:value property="creationDate" 
          data="order/@creation-date" decoder="Date">
            <jb:decodeParam name="format">yyyy-MM-dd</jb:decodeParam>
        </jb:value>
    </jb:bean>
</smooks-resource-list>

Now, with the configuration ready, let’s try to test if our POJO is constructed correctly.

First, we need to construct a Smooks object and pass input XML as a stream:

public Order converOrderXMLToOrderObject(String path) 
  throws IOException, SAXException {
 
    Smooks smooks = new Smooks(
      this.class.getResourceAsStream("/smooks-mapping.xml"));
    try {
        JavaResult javaResult = new JavaResult();
        smooks.filterSource(new StreamSource(this.class
          .getResourceAsStream(path)), javaResult);
        return (Order) javaResult.getBean("order");
    } finally {
        smooks.close();
    }
}

And finally, assert if the configuration is done properly:

@Test
public void whenConvert_thenPOJOsConstructedCorrectly() throws Exception {
    XMLToJavaConverter xmlToJavaOrderConverter = new XMLToJavaConverter();
    Order order = xmlToJavaOrderConverter
      .converOrderXMLToOrderObject("/order.xml");

    assertThat(order.getNumber(), is(771L));
    assertThat(order.getStatus(), is(Status.IN_PROGRESS));
    assertThat(
      order.getCreationDate(), 
      is(new SimpleDateFormat("yyyy-MM-dd").parse("2018-01-14"));
}

4.2. Advanced Binding – Referencing Other Beans and Lists

Let’s extend our previous example with supplier and order-items tags:

<order creation-date="2018-01-14">
    <order-number>771</order-number>
    <order-status>IN_PROGRESS</order-status>
    <supplier>
        <name>Company X</name>
        <phone>1234567</phone>
    </supplier>
    <order-items>
        <item>
            <quanitiy>1</quanitiy>
            <code>PX1234</code>
            <price>9.99</price>
        </item>
        <item>
            <quanitiy>1</quanitiy>
            <code>RX990</code>
            <price>120.32</price>
        </item>
    </order-items>
</order>

And now let’s update our model:

public class Order {
    // ..
    private Supplier supplier;
    private List<Item> items;
    // ...
}
public class Item {

    private String code;
    private Double price;
    private Integer quantity;
    // ...
}
public class Supplier {

    private String name;
    private String phoneNumber;
    // ...
}

We also have to extend the configuration mapping with the supplier and item bean definitions.

Notice that we’ve also defined separated items bean, which will hold all item elements in ArrayList.

Finally, we will use Smooks wiring attribute, to bundle it all together.

Take a look at how mappings will look like in this case:

<?xml version="1.0"?>
<smooks-resource-list 
  xmlns="http://www.milyn.org/xsd/smooks-1.1.xsd"
  xmlns:jb="http://www.milyn.org/xsd/smooks/javabean-1.2.xsd">

    <jb:bean beanId="order" 
      class="com.baeldung.smooks.model.Order" createOnElement="order">
        <jb:value property="number" data="order/order-number" />
        <jb:value property="status" data="order/order-status" />
        <jb:value property="creationDate" 
          data="order/@creation-date" decoder="Date">
            <jb:decodeParam name="format">yyyy-MM-dd</jb:decodeParam>
        </jb:value>
        <jb:wiring property="supplier" beanIdRef="supplier" />
        <jb:wiring property="items" beanIdRef="items" />
    </jb:bean>

    <jb:bean beanId="supplier" 
      class="com.baeldung.smooks.model.Supplier" createOnElement="supplier">
        <jb:value property="name" data="name" />
        <jb:value property="phoneNumber" data="phone" />
    </jb:bean>

    <jb:bean beanId="items" 
      class="java.util.ArrayList" createOnElement="order">
        <jb:wiring beanIdRef="item" />
    </jb:bean>
    <jb:bean beanId="item" 
      class="com.baeldung.smooks.model.Item" createOnElement="item">
        <jb:value property="code" data="item/code" />
        <jb:value property="price" decoder="Double" data="item/price" />
        <jb:value property="quantity" decoder="Integer" data="item/quantity" />
    </jb:bean>

</smooks-resource-list>

Finally, we’ll add a few assertions to our previous test:

assertThat(
  order.getSupplier(), 
  is(new Supplier("Company X", "1234567")));
assertThat(order.getItems(), containsInAnyOrder(
  new Item("PX1234", 9.99,1),
  new Item("RX990", 120.32,1)));

5. Messages Validation

Smooks comes with validation mechanism based on rules. Let’s take a look at how they are used.

Definition of the rules is stored in the configuration file, nested in the ruleBases tag, which can contain many ruleBase elements.

Each ruleBase element must have the following properties:

  • name – unique name, used just for reference
  • src – path to the rule source file
  • provider – fully qualified class name, which implements RuleProvider interface

Smooks comes with two providers out of the box: RegexProvider and MVELProvider.

The first one is used to validate individual fields in regex-like style.

The second one is used to perform more complicated validation in the global scope of the document. Let’s see them in action.

5.1. RegexProvider

Let’s use RegexProvider to validate two things: the format of the customer name, and phone number. RegexProvider as a source requires a Java properties file, which should contain regex validation in key-value fashion.

In order to meet our requirements, we’ll use the following setup:

supplierName=[A-Za-z0-9]*
supplierPhone=^[0-9\\-\\+]{9,15}$

5.2. MVELProvider

We’ll use MVELProvider to validate if the total price for each order-item is less then 200. As a source, we’ll prepare a CSV file with two columns: rule name and MVEL expression.

In order to check if the price is correct, we need the following entry:

"max_total","orderItem.quantity * orderItem.price < 200.00"

5.3. Validation Configuration

Once we’ve prepared the source files for ruleBases, we’ll move on to implementing concrete validations.

A validation is another tag in Smooks configuration, which contains the following attributes:

  • executeOn – path to the validated element
  • name – reference to the ruleBase
  • onFail – specifies what action will be taken when validation fails

Let’s apply validation rules to our Smooks configuration file and check how it looks like (note that if we want to use the MVELProvider, we’re forced to use Java binding, so that’s why we’ve imported previous Smooks configuration):

<?xml version="1.0"?>
<smooks-resource-list 
  xmlns="http://www.milyn.org/xsd/smooks-1.1.xsd"
  xmlns:rules="http://www.milyn.org/xsd/smooks/rules-1.0.xsd"
  xmlns:validation="http://www.milyn.org/xsd/smooks/validation-1.0.xsd">

    <import file="smooks-mapping.xml" />

    <rules:ruleBases>
        <rules:ruleBase 
          name="supplierValidation" 
          src="supplier.properties" 
          provider="org.milyn.rules.regex.RegexProvider"/>
        <rules:ruleBase 
          name="itemsValidation" 
          src="item-rules.csv" 
          provider="org.milyn.rules.mvel.MVELProvider"/>
    </rules:ruleBases>

    <validation:rule 
      executeOn="supplier/name" 
      name="supplierValidation.supplierName" onFail="ERROR"/>
    <validation:rule 
      executeOn="supplier/phone" 
      name="supplierValidation.supplierPhone" onFail="ERROR"/>
    <validation:rule 
      executeOn="order-items/item" 
      name="itemsValidation.max_total" onFail="ERROR"/>

</smooks-resource-list>

Now, with the configuration ready, let’s try to test if validation will fail on supplier’s phone number.

Again, we have to construct Smooks object and pass input XML as a stream:

public ValidationResult validate(String path) 
  throws IOException, SAXException {
    Smooks smooks = new Smooks(OrderValidator.class
      .getResourceAsStream("/smooks/smooks-validation.xml"));
    try {
        StringResult xmlResult = new StringResult();
        JavaResult javaResult = new JavaResult();
        ValidationResult validationResult = new ValidationResult();
        smooks.filterSource(new StreamSource(OrderValidator.class
          .getResourceAsStream(path)), xmlResult, javaResult, validationResult);
        return validationResult;
    } finally {
        smooks.close();
    }
}

And finally assert, if validation error occurred:

@Test
public void whenValidate_thenExpectValidationErrors() throws Exception {
    OrderValidator orderValidator = new OrderValidator();
    ValidationResult validationResult = orderValidator
      .validate("/smooks/order.xml");

    assertThat(validationResult.getErrors(), hasSize(1));
    assertThat(
      validationResult.getErrors().get(0).getFailRuleResult().getRuleName(), 
      is("supplierPhone"));
}

6. Message Conversion

The next thing we want to do is convert the message from one format to another.

In Smooks, this technique is also called templating and it supports:

  • FreeMarker (preferred option)
  • XSL
  • String template

In our example, we’ll use the FreeMarker engine to convert XML message to something very similar to EDIFACT, and even prepare a template for the email message based on XML order.

Let’s see how to prepare a template for EDIFACT:

UNA:+.? '
UNH+${order.number}+${order.status}+${order.creationDate?date}'
CTA+${supplier.name}+${supplier.phoneNumber}'
<#list items as item>
LIN+${item.quantity}+${item.code}+${item.price}'
</#list>

And for the email message:

Hi,
Order number #${order.number} created on ${order.creationDate?date} is currently in ${order.status} status.
Consider contacting the supplier "${supplier.name}" with phone number: "${supplier.phoneNumber}".
Order items:
<#list items as item>
${item.quantity} X ${item.code} (total price ${item.price * item.quantity})
</#list>

The Smooks configuration is very basic this time (just remember to import the previous configuration in order to import Java binding settings):

<?xml version="1.0"?>
<smooks-resource-list 
  xmlns="http://www.milyn.org/xsd/smooks-1.1.xsd"
  xmlns:ftl="http://www.milyn.org/xsd/smooks/freemarker-1.1.xsd">

    <import file="smooks-validation.xml" />

    <ftl:freemarker applyOnElement="#document">
        <ftl:template>/path/to/template.ftl</ftl:template>
    </ftl:freemarker>

</smooks-resource-list>

This time we need to just pass a StringResult to Smooks engine:

Smooks smooks = new Smooks(config);
StringResult stringResult = new StringResult();
smooks.filterSource(new StreamSource(OrderConverter.class
  .getResourceAsStream(path)), stringResult);
return stringResult.toString();

And we can, of course, test it:

@Test
public void whenApplyEDITemplate_thenConvertedToEDIFACT()
  throws Exception {
    OrderConverter orderConverter = new OrderConverter();
    String edifact = orderConverter.convertOrderXMLtoEDIFACT(
      "/smooks/order.xml");

   assertThat(edifact,is(EDIFACT_MESSAGE));
}

7. Conclusion

In this tutorial, we focused on how to convert messages to different formats, or transform them into Java objects using Smooks. We also saw how to perform validations based on regex or business logic rules.

As always, all the code used here can be found over on GitHub.


A Maze Solver in Java

$
0
0

1. Introduction

In this article, we’ll explore possible ways to navigate a maze, using Java.

Consider the maze to be a black and white image, with black pixels representing walls, and white pixels representing a path. Two white pixels are special, one being the entry to the maze and another exit.

Given such a maze, we want to find a path from entry to the exit.

2. Modelling the Maze

We’ll consider the maze to be a 2D integer array. Meaning of numerical values in the array will be as per the following convention:

  • 0 -> Road
  • 1 -> Wall
  • 2 -> Maze entry
  • 3 -> Maze exit
  • 4 -> Cell part of the path from entry to exit

We’ll model the maze as a graph. Entry and exit are the two special nodes, between which path is to be determined.

A typical graph has two properties, nodes, and edges. An edge determines the connectivity of graph and links one node to another.

Hence we’ll assume four implicit edges from each node, linking the given node to its left, right, top and bottom node.

Let’s define the method signature:

public List<Coordinate> solve(Maze maze) {
}

The input to the method is a maze, which contains the 2D array, with naming convention defined above.

The response of the method is a list of nodes, which forms a path from the entry node to the exit node.

3. Recursive Backtracker (DFS)

3.1. Algorithm

One fairly obvious approach is to explore all possible paths, which will ultimately find a path if it exists. But such an approach will have exponential complexity and will not scale well.

However, it’s possible to customize the brute force solution mentioned above, by backtracking and marking visited nodes, to obtain a path in a reasonable time. This algorithm is also known as Depth-first search.

This algorithm can be outlined as:

  1. If we’re at the wall or an already visited node, return failure
  2. Else if we’re the exit node, then return success
  3. Else, add the node in path list and recursively travel in all four directions. If failure is returned, remove the node from the path and return failure. Path list will contain a unique path when exit is found

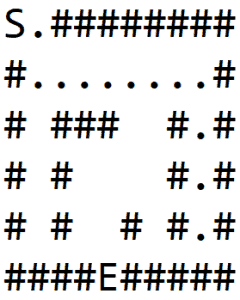
Let’s apply this algorithm to the maze shown in Figure-1(a), where S is the starting point, and E is the exit.

For each node, we traverse each direction in order: right, bottom, left, top.

In 1(b), we explore a path and hit the wall. Then we backtrack till a node is found which has non-wall neighbors, and explore another path as shown in 1(c).

We again hit the wall and repeat the process to finally find the exit, as shown in 1(d):

3.2. Implementation

Let’s now see the Java implementation:

First, we need to define the four directions. We can define this in terms of coordinates. These coordinates, when added to any given coordinate, will return one of the neighboring coordinates:

private static int[][] DIRECTIONS 
  = { { 0, 1 }, { 1, 0 }, { 0, -1 }, { -1, 0 } };

We also need a utility method which will add two coordinates:

private Coordinate getNextCoordinate(
  int row, int col, int i, int j) {
    return new Coordinate(row + i, col + j);
}

We can now define the method signature solve. The logic here is simple – if there is a path from entry to exit, then return the path, else, return an empty list:

public List<Coordinate> solve(Maze maze) {
    List<Coordinate> path = new ArrayList<>();
    if (
      explore(
        maze, 
        maze.getEntry().getX(),
        maze.getEntry().getY(),
        path
      )
      ) {
        return path;
    }
    return Collections.emptyList();
}

Let’s define the explore method referenced above. If there’s a path then return true, with the list of coordinates in the argument path. This method has three main blocks.

First, we discard invalid nodes i.e. the nodes which are outside the maze or are part of the wall. After that, we mark the current node as visited so that we don’t visit the same node again and again.

Finally, we recursively move in all directions if the exit is not found:

private boolean explore(
  Maze maze, int row, int col, List<Coordinate> path) {
    if (
      !maze.isValidLocation(row, col) 
      || maze.isWall(row, col) 
      || maze.isExplored(row, col)
    ) {
        return false;
    }

    path.add(new Coordinate(row, col));
    maze.setVisited(row, col, true);

    if (maze.isExit(row, col)) {
        return true;
    }

    for (int[] direction : DIRECTIONS) {
        Coordinate coordinate = getNextCoordinate(
          row, col, direction[0], direction[1]);
        if (
          explore(
            maze, 
            coordinate.getX(), 
            coordinate.getY(), 
            path
          )
        ) {
            return true;
        }
    }

    path.remove(path.size() - 1);
    return false;
}

This solution uses stack size up to the size of the maze.

4. Variant – Shortest Path (BFS)

4.1. Algorithm

The recursive algorithm described above finds the path, but it isn’t necessarily the shortest path. To find the shortest path, we can use another graph traversal approach known as Breadth-first search.

In DFS, one child and all its grandchildren were explored first, before moving on to another child. Whereas in BFS, we’ll explore all the immediate children before moving on to the grandchildren. This will ensure that all nodes at a particular distance from the parent node, are explored at the same time.

The algorithm can be outlined as follows:

  1. Add the starting node in queue
  2. While the queue is not empty, pop a node, do following:
    1. If we reach the wall or the node is already visited, skip to next iteration
    2. If exit node is reached, backtrack from current node till start node to find the shortest path
    3. Else, add all immediate neighbors in the four directions in queue

One important thing here is that the nodes must keep track of their parent, i.e. from where they were added to the queue. This is important to find the path once exit node is encountered.

Following animation shows all the steps when exploring a maze using this algorithm. We can observe that all the nodes at same distance are explored first before moving onto the next level:

4.2. Implementation

Lets now implement this algorithm in Java. We will reuse the DIRECTIONS variable defined in previous section.

Lets first define a utility method to backtrack from a given node to its root. This will be used to trace the path once exit is found:

private List<Coordinate> backtrackPath(
  Coordinate cur) {
    List<Coordinate> path = new ArrayList<>();
    Coordinate iter = cur;

    while (iter != null) {
        path.add(iter);
        iter = iter.parent;
    }

    return path;
}

Let’s now define the core method solve. We’ll reuse the three blocks used in DFS implementation i.e. validate node, mark visited node and traverse neighboring nodes.

We’ll just make one slight modification. Instead of recursive traversal, we’ll use a FIFO data structure to track neighbors and iterate over them:

public List<Coordinate> solve(Maze maze) {
    LinkedList<Coordinate> nextToVisit 
      = new LinkedList<>();
    Coordinate start = maze.getEntry();
    nextToVisit.add(start);

    while (!nextToVisit.isEmpty()) {
        Coordinate cur = nextToVisit.remove();

        if (!maze.isValidLocation(cur.getX(), cur.getY()) 
          || maze.isExplored(cur.getX(), cur.getY())
        ) {
            continue;
        }

        if (maze.isWall(cur.getX(), cur.getY())) {
            maze.setVisited(cur.getX(), cur.getY(), true);
            continue;
        }

        if (maze.isExit(cur.getX(), cur.getY())) {
            return backtrackPath(cur);
        }

        for (int[] direction : DIRECTIONS) {
            Coordinate coordinate 
              = new Coordinate(
                cur.getX() + direction[0], 
                cur.getY() + direction[1], 
                cur
              );
            nextToVisit.add(coordinate);
            maze.setVisited(cur.getX(), cur.getY(), true);
        }
    }
    return Collections.emptyList();
}

5. Conclusion

In this tutorial, we described two major graph algorithms Depth-first search and Breadth-first search to solve a maze. We also touched upon how BFS gives the shortest path from the entry to the exit.

For further reading, look up other methods to solve a maze, like A* and Dijkstra algorithm.

As always, the full code can be found over on GitHub.

Java Weekly, Issue 216

$
0
0

Here we go…

1. Spring and Java

>> Monitor and troubleshoot Java applications and services with Datadog 

Optimize performance with end-to-end tracing and out-of-the-box support for popular Java frameworks, application servers, and databases. Try it free.

>> Spring Cloud Contract in a polyglot world [spring.io]

Proper integration testing is tricky and Contract Testing is another take that can significantly help with that story.

>> On Spring Data and REST [blog.sourced-bvba.be]

Another interesting but controversial feature of Spring Data.

>> Reactive Streams in Java 9 [dzone.com]

An introduction to Reactive Streams – this time, in core Java.

Also worth reading:

Webinars and presentations:

Time to upgrade:

2. Technical and Musings

>> Traffic Shadowing With Istio: Reducing the Risk of Code Release [blog.christianposta.com]

A cool and practical example of traffic mirroring with Istio.

Also worth reading:

3. Comics

And my favorite Dilberts of the week:

>> Anger Issues  [dilbert.com]

>> Wally Pivots [dilbert.com]

>> A Brilliant Engineer [dilbert.com]

4. Pick of the Week

Picking this very interesting “discussion” this week:

>> REST is the new SOAP [medium.freecodecamp.org]

>> A Response to REST is the new SOAP [philsturgeon.uk]

Instance Profile Credentials using Spring Cloud

$
0
0

1. Introduction

In this quick article, we’re going to build a Spring Cloud application that uses instance profile credentials to connect to an S3 bucket.

2. Provisioning Our Cloud Environment

Instance profiles are an AWS feature that allows EC2 instances to connect to other AWS resources with temporary credentials. These credentials are short-lived and are automatically rotated by AWS.

Users can only request temporary credentials from within EC2 instances. However, we can use these credentials from anywhere until they expire.

To get more help specifically on instance profile configuration, check out AWS’s documentation.

2.1. Deployment

First of all, we need an AWS environment that has the appropriate setup.

For the code sample below, we need to stand up an EC2 instance, an S3 bucket, and the appropriate IAM roles. To do this, we can use the CloudFormation template in the code sample or simply stand these resources up on our own.

2.2. Verification

Next, we should make sure our EC2 instance can retrieve instance profile credentials. Replace <InstanceProfileRoleName> with the actual instance profile role name:

curl http://169.254.169.254/latest/meta-data/iam/security-credentials/<InstanceProfileRoleName>

If everything is setup correctly, then the JSON response will contain AccessKeyId, SecretAccessKey, Token, and Expiration properties.

3. Configuring Spring Cloud

Now, for our sample application. We need to configure Spring Boot to use instance profiles, which we can do in our Spring Boot configuration file:

cloud.aws.credentials.instanceProfile=true

And, that’s it! If this Spring Boot application is deployed in an EC2 instance, then each client will automatically attempt to use instance profile credentials to connect to AWS resources.

This is because Spring Cloud uses the EC2ContainerCredentialsProviderWrapper from the AWS SDK. This will look for credentials in priority order, automatically ending with instance profile credentials if it can’t find any others in the system.

If we need to specify that Spring Cloud only use instance profiles, then we can instantiate our own AmazonS3 instance.

We can configure it with an InstanceProfileCredentialsProvider and publish it as a bean:

@Bean
public AmazonS3 amazonS3() {
    InstanceProfileCredentialsProvider provider
      = new InstanceProfileCredentialsProvider(true);
    return AmazonS3ClientBuilder.standard()
      .withCredentials(provider)
      .build();
}

This will replace the default AmazonS3 instance provided by Spring Cloud.

4. Connecting to Our S3 Bucket

Now, we can connect to our S3 bucket using Spring Cloud as normal, but without needing to configure permanent credentials:

@Component
public class SpringCloudS3Service {

    // other declarations

    @Autowired
    AmazonS3 amazonS3;

    public void createBucket(String bucketName) {
        // log statement
        amazonS3.createBucket(bucketName);
    }
}

Remember that because instance profiles are only issued to EC2 instances, this code only works when running on an EC2 instance.

Of course, we can repeat the process for any AWS service that our EC2 instance connects to, including EC2, SQS, and SNS.

5. Conclusion

In this tutorial, we’ve seen how to use instance profile credentials with Spring Cloud. Also, we created a simple application that connects to an S3 bucket.

As always, the full source can be found over on GitHub.

Life Cycle of a Thread in Java

$
0
0

1. Introduction

In this article, we’ll discuss in detail a core concept in Java – the lifecycle of a thread.

We’ll use a quick illustrated diagram and, of course, practical code snippets to better understand these states during the thread execution.

To get started understanding Threads in Java, this article on creating a thread is a good place to start.

2. Multithreading in Java

In the Java language, multithreading is driven by the core concept of a Thread. During their lifecycle, threads go through various states:

3. Life Cycle of a Thread in Java

The java.lang.Thread class contains a static State enum – which defines its potential states. During any given point of time, the thread can only be in one of these states:

  1. NEW – newly created thread that has not yet started the execution
  2. RUNNABLE – either running or ready for execution but it’s waiting for resource allocation
  3. BLOCKED – waiting to acquire a monitor lock to enter or re-enter a synchronized block/method
  4. WAITING – waiting for some other thread to perform a particular action without any time limit
  5. TIMED_WAITING – waiting for some other thread to perform a specific action for a specified period
  6. TERMINATED – has completed its execution

All these states are covered in the diagram above; let’s now discuss each of these in detail.

3.1. New

A NEW Thread (or a Born Thread) is a thread that’s been created but not yet started. It remains in this state until we start it using the start() method.

The following code snippet shows a newly created thread that’s in the NEW state:

Runnable runnable = new NewState();
Thread t = new Thread(runnable);
Log.info(t.getState());

Since we’ve not started the mentioned thread, the method t.getState() prints:

NEW

3.2. Runnable

When we’ve created a new thread and called the start() method on that, it’s moved from NEW to RUNNABLE state. Threads in this state are either running or ready to run, but they’re waiting for resource allocation from the system.

In a multi-threaded environment, the Thread-Scheduler (which is part of JVM) allocates a fixed amount of time to each thread. So it runs for a particular amount of time, then relinquishes the control to other RUNNABLE threads.

For example, let’s add t.start() method to our previous code and try to access its current state:

Runnable runnable = new NewState();
Thread t = new Thread(runnable);
t.start();
Log.info(t.getState());

This code is most likely to return the output as:

RUNNABLE

Note that in this example, it’s not always guaranteed that by the time our control reaches t.getState(), it will be still in the RUNNABLE state.

It may happen that it was immediately scheduled by the Thread-Scheduler and may finish execution. In such cases, we may get a different output.

3.3. Blocked

A thread is in the BLOCKED state when it’s currently not eligible to run. It enters this state when it is waiting for a monitor lock and is trying to access a section of code that is locked by some other thread.

Let’s try to reproduce this state:

public class BlockedState {
    public static void main(String[] args) throws InterruptedException {
        Thread t1 = new Thread(new DemoThreadB());
        Thread t2 = new Thread(new DemoThreadB());
        
        t1.start();
        t2.start();
        
        Thread.sleep(1000);
        
        Log.info(t2.getState());
        System.exit(0);
    }
}

class DemoThreadB implements Runnable {
    @Override
    public void run() {
        commonResource();
    }
    
    public static synchronized void commonResource() {
        while(true) {
            // Infinite loop to mimic heavy processing
            // 't1' won't leave this method
            // when 't2' try to enters this
        }
    }
}

In this code:

  1. We’ve created two different threads – t1 and t2
  2. t1 starts and enters the synchronized commonResource() method; this means that only one thread can access it; all other subsequent threads that try to access this method will be blocked from the further execution until the current one will finish the processing
  3. When t1 enters this method, it is kept in infinite while loop; this is just to imitate heavy processing so that all other threads cannot enter this method
  4. Now when we start t2, it tries to enter commonResource() method, which is already being accessed by t1, thus, t2 will be kept in BLOCKED state

Being in this state, we call t2.getState() and get the output as:

BLOCKED

3.4. Waiting

A thread is in WAITING state when it’s waiting for some other thread to perform a particular action. According to JavaDocs, any thread can enter this state by calling any one of following three methods:

  1. object.wait()
  2. thread.join() or
  3. LockSupport.park()

Note that in wait() and join() – we do not define any timeout period as that scenario is covered in the next section.

We have a separate tutorial that discusses in detail the use of wait()notify() and notifyAll().

For now, let’s try to reproduce this state:

public class WaitingState implements Runnable {
    public static Thread t1;

    public static void main(String[] args) {
        t1 = new Thread(new WaitingState());
        t1.start();
    }

    public void run() {
        Thread t2 = new Thread(new DemoThreadWS());
        t2.start();

        try {
            t2.join();
        } catch (InterruptedException e) {
            Thread.currentThread().interrupt();
            Log.error("Thread interrupted", e);
        }
    }
}

class DemoThreadWS implements Runnable {
    public void run() {
        try {
            Thread.sleep(1000);
        } catch (InterruptedException e) {
            Thread.currentThread().interrupt();
            Log.error("Thread interrupted", e);
        }
        
        Log.info(WaitingState.t1.getState());
    }
}

Let’s discuss what we’re doing here:

  1. We’ve created and started the t1
  2. t1 creates a t2 and starts it
  3. While the processing of t2 continues, we call t2.join(), this puts t1 in WAITING state until t2 has finished execution
  4. Since t1 is waiting for t2 to complete, we’re calling t1.getState() from t2

The output here is, as you’d expect:

WAITING

3.5. Timed Waiting

A thread is in TIMED_WAITING state when it’s waiting for another thread to perform a particular action within a stipulated amount of time.

According to JavaDocs, there are five ways to put a thread on TIMED_WAITING state:

  1. thread.sleep(long millis)
  2. wait(int timeout) or wait(int timeout, int nanos)
  3. thread.join(long millis)
  4. LockSupport.parkNanos
  5. LockSupport.parkUntil

To read more about the differences between wait() and sleep() in Java, have a look at this dedicated article here.

For now, let’s try to quickly reproduce this state:

public class TimedWaitingState {
    public static void main(String[] args) throws InterruptedException {
        DemoThread obj1 = new DemoThread();
        Thread t1 = new Thread(obj1);
        t1.start();
        
        // The following sleep will give enough time for ThreadScheduler
        // to start processing of thread t1
        Thread.sleep(1000);
        Log.info(t1.getState());
    }
}

class DemoThread implements Runnable {
    @Override
    public void run() {
        try {
            Thread.sleep(5000);
        } catch (InterruptedException e) {
            Thread.currentThread().interrupt();
            Log.error("Thread interrupted", e);
        }
    }
}

Here, we’ve created and started a thread t1 which is entered into the sleep state with a timeout period of 5 seconds; the output will be:

TIMED_WAITING

3.6. Terminated

This is the state of a dead thread. It’s in the TERMINATED state when it has either finished execution or was terminated abnormally.

We have a dedicated article that discusses different ways of stopping the thread.

Let’s try to achieve this state in the following example:

public class TerminatedState implements Runnable {
    public static void main(String[] args) throws InterruptedException {
        Thread t1 = new Thread(new TerminatedState());
        t1.start();
        // The following sleep method will give enough time for 
        // thread t1 to complete
        Thread.sleep(1000);
        Log.info(t1.getState());
    }
    
    @Override
    public void run() {
        // No processing in this block
    }
}

Here, while we’ve started thread t1, the very next statement Thread.sleep(1000) gives enough time for t1 to complete and so this program gives us the output as:

TERMINATED

4. Conclusion

In this tutorial, we learned about the life-cycle of a thread in Java. We looked at all seven states defined by Thread.State enum and reproduced them with quick examples.

Although the code snippets will give the same output in almost every machine, in some exceptional cases, we may get some different outputs as the exact behavior of Thread Scheduler cannot be determined.

And, as always, the code snippets used here are available on GitHub.

Introduction to ActiveJDBC

$
0
0

1. Introduction

ActiveJDBC is a lightweight ORM following the core ideas of ActiveRecord, the primary ORM of Ruby on Rails.

It focuses on simplifying the interaction with databases by removing the extra layer of typical persistence managers and focuses on the usage of SQL rather than creating a new query language.

Additionally, it provides its own way of writing unit tests for the database interaction through the DBSpec class.

Let’s see how this library differs from other popular Java ORMs and how to use it.

2. ActiveJDBC vs Other ORMs

ActiveJDBC has stark differences compared to most other Java ORMs. It infers the DB schema parameters from a database, thus removing the need for mapping entities to underlying tables.

No sessions, no persistence managers, no need to learn a new query language, no getters/setters. The library itself is light in terms of size and number of dependencies.

This implementation encourages the usage of test databases which are cleaned up by the framework after executing the tests, thus reducing the cost of maintaining test databases.

However, a little extra step of instrumentation is needed whenever we create or update model. We’ll discuss this in coming sections.

3. Design Principles

  • Infers metadata from DB
  • Convention-based configuration
  • No sessions, no “attaching, re-attaching”
  • Lightweight Models, simple POJOs
  • No proxying
  • Avoidance of Anemic Domain Model
  • No need of DAOs and DTOs

4. Setting Up the Library

A typical Maven setup for working with a MySQL database includes:

<dependency>
    <groupId>org.javalite</groupId>
    <artifactId>activejdbc</artifactId>
    <version>1.4.13</version>
</dependency>
<dependency>
    <groupId>mysql</groupId>
    <artifactId>mysql-connector-java</artifactId>
    <version>5.1.34</version>
</dependency>

The latest version of activejdbc and mysql connector artifacts can be found on the Maven Central repository.

Instrumentation is the price of simplification and needed when working with ActiveJDBC projects.

There’s an instrumentation plugin which needs to be configured in the project:

<plugin>
    <groupId>org.javalite</groupId>
    <artifactId>activejdbc-instrumentation</artifactId>
    <version>1.4.13</version>
    <executions>
        <execution>
            <phase>process-classes</phase>
            <goals>
                <goal>instrument</goal>
            </goals>
        </execution>
    </executions>
</plugin>

The latest activejdbc-instrumentation plugin can also be found in Maven Central.

And now, we can process instrumentation by doing one of these two commands:

mvn process-classes
mvn activejdbc-instrumentation:instrument

5. Using ActiveJDBC

5.1. The Model

We can create a simple model with just one line of code – it involves extending the Model class.

The library uses inflections of the English language to achieve conversions of plural and singular forms of nouns. This can be overridden using the @Table annotation.

Let’s see how a simple model looks like:

import org.javalite.activejdbc.Model;

public class Employee extends Model {}

5.2. Connecting to a Database

Two classes – Base and DB – are provided to connect to databases.

The simplest way to connect to a database is:

Base.open("com.mysql.jdbc.Driver", "jdbc:mysql://host/organization", "user", "xxxxx");

When models are in operation, they utilize a connection found in the current thread. This connection is put on the local thread by the Base or DB class before any DB operation.

The above approach allows for a more concise API, removing the need for DB Session or Persistence managers like in other Java ORMs.

Let’s see how to use the DB class to connect to a database:

new DB("default").open(
  "com.mysql.jdbc.Driver", 
  "jdbc:mysql://localhost/dbname", 
  "root", 
  "XXXXXX");

If we look at how differently Base and DB are used to connect to databases, it helps us conclude that Base should be used if operating on a single database and DB should be used with multiple databases.

5.3. Inserting Record

Adding a record to the database is very simple. As mentioned before, there’s no need for setters and getters:

Employee e = new Employee();
e.set("first_name", "Hugo");
e.set("last_name", "Choi");
e.saveIt();

Alternatively, we can add the same record this way:

Employee employee = new Employee("Hugo","Choi");
employee.saveIt();

Or even, fluently:

new Employee()
 .set("first_name", "Hugo", "last_name", "Choi")
 .saveIt();

5.4. Updating Record

The snippet below shows how to update a record:

Employee employee = Employee.findFirst("first_name = ?", "Hugo");
employee
  .set("last_name","Choi")
  .saveIt();

5.5. Deleting Record

Employee e = Employee.findFirst("first_name = ?", "Hugo");
e.delete();

If there is a need to delete all records:

Employee.deleteAll();

If we want to delete a record from a master table which cascades to child tables, use deleteCascade:

Employee employee = Employee.findFirst("first_name = ?","Hugo");
employee.deleteCascade();

5.6. Fetching a Record

Let’s fetch a single record from the database:

Employee e = Employee.findFirst("first_name = ?", "Hugo");

If we want to fetch multiple records, we can use the where method:

List<Employee> employees = Employee.where("first_name = ?", "Hugo");

6. Transaction Support

In Java ORMs, there is an explicit connection or a manager object (EntityManager in JPA, SessionManager in Hibernate, etc.). There’s no such thing in ActiveJDBC.

The call Base.open() opens a connection, attaches it to the current thread and thus all subsequent methods of all models reuse this connection. The call Base.close() closes the connection and removes it from the current thread.

To manage transactions, there are are few convenience calls:

Starting a transaction:

Base.openTransaction();

Committing a transaction:

Base.commitTransaction();

Rolling back a transaction:

Base.rollbackTransaction();

7. Supported Databases

The latest version supports databases of likes SQLServer, MySQL, Oracle, PostgreSQL, H2, SQLite3, DB2.

8. Conclusion

In this quick tutorial, we focused on and explored the very basics of ActiveJDBC.

As always, the source code related to this article can be found over on Github.

AssertJ Exception Assertions

$
0
0

1. Overview

In this quick tutorial, we’ll have a look at AssertJ’s exception-dedicated assertions.

2. Without AssertJ

In order to test if an exception was thrown, we’d need to catch the exception and then perform assertions:

try {
    // ...
} catch (Exception e) {
    // assertions
}

But, what if an exception isn’t thrown? In that case, the test would pass; this is why it’s necessary to fail test cases manually.

3. With AssertJ

Using Java 8, we can do assertions on exceptions easily, by leveraging AssertJ and lambda expressions.

3.1. Using assertThatThrownBy()

Let’s check if indexing an out of bounds item in a list raises an IndexOutOfBoundsException:

assertThatThrownBy(() -> {
    List<String> list = Arrays.asList("String one", "String two"));
    list(2);
}).isInstanceOf(IndexOutOfBoundsException.class)
  .hasMessageContaining("Index: 2, Size: 2");

Notice how the code fragment that might throw an exception gets passed as a lambda expression.

Of course, we can leverage various standard AssertJ assertions here like:

.hasMessage("Index: %s, Size: %s", 2, 2)
.hasMessageStartingWith("Index: 2")
.hasMessageContaining("2")
.hasMessageEndingWith("Size: 2")
.hasMessageMatching("Index: \\d+, Size: \\d+")
.hasCauseInstanceOf(IOException.class)
.hasStackTraceContaining("java.io.IOException");

3.2. Using assertThatExceptionOfType

The idea is similar to the example above, but we can specify the exception type at the beginning:

assertThatExceptionOfType(IndexOutOfBoundsException.class)
  .isThrownBy(() -> {
      // ...
}).hasMessageMatching("Index: \\d+, Size: \\d+");

3.3. Using assertThatIOException and Other Common Types

AssertJ provides wrappers for common exception types like:

assertThatIOException().isThrownBy(() -> {
    // ...
});

And similarly:

  • assertThatIllegalArgumentException()
  • assertThatIllegalStateException()
  • assertThatIOException()
  • assertThatNullPointerException()

3.4. Separating the Exception From the Assertion

An alternative way to write our unit tests is writing the when and then logic in separate sections:

// when
Throwable thrown = catchThrowable(() -> {
    // ...
});

// then
assertThat(thrown)
  .isInstanceOf(ArithmeticException.class)
  .hasMessageContaining("/ by zero");

4. Conclusion

And there we are. In this short article, we discussed different ways to use AssertJ for performing assertions on exceptions.

As always, the code relating to this article is available over on Github.

Method Constraints with Bean Validation 2.0

$
0
0

1. Overview

In this article, we’ll discuss how to define and validate method constraints using Bean Validation 2.0 (JSR-380).

In the previous article, we discussed JSR-380 with its built-in annotations, and how to implement property validation.

Here, we’ll focus on the different types of method constraints such as:

  • single-parameter constraints
  • cross-parameter
  • return constraints

Also, we’ll have a look at how to validate the constraints manually and automatically using Spring Validator.

For the following examples, we need exactly the same dependencies as in Java Bean Validation Basics.

2. Declaration of Method Constraints

To get started, we’ll first discuss how to declare constraints on method parameters and return values of methods.

As mentioned before, we can use annotations from javax.validation.constraints, but we can also specify custom constraints (e. g. for custom constraints or cross-parameter constraints).

2.1. Single Parameter Constraints

Defining constraints on single parameters is straightforward. We simply have to add annotations to each parameter as required:

public void createReservation(@NotNull @Future LocalDate begin,
  @Min(1) int duration, @NotNull Customer customer) {

    // ...
}

Likewise, we can use the same approach for constructors:

public class Customer {

    public Customer(@Size(min = 5, max = 200) @NotNull String firstName, 
      @Size(min = 5, max = 200) @NotNull String lastName) {
        this.firstName = firstName;
        this.lastName = lastName;
    }

    // properties, getters, and setters
}

2.2. Using Cross-Parameter Constraints

In some cases, we might need to validate multiple values at once, e.g., two numeric amounts being one bigger than the other.

For these scenarios, we can define custom cross-parameter constraints, which might depend on two or more parameters.

Cross-parameter constraints can be considered as the method validation equivalent to class-level constraints. We could use both to implement validation based on several properties.

Let’s think about a simple example: a variation of the createReservation() method from the previous section takes two parameters of type LocalDate: a begin date and an end date.

Consequently, we want to make sure that begin is in the future, and end is after begin. Unlike in the previous example, we can’t define this using single parameter constraints.

Instead, we need a cross-parameter constraint.

In contrast to single-parameter constraints, cross-parameter constraints are declared on the method or constructor:

@ConsistentDateParameters
public void createReservation(LocalDate begin, 
  LocalDate end, Customer customer) {

    // ...
}

2.3. Creating Cross-Parameter Constraints

To implement the @ConsistentDateParameters constraint, we need two steps.

First, we need to define the constraint annotation:

@Constraint(validatedBy = ConsistentDateParameterValidator.class)
@Target({ METHOD, CONSTRUCTOR })
@Retention(RUNTIME)
@Documented
public @interface ConsistentDateParameters {

    String message() default
      "End date must be after begin date and both must be in the future";

    Class<?>[] groups() default {};

    Class<? extends Payload>[] payload() default {};
}

Here, these three properties are mandatory for constraint annotations:

  • message – returns the default key for creating error messages, this enables us to use message interpolation
  • groups – allows us to specify validation groups for our constraints
  • payload – can be used by clients of the Bean Validation API to assign custom payload objects to a constraint

For details how to define a custom constraint, have a look at the official documentation.

After that, we can define the validator class:

@SupportedValidationTarget(ValidationTarget.PARAMETERS)
public class ConsistentDateParameterValidator 
  implements ConstraintValidator<ConsistentDateParameters, Object[]> {

    @Override
    public boolean isValid(
      Object[] value, 
      ConstraintValidatorContext context) {
        
        if (value[0] == null || value[1] == null) {
            return true;
        }

        if (!(value[0] instanceof LocalDate) 
          || !(value[1] instanceof LocalDate)) {
            throw new IllegalArgumentException(
              "Illegal method signature, expected two parameters of type LocalDate.");
        }

        return ((LocalDate) value[0]).isAfter(LocalDate.now()) 
          && ((LocalDate) value[0]).isBefore((LocalDate) value[1]);
    }
}

As we can see, the isValid() method contains the actual validation logic. First, we make sure that we get two parameters of type LocalDate. After that, we check whether both are in the future and end is after begin.

Also, it’s important to notice that the @SupportedValidationTarget(ValidationTarget.PARAMETERS) annotation on the ConsistentDateParameterValidator class is required. The reason for this is because @ConsistentDateParameter is set on method-level, but the constraints shall be applied to the method parameters (and not to the return value of the method, as we’ll discuss in the next section).

Note: the Bean Validation specification recommends to consider null-values as valid. If null isn’t a valid value, the @NotNull-annotation should be used instead.

2.4. Return Value Constraints

Sometimes we’ll need to validate an object as it is returned by a method. For this, we can use return value constraints.

The following example uses built-in constraints:

public class ReservationManagement {

    @NotNull
    @Size(min = 1)
    public List<@NotNull Customer> getAllCustomers() {
        return null;
    }
}

For getAllCustomers(), the following constraints apply:

  • First, the returned list must not be null and must have at least one entry
  • Furthermore, the list must not contain null entries

2.5. Return Value Custom Constraints

In some cases, we might also need to validate complex objects:

public class ReservationManagement {

    @ValidReservation
    public Reservation getReservationsById(int id) {
        return null;
    }
}

In this example, a returned Reservation object must satisfy the constraints defined by @ValidReservation, which we’ll define next.

Again, we first have to define the constraint annotation:

@Constraint(validatedBy = ValidReservationValidator.class)
@Target({ METHOD, CONSTRUCTOR })
@Retention(RUNTIME)
@Documented
public @interface ValidReservation {
    String message() default "End date must be after begin date "
      + "and both must be in the future, room number must be bigger than 0";

    Class<?>[] groups() default {};

    Class<? extends Payload>[] payload() default {};
}

After that, we define the validator class:

public class ValidReservationValidator
  implements ConstraintValidator<ValidReservation, Reservation> {

    @Override
    public boolean isValid(
      Reservation reservation, ConstraintValidatorContext context) {

        if (reservation == null) {
            return true;
        }

        if (!(reservation instanceof Reservation)) {
            throw new IllegalArgumentException("Illegal method signature, "
            + "expected parameter of type Reservation.");
        }

        if (reservation.getBegin() == null
          || reservation.getEnd() == null
          || reservation.getCustomer() == null) {
            return false;
        }

        return (reservation.getBegin().isAfter(LocalDate.now())
          && reservation.getBegin().isBefore(reservation.getEnd())
          && reservation.getRoom() > 0);
    }
}

2.6. Return Value in Constructors

As we defined METHOD and CONSTRUCTOR as target within our ValidReservation interface before, we can also annotate the constructor of Reservation to validate constructed instances:

public class Reservation {

    @ValidReservation
    public Reservation(
      LocalDate begin, 
      LocalDate end, 
      Customer customer, 
      int room) {
        this.begin = begin;
        this.end = end;
        this.customer = customer;
        this.room = room;
    }

    // properties, getters, and setters
}

2.7. Cascaded Validation

Finally, the Bean Validation API allows us to not only validate single objects but also object graphs, using the so-called cascaded validation.

Hence, we can use @Valid for a cascaded validation, if we want to validate complex objects. This works for method parameters as well as for return values.

Let’s assume that we have a Customer class with some property constraints:

public class Customer {

    @Size(min = 5, max = 200)
    private String firstName;

    @Size(min = 5, max = 200)
    private String lastName;

    // constructor, getters and setters
}

A Reservation class might have a Customer property, as well as further properties with constraints:

public class Reservation {

    @Valid
    private Customer customer;
	
    @Positive
    private int room;
	
    // further properties, constructor, getters and setters
}

If we now reference Reservation as a method parameter, we can force the recursive validation of all properties:

public void createNewCustomer(@Valid Reservation reservation) {
    // ...
}

As we can see, we use @Valid at two places:

  • On the reservation-parameter: it triggers the validation of the Reservation-object, when createNewCustomer() is called
  • As we have a nested object graph here, we also have to add a @Valid on the customer-attribute: thereby, it triggers the validation of this nested property

This also works for methods returning an object of type Reservation:

@Valid
public Reservation getReservationById(int id) {
    return null;
}

3. Validating Method Constraints

After the declaration of constraints in the previous section, we can now proceed to actually validate these constraints. For that, we have multiple approaches.

3.1. Automatic Validation With Spring

Spring Validation provides an integration with Hibernate Validator.

Note: Spring Validation is based on AOP and uses Spring AOP as the default implementation. Therefore, validation only works for methods, but not for constructors.

If we now want Spring to validate our constraints automatically, we have to do two things:

Firstly, we have to annotate the beans, which shall be validated, with @Validated:

@Validated
public class ReservationManagement {

    public void createReservation(@NotNull @Future LocalDate begin, 
      @Min(1) int duration, @NotNull Customer customer){

        // ...
    }
	
    @NotNull
    @Size(min = 1)
    public List<@NotNull Customer> getAllCustomers(){
        return null;
    }
}

Secondly, we have to provide a MethodValidationPostProcessor bean:

@Configuration
@ComponentScan({ "org.baeldung.javaxval.methodvalidation.model" })
public class MethodValidationConfig {

    @Bean
    public MethodValidationPostProcessor methodValidationPostProcessor() {
        return new MethodValidationPostProcessor();
    }
}

The container now will throw a javax.validation.ConstraintViolationException, if a constraint is violated.

If we are using Spring Boot, the container will register a MethodValidationPostProcessor bean for us as long as hibernate-validator is in the classpath.

3.2. Automatic Validation With CDI (JSR-365)

As of version 1.1, Bean Validation works with CDI (Contexts and Dependency Injection for Java EE).

If our application runs in a Java EE container, the container will validate method constraints automatically at the time of invocation.

3.3. Programmatic Validation

For manual method validation in a standalone Java application, we can use the javax.validation.executable.ExecutableValidator interface.

We can retrieve an instance using the following code:

ValidatorFactory factory = Validation.buildDefaultValidatorFactory();
ExecutableValidator executableValidator = factory.getValidator().forExecutables();

ExecutableValidator offers four methods:

  • validateParameters() and validateReturnValue() for method validation
  • validateConstructorParameters() and validateConstructorReturnValue() for constructor validation

Validating the parameters of our first method createReservation() would look like this:

ReservationManagement object = new ReservationManagement();
Method method = ReservationManagement.class
  .getMethod("createReservation", LocalDate.class, int.class, Customer.class);
Object[] parameterValues = { LocalDate.now(), 0, null };
Set<ConstraintViolation<ReservationManagement>> violations 
  = executableValidator.validateParameters(object, method, parameterValues);

Note: The official documentation discourages to call this interface directly from the application code, but to use it via a method interception technology, like AOP or proxies.

In case you are interested how to use the ExecutableValidator interface, you can have a look at the official documentation.

4. Conclusion

In this tutorial, we had a quick look at how to use method constraints with Hibernate Validator, also we discussed some new features of JSR-380.

First, we discussed how to declare different types of constraints:

  • Single parameter constraints
  • Cross-parameter
  • Return value constraints

We also had a look at how to validate the constraints manually and automatically using Spring Validator.

As always, the full source code of the examples is available over on GitHub.


Create a Sudoku Solver in Java

$
0
0

1. Overview

In this article, we’re going to look at Sudoku puzzle and algorithms used for solving it.

Next, we’ll implement solutions in Java. The first solution will be a simple brute-force attack. The second will utilize the Dancing Links technique.

Let’s keep in mind that the focus we’re going to focus on the algorithms and not on the OOP design.

2. The Sudoku Puzzle

Simply put, Sudoku is a combinatorial number placement puzzle with 9 x 9 cell grid partially filled in with numbers from 1 to 9. The goal is to fill remaining, blank fields with the rest of numbers so that each row and column will have only one number of each kind.

What’s more, every 3 x 3 subsection of the grid can’t have any number duplicated as well. The level of difficulty naturally rises with the number of blank fields in each board.

2.1. Test Board

To make our solution more interesting and to validate the algorithm, we’re going to use the “world’s hardest sudoku” board, which is:

8 . . . . . . . . 
. . 3 6 . . . . . 
. 7 . . 9 . 2 . . 
. 5 . . . 7 . . . 
. . . . 4 5 7 . . 
. . . 1 . . . 3 . 
. . 1 . . . . 6 8 
. . 8 5 . . . 1 . 
. 9 . . . . 4 . .

2.2. Solved Board

And, to spoil the solution quickly – the correctly solved puzzle will give us the following result:

8 1 2 7 5 3 6 4 9 
9 4 3 6 8 2 1 7 5 
6 7 5 4 9 1 2 8 3 
1 5 4 2 3 7 8 9 6 
3 6 9 8 4 5 7 2 1 
2 8 7 1 6 9 5 3 4 
5 2 1 9 7 4 3 6 8 
4 3 8 5 2 6 9 1 7 
7 9 6 3 1 8 4 5 2

3. Backtracking Algorithm

3.1. Introduction

Backtracking algorithm tries to solve the puzzle by testing each cell for a valid solution.

If there’s no violation of constraints, the algorithm moves to the next cell, fills in all potential solutions and repeats all checks.

If there’s a violation, then it increments the cell value. Once, the value of the cell reaches 9, and there is still violation then the algorithm moves back to the previous cell and increases the value of that cell.

It tries all possible solutions.

3.2. Solution

First of all, let’s define our board as a two-dimensional array of integers. We will use 0 as our empty cell.

int[][] board = {
  { 8, 0, 0, 0, 0, 0, 0, 0, 0 },
  { 0, 0, 3, 6, 0, 0, 0, 0, 0 },
  { 0, 7, 0, 0, 9, 0, 2, 0, 0 },
  { 0, 5, 0, 0, 0, 7, 0, 0, 0 },
  { 0, 0, 0, 0, 4, 5, 7, 0, 0 },
  { 0, 0, 0, 1, 0, 0, 0, 3, 0 },
  { 0, 0, 1, 0, 0, 0, 0, 6, 8 },
  { 0, 0, 8, 5, 0, 0, 0, 1, 0 },
  { 0, 9, 0, 0, 0, 0, 4, 0, 0 } 
};

Let’s create a solve() method that takes the board as the input parameter and iterates through rows, columns and values testing each cell for a valid solution:

private boolean solve(int[][] board) {
    for (int row = BOARD_START_INDEX; row < BOARD_SIZE; row++) {
        for (int column = BOARD_START_INDEX; column < BOARD_SIZE; column++) {
            if (board[row][column] == NO_VALUE) {
                for (int k = MIN_VALUE; k <= MAX_VALUE; k++) {
                    board[row][column] = k;
                    if (isValid(board, row, column) && solve(board)) {
                        return true;
                    }
                    board[row][column] = NO_VALUE;
                }
                return false;
            }
        }
    }
    return true;
}

Another method that we needed is isValid() method, which is going to check Sudoku constraints, i.e., check if the row, column, and 3 x 3 grid are valid:

private boolean isValid(int[][] board, int row, int column) {
    return (rowConstraint(board, row)
      && columnConstraint(board, column) 
      && subsectionConstraint(board, row, column));
}

These three checks are relatively similar. First, let’s start with row checks:

private boolean rowConstraint(int[][] board, int row) {
    boolean[] constraint = new boolean[BOARD_SIZE];
    return IntStream.range(BOARD_START_INDEX, BOARD_SIZE)
      .allMatch(column -> checkConstraint(board, row, constraint, column));
}

Next, we use almost identical code to validate column:

private boolean columnConstraint(int[][] board, int column) {
    boolean[] constraint = new boolean[BOARD_SIZE];
    return IntStream.range(BOARD_START_INDEX, BOARD_SIZE)
      .allMatch(row -> checkConstraint(board, row, constraint, column));
}

Furthermore, we need to validate 3 x 3 subsection:

private boolean subsectionConstraint(int[][] board, int row, int column) {
    boolean[] constraint = new boolean[BOARD_SIZE];
    int subsectionRowStart = (row / SUBSECTION_SIZE) * SUBSECTION_SIZE;
    int subsectionRowEnd = subsectionRowStart + SUBSECTION_SIZE;

    int subsectionColumnStart = (column / SUBSECTION_SIZE) * SUBSECTION_SIZE;
    int subsectionColumnEnd = subsectionColumnStart + SUBSECTION_SIZE;

    for (int r = subsectionRowStart; r < subsectionRowEnd; r++) {
        for (int c = subsectionColumnStart; c < subsectionColumnEnd; c++) {
            if (!checkConstraint(board, r, constraint, c)) return false;
        }
    }
    return true;
}

Finally, we need a checkConstraint() method:

boolean checkConstraint(
  int[][] board, 
  int row, 
  boolean[] constraint, 
  int column) {
    if (board[row][column] != NO_VALUE) {
        if (!constraint[board[row][column] - 1]) {
            constraint[board[row][column] - 1] = true;
        } else {
            return false;
        }
    }
    return true;
}

Once, all that is done isValid() method can simply return true.

We’re almost ready to test the solution now. The algorithm is done. However, it returns true or false only.

Therefore, to visually check the board we need just to print out the result. Apparently, this isn’t part of the algorithm.

private void printBoard() {
    for (int row = BOARD_START_INDEX; row < BOARD_SIZE; row++) {
        for (int column = BOARD_START_INDEX; column < BOARD_SIZE; column++) {
            System.out.print(board[row][column] + " ");
        }
        System.out.println();
    }
}

We’ve successfully implemented backtracking algorithm that solves the Sudoku puzzle!

Obviously, there’s room for improvements as the algorithm naively checks each possible combinations over and over again (even though we know the particular solution is invalid).

4. Dancing Links

4.1. Exact Cover

Let’s look at another solution. Sudoku can be described as an Exact Cover problem, which can be represented by incidence matrix showing the relationship between two objects.

For example, if we take numbers from 1 to 7 and the collection of sets S = {A, B, C, D, E, F}, where:

  • A = {1, 4, 7}
  • B = {1, 4}
  • C = {4, 5, 7}
  • D = {3, 5, 6}
  • E = {2, 3, 6, 7}
  • F = {2, 7}

Our goal is to select such subsets that each number is there only once and none is repeated, hence the name.

We can represent the problem using a matrix, where columns are numbers and rows are sets:

  | 1 | 2 | 3 | 4 | 5 | 6 | 7 | 
A | 1 | 0 | 0 | 1 | 0 | 0 | 1 |
B | 1 | 0 | 0 | 1 | 0 | 0 | 0 |
C | 0 | 0 | 0 | 1 | 1 | 0 | 1 |
D | 0 | 0 | 1 | 0 | 1 | 1 | 0 |
E | 0 | 1 | 1 | 0 | 0 | 1 | 1 |
F | 0 | 1 | 0 | 0 | 0 | 0 | 1 |

Subcollection S* = {B, D, F} is exact cover:

  | 1 | 2 | 3 | 4 | 5 | 6 | 7 | 
B | 1 | 0 | 0 | 1 | 0 | 0 | 0 |
D | 0 | 0 | 1 | 0 | 1 | 1 | 0 |
F | 0 | 1 | 0 | 0 | 0 | 0 | 1 |

Each column has exactly one 1 in all selected rows.

4.2. Algorithm X

Algorithm X is a “trial-and-error approach” to find all solutions to the exact cover problem, i.e. starting with our example collection S = {A, B, C, D, E, F}, find subcollection S* = {B, D, F}.

Algorithm X works as follows:

  1. If the matrix A has no columns, the current partial solution is a valid solution;
    terminate successfully, otherwise, choose a column c (deterministically)
  2. Choose a row r such that Arc = 1 (nondeterministically, i.e., try all possibilities)
  3. Include row r in the partial solution
  4. For each column j such that Arj = 1, for each row i such that Aij = 1,
    delete row i from matrix A and delete column j from matrix A
  5. Repeat this algorithm recursively on the reduced matrix A

An efficient implementation of the Algorithm X is Dancing Links algorithm (DLX for short) suggested by Dr. Donald Knuth.

The following solution has been heavily inspired by this Java implementation.

4.3. Exact Cover Problem 

First, we need to create a matrix that will represent Sudoku puzzle as an Exact Cover problem. The matrix will have 9^3 rows, i.e., one row for every single possible position (9 rows x 9 columns) of every possible number (9 numbers).

Columns will represent the board (again 9 x 9) multiplied by the number of constraints.

We’ve already defined three constraints:

  • each row will have only one number of each kind
  • each column will have only one number of each kind
  • each subsection will have only one number of each kind

Additionally, there is implicit fourth constraint:

  • only one number can be in a cell

This gives four constraints in total and therefore 9 x 9 x 4 columns in the Exact Cover matrix:

private static int BOARD_SIZE = 9;
private static int SUBSECTION_SIZE = 3;
private static int NO_VALUE = 0;
private static int CONSTRAINTS = 4;
private static int MIN_VALUE = 1;
private static int MAX_VALUE = 9;
private static int COVER_START_INDEX = 1;
private int getIndex(int row, int column, int num) {
    return (row - 1) * BOARD_SIZE * BOARD_SIZE 
      + (column - 1) * BOARD_SIZE + (num - 1);
}
private boolean[][] createExactCoverBoard() {
    boolean[][] coverBoard = new boolean
      [BOARD_SIZE * BOARD_SIZE * MAX_VALUE]
      [BOARD_SIZE * BOARD_SIZE * CONSTRAINTS];

    int hBase = 0;
    hBase = checkCellConstraint(coverBoard, hBase);
    hBase = checkRowConstraint(coverBoard, hBase);
    hBase = checkColumnConstraint(coverBoard, hBase);
    checkSubsectionConstraint(coverBoard, hBase);
    
    return coverBoard;
}

private int checkSubsectionConstraint(boolean[][] coverBoard, int hBase) {
    for (int row = COVER_START_INDEX; row <= BOARD_SIZE; row += SUBSECTION_SIZE) {
        for (int column = COVER_START_INDEX; column <= BOARD_SIZE; column += SUBSECTION_SIZE) {
            for (int n = COVER_START_INDEX; n <= BOARD_SIZE; n++, hBase++) {
                for (int rowDelta = 0; rowDelta < SUBSECTION_SIZE; rowDelta++) {
                    for (int columnDelta = 0; columnDelta < SUBSECTION_SIZE; columnDelta++) {
                        int index = getIndex(row + rowDelta, column + columnDelta, n);
                        coverBoard[index][hBase] = true;
                    }
                }
            }
        }
    }
    return hBase;
}

private int checkColumnConstraint(boolean[][] coverBoard, int hBase) {
    for (int column = COVER_START_INDEX; column <= BOARD_SIZE; c++) {
        for (int n = COVER_START_INDEX; n <= BOARD_SIZE; n++, hBase++) {
            for (int row = COVER_START_INDEX; row <= BOARD_SIZE; row++) {
                int index = getIndex(row, column, n);
                coverBoard[index][hBase] = true;
            }
        }
    }
    return hBase;
}

private int checkRowConstraint(boolean[][] coverBoard, int hBase) {
    for (int row = COVER_START_INDEX; row <= BOARD_SIZE; r++) {
        for (int n = COVER_START_INDEX; n <= BOARD_SIZE; n++, hBase++) {
            for (int column = COVER_START_INDEX; column <= BOARD_SIZE; column++) {
                int index = getIndex(row, column, n);
                coverBoard[index][hBase] = true;
            }
        }
    }
    return hBase;
}

private int checkCellConstraint(boolean[][] coverBoard, int hBase) {
    for (int row = COVER_START_INDEX; row <= BOARD_SIZE; row++) {
        for (int column = COVER_START_INDEX; column <= BOARD_SIZE; column++, hBase++) {
            for (int n = COVER_START_INDEX; n <= BOARD_SIZE; n++) {
                int index = getIndex(row, column, n);
                coverBoard[index][hBase] = true;
            }
        }
    }
    return hBase;
}

Next, we need to update the newly created board with our initial puzzle layout:

private boolean[][] initializeExactCoverBoard(int[][] board) {
    boolean[][] coverBoard = createExactCoverBoard();
    for (int row = COVER_START_INDEX; row <= BOARD_SIZE; row++) {
        for (int column = COVER_START_INDEX; column <= BOARD_SIZE; column++) {
            int n = board[row - 1][column - 1];
            if (n != NO_VALUE) {
                for (int num = MIN_VALUE; num <= MAX_VALUE; num++) {
                    if (num != n) {
                        Arrays.fill(coverBoard[getIndex(row, column, num)], false);
                    }
                }
            }
        }
    }
    return coverBoard;
}

We are ready to move to the next stage now. Let’s create two classes that will link our cells together.

4.4. Dancing Node

Dancing Links algorithm operates on a basic observation that following operation on doubly linked lists of nodes:

node.prev.next = node.next
node.next.prev = node.prev

removes the node, while:

node.prev = node
node.next = node

restores the node.

Each node in DLX is linked to the node on the left, right, up and down.

DancingNode class will have all operations needed to add or remove nodes:

class DancingNode {
    DancingNode L, R, U, D;
    ColumnNode C;

    DancingNode hookDown(DancingNode node) {
        assert (this.C == node.C);
        node.D = this.D;
        node.D.U = node;
        node.U = this;
        this.D = node;
        return node;
    }

    DancingNode hookRight(DancingNode node) {
        node.R = this.R;
        node.R.L = node;
        node.L = this;
        this.R = node;
        return node;
    }

    void unlinkLR() {
        this.L.R = this.R;
        this.R.L = this.L;
    }

    void relinkLR() {
        this.L.R = this.R.L = this;
    }

    void unlinkUD() {
        this.U.D = this.D;
        this.D.U = this.U;
    }

    void relinkUD() {
        this.U.D = this.D.U = this;
    }

    DancingNode() {
        L = R = U = D = this;
    }

    DancingNode(ColumnNode c) {
        this();
        C = c;
    }
}

4.5. Column Node

ColumnNode class will link columns together:

class ColumnNode extends DancingNode {
    int size;
    String name;

    ColumnNode(String n) {
        super();
        size = 0;
        name = n;
        C = this;
    }

    void cover() {
        unlinkLR();
        for (DancingNode i = this.D; i != this; i = i.D) {
            for (DancingNode j = i.R; j != i; j = j.R) {
                j.unlinkUD();
                j.C.size--;
            }
        }
    }

    void uncover() {
        for (DancingNode i = this.U; i != this; i = i.U) {
            for (DancingNode j = i.L; j != i; j = j.L) {
                j.C.size++;
                j.relinkUD();
            }
        }
        relinkLR();
    }
}

4.6. Solver

Next, we need to create a grid consisting of our DancingNode and ColumnNode objects:

private ColumnNode makeDLXBoard(boolean[][] grid) {
    int COLS = grid[0].length;

    ColumnNode headerNode = new ColumnNode("header");
    List<ColumnNode> columnNodes = new ArrayList<>();

    for (int i = 0; i < COLS; i++) {
        ColumnNode n = new ColumnNode(Integer.toString(i));
        columnNodes.add(n);
        headerNode = (ColumnNode) headerNode.hookRight(n);
    }
    headerNode = headerNode.R.C;

    for (boolean[] aGrid : grid) {
        DancingNode prev = null;
        for (int j = 0; j < COLS; j++) {
            if (aGrid[j]) {
                ColumnNode col = columnNodes.get(j);
                DancingNode newNode = new DancingNode(col);
                if (prev == null) prev = newNode;
                col.U.hookDown(newNode);
                prev = prev.hookRight(newNode);
                col.size++;
            }
        }
    }

    headerNode.size = COLS;

    return headerNode;
}

We’ll use heuristic search to find columns and return a subset of the matrix:

private ColumnNode selectColumnNodeHeuristic() {
    int min = Integer.MAX_VALUE;
    ColumnNode ret = null;
    for (
      ColumnNode c = (ColumnNode) header.R; 
      c != header; 
      c = (ColumnNode) c.R) {
        if (c.size < min) {
            min = c.size;
            ret = c;
        }
    }
    return ret;
}

Finally, we can recursively search for the answer:

private void search(int k) {
    if (header.R == header) {
        handleSolution(answer);
    } else {
        ColumnNode c = selectColumnNodeHeuristic();
        c.cover();

        for (DancingNode r = c.D; r != c; r = r.D) {
            answer.add(r);

            for (DancingNode j = r.R; j != r; j = j.R) {
                j.C.cover();
            }

            search(k + 1);

            r = answer.remove(answer.size() - 1);
            c = r.C;

            for (DancingNode j = r.L; j != r; j = j.L) {
                j.C.uncover();
            }
        }
        c.uncover();
    }
}

If there are no more columns, then we can print out the solved Sudoku board.

5. Benchmarks

We can compare those two different algorithms by running them on the same computer (this way we can avoid differences in components, the speed of CPU or RAM, etc.). The actual times will differ from computer to computer.

However, we should be able to see relative results, and this will tell us which algorithm runs faster.

The Backtracking Algorithm takes around 250ms to solve the board.

If we compare this with the Dancing Links, which takes around 50ms, we can see a clear winner. Dancing Links is around five times faster when solving this particular example.

6. Conclusion

In this tutorial, we’ve discussed two solutions to a sudoku puzzle with core Java. The backtracking algorithm, which is a brute-force algorithm, can solve the standard 9×9 puzzle easily.

The slightly more complicated Dancing Links algorithm has been discussed as well. Both solve the hardest puzzles within seconds.

Finally, as always, the code used during the discussion can be found over on GitHub.

WebSockets with AsyncHttpClient

$
0
0

1. Introduction

AsyncHttpClient (AHC) is a library, based on Netty, created to easily execute asynchronous HTTP calls and communicate over the WebSocket protocol.

In this quick tutorial, we’ll see how we can start a WebSocket connection, send data and handle various control frames.

2. Setup

The latest version of the library can be found on Maven Central. We need be careful to use the dependency with the group id org.asynchttpclient and not the one with com.ning:

<dependency>
    <groupId>org.asynchttpclient</groupId>
    <artifactId>async-http-client</artifactId>
    <version>2.2.0</version>
</dependency>

3. WebSocket Client Configuration

To create a WebSocket client, we first have to obtain an HTTP client as shown in this article and upgrade it to support the WebSocket protocol.

The handling for the WebSocket protocol upgrade is done by the WebSocketUpgradeHandler class. This class implements the AsyncHandler interface and also provides us with a builder:

WebSocketUpgradeHandler.Builder upgradeHandlerBuilder
  = new WebSocketUpgradeHandler.Builder();
WebSocketUpgradeHandler wsHandler = upgradeHandlerBuilder
  .addWebSocketListener(new WebSocketListener() {
      @Override
      public void onOpen(WebSocket websocket) {
          // WebSocket connection opened
      }

      @Override
      public void onClose(WebSocket websocket, int code, String reason) {
          // WebSocket connection closed
      }

      @Override
      public void onError(Throwable t) {
          // WebSocket connection error
      }
  }).build();

For obtaining a WebSocket connection object we use the standard AsyncHttpClient to create an HTTP request with the preferred connection details, like headers, query parameters or timeouts:

WebSocket webSocketClient = Dsl.asyncHttpClient()
  .prepareGet("ws://localhost:5590/websocket")
  .addHeader("header_name", "header_value")
  .addQueryParam("key", "value")
  .setRequestTimeout(5000)
  .execute(wsHandler)
  .get();

4. Sending Data

Using the WebSocket object we can check whether the connection is successfully opened using the isOpen() method. Once we have an open connection we can send data frames with a string or binary payload using the sendTextFrame() and sendBinaryFrame() methods:

if (webSocket.isOpen()) {
    webSocket.sendTextFrame("test message");
    webSocket.sendBinaryFrame(new byte[]{'t', 'e', 's', 't'});
}

5. Handling Control Frames

The WebSocket protocol supports three types of control frames: ping, pong, and close.

The ping and pong frame are mainly used to implement a “keep-alive” mechanism for the connection. We can send these frames using the sendPingFrame() and sendPongFrame() methods:

webSocket.sendPingFrame();
webSocket.sendPongFrame();

Closing the existing connection is done by sending a close frame using the sendCloseFrame() method, in which we can provide a status code and a reason for closing the connection in the form of a text:

webSocket.sendCloseFrame(404, "Forbidden");

6. Conclusion

Having support for the WebSocket protocol, besides the fact that it provides an easy way to execute asynchronous HTTP requests, makes AHC a very powerful library.

The source code for the article is available over on GitHub.

Exploring jrecreate

$
0
0

1. Introduction to EJDK

The EJDK (Embedded Java Development Kit) was introduced by Oracle to solve the problem of providing binaries for all the available embedded platforms. We can download the latest EJDK from Oracle’s site here.

Simply put, it contains the tools for creating platform-specific JREs.

2. jrecreate

EJDK provides jrecreate.bat for Windows and jrecreate.sh for Unix/Linux platforms. This tool helps in assembling custom JREs for platforms we wish to use, and was introduced to:

  • minimize the release of binaries by Oracle for every platform
  • make it easy to create customized JREs for other platforms

The following syntax is used to execute the jrecreate command; in Unix/Linux:

$jrecreate.sh -<option>/--<option> <argument-if-any>

And in Windows:

$jrecreate.bat -<option>/--<option> <argument-if-any>

Note, we can add multiple options for a single JRE creation. Now, let’s take a look at some of the options available for the tool.

3. Options for jrecreate

3.1. Destination

The destination option is required and specifies the directory in which the target JRE should be created:

$jrecreate.sh -d /SampleJRE

On running the above command, a default JRE will be created in the specified location. The command line output will be:

Building JRE using Options {
    ejdk-home: /installDir/ejdk1.8.0/bin/..
    dest: /SampleJRE
    target: linux_i586
    vm: all
    runtime: jre
    debug: false
    keep-debug-info: false
    no-compression: false
    dry-run: false
    verbose: false
    extension: []
}

Target JRE Size is 55,205 KB (on disk usage may be greater).
Embedded JRE created successfully

From the above result, we can see that the target JRE is created in the specified destination directory. All the other options have taken their default values.

3.2. Profiles

The profile option is used to manage the size of the target JRE. The profiles define the functionality of the API to be included. If the profile option is not specified, the tool will include all the JRE APIs by default:

$jrecreate.sh -d /SampleJRECompact1/ -p compact1

A JRE with a compact1 profile will be created. We can also use ––profile instead of -p in the command. The command line output will display the following result:

Building JRE using Options {
    ejdk-home: /installDir/ejdk1.8.0/bin/..
    dest: /SampleJRECompact1
    target: linux_i586
    vm: minimal
    runtime: compact1 profile
    debug: false
    keep-debug-info: false
    no-compression: false
    dry-run: false
    verbose: false
    extension: []
}

Target JRE Size is 10,808 KB (on disk usage may be greater).
Embedded JRE created successfully

In the above result, note that the runtime option has the value as compact1. Also note the size of the result JRE is just under 11MB, down from 55MB in the previous example.

There are three available options for the profile setting: compact1, compact2, and compact3.

3.3. JVMs

The jvm option is used to customize our target JRE with specific JVMs based on the user’s needs. By default, it includes all the available JVMs (client, server, and minimal) if both profile and jvm options are not specified:

$jrecreate.sh -d /SampleJREClientJVM/ --vm client

A JRE with a client jvm will be created. The command line output will display the following result:

Building JRE using Options {
    ejdk-home: /installDir/ejdk1.8.0/bin/..
    dest: /SampleJREClientJVM
    target: linux_i586
    vm: Client
    runtime: jre
    debug: false
    keep-debug-info: false
    no-compression: false
    dry-run: false
    verbose: false
    extension: []
}

Target JRE Size is 46,217 KB (on disk usage may be greater).
Embedded JRE created successfully

In the above result, note that the vm option has the value Client. We can also specify the other JVMs like server and minimal with this option.

3.4. Extension

The extension option is used to include various allowed extensions to the target JRE. By default, there are no extensions added:

$jrecreate.sh -d /SampleJRESunecExt/ -x sunec

A JRE with an extension sunec (Security provider for Elliptic Curve Cryptography) will be created. We can also use ––extension instead of -x in the command. The command line output will display the following result:

Building JRE using Options {
    ejdk-home: /installDir/ejdk1.8.0/bin/..
    dest: /SampleJRESunecExt
    target: linux_i586
    vm: all
    runtime: jre
    debug: false
    keep-debug-info: false
    no-compression: false
    dry-run: false
    verbose: false
    extension: [sunec]
}

Target JRE Size is 55,462 KB (on disk usage may be greater).
Embedded JRE created successfully

In the above result, note that the extension option has the value sunec. Multiple extensions can be added with this option.

3.5. Other Options

Other than the major options discussed above, jrecreate also facilitates users with a few more options:

  • ––help: displays summary of command line options for jrecreate tool
  • ––debug:  creates JRE that has debug support
  • ––keep-debug-info: keeps the debug information from class and unsigned JAR files
  • ––dry-run: performs a dry run without actually creating the JRE
  • ––no-compression: creates a JRE with unsigned JAR files in uncompressed format
  • ––verbose: displays verbose output for all jrecreate commands

4. Conclusion

In this tutorial, we learned the basics of EJDK, and how the jrecreate tool is used to generate platform-specific JREs.

Spring ResponseStatusException

$
0
0

1. Overview

In this quick tutorial, we’ll discuss the new ResponseStatusException class introduced in Spring 5. This class supports the application of HTTP status codes to HTTP responses.

A RESTful application can communicate the success or failure of an HTTP request by returning the right status code in the response to the client. Simply put, an appropriate status code can help the client to identify problems that might have occurred while the application was dealing with the request.

2. ResponseStatus

Before we delve into ResponseStatusException, let’s quickly take a look at the @ResponseStatus annotation. This annotation was introduced in Spring 3 for applying HTTP Status code to an HTTP response.

We can use the @ResponseStatus annotation to set the status and reason in our HTTP response:

@ResponseStatus(code = HttpStatus.NOT_FOUND, reason = "Actor Not Found")
public class ActorNotFoundException extends Exception {
    // ...
}

If this exception is thrown while processing an HTTP request, then the response will include the HTTP status specified in this annotation.

One drawback of the @ResponseStatus approach is that it creates tight coupling with the exception. In our example, all exceptions of type ActorNotFoundException will generate the same error message and status code in the response.

3. ResponseStatusException

ResponseStatusException is a programmatic alternative to @ResponseStatus and is the base class for exceptions used for applying a status code to an HTTP response. It’s a RuntimeException and hence not required to be explicitly added in a method signature.

Spring provides 3 constructors to generate ResponseStatusException:

ResponseStatusException(HttpStatus status)
ResponseStatusException(HttpStatus status, java.lang.String reason)
ResponseStatusException(
  HttpStatus status, 
  java.lang.String reason, 
  java.lang.Throwable cause
)

ResponseStatusException, constructor arguments:

  • status – an HTTP status set to HTTP response
  • reason – a message explaining the exception set to HTTP response
  • cause – a Throwable cause of the ResponseStatusException

Note: in Spring, HandlerExceptionResolver intercepts and processes any exception raised and not handled by a Controller.

One of these handlers, ResponseStatusExceptionResolver, looks for any ResponseStatusException or uncaught exceptions annotated by @ResponseStatus and then extracts the HTTP Status code & reason and includes them in the HTTP response.

3.1. ResponseStatusException Benefits

ResponseStatusException usage has few benefits:

  • Firstly, exceptions of the same type can be processed separately and different status codes can be set on the response. Reducing tight coupling
  • Secondly, it avoids creation of unnecessary additional exception classes
  • Finally, it provides more control over exception handling, as the exceptions can be created programmatically

4. Examples

4.1. Generate ResponseStatusException

Now, let’s us see an example which generates a ResponseStatusException :

@GetMapping("/actor/{id}")
public String getActorName(@PathVariable("id") int id) {
    try {
        return actorService.getActor(id);
    } catch (ActorNotFoundException ex) {
        throw new ResponseStatusException(
          HttpStatus.NOT_FOUND, "Actor Not Found", ex);
    }
}

Spring Boot provides a default /error mapping, returning a JSON response with HTTP status and the exception message.

Here’s how the response looks:

$ curl -i -s -X GET http://localhost:8080/actor/8
HTTP/1.1 404
Content-Type: application/json;charset=UTF-8
Transfer-Encoding: chunked
Date: Sun, 28 Jan 2018 19:48:10 GMT

{
    "timestamp": "2018-01-28T19:48:10.471+0000",
    "status": 404,
    "error": "Not Found",
    "message": "Actor Not Found",
    "path": "/actor/8"
}

4.2. Different Status Code – Same Exception Type

Now, let’s see how a different status code is set to HTTP response when the same type of exception is raised:

@PutMapping("/actor/{id}/{name}")
public String updateActorName(
  @PathVariable("id") int id, 
  @PathVariable("name") String name) {
 
    try {
        return actorService.updateActor(id, name);
    } catch (ActorNotFoundException ex) {
        throw new ResponseStatusException(
          HttpStatus.BAD_REQUEST, "Provide correct Actor Id", ex);
    }
}

Here’s how the response looks:

$ curl -i -s -X PUT http://localhost:8080/actor/8/BradPitt
HTTP/1.1 400
...
{
    "timestamp": "2018-02-01T04:28:32.917+0000",
    "status": 400,
    "error": "Bad Request",
    "message": "Provide correct Actor Id",
    "path": "/actor/8/BradPitt"
}

5. Conclusion

In this quick tutorial, we discussed how to construct a ResponseStatusException in our program.

We also emphasized how it’s programmatically a better way to set HTTP status codes in HTTP Response than @ResponseStatus annotation.

As always, the full source code is available over on GitHub.

Infix Functions in Kotlin

$
0
0

1. Introduction

Kotlin is a language that adds many fresh features to allow writing cleaner, easier-to-read code.

This, in turn, makes our code significantly easier to maintain and allows for a better end result from our development. Infix notation is one of such features.

2. What is an Infix Notation?

Kotlin allows some functions to be called without using the period and brackets. These are called infix methods, and their use can result in code that looks much more like a natural language.

This is most commonly seen in the inline Map definition:

map(
  1 to "one",
  2 to "two",
  3 to "three"
)

“to” might look like a special keyword but in this example, this is a to() method leveraging the infix notation and returning a Pair<A, B>.

3. Common Standard Library Infix Functions

Apart from the to() function, used to create Pair<A, B> instances, there are some other functions that are defined as infix.

For example, the various numeric classes – Byte, Short, Int, and Long – all define the bitwise functions and(), or(), shl(), shr(), ushr(), and xor(), allowing some more readable expressions:

val color = 0x123456
val red = (color and 0xff0000) shr 16
val green = (color and 0x00ff00) shr 8
val blue = (color and 0x0000ff) shr 0

The Boolean class defines the and(), or() and xor() logical functions in a similar way:

if ((targetUser.isEnabled and !targetUser.isBlocked) or currentUser.admin) {
    // Do something if the current user is an Admin, or the target user is active
}

The String class also defines the match and zip functions as infix, allowing some simple-to-read code:

"Hello, World" matches "^Hello".toRegex()

There are some other examples that can be found throughout the standard library, but these are possibly the most common.

4. Writing Custom Infix Methods

Often, we’re going to want to write our own infix methods. These can be especially useful, for example, when writing a Domain Specific Language for our application, allowing the DSL code to be much more readable.

Several Kotlin libraries already use this to great effect.

For example, the mockito-kotlin library defines some infix functions — doAnswerdoReturn, and doThrow — for use when defining mock behavior.

Writing an infix function is a simple case of following three rules:

  1. The function is either defined on a class or is an extension method for a class
  2. The function takes exactly one parameter
  3. The function is defined using the infix keyword

As a simple example, let’s define a straightforward Assertion framework for use in tests. We’re going to allow expressions that read nicely from left to right using infix functions:

class Assertion<T>(private val target: T) {
    infix fun isEqualTo(other: T) {
        Assert.assertEquals(other, target)
    }

    infix fun isDifferentFrom(other: T) {
        Assert.assertNotEquals(other, target)
    }
}

This looks simple and doesn’t seem any different from any other Kotlin code. However, the presence of the infix keyword allows us to write code like this:

val result = Assertion(5)

result isEqualTo 5 // This passes
result isEqualTo 6 // This fails the assertion
result isDifferentFrom 5 // This also fails the assertion

Immediately, this is cleaner to read and easier to understand.

Note that infix functions can also be written as extension methods to existing classes. This can be powerful, as it allows us to augment existing classes from elsewhere — including the standard library — to fit our needs.

For example, let’s add a function to a String to pull out all of the substrings that match a given regex:

infix fun String.substringMatches(r: Regex) : List<String> {
    return r.findAll(this)
      .map { it.value }
      .toList()
}

val matches = "a bc def" substringMatches ".*? ".toRegex()
Assert.assertEquals(listOf("a ", "bc "), matches)

5. Summary

This quick tutorial shows some of the things that can be done with infix functions, including how to make use of some existing ones and how to create our own to make our code cleaner and easier to read.

As always, code snippets can be found over on over on GitHub.

Viewing all 3691 articles
Browse latest View live


<script src="https://jsc.adskeeper.com/r/s/rssing.com.1596347.js" async> </script>