Quantcast
Channel: Baeldung
Viewing all 3691 articles
Browse latest View live

Using Custom Banners in Spring Boot

$
0
0

1. Overview

By default, Spring Boot comes with a banner which shows up as soon as the application starts.

In this article, we’ll learn how to create a custom banner and use it in Spring Boot applications.

2. Creating a Banner

Before we start, we need to create the custom banner which will be displayed at the time of application start-up time. We can create the custom banner from scratch or use various tools that will do this for us.

There is a site available here, where you can upload any image and convert into ANSI charset in plain-text format.

In this example we used Baeldung’s official logo:

However, in some situation, we might like to use the banner in the plain text format since it’s relatively easier to maintain.

The plain-text custom banner which we used in this example is available here.

Point to note here is that ANSI charset has the ability to display colorful text in the console. This can’t be done with the simple plain text format.

3. Using the Custom Banner

Since we have the custom banner ready, we need to create a file named banner.txt in the src/main/resources directory and paste the banner content into it.

Point to note here is that banner.txt is the default expected banner file name, which Spring Boot uses. However, if we want to choose any other location or another name for the banner, we need to set banner.location property in the application.properties file:

banner.location=classpath:/path/to/banner/bannername.txt

We can also use images as banners too. Same as with banner.txt, Spring Boot expects the banner image’s name as banner.gif. Additionally, we can set different image properties such as height, width, etc. in the application.properties:

banner.image.location=classpath:banner.gif
banner.image.width=  //TODO
banner.image.height= //TODO
banner.image.margin= //TODO
banner.image.invert= //TODO

However, it’s always better to use text format because the application start up time will drastically increase if some complex image structure is used.

4. Conclusion

In this quick article, we showed how to use a custom banner in Spring Boot applications.

Like always, the full source code is available over on GitHub.


Introduction to Ratpack

$
0
0

1. Overview

Ratpack is a set of JVM based libraries built for modern days high-performance real-time applications. It’s built on top of embedded Netty event-driven networking engine and is fully compliant with the reactive design pattern.

In this article, we’ll learn how to use Ratpack and we’ll build a small application using it.

2. Why Ratpack?

The main advantages of Ratpack:

  • it’s very lightweight, fast and scalable
  • it consumes less memory than other frameworks such as DropWizard; an interesting benchmark comparison result can be found here
  • since it’s built on top of Netty, Ratpack is totally event-driven and non-blocking in nature
  • it has support for Guice dependency management
  • much like Spring Boot, Ratpack has its own testing libraries to quickly setup test-cases

3. Creating an Application

To understand how Ratpack works, let’s start by creating a small application with it.

3.1. Maven Dependencies

First, let’s add the following dependencies into our pom.xml:

<dependency>
    <groupId>io.ratpack</groupId>
    <artifactId>ratpack-core</artifactId>
    <version>1.4.5</version>
</dependency>
<dependency>
    <groupId>io.ratpack</groupId>
    <artifactId>ratpack-test</artifactId>
    <version>1.4.5</version>
</dependency>

You can check the latest version on Maven Central.

Note that although we are using Maven as our build system, as per Ratpack recommendation, it’s better to use Gradle as a build tool since Ratpack has first-class Gradle support provided via the Ratpack’s Gradle plugin.

We can use the following build Gradle script:

buildscript {
    repositories {
      jcenter()
    }
    dependencies {
      classpath "io.ratpack:ratpack-gradle:1.4.5"
    }
}
 
apply plugin: "io.ratpack.ratpack-java"
repositories {
    jcenter()
}
dependencies {
    testCompile 'junit:junit:4.11'
    runtime "org.slf4j:slf4j-simple:1.7.21"
}
test {
    testLogging {
      events 'started', 'passed'
    }
}

3.2. Building the Application

Once our build management is configured, we need to create a class to start the embedded Netty server and build a simple context to handle the default requests:

public class Application {
	
    public static void main(String[] args) throws Exception {
        RatpackServer.start(server -> server.handlers(chain -> chain
          .get(ctx -> ctx.render("Welcome to Baeldung ratpack!!!"))));
    }
}

As we can see, by using RatpackServer we can now start the server (default port 5050). The handlers() method takes a function that receives a Chain object, which maps all the respective incoming requests. This “Handler Chain API” is used for building the response handling strategy.

If we run this code snippet and hit the browser at http://localhost:5050, “Welcome to Baeldung ratpack!!!” should be displayed.

Similarly, we can map an HTTP POST request.

3.3. Handling URL Path Parameters

In the next example, we need to capture some URL path param in our application. In Ratpack we use PathTokens to capture them:

RatpackServer.start(server -> server
  .handlers(chain -> chain
  .get(":name", ctx -> ctx.render("Hello " 
  + ctx.getPathTokens().get("name") + " !!!"))));

Here, we’re mapping the name URL param. Whenever a request like http://localhost:5050/John would come, the response will be “Hello John !!!”.

3.4. Request/Response Header Modification with/without Filter

Sometimes, we need to modify the inline HTTP response header based on our need. Ratpack has MutableHeaders to customize outgoing responses.

For example, we need to alter following headers in the response: Access-Control-Allow-OriginAccept-Language, and Accept-Charset:

RatpackServer.start(server -> server.handlers(chain -> chain.all(ctx -> {
    MutableHeaders headers = ctx.getResponse().getHeaders();
    headers.set("Access-Control-Allow-Origin", "*");
    headers.set("Accept-Language", "en-us");
    headers.set("Accept-Charset", "UTF-8");
    ctx.next();
}).get(":name", ctx -> ctx
    .render("Hello " + ctx.getPathTokens().get("name") + "!!!"))));

By using MutableHeaders we set are setting the three headers and pushing them in the Chain.

In the same way, we can check the incoming request headers too:

ctx.getRequest().getHeaders().get("//TODO")

The same can be achieved by creating a filter. Ratpack has a Handler interface, which can be implemented to create a filter. It has only one method handle(), which takes the current Context as a parameter:

public class RequestValidatorFilter implements Handler {

    @Override
    public void handle(Context ctx) throws Exception {
        MutableHeaders headers = ctx.getResponse().getHeaders();
        headers.set("Access-Control-Allow-Origin", "*");
        ctx.next();
    }
}

We can use this filter in the following way:

RatpackServer.start(
    server -> server.handlers(chain -> chain
      .all(new RequestValidatorFilter())
      .get(ctx -> ctx.render("Welcome to baeldung ratpack!!!"))));
}

3.5. JSON Parser

Ratpack internally uses faster-jackson for JSON parsing. We can use Jackson module to parse any object to JSON.

Let’s create a simple POJO class which will be used for parsing:

public class Employee {

    private Long id;
    private String title;
    private String name;

    // getters and setters 

}

Here, we have created one simple POJO class named Employee, which has three parameters: id, title, and name. Now we will use this Employee object to convert into JSON and return the same when certain URL is hit:

List<Employee> employees = new ArrayList<Employee>();
employees.add(new Employee(1L, "Mr", "John Doe"));
employees.add(new Employee(2L, "Mr", "White Snow"));

RatpackServer.start(
    server -> server.handlers(chain -> chain
      .get("data/employees",
      ctx -> ctx.render(Jackson.json(employees)))));

As we can see, we are manually adding two Employee objects into a list and parsing them as JSON using Jackson module. As soon as the /data/employees URL is hit, the JSON object will be returned.

Point to note here is that we are not using ObjectMapper at all since Ratpack’s Jackson module will do the needful on the fly.

3.6. In-Memory Database

Ratpack has the first class support for in-memory databases. It uses HikariCP for JDBC connection pooling. In order to use it, we need to add Ratpack’s HikariCP module dependency in the pom.xml:

<dependency>
    <groupId>io.ratpack</groupId>
    <artifactId>ratpack-hikari</artifactId>
    <version>1.4.5</version>
</dependency>

If we are using Gradle, the same needs to be added in the Gradle build file:

compile ratpack.dependency('hikari')

Now, we need to create an SQL file with table DDL statements so that the tables are created as soon as the server is up and running. We’ll create the DDL.sql file in the src/main/resources directory and add some DDL statements into it.

Since we’re using H2 database, we have to add dependencies for that too.

Now, by using HikariModule, we can initialize the database at the runtime:

RatpackServer.start(
    server -> server.registry(Guice.registry(bindings -> 
      bindings.module(HikariModule.class, config -> {
          config.setDataSourceClassName("org.h2.jdbcx.JdbcDataSource");
          config.addDataSourceProperty("URL",
          "jdbc:h2:mem:baeldung;INIT=RUNSCRIPT FROM 'classpath:/DDL.sql'");
      }))).handlers(...));

4. Testing

As mentioned earlier, Ratpack has first-class support for jUnit test cases. By using MainClassApplicationUnderTest we can easily create test cases and test the endpoints:

@RunWith(JUnit4.class)
public class ApplicationTest {

    MainClassApplicationUnderTest appUnderTest
      = new MainClassApplicationUnderTest(Application.class);

    @Test
    public void givenDefaultUrl_getStaticText() {
        assertEquals("Welcome to baeldung ratpack!!!", 
          appUnderTest.getHttpClient().getText("/"));
    }

    @Test
    public void givenDynamicUrl_getDynamicText() {
        assertEquals("Hello dummybot!!!", 
          appUnderTest.getHttpClient().getText("/dummybot"));
    }

    @Test
    public void givenUrl_getListOfEmployee() 
      throws JsonProcessingException {
 
        List<Employee> employees = new ArrayList<Employee>();
        ObjectMapper mapper = new ObjectMapper();
        employees.add(new Employee(1L, "Mr", "John Doe"));
        employees.add(new Employee(2L, "Mr", "White Snow"));

        assertEquals(mapper.writeValueAsString(employees), 
          appUnderTest.getHttpClient().getText("/data/employees"));
    }
 
    @After
    public void shutdown() {
        appUnderTest.close();
    }

}

Please note that we need to manually terminate the running MainClassApplicationUnderTest instance by calling the close() method as it may unnecessarily block JVM resources. That’s why we have used @After annotation to forcefully terminate the instance once the test case executed.

5. Conclusion

In this article, we saw the simplicity of using Ratpack.

As always, the full source code is available over on GitHub.

Testing an OAuth Secured API with the Spring MVC Test Support

$
0
0

1. Overview

In this article, we’re going to show how we can test an API which is secured using OAuth with the Spring MVC test support.

2. Authorization and Resource Server

For a tutorial on how to setup an authorization and resource server, look through this previous article: Spring REST API + OAuth2 + AngularJS.

Our authorization server uses JdbcTokenStore and defined a client with id “fooClientIdPassword” and password “secret”, and supports the password grant type.

The resource server restricts the /employee URL to the ADMIN role.

Starting with Spring Boot version 1.5.0 the security adapter takes priority over the OAuth resource adapter, so in order to reverse the order, we have to annotate the WebSecurityConfigurerAdapter class with @Order(SecurityProperties.ACCESS_OVERRIDE_ORDER).

Otherwise, Spring will attempt to access requested URLs based on the Spring Security rules instead of Spring OAuth rules, and we would receive a 403 error when using token authentication.

3. Defining a Sample API

First, let’s create a simple POJO called Employee with two properties that we will manipulate through the API:

public class Employee {
    private String email;
    private String name;
    
    // standard constructor, getters, setters
}

Next, let’s define a controller with two request mappings, for getting and saving an Employee object to a list:

@Controller
public class EmployeeController {

    private List<Employee> employees = new ArrayList<>();

    @GetMapping("/employee")
    @ResponseBody
    public Optional<Employee> getEmployee(@RequestParam String email) {
        return employees.stream()
          .filter(x -> x.getEmail().equals(email)).findAny();
    }

    @PostMapping("/employee")
    @ResponseStatus(HttpStatus.CREATED)
    public void postMessage(@RequestBody Employee employee) {
        employees.add(employee);
    }
}

Keep in mind that in order to make this work, we need an additional JDK8 Jackson module. Otherwise, Optional class will not be serialized/deserialized properly. The latest version of jackson-datatype-jdk8 can be downloaded from Maven Central.

4. Testing the API

4.1. Setting Up the Test Class

To test our API, we will create a test class annotated with @SpringBootTest that uses the AuthorizationServerApplication class to read the application configuration.

For testing a secured API with Spring MVC test support, we need to inject the WebAppplicationContext and Spring Security Filter Chain beans. We’ll use these to obtain a MockMvc instance before the tests are run:

@RunWith(SpringRunner.class)
@WebAppConfiguration
@SpringBootTest(classes = AuthorizationServerApplication.class)
public class OAuthMvcTest {

    @Autowired
    private WebApplicationContext wac;

    @Autowired
    private FilterChainProxy springSecurityFilterChain;

    private MockMvc mockMvc;

    @Before
    public void setup() {
        this.mockMvc = MockMvcBuilders.webAppContextSetup(this.wac)
          .addFilter(springSecurityFilterChain).build();
    }
}

4.2. Obtaining an Access Token

Simply put, an APIs secured with OAuth2 expects to receive a the Authorization header with a value of Bearer <access_token>.

In order to send the required Authorization header, we first need to obtain a valid access token by making a POST request to the /oauth/token endpoint. This endpoint requires an HTTP Basic authentication, with the id and secret of the OAuth client, and a list of parameters specifying the client_id, grant_type, username, and password.

Using Spring MVC test support, the parameters can be wrapped in a MultiValueMap and the client authentication can be sent using the httpBasic method.

Let’s create a method that sends a POST request to obtain the token and reads the access_token value from the JSON response:

private String obtainAccessToken(String username, String password) throws Exception {
 
    MultiValueMap<String, String> params = new LinkedMultiValueMap<>();
    params.add("grant_type", "password");
    params.add("client_id", "fooClientIdPassword");
    params.add("username", username);
    params.add("password", password);

    ResultActions result 
      = mockMvc.perform(post("/oauth/token")
        .params(params)
        .with(httpBasic("fooClientIdPassword","secret"))
        .accept("application/json;charset=UTF-8"))
        .andExpect(status().isOk())
        .andExpect(content().contentType("application/json;charset=UTF-8"));

    String resultString = result.andReturn().getResponse().getContentAsString();

    JacksonJsonParser jsonParser = new JacksonJsonParser();
    return jsonParser.parseMap(resultString).get("access_token").toString();
}

4.3. Testing GET and POST Requests

The access token can be added to a request using the header(“Authorization”, “Bearer “+ accessToken) method.

Let’s attempt to access one of our secured mappings without an Authorization header and verify that we receive an unauthorized status code:

@Test
public void givenNoToken_whenGetSecureRequest_thenUnauthorized() throws Exception {
    mockMvc.perform(get("/employee")
      .param("email", EMAIL))
      .andExpect(status().isUnauthorized());
}

We have specified that only users with a role of ADMIN can access the /employee URL. Let’s create a test in which we obtain an access token for a user with USER role and verify that we receive a forbidden status code:

@Test
public void givenInvalidRole_whenGetSecureRequest_thenForbidden() throws Exception {
    String accessToken = obtainAccessToken("user1", "pass");
    mockMvc.perform(get("/employee")
      .header("Authorization", "Bearer " + accessToken)
      .param("email", "jim@yahoo.com"))
      .andExpect(status().isForbidden());
}

Next, let’s test our API using a valid access token, by sending a POST request to create an Employee object, then a GET request to read the object created:

@Test
public void givenToken_whenPostGetSecureRequest_thenOk() throws Exception {
    String accessToken = obtainAccessToken("admin", "nimda");

    String employeeString = "{\"email\":\"jim@yahoo.com\",\"name\":\"Jim\"}";
        
    mockMvc.perform(post("/employee")
      .header("Authorization", "Bearer " + accessToken)
      .contentType(application/json;charset=UTF-8)
      .content(employeeString)
      .accept(application/json;charset=UTF-8))
      .andExpect(status().isCreated());

    mockMvc.perform(get("/employee")
      .param("email", "jim@yahoo.com")
      .header("Authorization", "Bearer " + accessToken)
      .accept("application/json;charset=UTF-8"))
      .andExpect(status().isOk())
      .andExpect(content().contentType(application/json;charset=UTF-8))
      .andExpect(jsonPath("$.name", is("Jim")));
}

5. Conclusion

In this quick tutorial, we have demonstrated how we can test an OAuth-secured API using the Spring MVC test support.

The full source code of the examples can be found in the GitHub project.

To run the test, the project has an mvc profile that can be executed using the command mvn clean install -Pmvc.

Guide to Internationalization in Spring Boot

$
0
0

1. Overview

In this quick tutorial, we’re going to take a look at how we can add internationalization to a Spring Boot application.

2. Maven Dependencies

For development, we need the following dependency:

<dependency>
    <groupId>org.springframework.boot</groupId>
    <artifactId>spring-boot-starter-thymeleaf</artifactId>
    <version>1.5.2.RELEASE</version>
</dependency>

The latest version of spring-boot-starter-thymeleaf can be downloaded from Maven Central.

3. LocaleResolver

In order for our application to be able to determine which locale is currently being used, we need to add a LocaleResolver bean:

@Bean
public LocaleResolver localeResolver() {
    SessionLocaleResolver slr = new SessionLocaleResolver();
    slr.setDefaultLocale(Locale.US);
    return slr;
}

The LocaleResolver interface has implementations that determine the current locale based on the session, cookies, the Accept-Language header, or a fixed value.

In our example, we have used the session based resolver SessionLocaleResolver and set a default locale with value US.

4. LocaleChangeInterceptor

Next, we need to add an interceptor bean that will switch to a new locale based on the value of the lang parameter appended to a request:

@Bean
public LocaleChangeInterceptor localeChangeInterceptor() {
    LocaleChangeInterceptor lci = new LocaleChangeInterceptor();
    lci.setParamName("lang");
    return lci;
}

In order to take effect, this bean needs to be added to the application’s interceptor registry.

To achieve this, our @Configuration class has to extend the WebMvcConfigurerAdapter class and override the addInterceptors() method:

@Override
public void addInterceptors(InterceptorRegistry registry) {
    registry.addInterceptor(localeChangeInterceptor());
}

5. Defining the Message Sources

By default, a Spring Boot application will look for message files containing internationalization keys and values in the src/main/resources folder.

The file for the default locale will have the name messages.properties, and files for each locale will be named messages_XX.properties, where XX is the locale code.

The keys for the values that will be localized have to be the same in every file, with values appropriate to the language they correspond to.

If a key does not exist in a certain requested locale, then the application will fall back to the default locale value.

Let’s define a default message file for the English language called messages.properties:

greeting=Hello! Welcome to our website!
lang.change=Change the language
lang.eng=English
lang.fr=French

Next, let’s create a file called messages_fr.properties for the French language with the same keys:

greeting=Bonjour! Bienvenue sur notre site!
lang.change=Changez la langue
lang.eng=Anglais
lang.fr=Francais

6. Controller and HTML Page

Let’s create a controller mapping that will return a simple HTML page called international.html that we want to see in two different languages:

@Controller
public class PageController {

    @GetMapping("/international")
    public String getInternationalPage() {
        return "international";
    }
}

Since we are using thymeleaf to display the HTML page, the locale-specific values will be accessed using the keys with the syntax #{key}:

<h1 th:text="#{greeting}"></h1>

If using JSP files, the syntax is:

<h1><spring:message code="greeting" text="default"/></h1>

If we want to access the page with the two different locales we have to add the parameter lang to the URL in the form: /international?lang=fr

If no lang parameter is present on the URL, the application will use the default locale, in our case US locale.

Let’s add a drop-down to our HTML page with the two locales whose names are also localized in our properties files:

<span th:text="#{lang.change}"></span>:
<select id="locales">
    <option value=""></option>
    <option value="en" th:text="#{lang.eng}"></option>
    <option value="fr" th:text="#{lang.fr}"></option>
</select>

Then we can add a jQuery script that will call the /international URL with the respective lang parameter depending on which drop-down option is selected:

<script src="https://ajax.googleapis.com/ajax/libs/jquery/3.1.1/jquery.min.js">
</script>
<script type="text/javascript">
$(document).ready(function() {
    $("#locales").change(function () {
        var selectedOption = $('#locales').val();
        if (selectedOption != ''){
            window.location.replace('international?lang=' + selectedOption);
        }
    });
});
</script>

7. Running the Application

In order to initialize our application, we have to add the main class annotated with @SpringBootApplication:

@SpringBootApplication
public class InternationalizationApp {
    
    public static void main(String[] args) {
        SpringApplication.run(InternationalizationApp.class, args);
    }
}

Depending on the selected locale, we will view the page in either English or French when running the application.

Let’s see the English version:

screen shot in English
And now let’s see the French version:
screen shot in French

8. Conclusion

In this tutorial, we have shown how we can use the support for internationalization in a Spring Boot application.

The full source code for the example can be found over on GitHub.

Introduction to JiBX

$
0
0

1. Overview

JiBX is a tool for binding XML data to Java objects. It provides solid performance compared to other common tools such as JAXB.

JiBX is also quite flexible when compared to other Java-XML tools, using binding definitions to decouple the Java structure from XML representation so that each can be changed independently.

In this article, we’ll explore the different ways provided by JiBX of binding the XML to Java objects.

2. Components of JiBX

2.1. Binding Definition Document

The binding definition document specifies how your Java objects are converted to or from XML.

The JiBX binding compiler takes one or more binding definitions as input, along with actual class files. It compiles the binding definition into Java bytecode by adding it to the class files. Once the class files have been enhanced with this compiled binding definition code, they are ready to work with JiBX runtime.

2.2. Tools

There are three main tools that we are going to use:

  • BindGen –  to generate the binding and matching schema definitions from Java code
  • CodeGen –  to create the Java code and a binding definition from an XML schema
  • JiBX2Wsdl – to make the binding definition and a matching WSDL along with a schema definition from existing Java code

3. Maven Configuration

3.1. Dependencies

We need to add the jibx-run dependency in the pom.xml:

<dependency>
    <groupId>org.jibx</groupId>
    <artifactId>jibx-run</artifactId>
    <version>1.3.1</version>
</dependency>

The latest version of this dependency can be found here.

3.2. Plugins

To perform the different steps in JiBX like code generation or binding generation, we need to configure maven-jibx-plugin in pom.xml.

For the case when we need to start from the Java code and generate the binding and schema definition, let’s configure the plugin:

<plugin>
    <groupId>org.jibx</groupId>
    <artifactId>maven-jibx-plugin</artifactId>
    ...
    <configuration>
        <directory>src/main/resources</directory>
        <includes>
            <includes>*-binding.xml</includes>
        </includes>
        <excludes>
            <exclude>template-binding.xml</exclude>
        </excludes>
        <verbose>true</verbose>
    </configuration>
    <executions>
        <execution>
            <phase>process-classes</phase>
            <goals>
                <goal>bind</goal>
            </goals>
        </execution>
    </executions>
</plugin>

When we have a schema and we generate the Java code and binding definition, the maven-jibx-plugin is configured with the information about schema file path and path to the source code directory:

<plugin>
    <groupId>org.jibx</groupId>
    <artifactId>maven-jibx-plugin</artifactId>
    ...
    <executions>
        <execution>
        <id>generate-java-code-from-schema</id>
        <goals>
             <goal>schema-codegen</goal>
        </goals>
            <configuration>
                <directory>src/main/jibx</directory>
                <includes>
                    <include>customer-schema.xsd</include>
                </includes>
                <verbose>true</verbose>
            </configuration>
            </execution>
            <execution>
                <id>compile-binding</id>
                <goals>
                    <goal>bind</goal>
                </goals>
            <configuration>
                <directory>target/generated-sources</directory>
                <load>true</load>
                <validate>true</validate>
                <verify>true</verify>
            </configuration>
        </execution>
    </executions>
</plugin>

4. Binding Definitions

Binding definitions are the core part of JiBX. A basic binding file specifies the mapping between XML and Java object fields:

<binding>
    <mapping name="customer" class="com.baeldung.xml.jibx.Customer">
        ...
        <value name="city" field="city" />
    </mapping>
</binding>

4.1. Structure Mapping

Structure mapping makes the XML structure look similar to object structure:

<binding>
    <mapping name="customer" class="com.baeldung.xml.jibx.Customer">
    ...
    <structure name="person" field="person">
        ...
        <value name="last-name" field="lastName" />
    </structure>
    ...    
    </mapping>
</binding>

The corresponding classes for this structure are going to be:

public class Customer {
    
    private Person person;
    ...
    
    // standard getters and setters

}

public class Person {
    
    private String lastName;
    ...
    
    // standard getters and setters

}

4.2. Collection and Array mappings

JiBX binding provides an easy way for working with a collection of objects:

<mapping class="com.baeldung.xml.jibx.Order" name="Order">
    <collection get-method="getAddressList" 
      set-method="setAddressList" usage="optional" 
      createtype="java.util.ArrayList">
        
        <structure type="com.baeldung.xml.jibx.Order$Address" 
          name="Address">
            <value style="element" name="Name" 
              get-method="getName" set-method="setName"/>
              ...
        </structure>
     ...
</mapping>

Let’s see corresponding mapping Java objects:

public class Order {
    List<Address> addressList = new ArrayList<>();
    ...
 
    // getters and setters here
}

public static class Address {
    private String name;
    
    ...
    // standard getters and setter
    
}

4.3. Advanced Mappings

So far we have seen a basic mapping definition. JiBX mapping provides different flavors of mapping like abstract mapping and mapping inheritance.

Let see how can we define an abstract mapping:

<binding>
    <mapping name="customer" 
      class="com.baeldung.xml.jibx.Customer">

        <structure name="person" field="person">
            ...
            <value name="name" field="name" />
        </structure>
        <structure name="home-phone" field="homePhone" />
        <structure name="office-phone" field="officePhone" />
        <value name="city" field="city" />
    </mapping>
 
    <mapping name="phone" 
      class="com.baeldung.xml.jibx.Phone" abstract="true">
        <value name="number" field="number"/>
    </mapping>
</binding>

Let’s see how this binds to Java objects:

public class Customer {
    private Person person;
    ...
    private Phone homePhone;
    private Phone officePhone;
    
    // standard getters and setters
    
}

Here we have specified multiple Phone fields in Customer class. The Phone itself is again a POJO:

public class Phone {

    private String number;
    
    // standard getters and setters
}

In addition to regular mappings, we can also define extensions. Each extension mapping refers to some base mapping. At the time of marshaling, the actual object type decides which XML mapping is applied.

Let’s see how the extensions work:

<binding>
    <mapping class="com.baeldung.xml.jibx.Identity" 
      abstract="true">
        <value name="customer-id" field="customerId"/>
    </mapping>
    ...  
    <mapping name="person" 
      class="com.baeldung.xml.jibx.Person" 
      extends="com.baeldung.xml.jibx.Identity">
        <structure map-as="com.baeldung.xml.jibx.Identity"/>
        ...
    </mapping>
    ...
</binding>

Let’s look at the corresponding Java objects:

public class Identity {

    private long customerId;
    
    // standard getters and setters
}

5. Conclusion

In this quick article, we have explored different ways by which we can use the JiBX for converting XML to/from Java objects. We have also seen how we can make use binding definitions to work with different representations.

Full code for this article is available over on GitHub.

Spring Boot Authentication Auditing Support

$
0
0

1. Overview

In this short article, we’ll explore the Spring Boot Actuator module and the support for publishing authentication and authorization events in conjunction with Spring Security.

2. Maven Dependencies

First, we need to add the spring-boot-starter-actuator to our pom.xml:

<dependency>
    <groupId>org.springframework.boot</groupId>
    <artifactId>spring-boot-starter-actuator</artifactId>
    <version>1.5.2.RELEASE</version>
</dependency>

The latest version is available in the Maven Central repository.

3. Listening for Authentication and Authorization Events

To log all authentication and authorization attempts in a Spring Boot application, we can just define a bean with a listener method:

@Component
public class LoginAttemptsLogger {

    @EventListener
    public void auditEventHappened(
      AuditApplicationEvent auditApplicationEvent) {
        
        AuditEvent auditEvent = auditApplicationEvent.getAuditEvent();
        System.out.println("Principal " + auditEvent.getPrincipal() 
          + " - " + auditEvent.getType());

        WebAuthenticationDetails details = 
          (WebAuthenticationDetails) auditEvent.getData().get("details");
        System.out.println("Remote IP address: " 
          + details.getRemoteAddress());
        System.out.println("  Session Id: " + details.getSessionId());
    }
}

Note that we’re just outputting some of the things that are available in AuditApplicationEvent to show what information is available. In an actual application, you might want to store that information in a repository or cache to process it further.

Note that any Spring bean will work; the basics of the new Spring event support are quite simple:

  • annotate the method with @EventListener
  • add the AuditApplicationEvent as the sole argument of the method

The output of running the application will look something like to this:

Principal anonymousUser - AUTHORIZATION_FAILURE
  Remote IP address: 0:0:0:0:0:0:0:1
  Session Id: null
Principal user - AUTHENTICATION_FAILURE
  Remote IP address: 0:0:0:0:0:0:0:1
  Session Id: BD41692232875A5A65C5E35E63D784F6
Principal user - AUTHENTICATION_SUCCESS
  Remote IP address: 0:0:0:0:0:0:0:1
  Session Id: BD41692232875A5A65C5E35E63D784F6

In this example, three AuditApplicationEvents have been received by the listener:

  1. Without logging on, access has been requested to a restricted page
  2. A wrong password has been used while logging on
  3. A correct password has been used the second time around

4. An Authentication Audit Listener

If the information exposed by Spring Boot’s AuthorizationAuditListener is not enough, you can create your own bean to expose more information.

Let’s have a look at an example, where we also expose the request URL that was accessed when the authorization fails:

@Component
public class ExposeAttemptedPathAuthorizationAuditListener 
  extends AbstractAuthorizationAuditListener {

    public static final String AUTHORIZATION_FAILURE 
      = "AUTHORIZATION_FAILURE";

    @Override
    public void onApplicationEvent(AbstractAuthorizationEvent event) {
        if (event instanceof AuthorizationFailureEvent) {
            onAuthorizationFailureEvent((AuthorizationFailureEvent) event);
        }
    }

    private void onAuthorizationFailureEvent(
      AuthorizationFailureEvent event) {
        Map<String, Object> data = new HashMap<>();
        data.put(
          "type", event.getAccessDeniedException().getClass().getName());
        data.put("message", event.getAccessDeniedException().getMessage());
        data.put(
          "requestUrl", ((FilterInvocation)event.getSource()).getRequestUrl() );
        
        if (event.getAuthentication().getDetails() != null) {
            data.put("details", 
              event.getAuthentication().getDetails());
        }
        publish(new AuditEvent(event.getAuthentication().getName(), 
          AUTHORIZATION_FAILURE, data));
    }
}

We can now log the request URL in our listener:

@Component
public class LoginAttemptsLogger {

    @EventListener
    public void auditEventHappened(
      AuditApplicationEvent auditApplicationEvent) {
        AuditEvent auditEvent = auditApplicationEvent.getAuditEvent();
 
        System.out.println("Principal " + auditEvent.getPrincipal() 
          + " - " + auditEvent.getType());

        WebAuthenticationDetails details
          = (WebAuthenticationDetails) auditEvent.getData().get("details");
 
        System.out.println("  Remote IP address: " 
          + details.getRemoteAddress());
        System.out.println("  Session Id: " + details.getSessionId());
        System.out.println("  Request URL: " 
          + auditEvent.getData().get("requestUrl"));
    }
}

As a result, the output now contains the requested URL:

Principal anonymousUser - AUTHORIZATION_FAILURE
  Remote IP address: 0:0:0:0:0:0:0:1
  Session Id: null
  Request URL: /hello

Note that we extended from the abstract AbstractAuthorizationAuditListener in this example, so we can use the publish method from that base class in our implementation.

If you want to test it, check out the source code and run:

mvn clean spring-boot:run

Thereafter you can point your browser to http://localhost:8080/.

5. Storing Audit Events

By default, Spring Boot stores the audit events in an AuditEventRepository. If you don’t create a bean with an own implementation, then an InMemoryAuditEventRepository will be wired for you.

The InMemoryAuditEventRepository is a kind of circular buffer that stores the last 4000 audit events in memory. Those events can then be accessed via the management endpoint http://localhost:8080/auditevents.

This returns a JSON representation of the audit events:

{
  "events": [
    {
      "timestamp": "2017-03-09T19:21:59+0000",
      "principal": "anonymousUser",
      "type": "AUTHORIZATION_FAILURE",
      "data": {
        "requestUrl": "/auditevents",
        "details": {
          "remoteAddress": "0:0:0:0:0:0:0:1",
          "sessionId": null
        },
        "type": "org.springframework.security.access.AccessDeniedException",
        "message": "Access is denied"
      }
    },
    {
      "timestamp": "2017-03-09T19:22:00+0000",
      "principal": "anonymousUser",
      "type": "AUTHORIZATION_FAILURE",
      "data": {
        "requestUrl": "/favicon.ico",
        "details": {
          "remoteAddress": "0:0:0:0:0:0:0:1",
          "sessionId": "18FA15865F80760521BBB736D3036901"
        },
        "type": "org.springframework.security.access.AccessDeniedException",
        "message": "Access is denied"
      }
    },
    {
      "timestamp": "2017-03-09T19:22:03+0000",
      "principal": "user",
      "type": "AUTHENTICATION_SUCCESS",
      "data": {
        "details": {
          "remoteAddress": "0:0:0:0:0:0:0:1",
          "sessionId": "18FA15865F80760521BBB736D3036901"
        }
      }
    }
  ]
}

6. Conclusion

With the actuator support in Spring Boot, it becomes trivial to log the authentication and authorization attempts from users. The reader is also referred to production ready auditing for some additional information.

The code from this article can be found over on GitHub

Property Testing Example With Javaslang

$
0
0

1. Overview

In this article, we’ll be looking at the concept of Property Testing and its implementation in the javaslang-test library.

The Property based testing (PBT) allows us to specify the high-level behavior of a program regarding invariants it should adhere to.

2. What is Property Testing?

A property is the combination of an invariant with an input values generator. For each generated value, the invariant is treated as a predicate and checked whether it yields true or false for that value.

As soon as there is one value which yields false, the property is said to be falsified, and checking is aborted. If a property cannot be invalidated after a specific amount of sample data, the property is assumed to be satisfied.

Thanks to that behavior, our test fail-fast if a condition is not satisfied without doing unnecessary work.

3. Maven Dependency

First, we need to add a Maven dependency to the javaslang-test library:

<dependency>
    <groupId>io.javaslang</groupId>
    <artifactId>javaslang-test</artifactId>
    <version>${javaslang.test.version}</version>
</dependency>

<properties>
    <javaslang.test.version>2.0.5</javaslang.test.version> 
</properties>

4. Writing Property Based Tests

Let’s consider a function that returns a stream of strings. It is an infinite stream of 0 upwards that maps numbers to the strings based on the simple rule. We are using here an interesting Javaslang feature called the Pattern Matching:

private static Predicate<Integer> divisibleByTwo = i -> i % 2 == 0;
private static Predicate<Integer> divisibleByFive = i -> i % 5 == 0;

private Stream<String> stringsSupplier() {
    return Stream.from(0).map(i -> Match(i).of(
      Case($(divisibleByFive.and(divisibleByTwo)), "DividedByTwoAndFiveWithoutRemainder"),
      Case($(divisibleByFive), "DividedByFiveWithoutRemainder"),
      Case($(divisibleByTwo), "DividedByTwoWithoutRemainder"),
      Case($(), "")));
}

Writing the unit test for such method will be error prone because there is a high probability that we’ll forget about some edge case and basically not cover all possible scenarios.

Fortunately, we can write a property-based test that will cover all edge cases for us. First, we need to define which kind of numbers should be an input for our test:

Arbitrary<Integer> multiplesOf2 = Arbitrary.integer()
  .filter(i -> i > 0)
  .filter(i -> i % 2 == 0 && i % 5 != 0);

We specified that input number needs to fulfill two conditions – it needs to be greater that zero, and needs to be dividable by two without remainder but not by five.

Next, we need to define a condition that checks if a function that is tested returns proper value for given argument:

CheckedFunction1<Integer, Boolean> mustEquals
  = i -> stringsSupplier().get(i).equals("DividedByTwoWithoutRemainder");

To start a property-based test, we need to use the Property class:

CheckResult result = Property
  .def("Every second element must equal to DividedByTwoWithoutRemainder")
  .forAll(multiplesOf2)
  .suchThat(mustEquals)
  .check(10_000, 100);

result.assertIsSatisfied();

We’re specifying that, for all arbitrary integers that are multiples of 2, the mustEquals predicate must be satisfied. The check() method takes a size of a generated input and number of times that this test will be run.

We can quickly write another test that will verify if the stringsSupplier() function returns a DividedByTwoAndFiveWithoutRemainder string for every input number that is divisible by two and five without the remainder.

The Arbitrary supplier and CheckedFunction need to be changed:

Arbitrary<Integer> multiplesOf5 = Arbitrary.integer()
  .filter(i -> i > 0)
  .filter(i -> i % 5 == 0 && i % 2 == 0);

CheckedFunction1<Integer, Boolean> mustEquals
  = i -> stringsSupplier().get(i).endsWith("DividedByTwoAndFiveWithoutRemainder");

Then we can run the property-based test for one thousand iterations:

Property.def("Every fifth element must equal to DividedByTwoAndFiveWithoutRemainder")
  .forAll(multiplesOf5)
  .suchThat(mustEquals)
  .check(10_000, 1_000)
  .assertIsSatisfied();

5. Conclusion

In this quick article, we had a look at the concept of property based testing.

We created tests using the javaslang-test library; we used the Arbitrary, CheckedFunction, and Property class to define property-based test using javaslang-test. 

The implementation of all these examples and code snippets can be found over on GitHub – this is a Maven project, so it should be easy to import and run as it is.

Form Validation with AngularJS and Spring MVC

$
0
0

1. Overview

Validation is never quite as straightforward as we expect. And of course validating the values entered by a user into an application is very important for preserving the integrity of our data.

In the context of a web application, data input is usually done using HTML forms and requires both client-side and server-side validation.

In this tutorial, we’ll have a look at implementing client-side validation of form input using AngularJS and server-side validation using the Spring MVC framework.

2. Maven Dependencies

To start off, let’s add the following dependencies:

<dependency>
    <groupId>org.springframework</groupId>
    <artifactId>spring-webmvc</artifactId>
    <version>4.3.7.RELEASE</version>
</dependency>
<dependency>
    <groupId>org.hibernate</groupId>
    <artifactId>hibernate-validator</artifactId>
    <version>5.4.0.Final</version>
</dependency>
<dependency>
    <groupId>com.fasterxml.jackson.core</groupId>
    <artifactId>jackson-databind</artifactId>
    <version>2.8.7</version>
</dependency>

The latest versions of spring-webmvc, hibernate-validator and jackson-databind can be downloaded from Maven Central.

3. Validation Using Spring MVC

An application should never rely solely on client-side validation, as this can be easily circumvented. To prevent incorrect or malicious values from being saved or causing improper execution of the application logic, it is important to validate input values on the server side as well.

Spring MVC offers support for server-side validation by using JSR 349 Bean Validation specification annotations. For this example, we will use the reference implementation of the specification, which is hibernate-validator.

3.1. The Data Model

Let’s create a User class that has properties annotated with appropriate validation annotations:

public class User {

    @NotNull
    @Email
    private String email;

    @NotNull
    @Size(min = 4, max = 15)
    private String password;

    @NotBlank
    private String name;

    @Min(18)
    @Digits(integer = 2, fraction = 0)
    private int age;

    // standard constructor, getters, setters
}

The annotations used above belong to the JSR 349 specification, with the exception of @Email and @NotBlank, which are specific to the hibernate-validator library.

3.2. Spring MVC Controller

Let’s create a controller class that defines a /user endpoint, which will be used to save a new User object to a List.

In order to enable validation of the User object received through request parameters, the declaration must be preceded by the @Valid annotation, and the validation errors will be held in a BindingResult instance.

To determine if the object contains invalid values, we can use the hasErrors() method of BindingResult.

If hasErrors() returns true, we can return a JSON array containing the error messages associated with the validations that did not pass. Otherwise, we will add the object to the list:

@PostMapping(value = "/user")
@ResponseBody
public ResponseEntity<Object> saveUser(@Valid User user, 
  BindingResult result, Model model) {
    if (result.hasErrors()) {
        List<String> errors = result.getAllErrors().stream()
          .map(DefaultMessageSourceResolvable::getDefaultMessage)
          .collect(Collectors.toList());
        return new ResponseEntity<>(errors, HttpStatus.OK);
    } else {
        if (users.stream().anyMatch(it -> user.getEmail().equals(it.getEmail()))) {
            return new ResponseEntity<>(
              Collections.singletonList("Email already exists!"), 
              HttpStatus.CONFLICT);
        } else {
            users.add(user);
            return new ResponseEntity<>(HttpStatus.CREATED);
        }
    }
}

As you can see, server-side validation adds the advantage of having the ability to perform additional checks that are not possible on the client side.

In our case, we can verify whether a user with the same email already exists – and return a status of 409 CONFLICT if that’s the case.

We also need to define our list of users and initialize it with a few values:

private List<User> users = Arrays.asList(
  new User("ana@yahoo.com", "pass", "Ana", 20),
  new User("bob@yahoo.com", "pass", "Bob", 30),
  new User("john@yahoo.com", "pass", "John", 40),
  new User("mary@yahoo.com", "pass", "Mary", 30));

Let’s also add a mapping for retrieving the list of users as a JSON object:

@GetMapping(value = "/users")
@ResponseBody
public List<User> getUsers() {
    return users;
}

The final item we need in our Spring MVC controller is a mapping to return the main page of our application:

@GetMapping("/userPage")
public String getUserProfilePage() {
    return "user";
}

We will take a look at the user.html page in more detail in the AngularJS section.

3.3. Spring MVC Configuration

Let’s add a basic MVC configuration to our application:

@Configuration
@EnableWebMvc
@ComponentScan(basePackages = "com.baeldung.springmvcforms")
class ApplicationConfiguration extends WebMvcConfigurerAdapter {

    @Override
    public void configureDefaultServletHandling(
      DefaultServletHandlerConfigurer configurer) {
        configurer.enable();
    }

    @Bean
    public InternalResourceViewResolver htmlViewResolver() {
        InternalResourceViewResolver bean = new InternalResourceViewResolver();
        bean.setPrefix("/WEB-INF/html/");
        bean.setSuffix(".html");
        return bean;
    }
}

3.4. Initializing the Application

Let’s create a class that implements WebApplicationInitializer interface to run our application:

public class WebInitializer implements WebApplicationInitializer {

    public void onStartup(ServletContext container) throws ServletException {

        AnnotationConfigWebApplicationContext ctx
          = new AnnotationConfigWebApplicationContext();
        ctx.register(ApplicationConfiguration.class);
        ctx.setServletContext(container);
        container.addListener(new ContextLoaderListener(ctx));

        ServletRegistration.Dynamic servlet 
          = container.addServlet("dispatcher", new DispatcherServlet(ctx));
        servlet.setLoadOnStartup(1);
        servlet.addMapping("/");
    }
}

3.5. Testing Spring MVC Validation Using cURL

Before we implement the AngularJS client section, we can test our API using cURL with the command:

curl -i -X POST -H "Accept:application/json" 
  "localhost:8080/spring-mvc-forms/user?email=aaa&password=12&age=12"

The response is an array containing the default error messages:

[
    "not a well-formed email address",
    "size must be between 4 and 15",
    "may not be empty",
    "must be greater than or equal to 18"
]

4. AngularJS validation

Client-side validation is useful in creating a better user experience, as it provides the user with information on how to successfully submit valid data and enables them to be able to continue to interact with the application.

The AngularJS library has great support for adding validation requirements on form fields, handling error messages, and styling valid and invalid forms.

First, let’s create an AngularJS module that injects the ngMessages module, which is used for validation messages:

var app = angular.module('app', ['ngMessages']);

Next, let’s create an AngularJS service and controller that will consume the API built in the previous section.

4.1. The AngularJS Service

Our service will have two methods that call the MVC controller methods — one to save a user, and one to retrieve the list of users:

app.service('UserService',['$http', function ($http) {
	
    this.saveUser = function saveUser(user){
        return $http({
          method: 'POST',
          url: 'user',
          params: {email:user.email, password:user.password, 
            name:user.name, age:user.age},
          headers: 'Accept:application/json'
        });
    }
	
    this.getUsers = function getUsers(){
        return $http({
          method: 'GET',
          url: 'users',
          headers:'Accept:application/json'
        }).then( function(response){
        	return response.data;
        } );
    }

}]);

4.2. The AngularJS Controller

The UserCtrl controller injects the UserService, calls the service methods, and handles the response and error messages:

app.controller('UserCtrl', ['$scope','UserService', function ($scope,UserService) {
	
	$scope.submitted = false;
	
	$scope.getUsers = function() {
		   UserService.getUsers().then(function(data) {
		       $scope.users = data;
	       });
	   }
    
    $scope.saveUser = function() {
    	$scope.submitted = true;
    	  if ($scope.userForm.$valid) {
            UserService.saveUser($scope.user)
              .then (function success(response) {
                  $scope.message = 'User added!';
                  $scope.errorMessage = '';
                  $scope.getUsers();
                  $scope.user = null;
                  $scope.submitted = false;
              },
              function error(response) {
                  if (response.status == 409) {
                    $scope.errorMessage = response.data.message;
            	  }
            	  else {
                    $scope.errorMessage = 'Error adding user!';
            	  }
                  $scope.message = '';
            });
    	  }
    }
   
   $scope.getUsers();
}]);

We can see in the example above that the service method is called only if the $valid property of userForm is true. Still, in this case, there is the additional check for duplicate emails, which can only be done on the server and is handled separately in the error() function.

Also notice that there is a submitted variable defined which will tell us if the form has been submitted or not.

Initially this variable will be false, and on invocation of the saveUser() method it becomes true. If we don’t want validation messages to show before the user submits the form, we can use the submitted variable to prevent this.

4.3. Form Using AngularJS Validation

In order to make use of the AngularJS library and our AngularJS module, we will need to add the scripts to our user.html page:

<script src="https://ajax.googleapis.com/ajax/libs/angularjs/1.5.6/angular.min.js">
</script>
<script src="https://ajax.googleapis.com/ajax/libs/angularjs/1.4.0/angular-messages.js">
</script>
<script src="js/app.js"></script>

Then we can use our module and controller by setting the ng-app and ng-controller properties:

<body ng-app="app" ng-controller="UserCtrl">

Let’s create our HTML form:

<form name="userForm" method="POST" novalidate 
  ng-class="{'form-error':submitted}" ng-submit="saveUser()" >
...
</form>

Note that we have to set the novalidate attribute on the form in order to prevent default HTML5 validation and replace it with our own.

The ng-class attribute adds the form-error CSS class dynamically to the form if the submitted variable has a value of true.

The ng-submit attribute defines the AngularJS controller function that will be called when the form in submitted. Using ng-submit instead of ng-click has the advantage that it also responds to submitting the form using the ENTER key.

Now let’s add the four input fields for the User attributes:

<label class="form-label">Email:</label>
<input type="email" name="email" required ng-model="user.email" class="form-input"/>

<label class="form-label">Password:</label>
<input type="password" name="password" required ng-model="user.password" 
  ng-minlength="4" ng-maxlength="15" class="form-input"/>

<label class="form-label">Name:</label>
<input type="text" name="name" ng-model="user.name" ng-trim="true" 
  required class="form-input" />

<label class="form-label">Age:</label>
<input type="number" name="age" ng-model="user.age" ng-min="18"
  class="form-input" required/>

Each input field has a binding to a property of the user variable through the ng-model attribute.

For setting validation rules, we use the HTML5 required attribute and several AngularJS-specific attributes: ng-minglength, ng-maxlength, ng-min, and ng-trim.

For the email field, we also use the type attribute with a value of email for client-side email validation.

In order to add error messages corresponding to each field, AngularJS offers the ng-messages directive, which loops through an input’s $errors object and displays messages based on each validation rule.

Let’s add the directive for the email field right after the input definition:

<div ng-messages="userForm.email.$error" 
  ng-show="submitted && userForm.email.$invalid" class="error-messages">
    <p ng-message="email">Invalid email!</p>
    <p ng-message="required">Email is required!</p>
</div>

Similar error messages can be added for the other input fields.

We can control when the directive is displayed for the email field using the ng-show property with a boolean expression. In our example, we display the directive when the field has an invalid value, meaning the $invalid property is true, and the submitted variable is also true.

Only one error message will be displayed at a time for a field.

We can also add a check mark sign (represented by HEX code character ✓) after the input field in case the field is valid, depending on the $valid property:

<div class="check" ng-show="userForm.email.$valid">✓</div>

AngularJS validation also offers support for styling using CSS classes such as ng-valid and ng-invalid or more specific ones like ng-invalid-required and ng-invalid-minlength.

Let’s add the CSS property border-color:red for invalid inputs inside the form’s form-error class:

.form-error input.ng-invalid {
    border-color:red;
}

We can also show the error messages in red using a CSS class:

.error-messages {
    color:red;
}

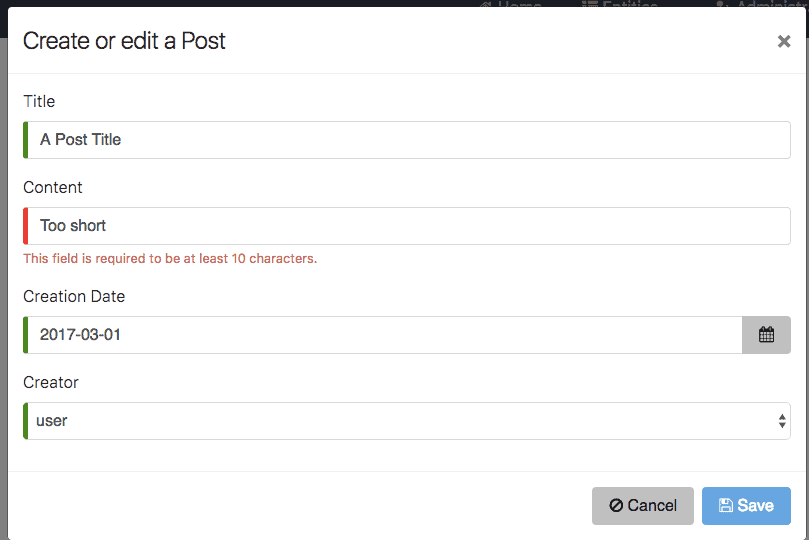
After putting everything together, let’s see an example of how our client-side form validation will look when filled out with a mix of valid and invalid values:

AngularJS form validation example

5. Conclusion

In this tutorial, we’ve shown how we can combine client-side and server-side validation using AngularJS and Spring MVC.

As always, the full source code for the examples can be found over on GitHub.

To view the application, access the /userPage URL after running it.


New Stream, Comparator and Collector Functionality in Guava 21

$
0
0

1. Introduction

This article is first in the series about the new features launched with Version 21 of the Google Guava library. We’ll discuss newly added classes and some major changes from previous versions of Guava.

More specifically, we’ll discuss additions and changes in the common.collect package.

Guava 21 introduces some new and useful functionality in the common.collect package; let’s have a quick look at some of these new utilities and how we can get the most out of them.

2. Streams

We’re all excited about the latest addition of java.util.stream.Stream in Java 8. Well, Guava is now making good use of streams and provides what Oracle may have missed.

Streams is a static utility class, with some much-needed utilities for handling Java 8 streams.

2.1. Streams.stream()

Streams class provides four ways to create streams using Iterable, Iterator, Optional and Collection.

Though, stream creation using Collection is deprecated, as it’s provided by Java 8 out of the box:

List<Integer> numbers = Arrays.asList(1,2,3,4,5,6,7,8,9,10);
Stream<Integer> streamFromCollection = Streams.stream(numbers);
Stream<Integer> streamFromIterator = Streams.stream(numbers.iterator());
Stream<Integer> streamFromIterable = Streams.stream((Iterable<Integer>) numbers);
Stream<Integer> streamFromOptional = Streams.stream(Optional.of(1));

Streams class also provides flavors with OptionalDouble, OptionalLong and OptionalInt. These methods return a stream containing only that element otherwise empty stream:

LongStream streamFromOptionalLong = Streams.stream(OptionalLong.of(1));
IntStream streamFromOptionalInt = Streams.stream(OptionalInt.of(1));
DoubleStream streamFromOptionalDouble = Streams.stream(OptionalDouble.of(1.0));

2.2. Streams.concat()

Streams class provides methods for concating more than one homogeneous streams.

Stream<Integer> concatenatedStreams = Streams.concat(streamFromCollection, streamFromIterable,streamFromIterator);

The concat functionality comes in a few flavors – LongStream, IntStream and DoubleStream.

2.3. Streams.findLast()

Streams have a utility method to find the last element in the stream by using findLast() method.

This method either returns last element or Optional.empty() if the stream is there are no elements in the stream:

List<Integer> integers = Arrays.asList(1,2,3,4,5,6,7,8,9,10);
Optional<Integer> lastItem = Streams.findLast(integers.stream());

The findLast() method works for LongStream, IntStream and DoubleStream.

2.4. Streams.mapWithIndex()

By using mapWithIndex() method, each element of the stream carries information about their respective position (index):

mapWithIndex( Stream.of("a", "b", "c"), (str, index) -> str + ":" + index)

This will return Stream.of(“a:0″,”b:1″,”c:2”).

Same can be achieved with IntStream, LongStream and DoubleStream using overloaded mapWithIndex().

2.5. Streams.zip()

In order to map corresponding elements of two streams using some function, just use zip method of Streams:

Streams.zip(
  Stream.of("candy", "chocolate", "bar"),
  Stream.of("$1", "$2","$3"),
  (arg1, arg2) -> arg1 + ":" + arg2
);

This will return Stream.of(“candy:$1″,”chocolate:$2″,”bar:$3”);

The resulting stream will only be as long as the shorter of the two input streams; if one stream is longer, its extra element will be ignored.

3. Comparators

Guava Ordering class is deprecated and in the phase of deletion in newer versions. Most of the functionalities of Ordering class are already enlisted in JDK 8.

Guava introduces Comparators to provide additional features of Ordering which are not yet provided by the Java 8 standard libs.

Let’s have a quick look at these.

3.1. Comparators.isInOrder()

This method returns true if each element in the Iterable is greater than or equal to the preceding one, as specified by the Comparator:

List<Integer> integers = Arrays.asList(1,2,3,4,4,6,7,8,9,10);
boolean isInAscendingOrder = Comparators.isInOrder(
  integers, new AscedingOrderComparator());

3.2. Comparators.isInStrictOrder()

Quite similar to the isInOrder() method but it strictly holds the condition, the element cannot be equal to the preceding one, it has to be greater than. The previous code will return false for this method.

3.3. Comparators.lexicographical()

This API returns a new Comparator instance – which sorts in lexicographical (dictionary) order comparing corresponding elements pairwise. Internally, it creates a new instance of LexicographicalOrdering<S>().

4. MoreCollectors

MoreCollectors contains some very useful Collectors which are not present in Java 8 java.util.stream.Collectors and are not associated with com.google.common type.

Let’s go over a few of these.

4.1. MoreCollectors.toOptional()

Here, Collector converts a stream containing zero or one element to an Optional:

List<Integer> numbers = Arrays.asList(1);
Optional<Integer> number = numbers.stream()
  .map(e -> e * 2)
  .collect(MoreCollectors.toOptional());

If the stream contains more than one elements – the collector will throw IllegalArgumentException.

4.2. MoreCollectors.onlyElement()

With this API, the Collector takes a stream containing just one element and returns the element; if the stream contains more than one element it throws IllegalArgumentException or if the stream contains zero element it throws NoSuchElementException.

5. Interners.InternerBuilder

This is an internal builder class to already existing Interners in Guava library. It provides some handy method to define concurrency level and type (weak or strong) of Interner you prefer:

Interners interners = Interners.newBuilder()
  .concurrencyLevel(2)
  .weak()
  .build();

6. Conclusion

In this quick article, we explored the newly added functionality in the common.collect package of Guava 21.

The code for this article can be found on Github, as always.

Introduction to JSONassert

$
0
0

1. Overview

In this article, we’ll have a look at the JSONAssert library – a library focused on understanding JSON data and writing complex JUnit tests using that data.

2. Maven Dependency

First, let’s add the Maven dependency:

<dependency>
    <groupId>org.skyscreamer</groupId>
    <artifactId>jsonassert</artifactId>
    <version>1.5.0</version>
</dependency>

Please check out the latest version of the library here.

3. Working with Simple JSON Data

3.1. Using the LENIENT Mode

Let’s start our tests with a simple JSON string comparison:

String actual = "{id:123, name:\"John\"}";
JSONAssert.assertEquals(
  "{id:123,name:\"John\"}", actual, JSONCompareMode.LENIENT);

The test will pass as the expected JSON string, and the actual JSON string are the same.

The comparison mode LENIENT means that even if the actual JSON contains extended fields, the test will still pass:

String actual = "{id:123, name:\"John\", zip:\"33025\"}";
JSONAssert.assertEquals(
  "{id:123,name:\"John\"}", actual, JSONCompareMode.LENIENT);

As we can see, the real variable contains an additional field zip which is not present in the expected String. Still, the test will pass.

This concept is useful in the application development. This means that our APIs can grow, returning additional fields as required, without breaking the existing tests.

3.2. Using the STRICT Mode

The behavior mentioned in the previous sub-section can be easily changed by using the STRICT comparison mode:

String actual = "{id:123,name:\"John\"}";
JSONAssert.assertNotEquals(
  "{name:\"John\"}", actual, JSONCompareMode.STRICT);

Please note the use of assertNotEquals() in the above example.

3.3. Using a Boolean Instead of JSONCompareMode

The compare mode can also be defined by using an overloaded method that takes boolean instead of JSONCompareMode where LENIENT = false and STRICT = true:

String actual = "{id:123,name:\"John\",zip:\"33025\"}";
JSONAssert.assertEquals(
  "{id:123,name:\"John\"}", actual, JSONCompareMode.LENIENT);
JSONAssert.assertEquals(
  "{id:123,name:\"John\"}", actual, false);

actual = "{id:123,name:\"John\"}";
JSONAssert.assertNotEquals(
  "{name:\"John\"}", actual, JSONCompareMode.STRICT);
JSONAssert.assertNotEquals(
  "{name:\"John\"}", actual, true);

3.4. The Logical Comparison

As described earlier, JSONAssert makes a logical comparison of the data. This means that the ordering of elements does not matter while dealing with JSON objects:

String result = "{id:1,name:\"John\"}";
JSONAssert.assertEquals(
  "{name:\"John\",id:1}", result, JSONCompareMode.STRICT);
JSONAssert.assertEquals(
  "{name:\"John\",id:1}", result, JSONCompareMode.LENIENT);

Strict or not, the above test will pass in both the cases.

Another example of logical comparison can be demonstrated by using different types for the same value:

JSONObject expected = new JSONObject();
JSONObject actual = new JSONObject();
expected.put("id", Integer.valueOf(12345));
actual.put("id", Double.valueOf(12345));

JSONAssert.assertEquals(expected, actual, JSONCompareMode.LENIENT);

The first thing to note here is that we are using JSONObject instead of a String as we did for earlier examples. The next thing is that we have used Integer for expected and Double for actual. The test will pass irrespective of the types because the logical value 12345 for both of them is same.

Even in the case when we have nested object representation, this library works pretty well:

String result = "{id:1,name:\"Juergen\", 
  address:{city:\"Hollywood\", state:\"LA\", zip:91601}}";
JSONAssert.assertEquals("{id:1,name:\"Juergen\", 
  address:{city:\"Hollywood\", state:\"LA\", zip:91601}}", result, false);

3.5. Assertions with User Specified Messages

All the assertEquals() and assertNotEquals() methods accept a String message as the first parameter. This message provides some customization to our test cases by providing a meaningful message in the case of test failures:

String actual = "{id:123,name:\"John\"}";
String failureMessage = "Only one field is expected: name";
try {
    JSONAssert.assertEquals(failureMessage, 
      "{name:\"John\"}", actual, JSONCompareMode.STRICT);
} catch (AssertionError ae) {
    assertThat(ae.getMessage()).containsIgnoringCase(failureMessage);
}

In the case of any failure, the entire error message will make more sense:

Only one field is expected: name 
Unexpected: id

The first line is the user specified message and the second line is the additional message provided by the library.

4. Working with JSON Arrays

The comparison rules for JSON arrays differ a little, compared to JSON objects.

4.1. The Order of the Elements in an Array

The first difference is that the order of elements in an array has to be exactly same in STRICT comparison mode. However, for LENIENT comparison mode, the order does not matter:

String result = "[Alex, Barbera, Charlie, Xavier]";
JSONAssert.assertEquals(
  "[Charlie, Alex, Xavier, Barbera]", result, JSONCompareMode.LENIENT);
JSONAssert.assertEquals(
  "[Alex, Barbera, Charlie, Xavier]", result, JSONCompareMode.STRICT);
JSONAssert.assertNotEquals(
  "[Charlie, Alex, Xavier, Barbera]", result, JSONCompareMode.STRICT);

This is pretty useful in the scenario where the API returns an array of sorted elements, and we want to verify if the response is sorted.

4.2. The Extended Elements in an Array

Another difference is that extended elements are not allowed when the dealing with JSON arrays:

String result = "[1,2,3,4,5]";
JSONAssert.assertEquals(
  "[1,2,3,4,5]", result, JSONCompareMode.LENIENT);
JSONAssert.assertNotEquals(
  "[1,2,3]", result, JSONCompareMode.LENIENT);
JSONAssert.assertNotEquals(
  "[1,2,3,4,5,6]", result, JSONCompareMode.LENIENT);

The above example clearly demonstrates that even with the LENIENT comparison mode, the items in the expected array has to match the items in the real array exactly. Adding or removing, even a single element, will result in a failure.

4.3. Array Specific Operations

We also have a couple of other techniques to verify the contents of the arrays further.

Suppose we want to verify the size of the array. This can be achieved by using a concrete syntax as the expected value:

String names = "{names:[Alex, Barbera, Charlie, Xavier]}";
JSONAssert.assertEquals(
  "{names:[4]}", 
  names, 
  new ArraySizeComparator(JSONCompareMode.LENIENT));

The String “{names:[4]}” specifies the expected size of the array.

Let’s have a look at another comparison technique:

String ratings = "{ratings:[3.2,3.5,4.1,5,1]}";
JSONAssert.assertEquals(
  "{ratings:[1,5]}", 
  ratings, 
  new ArraySizeComparator(JSONCompareMode.LENIENT));

The above example verifies that all the elements in the array must have a value between [1,5], both 1 and 5 inclusive. If there is any value less than 1 or greater than 5, the above test will fail.

5. Advanced Comparison Example

Consider the use case where our API returns multiple ids, each one being an Integer value. This means that all the ids can be verified using a simple regular expression ‘\d‘.

The above regex can be combined with a CustomComparator and applied to all the values of all the ids. If any of the ids does not match the regex, the test will fail:

JSONAssert.assertEquals("{entry:{id:x}}", "{entry:{id:1, id:2}}", 
  new CustomComparator(
  JSONCompareMode.STRICT, 
  new Customization("entry.id", 
  new RegularExpressionValueMatcher<Object>("\\d"))));

JSONAssert.assertNotEquals("{entry:{id:x}}", "{entry:{id:1, id:as}}", 
  new CustomComparator(JSONCompareMode.STRICT, 
  new Customization("entry.id", 
  new RegularExpressionValueMatcher<Object>("\\d"))));

The “{id:x}” in the above example is nothing but a placeholder – the x can be replaced by anything. As it is the place where the regex pattern ‘\d‘ will be applied. Since the id itself is inside another field entry, the Customization specifies the position of the id, so that the CustomComparator can perform the comparison.

6. Conclusion

In this quick article, we looked at various scenarios where JSONAssert can be helpful. We started with a super simple example and moved to more complex comparisons.

Of course, as always, the full source code of all the examples discussed here can be found over on GitHub.

Java Web Weekly, Issue 169

$
0
0

Lots of interesting writeups on Java 9 this week.

Here we go…

1. Spring and Java

>> A Nice API Design Gem: Strategy Pattern With Lambdas [jooq.org]

The introduction of lambda expressions and functional interfaces allows us to rethink the design and simplify the Strategy Design Pattern (and many other).

>> Spring Boot and Security Events with Actuator [codeleak.pl]

Spring Boot Actuator comes with user-friendly support for handling audit and security events.

Simply put, all we need to do is to define a listener for the predefined events.

>> Project Amber will revolutionize Java [sitepoint.com]

A lot of new changes are finally coming to Java. These include Local Variable Type Inference, Generic Enums, Data Classes and Pattern Matching.

“We’ve had those in other languages ten years ago” posts are coming.

>> Fully configurable mappings for Spring MVC [frankel.ch]

With a little bit of effort, we can bring the features of Boot Actuators to non-Boot applications as well.

>> Spring Data Improvements in IntelliJ IDEA 2017.1 [jetbrains.com]

IntelliJ IDEA is getting even more Spring-oriented features.

>> The Open-Closed Principle is Often Not What You Think it Is [jooq.org]

The pragmatic approach to the Open-Closed Principle does not involve aiming for openness at any costs.

>> JDK 9 Rampdown Phase 2: Process proposal [mail.openjdk.java.net]

The 2nd phase of JDK 9 rampdown just started.

>> Better tools for adjusting to strong encapsulation [mail.openjdk.java.net]

The internal APIs in the JDK should not have been used but they were by multiple frameworks which are experiencing errors now.

JDK 9 will feature a special workaround for these situations.

Also worth reading:

Webinars and presentations:

Time to upgrade:

2. Technical

>> The State of Browser Caching, Revisited [mnot.net]

An interesting write-up on the basics of browser caching.

>> Acing the technical interview [haphyr.com]

That’s how you make interviewers hate you 🙂

>> Taking a Pragmatic View of Isolated Tests [thecodewhisperer.com]

Writing isolated tests can greatly influence the design of your system by exposing excessive coupling and insufficient cohesion.

>> “Infinity” is a Bad Default Timeout [techblog.bozho.net]

Yeah, setting your timeouts to infinity or ignoring them is very likely not a good idea.

>> Don’t forget about value objects! [plainoldobjects.com]

Value Objects are a great way of dealing with the String type abuse. Working in a strongly typed language, it makes a lot of sense to leverage these.

Also worth reading:

3. Musings

>> The product Is – Is not – Does – Does not [martinfowler.com]

Sometimes it’s easier to explore and explain an idea by first clarifying what it’s not 🙂

>> Does software performance still matter? [lemire.me]

Software performance is critical and should not be neglected, but at the end of the day, it is the absolute value of the code that counts.

>> Don’t Just Flag It — Fix It! [daedtech.com]

Information about problems, without an actual solution – it is not a good way to go.

Also worth reading:

4. Comics

And my favorite Dilberts of the week:

>> How’d you get the black eye [dilbert.com]

>> My mom raised me by putting a thermos of coffee in my crib [dilbert.com]

>> An aggressive recruiter looking for passive job seekers [dilbert.com]

5. Pick of the Week

>> Open Source (Almost) Everything [tom.preston-werner.com]

Introduction to Testing with Spock and Groovy

$
0
0

1. Introduction

In this article, we’ll take a look at Spock, a Groovy testing framework. Mainly, Spock aims to be a more powerful alternative to the traditional JUnit stack, by leveraging Groovy features.

Groovy is a JVM-based language which seamlessly integrates with Java. On top of interoperability, it offers additional language concepts such as being a dynamic, having optional types and meta-programming.

By making use of Groovy, Spock introduces new and expressive ways of testing our Java applications, which simply aren’t possible in ordinary Java code. We’ll explore some of Spock’s high-level concepts during this article, with some practical step by step examples.

2. Maven Dependency

Before we get started, let’s add our Maven dependencies:

<dependency>
    <groupId>org.spockframework</groupId>
    <artifactId>spock-core</artifactId>
    <version>1.0-groovy-2.4</version>
    <scope>test</scope>
</dependency>
<dependency>
    <groupId>org.codehaus.groovy</groupId>
    <artifactId>groovy-all</artifactId>
    <version>2.4.7</version>
    <scope>test</scope>
</dependency>

We’ve added both Spock and Groovy as we would any standard library. However, as Groovy is a new JVM language, we need to include the gmavenplus plugin in order to be able to compile and run it:

<plugin>
    <groupId>org.codehaus.gmavenplus</groupId>
    <artifactId>gmavenplus-plugin</artifactId>
    <version>1.5</version>
    <executions>
        <execution>
            <goals>
                <goal>compile</goal>
                <goal>testCompile</goal>
            </goals>
        </execution>
     </executions>
</plugin>

Now we are ready to write our first Spock test, which will be written in Groovy code. Note that we are using Groovy and Spock only for testing purposes and this is why those dependencies are test-scoped.

3. Structure of a Spock Test

3.1. Specifications and Features

As we are writing our tests in Groovy, we need to add them to the src/test/groovy directory, instead of src/test/java. Let’s create our first test in this directory, naming it Specification.groovy:

class FirstSpecification extends Specification {

}

Note that we are extending the Specification interface. Each Spock class must extend this in order to make the framework available to it. It’s doing so that allows us to implement our first feature:

def "one plus one should equal two"() {
  expect:
  1 + 1 == 2
}

Before explaining the code, it’s also worth noting that in Spock, what we refer to as a feature is somewhat synonymous to what we see as a test in JUnit. So whenever we refer to a feature we are actually referring to a test.

Now, let’s analyze our feature. In doing so, we should immediately be able to see some differences between it and Java.

The first difference is that the feature method name is written as an ordinary string. In JUnit, we would have had a method name which uses camelcase or underscores to separate the words, which would not have been as expressive or human readable.

The next is that our test code lives in an expect block. We will cover blocks in more detail shortly, but essentially they are a logical way of splitting up the different steps of our tests.

Finally, we realize that there are no assertions. That’s because the assertion is implicit, passing when our statement equals true and failing when it equals false. Again, we’ll cover assertions in more details shortly.

3.2. Blocks

Sometimes when writing JUnit a test, we might notice there isn’t an expressive way of breaking it up into parts. For example, if we were following behavior driven development, we might end up denoting the given when then parts using comments:

@Test
public void givenTwoAndTwo_whenAdding_thenResultIsFour() {
   // Given
   int first = 2;
   int second = 4;

   // When
   int result = 2 + 2;

   // Then
   assertTrue(result == 4)
}

Spock addresses this problem with blocks. Blocks are a Spock native way of breaking up the phases of our test using labels. They give us labels for given when then and more:

  1. Setup (Aliased by Given) – Here we perform any setup needed before a test is run. This is an implicit block, with code not in any block at all becoming part of it
  2. When – This is where we provide a stimulus to what is under test. In other words, where we invoke our method under test
  3. Then – This is where the assertions belong. In Spock, these are evaluated as plain boolean assertions, which will be covered later
  4. Expect – This is a way of performing our stimulus and assertion within the same block. Depending on what we find more expressive, we may or may not choose to use this block
  5. Cleanup – Here we tear down any test dependency resources which would otherwise be left behind. For example, we might want to remove any files from the file system or remove test data written to a database

Let’s try implementing our test again, this time making full use of blocks:

def "two plus two should equal four"() {
    given:
        int left = 2
        int right = 2

    when:
        int result = left + right

    then:
        result == 4
}

As we can see, blocks help our test become more readable.

3.3. Leveraging Groovy Features for Assertions

Within the then and expect blocks, assertions are implicit.

Mostly, every statement is evaluated and then fails if it is not true. When coupling this with various Groovy features, it does a good job of removing the need for an assertion library. Let’s try a list assertion to demonstrate this:

def "Should be able to remove from list"() {
    given:
        def list = [1, 2, 3, 4]

    when:
        list.remove(0)

    then:
        list == [2, 3, 4]
}

While we’re only touching briefly on Groovy in this article, it’s worth explaining what is happening here.

First, Groovy gives us simpler ways of creating lists. We can just able to declare our elements with square brackets, and internally a list will be instantiated.

Secondly, as Groovy is dynamic, we can use def which just means we aren’t declaring a type for our variables.

Finally, in the context of simplifying our test, the most useful feature demonstrated is operator overloading. This means that internally, rather than making a reference comparison like in Java, the equals() method will be invoked to compare the two lists.

It’s also worth demonstrating what happens when our test fails. Let’s make it break and then view what’s output to the console:

Condition not satisfied:

list == [1, 3, 4]
|    |
|    false
[2, 3, 4]
 <Click to see difference>

at FirstSpecification.Should be able to remove from list(FirstSpecification.groovy:30)

While all that’s going on is calling equals() on two lists, Spock is intelligent enough to perform a breakdown of the failing assertion, giving us useful information for debugging.

3.4. Asserting Exceptions

Spock also provides us with an expressive way of checking for exceptions. In JUnit, some our options might be using a try-catch block, declare expected at the top of our test, or making use of a third party library. Spock’s native assertions come with a way of dealing with exceptions out of the box:

def "Should get an index out of bounds when removing a non-existent item"() {
    given:
        def list = [1, 2, 3, 4]
 
    when:
        list.remove(20)

    then:
        thrown(IndexOutOfBoundsException)
        list.size() == 4
}

Here, we’ve not had to introduce an additional library. Another advantage is that the thrown() method will assert the type of the exception, but not halt execution of the test.

4. Data Driven Testing

4.1. What is a Data Driven Testing?

Essentially, data driven testing is when we test the same behaviour multiple times with different parameters and assertions. A classic example of this would be testing a mathematical operation such as squaring a number. Depending on the various permutations of operands, the result will be different. In Java, the term we may be more familiar with is parameterized testing.

4.2. Implementing a Parameterized Test in Java

For some context, it’s worth implementing a parameterized test using JUnit:

@RunWith(Parameterized.class)
public class FibonacciTest {
    @Parameters
    public static Collection<Object[]> data() {
        return Arrays.asList(new Object[][] {     
          { 1, 1 }, { 2, 4 }, { 3, 9 }  
        });
    }

    private int input;

    private int expected;

    public ToThePowerOfTwo(int input, int expected) {
        this.input = input;
        this.expected = expected;
    }

    @Test
    public void test() {
        assertEquals(fExpected, Math.pow(3, 2));
    }
}

As we can see there’s quite a lot of verbosity, and the code isn’t very readable. We’ve had to create a two dimensional object array that lives outside of the test, and even a wrapper object for injecting the various test values.

4.3. Using Datatables in Spock

One easy win for Spock when compared to JUnit is how it cleanly it implements parameterized tests. Again, in Spock this is known as Data Driven Testing. Now, let’s implement the same test again, only this time we’ll use Spock with Data Tables, which provides a far more convenient way of performing a parameterized test:

def "numbers to the power of two"(int a, int b, int c) {
  expect:
      Math.pow(a, b) == c

  where:
      a | b | c
      1 | 2 | 1
      2 | 2 | 4
      3 | 2 | 9
  }

As we can see, we just have a straightforward and expressive Data table containing all our parameters.

Also, it belongs where it should do, alongside the test, and there is no boilerplate. The test is expressive, with a human readable name, and pure expect and where block to break up the logical sections.

4.4. When a Datatable Fails

It’s also worth seeing what happens when our test fails:

Condition not satisfied:

Math.pow(a, b) == c
     |   |  |  |  |
     4.0 2  2  |  1
               false

Expected :1

Actual   :4.0

Again, Spock gives us a very informative error message. We can see exactly what row of our Datatable caused a failure and why.

5. Mocking

5.1. What is Mocking?

Mocking is a way of changing the behaviour of a class which our service under test collaborates with. It’s a helpful way of being able to test business logic in isolation of it’s dependencies.

A classic example of this would be replacing a class which makes a network call with something which simply pretends to. For a more in-depth explanation, it’s worth reading this article.

5.2. Mocking using Spock

Spock has it’s own mocking framework, making use of interesting concepts brought to the JVM by Groovy. First, let’s instantiate a Mock:

PaymentGateway paymentGateway = Mock()

In this case, the type of our mock is inferred by the variable type. As Groovy is a dynamic language, we can also provide a type argument, allow us to not have to assign our mock to any particular type:

def paymentGateway = Mock(PaymentGateway)

Now, whenever we call a method on our PaymentGateway mocka default response will be given, without a real instance being invoked:

when:
    def result = paymentGateway.makePayment(12.99)

then:
    result == false

The term for this is lenient mocking. This means that mock methods which have not been defined will return sensible defaults, as opposed to throwing an exception. This is by design in Spock, in order to make mocks and thus tests less brittle.

5.3. Stubbing Method calls on Mocks

We can also configure methods called on our mock to respond in a certain way to different arguments. Let’s try getting our PaymentGateway mock to return true when we make a payment of 20:

given:
    paymentGateway.makePayment(20) >> true

when:
    def result = paymentGateway.makePayment(20)

then:
    result == true

What’s interesting here, is how Spock makes use of Groovy’s operator overloading in order to stub method calls. With Java, we have to call real methods, which arguably means that the resulting code is more verbose and potentially less expressive.

Now, let’s try a few more types of stubbing.

If we stopped caring about our method argument and always wanted to return true, we could just use an underscore:

paymentGateway.makePayment(_) >> true

If we wanted to alternate between different responses, we could provide a list, for which each element will be returned in sequence:

paymentGateway.makePayment(_) >>> [true, true, false, true]

There are more possibilities, and these may be covered in a more advanced future article on mocking.

5.4. Verification

Another thing we might want to do with mocks is assert that various methods were called on them with expected parameters. In other words, we ought to verify interactions with our mocks.

A typical use case for verification would be if a method on our mock had a void return type. In this case, by there being no result for us to operate on, there’s no inferred behavior for us to test via the method under test. Generally, if something was returned, then the method under test could operate on it, and it’s the result of that operation would be what we assert.

Let’s try verifying that a method with a void return type is called:

def "Should verify notify was called"() {
    given:
        def notifier = Mock(Notifier)

    when:
        notifier.notify('foo')

    then:
        1 * notifier.notify('foo')
}

Spock is leveraging Groovy operator overloading again. By multiplying our mocks method call by one, we are saying how many times we expect it to have been called.

If our method had not been called at all or alternatively had not been called as many times as we specified, then our test would have failed to give us an informative Spock error message. Let’s prove this by expecting it to have been called twice:

2 * notifier.notify('foo')

Following this, let’s see what the error message looks like. We’ll that as usual; it’s quite informative:

Too few invocations for:

2 * notifier.notify('foo')   (1 invocation)

Just like stubbing, we can also perform looser verification matching. If we didn’t care what our method parameter was, we could use an underscore:

2 * notifier.notify(_)

Or if we wanted to make sure it wasn’t called with a particular argument, we could use the not operator:

2 * notifier.notify(!'foo')

Again, there are more possibilities, which may be covered in a future more advanced article.

6. Conclusion

In this article, we’ve given a quick slice through testing with Spock.

We’ve demonstrated how, by leveraging Groovy, we can make our tests more expressive than the typical JUnit stack. We’ve explained the structure of specifications and features.

And we’ve shown how easy it is to perform data-driven testing, and also how mocking and assertions are easy via native Spock functionality.

The implementation of these examples can be found over on GitHub. This is a Maven-based project, so should be easy to run as is.

Introduction to Project Jigsaw

$
0
0

1. Introduction

Project Jigsaw is an umbrella project with the new features aimed at two aspects:

  • the introduction of module system in the Java language
  • and its implementation in JDK source and Java runtime

In this article, we’ll introduce you to the Jigsaw project and its features and finally wrap it up with a simple modular application.

2. Modularity

Simply put, modularity is a design principle that helps us to achieve:

  • loose coupling between components
  • clear contracts and dependencies between components
  • hidden implementation using strong encapsulation

2.1. Unit of Modularity

Now comes the question as to what is the unit of modularity? In the Java world, especially with OSGi, JARs were considered as the unit of modularity.

JARs did help in grouping the related components together, but they do have some limitations:

  • explicit contracts and dependencies between JARs
  • weak encapsulation of elements within the JARs

2.2. JAR Hell

There was another problem with JARs – the JAR hell. Multiple versions of the JARs lying on the classpath, resulted in the ClassLoader loading the first found class from the JAR, with very unexpected results.

The other issue with the JVM using classpath was that the compilation of the application would be successful, but the application will fail at runtime with the ClassNotFoundException, due to the missing JARs on the classpath at runtime.

2.3. New Unit of Modularity

With all these limitations, when using JAR as the unit of modularity, the Java language creators came up with a new construct in the language called modules. And with this, there is a whole new modular system planned for Java.

3. Project Jigsaw

The primary motivations for this project are:

  • create a module system for the language – implemented under JEP 261
  • apply it to the JDK source – implemented under JEP 201
  • modularize the JDK libraries – implemented under JEP 200
  • update the runtime to support modularity – implemented under JEP 220
  • be able to create smaller runtime with a subset of modules from JDK – implemented under JEP 282

Another important initiative is to encapsulate the internal APIs in the JDK, those who are under the sun.* packages and other non-standard APIs. These APIs were never meant to be used by public and were never planned to be maintained. But the power of these APIs made the Java developers leverage them in the development of different libraries, frameworks, and tools. There have been replacements provided for few internal APIs and the others have been moved into internal modules.

4. New Tools for Modularity

  • jdeps – helps in analyzing the code base to identify the dependencies on JDK APIs and the third party JARs. It also mentions the name of the module where the JDK API can be found. This makes it easier in modularizing the code base
  • jdeprscan – helps in analyzing the code base for usage of any deprecated APIs
  • jlink – helps in creating a smaller runtime by combining the application’s and the JDK’s modules
  • jmod – helps in working with jmod files. jmod is a new format for packaging the modules. This format allows including native code, configuration files, and other data that do not fit into JAR files

5. Module System Architecture

The module system, implemented in the language, supports these as a top level construct, just like packages. Developers can organize their code into modules and declare dependencies between them in their respective module definition files.

A module definition file, named as module-info.java, contains:

  • its name
  • the packages it makes available publicly
  • the modules it depends on
  • any services it consumes
  • any implementation for the service it provides

The last two items in the above list are not commonly used. They are used only when services are being provided and consumed via the java.util.ServiceLoader interface.

A general structure of the module looks like:

src
 |----com.baeldung.reader
 |     |----module-info.java
 |     |----com
 |          |----baeldung
 |               |----reader
 |                    |----Test.java
 |----com.baeldung.writer
      |----module-info.java
           |----com
                |----baeldung
                     |----writer
                          |----AnotherTest.java

The above illustration defines two modules: com.baeldung.reader and com.baeldung.writer. Each of them has its definition specified in module-info.java and the code files placed under com/baeldung/reader and com/baeldung/writer, respectively.

5.1. Module Definition Terminologies

Let us look at some of the terminologies; we will use while defining the module (i.e., within the module-info.java):

  • module: the module definition file starts with this keyword followed by its name and definition
  • requires: is used to indicate the modules it depends on; a module name has to be specified after this keyword
  • transitive: is specified after the requires keyword; this means that any module that depends on the module defining requires transitive <modulename> gets an implicit dependence on the <modulename>
  • exports: is used to indicate the packages within the module available publicly; a package name has to be specified after this keyword
  • opens: is used to indicate the packages that are accessible only at runtime and also available for introspection via Reflection APIs; this is quite significant to libraries like Spring and Hibernate, highly rely on Reflection APIs; opens can also be used at the module level in which case the entire module is accessible at runtime
  • uses: is used to indicate the service interface that this module is using; a type name, i.e., complete class/interface name, has to specified after this keyword
  • provides … with ...: they are used to indicate that it provides implementations, identified after the with keyword, for the service interface identified after the provides keyword

6. Simple Modular Application

Let us create a simple modular application with modules and their dependencies as indicated in the diagram below:

The com.baeldung.student.model is the root module. It defines model class com.baeldung.student.model.Student, which contains the following properties:

public class Student {
    private String registrationId;
    //other relevant fields, getters and setters
}

It provides other modules with types defined in the com.baeldung.student.model package. This is achieved by defining it in the file module-info.java:

module com.baeldung.student.model {
    exports com.baeldung.student.model;
}

The com.baeldung.student.service module provides an interface com.baeldung.student.service.StudentService with abstract CRUD operations:

public interface StudentService {
    public String create(Student student);
    public Student read(String registrationId);
    public Student update(Student student);
    public String delete(String registrationId);
}

It depends on the com.baeldung.student.model module and makes the types defined in the package com.baeldung.student.service available for other modules:

module com.baeldung.student.service {
    requires transitive com.baeldung.student.model;
    exports com.baeldung.student.service;
}

We provide another module com.baeldung.student.service.dbimpl, which provides the implementation com.baeldung.student.service.dbimpl.StudentDbService for the above module:

public class StudentDbService implements StudentService {

    public String create(Student student) {
        // Creating student in DB
        return student.getRegistrationId();
    }

    public Student read(String registrationId) {
        // Reading student from DB
        return new Student();
    }

    public Student update(Student student) {
        // Updating sutdent in DB
        return student;
    }

    public String delete(String registrationId) {
        // Deleting sutdent in DB
        return registrationId;
    }
}

It depends directly on com.baeldung.student.service and transitively on com.baeldung.student.model and its definition will be:

module com.baeldung.student.service.dbimpl {
    requires transitive com.baeldung.student.service;
    requires java.logging;
    exports com.baeldung.student.service.dbimpl;
}

The final module is a client module – which leverages the service implementation module com.baeldung.student.service.dbimpl to perform its operations:

public class StudentClient {

    public static void main(String[] args) {
        StudentService service = new StudentDbService();
        service.create(new Student());
        service.read("17SS0001");
        service.update(new Student());
        service.delete("17SS0001");
    }
}

And its definition is:

module com.baeldung.student.client {
    requires com.baeldung.student.service.dbimpl;
}

7. Compiling and Running the Sample

We have provided scripts for compiling and running the above modules for the Windows and the Unix platforms. These can be found under the core-java-9 project here. The order of execution for Windows platform is:

  1. compile-student-model
  2. compile-student-service
  3. compile-student-service-dbimpl
  4. compile-student-client
  5. run-student-client

The order of execution for Linux platform is quite simple:

  1. compile-modules
  2. run-student-client

In the scripts above, you will be introduced to the following two command line arguments:

  • –module-source-path
  • –module-path

Java 9 is doing away with the concept of classpath and instead introduces module path. This path is the location where the modules can be discovered.

We can set this by using the command line argument: –module-path.

To compile multiple modules at once, we make use of the –module-source-path. This argument is used to provide the location for the module source code.

8. Module System Applied to JDK Source

Every JDK installation is supplied with a src.zip. This archive contains the code base for the JDK Java APIs. If you extract the archive, you will find multiple folders, few starting with java, few with javafx and the rest with jdk. Each folder represents a module.

The modules starting with java are the JDK modules, those starting with javafx are the JavaFX modules and others starting with jdk are the JDK tools modules.

All JDK modules and all the user defined modules implicitly depend on the java.base module. The java.base module contains commonly used JDK APIs like Utils, Collections, IO, Concurrency among others. The dependency graph of the JDK modules is:

You can also look at the definitions of the JDK modules to get an idea of the syntax for defining them in the module-info.java.

9. Conclusion

In this article, we looked at creating, compiling and running a simple modular application. We also saw how the JDK source code had been modularized.

There are few more exciting features, like creating smaller runtime using the linker tool – jlink and creating modular jars among other features. We will introduce you to those features in details in future articles.

Project Jigsaw is a huge change, and we will have to wait and watch how it gets accepted by the developer ecosystem, in particular with the tools and library creators.

The code used in this article can be found over on GitHub.

Jackson Streaming API

$
0
0

1. Overview

In this article, we will be looking at the Jackson Streaming API. It supports both reading and writing, and by using it, we can write high-performance and fast JSON parsers.

On the flip-side, it is a bit difficult to use – every detail of JSON data needs to be handled explicitly in code.

2. Maven Dependency

Firstly, we need to add a Maven dependency to the jackson-core:

<dependency>
    <groupId>com.fasterxml.jackson.core</groupId>
    <artifactId>jackson-core</artifactId>
    <version>${jackson.version}</version>
</dependency>

<properties>
    <jackson.version>2.8.7</jackson.version>
<properties>

3. Writing to JSON

We can write JSON content directly to the OutputStream by using a JsonGenerator class. Firstly, we need to create the instance of that object:

ByteArrayOutputStream stream = new ByteArrayOutputStream();
JsonFactory jfactory = new JsonFactory();
JsonGenerator jGenerator = jfactory
  .createGenerator(stream, JsonEncoding.UTF8);

Next, let’s say that we want to write a JSON with the following structure:

{  
   "name":"Tom",
   "age":25,
   "address":[  
      "Poland",
      "5th avenue"
   ]
}

We can use an instance of the JsonGenerator to write specific fields directly to the OutputStream:

jGenerator.writeStartObject();
jGenerator.writeStringField("name", "Tom");
jGenerator.writeNumberField("age", 25);
jGenerator.writeFieldName("address");
jGenerator.writeStartArray();
jGenerator.writeString("Poland");
jGenerator.writeString("5th avenue");
jGenerator.writeEndArray();
jGenerator.writeEndObject();
jGenerator.close();

To check if proper JSON was created, we can create a String object with JSON object in it:

String json = new String(stream.toByteArray(), "UTF-8");
assertEquals(
  json, 
  "{\"name\":\"Tom\",\"age\":25,\"address\":[\"Poland\",\"5th avenue\"]}");

4. Parsing JSON

When we get a JSON String as an input, and we want to extract specific fields from it, a JsonParser class can be used:

String json
  = "{\"name\":\"Tom\",\"age\":25,\"address\":[\"Poland\",\"5th avenue\"]}";
JsonFactory jfactory = new JsonFactory();
JsonParser jParser = jfactory.createParser(json);

String parsedName = null;
Integer parsedAge = null;
List<String> addresses = new LinkedList<>();

We want to obtain parsedName, parsedAge, and addresses fields from input JSON. To achieve this, we need to handle low-level parsing logic and implement it ourselves:

while (jParser.nextToken() != JsonToken.END_OBJECT) {
    String fieldname = jParser.getCurrentName();
    if ("name".equals(fieldname)) {
        jParser.nextToken();
        parsedName = jParser.getText();
    }

    if ("age".equals(fieldname)) {
        jParser.nextToken();
        parsedAge = jParser.getIntValue();
    }

    if ("address".equals(fieldname)) {
        jParser.nextToken();
        while (jParser.nextToken() != JsonToken.END_ARRAY) {
            addresses.add(jParser.getText());
        }
    }
}
jParser.close();

Depending on the field name, we are extracting it and assigning to a proper field. After parsing the document, all fields should have correct data:

assertEquals(parsedName, "Tom");
assertEquals(parsedAge, (Integer) 25);
assertEquals(addresses, Arrays.asList("Poland", "5th avenue"));

5. Extracting JSON Parts

Sometimes, when we’re parsing a JSON document, we are interested in only one particular field.

Ideally, in these situations, we want to only parse the beginning of the document, and once the needed field is found, we can abort processing.

Let’s say that we are interested only in the age field of the input JSON. In this case, we can implement parsing logic to stop parsing once needed field is found:

while (jParser.nextToken() != JsonToken.END_OBJECT) {
    String fieldname = jParser.getCurrentName();

    if ("age".equals(fieldname)) {
        jParser.nextToken();
        parsedAge = jParser.getIntValue();
        return;
    }

}
jParser.close();

After processing, the only parsedAge field will have a value:

assertNull(parsedName);
assertEquals(parsedAge, (Integer) 25);
assertTrue(addresses.isEmpty());

Thanks to that, parsing of the JSON document will be a lot faster because we do not need to read the whole document but only small part of it.

6. Conclusion

In this quick article, we’re looking at how we can leverage the Stream Processing API out of Jackson.

The implementation of all these examples and code snippets can be found over on GitHub – this is a Maven project, so it should be easy to import and run as it is.

Returning an Image or a File with Spring

$
0
0

1. Overview

Serving static files to the client can be done in a variety of ways, and using a Spring Controller isn’t necessarily the best available option.

However, sometimes the controller route is necessary – and that’s what we’re going to be focused on in this quick article.

2. Using @ResponseBody

The first straightforward solution is to use the @ResponseBody annotation on a controller method to indicate that the object returned by the method should be marshalled directly to the HTTP  response body:

@GetMapping("/get-text")
public @ResponseBody String getText() {
    return "Hello world";
}

Thus, this method will just return the string Hello world instead of returning a view whose name is Hello world, like a more typical MVC application.

With @ResponseBody we can return pretty much any media type, as long as we have a corresponding HTTP Message converter that can handle and marshall that to the output stream.

3. Using produces for Returning Images

Returning byte arrays allows us to return almost anything – such as images or files:

@GetMapping(value = "/image")
public @ResponseBody byte[] getImage() throws IOException {
    InputStream in = getClass()
      .getResourceAsStream("/com/baeldung/produceimage/image.jpg");
    return IOUtils.toByteArray(in);
}

Here, we’re not defining that the returned byte array is an image. Therefore, the client won’t be able to handle this as an image – and more than likely the browser will simply e display the actual bytes of the image.

To define that the returned byte array corresponds to an image, we can set the produces attribute of the @GetMapping annotation to precise the MIME type of the returned object:

@GetMapping(
  value = "/get-image-with-media-type",
  produces = MediaType.IMAGE_JPEG_VALUE
)
public @ResponseBody byte[] getImageWithMediaType() throws IOException {
    InputStream in = getClass()
      .getResourceAsStream("/com/baeldung/produceimage/image.jpg");
    return IOUtils.toByteArray(in);
}

Here produces is set to MediaType.IMAGE_JPEG_VALUE to indicate that the returned object must be handled as a JPEG image.

And now, the browser is going to recognize and properly display the response body as an image.

4. Using produces for Returning Raw Data

The parameter produces can be set to a lot of different values (the complete list can be found here) depending on the type of object we want to return.

Therefore, if we want to return a raw file, we can simply use APPLICATION_OCTET_STREAM_VALUE:

@GetMapping(
  value = "/get-file",
  produces = MediaType.APPLICATION_OCTET_STREAM_VALUE
)
public @ResponseBody byte[] getFile() throws IOException {
    InputStream in = getClass()
      .getResourceAsStream("/com/baeldung/produceimage/data.txt");
    return IOUtils.toByteArray(in);
}

5. Conclusion

In this quick article, we had a look at a simple problem – returning images or files from a Spring Controller.

And, as always, the example code can be found over on Github.


Intro to JHipster

$
0
0

1. Introduction

This article will give you a quick overview of JHipster, show you how to create a simple monolithic application and custom entities using command line tools.

We will also examine the generated code during every step, and also cover the build commands and automated tests.

2. What is JHipster

JHipster is, in a nutshell, a high-level code generator built upon an extensive list of cutting-edge development tools and platforms.

The main components of the tool are:

JHipster creates, with just a few shell commands, a full-fledged Java web project with a friendly, responsive front-end, documented REST API, comprehensive test coverage, basic security and database integration! The resulting code is well commented and follows industries best practices.

Other key technologies leveraged by it are:

We are not required to use all those items on our generated application. The optional items are selected during project creation.

3. Installation

To install JHipster, we’ll first need to install all of its dependencies:

That’s enough dependencies if you decide to use AngularJS 2. However, if you prefer to go with AngularJS 1 instead, you would also need to install Bower and Gulp.

Now, to finish up, we just need to install JHipster itself. That is the easiest part. Since JHipster is a Yeoman generator, which in turn is a Javascript package, installing is as simple as running a simple shell command:

yarn global add generator-jhipster

That’s it! We’ve used Yarn package manager to install the JHipster generator.

4. Creating a Project

To create a JHipster project essentially is to build a Yeoman project. Everything starts with the yo command:

mkdir baeldung-app && cd baeldung-app
yo jhipster

This will create our project folder, named baeldung-app, and start up Yeoman’s command line interface that will walk us through creating the project.

The process involves 15 steps. I encourage you to explore the available options on each step. In the scope of this article, we’ll create a simple, Monolithic application, without deviating too much from the default options.

Here are the steps that are most relevant to this article:

  • Type of application – Choose Monolithic application (recommended for simple projects)
  • Installation of other generators from the JHipster Marketplace – Type N. In this step we could want to install cool add-ons. Some popular ones are entity-audit that enables data tracing; bootstrap-material-design, that uses the trendy Material Design components, and angular-datatables
  • Maven or Gradle – Choose Maven
  • Other technologies – Do not select any options, just press Enter to move to the next step. Here we can choose to plug in Social login with Google, Facebook, and Twitter, which is a very nice feature.
  • Client framework – Choose [BETA] Angular 2.x. We could also go with AngularJS 1
  • Enable internationalization – Type Y, then choose English as the native language. We can choose as many languages as we want as the second language
  • Test frameworks – Select Gatling and Protractor

JHipster will create the project files and will then start to install the dependencies. The following message  will be shown in the output:

I'm all done. Running npm install for you to install the required 
   dependencies. If this fails, try running the command yourself.

The dependencies installation can take a little while. Once it finishes it will display:

Server application generated successfully.

Run your Spring Boot application:
 ./mvnw

Client application generated successfully.

Start your Webpack development server with:
npm start

Our project is now created. We can run the main commands on our project root folder:

./mvnw #starts Spring Boot, on port 8080
./mvnw clean test #runs the application's tests
yarn test #runs the client tests

JHipster generates a README file, placed right in the root folder of our project. That file contains instructions to run many other useful commands related to our project.

5. Overview of Generated Code

Take a look at the files automatically generated. You’ll notice that the project looks quite a bit like a standard Java/Spring project, but with a lot of extras.

Since JHipster takes care of creating the front-end code as well, you’ll find a package.json file, a webpack folder, and some other web related stuff.

Let’s quickly explore some of the critical files.

5.1. Back-end Files

  • As expected, the Java code is contained in the src/main/java folder
  • The src/main/resources folder has some of the static content used by the Java code. Here we’ll find the internationalization files (in the i18n folder), email templates and some configuration files
  • Unit and integration tests are located in the src/test/java folder
  • Performance (Gatling) tests are in src/test/gatling. However, at this point, there won’t be much content in this folder. Once we have created some entities, the performance tests for those objects will be located here

5.2. Front-end

  • The root front end folder is src/main/webapp
  • The app folder contains much of the AngularJS modules
  • i18n contains the internationalization files for the front end part
  • Unit tests (Karma) are in the src/test/javascript/spec folder
  • End-to-end tests (Protractor)  are in the src/test/javascript/e2e folder

6. Creating Custom Entities

Entities are the building blocks of our JHipster application. They represent the business objects, like a User, a Task, a Post, a Comment, etc.

Creating entities with JHipster it’s a painless process. We can create an object using command line tools, similarly to how we’ve created the project itself, or via JDL-Studio, an online tool that generates a JSON representation of the entities that can later be imported into our project.

In this article, let’s use the command line tools to create two entities: Post and Comment.

A Post should have a title, a text content and a creation date. It should also be related to a user, who is the creator of the Post. A User can have many Posts associated with them.

A Post can also have zero or many Comments. Each Comment has a text and creation date.

To fire up the creation process of our Post entity, go to the root folder of our project and type:

yo jhipster:entity post

Now follow the steps presented by the interface.

  • Add a field named title of type String and add some validation rules to the field (Required, Minimum length and Maximum length)
  • Add another a field called content of type String and make it also Required
  • Add a third field named creationDate, of type LocalDate
  • Now let’s add the relationship with User. Notice that the entity User already exists. It’s created during the conception of the project. The name of the other entity is user, the relationship name is creator, and the type is many-to-one, the display field is name, and it’s better to make the relationship required
  • Do not choose to use a DTO, go with Direct entity instead
  • Choose to inject the repository directly into the service classNotice that, in a real world application, it would probably be more reasonable to separate the REST controller from the service class
  • To finish up, select infinite scroll as the pagination type
  • Give JHipster permission to overwrite existent files if required

Repeat the process above to create an entity named comment, with two fields, text, of type String, and creationDate of type LocalDate. Comment should also have a required many-to-one relationship with Post.

That’s it! There are many steps to the process, but you’ll  see that it doesn’t take that much time to complete them.

You will notice that JHipster creates a bunch of new files, and modifies a few others, as part of the process of creating the entities:

  • A .jhipster folder is created, containing a JSON file for each object. Those files describe the structure of the entities
  • The actual @Entity annotated classes are in the domain package
  • Repositories are created in the repository package
  • REST controllers go in the web.rest package
  • Liquibase changelogs for each table creation are in the resources/config/liquibase/changelog folder
  • In the front-end part, a folder for each entity is created in the entities directory
  • Internationalization files are set up in the i18n folder (feel free to modify those if you want to)
  • Several tests, front-end, and back-end are created in the src/test folder

That’s quite a lot of code!

Feel free to run the tests and double check that all are passing. Now we can also run performance tests with Gatling, using the command (the application has to be running for these tests to pass):

mvnw gatling:execute

If you want to check the front-end in action, start up the application with ./mvnw, navigate to http://localhost:8080 and log in as the admin user (password is admin).

Choose Post on the top menu, under the Entities menu item. You will be shown an empty list, that will later contain all posts. Click on the Create a new Post button to bring up the inclusion form:

Notice how careful JHipster is on the form components and validation messages. Off course we can modify the front end as much as we want, but the form is very well built as it is.

7. Continuous Integration Support

JHipster can automatically create configuration files for the most used Continuous Integration tools. Just run this command:

yo jhipster:ci-cd

And answer the questions. Here we can choose which CI tools we want to create config files for, whether we want to use Docker, Sonar and even deploy to Heroku as part of the build process.

The ci-cd command can create configuration files for the following CI tools:

  • Jenkins: the file is JenkinsFile
  • Travis CI: the file is .travis.yml
  • Circle CI: the file is circle.yml
  • GitLab: the file is .gitlab-ci.yml

8. Conclusion

This article gave a little bit of the taste of what JHipster is capable of. There of course a lot more to it than we can cover here, so definitely keep exploring the official JHipster website.

And as always, the code is available over on GitHub.

Intro to Apache Kafka with Spring

$
0
0

1. Overview

Apache Kafka is distributed and fault-tolerant stream processing system.

In this article, we’ll cover Spring support for Kafka and the level of abstractions it provides over native Kafka Java client APIs.

Spring Kafka brings the simple and typical Spring template programming model with a KafkaTemplate and Message-driven POJOs via @KafkaListener annotation.

2. Installation and Setup

To download and install Kafka, please refer to the official guide here. Once the Kafka server is running, let’s create a topic baeldung using the following command:

$ bin/kafka-topics.sh --create \
  --zookeeper localhost:2181 \
  --replication-factor 1 --partitions 1 \
  --topic baeldung

This article assumes that server is started using the default configuration and no server ports are changed.

3. Maven Dependency

At, first we need to add the spring-kafka dependency to our pom.xml:

<dependency>
    <groupId>org.springframework.kafka</groupId>
    <artifactId>spring-kafka</artifactId>
    <version>1.1.3.RELEASE</version>
</dependency>

The latest version of this artifact can be found here.

4. Producing Messages

To create messages, first, we need to configure a ProducerFactory which sets the strategy for creating Kafka Producer instances.

Then we need a KafkaTemplate which wraps a Producer instance and provides convenience methods for sending messages to Kafka topics.

Producer instances are thread-safe and hence using a single instance throughout an application context will give higher performance. Consequently, KakfaTemplate instances are also thread-safe and use of one instance is recommended.

4.1. Producer Configuration

@Configuration
public class KafkaProducerConfig {

    @Bean
    public ProducerFactory<String, String> producerFactory() {
        Map<String, Object> configProps = new HashMap<>();
        configProps.put(
          ProducerConfig.BOOTSTRAP_SERVERS_CONFIG, 
          bootstrapAddress);
        configProps.put(
          ProducerConfig.KEY_SERIALIZER_CLASS_CONFIG, 
          StringSerializer.class);
        configProps.put(
          ProducerConfig.VALUE_SERIALIZER_CLASS_CONFIG, 
          StringSerializer.class);
        return new DefaultKafkaProducerFactory<>(configProps);
    }

    @Bean
    public KafkaTemplate<String, String> kafkaTemplate() {
        return new KafkaTemplate<>(producerFactory());
    }
}

4.2. Publishing Messages

@Autowired
private KafkaTemplate<String, String> kafkaTemplate;

public void sendMessage(String msg) {
    kafkaTemplate.send(topicName, msg);
}

5. Consuming Messages

For consuming messages, we need to configure a ConsumerFactory and a KafkaListenerContainerFactory. Once these beans are available in spring bean factory, POJO based consumers can be configured using @KafkaListener annotation.

@EnableKafka annotation is required on the configuration class to enable detection of @KafkaListener annotation on spring managed beans.

5.1. Consumer Configuration

@EnableKafka
@Configuration
public class KafkaConsumerConfig {

    @Bean
    public ConsumerFactory<String, String> consumerFactory() {
        Map<String, Object> props = new HashMap<>();
        props.put(
          ConsumerConfig.BOOTSTRAP_SERVERS_CONFIG, 
          bootstrapAddress);
        props.put(
          ConsumerConfig.GROUP_ID_CONFIG, 
          groupId);
        props.put(
          ConsumerConfig.KEY_DESERIALIZER_CLASS_CONFIG, 
          StringDeserializer.class);
        props.put(
          ConsumerConfig.VALUE_DESERIALIZER_CLASS_CONFIG, 
          StringDeserializer.class);
        return new DefaultKafkaConsumerFactory<>(props);
    }

    @Bean
    public ConcurrentKafkaListenerContainerFactory<String, String> 
      kafkaListenerContainerFactory() {
   
        ConcurrentKafkaListenerContainerFactory<String, String> factory
          = new ConcurrentKafkaListenerContainerFactory<>();
        factory.setConsumerFactory(consumerFactory());
        return factory;
    }
}

5.2. Consuming Messages

@KafkaListener(topics = "topicName", group = "foo")
public void listen(String message) {
    System.out.println("Received Messasge in group foo: " + message);
}

Multiple listeners can be implemented for a topic, each with a different group Id. Furthermore, one consumer can listen for messages from various topics:

@KafkaListener(topics = "topic1, topic2", group = "foo")

Spring also supports retrieval of one or more message headers using the @Header annotation in the listener:

@KafkaListener(topics = "topicName")
public void listenWithHeaders(
  @Payload String message, 
  @Header(KafkaHeaders.RECEIVED_PARTITION_ID) int partition) {
      System.out.println(
        "Received Message: " + message"
        + "from partition: " + partition);
}

5.3. Consuming Messages from a Specific Partition

As you may have noticed, we had created the topic baeldung with only one partition. However, for a topic with multiple partitions, a @KafkaListener can explicitly subscribe to a particular partition of a topic with an initial offset:

@KafkaListener(
  topicPartitions = @TopicPartition(topic = "topicName",
  partitionOffsets = {
    @PartitionOffset(partition = "0", initialOffset = "0"), 
    @PartitionOffset(partition = "3", initialOffset = "0")
}))
public void listenToParition(
  @Payload String message, 
  @Header(KafkaHeaders.RECEIVED_PARTITION_ID) int partition) {
      System.out.println(
        "Received Messasge: " + message"
        + "from partition: " + partition);
}

Since the initialOffset has been sent to 0 in this listener, all the previously consumed messages from partitions 0 and three will be re-consumed every time this listener is initialized. If setting the offset is not required, we can use the partitions property of @TopicPartition annotation to set only the partitions without the offset:

@KafkaListener(topicPartitions 
  = @TopicPartition(topic = "topicName", partitions = { "0", "1" }))

5.4. Adding Message Filter for Listeners

Listeners can be configured to consume specific types of messages by adding a custom filter. This can be done by setting a RecordFilterStrategy to the KafkaListenerContainerFactory:

@Bean
public ConcurrentKafkaListenerContainerFactory<String, String>
  filterKafkaListenerContainerFactory() {

    ConcurrentKafkaListenerContainerFactory<String, String> factory
      = new ConcurrentKafkaListenerContainerFactory<>();
    factory.setConsumerFactory(consumerFactory());
    factory.setRecordFilterStrategy(
      record -> record.value().contains("World"));
    return factory;
}

A listener can then be configured to use this container factory:

@KafkaListener(
  topics = "topicName", 
  containerFactory = "filterKafkaListenerContainerFactory")
public void listen(String message) {
    // handle message
}

In this listener, all the messages matching the filter will be discarded.

6. Custom Message Converters

So far we have only covered sending and receiving Strings as messages. However, we can also send and receive custom Java objects. This requires configuring appropriate serializer in ProducerFactory and deserializer in ConsumerFactory.

Let’s look at a simple bean class, which we will send as messages:

public class Greeting {

    private String msg;
    private String name;

    // standard getters, setters and constructor
}

6.1. Producing Custom Messages

In this example, we will use JsonSerializer. Let’s look at the code for ProducerFactory and KafkaTemplate:

@Bean
public ProducerFactory<String, Greeting> greetingProducerFactory() {
    // ...
    configProps.put(
      ProducerConfig.VALUE_SERIALIZER_CLASS_CONFIG, 
      JsonSerializer.class);
    return new DefaultKafkaProducerFactory<>(configProps);
}

@Bean
public KafkaTemplate<String, Greeting> greetingKafkaTemplate() {
    return new KafkaTemplate<>(greetingProducerFactory());
}

This new KafkaTemplate can be used to send the Greeting message:

kafkaTemplate.send(topicName, new Greeting("Hello", "World"));

6.2. Consuming Custom Messages

Similarly, let’s modify the ConsumerFactory and KafkaListenerContainerFactory to deserialize the Greeting message correctly:

@Bean
public ConsumerFactory<String, Greeting> greetingConsumerFactory() {
    // ...
    return new DefaultKafkaConsumerFactory<>(
      props,
      new StringDeserializer(), 
      new JsonDeserializer<>(Greeting.class));
}

@Bean
public ConcurrentKafkaListenerContainerFactory<String, Greeting> 
  greetingKafkaListenerContainerFactory() {

    ConcurrentKafkaListenerContainerFactory<String, Greeting> factory
      = new ConcurrentKafkaListenerContainerFactory<>();
    factory.setConsumerFactory(greetingConsumerFactory());
    return factory;
}

The spring-kafka JSON serializer and deserializer uses the Jackson library which is also an optional maven dependency for the spring-kafka project. So let’s add it to our pom.xml:

<dependency>
    <groupId>com.fasterxml.jackson.core</groupId>
    <artifactId>jackson-databind</artifactId>
    <version>2.6.7</version>
</dependency>

Instead of using the latest version of Jackson, it’s recommended to use the version which is added to the pom.xml of spring-kafka.

Finally, we need to write a listener to consume Greeting messages:

@KafkaListener(
  topics = "topicName", 
  containerFactory = "greetingKafkaListenerContainerFactory")
public void greetingListener(Greeting greeting) {
    // process greeting message
}

7. Conclusion

In this article, we covered the basics of Spring support for Apache Kafka. We had a brief look at the classes which are used for sending and receiving messages.

Complete source code for this article can be found over on GitHub. Before executing the code, please make sure that Kafka server is running and the topics are created manually.

HTTP PUT vs HTTP PATCH in a REST API

$
0
0

1. Overview

In this quick article, we’re looking at differences between the HTTP PUT and PATCH verbs and at the semantics of the two operations.

We’ll use Spring to implement two REST endpoints that support these two types of operations, and to better understand the differences and the right way to use them.

2. When to use PUT and When PATCH?

Let’s start with a simple, and slightly simple statement.

When a client needs to replace an existing Resource entirely, they can use PUT. When they’re doing a partial update, they can use HTTP PATCH.

For instance, when updating a single field of the Resource, sending the complete Resource representation might be cumbersome and utilizes a lot of unnecessary bandwidth. In such cases, the semantics of PATCH make a lot more sense.

Another important aspect to consider here is idempotence; PUT is idempotent; PATCH can be, but isn’t required to. And, so – depending on the semantics of the operation we’re implementing, we can also choose one or the other based on this characteristic.

3. Implementing PUT and PATCH Logic

Let’s say we want to implement the REST API for updating a HeavyResource with multiple fields:

public class HeavyResource {
    private Integer id;
    private String name;
    private String address;
    // ...

First, we need to create the endpoint that handles a full update of the resource using PUT:

@PutMapping("/heavyresource/{id}")
public ResponseEntity<?> saveResource(@RequestBody HeavyResource heavyResource,
  @PathVariable("id") String id) {
    heavyResourceRepository.save(heavyResource, id);
    return ResponseEntity.ok("resource saved");
}

This is a standard endpoint for updating resources.

Now, let’s say that address field will often be updated by the client. In that case, we don’t want to send the whole HeavyResource object with all fields, but we do want the ability to only update the address field – via the PATCH method.

We can create a HeavyResourceAddressOnly DTO to represent a partial update of the address field:

public class HeavyResourceAddressOnly {
    private Integer id;
    private String address;
    
    // ...
}

Next, we can leverage the PATCH method to send a partial update:

@PatchMapping("/heavyresource/{id}")
public ResponseEntity<?> partialUpdateName(
  @RequestBody HeavyResourceAddressOnly partialUpdate, @PathVariable("id") String id) {
    
    heavyResourceRepository.save(partialUpdate, id);
    return ResponseEntity.ok("resource address updated");
}

With this more granular DTO, we can send the field we need to update only – without the overhead of sending whole HeavyResource.

If we have a large number of these partial update operations, we can also skip the creation of a custom DTO for each out – and only use a map:

@RequestMapping(value = "/heavyresource/{id}", method = RequestMethod.PATCH, consumes = MediaType.APPLICATION_JSON_VALUE)
public ResponseEntity<?> partialUpdateGeneric(
  @RequestBody Map<String, Object> updates,
  @PathVariable("id") String id) {
    
    heavyResourceRepository.save(updates, id);
    return ResponseEntity.ok("resource updated");
}

This solution will give us more flexibility in implementing API; however, we do lose a few things as well – such as validation.

4. Testing PUT and PATCH

Finally, let’s write tests for both HTTP methods. First, we want to test the update of the full resource via PUT method:

mockMvc.perform(put("/heavyresource/1")
  .contentType(MediaType.APPLICATION_JSON_VALUE)
  .content(objectMapper.writeValueAsString(
    new HeavyResource(1, "Tom", "Jackson", 12, "heaven street")))
  ).andExpect(status().isOk());

Execution of a partial update is achieved by using the PATCH method:

mockMvc.perform(patch("/heavyrecource/1")
  .contentType(MediaType.APPLICATION_JSON_VALUE)
  .content(objectMapper.writeValueAsString(
    new HeavyResourceAddressOnly(1, "5th avenue")))
  ).andExpect(status().isOk());

We can also write a test for a more generic approach:

HashMap<String, Object> updates = new HashMap<>();
updates.put("address", "5th avenue");

mockMvc.perform(patch("/heavyresource/1")
    .contentType(MediaType.APPLICATION_JSON_VALUE)
    .content(objectMapper.writeValueAsString(updates))
  ).andExpect(status().isOk());

5. Handling Partial Requests With Null Values

When we are writing an implementation for a PATCH method, we need to specify a contract of how to treat cases when we get null as a value for the address field in the HeavyResourceAddressOnly. 

Suppose that client sends the following request:

{
   "id" : 1,
   "address" : null
}

Then we can handle this as setting a value of the address field to null or just ignoring such request by treating it as no-change.

We should pick one strategy for handling null and stick to it in every PATCH method implementation.

6. Conclusion

In this quick tutorial, we focused on understanding the differences between the HTTP PATCH and PUT methods.

We implemented a simple Spring REST controller to update a Resource via PUT method and a partial update using PATCH.

The implementation of all these examples and code snippets can be found in the GitHub project – this is a Maven project, so it should be easy to import and run as it is.

Full-text Search with Solr

$
0
0

1. Overview

In this article, we’ll explore a fundamental concept in the Apache Solr search engine – full-text search.

The Apache Solr is an open source framework, designed to deal with millions of documents. We’ll go through the core capabilities of it with examples using Java library – SolrJ.

2. Maven Configuration

Given the fact that Solr is open source – we can simply download the binary and start the server separately from our application.

To communicate with the server, we’ll define the Maven dependency for the SolrJ client:

<dependency>
    <groupId>org.apache.solr</groupId>
    <artifactId>solr-solrj</artifactId>
    <version>6.4.2</version>
</dependency>

You can find the latest dependency here.

3. Indexing Data

To index and search data, we need to create a core; we’ll create one named item to index our data.

Before we do that, we need data to be indexed on the server, so that it becomes searchable.

There are many different ways we can index data. We can use data import handlers to import data directly from relational databases, upload data with Solr Cell using Apache Tika or upload XML/XSLT, JSON and CSV data using index handlers.

3.1. Indexing Solr Document

We can index data into a core by creating SolrInputDocument. First, we need to populate the document with our data and then only call the SolrJ’s API to index the document:

SolrInputDocument doc = new SolrInputDocument();
doc.addField("id", id);
doc.addField("description", description);
doc.addField("category", category);
doc.addField("price", price);
solrClient.add(doc);
solrClient.commit();

Note that id should naturally be unique for different items. Having an id of an already indexed document will update that document.

3.2. Indexing Beans

SolrJ provides APIs for indexing Java beans. To index a bean, we need to annotate it with the @Field annotations:

public class Item {

    @Field
    private String id;

    @Field
    private String description;

    @Field
    private String category;

    @Field
    private float price;
}

Once we have the bean, indexing is straight forward:

solrClient.addBean(item); 
solrClient.commit();

4. Solr Queries

Searching is the most powerful capability of Solr. Once we have the documents indexed in our repository, we can search for keywords, phrases, date ranges, etc. The results are sorted by relevance (score).

4.1. Basic Queries

The server exposes an API for search operations. We can either call /select or /query request handlers.

Let’s do a simple search:

SolrQuery query = new SolrQuery();
query.setQuery("brand1");
query.setStart(0);
query.setRows(10);

QueryResponse response = solrClient.query(query);
List<Item> items = response.getBeans(Item.class);

SolrJ will internally use the main query parameter in its request to the server. The number of returned records will be 10, indexed from zero when start and rows are not specified.

The search query above will look for any documents that contain the complete word “brand1” in any of its indexed fields. Note that simple searches are not case sensitive.

Let’s look at another example. We want to search any word containing “rand”, that starts with any number of characters and ends with only one character. We can use wildcard characters and in our query:

query.setQuery("*rand?");

Solr queries also support boolean operators like in SQL:

query.setQuery("brand1 AND (Washing OR Refrigerator)");

All boolean operators must be in all caps; those backed by the query parser are ANDOR, NOT, + and – .

What’s more, if we want to search on specific fields instead of all indexed fields, we can specify these in the query:

query.setQuery("description:Brand* AND category:*Washing*");

4.2. Phrase Queries

Up to this point, our code looked for keywords in the indexed fields. We can also do phrase searches on the indexed fields:

query.setQuery("Washing Machine");

When we have a phrase like “Washing Machine“, Solr’s standard query parser parses it to “Washing OR Machine“. To search for a whole phrase, we can only add the expression inside double quotes:

query.setQuery("\"Washing Machine\"");

We can use proximity search to find words within specific distances. If we want to find the words that are at least two words apart, we can use the following query:

query.setQuery("\"Washing equipment\"~2");

4.3. Range Queries

Range queries allow obtaining documents whose fields are between specific ranges.

Let’s say we want to find items whose price ranges between 100 to 300:

query.setQuery("price:[100 TO 300]");

The query above will find all the elements whose price are between 100 to 300, inclusive. We can use “}” and “{” to exclude end points:

query.setQuery("price:{100 TO 300]");

4.4. Filter Queries

Filter queries can be used to restrict the superset of results that can be returned. Filter query does not influence the score:

SolrQuery query = new SolrQuery();
query.setQuery("price:[100 TO 300]");
query.addFilterQuery("description:Brand1","category:Home Appliances");

Generally, the filter query will contain commonly used queries. Since they’re often reusable, they are cached to make the search more efficient.

5. Faceted Search

Faceting helps to arrange search results into group counts. We can facet fields, query or ranges.

5.1. Field Faceting

For example, we want to get the aggregated counts of categories in the search result. We can add category field in our query:

query.addFacetField("category");

QueryResponse response = solrClient.query(query);
List<Count> facetResults = response.getFacetField("category").getValues();

The facetResults will contain counts of each category in the results.

5.2. Query Faceting

Query faceting is very useful when we want to bring back counts of subqueries:

query.addFacetQuery("Washing OR Refrigerator");
query.addFacetQuery("Brand2");

QueryResponse response = solrClient.query(query);
Map<String,Integer> facetQueryMap = response.getFacetQuery();

As a result, the facetQueryMap will have counts of facet queries.

5.3. Range Faceting

Range faceting is used to get the range counts in the search results. The following query will return the counts of price ranges between 100 and 251, gapped by 25:

query.addNumericRangeFacet("price", 100, 275, 25);

QueryResponse response = solrClient.query(query);
List<RangeFacet> rangeFacets =  response.getFacetRanges().get(0).getCounts();

Apart from numeric ranges, Solr also supports date ranges, interval faceting, and pivot faceting.

6. Hit Highlighting

We may want the keywords in our search query to be highlighted in the results. This will be very helpful to get a better picture of the results. Let’s index some documents and define keywords to be highlighted:

itemSearchService.index("hm0001", "Brand1 Washing Machine", "Home Appliances", 100f);
itemSearchService.index("hm0002", "Brand1 Refrigerator", "Home Appliances", 300f);
itemSearchService.index("hm0003", "Brand2 Ceiling Fan", "Home Appliances", 200f);
itemSearchService.index("hm0004", "Brand2 Dishwasher", "Washing equipments", 250f);

SolrQuery query = new SolrQuery();
query.setQuery("Appliances");
query.setHighlight(true);
query.addHighlightField("category");
QueryResponse response = solrClient.query(query);

Map<String, Map<String, List<String>>> hitHighlightedMap = response.getHighlighting();
Map<String, List<String>> highlightedFieldMap = hitHighlightedMap.get("hm0001");
List<String> highlightedList = highlightedFieldMap.get("category");
String highLightedText = highlightedList.get(0);

We’ll get the highLightedText as “Home <em>Appliances</em>”. Please notice that the search keyword Appliances is tagged with <em>. Default highlighting tag used by Solr is <em>, but we can change this by setting the pre and post tags:

query.setHighlightSimplePre("<strong>");
query.setHighlightSimplePost("</strong>");

7. Search Suggestions

One of the important features that Solr supports are suggestions. If the keywords in the query contain spelling mistakes or if we want to suggest to autocomplete a search keyword, we can use the suggestion feature.

7.1. Spell Checking

The standard search handler does not include spell checking component; it has to be configured manually. There are three ways to do it. You can find the configuration details in the official wiki page. In our example, we’ll use IndexBasedSpellChecker, which uses indexed data for keyword spell checking.

Let’s search for a keyword with spelling mistake:

query.setQuery("hme");
query.set("spellcheck", "on");
QueryResponse response = solrClient.query(query);

SpellCheckResponse spellCheckResponse = response.getSpellCheckResponse();
Suggestion suggestion = spellCheckResponse.getSuggestions().get(0);
List<String> alternatives = suggestion.getAlternatives();
String alternative = alternatives.get(0);

Expected alternative for our keyword “hme” should be “home” as our index contains the term “home”. Note that spellcheck has to be activated before executing the search.

7.2. Auto Suggesting Terms

We may want to get the suggestions of incomplete keywords to assist with the search. Solr’s suggest component has to be configured manually. You can find the configuration details in its official wiki page.

We have configured a request handler named /suggest to handle suggestions. Let’s get suggestions for keyword “Hom”:

SolrQuery query = new SolrQuery();
query.setRequestHandler("/suggest");
query.set("suggest", "true");
query.set("suggest.build", "true");
query.set("suggest.dictionary", "mySuggester");
query.set("suggest.q", "Hom");
QueryResponse response = solrClient.query(query);
        
SuggesterResponse suggesterResponse = response.getSuggesterResponse();
Map<String,List<String>> suggestedTerms = suggesterResponse.getSuggestedTerms();
List<String> suggestions = suggestedTerms.get("mySuggester");

The list suggestions should contain all words and phrases. Note that we have configured a suggester named mySuggester in our configuration.

8. Conclusion

This article is a quick intro to the search engine’s capabilities and features of Solr.

We touched on many features, but these are of course just scratching the surface of what we can do with an advanced and mature search server such as Solr.

The examples used here are available as always, over on GitHub.

Java Generics Interview Questions (+Answers)

$
0
0

1. Introduction

In this article, we’ll go through some example Java generics interview questions and answers.

Generics are a core concept in Java, first introduced in Java 5. Because of this, nearly all Java codebases will make use of them, almost guaranteeing that a developer will run into them at some point. This is why it’s essential to understand them correctly, and is why they are more than likely to be asked about during an interview process.

2. Questions

Q1. What is a Generic Type Parameter?

Type is the name of a class or interface. As implied by the name, a generic type parameter is when a type can be used as a parameter in a class, method or interface declaration.

Let’s start with a simple example, one without generics, to demonstrate this:

public interface Consumer {
    public void consume(String parameter)
}

In this case, the method parameter type of the consume() method is String. It is not parameterized and not configurable.

Now let’s replace our String type with a generic type that we will call T. It is named like this by convention:

public interface Consumer<T> {
    public void consume(T parameter)
}

When we implement our consumer, we can provide the type that we want it to consume as an argument. This is a generic type parameter:

public class IntegerConsumer implements Consumer<Integer> {
    public void consume(Integer parameter)
}

In this case, now we can consume integers. We can swap out this type for whatever we require.

Q2. What Are Some Advantages of Using Generic Types?

One advantage of using generics is avoiding costs and provide type safety. This which is particularly useful when working with collections. Let’s demonstrate this:

Let’s demonstrate this:

List list = new ArrayList();
list.add("foo");
Object o = list.get(1);
String foo = (String) foo;

In our example, the element type in our list is unknown to the compiler. This means that the only thing that can be guaranteed is that it is an object. So when we retrieve our element, an object is what we get back. As the authors of the code, we know it’s a String, but we have to cast our object to one to fix the problem explicitly. This produces a lot of noise and boilerplate.

Next, if we start to think about the room for manual error, the casting problem gets worse. What if we accidentally had an integer in our list?

list.add(1)
Object o = list.get(1);
String foo = (String) foo;

In this case, we would get a ClassCastException at runtime, as an Integer cannot be cast to String.

Now, let’s try repeating ourselves, this time using generics:

List<String> list = new ArrayList<>();
list.add("foo");
String o = list.get(1);    // No cast
Integer foo = list.get(1); // Compilation error

As we can see, by using generics we have a compile type check which prevents ClassCastExceptions and removes the need for casting.

The other advantage is to avoid code duplication. Without generics, we have to copy and paste the same code but for different types. With generics, we do not have to do this. We can even implement algorithms which apply to generic types.

Q3. What is Type Erasure?

It’s important to realize that generic type information is only available to the compiler, not the JVM. In other words, type erasure means that generic type information is not available to the JVM at runtime, only compile time.

The reasoning behind major implementation choice is simple – preserving backward compatibility with older versions of Java. When a generic code is compiled into bytecode, it will be as if the generic type never existed. This means that compilation will:

  1. Replace generic types with objects
  2. Replace bounded types (More on these in a later question) with the first bound class
  3. Insert the equivalent of casts when retrieving generic objects.

It’s important to understand type erasure. Otherwise, a developer might get confused and think they’d be able to get the type at runtime:

public foo(Consumer<T> consumer) {
   Type type = consumer.getGenericTypeParameter()
}

The above example is a pseudo code equivalent of what things might look like without type erasure, but unfortunately, it is impossible. Once again, the generic type information is not available at runtime.

Q4. If a Generic Type is Omitted When Instantiating an Object, will the Code Still Compile?

As generics did not exist before Java 5, it is possible not to use them at all. For example, generics were retrofitted to most of the standard Java classes such as collections. If we look at our list from question one, then we will see that we already have an example of omitting the generic type:

List list = new ArrayList();

Despite being able to compile, it’s still likely that there will be a warning from the compiler. This is because we are losing the extra compile time check that we get from using generics.

The point to remember is that while backward compatibility and type erasure make it possible to omit generic types, it is bad practice.

Q5. How Does a Generic Method Differ From a Generic Type?

A generic method is where a type parameter is introduced to a method, living within the scope of that method. Let’s try this with an example:

public static <T> T returnType(T argument) { 
    return argument; 
}

We’ve used a static method but could have also used a non-static one if we wished. By leveraging type inference (covered in the next question), we can invoke this like any ordinary method, without having to specify any type arguments when we do so.

Q6. What is Type Inference?

Type inference is when the compiler can look at the type of a method argument to infer a generic type. For example, if we passed in to a method which returns T, then the compiler can figure out the return type. Let’s try this out by invoking our generic method from the previous question:

Integer inferredInteger = returnType(1);
String inferredString = returnType("String");

As we can see, there’s no need for a cast, and no need to pass in any generic type argument. The argument type only infers the return type.

Q7. What is a Bounded Type Parameter?

So far all our questions have covered generic types arguments which are unbounded. This means that our generic type arguments could be any type that we want.

When we use unbounded parameters, we are restricting the types that can be used as generic type arguments.

As an example, let’s say we want to force our generic type always to be a subclass of animal:

public abstract class Cage<T extends Animal> {
    abstract void addAnimal(T animal)
}

By using extends, we are forcing to be a subclass of animalWe could then have a cage of cats:

Cage<Cat> catCage;

But we could not have a cage of objects, as an object is not a subclass of an animal:

Cage<Object> objectCage; // Compilation error

One advantage of this is that all the methods of animal are available to the compiler. We know our type extends it, so we could write a generic algorithm which operates on any animal. This means we don’t have to reproduce our method for different animal subclasses:

public void firstAnimalJump() {
    T animal = animals.get(0);
    animal.jump();
}

Q8. Is it Possible to Declared a Multiple Bounded Type Parameter?

Declaring multiple bounds for our generic types is possible. In our previous example, we specified a single bound, but we could also specify more if we wish:

public abstract class Cage<T extends Animal & Comparable>

In our example, the animal is a class and comparable is an interface. Now, our type must respect both of these upper bounds. If our type were a subclass of animal but did not implement comparable, then the code would not compile. It’s also worth remembering that if one of the upper bounds is a class, it must be the first argument.

Q9. What is a Wildcard type?

A wildcard type represents an unknown type. It’s detonated with a question mark as follows:

public static consumeListOfWildcardType(List<?> list)

Here, we are specifying a list which could be of any type. We could pass a list of anything into this method.

Q10. What is an Upper Bounded Wildcard?

An upper bounded wildcard is when a wildcard type inherits from a concrete type. This is particularly useful when working with collections and inheritance.

Let’s try demonstrating this with a  farm class which will store animals, first without the wildcard type:

public class Farm {
  private List<Animal> animals;

  public void addAnimals(Collection<Animal> newAnimals) {
    animals.addAll(newAnimals);
  }
}

If we had multiple subclasses of animalsuch as cat and dog, we might make the incorrect assumption that we can add them all to our farm:

farm.addAnimals(cats); // Compilation error
farm.addAnimals(dogs); // Compilation error

This is because the compiler expects a collection of the concrete type animal, not one it subclasses.

Now, let’s introduce an upper bounded wildcard to our add animals method:

public void addAnimals(Collection<? extends Animal> newAnimals)

Now if we try again, our code will compile. This is because we are now telling the compiler to accept a collection of any subtype of animal.

Q11. What is an Unbounded Wildcard?

An unbounded wildcard is a wildcard with no upper or lower bound, that can represent any type.

It’s also important to know that the wildcard type is not synonymous to object. This is because a wildcard can be any type whereas an object type is specifically an object (and cannot be a subclass of an object). Let’s demonstrate this with an example:

List<?> wildcardList = new ArrayList<String>(); 
List<Object> objectList = new ArrayList<String>(); // Compilation error

Again, the reason the second line does not compile is that a list of objects is required, not a list of strings. The first line compiles because a list of any unknown type is acceptable.

Q12. What is a Lower Bounded Wildcard?

A lower bounded wildcard is when instead of providing an upper bound, we provide a lower bound by using the super keyword. In other words, a lower bounded wildcard means we are forcing the type to be a superclass of our bounded type. Let’s try this with an example:

public static void addDogs(List<? super Animal> list) {
   list.add(new Dog("tom"))
}

By using super, we could call addDogs on a list of objects:

ArrayList<Object> objects = new ArrayList<>();
addDogs(objects);

This makes sense, as an object is a superclass of animal. If we did not use the lower bounded wildcard, the code would not compile, as a list of objects is not a list of animals.

If we think about it, we wouldn’t be able to add a dog to a list of another subclass of animal, such as cats. This is why it’s called a lower bound. For example, this would not compile:

ArrayList<Cat> objects = new ArrayList<>();
addDogs(objects);

Q13. When Would You Choose to Use a Lower Bounded Type vs. an Upper Bounded Type?

When dealing with collections, a common rule for selecting between upper or lower bounded wildcards is PECS. PECS stands for producer extends, consumer super.

This can be easily demonstrated through the use of some standard Java interfaces and classes.

Producer extends just means that if you are creating a producer of a generic type, then use the extends keyword. Let’s try applying this principle to a collection, to see why it makes sense:

public static void makeLotsOfNoise(List<? extends Animal> animals) {
    animals.forEach(Animal::makeNoise);   
}

Here, we want to call makeNoise() on each animal in our collection. This means our collection is a produceras all we are doing with it is getting it to return animals for us to perform our operation on. If we got rid of extends, we wouldn’t be able to pass in lists of cats, dogs or any other subclasses of animals. By applying the producer extends principle, we have the most flexibility possible.

Consumer super means the opposite to producer extends. All it means is that if we are dealing with something which consumers elements, then we should use the super keyword. We can demonstrate this by repeating our previous example:

public static void addCats(List<? super Animal> animals) {
    animals.add(new Cat());   
}

We are only adding to our list of animals, so our list of animals is a consumer. This is why we use the super keyword. It means that we could pass in a list of any superclass of animal and add a cat to it. However, if we passed in a list of dogs, it would not compile because a cat is not a dog.

The final thing to consider is what to do if a collection is both a consumer and a producer. An example of this might be a collection where elements are both added and removed. In this case, an unbounded wildcard should be used.

Q14. Are There Any Situations Where Generic Type Information is Available at Runtime?

There is one situation where a generic type is available at runtime. This is when a generic type is part of the class signature like so:

public class CatCage implements Cage<Cat>

By using reflection, we get this type parameter:

(Class<T>) ((ParameterizedType) getClass()
  .getGenericSuperclass()).getActualTypeArguments()[0];

This code is somewhat brittle. For example, it’s dependant on the type parameter being defined on the immediate superclass. But, it demonstrates the JVM has does have this type information.

Viewing all 3691 articles
Browse latest View live