
1. Introduction
In this article, we’ll walk through the process of integrating OpenAI’s Java Client API.
We’ll start by setting up the Java client in our development environment, authenticating our API requests, and demonstrating how to interact with OpenAI models for text generation and AI-driven tasks.
2. Dependencies
First, we must import the required dependencies for our project. We can find the libraries in the Maven repository:
<dependency>
    <groupId>com.openai</groupId>
    <artifactId>openai-java</artifactId>
    <version>0.22.0</version>
</dependency>
3. Learning Assistant
We’ll build a tool designed to help us create a personalized curriculum based on the articles and tutorials available on Baeldung.
While the internet provides vast resources, organizing this information into a coherent learning path can be difficult. Learning new topics can quickly become overwhelming, as it can be difficult to identify the most effective resources and filter out irrelevant content.
To tackle this issue, we’ll develop a simple client that interacts with ChatGPT. This client will allow us to navigate the extensive collection of Baeldung articles and receive guided recommendations tailored to our learning goals.
4. OpenAI API Token
Obtaining an API token is the first step in connecting our application to the OpenAI API. This token is a secret key that authenticates our requests to the OpenAI servers.
To generate this token, we must log in to our OpenAI account and create a new API key from the API settings page:
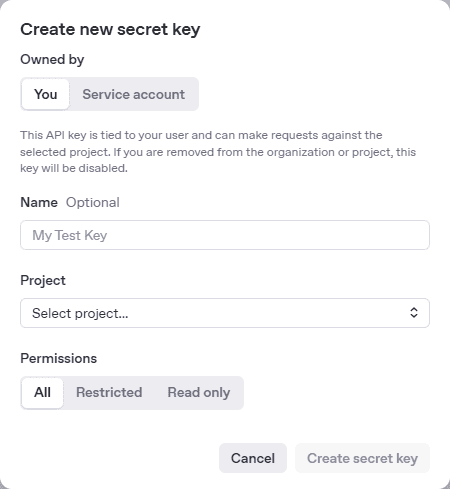
After obtaining the token, we can use it in our Java application to communicate securely with OpenAI’s models, ensuring our code doesn’t expose the API token.
For this example, we’ll configure the environment variable within our IDE, like IntelliJ IDEA. This is suitable for single experiments; however, in production, we’d more likely use a secret management tool like AWS Secrets Manager, HashiCorp Vault, or Azure Key Vault to store and manage our API keys securely.
We can generate two types of tokens: personal and service accounts. The personal token is self-explanatory. The tokens for service accounts are used for bots or applications that connect to our OpenAI projects. While both work, a personal token is good enough for our purpose.
5. OpenAIClient
Once we’ve set the token into our environment variables, we initialize an OpenAIClient instance, which allows us to interact with the APIs and receive responses from ChatGPT:
OpenAIClient client = OpenAIOkHttpClient.fromEnv();Now that we’ve initialized the client, let’s dive into the Completion and Assistants APIs.
6. Completion API vs. Assistants API
Let’s first consider the differences between the Completion API and the Assistants API, to help us determine which is best suited for different tasks.
The Completion API approach is perfect for simple tasks like generating short responses, writing code snippets, or crafting content sections. It’s also ideal for single-turn interactions that involve a specific question or request that yields a concise answer.
The Assistants API handles complex problems that require ongoing interaction and is suitable for multiple specialized tasks, such as writing an entire book, developing a software application, or managing intricate workflows. It provides tools like File Search, Code Interpreter, and Function Calling.
While Completion API suits quick tasks, Assistants API supports long-term projects with a structured approach.
7. Simple Completion
Using the Completion API, we create a request utilizing ChatCompletionCreateParams. The minimal setup requires a model of choice and a list of messages, but it can also accept temperature, max tokens, and other tuning options.
Let’s see now how we can individually use the addDeveloperMessage() and addUserMessage() methods:
Builder createParams = ChatCompletionCreateParams.builder()
  .model(ChatModel.GPT_4O_MINI)
  .addDeveloperMessage("You're helping me to create a curriculum to learn programming. Use only the articles from www.baeldung.com")
  .addUserMessage(userMessage);
Alternatively, we can provide these messages as ChatCompletionMessageParam instances or in a JSON format.
The simple Completion usage is straightforward – the AI model receives the messages, and, after processing, it responds with a text structure we can stream and print:
client.chat()
  .completions()
  .create(createParams.build())
  .choices()
  .stream()
  .flatMap(choice -> choice.message()
    .content()
    .stream())
  .forEach(System.out::println);
8. Conversational Completion
The conversational feature allows for ongoing dialogue with the AI until we exit the program.
Let’s observe how the response and interaction change now while the model and messages remain the same:
do {
    List<ChatCompletionMessage> messages = client.chat()
      .completions()
      .create(createParamsBuilder.build())
      .choices()
      .stream()
      .map(ChatCompletion.Choice::message)
      .toList();
    messages.stream()
      .flatMap(message -> message.content().stream())
      .forEach(System.out::println);
    System.out.println("-----------------------------------");
    System.out.println("Anything else you would like to know? Otherwise type EXIT to stop the program.");
    String userMessageConversation = scanner.next();
    if ("exit".equalsIgnoreCase(userMessageConversation)) {
      scanner.close();
      return;
    }
    messages.forEach(createParamsBuilder::addMessage);
    createParamsBuilder
      .addDeveloperMessage("Continue providing help following the same rules as before.")
      .addUserMessage(userMessageConversation);
} while (true);
9. Assistants
Now, let’s see how we can use the Assistant class with the minimal required parameters. Assistant supports tools like file search, code interpreter, and function calling.
First, we have to initialize an Assistant with a name and model, provide instructions, assign a role, provide content, and assign it to a Thread and a Run. These are mandatory and specific to OpenAI and facilitate the AI interaction:
Assistant assistant = client.beta()
  .assistants()
  .create(BetaAssistantCreateParams.builder()
    .name("Baeldung Tutor")
    .instructions("You're a personal programming tutor specialized in research online learning courses.")
    .model(ChatModel.GPT_4O_MINI)
    .build());
Thread thread = client.beta()
  .threads()
  .create(BetaThreadCreateParams.builder().build());
client.beta()
  .threads()
  .messages()
  .create(BetaThreadMessageCreateParams.builder()
    .threadId(thread.id())
    .role(BetaThreadMessageCreateParams.Role.USER)
    .content("I want to learn about Strings")
    .build());
Run run = client.beta()
  .threads()
  .runs()
  .create(BetaThreadRunCreateParams.builder()
    .threadId(thread.id())
    .assistantId(assistant.id())
    .instructions("You're helping me to create a curriculum to learn programming. Use only the articles from www.baeldung.com")
    .build());
In OpenAI’s API, a thread represents a sequence of interactions between a user and an assistant. When using the Assistants API, we create a thread to maintain context across multiple exchanges.
A run is an execution instance in which an assistant processes the user’s input and generates a response. Each run belongs to a thread and moves through different statuses.
Next, we execute the newly created thread and loop until the AI completes the assigned task, continuing until the status changes and differs from QUEUED or IN_PROGRESS:
while (run.status().equals(RunStatus.QUEUED) ||
  run.status().equals(RunStatus.IN_PROGRESS)) {
    System.out.println("Polling run...");
    java.lang.Thread.sleep(500);
    run = client.beta()
      .threads()
      .runs()
      .retrieve(BetaThreadRunRetrieveParams.builder()
        .threadId(thread.id())
        .runId(run.id())
        .build());
}
Now that the status has changed to COMPLETED, we can continue to process the response stream and print the messages:
System.out.println("Run completed with status: " + run.status() + "\n");
if (!run.status().equals(RunStatus.COMPLETED)) {
  return;
}
BetaThreadMessageListPage page = client.beta()
  .threads()
  .messages()
  .list(BetaThreadMessageListParams.builder()
    .threadId(thread.id())
    .order(BetaThreadMessageListParams.Order.ASC)
    .build());
page.autoPager()
  .stream()
  .forEach(currentMessage -> {
    System.out.println(currentMessage.role());
    currentMessage.content()
      .stream()
      .flatMap(content -> content.text().stream())
      .map(textBlock -> textBlock.text().value())
      .forEach(System.out::println);
    System.out.println();
  });
When dealing with large datasets, OpenAI’s API returns results in pages. autoPager() helps handle paginated responses automatically, allowing us to retrieve and process multiple results efficiently without manually iterating through pages.
Finally, we can delete the Assistant when it’s no longer needed or reuse the same assistant.id() for future tasks:
AssistantDeleted assistantDeleted = client.beta()
  .assistants()
  .delete(BetaAssistantDeleteParams.builder()
    .assistantId(assistant.id())
    .build());
System.out.println("Assistant deleted: " + assistantDeleted.deleted());
Notably, classes with the “Beta” prefix indicate experimental or early-stage features in OpenAI’s API. These features are subject to change, so we should use them cautiously in production applications.
10. Conclusion
Integrating OpenAI’s API into our Java app allows us to create tools that boost productivity and learning. We can automate workflows and develop responsive applications, paving the way for more AI innovation.
Next up would be LangChain4j with Quarkus and Spring AI Assistant for powerful abstractions that simplify working with LLMs in Java. These frameworks minimize reliance on one provider and enable flexible AI integrations.
As usual, all the code from this tutorial is available over on GitHub.
The post The OpenAI API Java Client first appeared on Baeldung.


