1. Overview
In this tutorial, we’ll explore how to handle alerts and popups in Selenium. Alerts and popups are common elements that can interrupt the flow of automated scripts, so managing them effectively is essential for ensuring smooth test execution.
First, we need to understand that alerts and popups come in various forms and require different handling techniques.
Simple alerts are basic notifications that need acknowledgment, typically through an “OK” button (part of the HTML browser standard). Confirmation alerts prompt users to accept or dismiss an action, while prompt alerts request user input. Additionally, popups can appear as separate browser windows or modal dialogs.
Throughout this tutorial, we’ll examine the types of alerts and popups we might encounter during web testing. We’ll demonstrate how to interact with each of these elements using Selenium to ensure our tests proceed without interruption.
2. Setup and Configuration
To handle alerts and popups, we first need to set up our environment with the two required dependencies: the Selenium Java library, which provides the core functionality for automating browsers, and WebDriverManager, which is essential for managing browser drivers by automatically downloading and configuring the correct versions.
To begin, let’s include the required dependencies in our project’s pom.xml file:
<dependency>
    <groupId>org.seleniumhq.selenium</groupId>
    <artifactId>selenium-java</artifactId>
    <version>4.23.1</version>
</dependency>
<dependency>
    <groupId>io.github.bonigarcia</groupId>
    <artifactId>webdrivermanager</artifactId>
    <version>5.8.0</version>
</dependency>
Once the dependencies are set up, we initialize a new instance of ChromeDriver to automate Google Chrome, but this configuration can be easily modified to accommodate other browsers:
private WebDriver driver;
@BeforeEach
public void setup() {
    driver = new ChromeDriver();
}
@AfterEach
public void tearDown() {
    driver.quit();
}
3. Handling Simple Alerts
In this section, we’ll focus on practical steps needed to handle simple alerts using Selenium. Simple alerts are basic alert windows with text and an “OK” button:

We’ll navigate to a sample webpage that demonstrates simple alerts and write a JUnit test to trigger and manage the alert. The Test Page for Javascript Alerts provides examples of various types of alerts, including the simple alert we aim to handle:
@Test
public void whenSimpleAlertIsTriggered_thenHandleIt() {
    driver.get("https://testpages.herokuapp.com/styled/alerts/alert-test.html");
    driver.findElement(By.id("alertexamples")).click();
    Alert alert = driver.switchTo().alert();
    String alertText = alert.getText();
    alert.accept();
    assertEquals("I am an alert box!", alertText);
}
In this test, we initialize the WebDriver and navigate to the test page. The simple alert is triggered by clicking the “Show alert box” button. Once we trigger the alert, we use Selenium’s switchTo().alert() method to switch the control from the main browser window to the alert window.
Once we’re on the alert window, we can now interact with it using the methods provided by Alert Interface. In the case of a simple alert box, we handle it by clicking on the “OK” button on the alert box using the method alert.accept(). Apart from just accepting or dismissing the alert, we can also make use of other useful methods such as alert.getText() to extract the text from the alert window:
String alertText = alert.getText();
Handling alerts in this way is crucial because if we don’t, the automated script will run into an exception. Let’s test this behavior by triggering an alert, deliberately not handling it, and trying to click on another element:
@Test
public void whenAlertIsNotHandled_thenThrowException() {
    driver.get("https://testpages.herokuapp.com/styled/alerts/alert-test.html");
    driver.findElement(By.id("alertexamples")).click();
    assertThrows(UnhandledAlertException.class, () -> {
        driver.findElement(By.xpath("/html/body/div/div[1]/div[2]/a[2]")).click();
    });
}
The result of the test case confirms that an UnhandledAlertException is thrown when an alert is not handled before attempting to interact with other elements on the page.
4. Handling Confirmation Alerts
Confirmation alerts are slightly different from simple alerts. They typically appear when a user action requires confirmation, such as deleting a record or submitting sensitive information. Unlike simple alerts, which only present an “OK” button, confirmation alerts offer two choices: “OK” to confirm the action or “Cancel” to dismiss it.

To demonstrate how to handle confirmation alerts, we’ll continue using the Test Page for Javascript Alerts. Our goal is to trigger a confirmation alert and interact with it by accepting and dismissing it and then verifying the outcomes.
Let’s see how we can handle confirmation alerts in Selenium:
@Test
public void whenConfirmationAlertIsTriggered_thenHandleIt() {
    driver.get("https://testpages.herokuapp.com/styled/alerts/alert-test.html");
    driver.findElement(By.id("confirmexample")).click();
    Alert alert = driver.switchTo().alert();
    String alertText = alert.getText();
    alert.accept();
    assertEquals("true", driver.findElement(By.id("confirmreturn")).getText());
    driver.findElement(By.id("confirmexample")).click();
    alert = driver.switchTo().alert();
    alert.dismiss();
    assertEquals("false", driver.findElement(By.id("confirmreturn")).getText());
}
In this test, we first navigate the page and trigger the confirmation alert by clicking the “Show confirm box” button. Using switchTo().alert(), we switch the control to focus on the alert and capture the text for verification. The alert is then accepted using the accept() method, and we check the result displayed on the page to confirm that the action was successfully completed.
To further demonstrate the handling of the confirmation alerts, the test triggers the alert again, but this time, we use the dismiss() method to cancel the action. After dismissing the action, we verify that the corresponding action was correctly aborted.
5. Handling Prompt Alerts
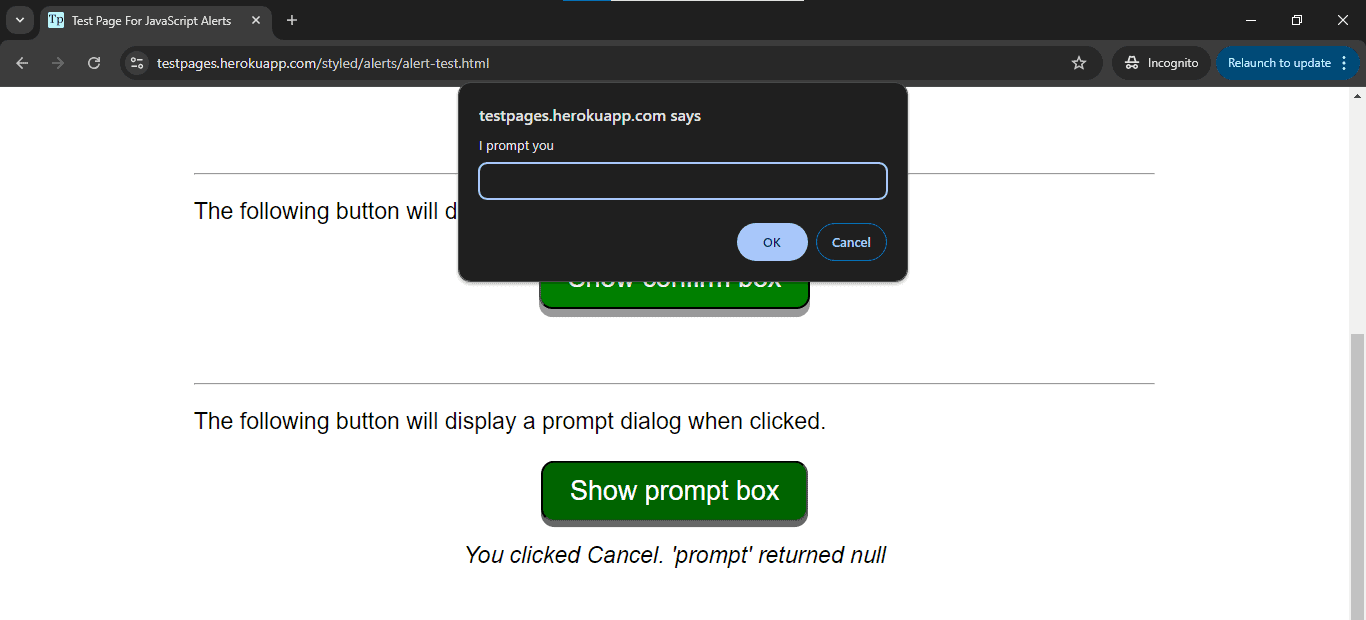
Prompt alerts are a more interactive form of browser alerts compared to simple and confirmation alerts. Unlike simple and confirmation alerts which only present a message to the user, prompt alerts present a message and text input field where the user can enter a response:

Prompt alerts typically appear when an action on the webpage requires user input. Handling these alerts in Selenium involves sending the desired input text to the alert and then managing the response by either accepting the input or dismissing the alert.
To demonstrate how to handle prompt alerts, we’ll use the same test page to trigger a prompt alert. Our goal is to trigger the alert, interact with it by submitting the input, and verify that the correct input was processed.
Let’s look at an example showing how we can handle a prompt alert in Selenium:
@Test
public void whenPromptAlertIsTriggered_thenHandleIt() {
    driver.get("https://testpages.herokuapp.com/styled/alerts/alert-test.html");
    driver.findElement(By.id("promptexample")).click();
    Alert alert = driver.switchTo().alert();
    String inputText = "Selenium Test";
    alert.sendKeys(inputText);
    alert.accept();
    assertEquals(inputText, driver.findElement(By.id("promptreturn")).getText());
}
This test navigates to the test page and triggers the prompt alert. The critical step when handling a prompt alert is sending the input text to the alert. We use sendKeys() to enter text into the input field of the prompt window. In this case, we send the string “Selenium Test” as the input. After sending the input, we use the accept() method to submit the input and close the alert.
Finally, we verify that the correct input was submitted by checking the text displayed on the page after the alert is processed. This step helps us ensure that the application correctly handles the input provided by our test script to the prompt alert.
6. Additional Concepts for Handling Alerts in Selenium
In addition to methods we’ve previously covered, two other important concepts in Selenium for managing alerts are alertIsPresent() with WebDriverWait and handling NoAlertPresentException.
6.1. Using alertIsPresent() with WebDriverWait
The alertIsPresent() condition is part of Selenium’s ExpectedConditions class. It’s used in conjunction with WebDriver’s wait functionality to pause the execution of the script until an alert is present on the page before interacting with it. It’s useful in scenarios where the appearance of an alert is not immediate or predictable.
Let’s see how to use alertIsPresent() with WebDriverWait:
WebDriverWait wait = new WebDriverWait(driver, Duration.ofSeconds(10));
Alert alert = wait.until(ExpectedConditions.alertIsPresent());
alert.accept();
In this implementation, instead of switching to the alert immediately, we use WebDriverWait with ExpectedConditions.alertIsPresent() to pause the script until the alert is detected. This approach ensures that our script only proceeds once the alert is available for interaction.
6.2. Handling NoAlertPresentException
Sometimes, alerts might not appear when we expect them to, and if we attempt to interact with an alert that is not present, our test will fail with a NoAlertPresentException. To handle such cases, we can use a try-catch block to catch the exception and proceed with alternative logic if the alert is not present:
@Test
public void whenNoAlertIsPresent_thenHandleGracefully() {
    driver.get("https://testpages.herokuapp.com/styled/alerts/alert-test.html");
    boolean noAlertExceptionThrown = false;
    try {
        Alert alert = driver.switchTo().alert();
        alert.accept();
    } catch (NoAlertPresentException e) {
        noAlertExceptionThrown = true;
    }
    assertTrue(noAlertExceptionThrown, "NoAlertPresentException should be thrown");
    assertTrue(driver.getTitle().contains("Alerts"), "Page title should contain 'Alerts'");
}
7. Handling Popups
In this section, we’ll explore how to handle popups in Selenium and discuss some of the challenges associated with handling them. Popups are a common feature in many websites and can generally be divided into two broad categories: browser-level and website application popups. Each category requires a different approach in Selenium, and strategies to handle them vary based on their behavior and implementation.
7.1. Browser-Level Popups
Browser-level popups are generated by the browser itself, independent of the web page’s HTML content. These popups often include system dialogs such as basic authentication windows. Browser-level popups are not part of the DOM and, therefore, cannot be interacted with directly using Selenium’s standard findElement() methods.
Common examples of browser-level popups include:
- Basic Authentication Popups: require users to enter a username and password before accessing a page
- File Upload/Download Dialogs: appear when the user is required to upload or download files
- Print Dialogs: triggered by the browser when a webpage or element is printed
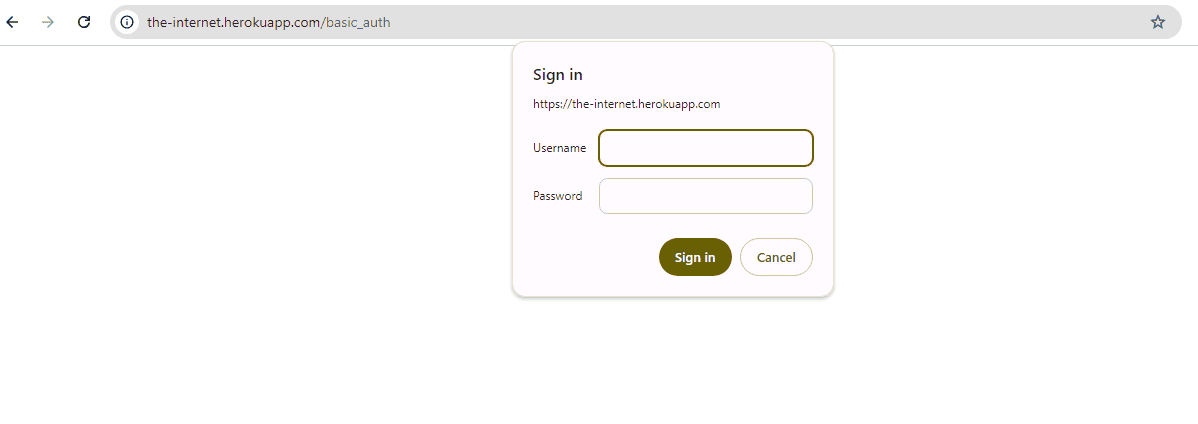
For this tutorial, we’ll focus on demonstrating how to handle a basic authentication popup. Basic authentication popups require credentials (username and password) before granting access to a webpage. We’ll use the demo page Basic Auth to trigger and handle the popup:

Browser-level popups like this are not accessible through standard web element inspection techniques. As a result, we can’t use the sendKeys() method to input credentials. Instead, we need to handle these popups at the browser level. Our approach is to bypass the popup entirely by embedding the necessary credentials directly into the URL.
Let’s see how to handle a basic authentication popup in Selenium:
@Test
public void whenBasicAuthPopupAppears_thenBypassWithCredentials() {
    String username = "admin";
    String password = "admin";
    String url = "https://" + username + ":" + password + "@the-internet.herokuapp.com/basic_auth";
    driver.get(url);
    String bodyText = driver.findElement(By.tagName("body")).getText();
    assertTrue(bodyText.contains("Congratulations! You must have the proper credentials."));
}
In this example, we bypass the basic authentication popup by embedding the username and password into the URL. This technique works for basic HTTP authentication popups. We then navigate to the designated URL, and the browser sends the request to the server with the embedded credentials in the URL. The server recognizes these credentials and authenticates the request without triggering the browser-level popup.
7.2. Web Application Popups
Web application popups are elements embedded directly within the webpage’s HTML and are part of the application’s front end. These popups are created using JavaScript or CSS and can include elements such as modal dialogs, banners, or custom alerts. Unlike browser-level popups, web application popups can be interacted with using standard Selenium commands, as they exist within the DOM.
Some common examples of web application popups include:
- Modal Dialogs: overlays and prevent user interaction with the rest of the page until closed
- Javascript Popups: triggered by user actions, such as confirming a deletion or submitting a form
- Custom Alerts and Toasts: notifications or messages that appear to inform users about an action
@Test
public void whenModalDialogAppears_thenCloseIt() {
    driver.get("https://the-internet.herokuapp.com/entry_ad");
    WebDriverWait wait = new WebDriverWait(driver, Duration.ofSeconds(10), Duration.ofMillis(500));
    WebElement modal = wait.until(ExpectedConditions.visibilityOfElementLocated(By.id("modal")));
    WebElement closeElement = driver.findElement(By.xpath("//div[@class='modal-footer']/p"));
    closeElement.click();
    WebDriverWait modalWait = new WebDriverWait(driver, Duration.ofSeconds(10));
    boolean modalIsClosed = modalWait.until(ExpectedConditions.invisibilityOf(modal));
    assertTrue(modalIsClosed, "The modal should be closed after clicking the close button");
}
In this test, the WebDriverWait ensures that the modal is fully visible before interacting with it. Once the modal appears, we locate the close button (which, in this case, is a <p> element inside the modal footer) and call the click() method to close it.
After the click, we verify that the modal is no longer visible using ExpectedConditions.invisibilityOf. Our test passed, indicating that a modal was discovered and closed successfully.
8. Conclusion
In this article, we’ve learned to use switchTo().alert() for JavaScript alerts, employ accept(), dismiss(), and sendKeys() methods, how to utilize WebDriverWait with alertIsPresent() for better synchronization, and how to bypass browser-level authentication popups.
The key takeaway is that we need to remember that specific approaches may vary depending on the application’s implementation, so we need to adapt our strategies accordingly. The complete source code for this tutorial is available over on GitHub.


