1. Introduction
In this tutorial, we’ll learn how to use the Jmix Studio and Jmix Framework for IntelliJ IDEA. We’ll build a full-stack MVP for a Spring Boot application that tracks employee expenses. From quickly setting up our project environment to generating responsive UIs and implementing role-based access, we’ll see how this framework accelerates development while preserving flexibility.
2. Project Overview and Setup
Our MVP is a web application where employees register their expenses. Admins define a few basic types of expenses like lunch, taxi, and airfares, while employees pick from these and include details like the amount spent, a date, and any other necessary details. We’ll also include authorization roles to differentiate between admins and employees so employees can only register expenses for themselves, but admins have full access to any user’s expenses.
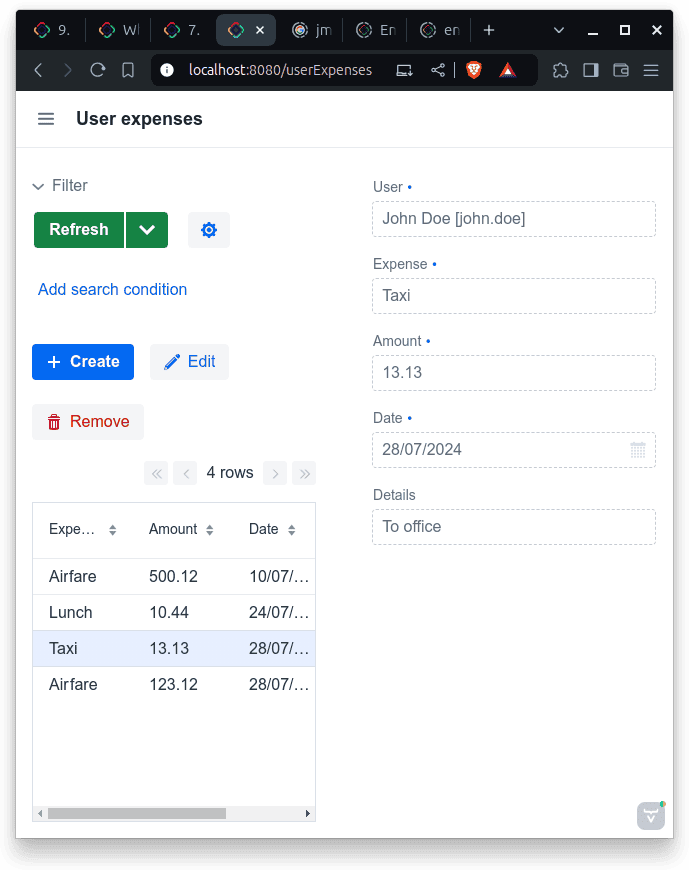
With a few clicks in Jmix Studio, we’ll include rich and responsive UIs for administering users and expenses. These will include advanced search filters and basic form validation out of the box:
2.1. Enrivonment Setup
Jmix requires an account. So, after starting one for free, we’ll install these tools to set up our environment:
- IntelliJ IDEA
- Jmix Plugin for IntelliJ
- Java 17 or newer
2.2. Creating a Jmix Project in IntelliJ
With our tools ready, we’ll open IntelliJ and see that a new “Jmix Project” option is now available:
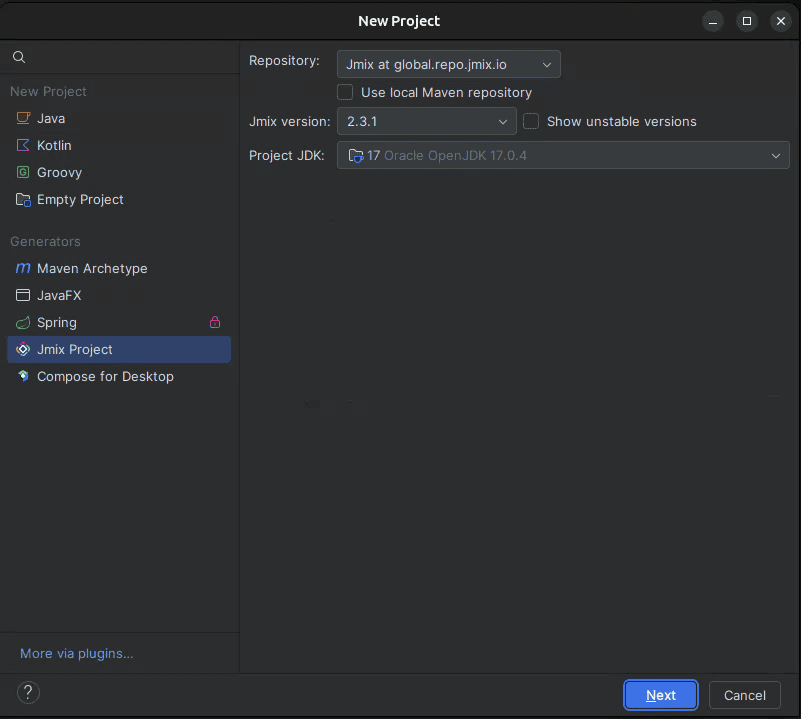
We’ll choose “Full-Stack Application (Java)” and click next. Then, we’ll select a project name and a base package, and that’s it. We must wait until all dependencies are downloaded and the project is indexed.
Most importantly, the first time we create a Jmix project, we’ll get a sign-in dialog. After signing in, let’s click on the Jmix button in IntelliJ’s sidebar to see what our project structure looks like:
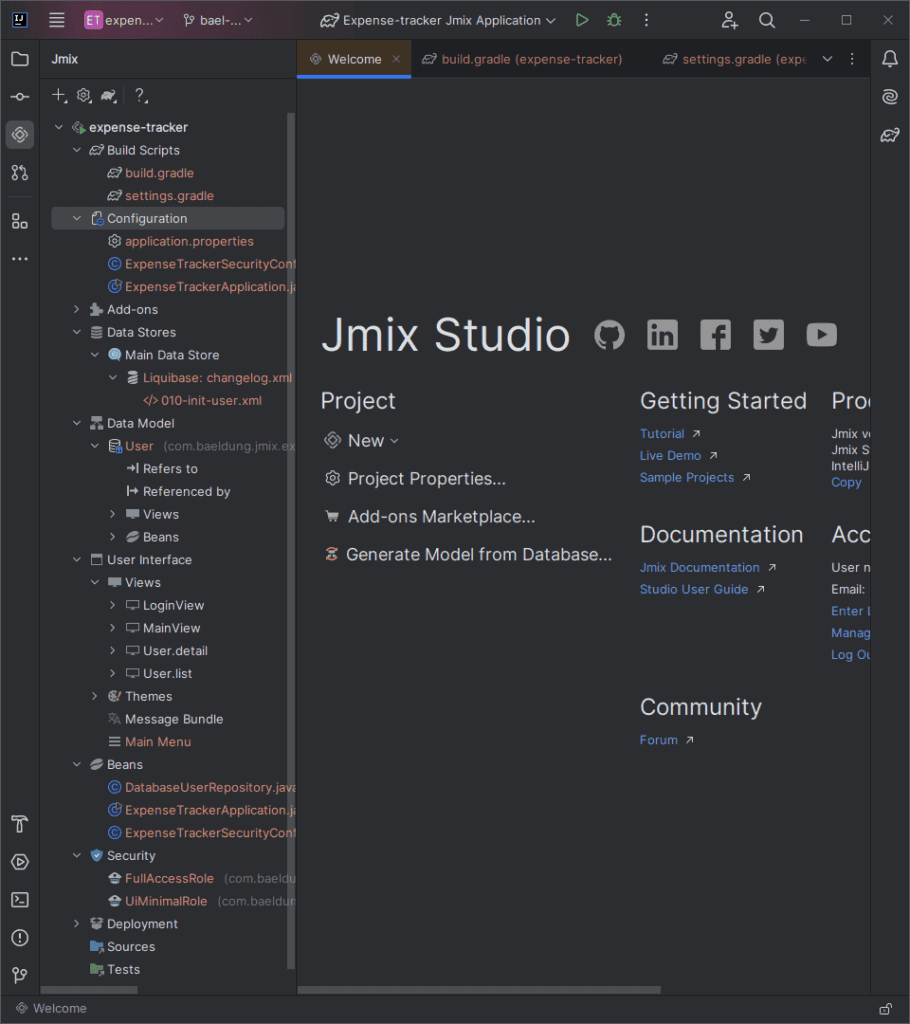
The structure includes basic functionalities like a User entity (which will represent employees), a few UI views, and basic authentication/authorization features. It also consists of a message bundle for internationalization and a basic CSS theme. Accessing the project structure via the Jmix plugin also allows shortcuts for various actions like new views or entities.
Also, it’s a regular Spring Boot app, so it’s familiar and easy to modify. Most importantly, it’s easy for those new to Spring Boot to navigate the project and see how things work.
3. Creating New Entities
Creating a new entity is as simple as focusing on the plugin’s panel, clicking the plus sign, and selecting “New JPA Entity…” We need to choose the class name and make sure “Entity” is selected for the entity type field. The plugin also lets us choose the ID type, which is UUID by default. Jmix also recommends checking the “versioned” option because it activates optimistic locking for entities.
Also, after creating our entity, we can add new attributes by clicking on the plus sign in the attributes section. Let’s start with an Expense entity to represent common types of expenses:
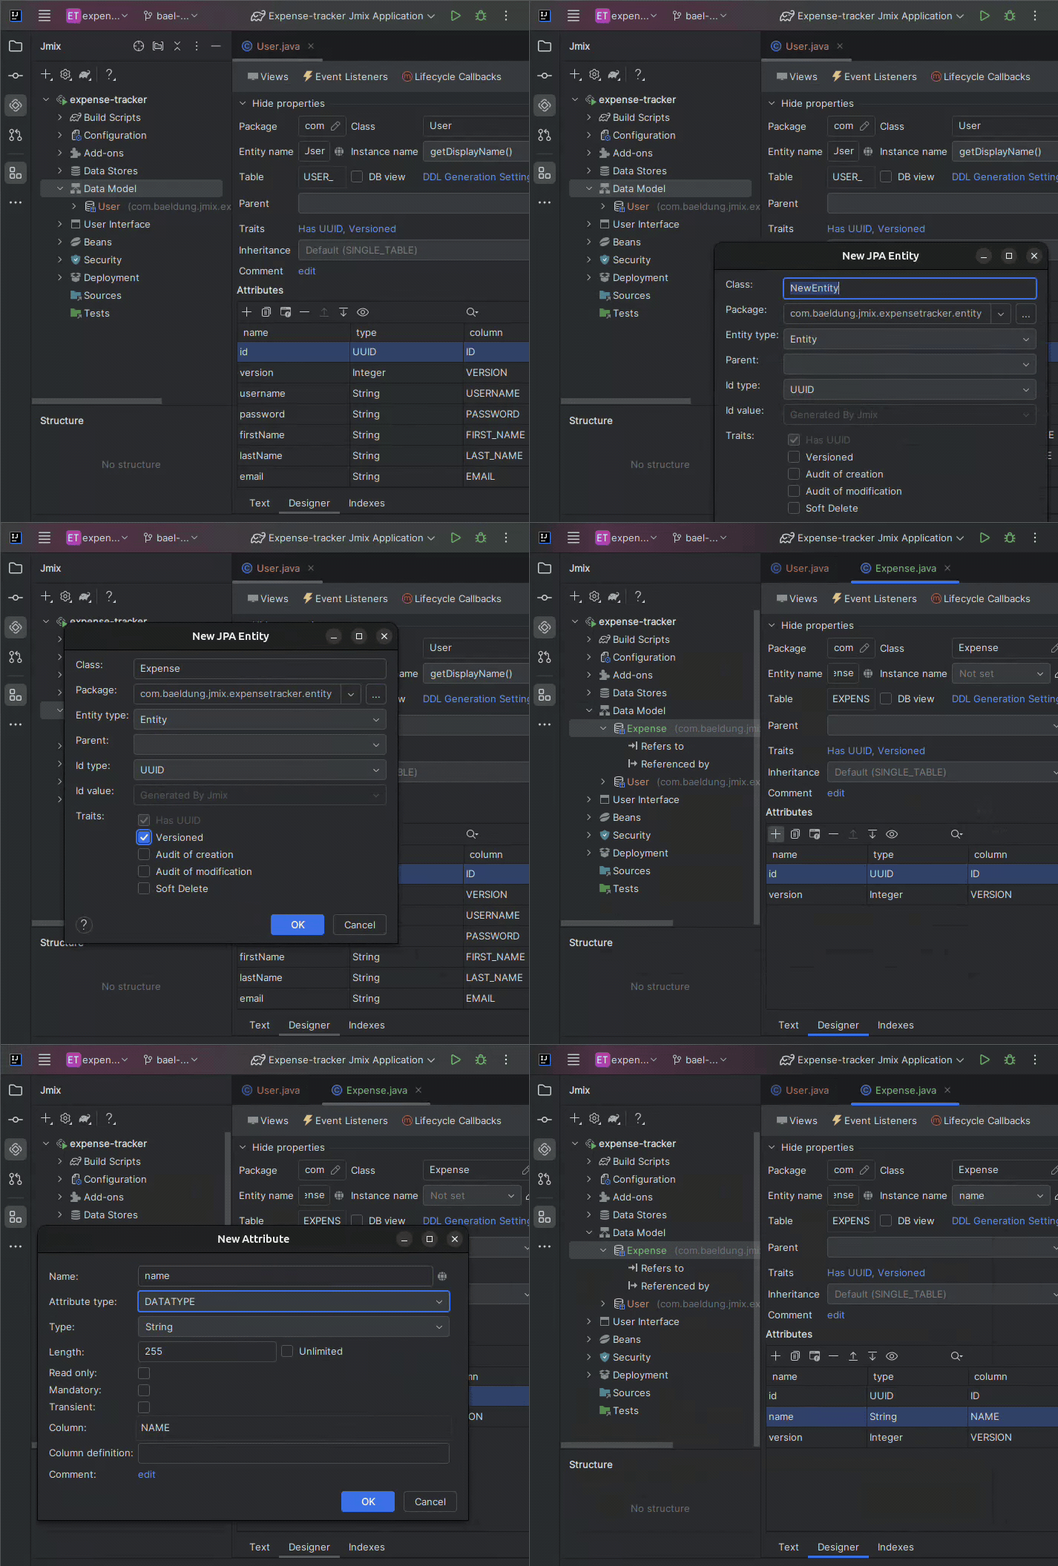
And since Jmix already adds the id and version attributes, we’ll only add the name attribute with type String for now. Most importantly, creating an entity via the Studio also generates Liquibase changelogs to create or modify database objects for us.
When adding new properties, most options are self-explanatory, but there are a few noteworthy mentions:
- Read-only: doesn’t create a setter for the property, and it won’t be editable in the UI
- Mandatory: creates a non-null constraint in the database and is checked in the UI
- Transient: It doesn’t create a column in the database, and it’s not shown in the UI
With our Expense entity still open, we’ll switch to the “Text” tab to find the generated code, which mixes JPA annotations with Jmix-specific ones:
@JmixEntity
@Table(name = "EXPENSE")
@Entity
public class Expense {
    @JmixGeneratedValue
    @Column(name = "ID", nullable = false)
    @Id
    private UUID id;

    @Column(name = "VERSION", nullable = false)
    @Version
    private Integer version;

    @InstanceName
    @Column(name = "NAME", nullable = false)
    @NotNull
    private String name;

    // standard getters and setters
}
Changes to the code are reflected in the “Designer” tab, and vice-versa. Also, we can use the JPA dev tools via the code editor’s inline actions. Let’s see the options that appear when we alt+enter on any line:
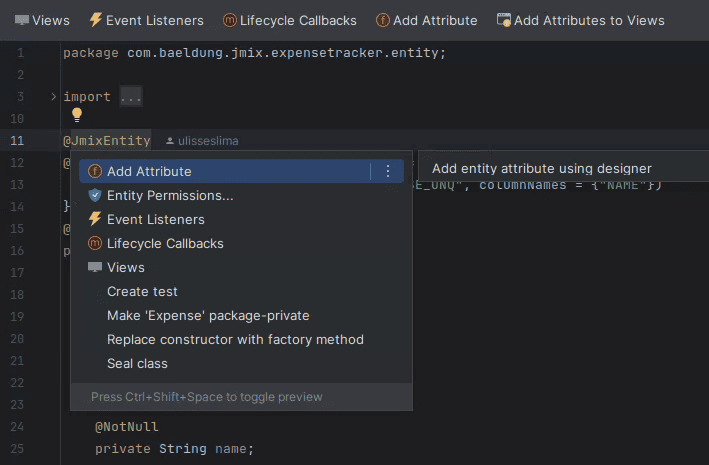
These options also appear in the top panel.
3.1. Adding a CRUD UI for an Entity
While focusing on an entity in the Designer, let’s click on “Views,” “Create view,” then “Entity list and detail views,” which creates a page for listing and filtering existing items and a page for creating/viewing/editing items. We can develop UIs for entities with complete CRUD functionality without touching any code:
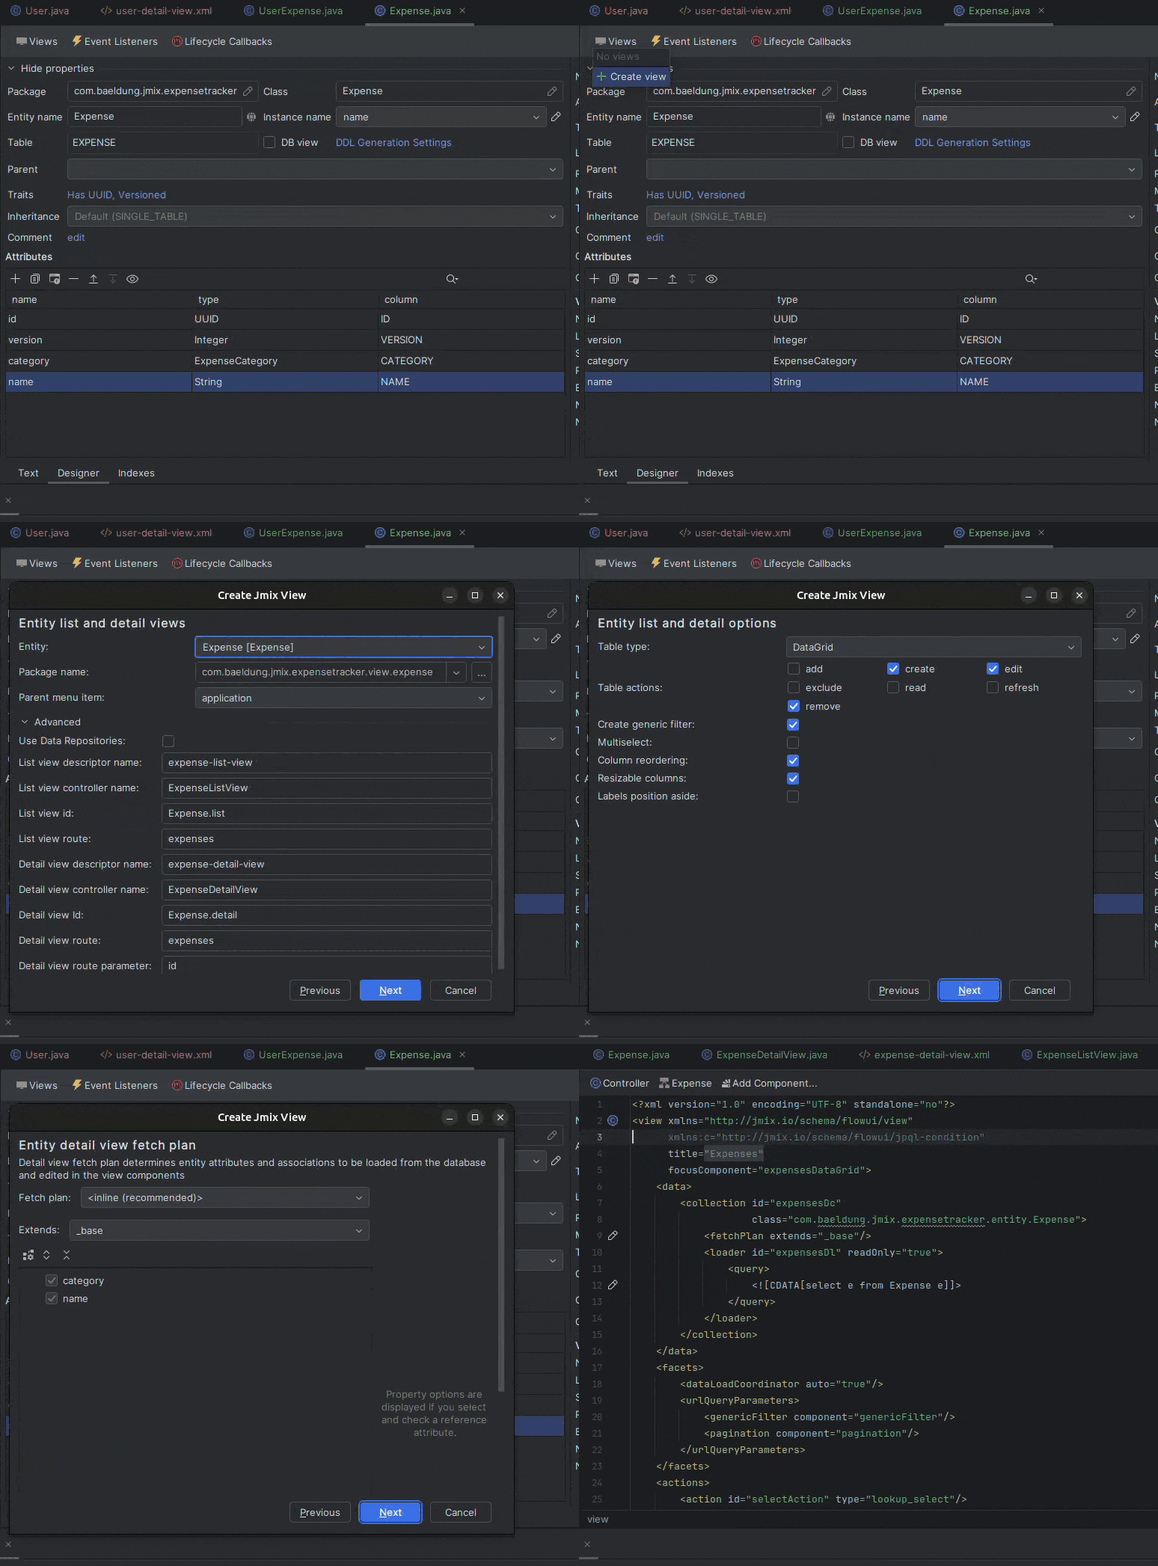
The wizard suggests good enough defaults and goes through a few key options:
- Entity: any of the @JmixEntity annotated classes. Defaults to the currently selected one
- Package name: defaults to the base package selected at project creation + view + the entity’s name
- Parent menu item: defaults to the one created along with the project
- Table actions: defaults to all CRUD actions
- Create a generic filter: this allows us to perform basic search filtering in the list view
- Fetch plan: defaults to fetching all columns from the row (excluding foreign keys)
- Localizable messages: allows us to change the titles of the two pages we’re creating
3.2. Creating Enumerations
We’ll limit expenses to a few categories. To do this, we’ll create an enum named ExpenseCategory with a few options:
- Education
- Food
- Health
- Housing
- Transportation
Let’s create this with the “New Enumeration” option:
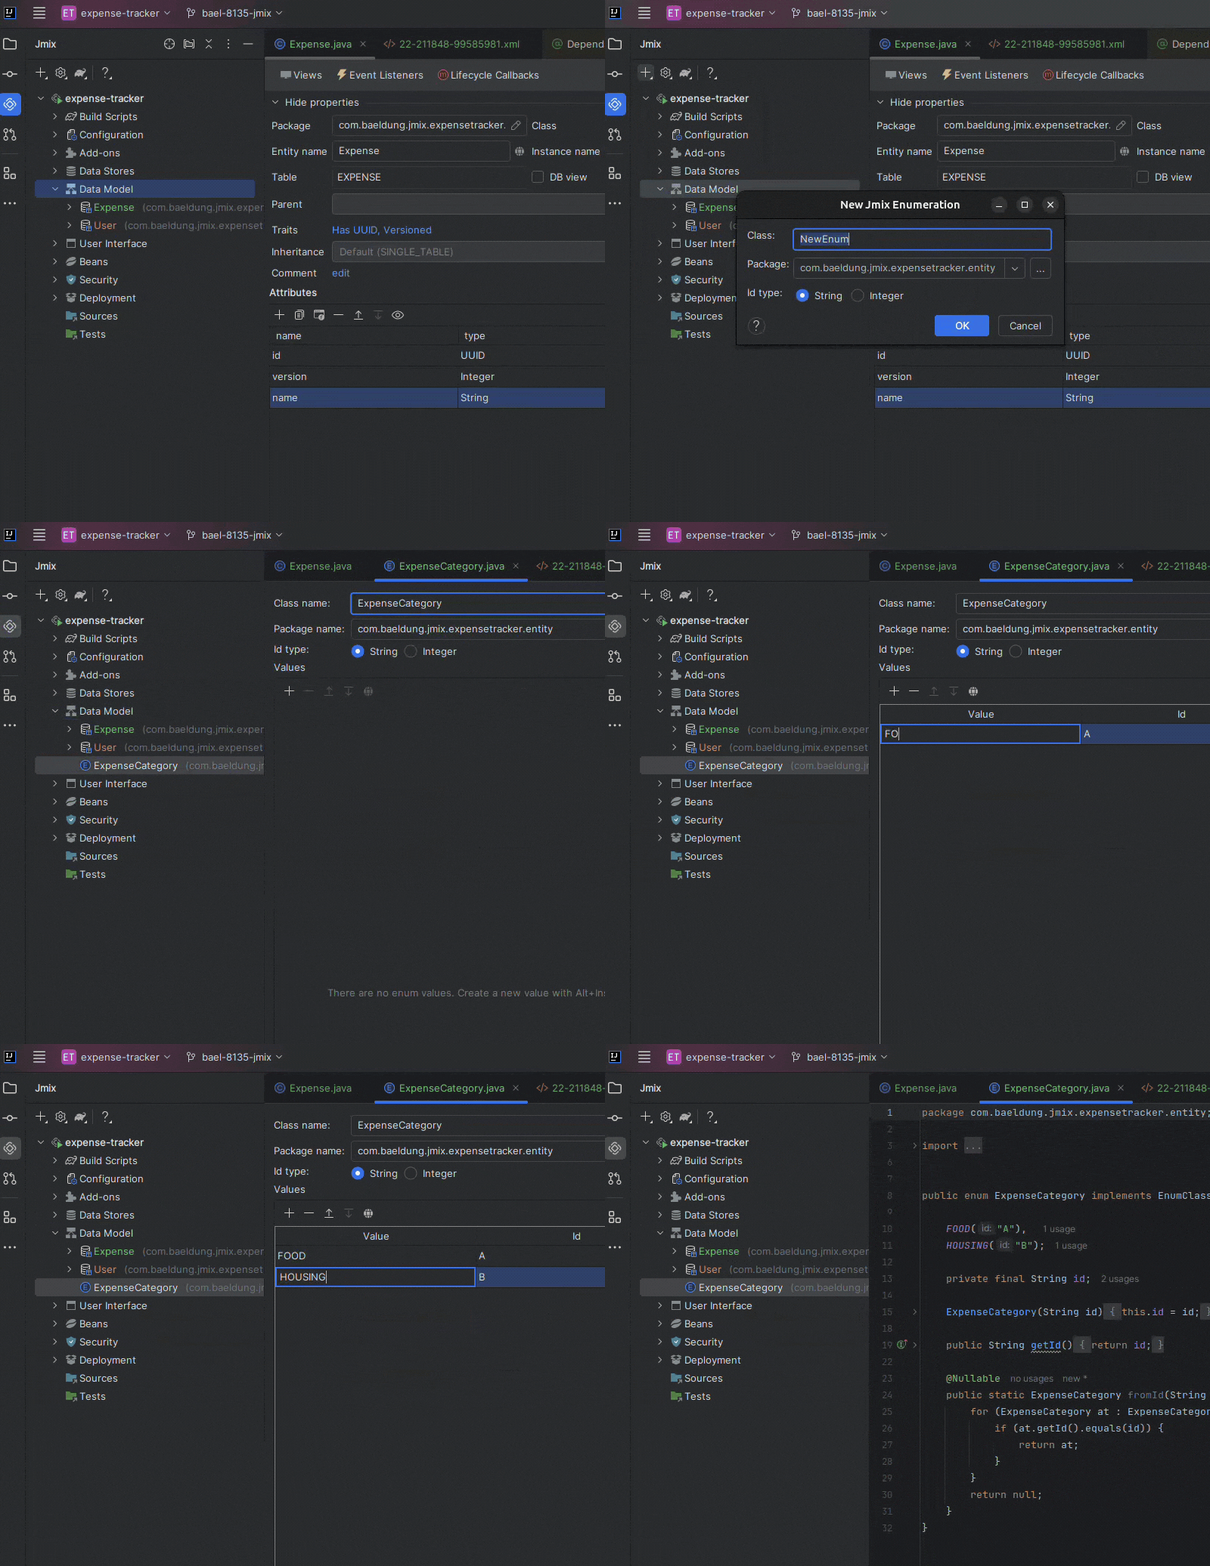
We can then add the ExpenseCategory to our Expense entity as a new mandatory attribute, choosing “ENUM” as the attribute type:
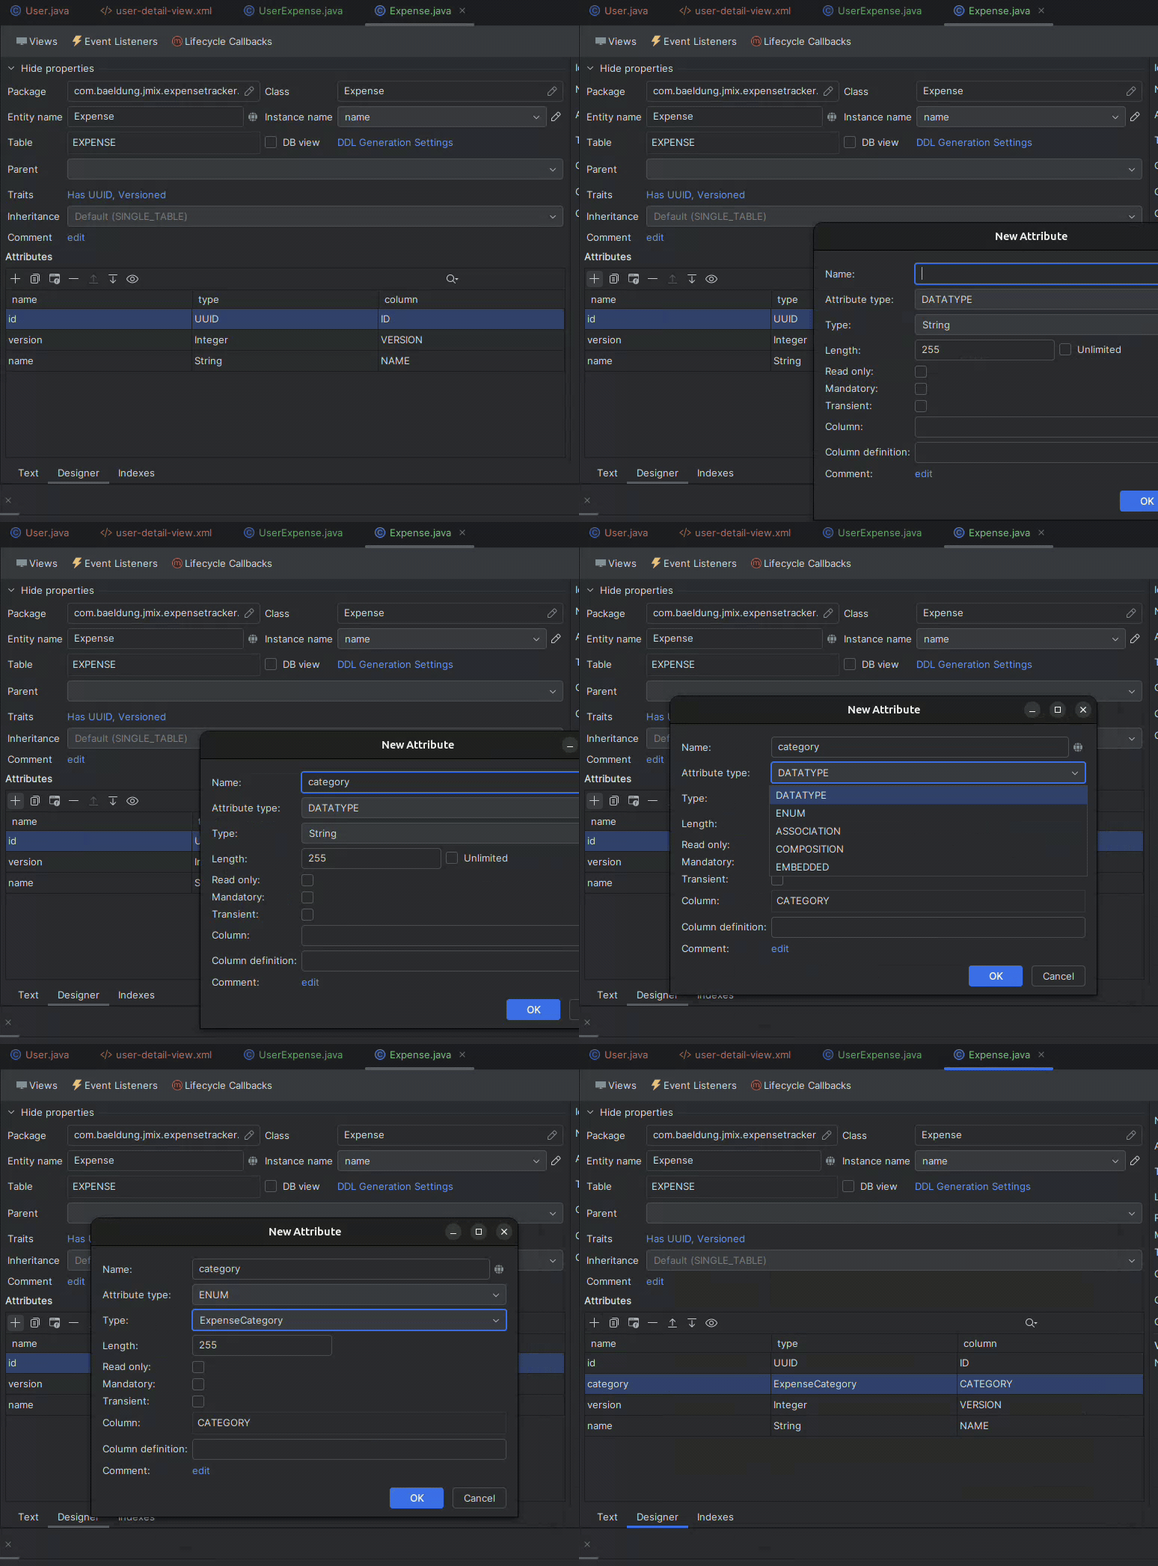
Since we created this attribute after creating our view, we can add it with the “Add to Views” button and choose in which views we want to see this property. This generates a select tag added to the detail view:
<formLayout id="form" dataContainer="expenseDc">
    <select id="categoryField" property="category"/>
    <textField id="nameField" property="name"/>
</formLayout>
Also, a column is added to the columns tag in the list view:
<columns resizable="true">
    <column property="category"/>
    <column property="name"/>
</columns>
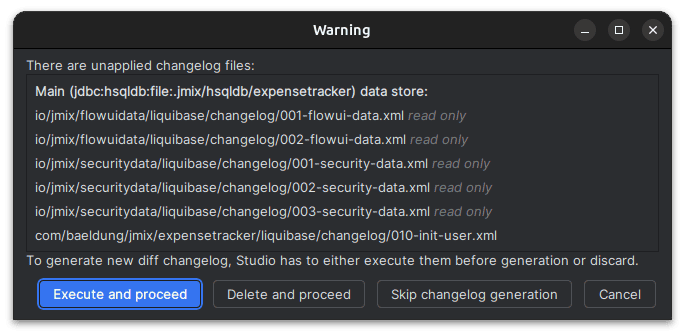
After completing the wizard, let’s launch the application. Jmix Studio automatically analyzes the data model against the data schema and generates Liquibase scripts with the changes, so we’ll see a dialog presenting the scripts to apply, and we only need to execute them to proceed:
After that, let’s check out our “Expenses” UI in the “Application” menu:
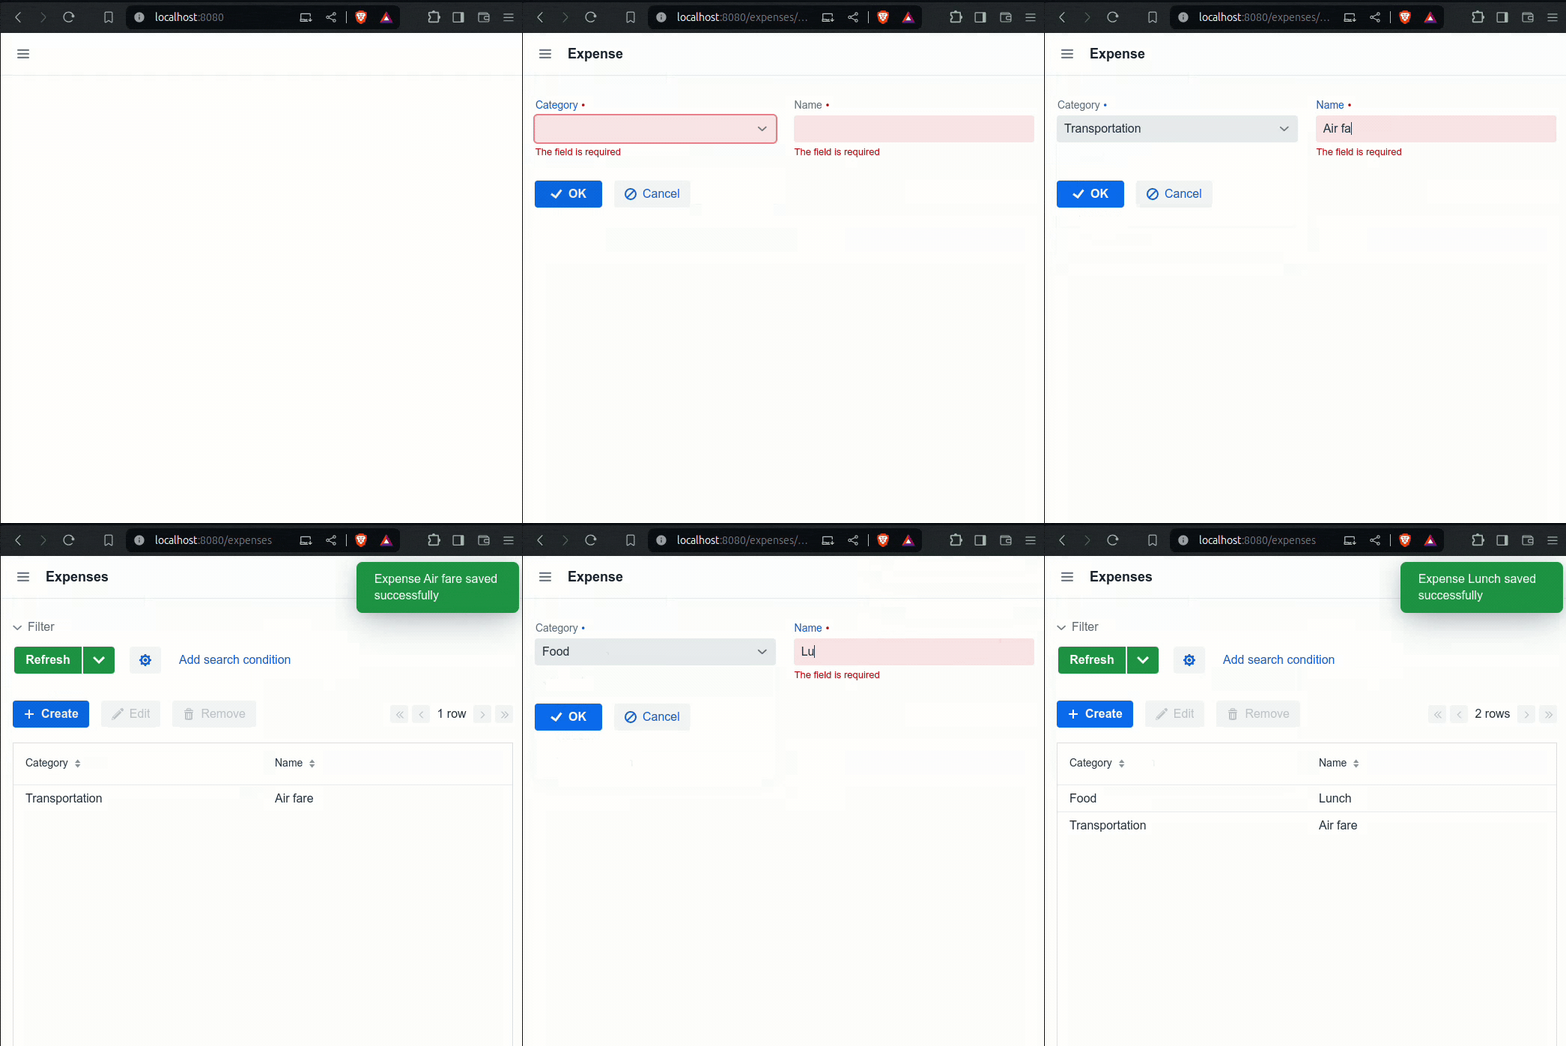
Note that we can already manage Expense items and that the UI is responsive. Also, we get the credentials filled out when logging in. This behavior is helpful for testing and is added in the application.properties:
ui.login.defaultUsername = admin
ui.login.defaultPassword = admin
3.3. Creating a Unique Constraint
Creating a unique constraint for expense names is a good idea to avoid duplications. When adding it via the plugin, it’s added to our Java class with the @UniqueConstraint annotation, which also includes validation in the UI:
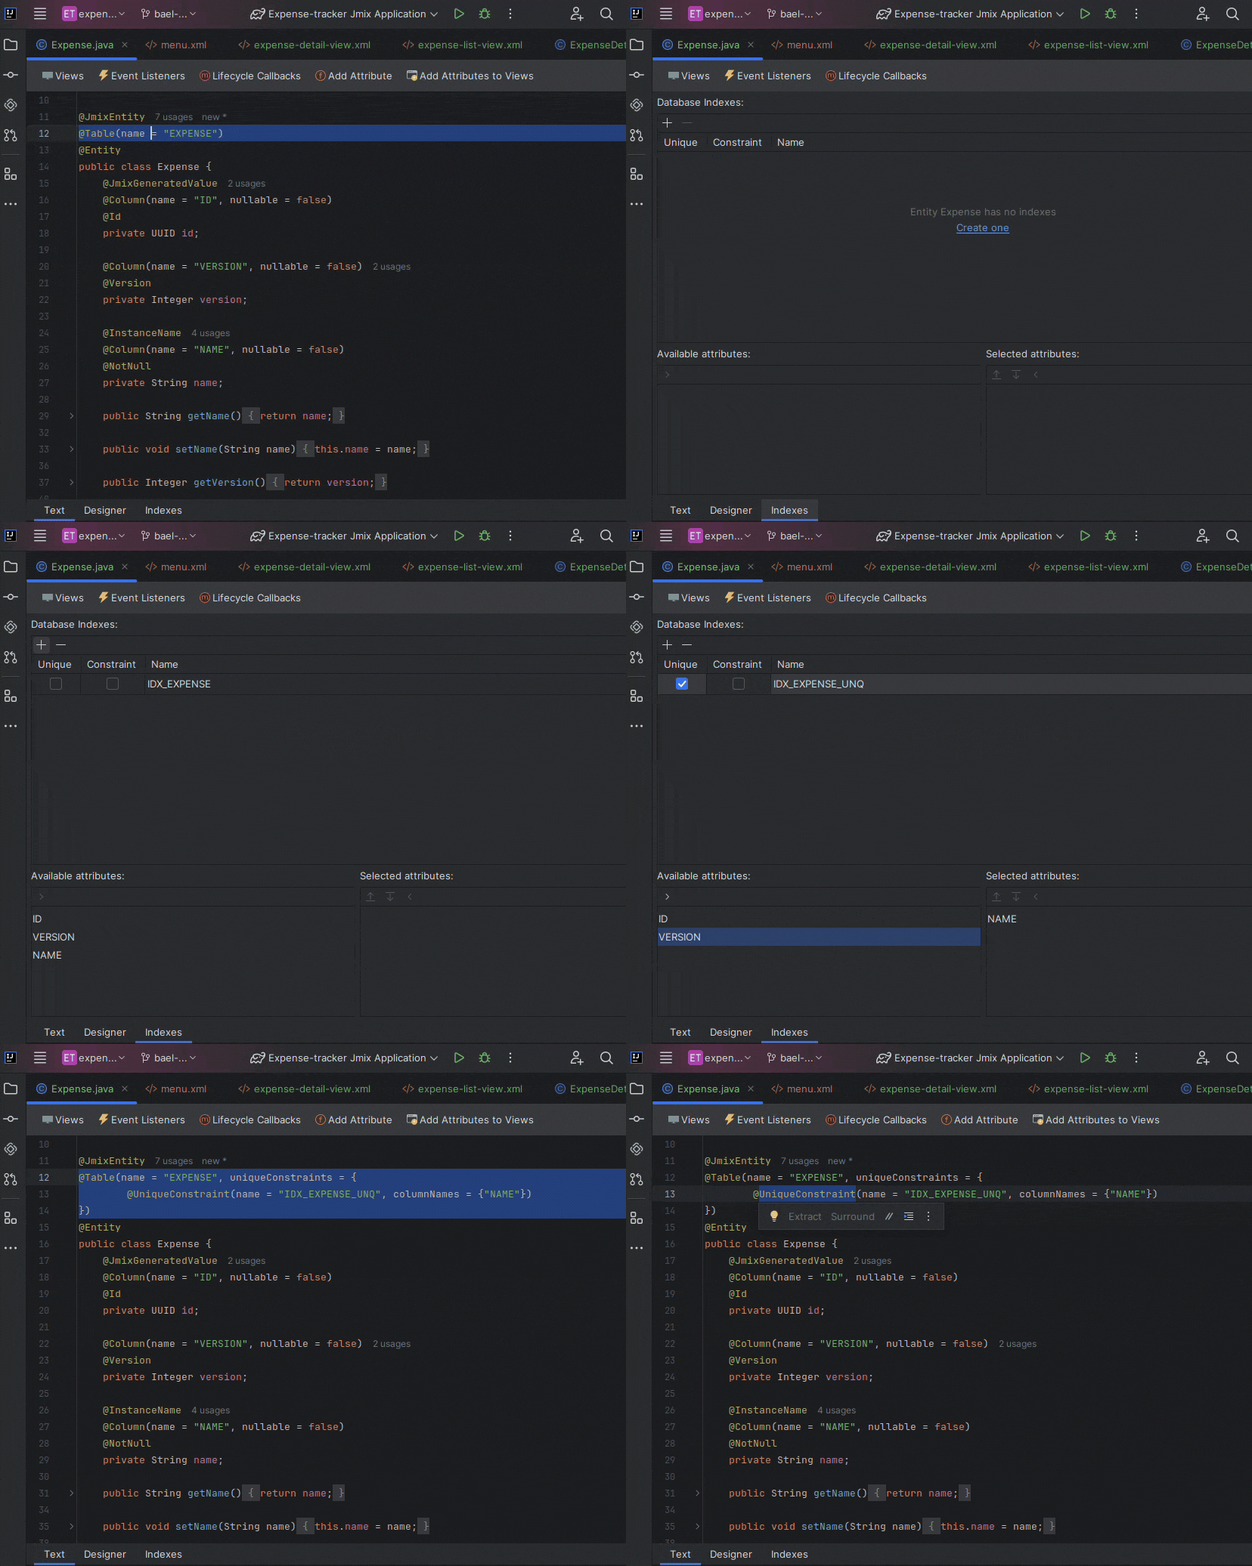
Again, the generated Liquibase changelog takes care of adding it to the database:
<databaseChangeLog>
    <changeSet id="1" author="expense-tracker">
        <addUniqueConstraint columnNames="NAME" constraintName="IDX_EXPENSE_UNQ" tableName="EXPENSE"/>
    </changeSet>
</databaseChangeLog>
We can personalize the error message for when the constraint is violated by switching to the Jmix panel, navigating to “User Interface” in the project structure, and then opening “Message Bundle.” All the messages from the application are there. Let’s add a new one:
databaseUniqueConstraintViolation.IDX_EXPENSE_UNQ=An expense with the same name already existsJmix recognizes a few particular prefixes for localization messages. For unique constraint violations, we have to start our message key with “databaseUniqueConstraintViolation.”, followed by our constraint name in the database, IDX_EXPENSE_UNQ.
4. Adding an Entity With Reference Attributes
We’ll need a new entity to represent an employee’s Expense. The plugin supports adding reference attributes, so let’s create a UserExpense entity and associate it with a reference to an Expense, a User, and related attributes:
| NAME | ATTRIBUTE TYPE | TYPE | CARDINALITY | MANDATORY |
|---|---|---|---|---|
| user | ASSOCIATION | User | Many to One | true |
| expense | ASSOCIATION | Expense | Many to One | true |
| amount | DATATYPE | Double | – | true |
| date | DATATYPE | LocalDate | – | true |
| details | DATATYPE | String | – | false |
Our new entity also uses the “versioned” option:
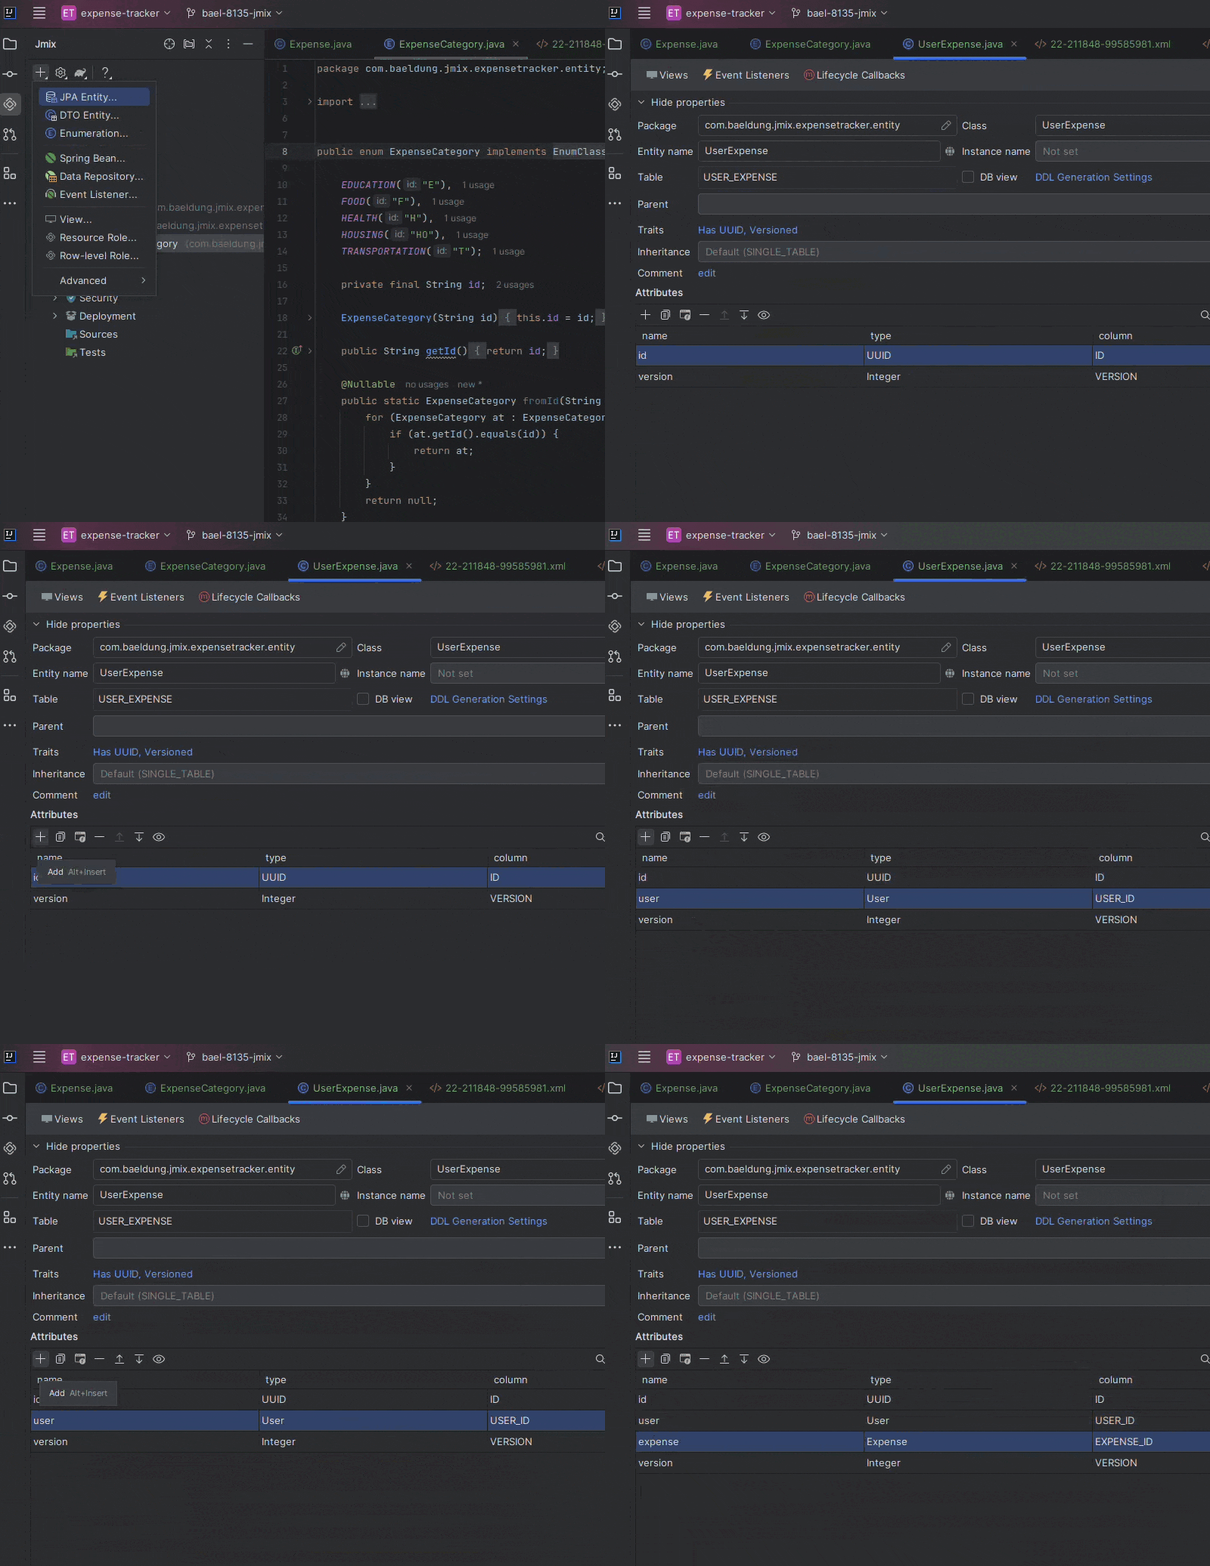
Opening our newly created entity, we can see how Jmix uses familiar JPA annotations and indexes our foreign keys:
@JmixEntity
@Table(name = "USER_EXPENSE", indexes = {
  @Index(name = "IDX_USER_EXPENSE_USER", columnList = "USER_ID"),
  @Index(name = "IDX_USER_EXPENSE_EXPENSE", columnList = "EXPENSE_ID")
})
@Entity
public class UserExpense {
    // standard ID and version fields...
}
Moreover, it uses FetchType.LAZY for the associations instead of the EAGER default so we don’t accidentally compromise performance. Let’s check the generated User association:
@JoinColumn(name = "USER_ID", nullable = false)
@NotNull
@ManyToOne(fetch = FetchType.LAZY, optional = false)
private User user;
The association uses JPA annotations, so it’s easy to change later if necessary.
4.1. Adding Date Validation
When we head over to the “Attributes” section in the Designer and choose a date property, we notice a few validation options appear. Let’s click on “not set” to set it for PastOrPresent. We can include a localized message by clicking the globe icon instead of using a literal message:
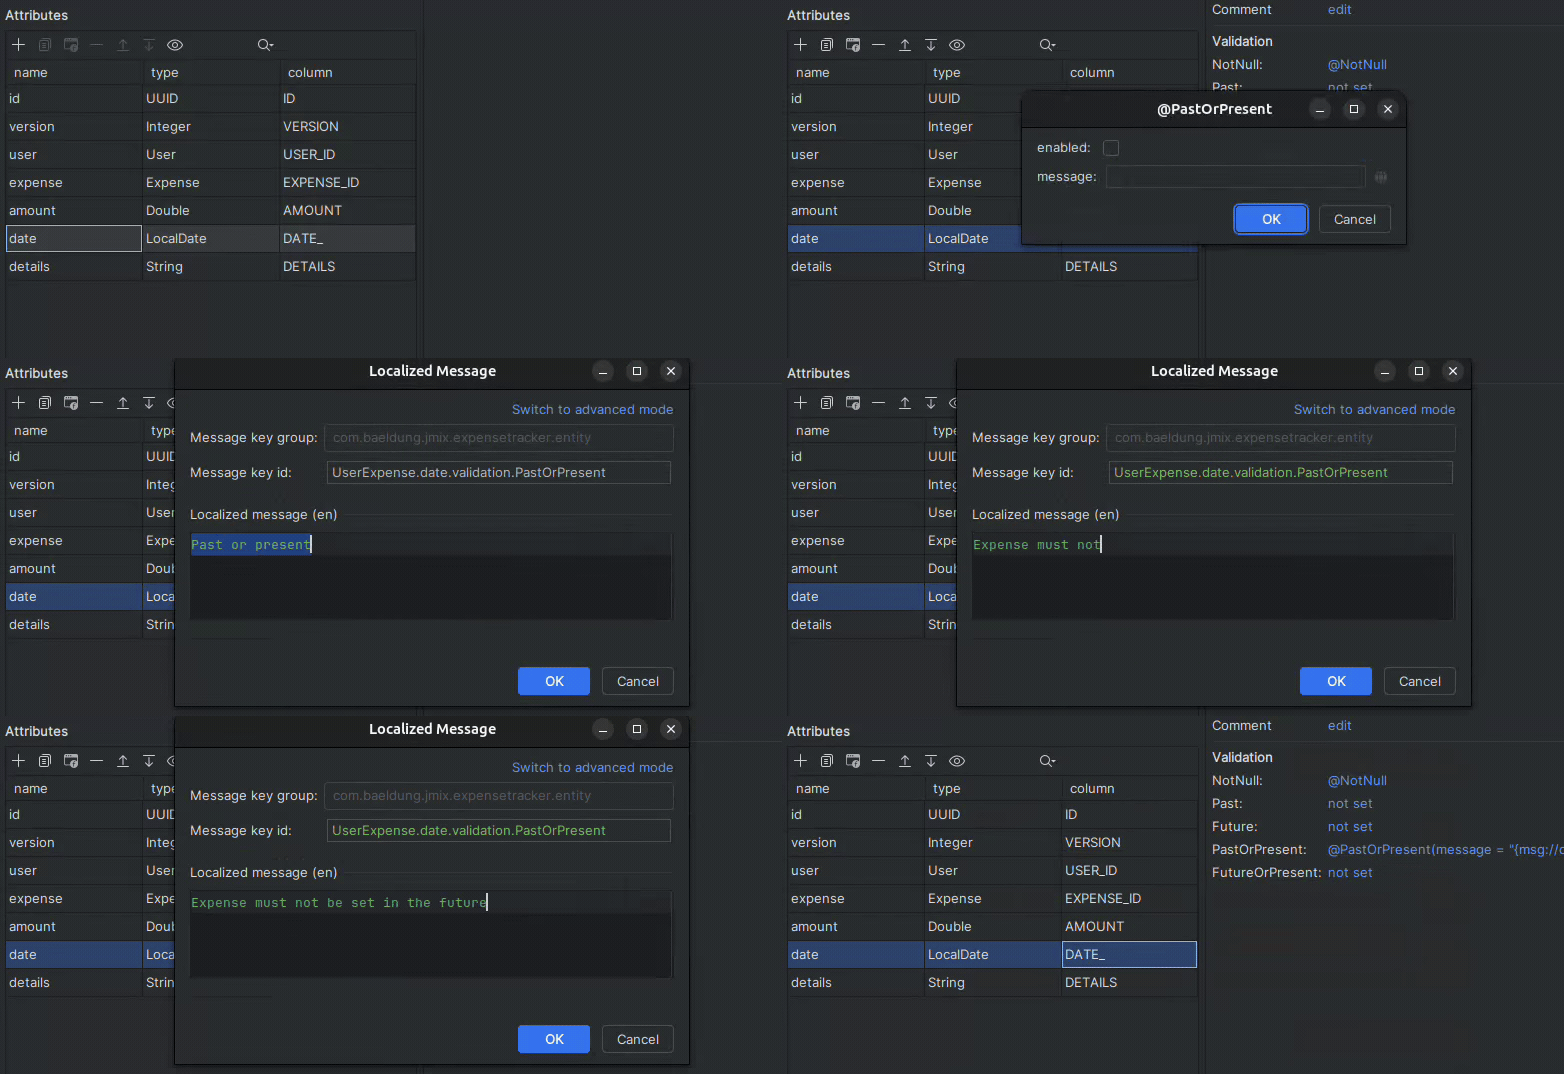
This validation blocks users from creating expenses with a future date. Including this annotation also turns off the selection of future dates for the date picker component that Jmix creates in our views.
4.2. Creating a Master-Detail View
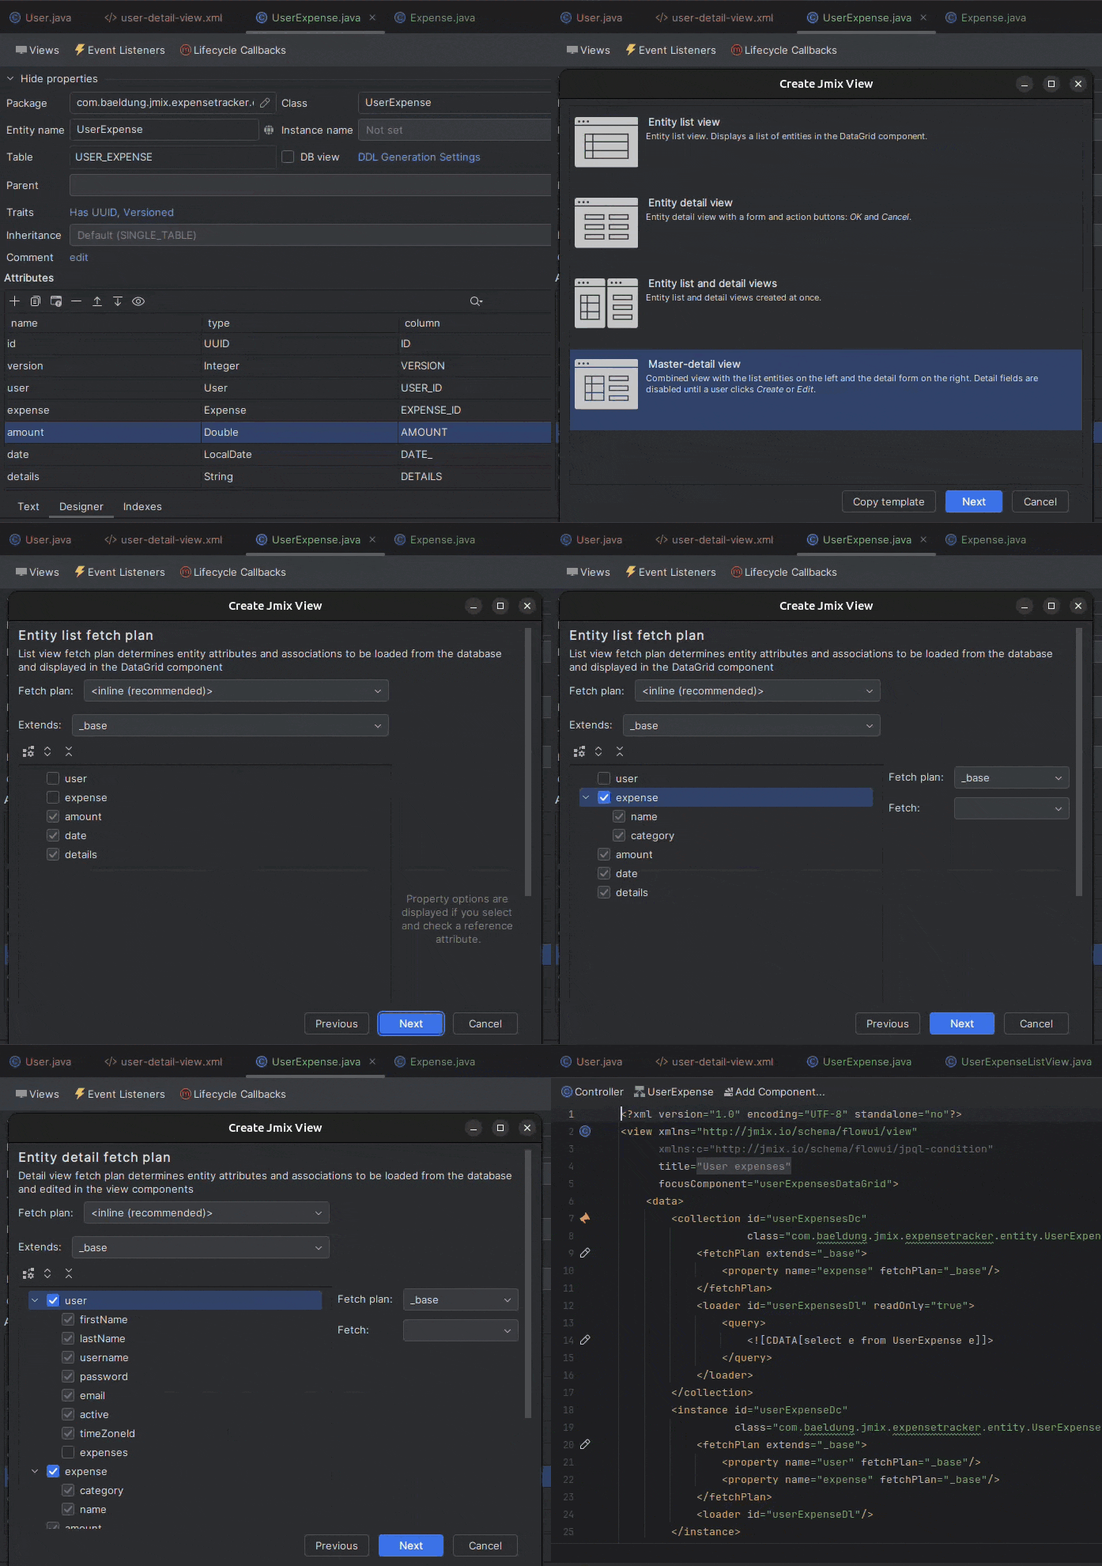
We’ve created a list view and a detail view for the Expense entity. Now, for the UserExpense entity, let’s try the Master-detail view, which combines both in a single UI. This time, in the entity list/detail fetch plan, we’ll add the expense property to include them in the initial query that lists all user expenses. And, only for the detail fetch plan, we’ll add the user property so we can query all the information necessary to open details for an expense:
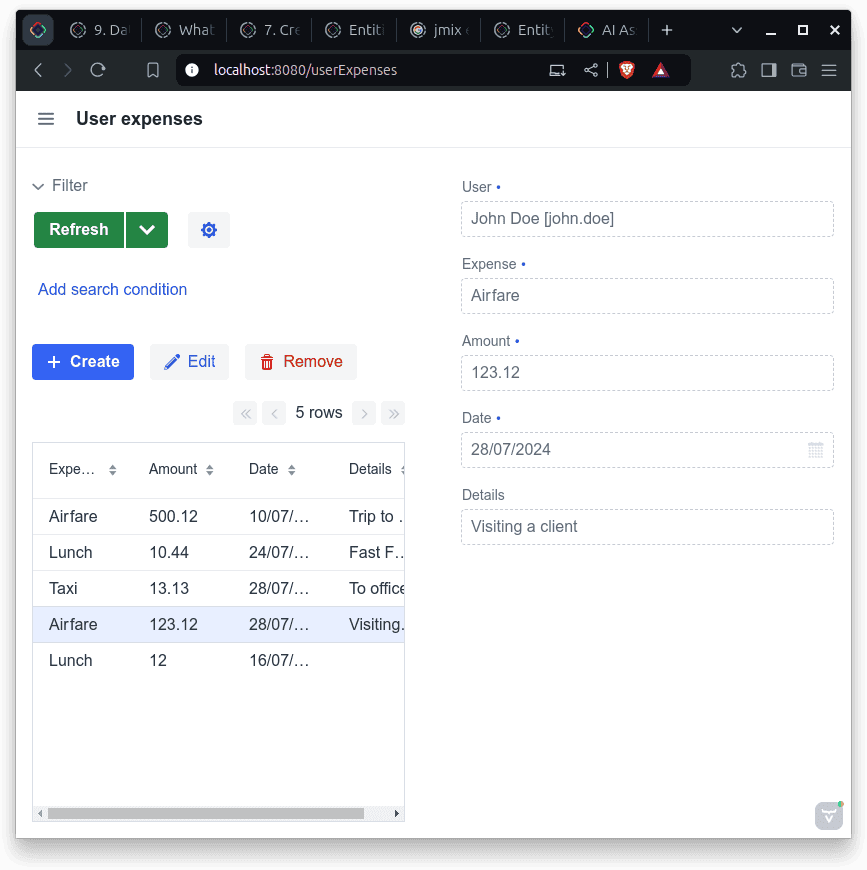
As before, we’ll find our new view in the application menu, under “User expenses,” ready to include some items:
Inspecting the generated code for user-expense-list-view.xml, we’ll notice how the plugin already included complex components for us, like a date picker, so we don’t have to bother with frontend stuff:
<datePicker id="dateField" property="date"/>However, this page gives full access to any user in the application. We’ll see how to control access later.
4.3. Adding Composition Attributes
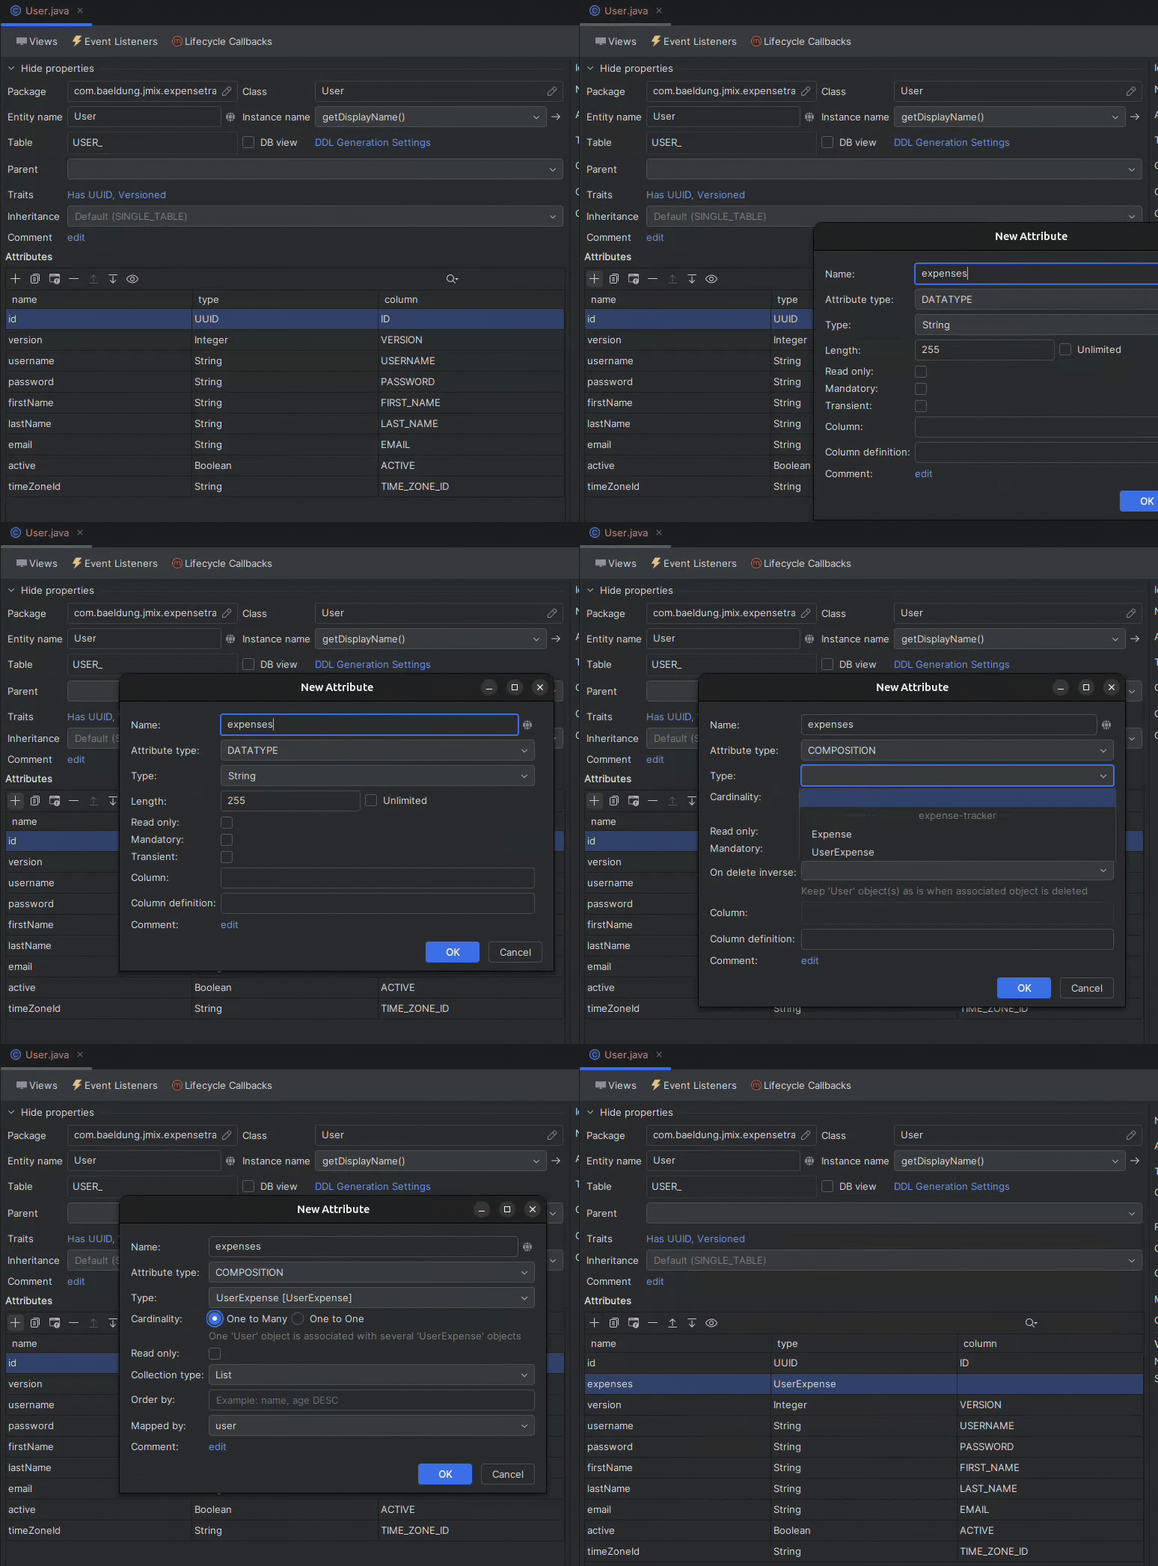
Now, let’s go back to the User entity and include an expenses attribute to list user expenses in our details view for quick reference. We’ll do this by adding a new attribute with the “composition” type and choosing UserExpense with one-to-many cardinality:
To add it to the user detail view, select the expenses attribute in the Designer and click the “Add to Views” button, checking its box in the User.detail layout view:
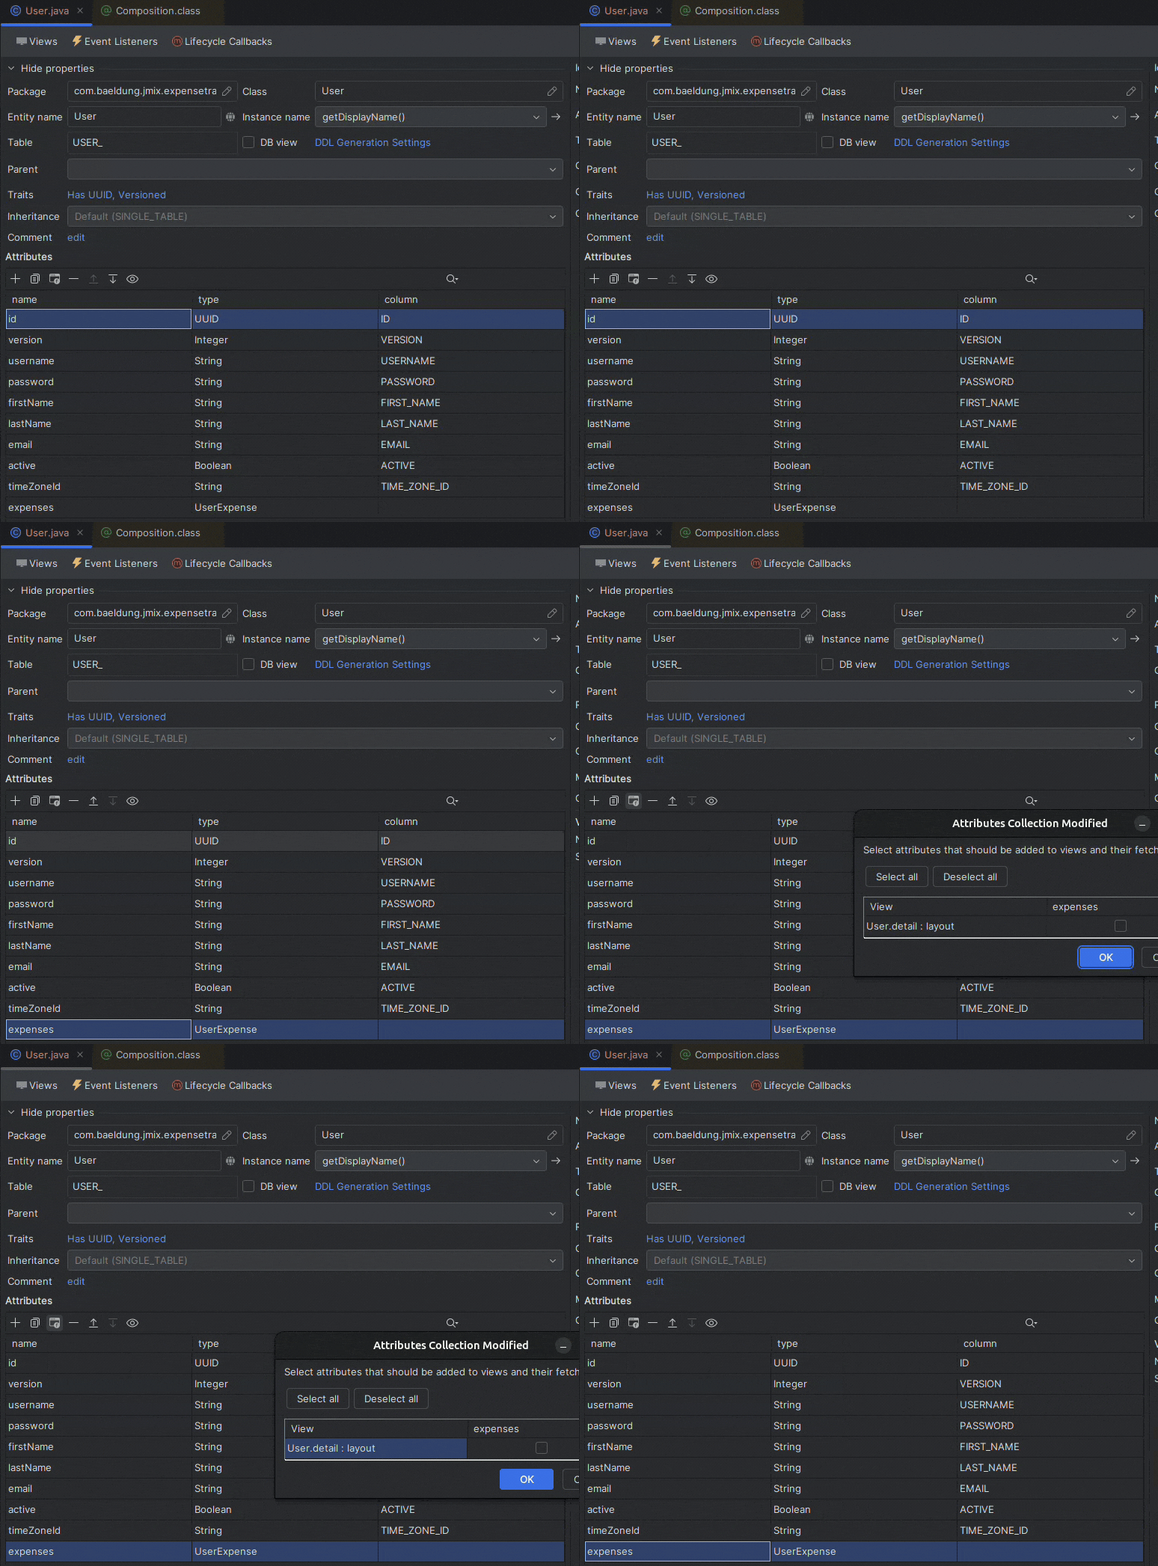
If we check user-detail-view.xml, we’ll see that Jmix added a fetchPlan for the expenses attribute:
<fetchPlan extends="_base">
    <property name="expenses" fetchPlan="_base"/>
</fetchPlan>
Fetch plans help avoid the N+1 problem by including any necessary joins in the initial query instead of making extra queries. We’ll also find a data container for binding to view objects:
<collection id="expensesDc" property="expenses"/>And a data grid element that allows CRUD operations on expenses:
<dataGrid id="expensesDataGrid" dataContainer="expensesDc">
    <actions>
        <action id="create" type="list_create"/>
        <action id="edit" type="list_edit"/>
        <action id="remove" type="list_remove"/>
    </actions>
    <columns>
        <column property="version"/>
        <column property="amount"/>
        ...
    </columns>
</dataGrid>
These are all defined with Jmix’s declarative layout tags and components.
4.4. Adding Fetched Columns to an Existing View
Let’s explore how this declarative layout definition works by adding properties from the Expense class to the expensesDataGrid component we’ve created. First, we’ll open user-detail-view.xml and select the data grid. Then, in the Jmix UI panel, we click on columns and select “Add” and “Column.” Finally, let’s choose the name and category properties from the expense object:
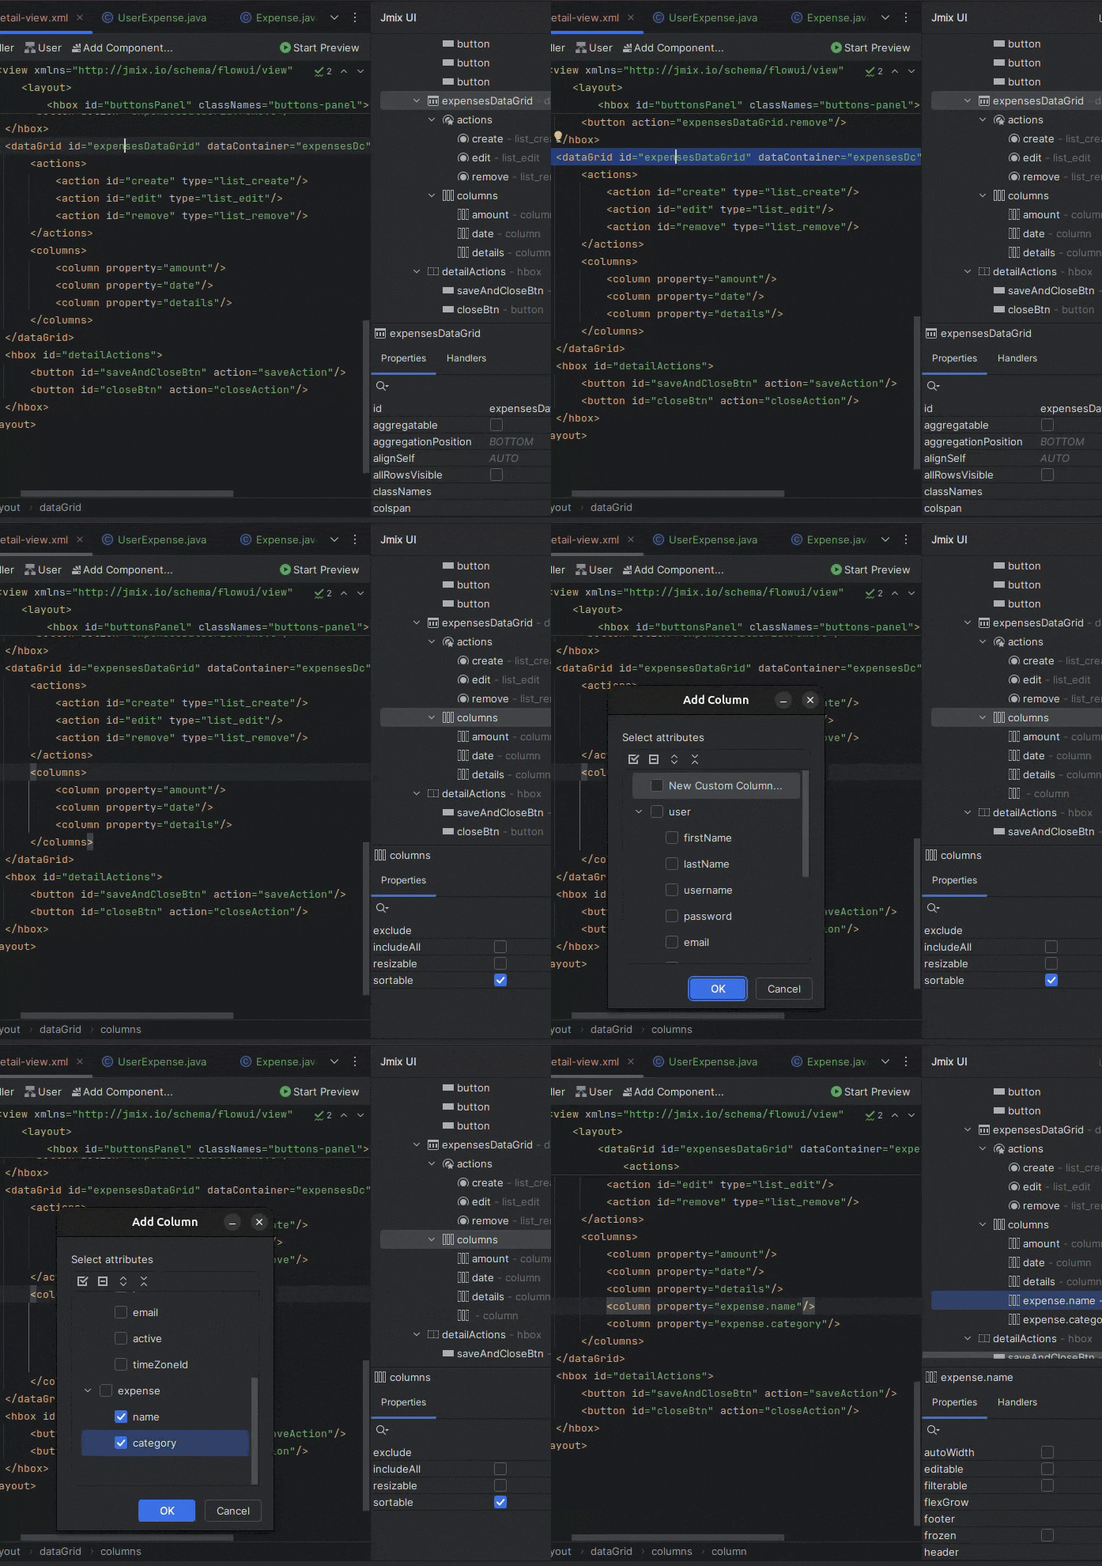
Besides the data grid receiving the new column elements, the fetch plan now includes the expense object:
<fetchPlan extends="_base">
    <property name="expenses" fetchPlan="_base">
        <property name="expense" fetchPlan="_base"/>
    </property>
</fetchPlan>
As a result, we’ll now see a data grid of user expenses directly when accessing the User detail view.
4.5. Hot Deploy
With Jmix Studio, most simple changes – like the new columns we added – are hot deployed, so we don’t need to relaunch our application to see the changes; a page refresh is enough:
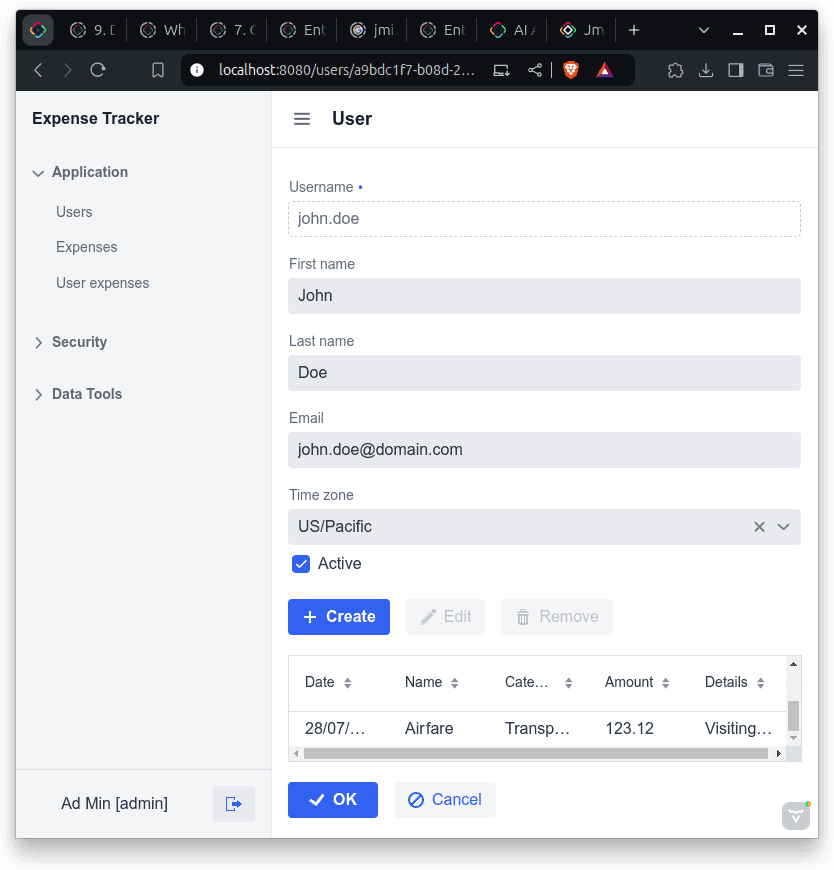
Updates are applied automatically when developing with Jmix locally.
5. Setting Up User Permissions
When accessing the application, we see the initial security roles created along with the project in the “Resource roles” menu under “Security.” These include a full-access role and a minimal role that only accepts logging in to the application.
We’ll create a role so employees can access the UserExpense menu and manage their expenses. Then, we’ll create a row-level access role to restrict users so they can only retrieve items that match their ID. This restriction guarantees that users can only see their own expenses.
5.1. Creating a New Resource Role
Resource roles control access to specific objects (like entities, entity attributes, and UI views) and operations in the project requested via the UI or the API. Since we’re only using views, let’s create one named EmployeeRole by right-clicking the “Security” node in Jmix, choosing “New,” and ensuring we mark the security scope as “UI”:
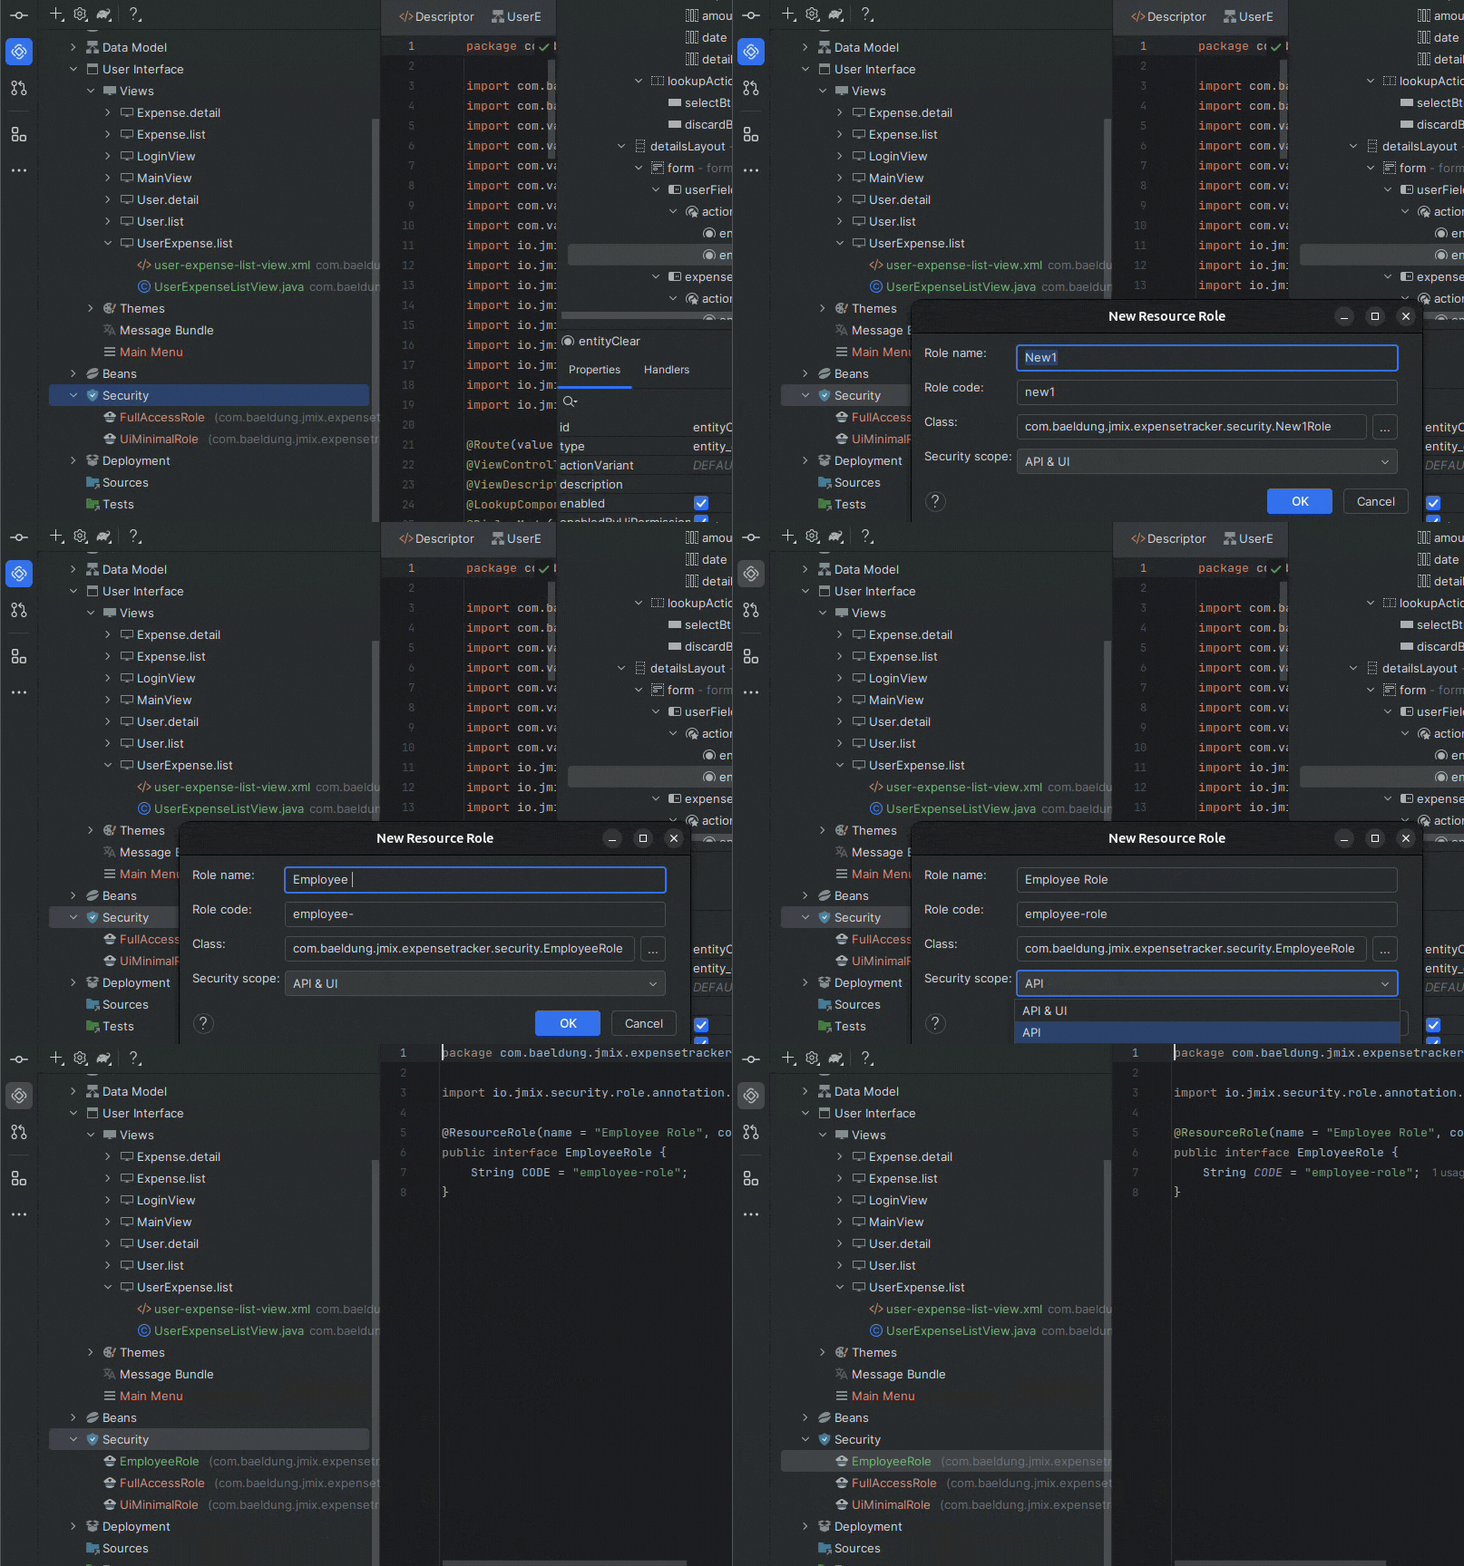
The role starts empty, containing only the code that’ll also appear in the UI:
@ResourceRole(name = "Employee Role", code = EmployeeRole.CODE, scope = "UI")
public interface EmployeeRole {
    String CODE = "employee-role";
}
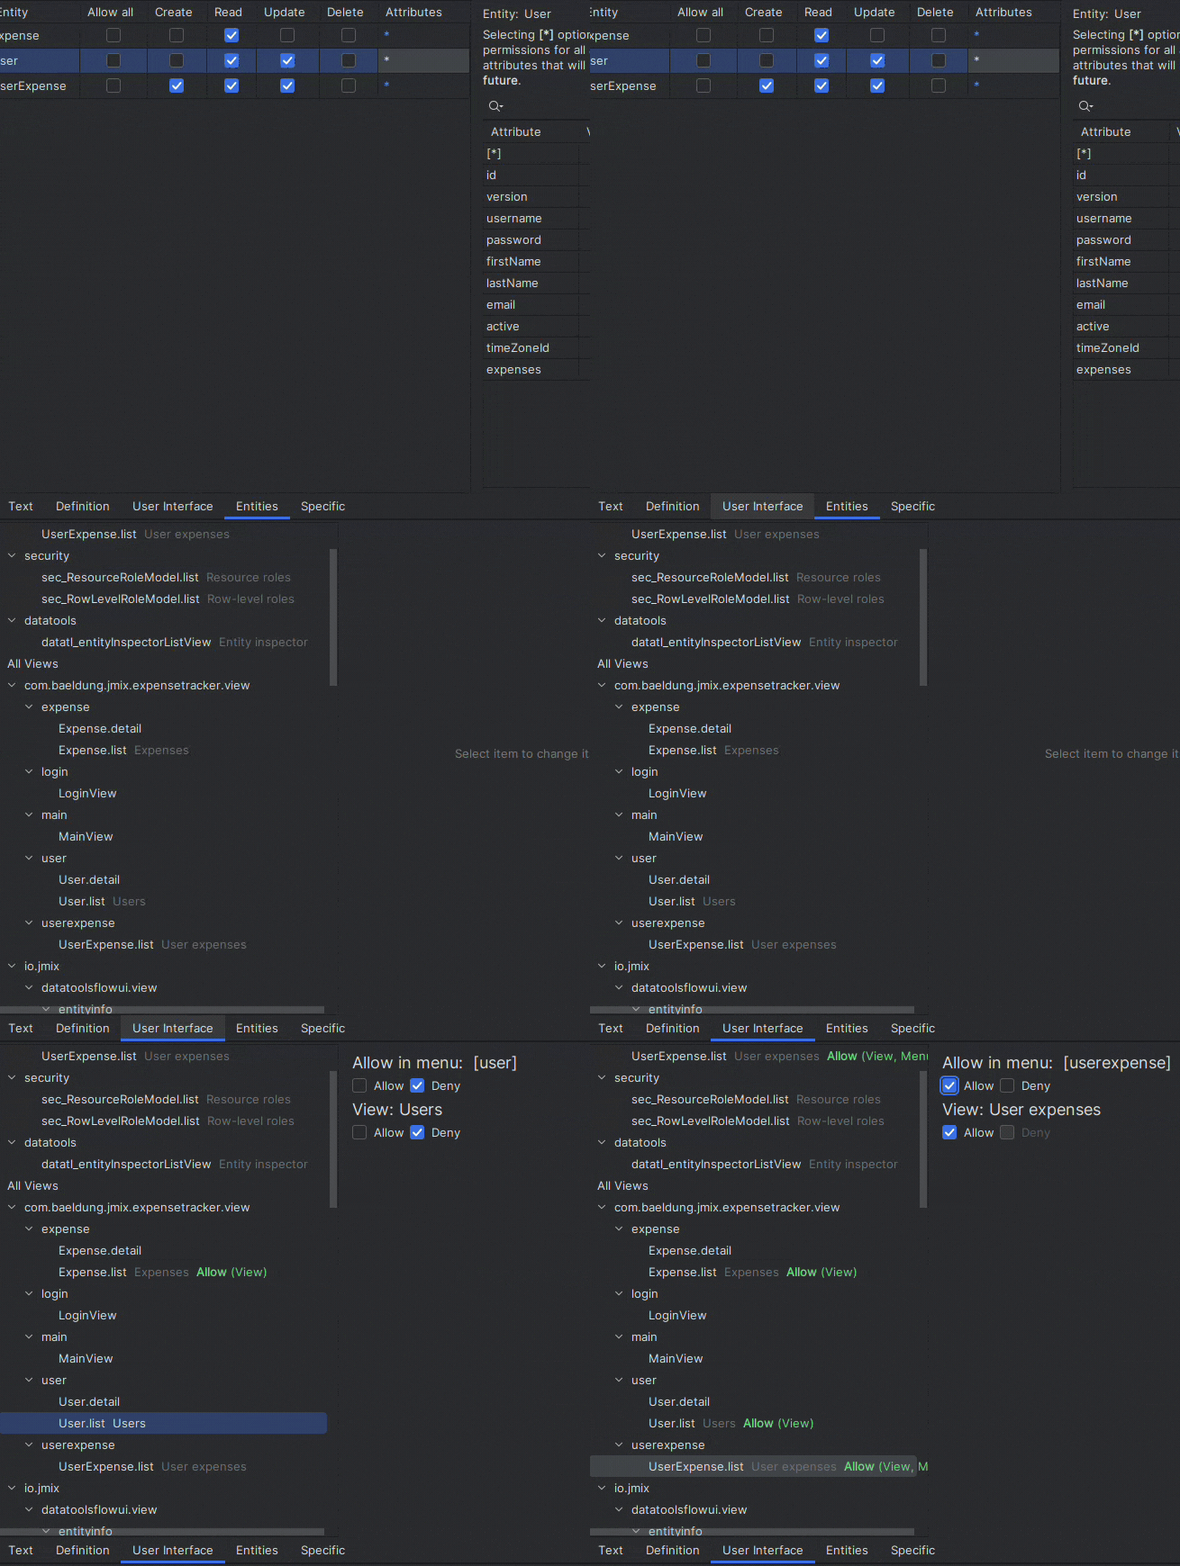
So, on our EmployeeRole page, let’s click Entities to define what operations on entities this role will permit. We’ll need all actions on UserExpense, except for deletion, reading and updating on User, and reading on Expense, so that we can select one of the available expense types when registering our own:
| ENTITY | CREATE | READ | UPDATE |
|---|---|---|---|
| Expense | X | ||
| User | X | X | |
| UserExpense | X | X | X |
Then, in the User Interface tab, we’ll select the views this role has access to. Since views can be interconnected, this page allows selecting between view access (via a component on the page) or menu access. Our UserExpense view is connected to the User view (for showing their details) and to the Expense view (for listing available expense types), so we’ll check “View” for User.list, Expense.list, and UserExpense.list. Finally, for the UserExpense.list, we’ll also check “Menu,” making it accessible via the UI:
5.2. Creating a New Row-Level Role With a JPQL Policy
To ensure employees can only see their own expenses when accessing the menu, we’ll create a row-level policy that’ll restrict every query only to fetch rows matching the ID of the logged-in User.
To do this, we’ll also need to add a JPQL policy. So, let’s create a row-level role named EmployeeRowLevelAccessRole by right-clicking the “Security” node in Jmix and choosing “New.” Then, in our newly created role, we’ll click “Add Policy” and then “Add JPQL Policy” to add policies for the entities that reference User:
- Entity: UserExpense; where clause: {E}.user.id = :current_user_id
- Entity: User; where clause: {E}.id = :current_user_id
When adding JPQL policies, {E} represents the current entity. We also get a few unique variables, like current_user_id, which resolves to the one currently logged in. Auto-complete is available in the plugin, so we can easily find our way around.
In the end, we can assign these roles to any users via the UI by accessing “Resource roles” and “Row-level roles” in the “Security” menu. Or, more conveniently, by using the “Role assignments” button in the list view, where we can add both roles to anyone in the list:
Users with these roles can now access the Expense list view and register their expenses. Most importantly, they won’t have access to expenses from others.
6. Conclusion
In this article, we demonstrated how to easily create a functional and secure web application, highlighting Jmix Studio’s potential to significantly accelerate our development cycle while maintaining high functionality and user experience standards. The comprehensive support for CRUD operations, role-based access control, and validation ensures security and usability.
As always, the source code is available over on GitHub.


