1. Overview
The Visual Studio Code (VSCode) editor is gaining popularity among Java developers. According to a survey by Baeldung, VSCode ranks third among Integrated Development Environments (IDEs) used by Java developers.
While build tools like Maven and Gradle simplify dependency management, beginners often start learning Java without them. VSCode provides an easy setup for manually adding JAR files to a Java project.
In this tutorial, we’ll learn how to add JAR files manually to a VSCode project through settings.json and the Reference Libraries section.
2. Why Add JAR Files Manually?
Adding JARs manually can be a great learning experience, especially for beginners who are learning about classpath management. Also, it can be ideal for a small project and quick prototyping. Furthermore, some legacy code may require manual JAR management.
However, manual JAR management may not be ideal for a large project because of the difficulty in managing the dependency versions and potential version conflicts. Also, it can be time-consuming for a larger project.
Build tools like Maven and Gradle solve these bottlenecks by simplifying the process of adding and updating external libraries.
3. Bootstrapping a Java Project With VSCode
To bootstrap a Java application with VSCode, we need to install the Java Extension Pack. Next, let’s open the Command Palette by clicking View at the toolbar and selecting the Command Palette option. Alternatively, we can use Ctrl + Shift + P shortcut keys.
Then, we need to type “Java: Create Java Project” and select it. Next, VSCode prompts us to select the build tool, let’s choose the “No build tools” option. Finally, we need to choose a name for the project and save it in a desired directory.
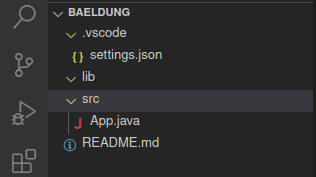
VSCode creates a new project with the following structure:

The .vscode folder contains the settings.json file. The lib folder can contain external jar files for the project. Finally, the src folder contains the source code.
4. Adding JAR File Through settings.json
After creating a project, our project contains a folder named .vscode which includes the settings.json file. The settings.json file allows us to specify the path to external dependencies, the output directory for compiled classes, and the path to the source code. This file is essential when managing dependency manually.
4.1. Understanding settings.json
The settings.json file manages the project settings. Here’s the initial content of the file:
{
    "java.project.sourcePaths": ["src"],
    "java.project.outputPath": "bin",
    "java.project.referencedLibraries": [
        "lib/**/*.jar"
    ]
}
The java.project.referencedLibraries key specifies the paths to JAR files. The values of the key are paths to the JAR files, typically defined as an array to accommodate multiple paths.
By default, it adds the lib folder already, any JAR file added to this folder is automatically added to the classpath.
4.2. Adding a JAR File
Let’s edit the App class created by default by logging ‘Hello World!‘ to the console using the SLF4J library:
class App {
    static Logger logger = LoggerFactory.getLogger(App.class);
    public static void main(String[] args) throws Exception {
        logger.info("Hello World!");
    }
}
However, the SLF4J library is not in our classpath, hence VSCode marks the Logger object with an error:

Next, let’s download the slf4j-api-2.1.0-alpha1.jar and slf4j-simple-2.1.0-alpha1.jar and add them to the lib folder:

After adding the downloaded JAR files to the lib folder, we can import the dependency without error. Note the lib folder is registered by default.
However, we may decide to reference the JAR file from another folder entirely by specifying the JAR file path in settings.json:
{
    "java.project.sourcePaths": ["src"],
    "java.project.outputPath": "bin",
    "java.project.referencedLibraries": [
        "lib/**/*.jar",
        "/home/baeldung/Downloads/slf4j-api-2.1.0-alpha1.jar",
        "/home/baeldung/Downloads/slf4j-simple-2.1.0-alpha1.jar"
    ]
}
Here, we add the path to JAR files from different folders different from the lib folder.
5. Adding JAR File Through the Sidebar Option
VSCode by default creates a section named ‘JAVA PROJECTS‘ at the sidebar when working on a Java project. This section when expanded has the Referenced Libraries and JRE System Library options:

To add a JAR file, let’s click on the plus sign to locate a JAR file and add it to our project:

After clicking the plus sign and locating the file, the Referenced libraries option is updated. Notably, the settings.json file also gets updated with the path of the JAR file.
Also, when we add a JAR file via the settings.json file, the Referenced libraries get updated with the JAR file.
6. Conclusion
In this article, we learned how to create a Java project in VSCode without a build tool. Then, we deep-dived into how to add an external jar file to the project by specifying the file location in the settings.json file or by adding it through the Reference Libraries section.


