1. Overview
For an end-user, the process of form submission is convenient, and to some extent, equivalent to just entering data and clicking on a submit button. However, from an engineering perspective, it takes an encoding mechanism to reliably send and receive this data from the client-side to the server-side for back-end processing.
For the scope of this tutorial, we'll focus on creating a form that sends its data as application/x-www-form-urlencoded content type in a Spring web application.
2. Form Data Encoding
The most commonly used HTTP method for form submissions is POST. However, for idempotent form submissions, we can also use the HTTP GET method. And, the way to specify the method is through the form's method attribute.
For forms that use the GET method, the entire form data is sent as part of the query string. But, if we're using the POST method, then its data is sent as part of the body of the HTTP request.
Moreover, in the latter case, we can also specify the encoding of data with the form's enctype attribute, which can take two values, namely application/x-www-form-urlencoded and multipart/form-data.
2.1. Media Type application/x-www-form-urlencoded
HTML forms have a default value of application/x-www-form-urlencoded for the enctype attribute as this takes care of the basic use cases where data is entirely text. Nevertheless, if our use case involves supporting file data, then we'll have to override it with a value of multipart/form-data.
Essentially, it sends the form data as key-value pairs separated by an ampersand (&) character. Also, the respective key and value are separated with the equals sign (=). Further, all reserved and non-alphanumeric characters are encoded using percent-encoding.
3. Form Submission in Browser
Now that we have our basics covered, let's go ahead and see how we can handle URL encoded form data for a simple use case of feedback submission in a Spring web app.
3.1. Domain Model
For our feedback form, we need to capture the email identifier of the submitter along with the comment. So, let's create our domain model in a Feedback class:
public class Feedback {
    private String emailId;
    private String comment;
}
3.2. Create Form
To use a simple HTML template to create our dynamic web form, we'll need to configure Thymeleaf in our project. After this, we're ready to add a GET endpoint /feedback that will serve the feedback view for the form:
@GetMapping(path = "/feedback")
public String getFeedbackForm(Model model) {
    Feedback feedback = new Feedback();
    model.addAttribute("feedback", feedback);
    return "feedback";
}
Note that we're using feedback as a model attribute to capture the user input. Next, let's create the feedback view in the feedback.html template:
<form action="#" method="post" th:action="@{/web/feedback}" th:object="${feedback}">
    <!-- form fields for feedback's submitter and comment info -->
</form>
Of course, we don't need to explicitly specify the enctype attribute as it'll pick the default value of application/x-www-form-urlencoded.
3.3. PRG Flow
As we're accepting user input through the browser feedback form, we must implement the POST/REDIRECT/GET (PRG) submission workflow to avoid duplicate submissions.
First, let's implement the POST endpoint /web/feedback that'll act as the action handler for the feedback form:
@PostMapping(
  path = "/web/feedback",
  consumes = {MediaType.APPLICATION_FORM_URLENCODED_VALUE})
public String handleBrowserSubmissions(Feedback feedback) throws Exception {
    // Save feedback data
    return "redirect:/feedback/success";
}
Next, we can implement the redirect endpoint /feedback/success that serves a GET request:
@GetMapping("/feedback/success")
public ResponseEntity<String> getSuccess() {
    return new ResponseEntity<String>("Thank you for submitting feedback.", HttpStatus.OK);
}
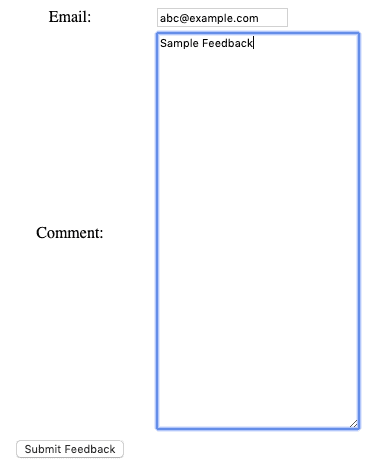
To validate the functionality of form submission workflow in a browser, let's visit localhost:8080/feedback:

Finally, we can also inspect that form data is being sent in the URL encoded form:
emailId=abc%40example.com&comment=Sample+Feedback
4. Non-Browser Requests
At times, we might not have a browser-based HTTP client. Instead, our client could be a utility such as cURL or Postman. In such a case, we don't need the HTML web form. Instead, we can implement a /feedback endpoint that serves the POST request:
@PostMapping(
  path = "/feedback",
  consumes = {MediaType.APPLICATION_FORM_URLENCODED_VALUE})
public ResponseEntity<String> handleNonBrowserSubmissions(@RequestBody Feedback feedback) throws Exception {
    // Save feedback data
    return new ResponseEntity<String>("Thank you for submitting feedback", HttpStatus.OK);
}
In the absence of the HTML form in our data flow, we don't necessarily need to implement the PRG pattern. However, we must specify that the resource accepts APPLICATION_FORM_URLENCODED_VALUE media type.
Finally, we can test it with a cURL request:
curl -X POST \
  http://localhost:8080/feedback \
  -H 'Content-Type: application/x-www-form-urlencoded' \
  -d 'emailId=abc%40example.com&comment=Sample%20Feedback'
4.1. FormHttpMessageConverter Basics
An HTTP request that sends application/x-www-form-urlencoded data must specify this in the Content-Type header. Internally, Spring uses the FormHttpMessageConverter class to read this data and bind it with the method parameter.
In cases where our method parameter is of a type MultiValueMap, we can use either the @RequestParam or @RequestBody annotation to bind it appropriately with the body of the HTTP request. That's because the Servlet API combines the query parameters and form data into a single map called parameters, and that includes automatic parsing of the request body:
@PostMapping(
  path = "/feedback",
  consumes = {MediaType.APPLICATION_FORM_URLENCODED_VALUE})
public ResponseEntity<String> handleNonBrowserSubmissions(
  @RequestParam MultiValueMap<String,String> paramMap) throws Exception {
    // Save feedback data
    return new ResponseEntity<String>("Thank you for submitting feedback", HttpStatus.OK);
}
However, for a method parameter of type other than MultiValueMap, such as our Feedback domain object, we must use only the @RequestBody annotation.
5. Conclusion
In this tutorial, we briefly learned about the encoding of form data in web forms. We also explored how to handle URL encoded data for browser and non-browser HTTP requests by implementing a feedback form in a Spring Boot web app.
As always, the complete source code for the tutorial is available over on GitHub.